
More Related Content
What's hot
What's hot (19)
Similar to Pop Art Technique
Similar to Pop Art Technique (20)
More from sullivanlaura
Recently uploaded
Recently uploaded (20)
Pop Art Technique
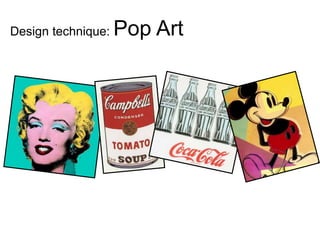
- 1. Design technique: Pop Art
- 2. What is Pop Art? Pop art is an art movement that developed in the mid-1950s in Britain. The movement itself proved to present a challenge to traditional fine art as it introduced imagery from popular culture, this imagery was sometimes removed from its associated context, isolated or combined with unrelated material. The meaning behind pop art referred to the attitude of design and not as much of the art itself.
- 3. creating pop art in Photoshop Here are some examples I have created.
- 4. Step 1 ) – choose an image The first step to creating a pop art image is to choose an image, it should be of of a high resolution as this will help create a better, more refined threshold later on.
- 5. Step 2) – draw a selection with lasso tool In order to create the desired pop art effect, we have to separate the subject image from its background and place on its own layer above the background layer. This is done using the lasso tool in which we simply draw around the main subject. After doing this press “cmd,shift and J” to place the subjected image onto a new layer. We can then change the name of this layer by double clicking on ‘Layer 1’ as this is going to be a threshold layer, I have titled it threshold.
- 6. Step 3) – add a solid fill colour below the new layer Now that the main subject image has been placed on to its own layer, we are now going to hide the original background and replace with a solid colour. To do this we need to select the background layer. With this layer selected go ahead and click on the new fill or adjustment layer icon at the bottom of the layers palette. Now select solid colour, and choose a colour. We now can see our chosen colour appear in the layers palette.
- 7. Step 4) – use the threshold adjustment to remove un-needed details The next step is to convert the main subject image to black and white, and remove most of the detail, this can be done easily using Photoshops Threshold adjustment. Click on the layer we named “threshold” earlier, then go up to the main toolbar and select “image, adjustments, threshold”.
- 8. After doing this the threshold dialog box will appear, we can now adjust the threshold for the desired effect. As we want minimal detail, there should be more white than black on the image. Desired effect: Undesired effect:
- 9. Step 5) – select the first section to colourize In order to create a pop art effect, we need to add colour to the different areas separately. To do this we need use the lasso tool to draw a selection around the first area you want to colourize and place onto a new layer. With the area selected press ‘cmd,shift,J’ and label this new layer an appropriate title.
- 10. Step 6) – continue selecting areas and creating layers Select the threshold layer and repeat the process but this time selecting a new section before creating a new layer for each. You can choose to have as many or as few sections of colour as you want.
- 11. Step 7) – add colour to your first section with a solid colour fill layer Now we have all of our sections we want to add colour to each one. To do this click on the first titled layer, hold down ‘alt’ and click on the new fill/adjustment layer. Whilst still holding down ‘alt’ select the solid colour fill button which is at the top of the list of options. We then get this box pop up, make sure to tick the box ‘use previous layer to create clipping mask’ We now can choose a desired colour.
- 12. After this, click on the drop down bar changing normal to mulitply. If we keep the mode as normal it would create this effect, which is not wanted. Where as the multiply mode brings out details.
- 13. Step 8) – repeat step 7 on each layer Now one layer is done, repeat the process of step 7 on the other layers to add colour. The colours can be re-edited as many times as you like. How the final layers palette looks with the selected colours.
- 14. Final result
- 15. Any questions?