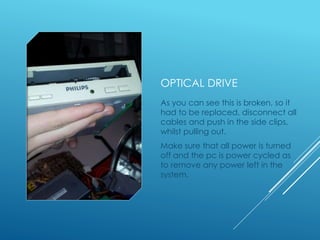
P5: SET UP A STANDALONE
COMPUTER SYSTEM,
INSTALLING HARDWARE
AND SOFTWARE
COMPONENTS
By George Smith-Moore
BEFORE YOU BEGIN…
 Before installing computer hardware, make sure
you have completed the following on the next
slides.
STEP 1. PLACE YOUR ANTISTATIC
MAT ON A CLEAN WORK SURFACE.
 For the first step, clean the work surface around you.
This is important as so you don’t have anything that could
interact with the hardware.
 Using an anti-static mat neutralises the effects of ESD, The mat
either comes with a crocodile clip on one end with a anti-static
wrist strap on the other (picture); the crocodile clip attaches to
the computer case to remove the effects of static electricity.
 Other types of anti-static equipment are: an plug socket on the
end (instead of a crocodile clip, but that is another type), this
ground all static electricity.
STEP 2. UNPLUG AND POWER
CYCLE PC
 After the anti-static mat is setup, place the pc (case) on the mat.
 Unplug the pc…(so no electricity is coming into the case).
 Power cycle the PC, (press the power button a couple of times,
this is to ensure all power has gone from the pc).
STEP 3. OPEN THE COMPUTER
 First open the computer case (and attach crocodile
clip if possible to case).
 This is so you can access the computer parts.
 To lift the pc onto the anti-static mat : You must have
you legs bent and back straight, this will minimise the
strain on your body.
RAM
RAM as shown above, comes
in various forms. The current
ubiquitous form is DDR3 (the
3rd generation, and shown to
the left). DDR3 allows for
speeds up to 1066MHz and
beyond. It also uses less
power. You can get GDDR5,
but this is only found in GPU’s
etc., although it is faster, the
price makes it not worth it.
DDR3 RAM is not compatible
with predecessors and so the
groove is not in the same
place to avoid confusion.
RAM
Ram is installed by placing into the
slot, pushing down, and then
fastening the clips either side inwards.
You have to be gentle as to not
damage the RAM. When installing
RAM use the corresponding colour
slots, so when installing two sticks use
the same colour slots (if all slots are
same colour, refer to the
motherboard manual).
RAM
 RAM is needed in an computer to store short
term memory, it runs programs.
 It is faster than traditional HDD memory and so is
preferred to store things temporarily, it is not used
to store things permanently as it is volatile.
 To upgrade RAM simply remove the old RAM and
place compatible new RAM in the existing slots.
 RAM stands for Random-Access Memory
NIC
I will be exchanging the NIC
(network interface card), with
a wireless NIC, the picture
shows the area which the
‘old’ NIC is housed.
NIC
This is the wireless NIC now in
the NIC’s place, to do this you
had to open the green lever,
and slide the NIC out. Then
place the wireless NIC into the
same slot (if compatible, as it
was in the case).
NIC
 The NIC is used to connect to the
internet or network, the wireless NIC is the
same but it does so wirelessly.
 To attach them to the system you have
to have a spare PCI, PCIe, or PCIe 2.0;
Some may require x16 bus whereas some
may only need x1 bus.
 The buses are of different sizes to allow
for more bandwidth. A smaller card (say
a x4 wireless NIC could fit into a x16 slot, it
would just use 4 of the 16 lanes
available).
OPTICAL DRIVE
The Optical Drive (CD/DVD
drive), it is easy to take out,
and may need to be
replaced, either because it is
broken or because you want
extras such as Blu-Ray or re-
write ability.
OPTICAL DRIVE
As you can see this is broken, so it
had to be replaced, disconnect all
cables and push in the side clips,
whilst pulling out.
Make sure that all power is turned
off and the pc is power cycled as
to remove any power left in the
system.
OPTICAL DRIVE
 Once you place the new drive in connect all of
the required cables and it’s good to go.
 The drive allows you to read disks of various
formats.
 The ‘RW’ allows for re-write ability of that
particular cd/DVD. The x16, x32, etc. refers to the
speed in which the disk would be read or written.
HDD
The HDD is where you store all of your
data permanently.
It uses (nowadays a SATA cable is
used).
A HDD is a mechanical drive that has
the capacity to store large amounts
of data permanently. Although the
HDD is being phased out by the SSD
as it is quicker and has no moving
parts.
HDD
I have pushed the correct
cables into the HDD, and
Motherboard. This will allow
connection between the
computer and it’s data.
 The HDD or SSD which could be an upgrade, are
placed in the HDD cage.
 The cable attached to the HDD has now been
replaced by the SATA cable, it is smaller and it
allows faster data transfer.

UNIT 2 P5

  • 1.
    P5: SET UPA STANDALONE COMPUTER SYSTEM, INSTALLING HARDWARE AND SOFTWARE COMPONENTS By George Smith-Moore
  • 2.
    BEFORE YOU BEGIN… Before installing computer hardware, make sure you have completed the following on the next slides.
  • 3.
    STEP 1. PLACEYOUR ANTISTATIC MAT ON A CLEAN WORK SURFACE.  For the first step, clean the work surface around you. This is important as so you don’t have anything that could interact with the hardware.  Using an anti-static mat neutralises the effects of ESD, The mat either comes with a crocodile clip on one end with a anti-static wrist strap on the other (picture); the crocodile clip attaches to the computer case to remove the effects of static electricity.  Other types of anti-static equipment are: an plug socket on the end (instead of a crocodile clip, but that is another type), this ground all static electricity.
  • 4.
    STEP 2. UNPLUGAND POWER CYCLE PC  After the anti-static mat is setup, place the pc (case) on the mat.  Unplug the pc…(so no electricity is coming into the case).  Power cycle the PC, (press the power button a couple of times, this is to ensure all power has gone from the pc).
  • 5.
    STEP 3. OPENTHE COMPUTER  First open the computer case (and attach crocodile clip if possible to case).  This is so you can access the computer parts.  To lift the pc onto the anti-static mat : You must have you legs bent and back straight, this will minimise the strain on your body.
  • 6.
    RAM RAM as shownabove, comes in various forms. The current ubiquitous form is DDR3 (the 3rd generation, and shown to the left). DDR3 allows for speeds up to 1066MHz and beyond. It also uses less power. You can get GDDR5, but this is only found in GPU’s etc., although it is faster, the price makes it not worth it. DDR3 RAM is not compatible with predecessors and so the groove is not in the same place to avoid confusion.
  • 7.
    RAM Ram is installedby placing into the slot, pushing down, and then fastening the clips either side inwards. You have to be gentle as to not damage the RAM. When installing RAM use the corresponding colour slots, so when installing two sticks use the same colour slots (if all slots are same colour, refer to the motherboard manual).
  • 8.
    RAM  RAM isneeded in an computer to store short term memory, it runs programs.  It is faster than traditional HDD memory and so is preferred to store things temporarily, it is not used to store things permanently as it is volatile.  To upgrade RAM simply remove the old RAM and place compatible new RAM in the existing slots.  RAM stands for Random-Access Memory
  • 9.
    NIC I will beexchanging the NIC (network interface card), with a wireless NIC, the picture shows the area which the ‘old’ NIC is housed.
  • 10.
    NIC This is thewireless NIC now in the NIC’s place, to do this you had to open the green lever, and slide the NIC out. Then place the wireless NIC into the same slot (if compatible, as it was in the case).
  • 11.
    NIC  The NICis used to connect to the internet or network, the wireless NIC is the same but it does so wirelessly.  To attach them to the system you have to have a spare PCI, PCIe, or PCIe 2.0; Some may require x16 bus whereas some may only need x1 bus.  The buses are of different sizes to allow for more bandwidth. A smaller card (say a x4 wireless NIC could fit into a x16 slot, it would just use 4 of the 16 lanes available).
  • 12.
    OPTICAL DRIVE The OpticalDrive (CD/DVD drive), it is easy to take out, and may need to be replaced, either because it is broken or because you want extras such as Blu-Ray or re- write ability.
  • 13.
    OPTICAL DRIVE As youcan see this is broken, so it had to be replaced, disconnect all cables and push in the side clips, whilst pulling out. Make sure that all power is turned off and the pc is power cycled as to remove any power left in the system.
  • 14.
    OPTICAL DRIVE  Onceyou place the new drive in connect all of the required cables and it’s good to go.  The drive allows you to read disks of various formats.  The ‘RW’ allows for re-write ability of that particular cd/DVD. The x16, x32, etc. refers to the speed in which the disk would be read or written.
  • 15.
    HDD The HDD iswhere you store all of your data permanently. It uses (nowadays a SATA cable is used). A HDD is a mechanical drive that has the capacity to store large amounts of data permanently. Although the HDD is being phased out by the SSD as it is quicker and has no moving parts.
  • 16.
    HDD I have pushedthe correct cables into the HDD, and Motherboard. This will allow connection between the computer and it’s data.
  • 17.
     The HDDor SSD which could be an upgrade, are placed in the HDD cage.  The cable attached to the HDD has now been replaced by the SATA cable, it is smaller and it allows faster data transfer.