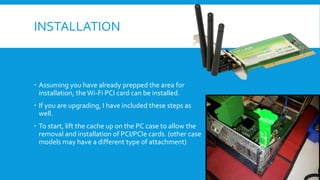
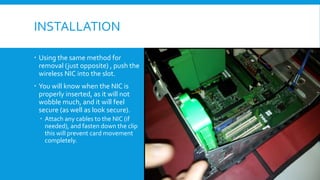
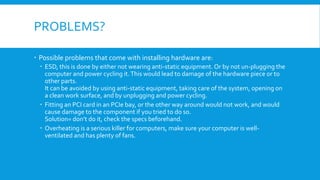
This document provides information about setting up Netgear routers and getting router login access. It discusses common issues people face when setting up their Netgear router for the first time and accessing the router dashboard. It also provides steps for installing a Netgear router, including choosing a router model, setting it up physically, connecting to the router login page, and connecting other devices to the network. Support for Netgear routers is available 24/7 from the experts at Routersupport.ca.
The document provides instructions for solving problems with Netgear routers and optimizing WiFi speed. It recommends pressing the reset button on the back of the router as the first step for troubleshooting. It also lists the Netgear router with the fastest speeds as having WiFi speeds up to 7.2Gbps and seven Ethernet ports. Additional tips for boosting WiFi speed include keeping the router updated, using a stronger antenna, removing devices leeching bandwidth, and adding a WiFi extender.
The document provides steps to set up a NETGEAR N750 wireless router and connect wireless devices to the network. The 6 steps are to: 1) unplug the modem and router, 2) cable the router, 3) cable the computer, 4) power on the modem, 5) power on the router, and 6) insert the CD and follow prompts to set up the wireless network. It also describes how to set up wireless security and connect wireless devices to the new network.
How to configure a cisco wireless access point (ap) from scratchIT Tech
The document provides step-by-step instructions for configuring a Cisco 1242G wireless access point from scratch. It describes connecting the AP to a power source and Ethernet, finding its IP address, logging into the web interface using the default credentials, running the Express Setup to configure basic network settings, enabling security settings like WEP encryption and changing the default password, and enabling the 2.4GHz radio to allow wireless devices to connect to the network. The Cisco 1242G AP offers business-grade features like multiple wireless protocols, security protocols, encryption, and management capabilities compared to consumer-grade APs.
Living in the Jungle: Legitimate users in Legitimate Insecure Wireless NetworksChema Alonso
Trabajo realizado para la medición del grado de inseguridad de una red WiFi a la que se conecta un equipo. En él se analizan las medidas de seguridad, el riesgo y los motivos por los que existen las redes WiFi inseguras
This document provides step-by-step instructions for configuring a Cisco 1242 wireless access point. It begins by describing the features and capabilities of the Cisco 1242 AP. It then outlines the 8 steps to configure the AP, which include connecting it to power and the network, obtaining the IP address, accessing the web interface, running express setup and security wizards, enabling the radios, changing passwords, and verifying wireless connectivity. Key configuration elements are setting the SSID, security settings, radio settings, and administrative passwords.
Bridge mode, as name suggests, is a mode in which router starts working as switch. This mode is usually switched-on when you have multiple routers in your premises. Normally multiple routers can interfere if placed under normal mode, so we put one router in normal mode and other in Bridge Mode... Visit : http://router-loginnet.com
How to safely configure your home wireless networkBarry Caplin
The document provides tips for securely setting up a home wireless network, including changing default passwords and SSIDs, disabling SSID broadcast, using encryption like WPA2, enabling firewalls, applying updates, and turning off the wireless access point when not in use. It also discusses wireless security practices when connecting to networks outside the home, recommending using a VPN and encrypting files for personal devices.
The document describes an IEEE 802.11b/g/n wireless USB adapter called the ST24C10 that features:
- Compliance with IEEE 802.11b/g/n standards for wireless networking and USB 2.0 specifications.
- Support for data transfer rates up to 150 Mbps and an operating range up to 5 meters.
- Security features including 64/128-bit WEP encryption, WPA/WPA2, and WPS for wireless network security.
This document discusses adding Wi-Fi connectivity to embedded systems using the inexpensive ESP8266 microcontroller module. It describes how the ESP8266 integrates Wi-Fi and TCP/IP networking protocols to allow microcontrollers to connect to the internet and transfer data. Programming the ESP8266 involves using AT commands or a more user-friendly LUA scripting language through the NodeMCU firmware. Example LUA code is provided to demonstrate setting up a Wi-Fi connection and making an HTTP request to a web server.
The document provides 7 steps for easily programming a POSITAL encoder using the UBIFAST Configuration Tool without any additional software or installations. The steps include connecting the encoder hardware, connecting a WiFi enabled device to the encoder's hotspot, entering incremental parameters like pulses per revolution in a web browser, verifying and saving the parameters, and receiving confirmation that programming was successful.
An expansion card, also known as an adapter card or add-on card, is a printed circuit board that can be inserted into an expansion slot on a computer motherboard. This provides additional capabilities to the computer, such as enhanced graphics via a video or graphics card. Common types of expansion cards include network interface cards, sound cards, and video cards. To install an expansion card, one must open the computer case, find an empty expansion slot, insert the card and secure it with a screw.
The document provides instructions for installing a wireless network interface card (NIC) and testing it. It outlines 4 steps for the installation: 1) preparing the computer case with an antistatic wristband, 2) removing any packaging from the NIC, 3) removing any frames or supports on the motherboard, and 4) screwing the wireless antenna onto the NIC. It then shows a table with 5 tests to check that the NIC is functioning properly, including checking device manager, lights on the NIC, ping response time, wireless connection strength, and ipconfig settings.
Testing for wireless nic, helpful guide.OriginalGSM
George Smith-Moore conducted a series of tests on a wireless network interface card (NIC) to check that it was installed and functioning properly. The tests included verifying that the device appeared in the device manager, that the light on the NIC was on, that the machine could be pinged, that an internet connection was established, and that the correct network information appeared when an "ipconfig/all" command was entered. The results showed that the device was successfully installed and detected, the light was on, the machine could be pinged with some signal strength reduction due to distance from the router, and the network information was displayed correctly.
La3 computer networks and communicationsAzmiah Mahmud
This document provides instructions for setting up a computer network. It begins by explaining the learning outcomes which are to install a Network Interface Card (NIC), configure network settings like IP address and subnet mask, and test the network connection. The next sections provide details on installing the NIC hardware and drivers, crimping Ethernet cables using straight and crossed wiring techniques, and configuring the TCP/IP network settings. Images and step-by-step instructions are included to guide the reader through each task.
Learning area 3_-_computer_networks_and_communications (1)Saktis Kesavan
This document provides instructions for setting up a network connection by installing a Network Interface Card (NIC) and connecting devices with Ethernet cables. It is meant for students learning about computer networks. The document explains how to insert a NIC into an expansion slot and install the proper drivers. It also describes how to crimp Ethernet cables by stripping them, arranging the wire order, cutting the wires at an angle, inserting them into connectors, and using a tester to check continuity. The goal is to teach students how to install a NIC, crimp straight cables to connect devices through a hub, and test that the network connection is configured correctly.
This document provides instructions for setting up a network connection. It discusses installing a network interface card and network drivers. It then covers crimping Ethernet cables using both straight and crossover techniques. Finally, it describes how to configure the workstation with an IP address, subnet mask, and other network settings to join a local area network and test the connection.
Learning area 3_-_computer_networks_and_communicationsSaktis Kesavan
This document provides instructions for setting up a network connection by installing a Network Interface Card (NIC) and crimping cables. It is intended for students learning about computer networks. The document explains how to insert a NIC into an expansion slot and install the proper drivers. It also describes how to crimp both ends of a straight cable by inserting wires into RJ45 connectors according to the 568B standard wiring schematic and then testing the cable for continuity. Completing these tasks will allow students to install a NIC, crimp cables, and set up a basic network.
Learning area 3 computer networks and communicationsShuren Lew
This document provides instructions for setting up a network. It begins by explaining what the learning module is about and who it is for. Specifically, it aims to teach students how to install a Network Interface Card, crimp cables, and configure and test a network. Some prior knowledge of computer networks is necessary to understand the material. The document then details the necessary hardware, provides diagrams to identify cable wiring schematics, and gives step-by-step instructions for installing a NIC, crimping straight and crossover cables, and configuring the network using the IP address, subnet mask and other settings.
Installation and configuration of Wireless NICAjay Jassi
This is a presentation showing how to install wireless NIC hardware and software. Images and annotations are used, to make it clear.
This is part of my IT coursework*
The document summarizes the steps taken to virtually install hardware components and Windows XP in a computer. It describes installing the power supply, RAM, CPU, heat sink, motherboard, network interface card, video adapter card, and hard disk, optical, and floppy drives. It emphasizes handling components carefully and using anti-static precautions to avoid electrostatic discharge damage during the installation process.
WEP, WPA, WPA2
Antenna: Internal
Power Consumption: <3W
Dimension: 85mm x 54mm x 5mm
Weight: 30g
System Requirement: Windows 98/ME/2000/XP
Certification: FCC, CE
Interface: PCMCIA Type II
Package Contents: Wireless LAN CardBus Card, Driver CD, Quick Installation Guide
Warranty: 1 Year
15
Wireless LAN PCMCIA Adapter
Chapter
5
Troubleshooting
1. The LED indicator does not light up.
- Check if the Wireless LAN CardBus Card is firmly inserted
The document provides instructions for assembling a computer, including:
1. Selecting and installing the case, power supply, motherboard components like RAM and CPU, internal drives like hard drives and optical drives, and adapter cards.
2. Connecting the various internal power and data cables like the 24-pin motherboard power connector and SATA cables for drives.
3. Connecting the front panel cables for power/reset buttons, LEDs, USB/audio ports.
2.1.1.5 Packet Tracer - Create a Simple Network Using Packet Tracer (3).pdfHaseebAli795005
This document provides instructions for building a simple network in Cisco Packet Tracer, including adding devices, configuring the devices with IP addresses, creating wireless access, and testing connectivity. The network consists of a PC, wireless router, cable modem, internet cloud, Cisco server, and laptop. The devices are configured, the laptop connects to the wireless network, and ping tests verify connectivity between the PC and Cisco server. Once completed, the network configuration is saved as a Packet Tracer activity file.
The document provides instructions for installing and configuring the IEEE 802.11a/n Wireless Outdoor CPE. It covers preparing for installation, connecting the hardware, mounting the CPE on a pole, and configuring the device for either AP mode or CPE mode. The installation requires connecting an Ethernet cable and power adapter, attaching optional external antennas, and accessing the web interface using the default IP and credentials. Configuration involves setting wireless parameters and security settings depending on whether the CPE is used as an access point or client.
IT Essentials (Version 7.0) - ITE Final Exam AnswersITExamAnswers.net
This document provides the answers to an IT Essentials (ITE v6.0 + v7.0) final exam. It includes 33 multiple choice questions about topics like ESD safety, motherboard components, RAM installation, hard drive connections, BIOS functions, and basic networking concepts. Each question is followed by an explanation of the correct answer. The document aims to help students and beginners learn and test their knowledge of fundamental PC hardware and networking topics covered in the ITE certification exam.
1. The document provides step-by-step instructions for assembling a computer, including preparing tools and materials, laying the motherboard, installing the processor, RAM, and other components, and connecting cables and power.
2. Key steps include laying the motherboard on a soft surface, installing the processor and heat sink, inserting RAM modules in the correct slots, attaching the power supply, and connecting cables and power to test the completed assembly.
3. The 13 steps cover installing all the main components - motherboard, processor, RAM, graphics card, hard drive, optical drive, and connecting all cables and power to test the computer.
1. The document provides step-by-step instructions for assembling a computer, outlining the necessary tools, materials, and 13 steps to complete the assembly.
2. Key steps include laying the motherboard in place, installing the processor, RAM, VGA card, hard drive, power supply, and connecting all cables and components.
3. The final step is to test if the computer can successfully boot up once fully assembled.
This CAO lab manual is strictly designed as per the BPUT syllabus covering all the experiments. Any suggestion and comments are welcome at neelamani.samal@gmail.com
Hardware and software installation (m2)Drew7Williams
This document summarizes the installation, updating, and testing of a wireless network interface card (NIC). First, anti-static gear was worn to safely install the wireless NIC. Then, the installation was checked in the network devices menu. A driver update scan found that the best driver was already installed. However, the wireless connection did not initially work until realizing it was not connected to the internet. Using ping commands to a website, a successful connection was then made over wireless communication.
The document provides questions and answers about network troubleshooting techniques.
1) The first step in troubleshooting a user unable to access a web server is to ask the user what URL they typed and any error messages they received.
2) Substitution, replacing the cable modem, represents the troubleshooting technique used to resolve an unstable internet connection.
3) When using the divide-and-conquer method to troubleshoot a single workstation unable to reach the internet, the first step would be to check the workstation's TCP/IP configuration.
Similar to Installation of a selected piece of hardware (20)
The document provides tips for maintaining a PC, including:
1. Back up data daily using external storage like a USB drive or cloud storage to minimize the risk of losing files.
2. Scan for viruses daily using antivirus software to protect against malware, which targets Windows PCs.
3. Perform disk cleanups regularly using tools like Disk Cleanup or CCleaner to remove unnecessary cached files and free up storage space.
4. Defragment disks monthly on Windows PCs to improve performance by organizing how files are stored.
The document summarizes tests performed on a configured computer system to check its functionality. Norton antivirus software was tested to ensure it could detect and remove malware, check for registry errors, and create custom scans/schedules. Microsoft Office applications were also tested by opening them and performing basic tasks to check load times and ensure features like the formula bar and slideshow buttons worked properly. Device drivers were checked to confirm they were correctly installed and up to date. The date and time settings were verified and corrected if needed. Printer paper size was configured both in the printer's settings and within applications.
This document provides instructions for installing a wireless network interface card (NIC) driver. It describes downloading and running the installation file, selecting the correct model of NIC during setup, allowing the installation wizard to complete, and verifying that the driver installed correctly by checking in the device manager. Once installed, the accompanying software can be used to easily connect to and monitor internet access through the NIC.
The document discusses various ways of configuring software and computer settings to better meet user needs. It describes changing the wallpaper, screen resolution, screensaver settings, icon size, mouse settings to left-handed mode, and setting up automatic virus scans. Configuring these settings allows for personalization, accessibility for those with visual impairments, protection against viruses, and a more comfortable experience for left-handed users.
The document provides instructions for setting up a standalone computer system. It describes installing various hardware components like the RAM, network interface card (NIC), optical drive, and hard disk drive (HDD). The key steps include placing the computer case on an anti-static mat, opening the case, installing the RAM by pushing it into slots on the motherboard, replacing the NIC with a wireless one by sliding it into an open slot, swapping out a broken optical drive, and connecting the HDD to the motherboard with SATA cables. Proper handling and connecting of the hardware components is emphasized to avoid damage and ensure everything works properly.
The document summarizes the steps taken to install OpenOffice, AVG antivirus software, and Skype on a computer system. It describes downloading each program, running the installation wizard, selecting default installation options, and completing the installation process. Once installed, the document recommends checking for updates to the antivirus software and setting routine scans.
The document provides specifications for computer components to outfit a Cisco room with 40 workstations. It proposes and justifies choices for the processor, motherboard, RAM, GPU, hard drive, disk drive, power supply, case, cooling, sound card, network card, USB, operating system, office software, antivirus, monitor, keyboard/mouse, and speakers. Costs are provided for each component and the total cost is estimated to be £13,259.60 including labour. Potential upgrades are discussed for the CPU, RAM, and motherboard that could improve performance for resource-intensive applications.
This document discusses several types of utility software and how they can impact system performance. It describes anti-virus software, backup software, disk cleaners, disk defragmenters, drive formatting, firewalls, and internet history software. It explains that utility software like anti-virus, backup, disk cleaner, and disk defragmenter programs can improve performance by removing malware, freeing up storage space, and organizing files efficiently on disks. However, it notes that utilities like internet histories may not improve performance and could reduce it by using storage space. Overall, the document concludes that while some utility software enhances performance, others may limit it depending on how they are used.
The main purposes of an operating system are to provide a user interface (typically graphical), manage computer hardware and software interactions, and maximize hardware performance. Without an operating system, software would need to be individually programmed for specific hardware configurations. Operating systems like Windows, macOS, and Linux provide standard interfaces that software can be written to, while drivers allow hardware to communicate with the operating system. Common operating systems provide different user experiences and capabilities.
The document discusses the specifications of a CYBERPOWER POWER MEGA PRO 3000 3D computer. It describes the CPU as an Intel Xeon E5-2690 Eight-Core 2.90GHz processor. It has 64GB of DDR3 RAM and a 1TB Samsung 840 EVO solid state drive for storage. The document explains the functions of the CPU, storage, and memory in processing and temporarily storing files to speed up the computer. It also summarizes the functions of various components of a typical computer motherboard.
The document evaluates the performance of a computer system and identifies potential improvements. It discusses:
1) Tests conducted to measure performance metrics like boot time and file transfer speeds. Results show the system performs below expectations.
2) Analysis of the task manager showing high RAM usage, indicating more RAM is needed.
3) Potential hardware upgrades are identified to improve each component's performance, like upgrading the CPU, motherboard, RAM, storage, GPU. Software upgrades like a newer OS are also recommended.
4) Benchmarks show the GPU is a bottleneck, unable to run games smoothly. A more powerful graphics card is needed to improve gaming performance.
Windows 8 and iOS 7 are compared. Windows 8 was released in 2012 featuring a new "Metro" tile-based interface and was designed to bridge computers and touch devices. iOS 7 was released in 2013 and featured a redesigned user interface. Key differences are that Windows 8 comes preinstalled on PCs while iOS 7 is available on Apple mobile devices only. Both operating systems focused on simpler, more useful designs and connectivity across devices.
This document provides specifications for 40 workstations for a Cisco room including:
- An Intel Celeron processor, MSI motherboard, 2x2GB RAM, integrated graphics, 500GB hard drive, DVD drive, case with 500W power supply, CPU fan, integrated sound and network cards, USB ports, Windows 7 OS, and free OpenOffice and AVG antivirus software. Justifications are provided for each choice based on cost effectiveness and meeting the basic needs of the workstations.
Anti-virus software protects systems from malware like viruses, worms, and spyware, and removes any existing malware to improve performance and prevent data loss. Backup software creates copies of data to allow restoration in case of system failure or data loss, improving security. Disk cleaners and defragmenters free up storage space by removing unnecessary files and organizing files, improving system performance. Formatting drives removes all existing data, allowing space for new data and potentially improved performance. Firewalls provide security without necessarily improving performance, while utilities like internet histories do not significantly change performance.
The three main families of operating systems are Windows, OSX, and Linux. An operating system provides a graphical user interface (GUI) desktop to interact with programs visually, and also acts as an intermediary between software and computer hardware. Linux is an open-source operating system kernel that allows different versions like Linux Mint and Ubuntu to be created, which can have varying graphical appearances despite being based on the same underlying Linux code.
This document provides specifications for the Cyberpower systems POWER MEGA PRO 3000 3D computer. It lists the components including an Intel Xeon E5-2690 8-core 2.9GHz processor, 64GB of DDR3 RAM, 1TB Samsung SSD, NVIDIA Quadro 6000 graphics card, and Asus Z9PE-D8WS motherboard. It then provides additional details about each component such as the CPU socket type, RAM speed, and storage capacity.
Windows 8 was released in October 2012 with a new "Metro" interface optimized for touchscreens. Windows 8.1, released later, added features to make the OS more usable without a touchscreen. Both versions aimed to consolidate Windows functionality across desktops, tablets, phones, and Xbox. iOS 7, released in 2013, redesigned Apple's mobile OS interface and added features like AirDrop for easier sharing. Both OSes focused on seamless experiences across connected devices while taking different approaches, with Windows spanning desktop and mobile and iOS separating the two.
The document discusses security measures for a solicitor's company including physical security cameras and locks, cybersecurity such as firewalls, antivirus software, and regular updates, access controls like administrator rights and discretionary access control, and backups stored on the cloud. While current security is adequate, improvements could include an alarm system, more secure encryption for sensitive data, and prioritizing RAM to isolate privileged processes. The security plan implemented has improved safety significantly but physical security could be strengthened further.
The document discusses various methods for managing IT security and access control. It outlines ways to protect an IT system such as installing firewalls and antivirus software, keeping systems updated, encrypting data transfers, regular backups, access controls like passwords and user rights restrictions. The document also describes discretionary access controls that give users rights to files and mandatory access controls that restrict access based on security levels.
This document discusses the impact of IT system breaches. It outlines how an organization's IT system can be breached through various means like hacking computers, emails, firewalls and USB ports. It also covers the legislation in place to protect data under the Data Protection Act. Common security threats are mostly internal like untrained staff or incorrectly configured wireless networks. The potential impacts of security breaches on businesses are significant, including loss of profit and reputation damage as customer data is lost or communications are disrupted. Competitors may also take advantage of a breach to steal customers.
Driving Business Innovation: Latest Generative AI Advancements & Success StorySafe Software
Are you ready to revolutionize how you handle data? Join us for a webinar where we’ll bring you up to speed with the latest advancements in Generative AI technology and discover how leveraging FME with tools from giants like Google Gemini, Amazon, and Microsoft OpenAI can supercharge your workflow efficiency.
During the hour, we’ll take you through:
Guest Speaker Segment with Hannah Barrington: Dive into the world of dynamic real estate marketing with Hannah, the Marketing Manager at Workspace Group. Hear firsthand how their team generates engaging descriptions for thousands of office units by integrating diverse data sources—from PDF floorplans to web pages—using FME transformers, like OpenAIVisionConnector and AnthropicVisionConnector. This use case will show you how GenAI can streamline content creation for marketing across the board.
Ollama Use Case: Learn how Scenario Specialist Dmitri Bagh has utilized Ollama within FME to input data, create custom models, and enhance security protocols. This segment will include demos to illustrate the full capabilities of FME in AI-driven processes.
Custom AI Models: Discover how to leverage FME to build personalized AI models using your data. Whether it’s populating a model with local data for added security or integrating public AI tools, find out how FME facilitates a versatile and secure approach to AI.
We’ll wrap up with a live Q&A session where you can engage with our experts on your specific use cases, and learn more about optimizing your data workflows with AI.
This webinar is ideal for professionals seeking to harness the power of AI within their data management systems while ensuring high levels of customization and security. Whether you're a novice or an expert, gain actionable insights and strategies to elevate your data processes. Join us to see how FME and AI can revolutionize how you work with data!
HCL Notes and Domino License Cost Reduction in the World of DLAUpanagenda
Webinar Recording: https://www.panagenda.com/webinars/hcl-notes-and-domino-license-cost-reduction-in-the-world-of-dlau/
The introduction of DLAU and the CCB & CCX licensing model caused quite a stir in the HCL community. As a Notes and Domino customer, you may have faced challenges with unexpected user counts and license costs. You probably have questions on how this new licensing approach works and how to benefit from it. Most importantly, you likely have budget constraints and want to save money where possible. Don’t worry, we can help with all of this!
We’ll show you how to fix common misconfigurations that cause higher-than-expected user counts, and how to identify accounts which you can deactivate to save money. There are also frequent patterns that can cause unnecessary cost, like using a person document instead of a mail-in for shared mailboxes. We’ll provide examples and solutions for those as well. And naturally we’ll explain the new licensing model.
Join HCL Ambassador Marc Thomas in this webinar with a special guest appearance from Franz Walder. It will give you the tools and know-how to stay on top of what is going on with Domino licensing. You will be able lower your cost through an optimized configuration and keep it low going forward.
These topics will be covered
- Reducing license cost by finding and fixing misconfigurations and superfluous accounts
- How do CCB and CCX licenses really work?
- Understanding the DLAU tool and how to best utilize it
- Tips for common problem areas, like team mailboxes, functional/test users, etc
- Practical examples and best practices to implement right away
HCL Notes und Domino Lizenzkostenreduzierung in der Welt von DLAUpanagenda
Webinar Recording: https://www.panagenda.com/webinars/hcl-notes-und-domino-lizenzkostenreduzierung-in-der-welt-von-dlau/
DLAU und die Lizenzen nach dem CCB- und CCX-Modell sind für viele in der HCL-Community seit letztem Jahr ein heißes Thema. Als Notes- oder Domino-Kunde haben Sie vielleicht mit unerwartet hohen Benutzerzahlen und Lizenzgebühren zu kämpfen. Sie fragen sich vielleicht, wie diese neue Art der Lizenzierung funktioniert und welchen Nutzen sie Ihnen bringt. Vor allem wollen Sie sicherlich Ihr Budget einhalten und Kosten sparen, wo immer möglich. Das verstehen wir und wir möchten Ihnen dabei helfen!
Wir erklären Ihnen, wie Sie häufige Konfigurationsprobleme lösen können, die dazu führen können, dass mehr Benutzer gezählt werden als nötig, und wie Sie überflüssige oder ungenutzte Konten identifizieren und entfernen können, um Geld zu sparen. Es gibt auch einige Ansätze, die zu unnötigen Ausgaben führen können, z. B. wenn ein Personendokument anstelle eines Mail-Ins für geteilte Mailboxen verwendet wird. Wir zeigen Ihnen solche Fälle und deren Lösungen. Und natürlich erklären wir Ihnen das neue Lizenzmodell.
Nehmen Sie an diesem Webinar teil, bei dem HCL-Ambassador Marc Thomas und Gastredner Franz Walder Ihnen diese neue Welt näherbringen. Es vermittelt Ihnen die Tools und das Know-how, um den Überblick zu bewahren. Sie werden in der Lage sein, Ihre Kosten durch eine optimierte Domino-Konfiguration zu reduzieren und auch in Zukunft gering zu halten.
Diese Themen werden behandelt
- Reduzierung der Lizenzkosten durch Auffinden und Beheben von Fehlkonfigurationen und überflüssigen Konten
- Wie funktionieren CCB- und CCX-Lizenzen wirklich?
- Verstehen des DLAU-Tools und wie man es am besten nutzt
- Tipps für häufige Problembereiche, wie z. B. Team-Postfächer, Funktions-/Testbenutzer usw.
- Praxisbeispiele und Best Practices zum sofortigen Umsetzen
Removing Uninteresting Bytes in Software FuzzingAftab Hussain
Imagine a world where software fuzzing, the process of mutating bytes in test seeds to uncover hidden and erroneous program behaviors, becomes faster and more effective. A lot depends on the initial seeds, which can significantly dictate the trajectory of a fuzzing campaign, particularly in terms of how long it takes to uncover interesting behaviour in your code. We introduce DIAR, a technique designed to speedup fuzzing campaigns by pinpointing and eliminating those uninteresting bytes in the seeds. Picture this: instead of wasting valuable resources on meaningless mutations in large, bloated seeds, DIAR removes the unnecessary bytes, streamlining the entire process.
In this work, we equipped AFL, a popular fuzzer, with DIAR and examined two critical Linux libraries -- Libxml's xmllint, a tool for parsing xml documents, and Binutil's readelf, an essential debugging and security analysis command-line tool used to display detailed information about ELF (Executable and Linkable Format). Our preliminary results show that AFL+DIAR does not only discover new paths more quickly but also achieves higher coverage overall. This work thus showcases how starting with lean and optimized seeds can lead to faster, more comprehensive fuzzing campaigns -- and DIAR helps you find such seeds.
- These are slides of the talk given at IEEE International Conference on Software Testing Verification and Validation Workshop, ICSTW 2022.
Full-RAG: A modern architecture for hyper-personalizationZilliz
Mike Del Balso, CEO & Co-Founder at Tecton, presents "Full RAG," a novel approach to AI recommendation systems, aiming to push beyond the limitations of traditional models through a deep integration of contextual insights and real-time data, leveraging the Retrieval-Augmented Generation architecture. This talk will outline Full RAG's potential to significantly enhance personalization, address engineering challenges such as data management and model training, and introduce data enrichment with reranking as a key solution. Attendees will gain crucial insights into the importance of hyperpersonalization in AI, the capabilities of Full RAG for advanced personalization, and strategies for managing complex data integrations for deploying cutting-edge AI solutions.
Unlocking Productivity: Leveraging the Potential of Copilot in Microsoft 365, a presentation by Christoforos Vlachos, Senior Solutions Manager – Modern Workplace, Uni Systems
In the rapidly evolving landscape of technologies, XML continues to play a vital role in structuring, storing, and transporting data across diverse systems. The recent advancements in artificial intelligence (AI) present new methodologies for enhancing XML development workflows, introducing efficiency, automation, and intelligent capabilities. This presentation will outline the scope and perspective of utilizing AI in XML development. The potential benefits and the possible pitfalls will be highlighted, providing a balanced view of the subject.
We will explore the capabilities of AI in understanding XML markup languages and autonomously creating structured XML content. Additionally, we will examine the capacity of AI to enrich plain text with appropriate XML markup. Practical examples and methodological guidelines will be provided to elucidate how AI can be effectively prompted to interpret and generate accurate XML markup.
Further emphasis will be placed on the role of AI in developing XSLT, or schemas such as XSD and Schematron. We will address the techniques and strategies adopted to create prompts for generating code, explaining code, or refactoring the code, and the results achieved.
The discussion will extend to how AI can be used to transform XML content. In particular, the focus will be on the use of AI XPath extension functions in XSLT, Schematron, Schematron Quick Fixes, or for XML content refactoring.
The presentation aims to deliver a comprehensive overview of AI usage in XML development, providing attendees with the necessary knowledge to make informed decisions. Whether you’re at the early stages of adopting AI or considering integrating it in advanced XML development, this presentation will cover all levels of expertise.
By highlighting the potential advantages and challenges of integrating AI with XML development tools and languages, the presentation seeks to inspire thoughtful conversation around the future of XML development. We’ll not only delve into the technical aspects of AI-powered XML development but also discuss practical implications and possible future directions.
Cosa hanno in comune un mattoncino Lego e la backdoor XZ?Speck&Tech
ABSTRACT: A prima vista, un mattoncino Lego e la backdoor XZ potrebbero avere in comune il fatto di essere entrambi blocchi di costruzione, o dipendenze di progetti creativi e software. La realtà è che un mattoncino Lego e il caso della backdoor XZ hanno molto di più di tutto ciò in comune.
Partecipate alla presentazione per immergervi in una storia di interoperabilità, standard e formati aperti, per poi discutere del ruolo importante che i contributori hanno in una comunità open source sostenibile.
BIO: Sostenitrice del software libero e dei formati standard e aperti. È stata un membro attivo dei progetti Fedora e openSUSE e ha co-fondato l'Associazione LibreItalia dove è stata coinvolta in diversi eventi, migrazioni e formazione relativi a LibreOffice. In precedenza ha lavorato a migrazioni e corsi di formazione su LibreOffice per diverse amministrazioni pubbliche e privati. Da gennaio 2020 lavora in SUSE come Software Release Engineer per Uyuni e SUSE Manager e quando non segue la sua passione per i computer e per Geeko coltiva la sua curiosità per l'astronomia (da cui deriva il suo nickname deneb_alpha).
In his public lecture, Christian Timmerer provides insights into the fascinating history of video streaming, starting from its humble beginnings before YouTube to the groundbreaking technologies that now dominate platforms like Netflix and ORF ON. Timmerer also presents provocative contributions of his own that have significantly influenced the industry. He concludes by looking at future challenges and invites the audience to join in a discussion.
Unlock the Future of Search with MongoDB Atlas_ Vector Search Unleashed.pdfMalak Abu Hammad
Discover how MongoDB Atlas and vector search technology can revolutionize your application's search capabilities. This comprehensive presentation covers:
* What is Vector Search?
* Importance and benefits of vector search
* Practical use cases across various industries
* Step-by-step implementation guide
* Live demos with code snippets
* Enhancing LLM capabilities with vector search
* Best practices and optimization strategies
Perfect for developers, AI enthusiasts, and tech leaders. Learn how to leverage MongoDB Atlas to deliver highly relevant, context-aware search results, transforming your data retrieval process. Stay ahead in tech innovation and maximize the potential of your applications.
#MongoDB #VectorSearch #AI #SemanticSearch #TechInnovation #DataScience #LLM #MachineLearning #SearchTechnology
Infrastructure Challenges in Scaling RAG with Custom AI modelsZilliz
Building Retrieval-Augmented Generation (RAG) systems with open-source and custom AI models is a complex task. This talk explores the challenges in productionizing RAG systems, including retrieval performance, response synthesis, and evaluation. We’ll discuss how to leverage open-source models like text embeddings, language models, and custom fine-tuned models to enhance RAG performance. Additionally, we’ll cover how BentoML can help orchestrate and scale these AI components efficiently, ensuring seamless deployment and management of RAG systems in the cloud.
Building Production Ready Search Pipelines with Spark and MilvusZilliz
Spark is the widely used ETL tool for processing, indexing and ingesting data to serving stack for search. Milvus is the production-ready open-source vector database. In this talk we will show how to use Spark to process unstructured data to extract vector representations, and push the vectors to Milvus vector database for search serving.
“An Outlook of the Ongoing and Future Relationship between Blockchain Technologies and Process-aware Information Systems.” Invited talk at the joint workshop on Blockchain for Information Systems (BC4IS) and Blockchain for Trusted Data Sharing (B4TDS), co-located with with the 36th International Conference on Advanced Information Systems Engineering (CAiSE), 3 June 2024, Limassol, Cyprus.
2. WHAT WILL BE INCLUDED?
I will show the installation process relating to a wireless NIC, PCI card.Testing the hardware and
showing potential problems.
3. INSTALLATION
Assuming you have already prepped the area for
installation, theWi-Fi PCI card can be installed.
If you are upgrading, I have included these steps as
well.
To start, lift the cache up on the PC case to allow the
removal and installation of PCI/PCIe cards. (other case
models may have a different type of attachment)
4. INSTALLATION
After the cache is lifted, the NIC can be pulled out, it may be a little tight, but you
must life the old PCI card put of the slot.
5. INSTALLATION
Using the same method for
removal (just opposite) , push the
wireless NIC into the slot.
You will know when the NIC is
properly inserted, as it will not
wobble much, and it will feel
secure (as well as look secure).
Attach any cables to the NIC (if
needed), and fasten down the clip
this will prevent card movement
completely.
6. TESTING FOR FUNCTIONALITY
Before you can test the hardware piece, you must first install the latest drivers,
this is to ensure all of the known bugs are gone.
So after the software has been installed (UNIT 3), the testing can commence.
One test is via the Device Manager, this is done by looking under the tab network
adapters, if theTP-LINK adapter is shown (without an exclamation mark next to
the image), then it has installed correctly.
Another test is to see the signal bar via
the task bar.
I have done several other tests, but I have
not shown pictures of them. A description
of the test is all on the next slide.
7. TESTING FOR FUNCTIONALITY
Test Number Test Description Expected Result Actual Result
1
Testing to see if the device
appears in the device
manager.
It would appear as the device
and the driver is successfully
installed
It appeared in the device
manager.
2
Testing to see if light at the
back of the wireless NIC is on.
The light would appear on the
wireless NIC.
It did appear on the wireless
NIC.
3
Ping the machine. I expected the machine to be
able to ping successfully
The machine pinged once
CMD was opened and the
command was entered.
4
Checking the internet
connection.
I expected a good internet
signal from the router.
The connection was not as
good as I had expected, this
could be due to distance from
the router.
5
Going into CMD and typing in
ipconfig/all.
Lists of information about the
network, for instance the ip
addresses, the subnet mask,
and the default gateway.
The correct information
appeared when the command
was entered.
8. PROBLEMS?
Possible problems that come with installing hardware are:
ESD, this is done by either not wearing anti-static equipment. Or by not un-plugging the
computer and power cycling it.This would lead to damage of the hardware piece or to
other parts.
It can be avoided by using anti-static equipment, taking care of the system, opening on
a clean work surface, and by unplugging and power cycling.
Fitting an PCI card in an PCIe bay, or the other way around would not work, and would
cause damage to the component if you tried to do so.
Solution= don’t do it, check the specs beforehand.
Overheating is a serious killer for computers, make sure your computer is well-
ventilated and has plenty of fans.