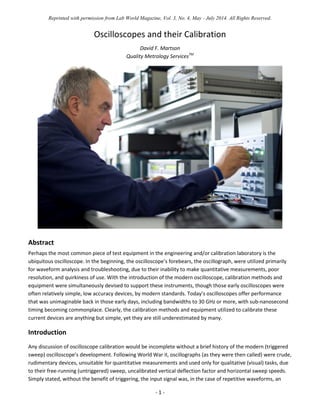
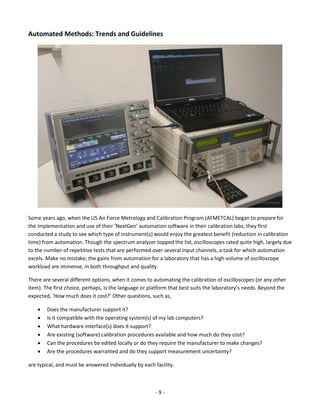
The document provides an overview of oscilloscope calibration, including a brief history of oscilloscope development and the introduction of dedicated calibration equipment. It describes the primary instruments used to calibrate the vertical, triggering, and horizontal subsystems of oscilloscopes. For the vertical subsystem, these include a standard amplitude calibrator, fast-rise pulse generator, high amplitude square wave generator, and constant amplitude signal generator. A constant amplitude signal generator is also used for triggering calibration. Horizontal sweep speeds are calibrated using a time-mark generator.
An LCD is a thin, flat panel that uses polarization of light to electronically display text, images, and video. It uses liquid crystals that shift polarization of light when voltage is applied. LCDs have transistors at each pixel to prevent crosstalk and allow higher resolutions, viewing angles, and response times than passive matrix displays. Color LCDs use red, green, and blue subpixels to display a wide range of colors.
This document discusses digital to analog converters (DACs). It explains that a DAC converts digital numbers into analog voltages or currents. The key components of a DAC are its digital input, analog output, and conversion process. Common DAC types include binary weighted resistor DACs and R-2R ladder DACs, which use resistors and switches to implement the conversion. Important DAC specifications are also outlined such as reference voltage, resolution, speed, settling time, and linearity. Common applications of DACs include function generators, digital oscilloscopes, and converting digital video signals to analog formats for display.
This is one of a type of Analog to Digital Converter (ADC).
Through this presentation, you will have a clear view of how an ADC works. This one specifies one of the types of Analog to Digital Convertor.
This document discusses interfacing a 7-segment display with an AVR microcontroller. It begins by introducing 7-segment displays and their use in common devices. It then explains the fundamentals of how a 7-segment display works, showing the individual segments that combine to display numbers. The document outlines the pin configurations for common anode and cathode displays and shows a block diagram of interfacing the display with a microcontroller port. It includes a table mapping hexadecimal values to the on/off states of the 7 segments needed to display each number and letter. Programming details are provided for initializing the controller and enabling the display output at a set brightness level.
Electronic voting machine project using 8051 microcontroller is used to develop a electronic machine for
several advantages like security, accuracy etc.
Water indicator Circuit to measure the level of any liquidBarani Tharan
This document describes a simple water level indicator circuit using a NE555 timer IC. The circuit uses two probes - one at the bottom water level and one at the top water level. When the bottom probe is uncovered, the 555 output goes high, triggering a relay that powers a motor. When the top probe is covered, a transistor resets the 555, turning the motor off. The circuit provides an automatic way to measure and control water levels to reduce waste and electricity consumption.
This document describes a water level indicator circuit that can be installed in overhead water tanks. It consists of sensors placed inside the tank that detect the water level and send signals to a circuit board. When the tank is full, the circuit activates a buzzer to alert the user and automatically shuts off the water pump to prevent overflow. The device allows users to monitor the water level without having to check the tank and ensures water is not wasted by overfilling.
The document describes the operation of a dual slope analog-to-digital converter (ADC). It consists of an integrator, comparator, counter, and reference voltage. In dual slope ADC, the analog input voltage is integrated for a fixed time and compared against the counter. Then, a reference voltage is integrated in the opposite direction until the integrator output reaches zero, at which point the counter value represents the digital output. The speed is slow but accuracy is high, as it corrects for drifts in the integrator.
The successive approximation register (SAR) analog-to-digital converter (ADC) uses a binary search algorithm to iteratively approximate the digital output value for an analog input signal. For each bit, it outputs a value from the digital-to-analog converter (DAC) based on the previous bits, compares this to the input, and sets the current bit accordingly. This process is repeated for all bits until the full digital output value is determined. SAR ADCs are well suited for applications requiring 8-16 bit resolution at sampling rates under 10 megasamples per second, as they have low power consumption and a small physical size but trade off in maximum sampling speed.
Reduced channel length cause departures from long channel behaviour as two-dimensional potential distribution and high electric fields give birth to Short channel effects.
Study of Transistor Characteristics in Common Emitter Amplifier.pdfMHSyam1
1. The document describes an experiment to study the characteristics of a bipolar junction transistor (BJT) operating in common emitter configuration as an amplifier.
2. Key aspects of the experiment include obtaining the input characteristics by varying the base-emitter voltage at constant collector-emitter voltages and measuring the base current, and obtaining the output characteristics by varying the collector voltage at constant base currents and measuring the collector current.
3. The results are presented in tables showing voltages, currents, and calculations to determine characteristics, along with graphs plotting the input and output characteristics. Simulated data and graphs are also provided for comparison with experimental measurements.
This document discusses channel length modulation in MOSFETs. It explains that in saturation, the channel length decreases with increasing drain voltage due to the depletion region extending farther into the channel. This effectively reduces the channel length and increases the drain current. The document derives an expression for drain current that includes a channel length modulation coefficient to model this effect, showing that current increases with higher drain voltages due to the reduced channel length.
Plasma displays use small cells filled with electrically charged gas that illuminate pixels when an electric current is applied. They can produce large, bright displays over 30 inches and have wide viewing angles and deep blacks. However, they use more power than LCDs and may cause noise or radio interference. While thicker than LCDs, some modern plasma TVs are as slim as 2.5 cm. Competing display technologies include LCD, OLED, and LED screens.
Notice Board is primary thing in any institution or organization or public utility places like bus stations, railway stations and parks. But sticking various notices day-to-day is a difficult process.
The document discusses liquid crystal displays (LCDs). LCDs are thin, flat display devices made up of pixels arrayed in front of a light source. Each pixel consists of liquid crystal molecules aligned between two transparent electrodes. Polarizing filters allow light to pass through in varying amounts, creating different levels of gray. Modern LCDs like computer monitors use an active matrix structure with thin-film transistors to access each pixel individually. LCDs are used in devices like computer monitors, laptops, televisions, and more.
This document discusses parity generators and checkers, which are used to detect errors in digital data transmission. It explains that a parity generator adds an extra parity bit to binary data to make the total number of 1s either even or odd. This allows a parity checker circuit at the receiver to detect errors if the number of 1s is the wrong parity. It provides truth tables and logic diagrams for 3-bit even and odd parity generators and an even parity checker. The boolean expressions for the parity generator and checker circuits are also derived.
Digital frequency meters can measure frequencies from 10 Hz to 12.5 MHz with sensitivities as low as 100 mV rms. They contain input amplifiers, pulse-forming circuits, and cascaded ring counting units to count input pulses and display the frequency digitally. Errors may occur due to quantization effects, time base inaccuracies, and trigger noise. Applications include frequency counting, precision radar measurements, and transducer-based physical measurements like speed, pressure, temperature and more.
This document describes the implementation of a bandgap reference circuit. It was designed by M. Lingadhar Reddy under the guidance of Mr. G. Shiva Kumar at GITAM University in Hyderabad, India from 2013-2015. The document outlines the basic operation of a bandgap reference circuit, which produces a reference voltage that is stable over changes in temperature, supply voltage, and process parameters. It discusses the tool and technology used, different approaches to bandgap references, and details the design and simulation results of a two-stage CMOS operational amplifier and final bandgap reference circuit implemented in a 90nm CMOS technology using Cadence Virtuoso.
Diode-Transistor Logic (DTL) was an early logic family that used diodes and bipolar transistors. It suffered from voltage degradation between stages. Transistor-Transistor Logic (TTL) replaced the diode inputs of DTL with a single multi-emitter bipolar transistor, making it more area efficient. TTL also had faster switching speeds than DTL due to its use of an active pull-up transistor and totem-pole output. Standard TTL gates like the 7400 series had propagation delays of 12ns, fanout of 10, and power dissipation of 10mW.
The document discusses synchronous and asynchronous counters. It defines a counter as a digital circuit that counts input pulses. Asynchronous counters have flip-flops that change state at different times since they do not share a common clock. Synchronous counters have all flip-flops change simultaneously due to a shared global clock, allowing them to operate at higher frequencies. The document provides examples of 2-bit, 3-bit, and 4-bit synchronous binary counters as well as a 4-bit synchronous decade counter along with their operations and timing diagrams.
LCDs use liquid crystals and polarized light to display images on a thin, flat screen. They have advantages over older CRT displays like smaller size, lower power consumption, and lighter weight. LCD pixels use liquid crystals that can be aligned by electric fields to allow light to pass through polarized filters, turning pixels on and off. Active matrix LCDs provide higher resolution by adding a transistor to each sub-pixel for individual control.
This document describes the design of optimized reversible Vedic multipliers for high-speed low-power operations. It presents 2x2, 4x4, and 8x8 bit reversible Vedic multipliers based on the Urdhva Tiryakbhyam multiplication algorithm. The multipliers were designed using reversible logic gates like Feynman, Peres, and HNG gates. Simulation results showed the reversible Vedic multipliers have lower time delay, area, and number of logic units compared to normal Vedic multipliers. Potential applications of these high-speed low-power multipliers include fast Fourier transforms, public key cryptography, and embedded systems.
This document discusses digital voltmeters (DVMs). It explains that DVMs display voltage measurements as numerical readings rather than using an analog needle gauge. The document covers various types of DVMs including ramp type, dual slope integrating type, successive approximation type, and microprocessor-based versions. It provides block diagrams and explanations of the operating principles for different DVM designs. Advantages of DVMs like accuracy, ease of reading, and versatility are also summarized.
This document discusses counters, which are digital circuits used for counting pulses. It describes asynchronous and synchronous counters, and different types including up/down counters, decade counters, ring counters, and Johnson counters. Examples of counter applications are given such as in kitchen appliances, washing machines, microwaves, and programmable logic controllers. Counters are used for tasks like time measurement, frequency division, and digital signal generation.
Constructing Stick diagram for Boolean expression with 4 or more Boolean variables becomes cumbersome with trivial methods. Euler Graph is constructed and stick diagrams are drawn with help of it. This ppt discuss the complete flow procedure.
This document provides an introduction to VLSI technology and MOS transistors. It discusses the history and generations of integrated circuits from SSI to VLSI. The dominant fabrication process for high performance VLSI circuits is now silicon CMOS technology. The document then describes the basic MOS transistor structure and different types of MOS transistors including nMOS, pMOS, and CMOS. It explains the working of enhancement mode and depletion mode transistors. Finally, it discusses CMOS fabrication processes like p-well and n-well and the basic structure of a p-well CMOS process.
An oscilloscope is a graph-displaying device used to measure electrical signals over time. It displays voltage on the y-axis and time on the x-axis, allowing observation of signal behavior. Oscilloscopes provide information about time, voltage, frequency, rise and fall times, and other signal characteristics. The device has vertical, horizontal, and trigger sections to control measurement settings. Analog oscilloscopes provide real-time signal display, while digital oscilloscopes can store and replay signals. Probes connect the oscilloscope to circuits and come in passive and active varieties with different characteristics for measuring voltage signals.
An oscilloscope displays voltage over time and is used to analyze electrical signals. It has vertical controls to set voltage, horizontal controls to set time, and trigger controls. Originally they used cathode ray tubes but now use LCD screens. Oscilloscopes are used in many fields to examine waveform shapes and time between events. Probes are necessary to minimize interference and loading when connecting to a circuit under test.
The cathode-ray oscilloscope (CRO) displays waveforms by plotting voltage over time. It consists of a cathode-ray tube (CRT) and various circuits. The CRT uses an electron gun to generate a focused electron beam that is deflected by electric fields to scan a fluorescent screen, creating the visual display. The vertical amplifier inputs the signal to be analyzed and the delay line synchronizes it with the timebase. The timebase generator produces a sawtooth voltage for the horizontal deflection of the beam across the screen. Triggering circuits synchronize the timebase to capture the desired part of the waveform. CROs can be analog for direct manual measurement or digital/storage for digital readout and retaining traces.
This document provides an overview of an oscilloscope. It begins with an introduction that defines an oscilloscope and describes what it can be used for. It then explains how an oscilloscope works through a block diagram of its major components, including the cathode ray tube, vertical and horizontal amplifiers, delay line, time base circuit, and trigger circuit. Each of these components is then described in more detail. The document also notes the different types of oscilloscopes and provides some examples of common uses.
This document provides an overview of cathode ray oscilloscopes (CROs). It discusses the introduction and basic diagram of a CRO, describing the main components of the cathode ray tube. It also covers multi-input oscilloscopes, describing the alternate and chopped modes of dual trace oscilloscopes and methods for generating dual beams. Additionally, it discusses Lissajous patterns generated from two input signals and how they can be used to measure frequency and phase. Finally, it provides an overview of digital storage oscilloscopes, including their block diagram and advantages over analog storage oscilloscopes.
An oscilloscope converts electrical signals into visual waveforms displayed on a screen. A dual-trace oscilloscope can display two such waveforms simultaneously, allowing easy comparison of inputs and outputs like those of an amplifier. It uses a single electron beam that is rapidly switched between two input channels to draw the two traces, whereas a dual-beam oscilloscope uses two separate electron beams. A dual-trace oscilloscope can operate in either alternate or chopped mode to display the two signals.
Cathode Ray Oscilloscope CRO & Digital Oscilloscope 'S WORKINGAbdul Qayoom Mangrio
it contain the working of CRO & DO
IT CONTAINs all the subtopics related to it. it has Block diagram, internal working and much more.
Subject; Measurement & Instrumentation
Teacher; ma'am Falak Naz Pathan
MEHRAN UET SZAB CAMPUS KHAIRPUR MIR'S
Comparative Analysis of Natural Frequency of Transverse Vibration of a Cantil...IRJET Journal
This document presents a comparative analysis of the natural frequency of transverse vibration of a cantilever beam using analytical and experimental methods. Analytical calculations are performed to determine the natural frequencies of the first three modes of vibration of the cantilever beam. Experimental testing is conducted using an impact hammer, accelerometer, and FFT analyzer. The natural frequencies measured experimentally are found to be close to those calculated analytically. The results demonstrate that analytical and experimental methods can both accurately determine the natural frequencies of a cantilever beam's vibration.
This presentation is a quick introduction to oscilloscopes. It explains the different types of oscilloscopes, their main characteristics, and the basic operations to configure your oscilloscope.
The document discusses the cathode ray oscilloscope (CRO), which is an electronic test instrument used to observe changing electrical signals over time. It describes the key components of a CRO including the cathode ray tube, vertical/horizontal controllers, triggers, and displays. The document explains how a CRO works by amplifying input signals and using electron beams to produce waveforms on the screen. Various sweep modes, synchronization methods, and applications of CROs for measuring voltage, current, and examining waveforms are also covered.
The document provides an overview of the oscilloscope by explaining that it is a graph-displaying device that draws a graph of an electrical signal over time, with voltage on the vertical axis and time on the horizontal axis. It then describes how an oscilloscope can be used to determine signal parameters like frequency, see circuit components represented by a signal, check for signal distortions, and more. The document also summarizes how analog and digital oscilloscopes work and key oscilloscope specifications and controls.
1.Oscilloscope. 2.Block diagram of Oscilloscope. 3.Types of Oscilloscope. 4.A...AL- AMIN
1.Oscilloscope.
2.Block diagram of Oscilloscope.
3.Types of Oscilloscope.
4.Applications of Oscilloscope.
5.Signal generator.
6. Types of signal generator.
7. Frequency synthesizer.
8.Analyzer.
9.Types of analyzer
cathode ray oscilloscope &function generatormegha agrawal
The document provides information about operating a cathode-ray oscilloscope (CRO). It describes the key components of a CRO including the cathode ray tube, electron gun, and horizontal and vertical deflection plates. It explains how a CRO works by deflecting an electron beam horizontally and vertically using sawtooth waveforms to display voltage signals on the screen as waveforms. It also lists and describes the main controls of a CRO including those for the vertical, horizontal and trigger sections.
The document discusses different types of oscilloscopes and function generators. It describes cathode-ray oscilloscopes (CROs), dual-beam oscilloscopes, analog storage oscilloscopes, digital oscilloscopes, mixed-signal oscilloscopes, and handheld oscilloscopes. It also discusses function generator controls, types of function generators including analog and digital, and sweep function generators. The document provides details on the systems and controls of oscilloscopes, including vertical, horizontal, and trigger systems. It explains the basic workings and applications of different oscilloscope and function generator types.
In this article from the January 2015 World Pipelines edition, Andre Lamarre, Business Development Manager - Power Generation and Pipeline Markets at Olympus NDT, writes about trusted UT inspection methods and new technique developments used to contribute to pipeline integrity.
More on Olympus ultrasonic flaw detectors: http://bit.ly/1zy3QUu
Contact us: http://bit.ly/1rDmq94
Sign up for our newsletter: http://bit.ly/1j5FOTy
The document discusses various types of signal analyzers including cathode ray oscilloscopes, wave analyzers, harmonic distortion analyzers, and spectrum analyzers. It provides details on the working principles, components, and applications of general purpose cathode ray oscilloscopes, dual beam oscilloscopes, sampling oscilloscopes, analog and digital storage oscilloscopes, frequency selective and heterodyne wave analyzers, and fundamental-suppression and heterodyne harmonic distortion analyzers.
The document discusses spectrum analyzers, which measure the magnitude of an input signal versus frequency. It describes the basic components and theory of operation of spectrum analyzers. The key components are the RF input, mixer, IF filter, detector, video filter and local oscillator. It also compares spectrum analyzers to oscilloscopes, describes common measurements, and types of analyzers including Fourier transform and swept analyzers. Finally, it discusses the front panel functions of spectrum analyzers.
IRJET- Wave Ultrasonic Testing and how to Improve its Characteristics by Vary...IRJET Journal
This document provides an overview of wave ultrasonic testing and how varying operational parameters can improve its characteristics. It discusses how guided wave testing using low frequencies below 100 kHz can be used to inspect pipes over long distances for corrosion detection. Commercial systems have been developed that use arrays of piezoelectric transducers to generate and control axially symmetric modes to identify non-symmetric features indicating defects. Varying the test frequency affects sensitivity, resolution, and range, with lower frequencies providing longer ranges but reduced resolution.
Ultrasonic ILI Removes Crack Depth-Sizing LimitsNDT Global
This white paper looks at how the new generation of high-resolution inspection robots overcame the crack-depth sizing limit of previous-generation UT for detection, sizing and location of cracks and crack-like defects in the body and welds of transmission pipelines. Supporting test data is also provided.
The document discusses the cathode ray oscilloscope (CRO), which is an electronic test instrument used to obtain waveforms of different input signals over time. It has four main sections - the display, vertical controllers, horizontal controllers, and triggers. The CRO is divided into a block diagram consisting of these sections along with a synchronizer. It plays an important role in analyzing electrical signals and circuit behavior by plotting amplitude over time on its x and y axes.
The document discusses the cathode ray oscilloscope (CRO), which is an electronic test instrument used to obtain waveforms of different input signals over time. It has four main sections - the display, vertical controllers, horizontal controllers, and triggers. The CRO is divided into these sections and uses probes to input signals, analyzing the waveform by plotting amplitude over the x and y axes.
An accelerometer is a device that measures acceleration forces. It contains capacitive plates that move relative to each other in response to acceleration, changing capacitance. This capacitance change can be converted to a voltage proportional to acceleration. Accelerometers are used to measure vibration in many fields. They are specified by factors like range, sensitivity, bandwidth, and axes. Common types include capacitive, piezoelectric, and strain gauge accelerometers. Proper calibration ensures the electrical output accurately represents measured acceleration.
- Oscilloscopes display voltage signals as waveforms over time to reveal important information about electrical signals that control electro-mechanical devices. They show voltage, frequency, noise and signal anomalies.
- Most oscilloscopes are now digital, which enables more accurate measurements, data storage, automated analysis and remote sharing of readings. Handheld digital oscilloscopes offer advantages like battery power and electrical isolation.
- Oscilloscopes reveal the shape, amplitude and frequency of waves to identify transient or harmonic signals that could compromise systems, while multimeters only provide numeric readings. Oscilloscope functions like sampling, triggering, and automated setup help analyze unknown waveforms.
The document provides an outline for a presentation on acoustic emission phenomena and applications. It discusses the history of acoustic emission and describes acoustic emission instrumentation components like sensors, preamplifiers, and data acquisition systems. It also covers acoustic emission measurement principles, source location techniques, applications of acoustic emission in metals, and international acoustic emission standards. The document contains detailed information on various acoustic emission concepts.
An oscilloscope is a device that displays an electrical signal as a graph, with voltage on the vertical axis and time on the horizontal axis. There are different types of oscilloscopes including analog, digital, mixed-domain, handheld, and mixed-signal. It is important to properly ground the oscilloscope and connect probes matched to the instrument. Calibration ensures accurate measurements.
Similar to Oscilloscopes and their Calibration-Web (20)
1. Reprinted with permission from Lab World Magazine, Vol. 3, No. 4, May - July 2014. All Rights Reserved.
- 1 -
Oscilloscopes and their Calibration
David F. Martson
Quality Metrology ServicesTM
Abstract
Perhaps the most common piece of test equipment in the engineering and/or calibration laboratory is the ubiquitous oscilloscope. In the beginning, the oscilloscope’s forebears, the oscillograph, were utilized primarily for waveform analysis and troubleshooting, due to their inability to make quantitative measurements, poor resolution, and quirkiness of use. With the introduction of the modern oscilloscope, calibration methods and equipment were simultaneously devised to support these instruments, though those early oscilloscopes were often relatively simple, low accuracy devices, by modern standards. Today’s oscilloscopes offer performance that was unimaginable back in those early days, including bandwidths to 30 GHz or more, with sub-nanosecond timing becoming commonplace. Clearly, the calibration methods and equipment utilized to calibrate these current devices are anything but simple, yet they are still underestimated by many.
Introduction
Any discussion of oscilloscope calibration would be incomplete without a brief history of the modern (triggered sweep) oscilloscope’s development. Following World War II, oscillographs (as they were then called) were crude, rudimentary devices, unsuitable for quantitative measurements and used only for qualitative (visual) tasks, due to their free-running (untriggered) sweep, uncalibrated vertical deflection factor and horizontal sweep speeds. Simply stated, without the benefit of triggering, the input signal was, in the case of repetitive waveforms, an
2. - 2 -
unstable signal moving across the screen, at best, and unusable for non-repetitive or one-shot events. When C. Howard Vollum, formerly a member of the U.S. Army Signal Corps team during the war that developed radar for the United States, designed and patented the first triggered sweep oscilloscope, the Tektronix®1 Type 511, released in June 1947, everything changed. This was the beginning of the modern (analog) oscilloscope. For the first time, the sweep was triggered and vertical deflection and horizontal sweep speeds were calibrated, facilitating traceable, quantitative measurements. The device previously suitable only as a ‘viewing screen’ was now capable of measurement, as well as displaying electrical phenomena, including single-shot events, as never before, thanks to the triggered sweep design. While we take these capabilities for granted, they literally opened the door for uninhibited technological growth, previously unseen, that continues to this day, using oscilloscopes produced by many different manufacturers.
As is commonly the case with the introduction of any new technology, it was necessary for new methods and equipment for the calibration of the oscilloscope to be developed. With the introduction of the 511, Tektronix faced that necessity by developing the first calibration routines intended for a production environment. Equipment designed specifically for oscilloscope calibration did not exist, and the equipment available for use was inefficient at the task, requiring time-consuming and complex setups, impeding production. For example, verifying vertical deflection factors typically relied on the use of a DC power supply, monitored by an external voltmeter, while verifying bandwidth involved the use of a signal generator whose externally leveled output (typically using vacuum thermocouples, an extremely slow and tedious process) to ensure amplitude flatness over the desired frequency range.
Likely born out of their obvious need for specialized, dedicated-use equipment to support the manufacture of oscilloscopes, Tektronix became the first leader in the manufacturer of oscilloscope calibration equipment by default. Soon, the basic instrumentation for oscilloscope calibration was defined: the standard amplitude calibrator (vertical deflection factor), fast-rise pulse generator (vertical transient response), high amplitude square wave generator (vertical attenuator compensation), constant amplitude signal generator (vertical bandwidth and trigger sensitivity), and time-mark generator (horizontal sweep speeds). These types of instruments became commonplace, and came to be used universally to calibrate oscilloscopes. Though initially developed by Tektronix, these devices have subsequently been produced by other manufacturers in various configurations.
Equipment Overview: Common Types and Applicability
Since the introduction of dedicated oscilloscope calibration equipment, there have also been many additional types of calibration fixtures used as well. For the purposes of this discussion, however, the focus is on the primary-use instruments utilized in calibration. Moreover, though several pieces of the equipment subsequently described may also be used for other testing, depending on unit under test (UUT) requirements, their usage is more commonly associated with a specific, primary purpose, e.g., vertical amplifier calibration. For the purposes of clarity, this discussion groups the calibration equipment discussion around the specific subsystems, e.g., vertical, triggering, and horizontal, and the calibration instrument(s) primarily used for each. In addition, it also uses the generic, descriptive names for the various instruments and/or functionality (many current oscilloscope calibration instruments are multifunction devices), rather than specific names subsequently used by the various manufacturers.
1 The author has no connection, professional or commercial, with Tektronix, other than a long association as a user of their products.
3. - 3 -
Vertical Subsystem
The primary characteristics requiring calibration in the oscilloscope’s vertical subsystem are amplitude and frequency response, though as oscilloscope bandwidths have risen, the input impedance, a key contributor to measurement errors at high frequency, is often calibrated as well. To calibrate these functions, however, requires as many as five separate devices and/or functionality. Let’s explore the requirements and instruments used to calibrate them.
The measurement of oscilloscope input impedance is straightforward, with oscilloscope calibrators from several manufacturers, both currently and in the past, having that functionality built in. Early on, however, that was not the case. Briefly, an ‘L-C’ meter was used to adjust the input capacitance (the resistive input values were typically fixed at 1 M in those days) on the direct (non-attenuated) input range. Once set, the subsequent adjustment of the vertical attenuator compensation indirectly matches, via visual observation of the waveform fidelity, the impedance (capacitance) of the attenuator ranges with that of the previously measured direct input.
The standard amplitude calibrator is used to calibrate the vertical gain/attenuation of oscilloscopes. Initially, these instruments output a square wave signal (approx. 1 kHz), since in early, analog oscilloscopes, the CRT graticule was an overlay, rather than being etched on the glass. The use of a square wave helped to minimize parallax errors associated with amplitude measurement during calibration by simplifying viewing. Subsequently, largely due to the development of digital storage oscilloscopes (DSO, which typically include a digital readout for various parameters, including voltage), many oscilloscope manufacturers began using DC voltage to calibrate vertical deflection factor rather than a square wave. Later amplitude calibration instruments began including ±DC volts, in addition to selectable frequency AC, and are capable of calibrating any of the various, applicable oscilloscope operating paradigms.
Though the calibration of vertical deflection factor is often accomplished using a single instrument and/or process, frequency response, however, is not always as straightforward. In older models of oscilloscopes, for example, the input attenuators often consisted of discrete, physical capacitor/resistor networks that required compensation (adjustment) in order to achieve a flat frequency response throughout the low and middle frequencies (similar to compensating a 10X probe for use with a particular oscilloscope). In order to accomplish this task, a high amplitude square wave generator, capable of producing approx. 100 Vpp, is used. The primary performance feature of this generator is to provide a square wave with very flat tops and bottoms in the lower to middle frequencies, with a large enough amplitude range adequate to address the various attenuator ranges that commonly exist on oscilloscopes.
Another instrument used for the calibration of frequency response is the fast-rise square wave generator. Sometimes referred to as ‘fast edge generator,’ and unlike the high amplitude square wave generator, its fast- rise counterpart is commonly limited in its output capability to a few volts, and specified for rise-time and flatness, the latter generally for a specified time epoch following the transition. The characteristics of the fast- rise generator may be used directly for oscilloscope rise-time calibration (with or without adjustment), as well as for vertical amplifier frequency response, which some manufacturers prefer to use in lieu of the swept frequency method.
Perhaps the mostly commonly employed method of calibrating oscilloscope vertical frequency response is the swept frequency method using a constant amplitude signal generator (where an applicable device exists). By design, the constant amplitude generator sine wave output, typically ranging from several millivolts to a few
4. - 4 -
volts, is internally leveled to maintain a peak-detected, flat output, in Vpp. This latter point is important to note in contrast to employing an rms levelling approach, which, unlike the peak responding device (oscilloscope) the generator’s output is designed to calibrate, instead also responds to distortion and noise products, inconsistent with the measurement.
It should be noted that at this point of their development, oscilloscopes have effective vertical bandwidths in excess of 30 GHz and, at this writing, there are no dedicated constant amplitude generators available beyond 6.4 GHz. Currently, when verifying UUT frequency response at frequencies in excess of that (or when such a generator in unavailable), the most common method is to use a high performance (low distortion and noise) HF signal generator in conjunction with a power meter and sensor and power splitter to externally level the measurement at the input to the UUT.
Triggering Subsystem
The oscilloscope’s triggering subsystem may consist of many operating modes and sources. For example, common choices for trigger sources are INT, EXT, LINE, etc. Common trigger modes are AC, DC, AC HF REJ, though in modern oscilloscopes, few, if any, of these modes are explicitly verified during calibration. Though some modern oscilloscope manufacturers have added additional functionality to this subsystem, the intent of this paper is to address the most common, mainstream characteristics and the instruments used to calibrate them.
The main functional parameters of the triggering subsystem requiring calibration are trigger sensitivity, typically internal and external, and trigger bandwidth (frequency response). Generally, these traits are both calibrated using a constant amplitude signal generator (or power meter/sensor). As mentioned at the outset, however, oscilloscopes with bandwidths of 30 GHz or more exist at this writing, with 10 GHz bandwidths becoming increasingly common. Similar to vertical frequency response calibration, above, trigger bandwidth verification may require a signal source beyond the capability of a dedicated oscilloscope calibration instrument, i.e., an HF generator.
Horizontal Subsystem
The oscilloscope’s horizontal subsystem, sometimes referred to as the horizontal timebase, sets the UUT displayed time scale (time/div), which, in the case of one current model of DSO, ranges from 20 s/div to 1 ps/div in real time! The calibration of the horizontal subsystem is accomplished entirely (in most cases) using a time mark generator. The time mark generator is designed to output time pulses (some models may utilize (or offer selectable) sine or spike waveforms, in lieu of, or in addition to pulses) at intervals matching those available on the oscilloscope. Additionally, some oscilloscopes offer external horizontal inputs with specified sensitivities and bandwidths; those models may require a standard amplitude calibrator, or other calibrated voltage source to address the former, a constant amplitude signal generator for the latter.
Manual Methods: Theory and Practice
With the development of the modern oscilloscope, it was also necessary to simultaneously devise the methods to calibrate them!
Oscilloscope calibration requires a repetitive testing regimen and address more test points than many other instruments, exceeded only, perhaps, by spectrum analyzers. With that in mind, any metrologically sound means
5. - 5 -
to streamline the process, minimize the tedium and, therefore, the possibility of errors occurring, are welcome! Though anecdotally attributed to Tektronix, a process has evolved over the years that virtually all major oscilloscope manufacturers use/specify in their respective calibration documentation. Briefly, the main subsystems of the oscilloscope (vertical, triggering, and horizontal) are each calibrated respectively, using the just calibrated (referred to in some circles as characterization) functional parameter as a basis for subsequent calibration of another parameter, function, or subsystem. The details of this process, by subsystem, are examined below.
Vertical Subsystem
Prior to beginning the actual calibration process, it may be necessary to perform routine operators or other preliminary adjustments. One such adjustment, for example, is the check/adjustment of the DC Step Attenuator Balance. Since this is typically an operator adjustment, it is independent of the calibrated parameters of vertical deflection factor, bandwidth, and other calibrated parameters associated with the vertical subsystem. Simply stated, proper DC Step Atten Bal (as it is sometimes abbreviated) occurs when no vertical shift in the trace as the input attenuator (Volts/Div) is switched throughout its range. While common on many older models of oscilloscopes, adjustment of the DC Step Atten Bal has all but disappeared in modern designs.
Following any necessary preliminary adjustments, the input impedance is measured. As mentioned previously, this is accomplished in a straightforward manner, with the oscilloscope calibrator having built-in functionality specifically designed for this purpose.
Next, the vertical gain/attenuation ratios are calibrated using the standard amplitude calibrator. As mentioned above, older, primarily analog models using cathode-ray tubes (CRTs) for displays utilized a square wave signal for vertical gain calibration. Most modern models using solid-state displays, e.g., liquid crystal displays (LCDs), are typically calibrated using a DC stimulus, with some models utilizing the consecutive application of a zero- centered, ±DC signal for gain calibration, where others prefer a zero-starting +DC signal alone. Generally speaking, calibration of vertical gain begins with the highest sensitivity available on the UUT (Unit Under Test), incrementing up through the range of available attenuation ratios (i.e., Volts/Div settings) until the upper limit of the UUT is reached. The steps are repeated on any additional available vertical inputs. This process may be a throwback to earlier designs, where the lowest range commonly bypassed the vertical attenuator networks, delivering the signal directly to the vertical amplifier with minimal signal conditioning (excluding input coupling) but, ultimately, it varies from manufacturer, model, and design. Once calibrated, the UUT display can be subsequently used to set required amplitude levels, such as those required for triggering calibration, alleviating the need for an external piece of equipment to set those levels, reducing time and increasing throughput. It should be noted that with some legacy designs, the Tektronix 7000 series of oscilloscope mainframes, for example, accommodated many models of vertical preamplifiers or ‘plug-ins,’ and must use a either a calibrated mainframe or first have the mainframe gain calibrated prior to calibration of the UUT vertical plug-in, in order to support plug-in interchangeability while retaining accuracy2.
At this point, the calibration of the UUT low and middle frequency response is completed, in the case of those models using discrete, and sometimes, electronic adjustment of the attenuator compensation in models that
2 Oscilloscope mainframes capable of accepting interchangeable vertical preamplifiers are equipped with an integral voltage calibrator, facilitating the adjustment of the preamplifier gain to match that of the mainframe. During calibration, the mainframe calibrator, which may source either AC, DC, or both, is also verified.
6. - 6 -
offer that capability. For those that do support discrete calibration of this parameter, it is normally accomplished using the high amplitude square wave generator. Some models, like many recent products produced by Tektronix, have built-in self-calibration or operator adjustment routines referred to as “Signal Path Compensation” (SPC) that performs these compensation adjustments automatically, without any external equipment required. In either case, the adjustment of the aforementioned attenuator networks to achieve smooth, flat amplitude vs. frequency response in the UUT is achieved. Though many newer oscilloscopes no longer require discrete compensation adjustments, the calibration laboratory workload may consist of many units that do.
The final step in calibrating the vertical subsystem is the verification of its frequency response. As mentioned above, the swept frequency method using a constant amplitude signal generator is most commonly employed for verification, though a fast-rise square wave generator is typically used for adjustment. Briefly recalling electrical theory, a square wave is harmonically rich, and the application of an adequately fast (its transient response corresponds to the UUT bandwidth) square wave, whose post-transition response is flat within a specific time epoch (window), facilitates proper adjustment of the UUT, ensuring a flat bandpass throughout the frequency range while rolling off smoothly at its upper bandwidth (-3 dB) limit.
Though the swept frequency method using a constant amplitude signal generator directly connected to the UUT is most commonly used for frequency response calibration, in today’s market of higher and higher bandwidth oscilloscopes, the use of a signal generator in conjunction with a power meter, power sensor, and power splitter is becoming increasingly more common. A typical connection for such testing is shown in Figure 1 below.
When using the above setup for frequency response testing, some additional areas of uncertainty are important to consider:
HF Generator distortion and noise
Power Splitter tracking error (output arm matching)
Mismatch between the Power Splitter and the UUT
Mismatch between the Power Sensor and Power Splitter
Fortunately, the impact the above has on the measurement process may be minimized through careful selection of instrumentation and its magnitude calculated and accounted for as part of the overall uncertainty. For example, if using an HF Generator whose harmonic distortion is -30 dBc, the additional uncertainty contribution is approx. 3%. Using a generator with a lower distortion level will lower the uncertainty associated with it. Similarly, using a power splitter with a low tracking error, as well as having a lower output VSWR improves the match at the UUT, as does utilizing a power sensor with a lower VSWR.
7. - 7 -
When calibrating oscilloscope frequency response using the swept frequency method (described above), it may be necessary to address UUT input impedances of both 1 M(an upper bandwidth limit of 250 MHz is typical for UUTs equipped with a 1 M input impedance), as well as 50 . Since the various models of constant amplitude signal generators manufactured for this purpose over the years have characteristic output impedances of 50 , when calibrating devices with a 1 M input impedance, an external 50 , feedthrough termination is employed at the generator output for impedance matching with the UUT input3. Depending on the shunt capacitance of the UUT and the VSWR of the termination used, an allowance may be necessary for the mismatch incurred at higher frequencies.
Triggering Subsystem
Following calibration of the vertical subsystem and its associated parameters, the calibration of the triggering subsystem typically follows, trigger sensitivity and trigger bandwidth. Trigger sensitivity, on most oscilloscopes, is calibrated for both internal and external sources. Generally speaking, internal trigger sensitivity is specified in terms of either UUT vertical divisions or fractions thereof (e.g., ≤ 0.7 div from DC to 50 MHz), or in terms of full- scale or fractions thereof (e.g., ≤ 50%FS at 11 GHz), and is often specified in combination with a limiting frequency. External trigger sensitivity is typically specified in terms of rms voltage required at the trigger input to effect stable triggering. Trigger bandwidth, the point at which stable triggering is unachievable or, in DSOs, the inability to display the input waveform due to undersampling, may be limited by the vertical frequency response of the UUT.
Trigger bandwidth specifications may exceed the vertical bandwidth of the oscilloscope, in some cases, to extend the functional characteristics of the unit, even though quantitative measurements of vertical parameters are not possible. During trigger bandwidth calibration, even when using a constant amplitude signal generator, it is generally necessary, due to the UUTs vertical frequency response, to readjust the generator output signal level in order to maintain the specified conditions. For example, in the above specifications (≤ 50%FS at 11 GHz), as applied to an oscilloscope with a 10 GHz bandwidth, would require increasing the output of the generator some 3 dB (30%) at 11 GHz in order to maintain the same display (amplitude) indication as when measured midband.
If calibration of the UUT trigger bandwidth requires a signal source beyond the capability of a dedicated oscilloscope calibration instrument, an HF Generator is connected via a power splitter to both the vertical and external trigger inputs. The applied signal level is measured using the UUTs just calibrated vertical input4. A typical configuration is shown in Fig. 2.
3 It should be noted that some models of oscilloscope calibrators have switchable, internal 50 terminations, rather than necessitating the physical insertion of an external termination.
4 Trigger bandwidth is a single-sided specification, i.e., Pass/Fail, with only a minimum specified signal level required for stable triggering, e.g., 200 mV at 1.8 GHz. As a result, it is typically specified with an allowance for the vertical performance and calibration requirements accounted for during design.
8. - 8 -
Horizontal Subsystem
Prior to the advent of the DSO (digital storage oscilloscope), the timebase in analog models consisted of a sweep circuit whose rates were determined by discrete components, usually based on RC time constants. As a result, each sweep speed (horizontal sweep rate) required calibration, due to component drift or other effects that affected the accuracy. To accomplish that, it was necessary for calibration personnel to increment through each available sweep speed (including those of the delayed/delaying sweep, if present) on the UUT while simultaneously setting the time mark generator output to match the indicated speed. For every sweep speed, the operator would check for coincidence, within the UUTs stated tolerance, with the display graticule, typically specified over the center eight horizontal divisions (2nd to 9th vertical graticule lines), though some models were specified over the entire 10 division sweep. The sweep magnifier (5x or 10x were common), if equipped, is verified in the same fashion.
In DSO models, the sweep speed determining components are often locked to a master timebase, usually a quartz crystal type, by frequency dividers and phase locked loops (PLLs), and except for failure, virtually never requiring verification of each individual sweep speed. Instead, differing approaches are used, the most common involving direct measurement of the time base using a frequency counter at a designated output (e.g., Frequency Reference Out).
9. - 9 -
Automated Methods: Trends and Guidelines
Some years ago, when the US Air Force Metrology and Calibration Program (AFMETCAL) began to prepare for the implementation and use of their ‘NextGen’ automation software in their calibration labs, they first conducted a study to see which type of instrument(s) would enjoy the greatest benefit (reduction in calibration time) from automation. Though the spectrum analyzer topped the list, oscilloscopes rated quite high, largely due to the number of repetitive tests that are performed over several input channels, a task for which automation excels. Make no mistake; the gains from automation for a laboratory that has a high volume of oscilloscope workload are immense, in both throughput and quality.
There are several different options, when it comes to automating the calibration of oscilloscopes (or any other item). The first choice, perhaps, is the language or platform that best suits the laboratory’s needs. Beyond the expected, ‘How much does it cost?’ Other questions, such as,
Does the manufacturer support it?
Is it compatible with the operating system(s) of my lab computers?
What hardware interface(s) does it support?
Are existing (software) calibration procedures available and how much do they cost?
Can the procedures be edited locally or do they require the manufacturer to make changes?
Are the procedures warranted and do they support measurement uncertainty?
are typical, and must be answered individually by each facility.
10. - 10 -
Perhaps the best advice is to first talk with other users (not the product sales staff) about the software they use, its advantages and disadvantages. Does the manufacturer adequately support it and the needs of the lab? Are they happy with it? In addition, any other questions pertinent to their facility and its needs.
Oftentimes, personal computers (PCs) used in calibration laboratories are not at the cutting edge of that technology. It is very important that any software choice not only supports the current operating system(s) of the lab's existing PCs, but also is forward compatible, actively upgraded to take advantage of new operating systems as they are implemented.
The GPIB (General Purpose Interface Bus) has and continues to be, especially in the case of calibration instrumentation, the primary interface used for remote control. When it comes to the oscilloscope workload, however, the remote options are many and varied, e.g., RS-232, USB, and Firewire (IEEE-1394), to name a few. A review of the remote interfaces supported by the software vs. those installed on the workload is imperative, in order to gain the most benefit from any software.
Several vendors supply calibration software platforms and/or software calibration procedures in various forms. In the case of ‘canned’ procedures, be especially vigilant of their quality and implementation. In my own experience, I have seen too many procedures sold as a black box. That is, the details of the tests, including the setup of the UUT and the calibration instruments, are invisible to the operators, and it must be taken on faith that the procedure writer knew what they were doing when it was developed. Unfortunately, many lack the same metrological rigor and overall quality that a skilled metrology technician would apply during a manual calibration setting, delivering substandard results, in the author’s opinion. If in doubt, ask to see the validation results and/or the measurement uncertainties associated with the use of the program, prior to purchase. Remember, it is the responsibility of the laboratory to validate all software procedures used for calibration; a poor choice in the beginning becomes more costly to maintain than the benefits it provides.
Calibration Uncertainty: Guidelines and Examples
As with any calibration process, the contributors to the uncertainty of measurement and the determination of their magnitude on the calibration process must be defined in accordance with accepted policies and practices, recognized through the world of metrology. Specifically, the Guide to the Uncertainty of Measurement, often referred to as the GUM. For oscilloscopes, the primary uncertainty sources are:
Uncertainty associated with the reference standards, resolution and harmonics
Uncertainty associated with impedance mismatch between the reference standard and the UUT
Uncertainty associated with the UUT itself, including reading uncertainty, noise and switch repeatability
In the case of DSO calibration, internal algorithms (e.g., averaging and interpolation) and their implementation into the UUT firmware may affect the results of the calibration and the uncertainties associated with it
Below is an example of the measurement uncertainty computation for oscilloscope vertical deflection.
Model Equation: Δ푦= 푁푖푛푑 ×푆표푠푐 ×푆푤 2√2 ×푇 × (푉푐푎푙,푖푛푑×푅푐푎푙 + 훿푂푐푎푙) + 훿푉표푠푐,푛표푖푠푒
11. - 11 -
With T = 1 and Rcal ≈ 1, the above equation reduces approximately to: Δ푦≈ 푁푖푛푑 ×푆표푠푐 ×푆푤 2√2 ×푉푐푎푙,푖푛푑×푅푐푎푙 × 푇 × (1 + 훿푂푐푎푙 푉푐푎푙,푖푛푑 ) (1 + 훿푉표푠푐,푛표푖푠푒 2√2 ×푉푐푎푙,푖푛푑 )
where:
Δy Vertical axis relative deviation
Nind Number of divisions indicated in oscilloscope display
Sosc Sensitivity setting (range) of the oscilloscope
SW Switch repeatability of the oscilloscope
T Transmission factor (loading effect) at calibrator output
Vcal, ind Calibrator output voltage indication
Rcal Calibrator readout factor
Ocal Calibrator offset voltage
Vosc, noise Oscilloscope noise (voltage), referred to the input
Using the above model, calculating the uncertainty budget for calibrating the 500 mV/div range utilizing a 6 division signal coverage:
Symbol
Xi
Estimate
Xi
Relative Standard Uncertainty
W(Xi)
Probability Distribution
Sensitivity Coefficient
|ci|
Relative Uncertainty Contribution
Wi(y)
Δy
0.0033
0.12%
Gaussian
1
0.12%
Nind
6 div
-
rectangular
-
-
Sosc
0.5 V/div
0.021%
rectangular
1
0.021%
SW
1
0.058%
rectangular
1
0.058%
T
1
0.0029%
rectangular
1
0.0029%
Vcal, ind
1.0572 V
0.087%
rectangular
1
0.087%
Rcal
1
0.00058%
rectangular
1
0.0006%
1 + 훿푂푐푎푙 푉푐푎푙,푖푛푑
1
0.012%
rectangular
1
0.012%
1 + 훿푉표푠푐,푛표푖푠푒 2√2 ×푉푐푎푙,푖푛푑
1
0.034%
rectangular
1
0.034%
Δy
1.0033
0.165%
In the above example, the relative uncertainty W(y) of the measurement result (measurand) is calculated using the root sum square (rss) method. Because, in this case, the sensitivity coefficients equal 1, there is no impact on this measurement. The expanded uncertainty, therefore, expressed using a coverage factor of k = 2 (approximately 95%) is 0.33%
12. - 12 -
Acknowledgements
The author wishes to express his appreciation to Mr. Karl-Peter Lallmann at 1A CAL GmbH, for manuscript and technical review, as well as for the photographs used herein.
The Author
David Martson’s personal experience with oscilloscope calibration goes back to the Tektronix 515, the second model of oscilloscope commercially produced by Tektronix, and continues to the modern day. His background in calibration and metrology includes DC-LF and RF/μW disciplines with over 40 years of experience, as well as having more than 20 years experience in laboratory automation. Mr. Martson served on the NCSLi (National Conference of Standards Laboratories, International) 141 Automatic Test and Measurement advisory committee. Mr. Martson has previously authored technical papers relating to calibration, metrology, and calibration automation.