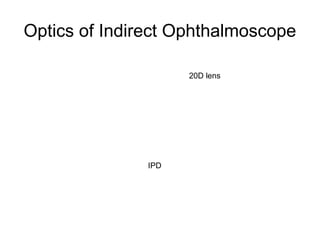
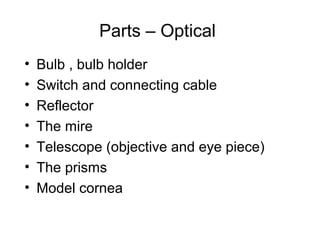
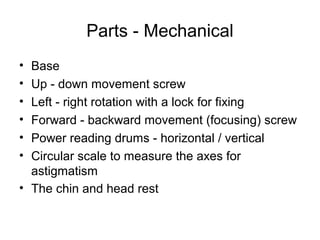
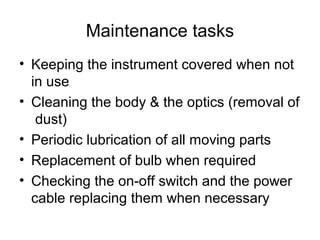
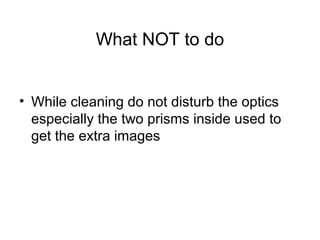
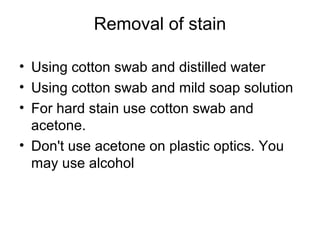
This document provides information about various ophthalmic instruments including their parts, maintenance, troubleshooting, and proper use. It discusses direct ophthalmoscopes, indirect ophthalmoscopes, streak retinoscopes, keratometers, slit lamps, operating microscopes, and electricity as it relates to powering medical devices. Tips are provided for cleaning, replacing parts, checking for proper function, and storing the instruments to maximize their lifespan.
Keratometry is a technique to measure the curvature of the cornea using a keratometer. A keratometer projects illuminated circles called mires onto the cornea which form reflected images. By measuring the size of the reflected images, the radius of curvature of the cornea can be calculated in two principal meridians. Keratometry is used to measure corneal astigmatism and monitor the shape of the cornea for conditions like keratoconus. Automated keratometers have replaced manual keratometers and can measure corneal curvature more quickly and accurately.
The document discusses the history and process of manufacturing glass and lenses. It provides details on:
1) Glassmaking has been traced back to 3500 BC based on the oldest glass beads, though its discovery is unknown. Glass was initially used for jewelry before being made into art objects in 16th century BC.
2) When heated to high temperatures, sand melts and becomes glass through a molecular structure change.
3) Lens manufacturing involves measuring a patient's prescription, selecting frames, grinding lenses to the correct optical power, and fitting lenses into frames through processes like cutting, edging and mounting.
4) Resin and glass are the two main materials used for ophthalmic lenses.
The document discusses Pentacam corneal topography. Some key points:
- Pentacam uses Scheimpflug imaging to obtain images of the anterior segment and measure the shape of the cornea.
- It provides quantitative indices like simulated keratometry and maps of corneal power, elevation, and irregularity to evaluate corneal shape.
- Pentacam is useful for diagnosing conditions like keratoconus by detecting thinning, steepening, and irregularity. It can also evaluate outcomes of procedures like refractive surgery and intraocular surgery.
- Clinical applications include pre-op screening, surgical planning, contact lens fitting, and determining refraction.
A dispensing optician fits eyeglasses and contact lenses according to prescriptions. They receive on-the-job or home study training. Responsibilities include filling prescriptions, assisting customers in selecting frames and lenses, and performing quality checks. Administrative duties involve organizing records, payments, and inventory. Valuable skills include physics, anatomy, math, precision work, and computer/communication abilities. Optometrists at optical shops listen to patients, communicate effectively, obtain consent, show care and compassion, and keep their skills and knowledge up to date.
This document discusses quality control of spectacles. It defines quality as the features and characteristics that satisfy customer needs. Quality control is a management system that coordinates quality development, maintenance, and improvement across design and manufacturing departments. This ensures economical production and customer satisfaction. For spectacles, quality control checks the power, axis, centration, material, tint, prism, lens surfaces and segments, and tests for parallelism using a flat surface. It also checks rimless frame alignment and verifies lens segments in bifocals.
The synoptophore is an instrument used in orthoptics to test binocular vision. It presents different images to each eye to test fusional abilities. The synoptophore was developed in the early 20th century based on the haploscopic principle. It uses mirrors and lenses to direct different images to each eye. Various models have different additional features like afterimage devices, automatic flashing, and measurement of vertical/torsional deviations. A wide range of slides can test functions like stereopsis, fusion, suppression, and retinal correspondence. The synoptophore is useful for both diagnosing binocular vision disorders and providing vergence therapy.
1. This document discusses fitting rigid gas permeable (RGP) contact lenses to toric corneas.
2. It describes various lens designs including spherical, aspheric, toric base curve, and spherical power equivalent lenses.
3. Guidelines are provided for selecting the appropriate lens type based on factors such as the amount of corneal toricity and whether the corneal cylinder matches the spectacle cylinder. Formulas and spreadsheets are also described to calculate the lens power.
This presentation explain about retinoscope, the instrument, its history, its types, the procedure and different cases also the advantages and disadvantages of the instrument and the working lens
Rigid gas permeable (RGP) contact lenses are rigid plastic lenses that transmit oxygen. They have inherent rigidity like PMMA but are semi-soft due to oxygen permeability. RGP lenses provide clearer vision than soft lenses, are more durable, and less expensive. However, they require an adaptation period and have a higher risk of dislodging than soft lenses. Key design features of RGP lenses include the back surface design, thickness, edge configuration, and diameter, which affect lens fit, movement, comfort, and vision. RGP lenses are used to correct astigmatism and presbyopia and for conditions like keratoconus.
The document discusses the process of optical dispensing, including defining optical dispensing, measuring frames and lenses, selecting frames based on facial shapes, lens materials and coatings, and the process of laying off, cutting, and edging lenses to fit into frames. Key steps include determining facial measurements, selecting appropriate frames, measuring pupillary distance, marking lenses, cutting lenses to shape using hand or automatic edgers, and fitting the finished lenses into frames.
The document summarizes the boxing system used for measuring eyeglass frames. The boxing system imagines drawing a box around the lens shape with the sides tangent to the edges. Key measurements include the A measurement (eye size), B measurement (vertical size), geometric center, distance between lenses, distance between centers, effective diameter, seg height/drop, temple length, length to bend, and front to bend. These standardized measurements are used to specify frame sizes and fit lenses.
1) The Jackson Cross Cylinder is an optical device used to objectively refine the measurement of astigmatism during refraction examinations. It consists of two equal but opposite cylinders mounted at right angles to each other.
2) The JCC is used to refine the cylindrical axis by placing it parallel to the trial lens cylinder and flipping it to see if there are changes in visual acuity. The trial lens cylinder is rotated based on the direction of clarity.
3) The JCC is also used to refine the cylindrical power by placing it parallel to the trial lens axis and flipping it. If clarity changes, cylinder power is increased based on the side of clarity.
The Worth Four Dot test is used to assess binocular vision. It presents four lights - red, green, green, white - through red-green glasses. The test checks for suppression or diplopia by asking the patient to report the number, color, and position of lights seen. Abnormal responses can indicate conditions like strabismus, suppression in one eye, or vertical/horizontal diplopia from deviations. The test is inexpensive and easy to perform but relies on subjective patient responses.
The document summarizes a case study of a 20-year-old male patient with left eye vision loss since childhood due to corneal scarring who was fitted for a prosthetic soft contact lens. Details are provided on the patient's history and examination, differential diagnosis, types and fitting criteria of prosthetic contact lenses, fitting of a medium brown type D prosthetic lens, and fitting assessment showing good coverage, centration, and movement. The plan is for the patient to be fitted with a single purecon prosthetic soft contact lens.
Different types and design of spectacle framesPabita Dhungel
This document discusses types of eyeglass frames, including their history, parts, materials, and frame selection considerations. It provides details on the various parts of frames like the front, temples, end-pieces, and bridges. It then examines the various materials used for frames, including metals like gold, aluminum, nickel silver, and plastics like acetate. For each material, the advantages and disadvantages are outlined. The document emphasizes properly selecting and fitting frames according to factors like age, prescription needs, and purposes.
Segment height is a measurement needed when ordering progressive or bifocal glasses online. It refers to the vertical distance from the bottom of the lenses to the pupil. Knowing the segment height ensures the reading portion of progressive lenses is placed correctly. If the current frames are unavailable, measure similar frames owned to get the height and width for fitting purposes. The document then provides steps to accurately measure segment height with a ruler by aligning it with the bottom of the lens while facing a mirror.
The keratometer is an instrument used to measure the curvature of the cornea, which provides information such as the radii of curvature, astigmatism level and direction, and presence of distortions. Keratometry is important for contact lens fitting, monitoring keratoconus, and determining intraocular lens power for cataract surgery. There are two main types - single-position keratometers measure two meridians simultaneously while double-position keratometers measure one meridian at a time. The procedure involves aligning and focusing the instrument before taking radius and astigmatism measurements from the scales.
Special contact lenses include:
Daily-wear lenses are removed nightly and replaced on an individualized schedule. Extended-wear lenses are worn overnight but removed at least weekly for cleaning. Disposable lenses are removed nightly and replaced daily, weekly, biweekly, or monthly.
Colored lenses change eye color appearance and circle lenses make the iris appear bigger, but over-the-counter colored contacts pose health risks. Toric lenses correct astigmatism but sometimes not as well as rigid gas permeable lenses. Bifocal or multifocal lenses correct nearsightedness, farsightedness, astigmatism, and presbyopia but visual quality is often not as good as
The document discusses various factors to consider when selecting eyeglass frames, including facial shape and features. It describes the seven main facial shapes and recommendations for frame styles that complement each shape. Additional details covered include using an existing frame versus a new frame, frame size, weight and color based on facial features, and bridge and temple designs that can shorten, lengthen or narrow the appearance of the nose. Proper fitting of the bridge and pads is also discussed to ensure comfort and support of heavier frames.
The document discusses different measurement systems used for eyeglasses, including the datum system and boxing system. It provides definitions for key optical and frame measurements such as:
- Eye size and lens size refer to the horizontal length of the lens or frame opening.
- Geometric center is the midpoint of the horizontal midline between the lens borders.
- Effective diameter is twice the distance from the geometric center to the lens bevel edge.
- Bridge size is the distance between the two lenses at the narrowest point of the frame.
- Segment height specifies the vertical distance of bifocal or progressive addition lenses.
The document discusses the Jackson Cross Cylinder (JCC) test, which is used during refraction to detect and refine astigmatism. The JCC is a combination of two cylinders of equal strength but opposite signs, placed at right angles to each other. During the test, the JCC is held in different positions before the eye to see if there is a change in visual acuity. If a position is clearer, it indicates the axis of astigmatism. The test is then used to refine the axis and power of any astigmatic correction.
Spherical and cylindrical lenses are the two main types of lenses. Spherical lenses have a constant curvature across all meridians, while cylindrical lenses have varying curvatures between meridians. Common spherical lens forms include plano-concave, plano-convex, and bi-convex. Tilting a lens can induce astigmatism, with the cylinder power equal to the sphere power and axis along the tilt meridian. The spherical equivalent represents the average power of a lens and is determined by combining half the cylinder power with the sphere power.
The document discusses the optics and use of a lensometer. A lensometer is a device used to measure the refractive power of lenses. It works using the Badal principle, where the eye is placed at the focal point of a lens and the image always subtends the same visual angle. There are manual and automated lensometers. A manual lensometer uses a telescope, target, and power drum to measure spherical and cylindrical lens powers by bringing lines of the target into focus. An automated lensometer uses an LCD monitor, lens plate, and memory buttons to electronically measure lens parameters. Correct use requires focusing the eyepiece and centering lenses to determine their optical power.
The document discusses lensometry, which is the process of using a lensometer or lensmeter to measure the optical properties of lenses. A lensometer projects lines that allow optometrists to determine information like the sphere, cylinder, and axis measurements specified in a prescription. It can also verify the accuracy of lenses and detect their type (spherical, astigmatic, prismatic). Lensometers are used to properly fit lenses into frames and ensure prescriptions are correct. The document outlines the history of the lensometer's invention and provides details on its use, parts, manual operation, and the measurements it can obtain for different lens types like bifocals.
This document discusses astigmatic lenses, which have non-uniform curvature across their surface resulting in different focal lengths in different meridians. There are two main types: cylindrical lenses, which have one curved and one plane surface, and toric lenses, which are a spherical lens combined with a cylindrical lens. Cylindrical lenses form a line image rather than a point, while toric lenses exhibit rotational movement when tested. The power of astigmatic lenses is measured and expressed based on the spherical and cylindrical components as well as the axis orientation.
discussion about Aspheric lens, fitting, indication,advantage and Disadvantages with traditional aspheric lens,need of Asphericity,Aspheric Lens Design, identification, troubleshooting
Manufactures and exporters all kinds of Surgical Medical Dental ENT instruments, guys do you need any instruments please feel free to contact us. info@numisma.biz and visit our website; www.numisma.biz and contact us; 92 333 865 9005
This document provides an overview of retinoscopy, including:
- A brief history and the development of different types of retinoscopes.
- The optical principles behind how retinoscopy works to assess refractive error.
- Different techniques for performing retinoscopy, including static, dynamic, and near retinoscopy.
- Factors that can impact the results or make retinoscopy more difficult in some patients.
- Uses of retinoscopy beyond assessing refractive error, such as detecting other ocular issues.
Looking deep into retina : indirect ophthalmoscopy and fundus drawingPrachir Agarwal
Indirect ophthalmoscopy provides a panoramic view of the fundus and is essential for a complete examination. It works by forming an aerial image of the retina between the condensing lens and observer. The power of the condensing lens determines the working distance, magnification, and field of view. Indirect ophthalmoscopy has advantages over direct including an unaffected view by refractive error and better illumination, resolution, and peripheral visualization. Proper technique involves adjusting the device, positioning the patient, and using scleral depression for stereoscopic viewing. Fundus drawings document examination findings and utilize various colors and line styles to depict different retinal structures and pathologies.
International federation of library associations and institutionsZainuddin Ibrahim
IFLA is a leading international body that represents libraries and promotes cooperation between information services worldwide. It aims to provide librarians with forums for sharing ideas and furthering library activities through international programs and standards. Some of IFLA's core programs include Universal Bibliographic Control, which develops international bibliographic standards, and Action for Development through Libraries, which supports libraries in developing countries.
Benefits of professional associations. Invited presentation to the Resume Review and Speakers workshop at Cal State-Fullerton 5 March 2011, sponsored by San Jose State U School of Library and Info Science's LISSTEN and ALASC groups.
This document provides an overview of retinoscopy, including:
- Retinoscopy is an objective technique to determine refractive errors by observing the movement of light reflected from the retina.
- The practitioner modifies the movement of the reflected light with trial lenses to find the point of reversal and determine the refractive error.
- It describes the parts of the retinoscope and how it works, as well as techniques for static and dynamic retinoscopy to evaluate spherical and cylindrical refractive errors.
- The document outlines the procedure for retinoscopy, including controlling accommodation, adding trial lenses to find the point of neutralization or reversal, and determining the final refractive prescription.
Dr. Pushkar Dhir gave a seminar on retinoscopy. He discussed how retinoscopy works by illuminating the retina and observing the light reflex. It can be used to objectively measure refractive error in infants and others who cannot communicate. Both dry and wet retinoscopy were explained. Challenges like an unclear red reflex due to media opacity or high refractive error were addressed. Subjective refinement using techniques like the Jackson Cross Cylinder was also covered. The seminar provided an in-depth overview of the retinoscopy procedure and techniques.
This presentation discusses retinoscopy, which is an objective method of determining refractive error by neutralizing the movement of light reflected from the retina. The history, theory, procedure, and types of retinoscopy are explained. Static retinoscopy finds the far point, while dynamic retinoscopy assesses accommodation. Observations of the retinoscopic reflex indicate refractive errors, and neutralization with lenses determines the prescription. Potential sources of error and techniques to confirm astigmatism are also reviewed.
Lenses of slit lamp biomicroscope & indirect ophthalmoscope.Ayat AbuJazar
This document discusses different lenses used for ophthalmic examination, including Volk double aspheric lenses, Goldmann three mirror lenses, and indirect ophthalmoscope lenses. Volk lenses come in 60D, 78D, and 90D powers and are used for slit lamp biomicroscopy. The 60D provides high magnification of the posterior pole, while the 78D is for general diagnosis and the 90D is for small pupils. Goldmann three mirror lenses provide a 3D view of the anterior chamber and fundus and require a coupling agent. Indirect lenses act as condensing lenses, with higher powered lenses providing less magnification but wider field of view.
The document summarizes key aspects of ophthalmoscopy, including a brief history of its invention by Hermann von Helmholtz in 1850. It describes the basic structure and components of modern ophthalmoscopes, how they are used to examine the retina, and what various normal and pathological retinal findings appear as during an exam. Key structures that can be visualized include the optic disc, arteries and veins, macula, as well as conditions like diabetes, vascular occlusions, retinal detachments, and more.
A keratometer is an instrument that measures the curvature of the cornea to detect and quantify astigmatism. It provides measurements of the flattest and steepest meridians of the cornea in diopters. Manual keratometry is preferred for certain patients and when performing toric IOL calculations, while corneal topography can provide additional information about the anterior corneal surface. Proper use and calibration of the keratometer is important for obtaining accurate measurements.
The document discusses the slit-lamp biomicroscope, which is used to examine the eye. It has three main components: the mechanical system to position the patient and microscope, the illumination system to provide a focused beam of light, and the observation system consisting of compound microscopes. Different illumination techniques such as direct, indirect, and focal illumination are used to examine different parts of the eye at various magnifications. The slit-lamp allows close examination of structures like the cornea, anterior chamber, and lens.
1. The document describes the technique of direct ophthalmoscopy, providing details on its history, modern instrumentation, use, and what can be observed through examination of the retina.
2. Key aspects covered include how the examiner is able to view the retina by aligning their eye with the light source entering the patient's eye, and modern ophthalmoscopes using mirrors to reflect light at a 90 degree angle.
3. The summary also notes what can be seen through direct ophthalmoscopy like the optic disc, macula, blood vessels, and various pathological features.
This document provides instructions for performing a direct ophthalmoscopy exam, including: examining the red reflex and funduscopic view of the optic disc, vessels, macula and any pathology; using lenses and filters to better visualize structures; documenting findings; and ensuring patient comfort and consent throughout the process. Key steps involve darkening the room, inserting dilating eye drops if needed, positioning the patient, and systematically examining both eyes with an ophthalmoscope to evaluate internal eye structures and diagnose any abnormalities.
This document discusses different types of flaps used in plastic surgery for tissue reconstruction. It begins by explaining that flaps are vascularized tissue transferred from one part of the body to another to reconstruct areas of tissue loss. The document then categorizes flaps based on their components, configuration, congruity, circulation, and conditioning. It provides examples of various local, regional, pedicled, and free flaps. Key advantages and disadvantages of different flap types are highlighted. Monitoring techniques and potential complications of flap surgery are also summarized.
This document discusses the history and optics of the retinoscope, an instrument used in eye examinations to objectively determine a patient's refractive error. It describes how early models used spots or streaks of light and how modern streak retinoscopes work. The retinoscopist can control the orientation and vergence of the emitted light streak and uses this to evaluate the patient's refractive state based on the appearance of the light reflected from their retina. Neutralization retinoscopy involves keeping the retinoscope at a fixed distance while changing the light vergence to determine the refractive error that produces a neutralized reflex from the patient's eye.
Primary eye care Doctor of Optometry Care Of Ophthalmic InstrumentsSahibzada Anjum Nadeem
The document provides information about the maintenance and use of various ophthalmic instruments. It discusses direct ophthalmoscopes, indirect ophthalmoscopes, streak retinoscopes, keratometers, and slit lamps. For each instrument, it describes the parts, common problems encountered, and maintenance tasks to keep the instruments functioning properly. Proper cleaning and care of optics, electrical components, batteries, and mechanical parts is emphasized.
The document discusses different types of microscopes. It begins by defining a microscope as an optical instrument used to magnify small objects. It then describes the key parts and uses of compound light microscopes, which use multiple lenses to magnify specimens and have various objectives that provide different levels of magnification. The document also briefly mentions stereomicroscopes, which use two eyepieces to provide a three-dimensional view of larger specimens, and electron microscopes, which can achieve much higher magnifications than light microscopes.
The document discusses different types of lensesometers used to measure the refractive power of lenses. It describes manual lensesometers, which provide accurate power measurements but require skill to use, especially for toric lenses. Automated lensesometers are easier to use and can print prescriptions, but are less accurate than manual models. The document outlines the steps to measure spherical and cylindrical lenses using a manual lensesometer, including focusing the eyepiece, centering the target, and rotating drums to sharpen meridians. Lens power is recorded based on the orientation of central dots or lines in the target.
The document provides guidance on basic care and maintenance of ophthalmic equipment. It emphasizes that equipment should be treated carefully to prevent damage and extend lifespan. Regular cleaning and inspection of parts like bulbs, fuses, cords and batteries is important. Optical surfaces must be protected from dust and scratches during cleaning. Maintaining supplies of spare parts and having policies for equipment planning and management can help reduce downtime. Proper storage and use of dehumidifiers can also help prevent fungus growth on optical surfaces.
The document describes the main parts and functions of a compound microscope. It details the mechanical, illuminating, and magnifying parts. The mechanical parts include the base, pillar, and stage, and are used to support and adjust the microscope. The illuminating parts provide light, and include the mirror, lamp, and condenser. The magnifying parts magnify the specimen and include the objectives and ocular lenses. It provides instructions on using a compound microscope, including focusing, adjusting the diaphragm and objectives, and carrying the microscope properly. Mounting specimens on slides and staining are also summarized.
A compound microscope contains mechanical, illuminating, and magnifying parts. The mechanical parts support and adjust the microscope. Illuminating parts like the mirror, lamp, and condenser provide and direct light to the specimen. Magnifying parts like the objectives and ocular further enlarge the specimen's image. Users must carry the microscope carefully, start with low power objectives, focus using coarse and fine knobs appropriately, and adjust the diaphragm and light for optimal viewing. Staining can enhance structures in specimens.
The document describes the main parts and functions of a compound microscope. It discusses the mechanical, illuminating, and magnifying parts. The mechanical parts include the base, pillar, arm, stage, and adjustment knobs. The illuminating parts provide light, such as the mirror, lamp, condenser, and iris diaphragm. The magnifying parts magnify the specimen and include the objectives, ocular, and body tube. It also provides instructions for using a compound microscope, including focusing, adjusting the light, and mounting slides.
The document describes the main parts and functions of a compound microscope. It discusses the mechanical, illuminating, and magnifying parts. The mechanical parts include the base, pillar, arm, stage, and others used to support and adjust the microscope. The illuminating parts provide light, such as the mirror, lamp, condenser, and iris diaphragm. The magnifying parts magnify the specimen and include the objectives, ocular, and how they work together. It also provides instructions on using the microscope, focusing, adjusting the light, and mounting slides.
This document provides information about three-way and four-way switches:
- It defines single pole, single throw (SPST), single pole double throw (SPDT), double pole single throw (DPST), and double pole double throw (DPDT) switches.
- It explains that three-way switches have three terminals and are used to control lights from two locations, while four-way switches have four terminals and control lights from more than two locations.
- The document demonstrates how a circuit works using two three-way switches and one four-way switch to control a light from multiple locations.
SYNAPTOPHORE
Also known as major amblyoscope
It is haploscopic device based on mechanical dissociation of the two eyes , by the means of two optical tubes
Strength of the lenses with eyepiece +6.50D
OPTICS OF SYNAPTOPHORE
Consist of :
Light source
Slide of focal length of lens
Plane mirror
+6.50D eyepiece
SLIDES
Range of slides
Size of picture on the slides subtends , visual angles of different degrees at nodal point .
Simultaneous macular perception (SMPp slides
Fusion slides
Stereopsis slides
After image slides
Haidinger brushes
Detailed instumentaion and use of manual Lensometer and just a outline of automated lensometer.
I have used the picture of manual lensometer with out the parts describtion because i have explained orally by showing the picture..
Hope u all like it and may help you in learning better. :)
A lensmeter is an instrument used to measure the optical power of lenses. It works by projecting illuminated lines through a test lens and measuring the lens's back focal length. There are manual and automatic lensmeters. A manual lensmeter consists of an illuminated target, fixed lens, telescope, and adjustable eyepiece. To measure a lens, the user adjusts the eyepiece for clear focus, centers the lens, and turns the power drum until the projected lines come into focus, reading the lens power. Spherical lenses focus both single and triple lines at the same power. Cylindrical lenses require adjusting both the power and axis drums to bring each line type into focus separately.
The "Exploring the Versatility of Slit Lamp Examination: A Comprehensive Guide" PowerPoint presentation is designed to provide a thorough understanding of slit lamp examination in ophthalmology. This educational resource aims to equip healthcare professionals, ophthalmologists, optometrists, and medical students with the knowledge and skills necessary to perform accurate and detailed assessments using the slit lamp.
The presentation begins with an introduction to the slit lamp, highlighting its essential components and its significance in ophthalmic practice. Participants will gain a clear understanding of the microscope and illumination system integrated into the slit lamp, enabling them to appreciate the versatility and wide range of applications this instrument offers.
The indications for slit lamp examination will be discussed in detail, emphasizing its role in diagnosing and monitoring various ocular conditions, as well as its utility in preoperative assessments for cataract surgery and other procedures. Participants will also learn about the step-by-step technique of performing a slit lamp examination, including proper patient positioning and adjustments, and the effective use of chin rests, forehead rests, and oculars for optimal visualization.
An in-depth exploration of various illumination techniques used during slit lamp examination will be presented, such as direct illumination, diffuse illumination, retroillumination, and specular reflection. Participants will gain proficiency in applying these techniques to evaluate the anterior segment of the eye, including the conjunctiva, cornea, iris, and lens. They will also learn how to identify and assess abnormalities through the examination of the posterior segment, including the vitreous, retina, and optic nerve.
The presentation will highlight the integration of additional diagnostic tools with slit lamp examination, such as fluorescein staining for corneal integrity assessment, gonioscopy for angle structure evaluation, and anterior segment photography for documentation purposes. Real-life case examples and clinical photographs will be utilized to illustrate common findings observed during slit lamp examination, helping participants enhance their diagnostic skills and understand the significance of each finding.
The limitations and challenges associated with slit lamp examination will also be discussed, including factors that may affect image quality and interpretation. Strategies for managing patient discomfort and maximizing cooperation will be addressed.
In conclusion, this comprehensive guide on slit lamp examination will empower healthcare professionals with the necessary knowledge and techniques to perform accurate assessments and diagnose a wide range of ocular conditions. Attendees will leave with a deep understanding of the slit lamp's versatility and its invaluable role in comprehensive eye care.
The document describes the main parts and functions of a compound microscope, including mechanical parts like the base and stage that support the microscope, magnifying parts like the objectives and ocular that enlarge specimens, and illuminating parts like the mirror and condenser that provide light. It also explains how to properly use a compound microscope, such as carrying and focusing it, as well as techniques for preparing slides including mounting, staining, and examining specimens.
The document describes the main parts of a microscope and their functions. It explains that a microscope uses lenses to magnify small objects. The main parts include the arm, base, eyepiece, body tube, revolving nosepiece, stage, objective lenses, fine and coarse adjustment knobs, slide holder, diaphragm, light source, and on/off switch. It also provides instructions for properly focusing a microscope and handling/storing the device.
The document describes the components and uses of a trial box, which is a set of lenses, frames, and accessories used to test vision. It contains trial frames that hold spherical, cylindrical, and prismatic lenses in various diopters for refraction testing. Accessories include occluders, filters, Maddox rods, and near charts for additional exams. The trial box is an essential tool for optometrists to objectively and subjectively refract patients and diagnose vision disorders.
The document describes the components and uses of a trial box, which is a set of lenses, frames, and accessories used to test vision. It contains trial frames that hold spherical, cylindrical, and prismatic lenses in various diopters for refraction testing. Accessories include occluders, filters, charts, and tools like Maddox rods and cross cylinders. The trial box is used for objective and subjective refraction, diagnosing conditions like squint, and assessing binocular vision.
The slit lamp is an instrument used to examine the eye and adnexa. It consists of a binocular microscope combined with a light source that provides illumination in the form of an adjustable narrow slit. This allows for stereoscopic examination of the external eye structures at high magnification. The slit lamp utilizes various optical configurations and illumination techniques to evaluate the different layers and structures of the anterior segment of the eye. It is an essential tool in ophthalmic examination and diagnosis.
The document discusses the slit lamp biomicroscope, which is an important tool used to examine the anterior segment of the eye. It works on the same principle as a compound microscope, with an objective lens facing the patient and an eyepiece facing the examiner. There are different types of slit lamps produced by Zeiss and Haag Streit. Examination involves properly positioning the patient and adjusting the instrument, then using various illumination methods like diffuse, direct, and retro illumination to view the different structures of the anterior eye segment. The slit lamp is used for both diagnostic evaluation of ocular diseases and performing procedures.
Similar to Ophthalmic instruments care and maintenance (20)
1. Ophthalmic Instruments
an introduction including some
tips for care and maintenance
Prof. V. Srinivasan M.A.,M.S. (Oregon USA)
Consultant, Instruments lab,
Aravind Eye Hospital. Madurai,
India
3. Parts
• Handle
• Cells / Battery (use and throw,
rechargeable) / power supply
• On-off switch and brightness control
• Head
• Bulb
• Aperture, filter systems
• Lenses, reflectors, windows, shutter
• Disc lens + extra lenses
• Screws, springs, steel balls
• Shutter, pouch / box
4. Problem – No light or dim light – Level I
• Battery / cells not placed properly or rundown
- check their position, their voltage, recharge or
replace them (all cells)
• Power supply problems
- check input and output voltages, the switch,
connecting wires and the circuit and rectify
faults noticed
• Bulb fused or darkened - check and replace
• On off switch and brightness control not
functioning - check and clean rheostat & switch
• Head not mounted properly on the handle
- check and fix properly
5. Problem - No Light or dim light -
Level II – little more involved
• Reflector dislocated
• Window shutter stuck up
• Disc lens, aperture / filter system broken
or stuck up
• Lenses broken or dislocated
• Too much dust (particles of smoke) or
moisture inside the head
The remedy for all these is to open the head
clean and fix or replace the parts
6. Extra information for technicians
• The blue (red free) filter is used to cut out the red glare
of the retina
• Polarizing filter is used to cut out reflection from
cornea
• Small aperture is used for undialated (small) pupil
• Regular aperture is used otherwise
• Slit aperture is a used as in slit lamp
• The special aperture with concentric circles and the
plus sign is used to detect any bulge projection on the
surface of retina
• If the tiny steel balls in the instrument are lost one can
replace them with a steel balls used in the bearings of
bicycle
• Small springs can be wound using thin wires
7. Hints to be passed on to users
• Keep the instrument in the box / pouch when not in
use to avoid collection of dust on the instrument
• Make sure the on-off switch is fully turned off ( a
click sound will be heard) before placing the
instrument in the box / pouch.
• Recharge rechargeable cells at the end of each day
after work
• When the instruments is not likely to be used for a
few days remove the battery / cells keep them out of
the handle to avoid leakage
• Avoid smoking. Smoker’s breath carries fine smoke
particles into the instrument that reduce illumination
8. Bulb
Condensing lens
Image forming lens
Slit, filters apertures
Reflector
Optics of direct ophthalmoscope
• The bulb is filament type halogen bulb that gives more
light
• The reflector is a front silvered mirror (fully reflecting), or
a total reflecting prism except and in Welch Allyn
Ophthalmoscopes in which it is a partially reflecting
mirror
Total reflecting prism
9. Indirect Ophthalmoscope
A diagnostic instrument used to look at
the retina in the eye
Also used as therapeutic instrument to
deliver laser pulses at required spots in
the retina
10. Comparison
Indirect
• Binocular
• Stereoscopic (Three
dimensional image)
• Magnification is less (3X
with a 20 D lens)
• Field of view is more and
can be increased by using a
depressor
• Observer remains at a
distance from the patient
• Darkening of the room
required
• Inverted image
Direct
• Monocular
• Flat image ( Two
dimensional image)
• Magnification is more 15X
• Field of view is less
• Observer has to be close to
the patient
• Can be used in day light
• Erect image
11. Parts
• Head band / spectacle mounted
• Power supply, battery box, cable, switch
• Illumination system – bulb, lenses,
reflecting mirror, filters, apertures
• Viewing system – lenses, reflecting
prisms or front silvered mirrors, screws
• Teaching mirror
• 20D / 30 D lens
• Depressor
12. Problems – No light
• Check on-off switch - rectify defects if any
• Check power supply voltage (input /
output) and rectify defects if any
• Check battery pack voltage - recharge if
necessary
• Check connecting wires for continuity or
short circuit - replace if necessary
• Check the fuse - if blown out replace
• Check the bulb - if fused or blackened
replace
13. Other problems and tasks
• Spot of light not in focus – lenses, filters,
reflector, aperture in the illumination system
disturbed - check and rectify
• Diplopia (Double image) – mirrors / prisms and
lenses in the viewing system disturbed. – check
and align them properly looking at an object at
a distance of a meter
• Head band problems – cleanliness, padding,
fitting screws and connecting wire should all be
checked cleaned often and defects removed
• Keep the 20D lens clean
15. Streak Retinoscope
Along with the lenses in a trial set
it is used in objective refraction for
the measurement of spectacle
power and for fixing the axis of
astigmatism if present
16. Parts
• Handle
• Cells / Battery (use and throw,
rechargeable / power supply)
• On-off switch and illumination control
• Head
• Bulb
• Beam width adjustment
• Beam orientation adjustment
• Lenses, reflector and window
17. Problem – no light
• Battery / cells not properly placed or run down
- check and replace battery / cells
• Power supply problems - check input output
voltages, switch & connecting wires and the
circuit
• Bulb fused or darkened - check and replace
• Head not mounted properly on the handle
- check and fix properly
• Lenses disturbed - check and correct
• Reflector disturbed - check and correct
18. Other Problems
• Light flickering - loose electrical contact at
the bulb holder and illumination control -
check and clean
• Beam width adjustment problem - check,
clean and gently lubricate shaft movement
in the head
• Beam orientation adjustment problem -
check, clean and lubricate the turning
knob
• Dust on reflector, window - clean
19. Additional Information
• Keep the retinoscope in the box when not in use
• While turning it off turn the switch all the way till a
click sound is heard
• If the retinoscope is not likely to be used for a
few days keep the battery / cells outside. This will
avoid leakage of battery / cells
• The handle of streak retinoscope and direct
ophthalmoscope are the same. Some
manufacturers supply the two heads with a single
handle for economy and convenience in carrying
them in a single box
• The bulbs of direct ophthalmoscope and streak
retinoscope are not the same. Retinoscope bulbs
have a straight filament.
20. Keratometer
Used in measurement of the corneal
power required in the calculation of IOL
power in cataract surgery
&
Used in contact lens fitting
21. Parts – Optical
• Bulb , bulb holder
• Switch and connecting cable
• Reflector
• The mire
• Telescope (objective and eye piece)
• The prisms
• Model cornea
22. Parts - Mechanical
• Base
• Up - down movement screw
• Left - right rotation with a lock for fixing
• Forward - backward movement (focusing) screw
• Power reading drums - horizontal / vertical
• Circular scale to measure the axes for
astigmatism
• The chin and head rest
23. Maintenance tasks
• Keeping the instrument covered when not
in use
• Cleaning the body & the optics (removal of
dust)
• Periodic lubrication of all moving parts
• Replacement of bulb when required
• Checking the on-off switch and the power
cable replacing them when necessary
24. Calibration check
• Check the calibration every day before
using the instrument using the model
cornea. If the calibration is disturbed
correct it immediately
• Correct power of IOL to be used in a
cataract surgery depends on the power of
the cornea. Correct Keratometer readings
are very important
25. What NOT to do
• While cleaning do not disturb the optics
especially the two prisms inside used to
get the extra images
26. Slit Lamp
An instrument used to examine all parts
of the eye
Also used to deliver laser pulses into the
eye for treatment
Convenient instrument for
photographing different parts of the eye
27. Types
• Bulb located at the top
– tilting type
– Uses a front silvered
mirror to reflect light
in the direction of
the patient
• Bulb located at the
bottom – fixed type
– Uses a total
reflecting prism to
reflect light in the
direction of the
patient
• Inclined optics
– consists of two
objectives looking at
an angle.
Magnification
change achieved
by changing the
objective
• Parallel optics
– Single objective lets
two beams of light
into the instrument
at an angle. Has 3
or 5 step
magnification using
Galilean set-up
28. Parts
• Illumination system
– Bulb, condensing lens, slit, slit width adjustment, slit height
adjustment, slit orientation adjustment, filters, power supply
illumination control and power card
• Magnification system
– Stereo compound microscope. With a prism arrangement
that lets adjustment of eye pieces separation to suit the IPD
of the observer. The final image is erect without left right
inversion
• Mechanical system
– Table movement up / down (manual / electrical)
– Joystick movement up / down, forward / backward, left /
right
– Chin and head rest movement up / down
– Illumination system tilting arrangement / slit adjustments
(width, height and orientation with respect to the vertical)
29. Maintenance tasks
• Keep the instrument covered when not in
use
• Replace bulb when necessary
• Remove of dust and stain
• Lubricate and check all mechanical
movements periodically
• Check electrical parts
30. Trouble shooting
• No light
– Check power at the socket, check the switch, check
whether the slit is open, check bulb, check slit width /
height / orientation adjustments (they may be stuck
up) rectify the defect noticed
• Diplopia – double image
– Eye pieces disturbed – check and restore it to proper
position
• Hard movement
– Clean relevant parts and lubricate gently
– The spherical surface in the joy stick set
up may be worn out. Replace it
31. Suggested maintenance schedule
• Optics cleaning as and when found
necessary – at least once a week
• Stripping, cleaning and assembling of
illumination system – once in three
months
• Stripping, cleaning and assembling of
mechanical systems once in a year
• If the location is in a monsoon area a
thorough cleaning is very important soon
after the monsoon is over
32. Other instruments used with Slit
Lamp
• 78D / 90D lens to look at the fundus
• Gonio lens to look at the angle of the eye
• Applanation tonometer to measure the
IOP
• Micromanipulator to used to deliver the
laser beam at required spots
• Camera
34. Parts
• Objective lens
• Eye pieces
• Magnification changer mechanical 5 step
arrangement or motorized (zoom) system
• Illumination system – bulb, fiber optic cable, the
axial illumination arrangement power unit, cooling
fan
• Attachments – Beam splitter, assistant scope,
recording systems (camera / video)
• The vertical stand, rotating arm, the base wheels
and locking arrangement (Ceiling mounted and
table mounted microscopes are also in use)
35. Maintenance tasks
• Keep the optics covered when the instrument is not in use
• Clean optics (external surfaces) every day after use
• Do not open the microscope head or eye pieces assembly.
They are usually airtight. Open and clean only if any dust or
foreign body is noticed inside
• A full cleaning of all optical parts may be needed in monsoon
areas soon after monsoon to avoid the growth of fungus. In
such regions keep silica gel pockets in the vicinity of the optics
to keep the region dry this will prevent fungus growth. Also
keep the region around the microscope warm with an electric
bulb hanging just above the microscope this will also help to
reduce fungus formation
• Remove the microscope out of the OT when the OT is washed
or cleaned and keep it outside till the OT is dry
• Check the wheels and lubricate it for easy movement, check
the locking system, repair it if it is not working
• Check the electrical parts. At the commencement all the bulbs
should be in good condition
• Check that the optic fiber is not bent sharply nor twisted tight
36. Some tips for the users
• Remove all extra attachments, beam splitters,
recording systems, assistant scopes when not in use.
They tend to reduce the brightness of the final image
• Greater magnification implies lesser brightness of the
image and lesser field of view
• Longer working distance also reduces the field of view
• Keep the brightness low unless it is needed this will
ensure a longer life for the bulb
• Avoid movement of the microscope when the bulb is
on
• Microscope head can be moved up or down during the
surgery with the help of foot switch control. When such
movement is necessary at the start of the surgery
position the microscope such that there is enough
movement. It is always better to test this in advance
38. What is it and what are the uses?
It is energy – readily available and very clean
Uses:
1. to get light – bulb, fluorescent tube light, discharge lamps, the LED (light
emitting diodes)
2. to get heat – ovens, sterilizers, soldering rod
3. to get chillness – refrigerator, air conditioners, freezers
4. to achieve movement – electric motors, fan, water pump, mixies, grinders,
locomotives
5. in communication and entertainment – telephone, radar, audio, radio, TV,
video ans some musical instruments, toys
6. in electronic instruments – computers, instruments used in health care
Diagnostic instruments : X-ray machine, CT, NMR and other scan
machines, ECG, ERG and similar recording devices
Therapeutic instruments: Electro surgical instruments, phaco machine used
in eye care
7. in electroplating
8. to get powerful electromagnet
9. and so on and on……
39. Some terms used in electricity
• Volt – a measure of the strength of electricity
• Ampere (current) – a measure of flow of
electricity
• Watt (power) – product of volt and ampere
– 1000 watt bulb glowing under 200 volt will require
take 4 ampere of current
• KWH (kilo watt hour, also known as the unit) –
is a measure of electrical energy consumed
– A 1000 watt bulb glowing for an hour consumes a
unit of electrical energy
40. AC / DC
• Electricity is available as DC (current flowing in one
direction only) or AC (with the direction of flow
alternating). The frequency of alternation is 50Hz in
most countries and 60Hz in some countries in
American continent
• With AC, voltage can be stepped up or down easily
using a transformer. This property is very useful in
transport of electricity with minimum loss in
transmission. Higher the voltage lower is the current
for the same amount of energy and hence lower the
heat loss in transmission
• Almost all electronic instruments require DC. The first
unit in any electronic instrument is a power unit that
converts (rectifies) AC into DC
41. Caution
• The mains voltage is 220 V in most countries. However it is 110V in certain
countries in the American Continent. An instrument designed for 110V if
connected to a 220V supply will ‘burn off’. Suitable voltage transformer is
required
• Some instruments have a facility for choosing the voltage. Set the correct
voltage before using the machine. This may require change in the protective
fuse. A 110V instrument that has a 200 mA fuse will be equally safe only
with a 100 mA fuse while working on 220V.
• These days instrument that work on a range of voltages 110 to 220 are
available. Such instruments however are not protected against accidental
higher voltages like 240 that one may get in some locations. It is safer to use
such instruments with a 220-110 step down voltage transformer than to
expect a steady voltage of 220V all the time.
• Instruments that use the frequency of AC in any aspect of its function like
the TV working in America, the NTS system working on 60 Hz will not work
in other countries that have the PAL system working on 50 Hz
• Some instruments that have electric motors and designed for use with 60Hz
may work in 50 Hz but the motor may get heated more
• The voltage and frequency ratings on instruments are always indicated on
the instrument. They must be noted before use.
42. Problems
• Power cut – solved using stand by
generator, inverter, UPS
• Voltage fluctuation – solved using voltage
regulator, stabilizers (relay or servo)
• Surge – sudden increase in voltage due to
natural (lightning) or man made causes –
solved using surge protector
43. Safety factors
• Insulation – of the cable and of all electrical
accessories (switches, plugs sockets etc.) is
important. Insulation tape is only a temporary
solution
• Ground (earth) connection ensures protection
when there is any leakage of electricity in the
instrument or in the building. Ground connection
should be used where ever provided. Periodic
inspection of the grounding (earthing) installation
of the building is necessary
• Fuse / Cutout – these are safety devices used in
the building and in individual instrument to
protect against high current (consequent over
heating and fire) that may arise due to some
accident or overloading of the instrument. The
fuse rating should be strictly adhered to.
44. Some tips
• Always wear foot ware while working on
electrical instruments / installations
• Keep the working area dry. Moist surfaces
provide easy flow (leakage) of electricity
• Don’t take any risk with electricity
• Check the instrument / installation using a line
tester or a multimeter and ensure there is no
voltage before you start working
• Even in instrument that are turned off
components like capacitors may retain electricity
and can cause harm
• Remember electricity can do lot of work for us
(like a good servant) but if you make a mistake it
will punish you (like a bad master) even if it is
your first mistake
45. Optics Cleaning
• Clean optics is needed for good vision.
• Optics get dirty due to dust and stain
46. Removal of dust
• By blowing air
• Using soft brush
• Using cotton swab and mild soap solution
47. Removal of stain
• Using cotton swab and distilled water
• Using cotton swab and mild soap solution
• For hard stain use cotton swab and
acetone.
• Don't use acetone on plastic optics. You
may use alcohol