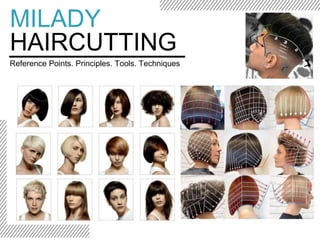
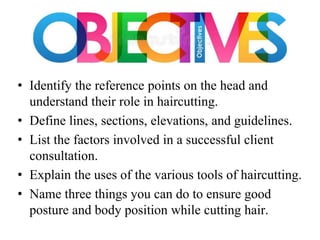
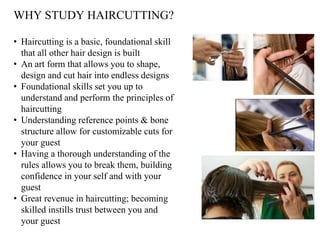
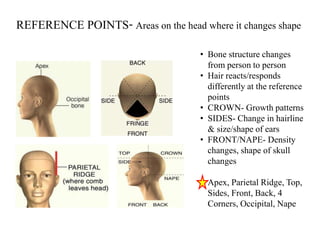
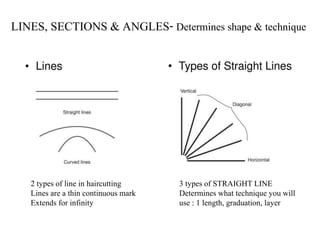
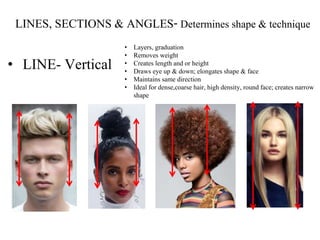
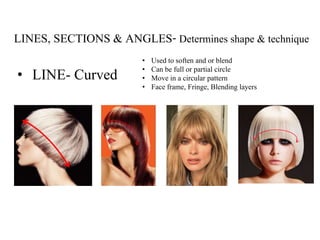
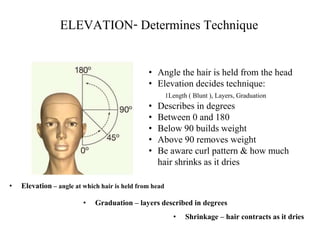
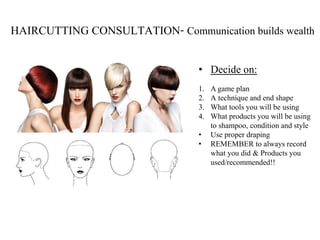
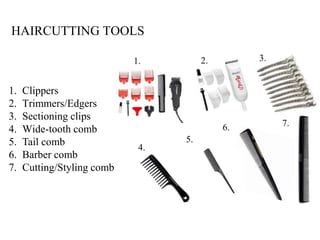
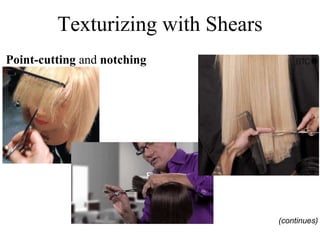
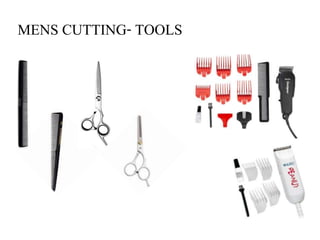
This document provides an overview of haircutting techniques and tools. It begins by identifying key reference points on the head and defining lines, sections, and angles used in haircutting. It then explains the importance of client consultation and lists various haircutting tools. The document outlines three basic haircutting techniques - one length, graduation, and layering cuts. It provides examples of different texturizing techniques and safety tips for haircutting. Overall, the document serves as a guide for the foundational skills, principles, and techniques of haircutting.
Image Management : Clothes as per Body Shapes, Accessories, Communication, Gr...Mihir Jhaveri (26,000+)
Image Management : Clothes as per Body Shapes, Accessories, Communication, Grooming, Makeup tips, Host a Party, Body Types, Indian context, www.mihirjhaveri.com
Brush your hair in the course that it develops so that the hairs are at their greatest tallness and confronting in the same bearing and you may also utilize beard oil. At that point choose how you need your whiskers to look when you're done trimming. For more information visit: http://www.wazzidaproducts.com/
LESSON OBJECTIVES:
After completing this lesson, the student will be able to:
1. Execute finger waving, pin curling, roller setting, and hair
wrapping.
Synthetic Fiber Construction in lab .pptxPavel ( NSTU)
Synthetic fiber production is a fascinating and complex field that blends chemistry, engineering, and environmental science. By understanding these aspects, students can gain a comprehensive view of synthetic fiber production, its impact on society and the environment, and the potential for future innovations. Synthetic fibers play a crucial role in modern society, impacting various aspects of daily life, industry, and the environment. ynthetic fibers are integral to modern life, offering a range of benefits from cost-effectiveness and versatility to innovative applications and performance characteristics. While they pose environmental challenges, ongoing research and development aim to create more sustainable and eco-friendly alternatives. Understanding the importance of synthetic fibers helps in appreciating their role in the economy, industry, and daily life, while also emphasizing the need for sustainable practices and innovation.
This is a presentation by Dada Robert in a Your Skill Boost masterclass organised by the Excellence Foundation for South Sudan (EFSS) on Saturday, the 25th and Sunday, the 26th of May 2024.
He discussed the concept of quality improvement, emphasizing its applicability to various aspects of life, including personal, project, and program improvements. He defined quality as doing the right thing at the right time in the right way to achieve the best possible results and discussed the concept of the "gap" between what we know and what we do, and how this gap represents the areas we need to improve. He explained the scientific approach to quality improvement, which involves systematic performance analysis, testing and learning, and implementing change ideas. He also highlighted the importance of client focus and a team approach to quality improvement.
Unit 8 - Information and Communication Technology (Paper I).pdfThiyagu K
This slides describes the basic concepts of ICT, basics of Email, Emerging Technology and Digital Initiatives in Education. This presentations aligns with the UGC Paper I syllabus.
Ethnobotany and Ethnopharmacology:
Ethnobotany in herbal drug evaluation,
Impact of Ethnobotany in traditional medicine,
New development in herbals,
Bio-prospecting tools for drug discovery,
Role of Ethnopharmacology in drug evaluation,
Reverse Pharmacology.
How to Create Map Views in the Odoo 17 ERPCeline George
The map views are useful for providing a geographical representation of data. They allow users to visualize and analyze the data in a more intuitive manner.
We all have good and bad thoughts from time to time and situation to situation. We are bombarded daily with spiraling thoughts(both negative and positive) creating all-consuming feel , making us difficult to manage with associated suffering. Good thoughts are like our Mob Signal (Positive thought) amidst noise(negative thought) in the atmosphere. Negative thoughts like noise outweigh positive thoughts. These thoughts often create unwanted confusion, trouble, stress and frustration in our mind as well as chaos in our physical world. Negative thoughts are also known as “distorted thinking”.
Read| The latest issue of The Challenger is here! We are thrilled to announce that our school paper has qualified for the NATIONAL SCHOOLS PRESS CONFERENCE (NSPC) 2024. Thank you for your unwavering support and trust. Dive into the stories that made us stand out!
Instructions for Submissions thorugh G- Classroom.pptxJheel Barad
This presentation provides a briefing on how to upload submissions and documents in Google Classroom. It was prepared as part of an orientation for new Sainik School in-service teacher trainees. As a training officer, my goal is to ensure that you are comfortable and proficient with this essential tool for managing assignments and fostering student engagement.
Operation “Blue Star” is the only event in the history of Independent India where the state went into war with its own people. Even after about 40 years it is not clear if it was culmination of states anger over people of the region, a political game of power or start of dictatorial chapter in the democratic setup.
The people of Punjab felt alienated from main stream due to denial of their just demands during a long democratic struggle since independence. As it happen all over the word, it led to militant struggle with great loss of lives of military, police and civilian personnel. Killing of Indira Gandhi and massacre of innocent Sikhs in Delhi and other India cities was also associated with this movement.
Students, digital devices and success - Andreas Schleicher - 27 May 2024..pptxEduSkills OECD
Andreas Schleicher presents at the OECD webinar ‘Digital devices in schools: detrimental distraction or secret to success?’ on 27 May 2024. The presentation was based on findings from PISA 2022 results and the webinar helped launch the PISA in Focus ‘Managing screen time: How to protect and equip students against distraction’ https://www.oecd-ilibrary.org/education/managing-screen-time_7c225af4-en and the OECD Education Policy Perspective ‘Students, digital devices and success’ can be found here - https://oe.cd/il/5yV
2. OBJECTIVES
• Identify the reference points on the head and
understand their role in haircutting.
• Define lines, sections, elevations, and guidelines.
• List the factors involved in a successful client
consultation.
• Explain the uses of the various tools of haircutting.
• Name three things you can do to ensure good
posture and body position while cutting hair.
3. • Perform the four basic haircuts.
• List the multiple ways to section and cut the bang
(fringe) area.
• Discuss and explain three different texturizing
techniques performed with shears.
• Explain a clipper cut.
• Identify the uses of a trimmer.
4.
5. • Haircutting is a basic, foundational skill
that all other hair design is built
• An art form that allows you to shape,
design and cut hair into endless designs
• Foundational skills set you up to
understand and perform the principles of
haircutting
• Understanding reference points & bone
structure allow for customizable cuts for
your guest
• Having a thorough understanding of the
rules allows you to break them, building
confidence in your self and with your
guest
• Great revenue in haircutting; becoming
skilled instills trust between you and
your guest
WHY STUDY HAIRCUTTING?
6. REFERENCE POINTS- Areas on the head where it changes shape
• Bone structure changes
from person to person
• Hair reacts/responds
differently at the reference
points
• CROWN- Growth patterns
• SIDES- Change in hairline
& size/shape of ears
• FRONT/NAPE- Density
changes, shape of skull
changes
• Apex, Parietal Ridge, Top,
Sides, Front, Back, 4
Corners, Occipital, Nape
7. LINES, SECTIONS & ANGLES- Determines shape & technique
2 types of line in haircutting
Lines are a thin continuous mark
Extends for infinity
3 types of STRAIGHT LINE
Determines what technique you will
use : 1 length, graduation, layer
8. • LINE- Horizontal
• 1 Length, 0 degrees, Blunt cut
• Creates width
• Creates weight line
• Draws eye side to side
• Maintains same direction
• Ideal for fine hair & or low density
LINES, SECTIONS & ANGLES- Determines shape & technique
9. • LINE- Vertical
• Layers, graduation
• Removes weight
• Creates length and or height
• Draws eye up & down; elongates shape & face
• Maintains same direction
• Ideal for dense,coarse hair, high density, round face; creates narrow
shape
LINES, SECTIONS & ANGLES- Determines shape & technique
10. • LINE- Diagonal
• Mostly seen in Graduation; 1 lengths, layers
• Builds weight
• Create emphasis/ focal point
• Draws eye to certain area of style
• Maintains same direction
• Ideal for all hair types, low & medium density
• Minimize or enhance facial shape
LINES, SECTIONS & ANGLES- Determines shape & technique
11. • LINE- Curved
• Used to soften and or blend
• Can be full or partial circle
• Move in a circular pattern
• Face frame, Fringe, Blending layers
LINES, SECTIONS & ANGLES- Determines shape & technique
12. ELEVATION- Determines Technique
• Angle the hair is held from the head
• Elevation decides technique:
1Length ( Blunt ), Layers, Graduation
• Describes in degrees
• Between 0 and 180
• Below 90 builds weight
• Above 90 removes weight
• Be aware curl pattern & how much
hair shrinks as it dries
• Elevation – angle at which hair is held from head
• Graduation – layers described in degrees
• Shrinkage – hair contracts as it dries
13.
14.
15. ELEVATION- Determines Technique
CUTTING LINE- Angle at which fingers are held when cutting
Angle/Elevation used in your technique
Finger position, Finger angle, Cutting angle, Section angle
BUILDS WEIGHT REMOVES WEIGHT BUILDS WEIGHT/EMPHASIS
16. HAND POSTIONS FOR CUTTING ANGLES/ S.A.A
-LAYERS
-1 LENGTH (BLUNT); GRADUATIONS
-GRADUATION; LAYERS
17. GUIDELINES-
STATIONARY-
All hair come to same point;
over direction can be used
TRAVELING/MOBILE/MOVEABLE-
Small section of guide moves to each
section through out the cut
Below Parietal Ridge is EXTERIOR/ PERIMETER; Above is INTERIOR
18. OVERDIRECTION- Forward & Backward
• Combing hair away from natural falling
position
• Graduations, layers & 1 lengths ( Blunt )
• Backwards: maintains length in the front
• Forwards: maintains length in the back
19.
20. HAIRCUTTING CONSULTATION- Communication builds wealth
• D.E.P.T.H
• Scalp analysis & bone structure
• Growth patterns
• Speak to them, not the mirror
• When was their last cut
• How often do they get it cut
• How much effort do they put in at
home
• How often are they willing to
maintain
• What products do they use at home
• Lifestyle: career, hobbies etc
• Classic or Trendy
• Face shape
• Can their desired result even be
achieved with their texture & density
• Be honest!!
• COMMUNICATE
density. elasticity. porosity. texture. hair history
21. HAIRCUTTING CONSULTATION- Communication builds wealth
• Instead of asking “ What do you have in
mind today?” ASK “What do you want to
achieve with your hair?”
• Ask what they like about their hair
now…What has been done in the past
that they DID NOT like…..What has
been done that they DID like
• Are you – The stylist- hesitant about the
goal? Be honest
• Is length a priority? Have guest describe
& show you her desired length
• Communicate with guest if they are
making a BIG change- make sure it is not
an emotional decision
• WATCH their body language and eyes
say/react
• REPEAT back what they said
22. 1. A game plan
2. A technique and end shape
3. What tools you will be using
4. What products you will be using
to shampoo, condition and style
• Use proper draping
• REMEMBER to always record
what you did & Products you
used/recommended!!
• Decide on:
HAIRCUTTING CONSULTATION- Communication builds wealth
24. What can effect your decision?
WAVE PATTERN
TEXTURE DENSITY
LOW
MEDIUM
HIGH
25. What can effect your decision?
Fine VS Coarse
Finger Angle
Growth Pattern
26. Your foundation begins here- Perimeter/ One length.
Tension, Elevation, HAIRLINE,
What's in the way?
( ears, shoulders, chair)
27. Show Proper use of Haircutting Tools
• Haircutting and
texturizing shears
• Straight razor
Razor comb
Straight razor
Can have guard
( like feather razor)
BLUNT/HEAVY OR CHOPPY LINE WISPY/SOFT LINE
29. All About Shears
• Steel- Japan, Germany, United States; 440 A ( 56) to 440 C; Stainless
steel- Carbon content VS iron; not able to rust
• Titanium added VS coating
• Hitachi – highest quality steel
• V(g) 10- Japanese high quality- added titanium
– Gauging hardness is known as THE ROCKWELL HARDNESS: 56/57
is ideal; 63 too hard/brittle
• Cast shears- Mold; more fragile, cheaper, mass produced
• Forged shears-Heated & hammered/pressed; more durable, longer
lasting
30. Parts of a Shear
• Cutting edge
• Pivot
• Adjustment knob
• Finger tang
• Ring-finger hole
• Thumb hole
Convex blade gives smoothest
cut; sharpest edge, requires less
force to cut; Beveled edge- more
dull, hear cutting, cheap
31. SHEARMAINTENENCE
• Shears need to be cleaned
after every guest
• Wipe with towel to remove
debris & hair
• Wipe with rubbing alcohol
• Lubricate with shear oil- at
least weekly
• Have sharpened when
needed
• Use Clippercide for clippers
• Lubricate clippers
32. Left-Handed vs. Right-Handed
• There is a difference between a right-handed and a
left-handed shear. Simply taking a right-handed shear
and turning it over does not make it appropriate for a
left-handed cutter, because the blades of the shear
need to be reversed.
Left blade is on top
34. Regular shears, thumb is vertical, wrist may be arched
Swivel thumb is a natural position( like shaking hands )
Horizontal cutting action; allows for less stress, fatigue
SWIVEL
35. Purchasing Shears
• Know how the shear was
manufactured.
• Ask about the steel quality.
• Decide on the right blade edge.
• Decide on the best handle design
for you.
• Be sure of fit.
36. • Hold shears in hand.
• Swivel thumb shears.
• Learn about service
agreement.
• Ask about warranty.
• Analyze cost.
• Determine how many
needed.
Purchasing Shears
37. Fitting the Shear Correctly
• Fitting ring finger
• Fitting thumb
• Relaxing grip
• Correct finger position and alignment
39. HOLDING YOUR SHEARS
• Holding shears properly
Moving THUMB ONLY
Palming shears;
Holding comb
40. Holding the Razor
• Method A
– Open razor so handle is higher than shank.
– Place thumb on thumb grip.
– Place index, middle, and ring fingers on shank.
– Place little finger in tang.
– Position razor on top of subsection.
41. • Method B
– Open razor so handle and shank form a straight line.
– Place thumb on grip and wrap fingers around handle.
Holding the Razor
42. Handling the Comb and Tension
• Both the wide and fine teeth of the comb are regularly used when cutting
hair.
• The wide teeth are used for combing and parting hair, while the finer teeth
comb the section before cutting.
• Tension is the amount of pressure applied when combing and holding a
subsection.
43. Understand Proper Posture and
Body Position
• Position the client.
– Sitting straight
– Legs not crossed
• Center your weight.
– Knees slightly bent, not
locked
– Bend one knee to lean
slightly
• Stand in front of section being
cut.
44. HAND POSTIONS FOR CUTTING ANGLES/ S.A.A
-LAYERS
-1 LENGTH (BLUNT); GRADUATIONS
-GRADUATION; LAYERS
45. TECHNIQUES
Your technique is determined by your
elevation; how you want your end result
to look:
3 Techniques but endless possibilities!!!!!
• 1 Length, Layers, Graduation
4 Basic cuts that fall within those 3
techniques:
• 0 degrees
• 45 degrees
• 90 degrees
• 180 degrees
0 Degrees; 1 LENGTH
GRADUATION
LAYERS
46. Blunt haircut
• Also known as a
one-length haircut.
• Hair comes to a single
hanging level, forming a
weight line.
Cut Hair using Basic Haircutting
Techniques
47. TECHNIQUES- 1 LENGTH
• Also known as BLUNT and 0 Degrees
• All hair falls to the same point
• NO ELEVATION
• Stationary guide
• Can use Overdirection
• Section angle is parallel to the floor
• Creates width & volume
• Makes fine hair appear thicker
• Draws eye side to side
• Weight line is at the perimeter
• 3 basic 1 lengths: square, round & triangle (
diagonal )
48. Graduated Haircut
• Build up of weight.
• Caused by cutting the hair
with tension, low to
medium elevation, or
overdirection.
• The ends of the hair
appear to be stacked.
49. TECHNIQUES- GRADUATION
• Also known as Stacked, Wedge, Pageboy
• Standard elevation is 45 degrees
• Over direction is used throughout the
haircut
• Creates volume and emphasis/focal point
• Weight line is where “stack” forms
• Can be stationary or traveling guide
• Below occipital is “tapered”
• Graduation can live anywhere between 1
degree & 45 degrees
50. Layered Haircut
• The hair is cut at higher
elevations, usually
90 degrees.
• Layered haircuts generally
have less weight than
graduated haircuts.
• In a layered haircut, the ends
appear farther apart.
51. TECHNIQUES- 180 Degrees
• Also known as “Long Layers” or
Shag
• 180 Degree elevation
• All subsections are
OVERDIRECTED
to top ( apex )
• Subtle movement in hair style
• Reduces weight but can give body
• Let length “fall out”
• Check for “Corners”/ Blending
points
• Be aware of parietal ridge, density at
hairline & fringe area
52. TECHNIQUES- 90 Degrees
• Also known at “Uniform layers”
• 90 Degree elevation
• Traveling guide
• Subsections are cut with round of
the head
• Adds volume on top
• Reduces weight/ taper sides &
below Occipital
53. HAIRCUTTING SAFETY
• Palm the shears- prevent cutting yourself,
your guest or accidently cutting hair
• Do not cut past Second Knuckle- Tension
changes
• Take care around the ears- skin is thinner
• Adjust tension of shears
• Use razor guard
• Dispose of razor blades properly
• Blood spill kit- add extra gloves & ziplock
bags
54. HAIRCUTTING TIPS
• Clean partings: control, consistency
• Lines & sections
• Crown & nape/ hairline
• Around the ears
• Tension/ Shrinking
• Head position
• Moisture
• Guideline
• Cross check
• Use the mirror
• Check balance
• Stand in front of you
55. • Shrinks more than
straight hair- sometimes
over 2 inches
• Minimal tension
• Wide tooth comb
• Naturally graduates
itself
• Expands more than
straight hair
• May need to be styled
straight before cutting
CURLY HAIR TIPS
56. Cutting the Bangs
• The bang or fringe area includes the hair
that lies between the two front corners.
• Be sure the hair is either damp or
completely dry.
• Do not use tension, allow for the natural lift
of the hair.
57. • Gives a softer appearance than a shear cut.
• The razor is a great option when working
with medium hair textures.
• When working with a razor, the ends are cut
at an angle and the line is not blunt.
• This produces softer shapes with more visible
separation, or a feathered effect, on the ends.
• Guide above fingers.
• Avoid using on fine, coarse,
wiry, curly or damaged hair.
• Always use a guard.
• Always use a new blade.
• Keep hair wet.
• Hold razor at an angle; never
force.
RAZOR CUTTING/ TEXTURIZING
58. Slide Cutting
• Used to cut or thin hair.
• Blends shorter hair to longer.
• Useful in texturizing.
• Only on wet hair.
59. Scissor-Over-Comb
• Hair held in place with
comb.
• Shear tips remove
length.
• Method used to create
short tapers.
• Works best on dry hair.
• Lift hair with comb;
comb acts as guide.
(continues)
60. • Do not hold hair between fingers.
• Shears and comb move up head together.
• Strive for continual motion.
Scissor-Over-Comb
68. Texturizing with Thinning Shears and Razor
• Remove bulk or weight.
– Section as for haircut.
– Comb subsection from
head.
– Cut 4 to 5 inches from
scalp.
– Stay farther from scalp for
coarse hair.
• Remove weight from ends.
(continues)
70. • Thinning shears-over-comb
• Other thinning shears techniques
• Free-hand slicing with razor
• Razor-over-comb
• Razor rotation
Texturizing with Thinning Shears and Razor
71. Effectively Use Clippers and Trimmers
• Electric or battery-operated tools that cut the hair by
using two moving blades held in place by a metal
plate with teeth.
• Mainly used for cutting shorter haircuts and can be
used to create a taper.
75. Trimming Facial Hair
• Using tool-over-comb method
• Cutting against comb
• Using length guard
• Brow and ear hair
76. 1. What are reference points and
what is their function?
2. What are lines, sections,
elevations, and guidelines?
3. What are important
considerations to discuss with a
client during a haircutting
consultation?
Chapter Review Questions
77. 4. What are a razor, haircutting
shears, styling or cutting comb, and
texturizing shears used for?
5. Name three steps to ensuring good
posture and body position while
cutting hair.
6. Name and describe four basic types
of haircuts.
Chapter Review Questions
78. 7. What is another name for
bangs? When should you avoid
cutting bangs? Name five basic
types of bangs.
8. Name and describe at least
three different texturizing
techniques performed with
shears.
9. What is a clipper cut?
10. How is a trimmer used?
Chapter Review Questions
Editor's Notes
WHY STUDY HAIRCUTTING?
Haircutting is the basic foundational skill upon which all other hair design is built.
Being able to rely on your haircutting skills and techniques when creating a haircut is what will build confidence, trust, and loyalty between a cosmetologist and his or her clients.
The ability to duplicate an existing haircut or create a new haircut from a photo will build a stronger professional relationship between stylist and client.
A good haircut that is easy to style and maintain will make clients happy with their experience and will build repeat services.
Studying the fundamentals will allow you to understand advanced haircutting techniques.
Specializing in haircutting will increase your career opportunities and profits as a hairstylist.
SHOW PROPER USE OF HAIRCUTTING TOOLS
Haircutting shears, also known as scissors, are mainly used to cut blunt or straight lines in hair. They may also be used to slide cut, point cut, or to implement other texturizing techniques (discussed later in this chapter).
Texturizing shears are mainly used to remove bulk from the hair. They are sometimes referred to as thinning shears, tapering shears, or notching shears.
Many types of texturizing shears are used today, with varying amounts of teeth in the blades.
A general rule of thumb is that the more teeth in the shear, the less hair is removed per cut.
Notching shears are usually designed to remove more hair, with larger teeth set farther apart
Straight razors or feather blades are mainly used when a softer effect on the ends of the hair is desired. Razors can be used to create an entire haircut, to thin hair out, or to texturize in certain areas. They come in different shapes and sizes, and with or without guards
ALL ABOUT SHEARS
One of the most important tools in your career
Steel shears
All professional haircutting shears are made of steel. Three countries are primarily responsible for manufacturing the steel used to make professional shears: Japan, Germany, and the United States.
Hardness
The hardness of the steel determines if the shear can hold a hard edge for an extended period of time.
Gauge
The gauge is called the Rockwell hardness and should be at least 56 or 57. If higher than 63, the shear will be too hard and brittle to work with.
Forged versus cast shears
Professional shears are made in one of two ways; they are either cast or forged.
Cast shears
Cast shears are made by a process whereby molten steel is poured into a mold and cooled.
Forged shears
Forged shears are made by a process of working metal to a finished shaped by hammering or pressing. The metal is heated to over 2,100 degrees. After the hammering or pressing (shaping) is complete, the metal is cooled in water. The resulting metal is much denser and harder than cast metal.
PARTS OF A SHEAR
Cutting edge is the part of the blade that does the cutting.
The pivot and the adjustment area are the parts that make the shears cut.
The adjustment knob pulls blades together at the correct tension.
The finger tang is the contact point for the pinky finger; it allows for more control and a more relaxed grip.
The ring finger hole is where you place the ring finger.
The thumb hole is placed on the thumb just over the cuticle.
LEFT-HANDED VS. RIGHT-HANDED
Professionals must use shears designed for use by their dominant hand.
PURCHASING SHEARS
Know how the shear was manufactured. Forged shears are more sound, last longer, and cost more.
Ask about the steel quality Look for a 440-A steel or higher.
Decide on the right blade edge. A full convex edge will give the smoothest cut with the sharpest edge possible.
Decide on the best handle design for you. Shears will have one of three types of handle grips and you will need to decide which one is best for you.
Opposing grip. This forces the thumb underneath the ring finger and creates stress and pressure on the nerves and tendons of the hand.
Offset grip. This moves the thumb forward so it is resting below the ring and middle finger.
Full offset or crane grip. This is the most anatomically correct handle design. It positions the thumb grip under the index finger and releases pressure and stress put on the nerves and tendons of the hand and thumb.
Be sure the shears fit properly. Since you will be working with your shears almost constantly, consider purchasing a shear that comes with a finger-fitting system so that the shear can be custom fitted to the exact size of your ring finger and thumb diameter. A proper fit will ensure maximum performance, comfort, and control.
PURCHASING SHEARS (continued)
Hold the shears in your hands. Since purchasing a shear is a very personal thing, you need to feel shears in your hand before you buy them. When you are ready to purchase your shears, select a vendor that has plenty of shear samples for you to try and a representative who will allow you all the time you need to make the right choice.
Swivel thumb shear. A popular option, the swivel shear provides great comfort and control. The swivel shear allows you to lower your shoulder and elbow and straighten the wrist while cutting, for a more relaxed working posture
Ask about the service agreement. Can the company service them in a timely and convenient manner?
Ask about the warranty. Since every company offers a different warranty for their shears, make sure you know what the warranty period is and exactly what the warranty covers before you buy the shears.
Analyze the cost of the shears. The cost of cast shears should not exceed $200. A high quality, forged shear should cost between $250 and $350.
Determine how many are needed. Two cutting shears and one blending shear are recommended.
FITTING THE SHEAR CORRECTLY
Custom-fitted shears
Buying and using ergonomically correct and custom-fitted shears can help reduce musculoskeletal disorders.
Fitting the ring finger
The hole rests between the first and second knuckle with only a bit of extra space around the finger.
Fitting the thumb
The hole rests slightly over the cuticle area of thumb.
Relaxing your grip
A relaxed grip allows you to cut without any thumb pressure.
Correct finger position and alignment
This gives correct nerve and tendon alignment in the hand. Find a handle design that cradles your middle finger.
HOLDING YOUR TOOLS
A proper hold gives you the most control and the best results when cutting hair.
A proper hold helps you avoid muscle strain in your hands, arms, neck, and back.
Holding shears
Open your dominant hand and place your ring finger in the finger grip of the still blade and your little finger in the finger brace (tang).
Place your thumb in the finger grip of the moving blade.
Practice opening and closing them. Concentrate on moving your thumb only.
HOLDING THE RAZOR
Method A
Open the razor so that the handle is higher than the shank.
Place thumb on thumb grip.
Place index, middle, and ring fingers on shank.
Place the little finger in the tang, underneath the handle.
When cutting a subsection, position the razor on top of the subsection, the part facing you, for maximum control.
HOLDING THE RAZOR (continued)
Method B
Open the razor until the handle and shank form a straight line.
Place the thumb on the grip and wrap the fingers around the handle.
HANDLING THE COMB AND TENSION
Both the wide and fine teeth of the comb are regularly used when cutting hair. The wide teeth are used for combing and parting hair, while the finer teeth comb the section before cutting. The finer teeth provide more tension and are useful when cutting around the ears, when dealing with difficult hairlines, and when cutting curly hair. You should plan on spending some time practicing how to turn the comb in your hand while palming the shears.
Tension
Tension is the amount of pressure applied when combing and holding a subsection. Tension is created by stretching or pulling the subsection.
Tension ranges from minimum to maximum. You control tension with your fingers when you hold the subsection of hair between them. Consistent tension is important for constant, even results in a haircut.
Maximum tension is used on straight hair when you want precise lines.
Less tension is used with curly or wavy hair, less tension is better because a lot of tension will result in the hair shrinking even more than usual as it dries.
Minimum or no tension should be used around the ears and on hairlines with strong growth patterns.
UNDERSTAND PROPER POSTURE AND BODY POSITION
Posture is how you stand and sit. Body position is how you hold your body when cutting hair. Good posture and body position will help avoid back problems in the future to ensure better haircutting results.
Position the client
Make sure that your client is sitting up straight and that his or her legs are not crossed.
Remember, you can move the client by turning the chair or raising/lowering the chair—whichever gives you the option of keeping your body in the same place—or by angling the client’s chair so you can see what you are doing in the mirror.
Center your weight
When standing, keep your knees slightly bent rather than locked. Instead of bending at the waist, try bending one knee if you need to lean slightly one way or the other. When sitting, keep both feet on the floor.
Work in front of your section
When cutting hair, a general rule of thumb is to stand or sit directly in front of the area you are cutting. By doing this, you keep your body weight centered and you will automatically find yourself moving around the head during a haircut.
CUT HAIR USING BASIC HAIRCUTTING TECHNIQUES
The art of haircutting is made up of variations on four basic haircuts: blunt, graduated, layered, and long-layered.
An understanding of these basic haircuts is essential before you can begin experimenting with other cuts and effects.
Blunt Haircut
A blunt haircut also known as known as a one-length haircut; all the hair comes to a single hanging level, forming a weight line.
A weight line is a visual line in the haircut where the ends of the hair hang together.
The blunt cut is also referred to as a zero-elevation cut or no-elevation cut because it has no elevation or overdirection.
It is cut with a stationary guide.
The cutting line can be horizontal, diagonal, or rounded.
Blunt haircuts are excellent for finer and thinner hair types because all the hair is cut to one length, therefore making it appear thicker.
Note: All lesson information and instructor support materials for Chapter 16, Procedures 16–1, 16–2, 16–3, 16–4, and 16–5 and pages 382–388 from the core text, can be found in Lesson Plan 16.1 and 16.2.
GRADUATED HAIRCUT
A graduated haircut is a slow or immediate build up of weight; this is caused by cutting the hair with tension, low to medium elevation, or overdirection.
The most common elevation is 45 degrees. In a graduated haircut, there is a visual buildup of weight in a given area. The ends of the hair appear to be stacked.
LAYERED HAIRCUT
An layered haircut is an effect achieved by cutting the hair with elevation or overdirection.
The hair is cut at higher elevations, usually 90 degrees.
Layered haircuts generally have less weight than graduated haircuts.
In a layered haircut, the ends appear farther apart.
Layers
Layers create movement and volume in the hair by releasing weight. A layered haircut can be created with a traveling guide, a stationary guide, or both.
CUTTING THE BANGS (FRINGE)
The bang or fringe area includes the hair that lies between the two front corners, or approximately between the outer corners of the eyes (figure 16–96).
When cutting the bangs or fringe, be sure the hair is either damp or completely dry. Also, when combing and preparing to cut bangs and/or fringe do not use tension, allow for the natural lift of the hair.
Natural distribution is how hair is moved over the head, when locating the bang area.
There are five basic types of bangs (fringe):
Asymmetric bang
Side swept bang
Versatile bang
Short textured bang
Square bang.
SLIDE CUTTING
Slide cutting is a method of cutting or layering the hair in which the fingers and shears glide along the edge of the hair to remove length.
Rather than opening and closing the shears, you keep them partially open as you slide along the edge of the section. This technique should only be performed on wet hair with very sharp shears.
SCISSOR-OVER-COMB
Scissor over comb, also known as shear-over-comb, is a barbering technique that has crossed over.
Stand or sit directly in front of the section you are working on.
Place the comb, teeth first, into the hairline and turn the comb so that the teeth are angled away from the head.
With the still blade of the shears parallel to the spine of the comb, begin moving the comb up the head, continually opening and closing the thumb blade smoothly and quickly.
Angle the comb farther away from the head as you reach the area you are blending to avoid cutting into the length (weight).
TEXTURIZING WITH SHEARS
Texturizing is the process of removing excess bulk without shortening the length. It can also be used to cut for effect within the hair length, causing wispy or spiky results. The term texturize should not be confused with hair texture, which is the diameter of the hair strand itself.
Point-cutting is performed on the ends of the hair using the tips, or points, of the shears to create a broken edge.
Can be done on wet or dry hair.
Hold the hair 1 to 2 inches (2.5 to 5 cm) from ends.
Point the tips into the ends with your palm facing away from you.
A more vertical shears angle removes less hair. The more diagonal the shears angle, the more hair is removed and the chunkier the effect.
Notching is another version of point cutting. Notching is more aggressive and creates a chunkier effect. Notching is done toward the ends.
TEXTURIZING WITH SHEARS (continued)
Free-hand notching also uses tips of shears.
Shears are not slid.
Pieces are snipped out randomly. Generally used throughout interior, rather than at ends.
Works well on curly hair.
Effilating, also known as slithering, is the process of thinning the hair to graduated lengths with shears. Hair strand is cut by a sliding movement of the shears, with the blade kept partially opened. It reduces volume and creates movement.
Slicing is a technique that removes bulk and adds movement through the lengths of the hair.
Shears are never closed completely.
Use only blade near pivot.
Carving is a version of slicing that creates a visual separation in the hair.
Works best on short hair.
Place still blade into the hair and rest it on the scalp.
Move shears through the hair; gently open and partially close shears as you move.
Carving the ends: Adds texture and separation to the perimeter of a haircut by holding the ends of a small piece between your thumb and index fingers and carving a surface of that piece.
Begin carving 3 inches from ends toward your fingers.
TEXTURIZING WITH THE RAZOR
You can use the razor to remove weight to taper the hair.
Removing weight to taper the ends
On damp hair, hold the section out from the head with your fingers at the ends. Place the razor flat to the hair, 2 to 3 inches (5 to 7.5 centimeters) away from your fingers . Gently stroke the razor, removing a thin sheet of hair from the area (figure 16–124). This tapers the ends of the section. This technique can be used on any area of the haircut where this effect is desired.
Free-hand slicing
When free-hand slicing at midshaft of the subsection, comb the hair out from the head and hold it with your fingers close to the ends. With the tip of the razor, slice out pieces of hair. The more vertical the movement, the less hair you remove; the more horizontal the movement, the more hair you remove. This technique releases weight from the subsection, allowing it to move more freely.
TEXTURIZING WITH THINNING SHEARS AND RAZOR
Removing bulk or weight
Section as for a haircut.
Comb subsection out from head.
Cut 4 to 5 inches from scalp.
On coarse hair, stay farther from scalp. For blunt cuts, avoid cutting on top.
Removing weight from ends: Can be used on thin and thick hair. It helps taper the perimeter of both graduated and blunt haircuts.
TEXTURIZING WITH THE RAZOR
You can use the razor to remove weight to taper the hair.
Removing weight to taper the ends
On damp hair, hold the section out from the head with your fingers at the ends. Place the razor flat to the hair, 2 to 3 inches (5 to 7.5 centimeters) away from your fingers . Gently stroke the razor, removing a thin sheet of hair from the area (figure 16–124). This tapers the ends of the section. This technique can be used on any area of the haircut where this effect is desired.
Free-hand slicing
When free-hand slicing at midshaft of the subsection, comb the hair out from the head and hold it with your fingers close to the ends. With the tip of the razor, slice out pieces of hair. The more vertical the movement, the less hair you remove; the more horizontal the movement, the more hair you remove. This technique releases weight from the subsection, allowing it to move more freely.
TEXTURIZING WITH THINNING SHEARS AND RAZOR (continued)
Thinning shear-over-comb: useful for blending weight lines on finer textures of hair. Can also be used on thick and coarse haircuts that are very short.
Other thinning shears techniques: any texturizing technique that can be done with shears can also be done with thinning shears.
Free-hand slicing with razor: used on hair ends to produce a softer perimeter or to create separation throughout the shape.
Razor-over-comb is a technique where the comb and the razor are used on the surface of the hair. Using the razor on the surface softens weight lines and causes the area to lie closer to the head.
Razor rotation is very similar to razor-over-comb. The difference is that with razor rotation you make small circular motions. Small, circular motions, the comb follows the razor through the area just cut.
EFFECTIVELY USE CLIPPERS AND TRIMMERS
Clippers are electric or battery-operated tools that cut the hair by using two moving blades held in place by a metal plate with teeth. The blade action is faster than the eye can see. Clippers are mainly used for cutting shorter haircuts and can be used to create a taper, hair that is cut very short and close to the hairline and that gradually gets longer as you move up the head.
Clipper Uses:
Without length guards
To remove hair completely (great for cleaning up necklines and around the ears).
To taper hairlines from extremely short lengths into longer lengths, using the clipper-over-comb technique (this technique is very similar to scissor-over-comb, except that the clippers move side to side across the comb rather than bottom to top).
With length guards
Attachments that fit over the blade plate and vary in size from ⅛ inch to 1 inch for short, layered cuts.
CLIPPER-OVER-COMB
The clipper-over-comb technique allows you to cut the hair very close to the scalp and create a flat top or square shape.
The way you use the comb is the same as when you are working with scissor-over-comb.
The main difference is that the clippers move across the comb, which requires that you keep the comb in position as you cut.
The angle at which you hold the comb determines the amount of hair that is removed.
Stand in front of the section
The area being cut should be at eye level.
Comb placement
Place the comb teeth-first into the hairline. Turn the comb so the teeth are angled slightly away from the head. Work against growth patterns and ensure that the hair is lifted away from the head.
Hold the comb stationary.
Cut length against the comb, moving the clippers from right to left (or left to right if left-handed).
Stop to cut.
Movements should be fluid, but stop to cut. Remove the comb from the hair and begin the motion again. Use a previously cut section as a guideline.
TRIMMING FACIAL HAIR
Use a tool-over-comb method. When removing length, use the comb to control the hair and always cut against the comb.
Cut against the comb.
Use a length guard. An attachment can assist in achieving the desired beard length. If using shears rather than clippers, use a less expensive pair since facial hair is very coarse and may dull shears.
Discuss brow and ear hair. Ask the client if he wants excess ear or eyebrow hair removed. If so, be very focused in these sensitive areas.
CHAPTER REVIEW QUESTIONS
1. What are reference points and what is their function?
Answer: Reference points are the ears, jawline, occipital bone, apex, and parietal ridge. Reference points help ensure balance within the design so that both sides of the haircut will turn out the same. They also allow the stylist to recreate the same style again and again. In addition, they tell the stylist where and when it is necessary to change techniques in order to make up for irregularities in the head form.
2. What are lines, sections, elevations, and guidelines?
Answer:
A line is a thin continuous mark used as a guide.
A section describes the working area that the hair is separated into prior to cutting; elevation is the angle or degree at which a subsection of hair is held, or lifted, from the head when cutting; and guidelines are sections of hair, located either at the perimeter or the interior of the cut, that determine the length the hair will be cut.
A guideline is also referred to as a guide; it is usually the first section that is cut to create a shape.
3. What are important considerations to discuss with a client during a haircutting consultation?
Answer: Discuss what the client desires; how much time is she/he willing to spend on hair styling; what is his/her lifestyle; is a classic or trendy style more appropriate; what is the client’s face shape; what does hair analysis reveal; recommend products that will support the look and how to apply them; and explain the necessary tools (blowdryer, type of brush, diffuser, flat iron, etc.) needed for home maintenance.
CHAPTER REVIEW QUESTIONS (continued)
7. What is another name for bangs? When should you avoid cutting bangs? Name five basic types of bangs.
Answer: Because much of our haircutting history comes from England, you will sometimes hear the word fringe used instead of bangs. The two words mean the same thing. Avoid cutting bangs on clients with strong cowlicks or low hairlines; always take into consideration suitability, texture, and face shape. The five basic types of bangs are: side swept, versatile, square, asymmetric, and short textured bangs.
8. Name and describe three or more different texturizing techniques performed with shears.
Answer:
Point cutting: A technique performed on the ends of the hair using the tips, or points, of the shears.
Notching: Another version of point cutting that is more aggressive and creates a chunkier effect than point cutting.
Slicing: Removes weight and adds movement through the lengths of the hair.
Effilating or slithering: The process of thinning the hair to graduated lengths with shears. A sliding movement of the shears cuts the hair strand, with the blade kept partially opened. It reduces volume and creates movement.
Carving: Creates a visual separation in the hair.
Carving the ends: Adds texture and separation to the perimeter of a haircut by holding the ends of a small piece and carving a surface of that piece.