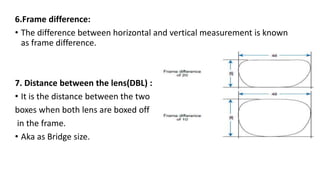
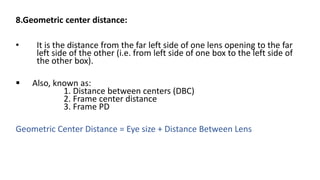
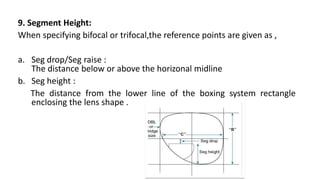
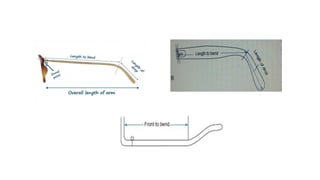
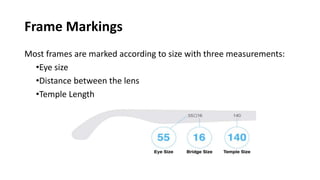
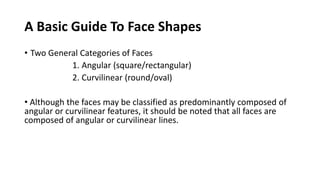
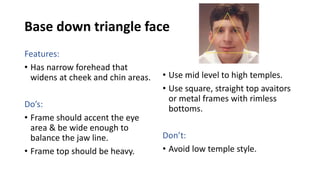
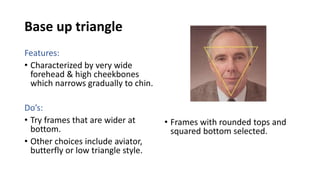
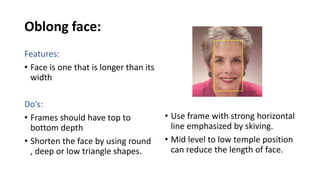
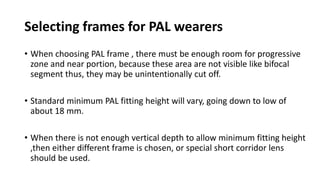
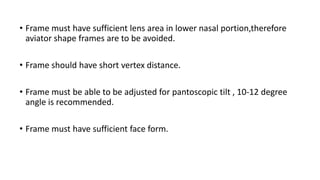
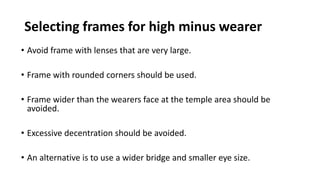
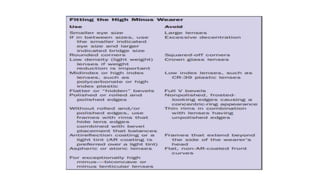
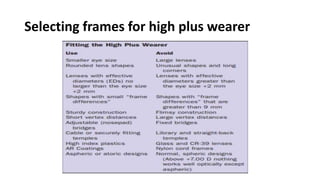
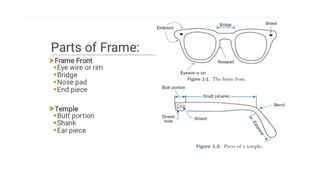
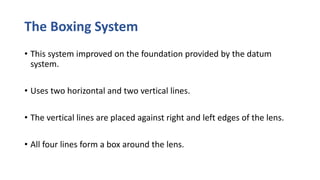
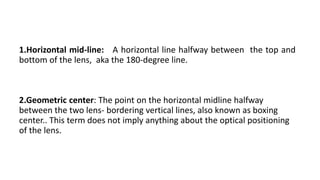
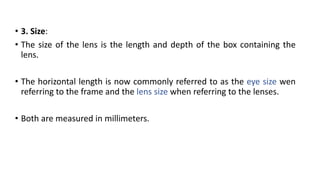
This document discusses frame selection and parameters for dispensing glasses. It describes the boxing system used to measure frame and lens sizes. Key frame measurements include eye size, bridge size, temple length, and frame center distance. Face shapes like oval, round, square and their best fitting frame styles are outlined. Frame properties that affect balance, length and nose appearance are also covered. Special considerations for children, older adults and other patient types are provided. The goals of proper frame selection are to support lenses comfortably while matching facial features.
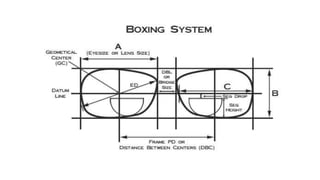
2. Dispensing:
• An optical dispensing is subspecialty of optometry of which includes
all procedures from the time the glass prescription is presented ,till
the patients are on with the pair the glasses satisfactorily.
3. Introduction
• Frame is that portion of the spectacle that holds the lenses containing
the ophthalmic prescription in their proper position in front of eye.
• A frame generally consist of the front , which in one form or another
contain lenses, and the temples, which attach to the front and hook
over the ears to help hold the spectacles in place.
6. The older Datum system
• Two horizontal lines were drawn at the highest and lowest edge of the
lens.
• A line drawn halfway between the two horizontal lines and parallel to
them was known as the Datum line.
• The width of the lens along the line was called Datum length or eye
size.
• The point along the datum line halfway between edges of the lens is
the Datum centre.
7. • The depth of the lens, measured as the vertical depth through the
datum centre was the mid- datum depth.
8. The Boxing System
• This system improved on the foundation provided by the datum
system.
• Uses two horizontal and two vertical lines.
• The vertical lines are placed against right and left edges of the lens.
• All four lines form a box around the lens.
9.
10. 1.Horizontal mid-line: A horizontal line halfway between the top and
bottom of the lens, aka the 180-degree line.
2.Geometric center: The point on the horizontal midline halfway
between the two lens- bordering vertical lines, also known as boxing
center.. This term does not imply anything about the optical positioning
of the lens.
11. • 3. Size:
• The size of the lens is the length and depth of the box containing the
lens.
• The horizontal length is now commonly referred to as the eye size wen
referring to the frame and the lens size when referring to the lenses.
• Both are measured in millimeters.
12. 4. Measurement:
• For horizontal boxing dimensions of a frame,
the measurement begins at the inside of the
groove on the left side of the imaginary
enclosing box and extends horizontally across
the lens opening to the farthest part of the
groove on the right side of the box.
• In measuring a lens the measurement begins at the apex, or point, of
the bevel on the left side of the box enclosing the lens and extends to
the apex of the bevel on the right side of the box.
13. 5. Effective Diameter: It is found by doubling the distance from the
geometric center of the lens to the apex of the lens bevel
farthest from it.
• This measurement helps determine the smallest lens blank from
which the lens can be cut.
Minimum Blank Size = Effective Diameter + 2
14. • ‘A’ Dimension: It is the horizontal boxing width.It is the width of the
enclosing box not the width of the lens at the middle of the shape.
• ‘B’ Dimension : It is the vertical boxing length.
• ‘C’ Dimension : It is the width of the lens along the horizontal midline.
[Note: C-size is the circumference of the edged lens and is used to
increase accuracy when duplicating an old lens size when edging.]
15. 6.Frame difference:
• The difference between horizontal and vertical measurement is known
as frame difference.
7. Distance between the lens(DBL) :
• It is the distance between the two
boxes when both lens are boxed off
in the frame.
• Aka as Bridge size.
16. 8.Geometric center distance:
• It is the distance from the far left side of one lens opening to the far
left side of the other (i.e. from left side of one box to the left side of
the other box).
Also, known as:
1. Distance between centers (DBC)
2. Frame center distance
3. Frame PD
Geometric Center Distance = Eye size + Distance Between Lens
17. 9. Segment Height:
When specifying bifocal or trifocal,the reference points are given as ,
a. Seg drop/Seg raise :
The distance below or above the horizonal midline
b. Seg height :
The distance from the lower line of the boxing system rectangle
enclosing the lens shape .
18. Temple Length
Most temples are currently marked with the total, or overall, temple
length.
Temple lengths are expressed in millimeters.
Temples length my be measured in one of the following ways.
1. Overall Temple Length
2. Length to Bend (LTB)
3. Front to Bend (FTB)
19.
20. Frame Markings
Most frames are marked according to size with three measurements:
•Eye size
•Distance between the lens
•Temple Length
22. A Basic Guide To Face Shapes
• Two General Categories of Faces
1. Angular (square/rectangular)
2. Curvilinear (round/oval)
• Although the faces may be classified as predominantly composed of
angular or curvilinear features, it should be noted that all faces are
composed of angular or curvilinear lines.
24. How to Analyze Face Shapes
Measuring the Width of the Face
The width of the face is divided into five sections
about the width of an eye
Unequal sections such as narrow set eyes or
wide cheeks are identified.
The face may be either too wide or too narrow when
compared to the ideal oval face.
Frames are chosen to restore facial balance.
25. Measuring the Length of the Face
I. The face is divided into three horizontal sections:
a. Hairline to brow line
b. Brow line to tip of nose
c. Tip of nose to chin
II. Unequal sections are identified.
III. The face may be either too long or too short
26. Dot and Define:
• Dots placed on each side of a patient’s brow, cheek and jaw.
• The dot method will help to identify the shape and size of the face.
•The dots can also help identify strong and weak points.
27. Face, Frames and Guidelines
Oval shape:
Features:
• Ideal face shape
• Frame should maintain the
natural balance of face.
Do’s:
• Frames wide or wider than the
broadest part of face selected.
Don’t:
• Avoid low and swooping
temples.
28. Diamond face:
Features:
• Rarest face shape
• Face narrow at the eyeline or
jawline with small forehead and
chin.
• Cheek bone high and dramatic.
Do’s:
• Frames heavy on top should be
chosen.
• Rimless frames
• Square frames or frames with a
straight top & curved bottom
selected.
Don’t:
• Low temples should be avoided.
29. Round face:
Features:
• Face has few angles.
• Length and width are roughly
equal.
Do’s:
• Slightly angular frame will
narrow the roundness.
• High or mid high temple help
create a longer profile.
• Clear bridge widens the eye.
• Frame should be wider than
they are deep.
Don’t:
• Avoid excessively rounded or
square style which will
exaggerate facial roundness.
30. Square face:
Features:
• Characterized by a strong
jawline, a broad forehead &
wide chin ,cheekbone.
Do’s:
• Gentle curved narrow style will
minimize & lengthen face.
• Frame should be wider than
widest part of face.
• Select frame with weight on top.
• Oval shape with mid- level to
high temples.
31. Base down triangle face
Features:
• Has narrow forehead that
widens at cheek and chin areas.
Do’s:
• Frame should accent the eye
area & be wide enough to
balance the jaw line.
• Frame top should be heavy.
• Use mid level to high temples.
• Use square, straight top avaitors
or metal frames with rimless
bottoms.
Don’t:
• Avoid low temple style.
32. Base up triangle
Features:
• Characterized by very wide
forehead & high cheekbones
which narrows gradually to chin.
Do’s:
• Try frames that are wider at
bottom.
• Other choices include aviator,
butterfly or low triangle style.
• Frames with rounded tops and
squared bottom selected.
33. Oblong face:
Features:
• Face is one that is longer than its
width
Do’s:
• Frames should have top to
bottom depth
• Shorten the face by using round
, deep or low triangle shapes.
• Use frame with strong horizontal
line emphasized by skiving.
• Mid level to low temple position
can reduce the length of face.
34. The AHA! moment
Don’t worry if your face shape doesn’t fit
into these categories. Just decide if you are
more angular or curvy and then choose the
frame in contrasting shape.
35. Frame suitability
Affecting the length of the face
• The first concern is with the width and depth of the frame which is
related to length and breadth of face.
• The second concern deals with angularity or roundness of the frame
line as related to angularity or roundness of the face and the eyebrow
line.
36. • A deeper frame is more complimentary to a long face, while a
narrower frame lend itself more easily to a wide face.
• A darker solid-coloured frame will aid the effect of shortening a long
face more readily
37.
38. Affecting facial balance:
• With faces somewhat wider in one area than in another , frames can
be used to balance out a wider area and to shift the facial emphasis.
• Base down triangular face:
-The frame width should be approximately the same width as the lower
facial area.
-Oval and upswept shape preferable, rectangular design not because
lower rim parallel the jawline , tends to emphasis the width of the base
of triangle.
39. - Frame should be dark colour for emphasis to further balance the
overall facial shape.
Solid- If the face is long
Vertically gradient – If the face is short.
• Base up triangular face:
-More difficult to fit
-Frame should be the minimum width.
-Frame should be of light or medium weight and of a lighter colour
when possible.
41. Bridge design:
• Frame selection can cause nose to appear longer or shorter than it
really is, depending on the frame bridge chosen.
• To lengthen the nose ,a frame is chosen that exposes as much of the
nose as possible.
42. • In case of keyhole bridge , using a dark color will increase the illusion of
nose length.
• In case of saddle bridge , the lower the bridge the greater the effect of
shortening the nose.
-Darker colour makes the nose look still
shorter
-Lighter colour has tendency to reverse
the effect.
43. • If the base of the nose is narrow , choose a frame with high, thin bridge
style.
• If the base of the nose is wide , choose a frame with a low-set, vertically
wide bridge.
44. Fitting consideration:
• Once the lens size and shape have been selected , the essence of well
–fitted frame rest in the choice of the proper bridge and the proper
temple style and length.
• The appropriate bridge is determined by its width , the position of its
pads , the frontal angle of the bridge ,the splay angle and the vertical
angle of pads.
46. Temples:
• All temples help hold the lenses in place primarily by the area of
contact with the side of the head and not by the pressure at the tip of
the temple or against the upper crease in the ear.
• The temple should be long enough so that the bend of the temple
takes place just barely past the top of the ear.
• The exact fit of the bent-down portion or earpiece against the head
can be achieved during adjustment of the frame
47. • Spectacles with flat, straight back or library temples are suitable when
their removal and replacement without altering adjustment is desired.
• This situation would arise when the spectacles are to be worn only
occasionally or mainly for reading or desk work.
• A skull temple is applicable if the wearer’s activity requires the normal
amount of movement or constant wear.
• If the head is to be lowered markedly or the individual is physically
active, riding bows or comfort cable temples are preferable.
48. Temple style Indicated for Contraindicated for
Comfortable cable
Riding bow
Active people
Job requiring unusual head position
Young children
Especially heavy frames or lenses
Off and on wear
Straight back
Off and on wear Heavy lenses
Person with parallel- sided nose
Person with flat nose
Frames with weak fronts
Skull
Normal, everyday wear Job requiring unusual head position
49. Selecting frames for PAL wearers
• When choosing PAL frame , there must be enough room for progressive
zone and near portion, because these area are not visible like bifocal
segment thus, they may be unintentionally cut off.
• Standard minimum PAL fitting height will vary, going down to low of
about 18 mm.
• When there is not enough vertical depth to allow minimum fitting height
,then either different frame is chosen, or special short corridor lens
should be used.
50. • Frame must have sufficient lens area in lower nasal portion,therefore
aviator shape frames are to be avoided.
• Frame should have short vertex distance.
• Frame must be able to be adjusted for pantoscopic tilt , 10-12 degree
angle is recommended.
• Frame must have sufficient face form.
51. Selecting frames for high minus wearer
• Avoid frame with lenses that are very large.
• Frame with rounded corners should be used.
• Frame wider than the wearers face at the temple area should be
avoided.
• Excessive decentration should be avoided.
• An alternative is to use a wider bridge and smaller eye size.
54. Selecting frames for children
• Children frames should be sturdy.
• Look for solidly build frame, be they are metal or plastic. Nylon cord
frame should be avoided.
• The lens groove should be deep so that lenses are more securely
seated in the frame.
55. • Spring temple should be selected if available as it absorbs shock , transfer
to bridge.
• Polycarbonate lens or trivex lens are lens of choice for children because
of high impact resistance and additional advantage of UV protection.
56. Selecting frames for Older wearers:
• With age , the skin loses its elasticity. This causes nose pad to depress
the skin , leaving red marks that develop easily into sore which do not
heal easily.
• Thus, choose a frame that is light weight and combining that selection
with lightweight lens material solves problem.
• The bridge must seat itself over a largest possible area to evenly
distribute weight of the glasses thus when frame with adjustable pad
are selected larger area must be considered.
59. PD measurement:
• Pupillary measurement is a critical function in the dispensing of
spectacles.
• It can be measured in various ways and the most consistance
,accurate method for measuring pd are performed using the following
tool:
1. PD ruler which can be measured monocularly or binocularly.
2. Pupillometer.
62. Summary
• To develop the skill in frame selection we must have knowledge about
frame parameters.
• The goals for frame selection are:
The frame should mechanically support the lenses.
The bridge design should facilitate a comfortable, supportive fit that
maintains the position of the lenses relative to the wearer’s natural
gaze.
63. The overall frame size and design should be in keeping with the facial
characteristics of the wearer.
Appropriate adjustment must be possible to allow the frame fitting
to be fine tuned at the time of collection.
Frame design, style and colour should meet the patient’s aesthetic
tastes.
The final, fitted spectacles should meet or exceed the patient’s
expectations.
64. References:
• System of ophthalmic dispensing.
• Clinical optics.
• CET articles
• Previous presentation.
Editor's Notes
To develop the skill in frame selection we must have knowledge about frame parameters....which is discussed under the datum system and the boxing system.
For simplification, the discussion of the shape of the frame suitabilty can be broken down into two categories.
Significance of splay angle
Must be appropriate so that the weight of the spectacle is distributed over the entire flat surface of the pad.