Milady nail enhancements ch 27, 28, 29
•Download as PPTX, PDF•
3 likes•3,471 views

Milady Nail wraps, Monomer/polymer, Gels

Recommended
More Related Content
What's hot
What's hot (20)
Similar to Milady nail enhancements ch 27, 28, 29
Similar to Milady nail enhancements ch 27, 28, 29 (20)
More from Cosmetology
Recently uploaded
Recently uploaded (20)
Milady nail enhancements ch 27, 28, 29
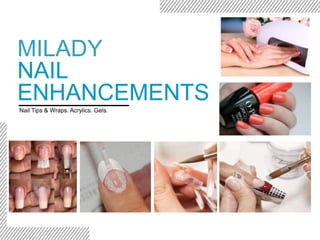
- 1. MILADY NAIL ENHANCEMENTS Nail Tips & Wraps. Acrylics. Gels.
- 2. • Nail services have become extremely popular from Manicures to Enhancements • Adds extra revenue to your services & salons • Understanding the variety of Nail Enhancements will allow you to properly choose the correct option for your guest WHY? THE WHY?
- 3. WHY? AGENDA AGENDA WEEK 1 TUESDAY- Nail Wrap supplies to resin WEDNESDAY- Fabrics to removal THURSDAY-Acrylic Chemistry to supplies FRIDAY-Mix Ratio to Supplies/storing WEEK 2 TUESDAY-Acrylic maintenance to odorless WEDNESDAY- UV gel Chemistry to types THURSDAY- Supplies to UV/LED FRIDAY-Hard/Soft gel; REVIEW ALL 3 CHAPTERS
- 4. Learn All You Need to Know About Nail Tips (continues) NAIL TIPS- Plastic, pre-molded nail shaped from ABS For added strength & or length; Used with an OVERLAY ACRYLONITRILE BUTADIENE STYRENE: Plastic, high heat resistant, chemical resistant(acids), low cost, NOT biodegradable, durable, shiny
- 5. Learn All You Need to Know About Nail Tips (continued) NAIL TIPS SUPPLIES TUBE BRUSH DROP APPLICATOR ABRASIVES BUFFER BLOCK DEHYRDRATORS TIP CUTTER
- 6. Application of Nail Tips NAIL TIPS • Many nail tips have a depression called a WELL • Serves as the point of contact with the nail plate • Important to choose proper well for YOUR GUESTS NAIL SHAPE • Too curved, creates air bubble, lifts or pushes sides out • Too flat will lift off the natural curve, painful when glued
- 7. Application of Nail Tips NAIL TIPS • Tips should never cover more than half the natural nail plate • Cover from side wall to side wall • When using a tip with a well, Rock tip on in order to reduce air bubbles in adhesive • Tip is placed at a 45 degree angle against free edge and rocked on until Position Stop is against free edge of natural nail
- 8. Application of Nail Tips NAIL TIPS - Adhesive • Adhesive = professional term • Bonding agent to secure nail tip to natural nail • Comes in a Tube, Brush on or a Drop Applicator • Thick adhesive is a gel based and requires more drying time • Thinner viscosity dries around 5 seconds • When opening nail adhesive , point away from your Guests face
- 9. Application of Nail Tips NAIL TIPS • Use a larger Nail tip & file to tailor to your guest nail, VS using a too small tip • Trim and or Bevel before applying • Pre-beveled tips = less blending time • STOP, ROCK & HOLD METHOD- Rock the tip on, release air pockets, hold 5-10 seconds • Contact area will need to be reduced with a fine to medium abrasive ( blending ) • NO VISIBLE line between tip and nail 45 degrees
- 10. Explore the Uses of Nail Wraps NAIL WRAPS • Nail Wrap is any method of securing a layer of fabric or paper on and around the nail tip • Used as an OVER LAY • Can strengthen natural nail or create nail extensions • Secured on to the nail with Nail Wrap Resin • 4 Main types of Fabric • SILK • LINEN • FIBERGLASS • PAPER Strengthen natural nail Overlay on tip Extension
- 11. Supplies • Nail dehydrator • Tweezers- Keep Natural Oils OFF FABRIC; PREVENTS ADHESION • Tip cutters • Tip adhesive • Nail tips • Block buffer • Fabric • Abrasive file • Fabric scissors • Plastic sheet- Keep Fabric on • Lint-free wipes- Remove any debris before drying NAIL WRAP SUPPLIES • Building resin- Brush, Gel, Drop • Activator- Spray, Brush, Gel
- 12. Explore the Uses of Nail Wraps NAIL WRAP- Application • Before applying Tips, Wraps or any Enhancement: • Prepare Natural Nail by removing shine with a fine abrasive buffer -240 GRIT – FLAT ACROSS THE NAIL • Cleanse nail and apply Dehydrator A rough service allows better product adhesion; Grooves in nail plate allow product to “sink in” No oil present on surface; Residue creates a barrier product sticks to instead of adhering to nail ALWAYS END NAIL SERVICES WITH CUTICLE OIL!!!! Remove shine & any dead nail/skin cells
- 13. Explore the Uses of Nail Wraps NAIL WRAP- Application • Nail Wrap Resin is used to coat & secure fabric to natural nail & nail tip • CYANOACRYLATE is a specialized acrylic monomer that adheres and POLYMERIZES in seconds • Moisture sensitive: IMPORTANT that product stays closed & nail is DRY • Moisture helps activate the curing process • Natural nail was enough NATURAL MOISTURE ACTIVATOR/ACCELORATOR is a catalyst that speeds up hardening Dissipates in 2 min Too much can cause a heat reaction burning the nail plate up to 170 degrees!!!! FOLLOW MANUFACTURERS DIRECTIONS!
- 14. WHY? REVIEW- TUESDAY • What are Nail Tips made from? What are some characteristics of it? • Professional term for nail glue? Ways it is packaged? • What removes moisture from the nail plate? Why do you NEED to use it? • Why are toe nail clippers not recommended to use? • What is the depression called in a nail tip? • What are the 3 types of well? Why is it important to have different kinds? • What is the position stop? What angle is the tip held? • What are the 3 ways to use a Nail wrap? • What is Cyanoacrylate? • The activator is also known as a ? Why do you need to use?
- 15. Explore the Uses of Nail Wraps NAIL WRAP- Fabrics • Silk, Linen, Fiberglass ( most popular ), Paper • Cut to cover surface of nail • Packaged as swatches, on a roll or pre-cut • Nail Wraps are natural & thin in appearance; great for a sensitive guest or guests with fragile nails trying to grow them out especially after removal of acrylics • Less likely to cause nail infections • Lift easily if exposed to water regularly ROLL SWATCH SHEETS PRE CUT STRIPS PRE CUT
- 16. Explore the Uses of Nail Wraps NAIL WRAP- Fabrics • SILK • Thin natural material with a light weave • Silk is the go to for guests who want their nails- Just stronger • Becomes transparent when resin is applied • Light weight & smooth • Moldable to shape • Comparable to gel polish but less damaging Silk & Fiberglass mix
- 17. Explore the Uses of Nail Wraps NAIL WRAP- Fabrics • Linen • Strongest BUT heaviest • Closely woven heavy material • “Thick as a bandage” • Adhesives do not penetrate as well • Opaque finish- will need a nail color after • Perfect for the guest who cant or wont wear a Nail Tip • Mix Silk & Linen for a Natural French manicure • Not common: “old school “
- 18. Explore the Uses of Nail Wraps NAIL WRAP- Fabrics • Fiberglass • Thin synthetic mesh with a loose weave • Easy to use & resin penetrates easily- improving adhesion • Very strong BUT can see mesh if you look closely after completed • Thinner than acrylic • Moldable to shape • Better option for the guest that wants length
- 19. Explore the Uses of Nail Wraps NAIL WRAP- Fabrics• Paper • Temporary nail wraps made from thin paper • Does not have the strength & durability • NEEDS RESIN ACCELERATOR • “End Paper” material • Late 1800s: tea bags, coffee filters & cigarette papers were used to strengthen nails • Not popular today • Paper nails today: Thin wax paper, tissue paper, newspaper etc sealed to nail ( usually a pattern paper )
- 20. Nail Wrap Maintenance, Repair, and Removal• Maintenance – term used for when the enhancement needs to be serviced after two or more weeks from the initial application • Uses – To fill /BACK FILL – Same steps & products as original set- only applied to new growth – To structurally correct the nail- rebalance, “fix” imbalances in natural nail plate or natural weak areas NAIL WRAP- Maintenance Cut to fit New Growth
- 21. Fabric Wrap Repair • Stress strip – fabric cut to 1/8 inch in length and applied to weak point • Repair patch – piece of fabric cut to completely cover a crack or break in the nail NAIL WRAP- Maintenance
- 22. Fabric Wrap Removal• Wraps must be removed carefully to avoid damage to the nail plate. • Enhancement is immersed in acetone: 2-3 min increments • Wait for nail wrap to melt away and gently slide softened wrap off • Allow nail “ breathe” • Take about 4-6 months for natural nail to return to original state • Keep cuticles, hands & nails moisturized afterwards • Apply strengthener • Nails will become “harder” after about a week once moisture evaporates NAIL WRAP- Removal
- 23. WHY? REVIEW- WEDNESDAY • How are nail fabrics packaged? • 1 Pro to fabric and 1 Con to fabric? • Which fabric becomes clear when resin is applied? • Which fabric is strongest but the heaviest? • Which fabric is strong but you can easily see it? • What was used to make paper nails in the 1800s? • How many weeks in-between services should you wait for a back fill/rebalance? • What is a stress strip? • How do you remove wraps?
- 24. Chapter 28 Monomer Liquid & Polymer Powder Nail Enhancements
- 25. Introduction Monomer & Polymer- ACRYLIC Your text here • These enhancements are known as SCULPTURED NAILS • Created by combining a liquid with a powder • Considered a lucrative service • Can be applied in 4 ways: • Protective overlay • Over a nail tip • Nail extension • Nail art
- 26. Convey the Chemistry of Monomer Liquid and Polymer Powder Nail Enhancements • Part of the Methacrylate family • Monomer means “one unit” (unit being a molecule) • Polymer means “many units” (many molecules) • When mixed together, they form a BEAD which then forms long, chain- like structures that create nail enhancements which can be applied over the natural nail, a tip, a form, or can be used to sculpt nail art. (continues) Monomer & Polymer- ACRYLIC Chemistry Make up:
- 27. Convey the Chemistry of Monomer Liquid and Polymer Powder Nail Enhancements (continues) Monomer & Polymer- ACRYLIC Chemistry Make up: • Liquid MONOMER mixed with powder POLYMER • Attract & Connect called POLYMERIZATION • Numerous chains connect by CROSS LINKS • These cross links form Grid/Net like structure creating the hardened acrylic
- 28. • EMA – ethyl methacrylate monomer, which is the industry standard • Odorless – has a lower odor than the traditional monomer • MMA – methyl methacrylate monomer, which is not recommended for use on nails and is not legal according to the state board rules in some states Convey the Chemistry of Monomer Liquid and Polymer Powder Nail Enhancements (continued) (continues) Monomer & Polymer- LIQUID • The Industry standards are ETHYL METHACRYLATE MONOMER liquid ( EMA ) and ODORLESS MONOMER liquid
- 29. EMA- Ethyl Methacrylate Monomer (continues) Monomer & Polymer- LIQUID • 70-90% EMA; remaining is MMA • Larger molecules so it does NOT penetrate the nail plate • Flexible • Created in late 90s to replace MMA • No allergic reactions • No burning • Matches to your natural nails surface • Nail does NOT need to be roughed up with a drill • Easily removed in acetone • Less odor • Less health hazards when breathing it in
- 30. MMA- Methyl Methacrylate (continues) Monomer & Polymer- LIQUID • Not regulated by FDA • Not legal is most states • Small molecules that penetrate nail plate and skin pores • Creates a ridged & hard nail • Same ingredient in Dental work ( crowns ) • Same ingredient as plexiglass and bone cement • Resistant to solvents; needs to be pried off or filed off with electric file • Cheap • Has a pungent almost fruit odor that causes dizziness • Itchy and burning during or after • Aggressively filing your nail: MMA does not stick well to plate like EMA • Can turn natural nails yellow • Does cure quicker & is cheaper • Produces a lot of dust • When in blood stream, it is METHANOL- linked to miscarriages
- 31. • Polymer powder is made up of POLYMERIZATION, also known as curing or hardening, a chemical reaction that creates polymers. • CHAIN REACTION is creating polymers and is known as POLYMERIZATION REACTION • INTIATORS in Powder that are activated by a CATALYST in liquid that permanently links molecules together • INTIATOR is Benzol Peroxide ( BPO ) • CATALYST speeds up reaction so nail can cure/harden faster Monomer & Polymer- POWDER
- 32. • CATALYST in Liquid • INITIATOR in Powder • Initiator makes the MONOMER move around • Active Monomer attaches to Polymer • Creates chain • Catalyst in Monomer is used to speed up that process so hardening/curing can happen quickly Monomer & Polymer- ACRYLIC Chemistry Make up:
- 33. Specify the Supplies Required for Monomer Liquid and Polymer Powder Nail Enhancements • Monomer liquid • Polymer powder • Nail dehydrator • Nail primer (continues) • Abrasives • Nail forms • Nail tips • Dappen dish • Monomer liquid and polymer powder application brush • Safety eyewear • Dust masks • Protective gloves Monomer & Polymer- SUPPLIES
- 34. WHY? REVIEW- THURSDAY • Acrylic is also known as what type of nail? • What are the 4 ways to apply Acrylic? • Mono means? Poly means? • Which one is the liquid? • The attraction between Monomer & Polymer creates what action? • What is the industry standard of Monomer liquid? • Why is EMA better than MMA? • What is in Polymer Powder that gets activated by the Catalyst in the Liquid? • What is that ingredient?
- 35. Specify the Supplies Required for Monomer Liquid and Polymer Powder Nail Enhancements • The amount of Monomer liquid to Polymer powder creates a bead • Your MIX RATIO determines the texture of your bead • ALWAYS FOLLOW MANUFACTURER DIRECTIONS! – The BPO ( INTIATOR ) amount is designed to fit ratio in liquid – Wrong ratio can cause nail to not cure properly, be brittle or discolored (continues) Monomer & Polymer- SUPPLIES WET- 2 Monomer to 1 Polymer DRY- 1 to 1 ratio MEDIUM- 1 ½ Monomer to 1 Polymer
- 36. Specify the Supplies Required for Monomer Liquid and Polymer Powder Nail Enhancements• POLYMER POWDER: Most common colors are White, Clear, Natural, Pink but there is a large variety of colors to choose from (continues) Monomer & Polymer- SUPPLIES • NAIL DEHYDRATOR: Removes all moisture and or oil on nail plate, prevents lifting
- 37. Specify the Supplies Required for Monomer Liquid and Polymer Powder Nail Enhancements • NAIL PRIMER: Used on natural nail before application to help in adhesion • There are 2 kinds: ACID BASED & NON ACID/ACID FREE • Never apply enhancement product over WET PRIMER, causes discoloration • Apply only to nail, avoid excessive use: irritate the skin, make nail brittle • Never use Primer with debris floating in it (continues) Monomer & Polymer- SUPPLIES • ACID BASED – Apply with dotting towards center of nail – Stronger Covalent bond – Primer will spread evenly – Is corrosive to skin • NON ACID BASED – Cover nail with 3 brush strokes – Weaker Hydrogen bond – Don’t cut through dirt & oil as well – Does not effect skin
- 38. Specify the Supplies Required for Monomer Liquid and Polymer Powder Nail Enhancements • ABRASIVES: Nail files or buffers. The grit refers to how many grits of sand per square inch. The lower the number the rougher the abrasive: • Medium is used most for shaping; Fine is used for refining/filing (continues) Monomer & Polymer- SUPPLIES • NAIL FORMS: Placed under free edge & used as a guide to extend nail enhancement beyond fingertip COARSE MEDIUM-FINE SHINE/ 3 SIDES 400/1,000/4,000 Single use Multi use
- 39. Learn All You Need to Know About Nail Tips (continues) NAIL TIPS- Plastic, pre-molded nail shaped from ABS For added strength & or length; Used with an OVERLAY ACRYLONITRILE BUTADIENE STYRENE: Plastic, high heat resistant, chemical resistant(acids), low cost, NOT biodegradable, durable, shiny
- 40. Specify the Supplies Required for Monomer Liquid and Polymer Powder Nail Enhancements • DAPPEN DISH: Monomer liquid & Polymer powder are poured into these containers – Small containers that help stop evaporation; always keep closed when not in use – Empty after EACH GUEST – Dispose of excess by mixing with powder or soaking up in paper towel (continues) Monomer & Polymer- SUPPLIES • NAIL BRUSHES: Natural bristle- Kolinsky, Sable or blend of both – Oval, Round or Square ( # 8 OVAL IS MOST COMMON ) – Synthetic cheap brushes does not pick up enough liquid or release bead – Middle of brush to shape free edge ( better control ) – Odor less- flat brush because it requires less liquid
- 41. Specify the Supplies Required for Monomer Liquid and Polymer Powder Nail Enhancements • SAFETY EYEWEAR: Safety goggles/glasses; protects eyes from debris & splashes – Lenses are cleat polycarbonate , are thinner and lighter than regular plastic – 10 times more impact resistant than plastic or glass lenses – Can add readers to (continues) Monomer & Polymer- SUPPLIES • DUST MASKS: Worn over nose/mouth to prevent inhalation – Does not protect against VAPOR
- 42. Specify the Supplies Required for Monomer Liquid and Polymer Powder Nail Enhancements • PROTECTIVE GLOVES: Disposable or Multi-use – Nitrile is recommended because of high chemical resistance and protection against bacteria/virus – Vinyl & latex do not hold up against nail products; tear easily (continues) Monomer & Polymer- SUPPLIES • STORING AND DISPOSING – Store in separate covered containers – Cool, dark area – Dispose according to local rules/regulations – Soak up excess liquid with paper towel – Place in bag & in a metal trash bin – Clean brushes properly – DO NOT POUR DOWN THE DRAIN
- 43. WHY? REVIEW- FRIDAY • What are the 3 mix ratios? • What does the nail dehydrator do? • What are the 2 types of Primer? • Why do you need to use a Primer? • The grit on an abrasive refers to what? • What are nail forms? • Nail tips are made from what type of plastic? • How do you properly dispose of unused product?
- 44. Maintenance, Crack Repair, and Removal Monomer & Polymer- Steps Clean nails File Cuticle work 180 GRIT nail plate Clean powder & debris Primer & Dehydrator
- 45. Maintenance, Crack Repair, and Removal Monomer & Polymer- Steps Gently roll powder Pour liquid in dappen dish Absorb liquid Dip in powder Form bead Wipe brush after each application Soak up excess
- 46. Maintenance, Crack Repair, and Removal Monomer & Polymer- Steps Same length; 180 GRIT Side wall file 1 direction Continue Side wall Follow curve 280 GRIT Whole plate Buff/shine
- 47. Maintenance, Crack Repair, and Removal • Apply bead in 3 zones for an easy natural blend • Remember to wipe brush before creating new bead • Allow nail to harden before filing or removing form • Test nail by gently tapping with back of brush; light clicking sound NOT A HOLLOW SOUND Monomer & Polymer- Maintenance
- 48. Maintenance, Crack Repair, and Removal• Maintenance helps prevent lifting or cracking. • Proper maintenance must be performed every 2- 3 weeks. • Treat area to be fixed or cured the same steps as original set Monomer & Polymer- Maintenance
- 49. Properly Structured Nail Enhancements • Apex- Arch; Most strength • Stress area- Grows beyond finger tip • Smile line- Pink & white meet in French manicure • Sidewall • Nail extension- underside- Thin is most comfortable; same on each nail • Thickness – Consistent; not too thick( heavy) • Natural looking nail should be thin at sidewalls & free edge • C-curve- matches natural curve of nail; 35% is average Monomer & Polymer-Structure
- 50. Monomer Liquid and Polymer Powder Nail Enhancement Removal • Nippers can damage nail plate • Soak the enhancements off of the nail using acetone or the manufacturer’s suggested removal solution. May take up to 20-30 min • Check every 2-3 min • Can warm up acetone by placing bowl on top of a warm bowl of water • Remove the enhancement, and complete the service. • Plate will appear thinner & flexibility will be high- within 24 hours nail will regain rigidness Monomer & Polymer- Removal
- 51. Describe Odorless Monomer Liquid and Polymer Powder Products • Not the same chemistry: uses Methoxyethoxy ethyl methacrylate • Consists of larger molecules & evaporates more slowly • The slower evaporation allows more oxygen to react creating a tacky INHIBITION LAYER that needs to be removed after hardening • Little to no odor since there is no EMA/MMA • Dry mix ratio, takes longer to cure • Use a flat brush; too wet causes skin irritation ODOR LESS MONOMER & POLYMER
- 52. Create Monomer Liquid and Polymer Powder Nail Art 3D NAIL ART & INLAID DESIGNS
- 53. WHY? REVIEW- TUESDAY • How many zones is the nail bed split into when applying your bead? • How do you test if you nail has correctly hardened? • What is the highest point on the nail? • What is the average % or C curve? • How long do you soak nails in acetone for removal? • Odorless Acrylic creates a tacky layer called the? • What is the mixing ratio for Odorless? • What is the difference between 3D and Inlaid designs?
- 54. Chapter 29 Light Cured Gels
- 55. • Light cured gel – Also known as UV and LED gel – A type of nail enhancement product that hardens when exposed to a UV or LED light source • Light cured gel is an increasingly popular method for nail enhancement services • Became well known around the early 2000’s • Great alternative to Acrylics & Wraps • Least damaging nail enhancement • Low to no odor Introduction Light Cured Gels
- 56. Comprehend the Chemistry of Light Cured Gels Light cured gels rely on ingredients similar to Monomer & Polymer family; SUBCATEGORY- ACRYLATES • Urethane- Means a synthetic coating or seal. To protect from heat and moisture • Acrylate- In all nail enhancements & polishes; Adhesive based to sculpt & adhere to nail • Urethane Acrylate- Original; cures faster; can cause burning • Urethane Methacrylate- Slower cure ; better for sensitive skin • High abrasion resistance & DURABLE • 5-500 molecules VS millions of molecules in Monomer Liquid • Larger molecules; Less penetration; Less odor Light Cured Gels ACRYLIC GEL
- 57. Comprehend the Chemistry of Light Cured Gels• Oligomer – a short chain of monomer liquids that is often thick, sticky, and gel-like and that is not long enough to be considered a polymer. • Oligomer : Holds & generates heat • Main ingredient; gives shine & rigidness • A chemical within the product, called a photoinitiator initiates the polymerization reaction. Light Cured Gels
- 58. Comprehend the Chemistry of Light Cured Gels• PHOTOINITIATOR is a chemical that initiates the POLYMERIZATION REACTION • Absorb light & convert into energy – Resin, photo initiator & proper curing bulb cause gel to cure/harden – Light source: UV , LED – Light source activates photo initiator; Molecules move around freely- photo initiator Light Cured Gels OLIGOMER MONOMERS PHOTO INITIATOR
- 59. Describe Light Cured Gels• The different light cured gels – Thin-viscosity gels – Medium-viscosity gels – Thick-viscosity gels – Building or sculpting gels. • The one-color method – one color of gel is applied over the entire surface of the nail • The two-color method – two colors of resin are used to overlay the nail Light Cured Gels
- 60. Types of Light Cured Gels • Bonding gels- Increase adhesion to natural nail plate; may have slight odor • Building gels- Thick; build an arch or curve; fiberglass pieces; good for cracks/breaks; SCULPTING GEL • Self-leveling gels- Thin; settle & level themselves; used over an overlay or ontop of a sculpted building gel • Pigmented gels- Building or self leveling; has color pigment • Gel polish- thin, pigmented; pot or bottle; in place of lacquer • Glossing gel- Sealing gel; shine; like a top coat Light Cured Gels- TYPES
- 61. Types of Light Cured Gels• 2 MAIN TYPES – TRADTIONAL: Creates a tacky, sticky layer called the INHIBITION LAYER; after curing – INHIBITION LAYER- Oxygen didn’t allow curing of top layer; sticky cause Oligomers are sticky/gel like & Monomers didn’t not adhere; Can be a normal process OR the light bulb is wrong/old – Needs to be removed with alcohol on a lint free wipe – TACK FREE: Will discolor polish when curing; Does not last as long as traditional gel; mostly seen a top coat Light Cured Gels- TYPES
- 62. Types of Light Cured Gels Light Cured Gels- TYPES • OPACITY- amount of colored pigment concentration in gel
- 63. WHY? REVIEW- WEDNESDAY • Gel nails are also called what? • What subcategory are they apart of? • What are the 2 types of URETHANE? • Which is better for sensitive skin? • What is the chain of monomers that is thick, sticky and gel like? • What is a photoinitator? and what does it create? • What does Viscosity mean? • Which gel settles itself? • Which gel is like a top coat or a seal? • What does the Traditional gel create that needs to be removed after hardening? • What does opacity mean?
- 64. Light Cured Gels- SUPPLIES • Light curing gel lamps • Application brushes- small is best • Primer/bonding gel • Light cured gel • Nail forms/CLEAR
- 65. • Nail tips Light Cured Gels- SUPPLIES • Nail Adhesive • Nail Dehydrator • Abrasives • Cleansing Solution • Lint Free Wipes
- 66. • Shelf life between 12-36 months ( depends on how well you take care of them) • Companies will print on the container the standard shelf life • Be sure that lids are on tight and containers are upright to avoid leakage. • Gels should be stored in a dark, cool place to prolong the life of the product. Away from natural sunlight/UV light. ( Will eventually cause polish to cure) • If polish has sat for a while, roll polish for better consistent application of ingredients • Use a gel polish thinner if needed Light Cured Gels- STORING
- 67. • How easy would your guest like the polish removed? • How long does your guest want it to last? 1. Length and hardness: Not as thick as other nail enhancements. Resembles the natural nail plate thickness; For an extended length, tips can be added as an enhancement. 2. Nail Health: Gel nail sets are easier to apply and less abrasive on your nail bed. Nail plate does not need to be aggressively filed prior to application 3. Cost and maintenance: Can change gel polish weekly; Costs less than other nail enhancements 4. Endurance: Gel nails are less harsh on the cuticles and nail bed; last 2-3.5 weeks on the nails while acrylic nails last a month or longer before they need refills. Light Cured Gels- When to Use
- 68. • Flat fingernails – thicker building gel • Arched or curved fingernails – self-leveling gel • Frequent breaks – gel with fiberglass Light Cured Gels- Choosing Proper Material
- 69. • If burning occurs- Exothermic Reaction- Too much product or too strong of a bulb/lamp • UV bulb emits UV radiation to cure gel nail enhancements • Bulbs loose radiation after a few months: Change 2-3 times a year • UV lamp is the light unit/device – controls bulbs to cure • Lamp number is distance from top-bottom- side to side; determines cure time • Comes in 4, 6, 7, 8 9 watt – 9 is most common – Wattage measures how much electricity the bulb consumes – 36 watt unit uses 4- 9 watt bulbs CourtesyofLightEleganceNailProducts Light Cured Gels- Lamps & Bulbs
- 70. • LED- Light Emitting Diode – Cure LED gel products only – More narrow Wavelength; Higher concentration – Cures faster- 15 – 20 sec – Less energy/ eco friendly – Bulbs last a life time – Need an LED Photo Initiator – Costly investment – No exposure to UV on skin – Can be used just as a BASE COAT prior to color application CourtesyofLightEleganceNailProducts • UV – Cures ALL types of gel polish – Emits broad UV wavelengths – Cures around 2 min – Uses more energy – Bulbs need to be replaces periodically – More affordable lamp & products
- 71. Specify the Advantages of Light Cured Gel Polish • Cure rather than dry • Do not imprint or smudge while lacquer is drying • Do not thicken over time • Last longer in the bottle • Can be a lucrative service
- 72. • Every two weeks • Use 180-grit abrasive file. • Remove oils for better adhesion with alcohol or recommended cleaner • File with a lighter touch than on ML/PP- Softer surface Light Cured Gels- Maintain & Remove
- 73. WHY? REVIEW- THURSDAY • What is the shelf life of gel? • Where should it be stored and why? • When do you choose gel over other enhancements? • A flat finger nail needs what type of gel? • Which gel will provide thickness but levels itself? • If a guest has frequent breaks what should their gel have to increase durability? • How many times a year shiykd you change your bulbs? • What is the most common watt? • What does watt measure? • Pro to UV/ Pro to LED • Why is it important to know the difference between the two? • How often should you maintain?
- 74. • Hard (traditional) UV and LED gels – cannot be removed with acetone – must be filed off- CLEAN SURAFE WITH NYLON BRUSH – good for a BASE or building extension – Thicker consistency – Tight compact molecular structure where Acetone can not penetrate – More costly • Soft UV and LED gels – removed by soaking in acetone – included gel polish – in-between polish & hard gel consistency ( medium ) – 5-15 min soak; check every 2-3 min – scrap with wooden stick – Costs less – Elongated molecular structure- creates spaces where acetone can penetrate Light Cured Gels- Maintain & Remove