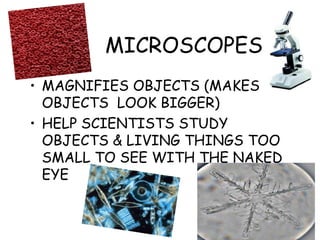
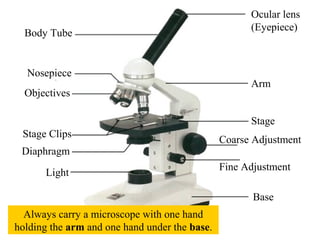
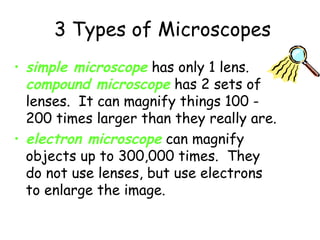
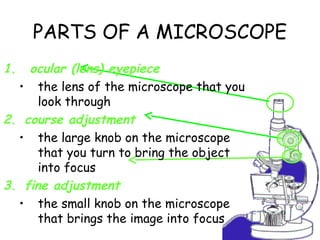
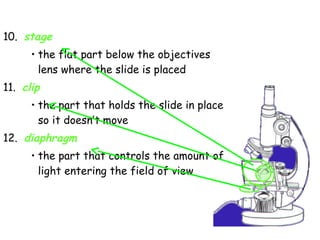
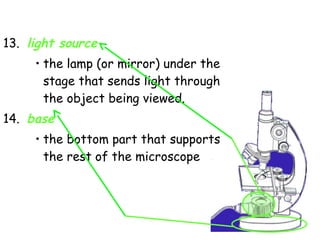
Microscopes are tools that magnify objects too small to see with the naked eye. They have various parts including objectives, an eyepiece, stage, and light source. There are three main types - simple, compound, and electron microscopes. Compound microscopes use two sets of lenses to magnify objects up to 200 times, while electron microscopes can magnify objects up to 300,000 times using electrons rather than lenses. Microscopes are used by scientists to study living and non-living tiny specimens.
as a partial requirement for one of my subject for this semester
I would like you to view my presentation and comment as well
I will be very glad if you find my presentation interesting, or comment on how I can improve my craft, THANK YOU :)
as a partial requirement for one of my subject for this semester
I would like you to view my presentation and comment as well
I will be very glad if you find my presentation interesting, or comment on how I can improve my craft, THANK YOU :)
The existence of isotopes was first suggested in 1913 by the radiochemist Frederick Soddy,
based on studies of radioactive decay chains that indicated about 40 different species referred
to as radioelements (i.e. radioactive elements) between uranium and lead, although the periodic
table only allowed for 11 elements.
*In nature, most of the elements have many atoms that have the same atomic number but
different mass numbers such atoms of an element are called isotopes. This concept will be more clear from this ppt. And also radioactive isotopes applications and calculation of average atomic mass are explained. Hope it helps! And this is mainly for class ix
Read| The latest issue of The Challenger is here! We are thrilled to announce that our school paper has qualified for the NATIONAL SCHOOLS PRESS CONFERENCE (NSPC) 2024. Thank you for your unwavering support and trust. Dive into the stories that made us stand out!
How to Split Bills in the Odoo 17 POS ModuleCeline George
Bills have a main role in point of sale procedure. It will help to track sales, handling payments and giving receipts to customers. Bill splitting also has an important role in POS. For example, If some friends come together for dinner and if they want to divide the bill then it is possible by POS bill splitting. This slide will show how to split bills in odoo 17 POS.
Unit 8 - Information and Communication Technology (Paper I).pdfThiyagu K
This slides describes the basic concepts of ICT, basics of Email, Emerging Technology and Digital Initiatives in Education. This presentations aligns with the UGC Paper I syllabus.
Ethnobotany and Ethnopharmacology:
Ethnobotany in herbal drug evaluation,
Impact of Ethnobotany in traditional medicine,
New development in herbals,
Bio-prospecting tools for drug discovery,
Role of Ethnopharmacology in drug evaluation,
Reverse Pharmacology.
The Roman Empire A Historical Colossus.pdfkaushalkr1407
The Roman Empire, a vast and enduring power, stands as one of history's most remarkable civilizations, leaving an indelible imprint on the world. It emerged from the Roman Republic, transitioning into an imperial powerhouse under the leadership of Augustus Caesar in 27 BCE. This transformation marked the beginning of an era defined by unprecedented territorial expansion, architectural marvels, and profound cultural influence.
The empire's roots lie in the city of Rome, founded, according to legend, by Romulus in 753 BCE. Over centuries, Rome evolved from a small settlement to a formidable republic, characterized by a complex political system with elected officials and checks on power. However, internal strife, class conflicts, and military ambitions paved the way for the end of the Republic. Julius Caesar’s dictatorship and subsequent assassination in 44 BCE created a power vacuum, leading to a civil war. Octavian, later Augustus, emerged victorious, heralding the Roman Empire’s birth.
Under Augustus, the empire experienced the Pax Romana, a 200-year period of relative peace and stability. Augustus reformed the military, established efficient administrative systems, and initiated grand construction projects. The empire's borders expanded, encompassing territories from Britain to Egypt and from Spain to the Euphrates. Roman legions, renowned for their discipline and engineering prowess, secured and maintained these vast territories, building roads, fortifications, and cities that facilitated control and integration.
The Roman Empire’s society was hierarchical, with a rigid class system. At the top were the patricians, wealthy elites who held significant political power. Below them were the plebeians, free citizens with limited political influence, and the vast numbers of slaves who formed the backbone of the economy. The family unit was central, governed by the paterfamilias, the male head who held absolute authority.
Culturally, the Romans were eclectic, absorbing and adapting elements from the civilizations they encountered, particularly the Greeks. Roman art, literature, and philosophy reflected this synthesis, creating a rich cultural tapestry. Latin, the Roman language, became the lingua franca of the Western world, influencing numerous modern languages.
Roman architecture and engineering achievements were monumental. They perfected the arch, vault, and dome, constructing enduring structures like the Colosseum, Pantheon, and aqueducts. These engineering marvels not only showcased Roman ingenuity but also served practical purposes, from public entertainment to water supply.
We all have good and bad thoughts from time to time and situation to situation. We are bombarded daily with spiraling thoughts(both negative and positive) creating all-consuming feel , making us difficult to manage with associated suffering. Good thoughts are like our Mob Signal (Positive thought) amidst noise(negative thought) in the atmosphere. Negative thoughts like noise outweigh positive thoughts. These thoughts often create unwanted confusion, trouble, stress and frustration in our mind as well as chaos in our physical world. Negative thoughts are also known as “distorted thinking”.
4. 3 Types of Microscopes
• simple microscope has only 1 lens.
compound microscope has 2 sets of
lenses. It can magnify things 100 -
200 times larger than they really are.
• electron microscope can magnify
objects up to 300,000 times. They
do not use lenses, but use electrons
to enlarge the image.
5. PARTS OF A MICROSCOPE
1. ocular (lens) eyepiece
• the lens of the microscope that you
look through
2. course adjustment
• the large knob on the microscope
that you turn to bring the object
into focus
3. fine adjustment
• the small knob on the microscope
that brings the image into focus
6. PARTS OF A MICROSCOPE
4. arm
• the part of the microscope
supporting the body tube
5. body tube
• the part that holds the eyepiece and
the objective lenses.
6. nosepiece
• the part at the bottom of the body
tube that holds the objective lenses
and allows them to be turned
7. 7. high power objective lens
• the lens that magnifies the object the
greatest amount. (usually 40x)
8. Low power (scanner) objective lens
• the lens that magnifies the object the
least amount (usually used to find the
object; magnifies only 3x or 4x)
9. middle power objective lens
• the lens that usually magnifies the object
more than the scanner lens, but less than
the high power lens (usually 10x to 20x)
8. 10. stage
• the flat part below the objectives
lens where the slide is placed
11. clip
• the part that holds the slide in place
so it doesn’t move
12. diaphragm
• the part that controls the amount of
light entering the field of view
9. 13. light source
• the lamp (or mirror) under the
stage that sends light through
the object being viewed.
14. base
• the bottom part that supports
the rest of the microscope
11. Field of View
• Field of view is the area (circle)
that you see when looking through
the eyepiece
12. Comparing Powers of Magnification
We can see better details with higher the
powers of magnification, but we cannot
see as much of the image.
Which of these images
would be viewed at a
higher power of
magnification?
13. What’s my power?
To calculate the power of magnification, multiply the power of the
ocular lens by the power of the objective.
What are the powers of
magnification for each of
the objectives we have on
our microscopes?
Fill in the table on
your worksheet.
14. Calculating Magnification
1. Find the power of the lens. It is found on
the side of the lens. Magnification power of
a lens is always identified by the label of x
(10x, 1000x)
2. Multiply the power of the eyepiece by the
power of the objective lens.
3. Examples:
eyepiece obj. lens
10x times 100x
10x times 50x
10x times 40x
15. Appearance of the Specimen
• Objects appear upside-down &
backward
• Movement appears to be in opposite
direction than actual movement 1
2
move slide
slide appears to move
2 1
16. Let’s give it a try ...
1 – Turn on the microscope and then rotate the nosepiece to click the
red-banded objective into place.
2 – Place a slide on the stage and secure it using the stage clips. Use
the coarse adjustment knob (large knob) to get it the image into view
and then use the fine adjustment knob (small knob) to make it
clearer.
4 – When you are done, turn off the microscope and put up the
slides you used.
3 – Once you have the image in view, rotate the nosepiece to view it
under different powers. Draw what you see on your worksheet!
Be careful with the largest objective! Sometimes there is
not enough room and you will not be able to use it!
17. Recording Observations
• Draw specimen large enough to fill
“field of view” circle
• Draw as many details as possible
• Drawing should be neat
• Label specimen
• Label power of magnification
• Name & date on paper
18. Making a Wet Mount Slide
1. Use dropper to place a drop of
water on the center of a clean slide.
2. Use tweezers to lay specimen on
the drop of water.
3. Gently touch the cover slip to the
edge of the drop of water to cover
the specimen & the water.
19. How to make a wet-mount slide …
1 – Get a clean slide and coverslip from your teacher.
2 – Place ONE drop of water in the middle of the slide. Don’t use
too much or the water will run off the edge and make a mess!
3 – Place the edge of the cover slip on one side of the water drop.
You do not need to use the stage clips
when viewing wet-mount slides!
5 – Place the slide on the stage and view it first with the red-banded
objective. Once you see the image, you can rotate the nosepiece to
view the slide with the different objectives.
4 - Slowly lower the cover slip on top of the drop.
Cover
Slip
Lower slowly