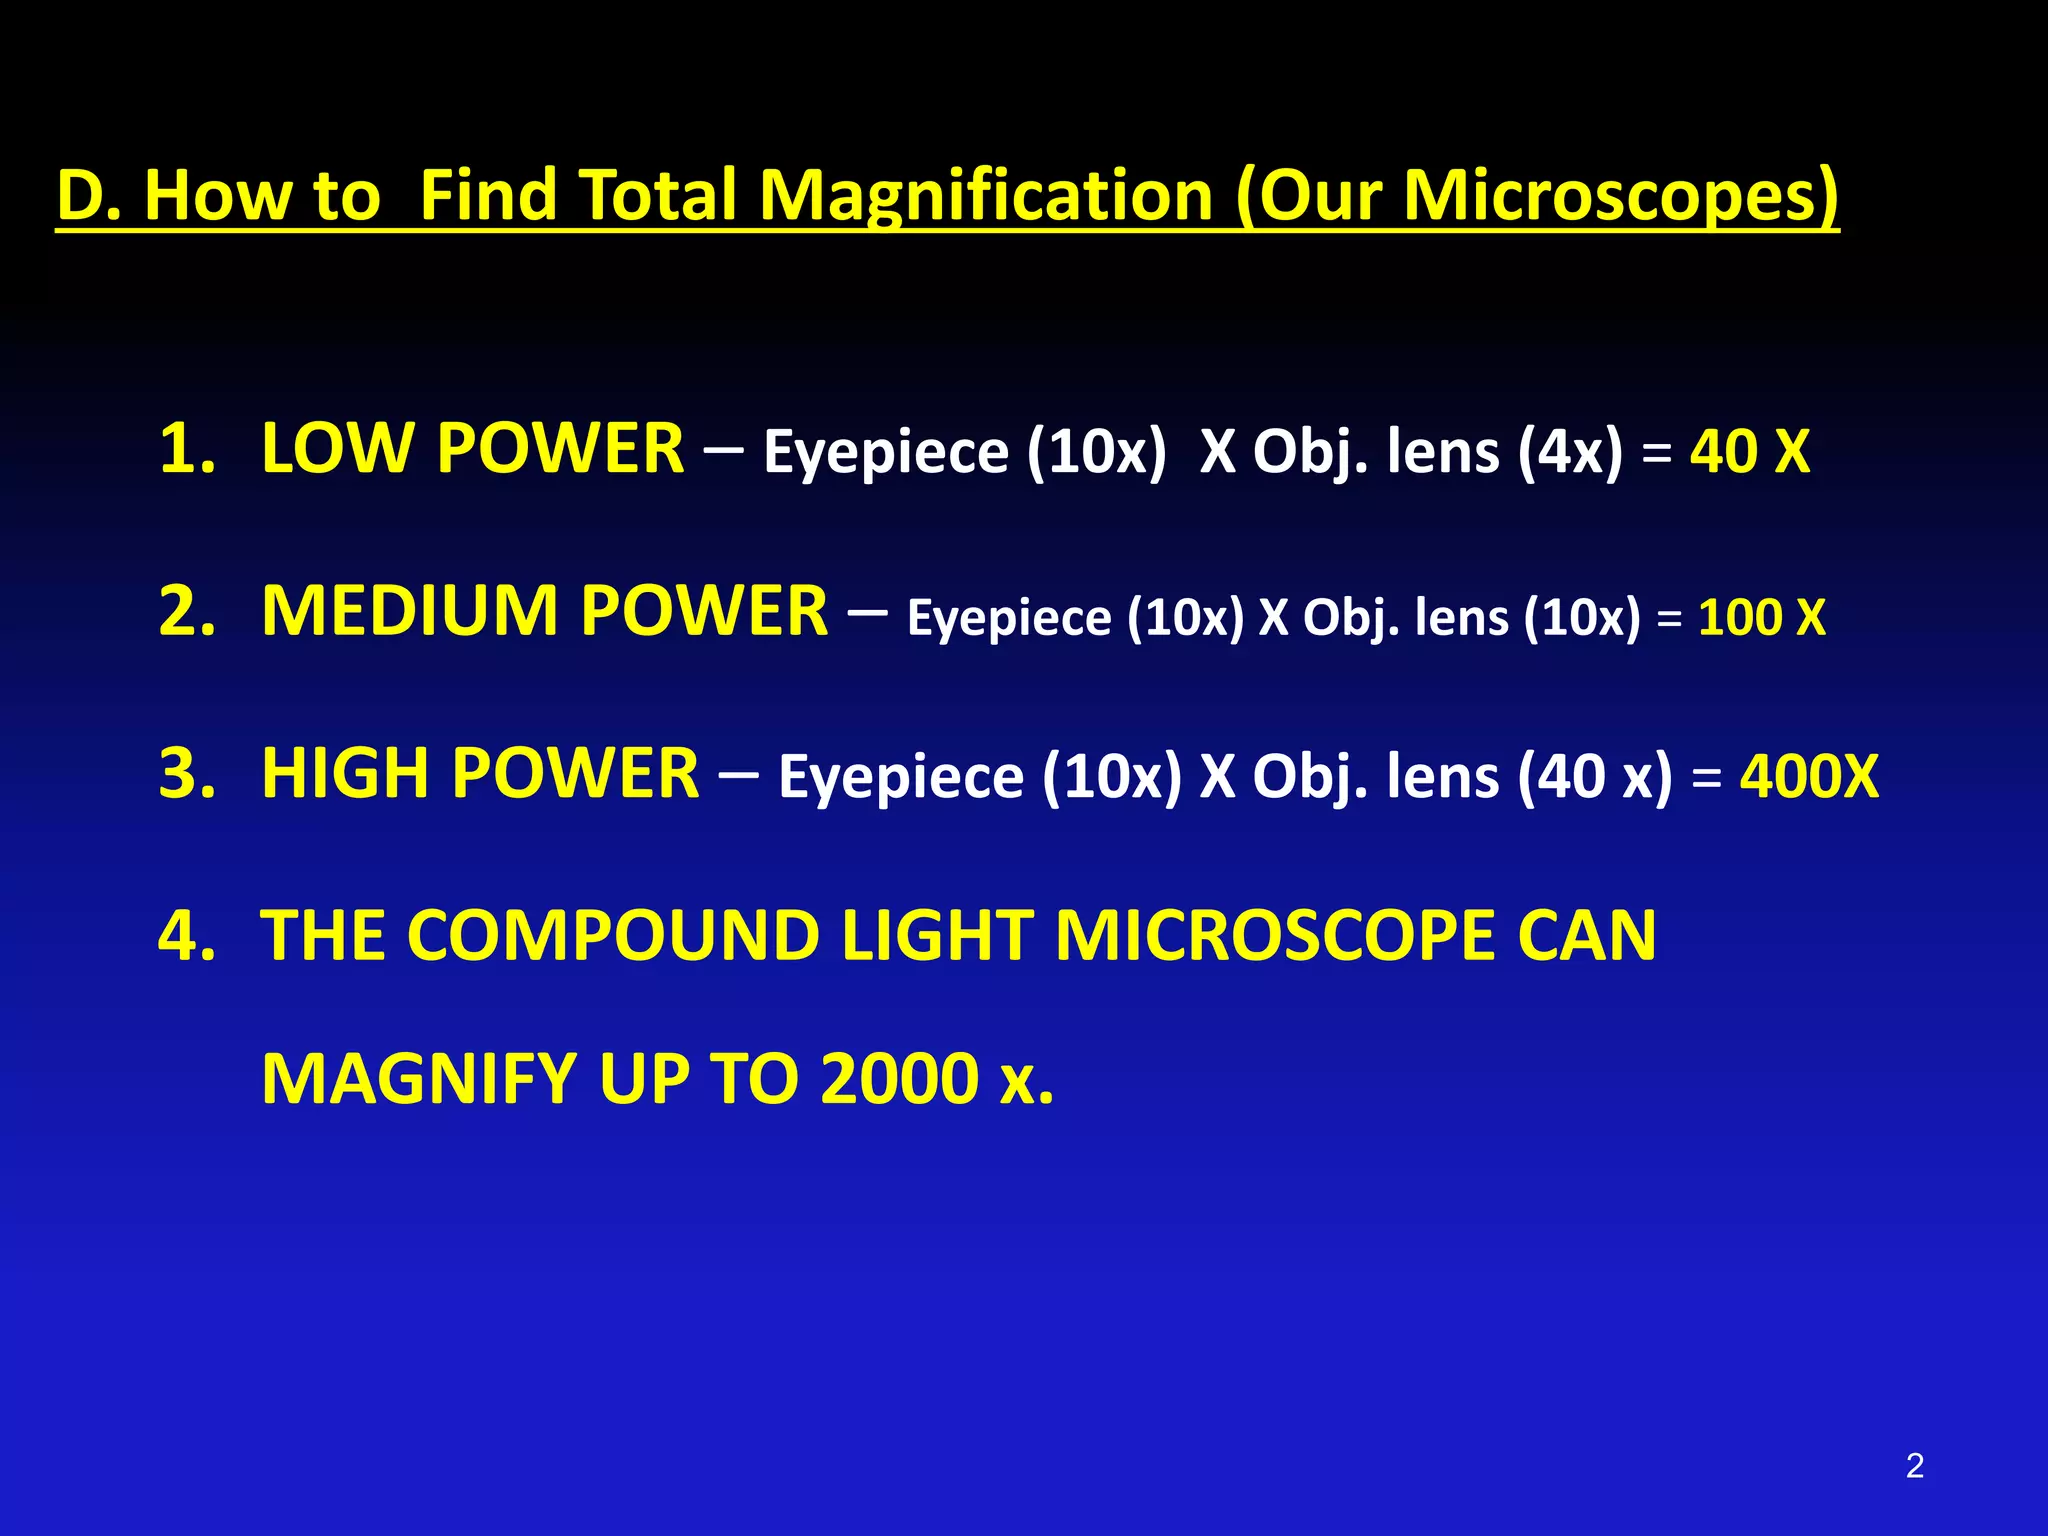
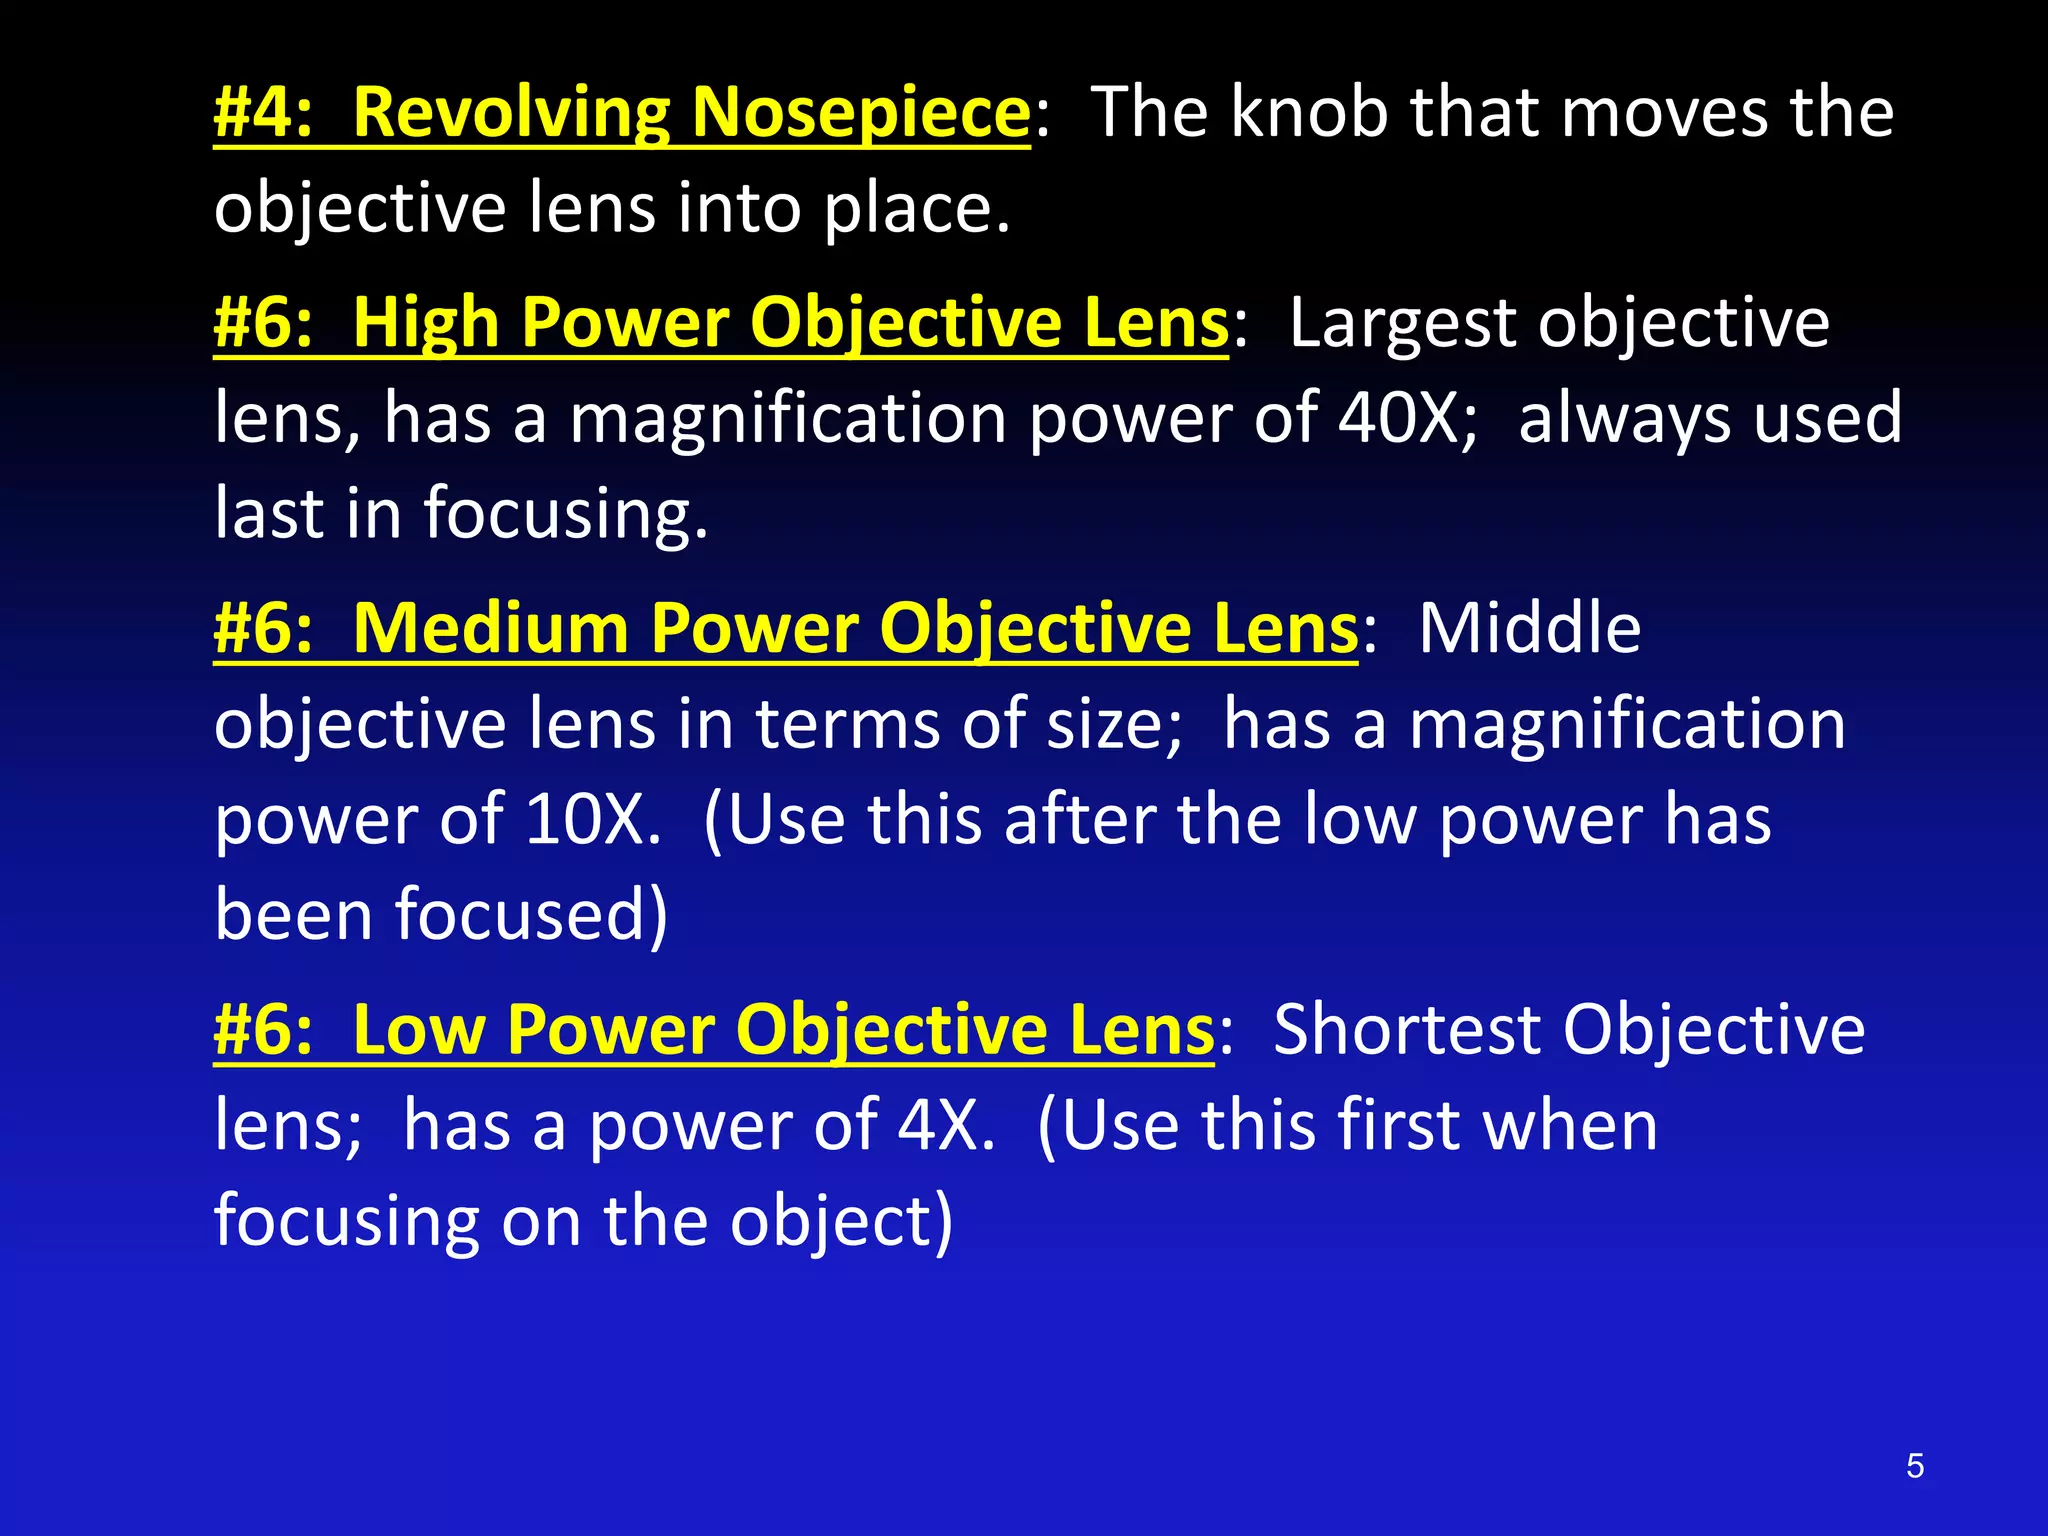
STEM : Microscope Review
1
D. How to Find Total Magnification (Our Microscopes)
1. LOW POWER – Eyepiece (10x) X Obj. lens (4x) = 40 X
2. MEDIUM POWER – Eyepiece (10x) X Obj. lens (10x) = 100 X
3. HIGH POWER – Eyepiece (10x) X Obj. lens (40 x) = 400X
4. THE COMPOUND LIGHT MICROSCOPE CAN
MAGNIFY UP TO 2000 x.
2
3
E. Parts of the Compound Light Microscope
#1: Eyepiece: Part you look through, has a
magnification of 10X.
#10: Coarse Adjustment Knob: Usually the larger of
the two knobs; use this first to bring the object into
rough focus.
a. Use only under low and medium power!!!!
#13: Fine Adjustment Knob: Smaller of the two
knobs; used to bring the object into “perfect” focus.
(always use this last)
#3: Arm: used to carry the microscope.
#8: Slide (what you put on the microscope stage)
4
#4: Revolving Nosepiece: The knob that moves the
objective lens into place.
#6: High Power Objective Lens: Largest objective
lens, has a magnification power of 40X; always used
last in focusing.
#6: Medium Power Objective Lens: Middle
objective lens in terms of size; has a magnification
power of 10X. (Use this after the low power has
been focused)
#6: Low Power Objective Lens: Shortest Objective
lens; has a power of 4X. (Use this first when
focusing on the object)
5
#9: Stage: Place where the slide is placed.
#5: Stage Clips: Holds the slide in place.
#11: Diaphragm: A disc that regulates the amount
of light hitting the object.
#15: Base: Bottom of microscope; used to carry
microscope with arm.
#12: Light/Mirror: Illumination source for the
microscope. (Provides light to view the object).
#2: Body Tube (Eyepiece Tube): Connects the
eyepiece to the revolving nosepiece.
#14: Power Switch: Turns light on for microscope.
6
F. Other Tools for Microscope Use:
1. Slides: Glass or plastic where specimen is placed.
2. Coverslip: glass or plastic placed over the
specimen to secure the object.
a. Coverslip should be placed onto the slide on a 45
degree angle and pushed down to force out air
bubbles.
7
G. Rules of the Microscope
1. Always carry the microscope holding the arm
with one hand and supporting the base with the
other hand.
2. NEVER touch the lenses with your fingers!!!!
3. The coarse adjustment know is used only when
looking through the lowest power objective
lens!!!
4. The fine adjustment knob is used when the high
power objective is in place
5. Cover the microscope when you store it!!!
Do not copy this slide…we will discuss it!!!
8
H. How to Use a Microscope
1. Place the microscope on a flat surface that is clear of
objects. The arm should be toward you.
2. Look through the eyepiece. Adjust the diaphragm so
light comes through the opening of the stage.
3. Place a slide on the stage so the specimen is in the
field of view. Hold it firmly in place by using the
stage clips.
4. Always focus with the coarse adjustment and low
power objective first!!
5. After the object is in focus on low power, turn the
nosepiece until the high power objective is in place.
6. Make sure the specimen is centered before changing
powers!!
7. USE ONLY THE FINE ADJUSTMENT TO FOCUS WITH
THE HIGH POWER OBJECTIVE LENS!!!
9
I. Making a Wet Mount Slide
1. Carefully place the item you want to look at in
the center of a clean, glass slide. Make sure the
sample is thin enough for light to pass through it.
2. Use a dropper to place one or two drops of water
on the sample.
3. Hold a clean cover slip by the edges and place it
at one edge of the water. Slowly lower the
coverslip (45 degree anlge) onto the water until it
lies flat.
4. If you have too much water or a lot of air
bubbles, touch the edge of a paper towel to the
edge of the coverslip to draw off extra water and
draw out unwanted air.
10
5. Sometimes Stain(Iodine) is used to make hidden
cell parts visible.
a. Other stains besides iodine are used in the science
world.
11

Microscope review

  • 1.
  • 2.
    D. How toFind Total Magnification (Our Microscopes) 1. LOW POWER – Eyepiece (10x) X Obj. lens (4x) = 40 X 2. MEDIUM POWER – Eyepiece (10x) X Obj. lens (10x) = 100 X 3. HIGH POWER – Eyepiece (10x) X Obj. lens (40 x) = 400X 4. THE COMPOUND LIGHT MICROSCOPE CAN MAGNIFY UP TO 2000 x. 2
  • 3.
  • 4.
    E. Parts ofthe Compound Light Microscope #1: Eyepiece: Part you look through, has a magnification of 10X. #10: Coarse Adjustment Knob: Usually the larger of the two knobs; use this first to bring the object into rough focus. a. Use only under low and medium power!!!! #13: Fine Adjustment Knob: Smaller of the two knobs; used to bring the object into “perfect” focus. (always use this last) #3: Arm: used to carry the microscope. #8: Slide (what you put on the microscope stage) 4
  • 5.
    #4: Revolving Nosepiece:The knob that moves the objective lens into place. #6: High Power Objective Lens: Largest objective lens, has a magnification power of 40X; always used last in focusing. #6: Medium Power Objective Lens: Middle objective lens in terms of size; has a magnification power of 10X. (Use this after the low power has been focused) #6: Low Power Objective Lens: Shortest Objective lens; has a power of 4X. (Use this first when focusing on the object) 5
  • 6.
    #9: Stage: Placewhere the slide is placed. #5: Stage Clips: Holds the slide in place. #11: Diaphragm: A disc that regulates the amount of light hitting the object. #15: Base: Bottom of microscope; used to carry microscope with arm. #12: Light/Mirror: Illumination source for the microscope. (Provides light to view the object). #2: Body Tube (Eyepiece Tube): Connects the eyepiece to the revolving nosepiece. #14: Power Switch: Turns light on for microscope. 6
  • 7.
    F. Other Toolsfor Microscope Use: 1. Slides: Glass or plastic where specimen is placed. 2. Coverslip: glass or plastic placed over the specimen to secure the object. a. Coverslip should be placed onto the slide on a 45 degree angle and pushed down to force out air bubbles. 7
  • 8.
    G. Rules ofthe Microscope 1. Always carry the microscope holding the arm with one hand and supporting the base with the other hand. 2. NEVER touch the lenses with your fingers!!!! 3. The coarse adjustment know is used only when looking through the lowest power objective lens!!! 4. The fine adjustment knob is used when the high power objective is in place 5. Cover the microscope when you store it!!! Do not copy this slide…we will discuss it!!! 8
  • 9.
    H. How toUse a Microscope 1. Place the microscope on a flat surface that is clear of objects. The arm should be toward you. 2. Look through the eyepiece. Adjust the diaphragm so light comes through the opening of the stage. 3. Place a slide on the stage so the specimen is in the field of view. Hold it firmly in place by using the stage clips. 4. Always focus with the coarse adjustment and low power objective first!! 5. After the object is in focus on low power, turn the nosepiece until the high power objective is in place. 6. Make sure the specimen is centered before changing powers!! 7. USE ONLY THE FINE ADJUSTMENT TO FOCUS WITH THE HIGH POWER OBJECTIVE LENS!!! 9
  • 10.
    I. Making aWet Mount Slide 1. Carefully place the item you want to look at in the center of a clean, glass slide. Make sure the sample is thin enough for light to pass through it. 2. Use a dropper to place one or two drops of water on the sample. 3. Hold a clean cover slip by the edges and place it at one edge of the water. Slowly lower the coverslip (45 degree anlge) onto the water until it lies flat. 4. If you have too much water or a lot of air bubbles, touch the edge of a paper towel to the edge of the coverslip to draw off extra water and draw out unwanted air. 10
  • 11.
    5. Sometimes Stain(Iodine)is used to make hidden cell parts visible. a. Other stains besides iodine are used in the science world. 11