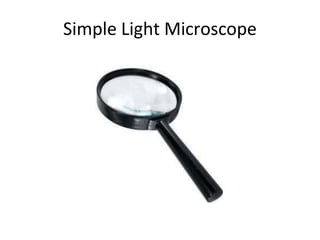
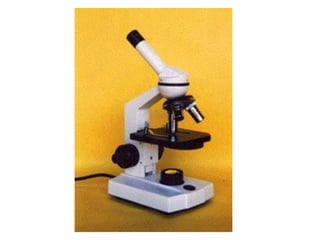
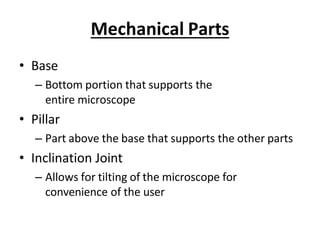
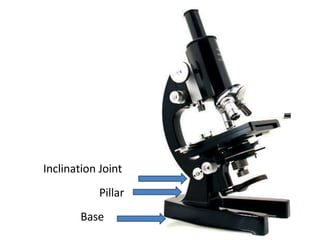
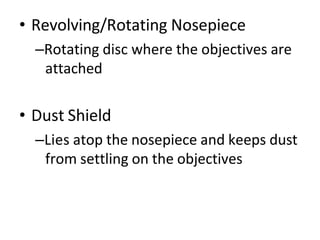
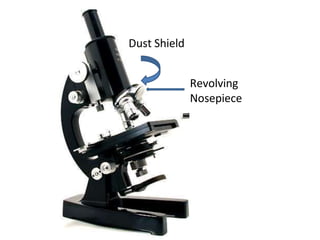
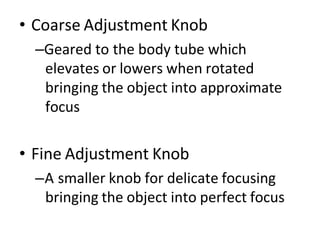
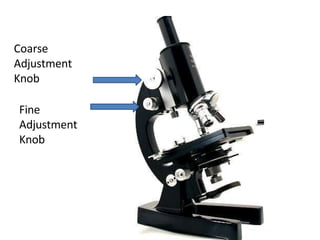
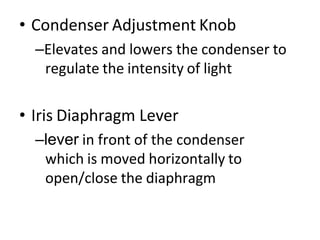
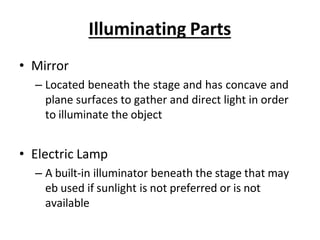
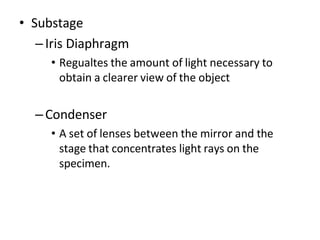
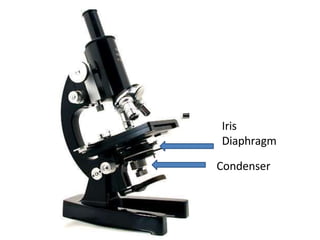
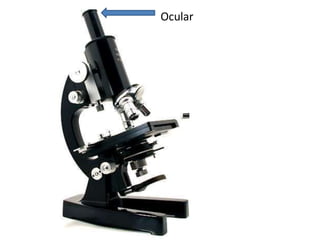
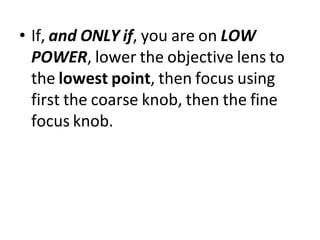
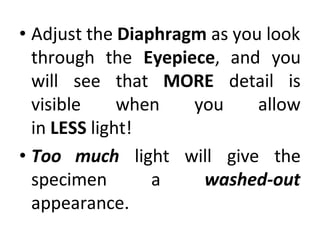
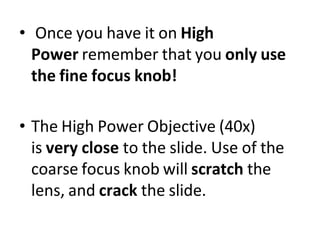
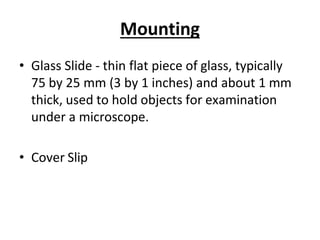
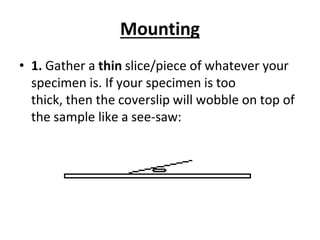
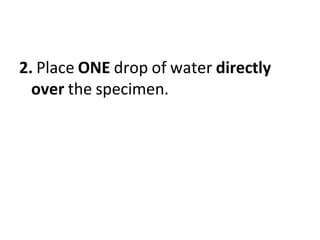
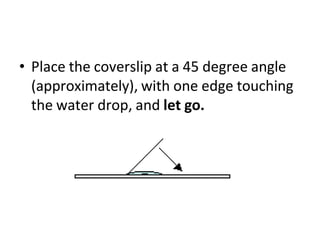
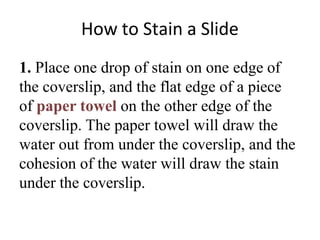
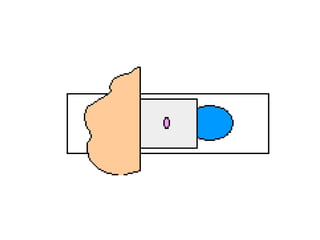
Parts and Functions of a
Compound Microscope
Light Microscope
• Simple – uses a single lens
• Compound – uses a set of lenses or lens
systems
Simple Light Microscope
Compound Microscope
• Mechanical Parts
– Used to support and adjust the parts
• Magnifying Parts
– Used to enlarge the specimen
• Illuminating Parts
– Used to provide light
Mechanical Parts
• Base
– Bottom portion that supports the
entire microscope
• Pillar
– Part above the base that supports the other parts
• Inclination Joint
– Allows for tilting of the microscope for
convenience of the user
Inclination Joint
Pillar
Base
• Arm/Neck
–Curved/slanted part which is held
while carrying the microscope
• Stage
–Platform where object to be examined
is placed
• Stage Clips
–Secures the specimen to the stage
• Stage Opening
• Body Tube
–Attached to the arm and houses
the lenses
• Draw Tube
–Cylindrical structure on top of the body
tube that holds the ocular lenses
Draw Tube
Stage
Body Tube
Arm / Neck
• Revolving/Rotating Nosepiece
–Rotating disc where the objectives are
attached
• Dust Shield
–Lies atop the nosepiece and keeps dust
from settling on the objectives
Dust Shield
Revolving
Nosepiece
• Coarse Adjustment Knob
–Geared to the body tube which
elevates or lowers when rotated
bringing the object into approximate
focus
• Fine Adjustment Knob
–A smaller knob for delicate focusing
bringing the object into perfect focus
Coarse
Adjustment
Knob
Fine
Adjustment
Knob
• Condenser Adjustment Knob
–Elevates and lowers the condenser to
regulate the intensity of light
• Iris Diaphragm Lever
–lever in front of the condenser
which is moved horizontally to
open/close the diaphragm
Iris
Diaphragm
Lever
Condenser
Adjustment
Knob
Illuminating Parts
• Mirror
– Located beneath the stage and has concave and
plane surfaces to gather and direct light in order
to illuminate the object
• Electric Lamp
– A built-in illuminator beneath the stage that may
eb used if sunlight is not preferred or is not
available
Mirror /
Electric
Lamp
• Substage
–Iris Diaphragm
• Regualtes the amount of light necessary to
obtain a clearer view of the object
–Condenser
• A set of lenses between the mirror and the
stage that concentrates light rays on the
specimen.
Iris
Diaphragm
Condenser
MAGNIFYING PARTS
• Ocular / Eyepiece
– Another set of lens found on top of the body tube
which functions to further magnify the image
produced by the objective lenses. It usually ranges
from 5x to 15x.
Ocular
MAGNIFYING PARTS
• Objectives
– Metal cylinders attached below the nosepiece and contains
especially ground and polished lenses
• LPO / Low Power Objective
– Gives the lowest magnification, usually 10x
• HPO / High Power Objective
– Gives higher magnification usually 40x or 43x
• OIO / Oil Immersion Objective
– Gives the highest magnification, usually 97x or 100x, and
is used wet either with cedar wood oil or synthetic oil
Objectives
Use of the Compound
Microscope
• Make sure all backpacks are out of
the aisles before you get a
microscope!
• Always carry the microscope with
one hand on the Arm and one hand
on the Base. Carry it close to your
body.
• Be gentle.
• Setting the microscope down
on the table roughly could jar
lenses and other parts loose.
• Always start and end with lowest
powered objective.
• Place the slide on the microscope
stage, with the specimen directly
over the center of the glass circle on
the stage (directly over the light).
• If you wear glasses, take them off; if
you see only
your eyelashes, move closer.
• If you see a dark line that goes part
way across the field of view, try
turning the eyepiece.
• Use only the Fine adjustment knob
when using the HIGH (long) POWER
OBJECTIVE.
• As much as possible, keep both eyes
open to reduce eyestrain. Keep eye
slightly above the eyepiece to reduce
eyelash interference.
• If, and ONLY if, you are on LOW
POWER, lower the objective lens to
the lowest point, then focus using
first the coarse knob, then the fine
focus knob.
• Adjust the Diaphragm as you look
through the Eyepiece, and you
will see
visible
that
when
MORE detail is
you allow
in LESS light!
• Too much
specimen
appearance.
light will give the
a washed-out
• Once you have it on High
Power remember that you only use
the fine focus knob!
• The High Power Objective (40x)
is very close to the slide. Use of the
coarse focus knob will scratch the
lens, and crack the slide.
Mounting
• Glass Slide - thin flat piece of glass, typically
75 by 25 mm (3 by 1 inches) and about 1 mm
thick, used to hold objects for examination
under a microscope.
• Cover Slip
Mounting
• 1. Gather a thin slice/piece of whatever your
specimen is. If your specimen is too
thick, then the coverslip will wobble on top of
the sample like a see-saw:
2. Place ONE drop of water directly
over the specimen.
• Place the coverslip at a 45 degree angle
(approximately), with one edge touching
the water drop, and let go.
Staining
• A technique in microscopy that is used to
enhance the image of the specimen.
• To distinguish structures in cells and tissues
How to Stain a Slide
1. Place one drop of stain on one edge of
the coverslip, and the flat edge of a piece
of paper towel on the other edge of the
coverslip. The paper towel will draw the
water out from under the coverslip, and the
cohesion of the water will draw the stain
under the coverslip.
• As soon as the stain has covered the
area containing the specimen you
are finished. The stain does not need
to be under the entire coverslip. If the
stain does not cover the area
needed, get a new piece of paper
towel and add more stain until it
does.
• 3. Be sure to wipe off the excess
stain with a paper towel, so you
don’t end up staining the
objective lenses.
• 4. You are now ready to place the
slide on the microscope stage. Be
sure to follow all the instructions
as to how to use the microscope.
• 5. When you have completed your
drawings, be sure to wash and
dry both the slide and the
coverslip and return them to
the correct places!

partsandfunctionsofacompoundmicroscope-120920041156-phpapp02-1.pptx

  • 1.
    Parts and Functionsof a Compound Microscope
  • 2.
    Light Microscope • Simple– uses a single lens • Compound – uses a set of lenses or lens systems
  • 3.
  • 4.
    Compound Microscope • MechanicalParts – Used to support and adjust the parts • Magnifying Parts – Used to enlarge the specimen • Illuminating Parts – Used to provide light
  • 6.
    Mechanical Parts • Base –Bottom portion that supports the entire microscope • Pillar – Part above the base that supports the other parts • Inclination Joint – Allows for tilting of the microscope for convenience of the user
  • 7.
  • 8.
    • Arm/Neck –Curved/slanted partwhich is held while carrying the microscope • Stage –Platform where object to be examined is placed • Stage Clips –Secures the specimen to the stage
  • 9.
    • Stage Opening •Body Tube –Attached to the arm and houses the lenses • Draw Tube –Cylindrical structure on top of the body tube that holds the ocular lenses
  • 10.
  • 11.
    • Revolving/Rotating Nosepiece –Rotatingdisc where the objectives are attached • Dust Shield –Lies atop the nosepiece and keeps dust from settling on the objectives
  • 12.
  • 13.
    • Coarse AdjustmentKnob –Geared to the body tube which elevates or lowers when rotated bringing the object into approximate focus • Fine Adjustment Knob –A smaller knob for delicate focusing bringing the object into perfect focus
  • 14.
  • 15.
    • Condenser AdjustmentKnob –Elevates and lowers the condenser to regulate the intensity of light • Iris Diaphragm Lever –lever in front of the condenser which is moved horizontally to open/close the diaphragm
  • 16.
  • 17.
    Illuminating Parts • Mirror –Located beneath the stage and has concave and plane surfaces to gather and direct light in order to illuminate the object • Electric Lamp – A built-in illuminator beneath the stage that may eb used if sunlight is not preferred or is not available
  • 18.
  • 19.
    • Substage –Iris Diaphragm •Regualtes the amount of light necessary to obtain a clearer view of the object –Condenser • A set of lenses between the mirror and the stage that concentrates light rays on the specimen.
  • 20.
  • 21.
    MAGNIFYING PARTS • Ocular/ Eyepiece – Another set of lens found on top of the body tube which functions to further magnify the image produced by the objective lenses. It usually ranges from 5x to 15x.
  • 22.
  • 23.
    MAGNIFYING PARTS • Objectives –Metal cylinders attached below the nosepiece and contains especially ground and polished lenses • LPO / Low Power Objective – Gives the lowest magnification, usually 10x • HPO / High Power Objective – Gives higher magnification usually 40x or 43x • OIO / Oil Immersion Objective – Gives the highest magnification, usually 97x or 100x, and is used wet either with cedar wood oil or synthetic oil
  • 24.
  • 25.
    Use of theCompound Microscope
  • 26.
    • Make sureall backpacks are out of the aisles before you get a microscope! • Always carry the microscope with one hand on the Arm and one hand on the Base. Carry it close to your body.
  • 27.
    • Be gentle. •Setting the microscope down on the table roughly could jar lenses and other parts loose.
  • 28.
    • Always startand end with lowest powered objective.
  • 29.
    • Place theslide on the microscope stage, with the specimen directly over the center of the glass circle on the stage (directly over the light).
  • 30.
    • If youwear glasses, take them off; if you see only your eyelashes, move closer. • If you see a dark line that goes part way across the field of view, try turning the eyepiece.
  • 31.
    • Use onlythe Fine adjustment knob when using the HIGH (long) POWER OBJECTIVE. • As much as possible, keep both eyes open to reduce eyestrain. Keep eye slightly above the eyepiece to reduce eyelash interference.
  • 32.
    • If, andONLY if, you are on LOW POWER, lower the objective lens to the lowest point, then focus using first the coarse knob, then the fine focus knob.
  • 33.
    • Adjust theDiaphragm as you look through the Eyepiece, and you will see visible that when MORE detail is you allow in LESS light! • Too much specimen appearance. light will give the a washed-out
  • 34.
    • Once youhave it on High Power remember that you only use the fine focus knob! • The High Power Objective (40x) is very close to the slide. Use of the coarse focus knob will scratch the lens, and crack the slide.
  • 35.
    Mounting • Glass Slide- thin flat piece of glass, typically 75 by 25 mm (3 by 1 inches) and about 1 mm thick, used to hold objects for examination under a microscope. • Cover Slip
  • 36.
    Mounting • 1. Gathera thin slice/piece of whatever your specimen is. If your specimen is too thick, then the coverslip will wobble on top of the sample like a see-saw:
  • 37.
    2. Place ONEdrop of water directly over the specimen.
  • 38.
    • Place thecoverslip at a 45 degree angle (approximately), with one edge touching the water drop, and let go.
  • 39.
    Staining • A techniquein microscopy that is used to enhance the image of the specimen. • To distinguish structures in cells and tissues
  • 40.
    How to Staina Slide 1. Place one drop of stain on one edge of the coverslip, and the flat edge of a piece of paper towel on the other edge of the coverslip. The paper towel will draw the water out from under the coverslip, and the cohesion of the water will draw the stain under the coverslip.
  • 42.
    • As soonas the stain has covered the area containing the specimen you are finished. The stain does not need to be under the entire coverslip. If the stain does not cover the area needed, get a new piece of paper towel and add more stain until it does.
  • 43.
    • 3. Besure to wipe off the excess stain with a paper towel, so you don’t end up staining the objective lenses.
  • 44.
    • 4. Youare now ready to place the slide on the microscope stage. Be sure to follow all the instructions as to how to use the microscope.
  • 45.
    • 5. Whenyou have completed your drawings, be sure to wash and dry both the slide and the coverslip and return them to the correct places!