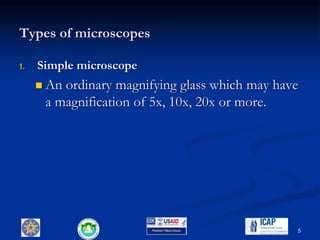
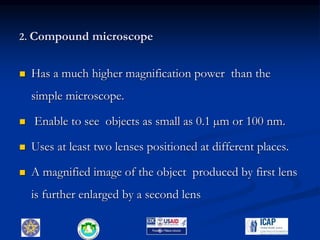
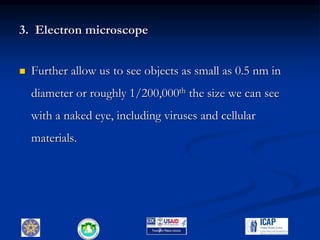
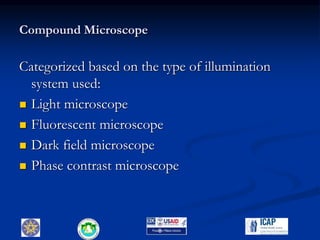
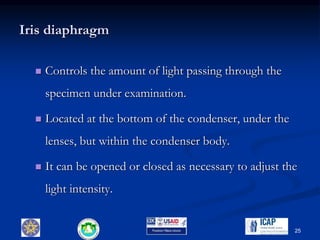
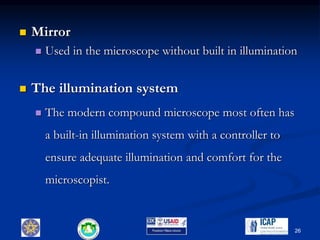
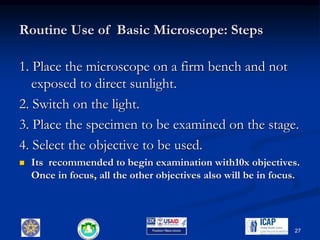
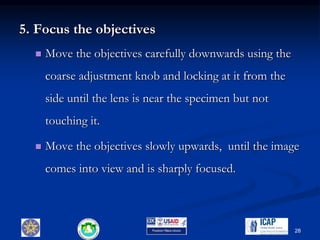
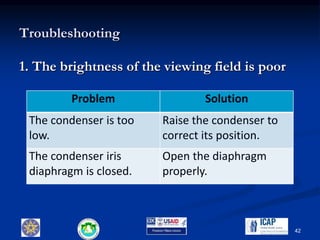
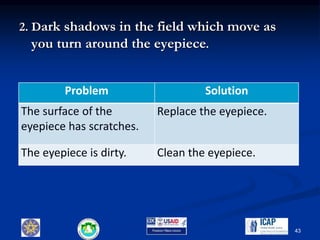
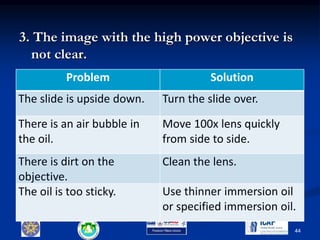
1. The document provides instructions on the proper use and care of laboratory instruments and glassware, with a focus on microscopes.
2. It describes the main parts of the microscope, including the base, arm, body tube, ocular lens, objective lenses, stage, condenser, and focusing knobs.
3. Directions are given for calculating total magnification, focusing, and cleaning the microscope, as well as safely transporting and storing the instrument.
This document provides information about bright field microscopes. It describes how bright field microscopes work by using light to illuminate specimens on a slide, which appear dark against a bright background. It outlines the basic components of a microscope like the stage, objectives, and eyepieces. The document discusses using bright field microscopy to view stained specimens and provides tips for microscope care, setup, use, and troubleshooting common problems.
The document provides an overview of microscopes, including their history and uses. It describes the key parts and functions of compound light microscopes, such as the mechanical and optical systems including objectives, eyepieces, stages, and condensers. Different types of lenses and their magnifications are discussed. The document also covers using microscopes properly, including focusing techniques and using immersion oil with high magnification objectives.
The document provides instructions for students on the proper use and care of a microscope during laboratory experiments. It describes the main components of the microscope, including the body, base, stage, illumination system, magnifying lenses, and adjusting system. It provides step-by-step instructions on how to use the different objective lenses, adjust the light and focus to view unstained and stained samples. Students are advised to clean lenses after use and store the microscope properly.
The document discusses the compound microscope. It describes how a compound microscope uses two lenses, an objective lens near the specimen and an eyepiece lens, to magnify the specimen. It details the various parts of a compound microscope, including the stage, objective lenses, eyepiece, condenser, and diaphragm. It explains that changing the objective lens allows higher magnification and that oil immersion objectives provide the highest magnification of 100x.
1. The document describes the process of observing microorganisms under a microscope using simple staining. It explains how microscopes work and their main parts.
2. Microbial cells are mostly transparent so staining increases contrast. Stains use positively charged dye molecules that bind to cells' negative charge. Cells are heat fixed to prevent washing away during staining.
3. The procedure involves making a smear, heat fixing, staining with methylene blue, rinsing and examining under the microscope. Cell shapes like cocci and bacilli can be distinguished.
This document provides information about microscopes and their parts. It discusses that microscopes are used to magnify objects too small to see with the naked eye. There are three main types: simple, compound, and electron. The compound microscope has two lens which allows higher magnification of 100-200 times. The parts of the microscope include the eyepiece, tube, stage, objectives, coarse and fine adjustments. Objective lenses provide different levels of magnification like 4X, 10X, and 40X. The condenser and diaphragm help focus and adjust the light. Proper use and care of the microscope is described.
LAB-2 of hshaiiananaiaihana maiuhvwbj.pdfssuserdf9205
Â
The document provides an overview of microscopes and their parts. It discusses how microscopes are used to observe small objects like bacteria and cell structures. It describes the main types as light microscopes and electron microscopes. It then details the key parts of a light compound microscope, including the eyepiece lenses, body tube, revolving nosepiece, objective lenses, stage, condenser, diaphragm, coarse and fine adjustments, stage movement controls, arm, and base.
The document provides information about microscopes, including their history, parts, and functions. It discusses how microscopes are used to view small objects not visible to the naked eye. The three main parts are the magnifying parts like the eyepiece and objective lenses, the illuminating parts like the mirror and diaphragm, and the mechanical parts like the stage and adjustment knobs. Microscopes are important scientific tools that allow observation of cells and microorganisms and have been useful in studying viruses like COVID-19.
The document provides information about microscopes, including their history, parts, and functions. It discusses how microscopes are used to view small objects not visible to the naked eye. The three main parts are the magnifying parts like the eyepiece and objective lenses, the illuminating parts like the mirror and diaphragm, and the mechanical parts like the stage and adjustment knobs. Microscopes are important scientific tools that allow observation of cells and microorganisms and have been useful in studying viruses like the COVID-19 virus.
Q2_living things and their environment.pptxAURORACARIAGA2
Â
The document provides information about the levels of biological organization from cells to the biosphere:
- Cells are the basic unit of life and can be either unicellular or multicellular. Tissues are made of cells that work together, while organs are made of tissues. Organ systems consist of multiple cooperating organs.
- Organisms can be either unicellular or multicellular. Populations are groups of the same species in an area. Communities include all species in an area. Ecosystems include all communities and physical components in an area.
- The biosphere is the highest level and includes all ecosystems on Earth. Biology studies living things across these levels of organization from cells to the entire planet.
This document provides instructions for the use and care of a compound light microscope. It describes the basic anatomy of a microscope, including the objectives and ocular lenses used to magnify specimens. It explains that total magnification is calculated by multiplying the objective and ocular magnifications. The document then provides a step-by-step guide for setting up the microscope and viewing a slide, including how to focus at different magnifications and use immersion oil. It stresses the importance of properly cleaning the microscope after use.
This document discusses various histological tools used to study tissues at the microscopic level. It describes light microscopes, which use visible light and can magnify up to 1000x, and electron microscopes, which use electron beams to achieve much higher magnification up to 1 million times. Key histological techniques mentioned include biopsy, tissue processing, staining, immunohistochemistry, and different types of microscopy like fluorescence and polarizing microscopy. The document provides details on the basic components and functioning of different microscope types used in histology.
The document provides information about microscopy, including:
1. Defining key microscope terms like magnification, resolving power, contrast, and depth of field.
2. Describing the parts and proper use of compound light microscopes, including objectives, oculars, stages, condensers, and focusing.
3. Explaining how microscope images are inverted and techniques like using different magnifications, iris diaphragms, and immersion oil.
The document provides an overview of microscopy, including:
1) Definitions of microscopy and related terms like magnification and resolution.
2) A brief history highlighting early pioneers like van Leeuwenhoek who made important early discoveries.
3) Descriptions of common microscope types like compound, phase contrast, and electron microscopes.
4) Explanations of key microscope components like the objective lens, eyepiece, stage, and illumination methods.
This document provides an overview of microscopy, including:
1. It defines microscopy as using an instrument called a microscope to view objects too small to see with the naked eye.
2. It describes some key parts and types of microscopes like compound, phase contrast, dark ground, and electron microscopes.
3. It explains concepts like magnification, resolution, and aberration that are important for microscopy.
This document discusses various histological tools used to study tissues at the microscopic level. It describes light microscopes, which use visible light and magnification to examine thin tissue slices stained with histological dyes. Electron microscopes are also covered, using electron beams instead of light for higher resolution imaging of cell structures. Specific techniques covered include fluorescence microscopy using fluorescent dyes, polarizing microscopy examining birefringence, and transmission electron microscopy producing 2D images of cell organelles. The history and development of microscopy from early simple microscopes to modern compound and electron microscopes is summarized.
The document provides information about using a compound light microscope, including:
1) The main parts of a compound light microscope are the ocular lenses, body tube, objective lenses, stage, condenser, iris diaphragm, coarse and fine adjustment knobs, and light source.
2) To examine a specimen, the user selects the appropriate objective lens, focuses using the coarse and fine adjustment knobs, and adjusts the condenser and iris diaphragm to control illumination.
3) For oil immersion objectives, oil is added to the slide and specimen to allow for higher magnification imaging.
The document discusses the history and components of the microscope. It describes how Antony van Leeuwenhoek is credited with developing the first microscope in the 16th century and discovering bacteria and cells. The main types of microscopes are described as optical, electron, and scanning probe microscopes. Optical microscopes are further divided into simple and compound microscopes. Compound microscopes use two lenses, the objective and eyepiece lenses, to magnify specimens, while simple microscopes use only one lens. The parts of a compound microscope and how it works to produce a magnified image are also outlined.
These lectures has prepared for postgraduate student (Ophthalmology) according to the curriculum of Bangladesh College of Physician and Surgeons (BCPS) and Bangabondhu Sheikh Mujib Medical University (BSMMU) Bangladesh
Microscopy is used to observe microorganisms that are too small to be seen with the naked eye. There are two main types of microscopes - light microscopes, which use lenses and visible light, and electron microscopes, which use a beam of electrons. Light microscopes can be brightfield, using visible light against a bright background, or darkfield. Brightfield microscopy is commonly used to observe stained specimens and count microbes. The resolution of light microscopes is limited by the wavelength of visible light used. Higher resolutions can be achieved using oil immersion lenses, which match the refractive index of the microscope slide and oil to improve image quality at magnifications over 100x.
Practical Manual of Pharmacognosy Diploma in Pharmacy 1st year.pdfSumit Tiwari
Â
This document outlines experiments to be conducted in a practical lab manual for a D. Pharm 1st year course. It includes 18 experiments focusing on the macroscopic and microscopic study of various plant materials and chemical tests. The experiments cover topics like the study of a compound microscope, examination of plant leaves and seeds like Senna, Datura, Isapgol, Cardamom, Fennel, and chemical tests for substances like agar, acacia, tragacanth, gelatin and starch. For each experiment, the aim, requirements, theory, procedure, observations and constituents are provided.
General Microbiology Section 1.pdf and bacteriaemysareed
Â
The document provides instructions and information about laboratory techniques including aseptic technique, microscopy, and bacteria. It describes how to properly handle materials to prevent contamination, the main components and principles of microscopes, different types of microscopes, and common bacterial shapes and arrangements. Key points are aseptic technique prevents contamination, objectives and oculars provide magnification in microscopes, and common bacteria shapes include coccus, bacillus, and spiral forms that can be arranged in various ways.
Similar to Module 2-Microscopy Parts, care and handling.ppt (20)
Executive Directors Chat Leveraging AI for Diversity, Equity, and InclusionTechSoup
Â
Letâs explore the intersection of technology and equity in the final session of our DEI series. Discover how AI tools, like ChatGPT, can be used to support and enhance your nonprofit's DEI initiatives. Participants will gain insights into practical AI applications and get tips for leveraging technology to advance their DEI goals.
Strategies for Effective Upskilling is a presentation by Chinwendu Peace in a Your Skill Boost Masterclass organisation by the Excellence Foundation for South Sudan on 08th and 09th June 2024 from 1 PM to 3 PM on each day.
This presentation was provided by Steph Pollock of The American Psychological Associationâs Journals Program, and Damita Snow, of The American Society of Civil Engineers (ASCE), for the initial session of NISO's 2024 Training Series "DEIA in the Scholarly Landscape." Session One: 'Setting Expectations: a DEIA Primer,' was held June 6, 2024.
LAND USE LAND COVER AND NDVI OF MIRZAPUR DISTRICT, UPRAHUL
Â
This Dissertation explores the particular circumstances of Mirzapur, a region located in the
core of India. Mirzapur, with its varied terrains and abundant biodiversity, offers an optimal
environment for investigating the changes in vegetation cover dynamics. Our study utilizes
advanced technologies such as GIS (Geographic Information Systems) and Remote sensing to
analyze the transformations that have taken place over the course of a decade.
The complex relationship between human activities and the environment has been the focus
of extensive research and worry. As the global community grapples with swift urbanization,
population expansion, and economic progress, the effects on natural ecosystems are becoming
more evident. A crucial element of this impact is the alteration of vegetation cover, which plays a
significant role in maintaining the ecological equilibrium of our planet.Land serves as the foundation for all human activities and provides the necessary materials for
these activities. As the most crucial natural resource, its utilization by humans results in different
'Land uses,' which are determined by both human activities and the physical characteristics of the
land.
The utilization of land is impacted by human needs and environmental factors. In countries
like India, rapid population growth and the emphasis on extensive resource exploitation can lead
to significant land degradation, adversely affecting the region's land cover.
Therefore, human intervention has significantly influenced land use patterns over many
centuries, evolving its structure over time and space. In the present era, these changes have
accelerated due to factors such as agriculture and urbanization. Information regarding land use and
cover is essential for various planning and management tasks related to the Earth's surface,
providing crucial environmental data for scientific, resource management, policy purposes, and
diverse human activities.
Accurate understanding of land use and cover is imperative for the development planning
of any area. Consequently, a wide range of professionals, including earth system scientists, land
and water managers, and urban planners, are interested in obtaining data on land use and cover
changes, conversion trends, and other related patterns. The spatial dimensions of land use and
cover support policymakers and scientists in making well-informed decisions, as alterations in
these patterns indicate shifts in economic and social conditions. Monitoring such changes with the
help of Advanced technologies like Remote Sensing and Geographic Information Systems is
crucial for coordinated efforts across different administrative levels. Advanced technologies like
Remote Sensing and Geographic Information Systems
9
Changes in vegetation cover refer to variations in the distribution, composition, and overall
structure of plant communities across different temporal and spatial scales. These changes can
occur natural.
How to Manage Your Lost Opportunities in Odoo 17 CRMCeline George
Â
Odoo 17 CRM allows us to track why we lose sales opportunities with "Lost Reasons." This helps analyze our sales process and identify areas for improvement. Here's how to configure lost reasons in Odoo 17 CRM
How to Setup Warehouse & Location in Odoo 17 InventoryCeline George
Â
In this slide, we'll explore how to set up warehouses and locations in Odoo 17 Inventory. This will help us manage our stock effectively, track inventory levels, and streamline warehouse operations.
A review of the growth of the Israel Genealogy Research Association Database Collection for the last 12 months. Our collection is now passed the 3 million mark and still growing. See which archives have contributed the most. See the different types of records we have, and which years have had records added. You can also see what we have for the future.
How to Add Chatter in the odoo 17 ERP ModuleCeline George
Â
In Odoo, the chatter is like a chat tool that helps you work together on records. You can leave notes and track things, making it easier to talk with your team and partners. Inside chatter, all communication history, activity, and changes will be displayed.
Exploiting Artificial Intelligence for Empowering Researchers and Faculty, In...Dr. Vinod Kumar Kanvaria
Â
Exploiting Artificial Intelligence for Empowering Researchers and Faculty,
International FDP on Fundamentals of Research in Social Sciences
at Integral University, Lucknow, 06.06.2024
By Dr. Vinod Kumar Kanvaria
2. Learning Objectives
At the end of this module the learner should be able to:
īŽ Describe parts of a microscope and their use
īŽ Explain proper storage of the microscope
īŽ Describe cleaning the microscope
īŽ Explain maintenance of microscopes
īŽ Discuss troubleshooting of common problems
associated with the use of a microscope
2
3. Content Outline
īŽ Microscopy
īŽ Parts of a microscope
īŽ Microscope storage conditions
īŽ Equipment required for microscope maintenance
īŽ Cleaning solutions and solvent required to clean
optics, stage and body
īŽ Materials required for cleaning and its microscope
3
4. Microscopy
īŽ The science of investigating small objects using a
microscope.
īŽ Has an essential role for the diagnosis and management
of many infectious disease through examination of
clinical specimen.
4
5. Types of microscopes
1. Simple microscope
īŽ An ordinary magnifying glass which may have
a magnification of 5x, 10x, 20x or more.
5
6. 2. Compound microscope
īŽ Has a much higher magnification power than the
simple microscope.
īŽ Enable to see objects as small as 0.1 Âĩm or 100 nm.
īŽ Uses at least two lenses positioned at different places.
īŽ A magnified image of the object produced by first lens
is further enlarged by a second lens
6
7. 3. Electron microscope
īŽ Further allow us to see objects as small as 0.5 nm in
diameter or roughly 1/200,000th the size we can see
with a naked eye, including viruses and cellular
materials.
7
8. Compound Microscope
Categorized based on the type of illumination
system used:
īŽ Light microscope
īŽ Fluorescent microscope
īŽ Dark field microscope
īŽ Phase contrast microscope
8
9. 9
Based on the number of eyepieces, Two types of
compound microscopes available:
Monocular microscopes
âĸ Single eyepiece
âĸ Convenient for use by beginners and for field work
where there is no electricity.
Binocular microscopes
âĸTwo eyepieces
âĸ Recommended where much microscopic work has to
be done.
10. The resolving power of a microscope
īŽ The ability of an objective to distinguish the dots
separately and distinctly.
īŽ The limit of usable magnification.
âĸ The human eye can separate dots that are 0.25 mm
in diameter.
âĸ A light microscope can separates dots that are
0.25Âĩm apart.
âĸ The electron microscope can separate dots that are
0.5 nm apart.
10
11. Parts of a Compound Microscope
īŽ Microscope stand
īŽ Mechanical adjustment system
īŽ Optics
11
13. Microscope Stand
īŽ Tube
īŽ Holds the eyepiece and objectives in line and at the
correct distance
īŽ Stage
īŽ Flat place in which the specimen to be examined is
placed.
īŽ In the center there is circular hole that allow the
light form the lamp to pass through
13
14. Microscope standâĻ
īŽ Mechanical stage
īŽ Enables the slide to be moved in a controlled way,
either along or across the slide.
īŽ Sub stage
īŽ Located Immediately below the stage
īŽ Holds a condenser lens with an iris diagraph and a
holder for light filters and stops.
īŽ Foot/Base
īŽ This makes sure that the microscope is placed firmly
on the laboratory bench.
14
15. The Mechanical Adjustment System
īŽ Coarse adjustment
īŽ Used to focus using low-power objectives
īŽ Controlled by a pair of large knobs positioned one
on each end of the body
īŽ Rotation of these knobs moves the tube with its
lenses or, in some microscopes, the stage up or
down rapidly.
15
16. īŽ Fine adjustment
īŽ Used to focus objectives for high-power objectives
īŽ Moves the objectives or stage up or down very
slowly.
īŽ Controlled by two smaller knobs on each end of the
slide.
16
17. īŽ Condenser adjustment
īŽ Has an adjustment system for its focusing i.e.
opening and closing of its aperture .
īŽ Can also be swung aside to remove it or to exchange
it with another.
īŽ Focused by rotating a knob to one side of it.
17
18. Optics of a Light Microscope
īŽ Objectives
īŽ The most important parts as the quality and
magnification of the image depend on it.
18
19. Description of objectives according to Lens
diameter and equivalent focal length (EFL)
Objectives Description
Diameter Equivalent focal
length
10x 16mm 2/3 inch
40x 4mm 1/6 inch
100x 2mm 1/12 inch
19
20. The low power objective: 10x
īŽ Used for initial scanning and observation in
most microscopic works.
īŽ Used for initial focusing and light adjustment of
the microscope.
20
21. The high power objective: 40x
īŽ Used for more detailed study as the total
magnification with 10x eyepiece is 400.
īŽ Used for the diagnosis of intestinal protozoal
parasites, urine sediments/cells, casts crystals,
and histological sections.
21
22. The oil immersion objectives: 100x
īŽ Has a very short focal length and working
distance.
īŽ The lens rests almost on a microscopic slide
when in use.
īŽ Oil is used to increase the numerical aperture
and the resolving power of the objective.
22
23. Ocular (Eyepiece)
īŽ A lens that magnifies the image formed by the
objectives.
īŽ The usual magnification of the ocular is 10x, others are
4x, 6x, 7x, 15x and 20x.
īŽ The higher the power, the greater the total
magnification of the microscope.
īŽ The lower the power of the eyepiece, however, the
brighter and sharper is the image.
23
24. Condenser Lens
īŽ A large lens with an iris diaphragm placed below the
stage.
īŽ Directs the beam of light from the light source to the
specimen under examination.
īŽ Consists of two or three curved lenses so that the light
can pass to the objectives at a sufficiently wide angle.
īŽ Raised and lowered beneath the stage to provide light
based on the type of objective used
24
25. Iris diaphragm
īŽ Controls the amount of light passing through the
specimen under examination.
īŽ Located at the bottom of the condenser, under the
lenses, but within the condenser body.
īŽ It can be opened or closed as necessary to adjust the
light intensity.
25
26. īŽ Mirror
īŽ Used in the microscope without built in illumination
īŽ The illumination system
īŽ The modern compound microscope most often has
a built-in illumination system with a controller to
ensure adequate illumination and comfort for the
microscopist.
26
27. Routine Use of Basic Microscope: Steps
1. Place the microscope on a firm bench and not
exposed to direct sunlight.
2. Switch on the light.
3. Place the specimen to be examined on the stage.
4. Select the objective to be used.
īŽ Its recommended to begin examination with10x objectives.
Once in focus, all the other objectives also will be in focus.
27
28. 5. Focus the objectives
īŽ Move the objectives carefully downwards using the
coarse adjustment knob and locking at it from the
side until the lens is near the specimen but not
touching it.
īŽ Move the objectives slowly upwards, until the image
comes into view and is sharply focused.
28
29. 6. Focus the condenser.
īŽ Open the iris of the condenser fully and, focus the condenser on the
detail of the light source until the image appears sharp.
7. Adjust the opening of the condenser iris according
to the specimen examined.
īŽ Stained smears the condenser iris should be opened
more widely giving a well-illuminated image with fine
details.
īŽ Unstained specimen the condenser iris should be
opened in reduced manner to increase the contrast.
29
30. 8. Examine the specimen:
īŽ For a higher magnification, swing the 40x into place.
Focus the 40x objectives using the fine adjustment.
īŽ For the highest magnification, add a drop of
immersion oil to the specimen and swing the 100x oil
immersion objectives in to place. Open the iris fully to
fill the objectives with light.
30
31. Care and Handling of the Compound
Microscope
īŽ Good working knowledge and proper care of the
microscope are critical to good diagnostic work.
īŽ Always use two hands to carry the microscope - one on
the arm and one under the base.
īŽ Never carry the microscope upside down, for the
ocular can and will fall out.
īŽ Never expose it to sharp knocks, vibrations,
moisture, dust or direct sunlight.
31
32. īŽ Always turn off the light when not in use.
īŽ Use lens paper which is lightly moistened with ethyl
ether/alcohol (80/20 v/v) to clean all lenses.
īŽ Always use the proper focusing technique to avoid
ramming the objective lens into a slide - this can break
the objective lens and/or ruin an expensive slide.
īŽ Always carefully place the wire out of harmâs way.
īŽ Always replace the cover on the microscope when you
put it away
32
33. Materials Required for Cleaning a Microscope
Anti-Mold Strips
īŽ Applied to prevent mold.
īŽ Replace these strips every 3 years. Remove dust attached to
the microscope with a blower.
Lens paper moistened with ethyl/ether alcohol
īŽ Applied to four lenses to clean debris and fingerprints before
and after examination.
33
34. Microscope Cleaning Process
īŽ Cleaning the eye piece
īŽ Cleaning the objectives
īŽ Cleaning the microscope stage
īŽ Cleaning the microscope body
īŽ Cleaning the condenser
34
35. Cleaning the eye piece
īŽ Blow to remove dust before wiping lens
īŽ Clean the eyepieces with a cotton swab
moistened with lens cleaning solution
īŽ Clean in a circular motion inside out
īŽ Wipe the eyepieces dry with lens paper
īŽ Repeat cleaning and drying if required
35
36. Cleaning the Objectives
īŽ Should be cleaned while attached to the microscope
īŽ Moisten the lens paper with the cleaning solution.
īŽ Wipe gently the objective in a circular motion from the
inside out
īŽ Wipe with lens cleaning paper
īŽ Should never be removed from the nosepiece
36
37. Cleaning the Microscope Stage
īŽ Wipe stage using the cleaning solution on a soft
cloth.
īŽ Thoroughly dry the stage.
īŽ Repeat the above steps, if required
37
38. Cleaning the Microscope Body
īŽ Unplug the microscope from the power source
īŽ Moisten the cotton pad with a mild cleaning
agent
īŽ Wipe the microscope body to remove dust, dirt
and oil
īŽ Repeat steps1â3, if required
38
39. Cleaning the Condenser
īŽ Unplug the microscope from the power source
īŽ Clean the condenser lens and auxiliary lens using
lint-free cotton swabs moistened with lens
cleaning solution
īŽ Wipe with dry swabs
39
40. Maintenance of the microscope:
Replacing the Microscope Bulb
īŽ Unplug the microscope from the power source
īŽ Find the location of the bulb
īŽ Follow manufacturerâs instructions to remove the bulb
īŽ Use tissue paper to remove the bulb from the
microscope
īŽ Replace the bulb by holding it with lens paper or an
appropriate device
NB: Never touch the bulb with your fingers.
40
41. Microscope Repair
īŽ Never disassemble the microscope
īŽ Optics: eyepieces and objectives
īŽ Mechanics: stage and focus adjustments
īŽ Repair of these items requires a service engineer
41
42. Troubleshooting
1. The brightness of the viewing field is poor
Problem Solution
The condenser is too
low.
Raise the condenser to
correct its position.
The condenser iris
diaphragm is closed.
Open the diaphragm
properly.
42
43. 2. Dark shadows in the field which move as
you turn around the eyepiece.
Problem Solution
The surface of the
eyepiece has scratches.
Replace the eyepiece.
The eyepiece is dirty. Clean the eyepiece.
43
44. 3. The image with the high power objective is
not clear.
Problem Solution
The slide is upside down. Turn the slide over.
There is an air bubble in
the oil.
Move 100x lens quickly
from side to side.
There is dirt on the
objective.
Clean the lens.
The oil is too sticky. Use thinner immersion oil
or specified immersion oil.
44
45. 4. The image is not clear with the low power
objective.
Problem Solution
There is oil on the lens. Clean the lens.
There is a layer of dust on
the upper surface of the
objective.
Clean the lens.
45
46. If the field is still dim and cloudy, consider
the following possible causes:
īŽ Massive growth of fungus on the lenses or prisms
due to storage in a high humidity environment
īŽ Penetration of immersion oil between the lenses of
the objective through damaged lens cement
īŽ A damaged objective (due to careless focusing,
dropping, rough changing of slides)
46
47. Frequently-encountered operational errors
include the following:
īŽ Focusing the first slide using the 100x without passing
through a 10x objective.
īŽ Changing slides from under the immersion objective
without turning it away first.
īŽ Wiping lenses without first blowing away dust and
sand.
īŽ Cleaning lenses or other parts with xylene.
īŽ Using cedar wood oil, liquid paraffin, or xylene-diluted
oil instead of pure synthetic immersion oil.
īŽ Keeping the microscope in a confined space.
47
48. Log Book
īŽ It should be maintained to enter problems
encountered in the operation of the microscope,
maintenance schedule, repairs done on the
microscope and availability of spares like bulbs,
fuses, anti-mold strips etc.
48