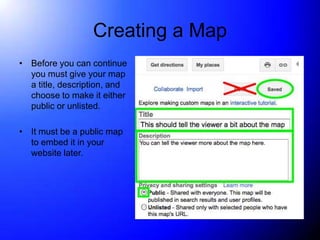
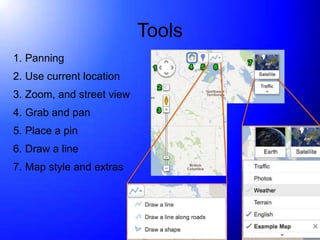
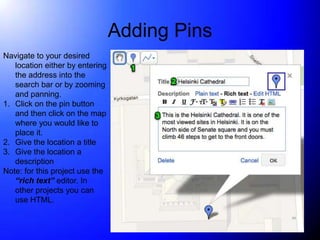
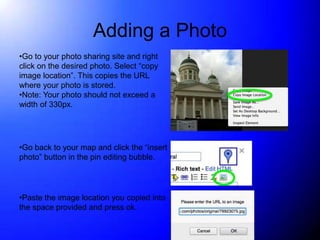
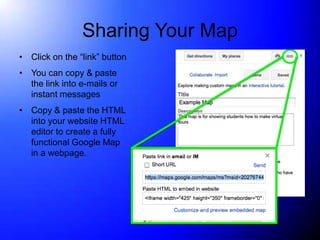
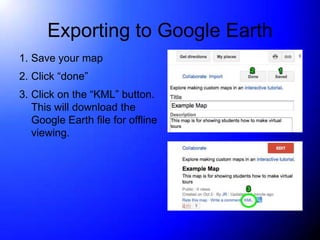
Making a Virtual Tour
    Using Google maps/earth
Making Maps
There are many reasons to make public maps.
  This photo tutorial will show you the basic steps
  to creating your own virtual tour (see assignment
  #5, Font Walk)
Preliminary Tasks
•   Walk around part of your city/town
    –   Photograph interesting examples of typography
        •   Do not forget to look up!
    –   Record the address of the photo
        •   Other details of the placement of the typography
            would also be useful
•   Upload photos to your photo sharing site of
    choice (I used Panoramio)
•   Research the history of the type or the place
    where it appeared
Creating Your Virtual Tour
                    Sign Up/Sign In


Note: Make sure the “stay signed in” box is
unchecked for security
Creating a Map
                Once you have signed-in go to Google Maps


Along the left side you will
see a menu.
1. Click “My Places”
2. Click “Create Map”
Creating a Map
• Before you can continue
  you must give your map
  a title, description, and
  choose to make it either
  public or unlisted.

• It must be a public map
  to embed it in your
  website later.
Tools
1. Panning
2. Use current location
3. Zoom, and street view
4. Grab and pan
5. Place a pin
6. Draw a line
7. Map style and extras
Adding Pins
Navigate to your desired
   location either by entering
   the address into the
   search bar or by zooming
   and panning.
1. Click on the pin button
   and then click on the map
   where you would like to
   place it.
2. Give the location a title
3. Give the location a
   description
Note: for this project use the
   “rich text” editor. In
   other projects you can
   use HTML.
Adding a Photo
•Go to your photo sharing site and right
click on the desired photo. Select “copy
image location”. This copies the URL
where your photo is stored.
•Note: Your photo should not exceed a
width of 330px.


•Go back to your map and click the “insert
photo” button in the pin editing bubble.


•Paste the image location you copied into
the space provided and press ok.
Sharing Your Map
• Click on the “link” button
• You can copy & paste
  the link into e-mails or
  instant messages
• Copy & paste the HTML
  into your website HTML
  editor to create a fully
  functional Google Map
  in a webpage.
Exporting to Google Earth
1. Save your map
2. Click “done”
3. Click on the “KML” button.
   This will download the
   Google Earth file for offline
   viewing.

Making a Google Maps Tour

  • 1.
    Making a VirtualTour Using Google maps/earth
  • 2.
    Making Maps There aremany reasons to make public maps. This photo tutorial will show you the basic steps to creating your own virtual tour (see assignment #5, Font Walk)
  • 3.
    Preliminary Tasks • Walk around part of your city/town – Photograph interesting examples of typography • Do not forget to look up! – Record the address of the photo • Other details of the placement of the typography would also be useful • Upload photos to your photo sharing site of choice (I used Panoramio) • Research the history of the type or the place where it appeared
  • 4.
    Creating Your VirtualTour Sign Up/Sign In Note: Make sure the “stay signed in” box is unchecked for security
  • 5.
    Creating a Map Once you have signed-in go to Google Maps Along the left side you will see a menu. 1. Click “My Places” 2. Click “Create Map”
  • 6.
    Creating a Map •Before you can continue you must give your map a title, description, and choose to make it either public or unlisted. • It must be a public map to embed it in your website later.
  • 7.
    Tools 1. Panning 2. Usecurrent location 3. Zoom, and street view 4. Grab and pan 5. Place a pin 6. Draw a line 7. Map style and extras
  • 8.
    Adding Pins Navigate toyour desired location either by entering the address into the search bar or by zooming and panning. 1. Click on the pin button and then click on the map where you would like to place it. 2. Give the location a title 3. Give the location a description Note: for this project use the “rich text” editor. In other projects you can use HTML.
  • 9.
    Adding a Photo •Goto your photo sharing site and right click on the desired photo. Select “copy image location”. This copies the URL where your photo is stored. •Note: Your photo should not exceed a width of 330px. •Go back to your map and click the “insert photo” button in the pin editing bubble. •Paste the image location you copied into the space provided and press ok.
  • 10.
    Sharing Your Map •Click on the “link” button • You can copy & paste the link into e-mails or instant messages • Copy & paste the HTML into your website HTML editor to create a fully functional Google Map in a webpage.
  • 11.
    Exporting to GoogleEarth 1. Save your map 2. Click “done” 3. Click on the “KML” button. This will download the Google Earth file for offline viewing.