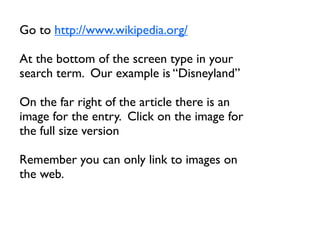
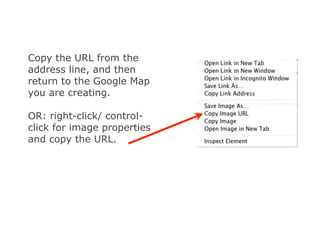
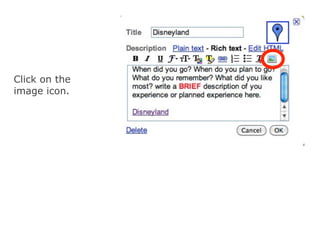
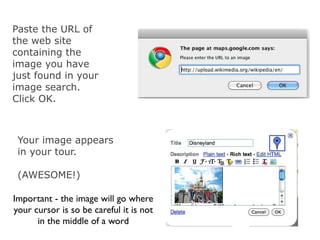
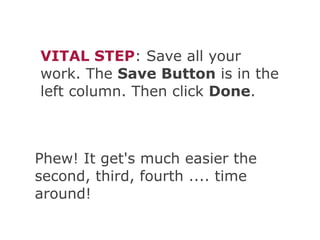
Get to know Google Maps
         Tutorial instructions from
 http://googletreks.org/tutorial/index.htm
Go to google maps      http://maps.google.com/


Select “my maps” and
   log in with your
 mychawanakee.org
         email
You will be creating a Google Map of 3
vacation spots you have been to or that
        you would like to go to.


                                Title: My Vacation Spots
                                 *SELECT “SAVE” AFTER
                                 GIVING YOUR PROJECT
                                       A TITLE
Now it's time to
travel virtually to
the first stop on
your tour. Type in
the address or
landmark you wish
visit virtually


In the left column, a
list of possible sites
that match your
search appears.
Map View

In the main
screen, a map of
possible sites that
match your search
appears.


                      Satelite View


Zoom in to locate
your exact site
Look in the upper right side
of the screen for your map
tools


Click on the
Pushpin(middle) Tool
and then click on the
exact location of the first
stop on your tour.

A window, as shown on
the right, appears.
Add a title for the first stop on your tour


When you click on the
default blue pushpin, a
wide choice of icons
appears. Use any of
these icons, or create
a custom icon
Now add a description of
the first stop on your tour.

Remember to click Save
frequently!


Click on the Rich text
button to bring up
additional tools, similar
to tools within a word
processing program.
Highlight the text you
wish, then change its
font, color, etc.
How it's time to add
links to the Web.

Highlight the text
that will become a
link, then click on
the link icon.


A dialog box
appears
requesting the
URL for your
external link.
Paste the URL of
the web site that
will allow learners
to click from your
tour to the Web for
additional
information.


Now you text appears
as a link: blue and
underlined before it's
visited, and purple and
underlined after it's
visited.

You can create links to
videos or any other web
sites in the same way.
Now it's time to add
graphics. You can link only to
graphics of the Web. We will
use Wikipedia. Remember
Google Images is blocked
so you will have to be more
creative
Go to http://www.wikipedia.org/

At the bottom of the screen type in your
search term. Our example is “Disneyland”

On the far right of the article there is an
image for the entry. Click on the image for
the full size version

Remember you can only link to images on
the web.
Copy the URL from the
address line, and then
return to the Google Map
you are creating.

OR: right-click/ control-
click for image properties
and copy the URL.
Click on the
image icon.
Paste the URL of
the web site
containing the
image you have
just found in your
image search.
Click OK.


 Your image appears
 in your tour.

 (AWESOME!)

Important - the image will go where
your cursor is so be careful it is not
      in the middle of a word
VITAL STEP: Save all your
work. The Save Button is in the
left column. Then click Done.


Phew! It get's much easier the
second, third, fourth .... time
around!

Get to know Google maps

  • 1.
    Get to knowGoogle Maps Tutorial instructions from http://googletreks.org/tutorial/index.htm
  • 2.
    Go to googlemaps http://maps.google.com/ Select “my maps” and log in with your mychawanakee.org email
  • 3.
    You will becreating a Google Map of 3 vacation spots you have been to or that you would like to go to. Title: My Vacation Spots *SELECT “SAVE” AFTER GIVING YOUR PROJECT A TITLE
  • 4.
    Now it's timeto travel virtually to the first stop on your tour. Type in the address or landmark you wish visit virtually In the left column, a list of possible sites that match your search appears.
  • 5.
    Map View In themain screen, a map of possible sites that match your search appears. Satelite View Zoom in to locate your exact site
  • 6.
    Look in theupper right side of the screen for your map tools Click on the Pushpin(middle) Tool and then click on the exact location of the first stop on your tour. A window, as shown on the right, appears.
  • 7.
    Add a titlefor the first stop on your tour When you click on the default blue pushpin, a wide choice of icons appears. Use any of these icons, or create a custom icon
  • 8.
    Now add adescription of the first stop on your tour. Remember to click Save frequently! Click on the Rich text button to bring up additional tools, similar to tools within a word processing program. Highlight the text you wish, then change its font, color, etc.
  • 9.
    How it's timeto add links to the Web. Highlight the text that will become a link, then click on the link icon. A dialog box appears requesting the URL for your external link.
  • 10.
    Paste the URLof the web site that will allow learners to click from your tour to the Web for additional information. Now you text appears as a link: blue and underlined before it's visited, and purple and underlined after it's visited. You can create links to videos or any other web sites in the same way.
  • 11.
    Now it's timeto add graphics. You can link only to graphics of the Web. We will use Wikipedia. Remember Google Images is blocked so you will have to be more creative
  • 12.
    Go to http://www.wikipedia.org/ Atthe bottom of the screen type in your search term. Our example is “Disneyland” On the far right of the article there is an image for the entry. Click on the image for the full size version Remember you can only link to images on the web.
  • 13.
    Copy the URLfrom the address line, and then return to the Google Map you are creating. OR: right-click/ control- click for image properties and copy the URL.
  • 14.
  • 15.
    Paste the URLof the web site containing the image you have just found in your image search. Click OK. Your image appears in your tour. (AWESOME!) Important - the image will go where your cursor is so be careful it is not in the middle of a word
  • 16.
    VITAL STEP: Saveall your work. The Save Button is in the left column. Then click Done. Phew! It get's much easier the second, third, fourth .... time around!