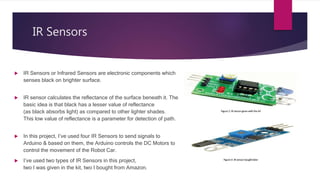
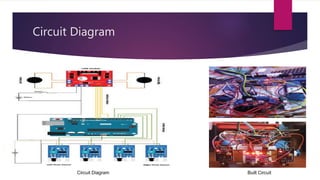
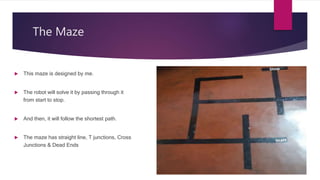
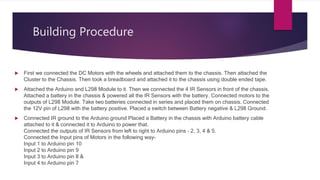
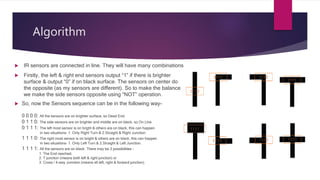
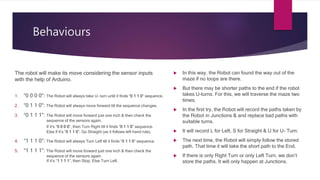
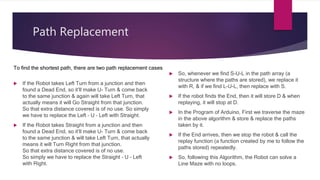
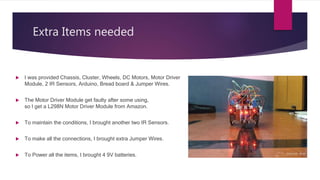
Line Maze Solver
A Project on
Soujanya Chatterjee
Eckovation
Robotics Online Certification Course
Presented By:
Project Under:
Contents
 Background History
 Introduction
 Components
 Circuit Diagram
 Building Procedure
 Algorithm
 Issue Faced & Solutions
 Conclusions
 References
Background History
 In the middle of the 20th century, Maze Solving problems became an important field of Robotics.
 In the year of 1972, editors of IEEE Spectrum magazine came up with the concept of micro-mouse,
which is a small microprocessor controlled vehicle with self-intelligence and capability to navigate a critical
maze.
 Then in May 1977, the fast US Micro-mouse contest, called “Amazing Micro-mouse Maze Contest”
was announced by IEEE Spectrum.
 From then, this type of contest became more popular and many type of maze solving robots are developed every
year.
Introduction
 Robots are expected to be intelligent and one of the way to test this intelligence is to check
whether they can solve a maze or not.
 Maze solving is an important field of robotics and is based on one of the most important areas of robotics,
which is Decision Making Algorithm.
 As this robot will be placed in an unknown place and it requires to have a good decision making capability.
A maze solver must navigate from the starting end of the maze to the end of the maze, but the path taken
by the robot to solve the maze may not be same every time.
 The robot solves the maze made out of lines i.e. two dimensional maze.
The line is of black color and the background is of brighter shade.
Components
The hardware components which were used to build the maze solver robot are
1. Arduino Uno Microcontroller
2. Four Infrared Sensors (IR sensor)
3. L298N Motor Driver for driving the 2 DC motors which are connected to the wheels.
4. The power supply is provided with the help of four 9V batteries.
One for IR Sensors & one for Arduino & two in series for the Motor Driver.
This course sent me a kit which contained Arduino Uno, two IR Sensors, DC Motors, Wheels, Chassis and all the necessary components.
Arduino
 Arduino is the heart of this project. All program of this project is
stored in its microprocessor. It is an open source hardware
development board based on the ATmega328.
 It has 14 digital input/output pins (of which 6 can be used as PWM
outputs), 6 analog inputs, a 16 MHz ceramic resonator, a USB
connection, a power jack, an ICSP header and a reset button.
 Arduino is coded in Arduino IDE installed on PC & the code is
uploaded to Arduino via USB cable.
The codes always contain two functions,
1: Setup – to assign the pins to input/outputs etc.
2: Loop – a function which executed repeatedly.
The codes can have infinite functions created by users and called
them in the loop function.
IR Sensors
 IR Sensors or Infrared Sensors are electronic components which
senses black on brighter surface.
 IR sensor calculates the reflectance of the surface beneath it. The
basic idea is that black has a lesser value of reflectance
(as black absorbs light) as compared to other lighter shades.
This low value of reflectance is a parameter for detection of path.
 In this project, I’ve used four IR Sensors to send signals to
Arduino & based on them, the Arduino controls the DC Motors to
control the movement of the Robot Car.
 I’ve used two types of IR Sensors in this project,
two I was given in the kit, two I bought from Amazon.
L298N Motor Driver Module
 L298 is a 46V, 2A Stepper Motor/Dual DC Motor Driver module which
can drive bipolar stepper motor, and in our case, two DC motors at the
same time.
 Each L298 has two H-Bridges. Each H-Bridge can supply 2A current.
 It has a heat sink for better heat dissipation and fly back diodes for
protection from back EMF.
Circuit Diagram
Circuit Diagram Built Circuit
The Maze
 This maze is designed by me.
 The robot will solve it by passing through it
from start to stop.
 And then, it will follow the shortest path.
 The maze has straight line, T junctions, Cross
Junctions & Dead Ends
Building Procedure
 First we connected the DC Motors with the wheels and attached them to the chassis. Then attached the
Cluster to the Chassis. Then took a breadboard and attached it to the chassis using double ended tape.
 Attached the Arduino and L298 Module to it. Then we connected the 4 IR Sensors in front of the chassis.
Attached a battery in the chassis & powered all the IR Sensors with the battery. Connected motors to the
outputs of L298 Module. Take two batteries connected in series and placed them on chassis. Connected
the 12V pin of L298 with the battery positive. Placed a switch between Battery negative & L298 Ground.
 Connected IR ground to the Arduino ground Placed a Battery in the chassis with Arduino battery cable
attached to it & connected it to Arduino to power that.
Connected the outputs of IR Sensors from left to right to Arduino pins – 2, 3, 4 & 5.
Connected the Input pins of Motors in the following way-
Input 1 to Arduino pin 10
Input 2 to Arduino pin 9
Input 3 to Arduino pin 8 &
Input 4 to Arduino pin 7
Algorithm
 The algorithm used is Left Hand Rule.
 What it means is that we will turn left whenever it is possible
and turn right only when we are at an intersection and
there is no other path to follow.
 So, it will turn left over straight & turn straight over right
if no left path is there.
 If there is no junction, the robot will simply follow the line.
 During the path, 8 possibilities can be encountered by the
Robot.
Algorithm
 IR sensors are connected in line. They will have many combinations
 Firstly, the left & right end sensors output “1” if there is brighter
surface & output “0” if on black surface. The sensors on center do
the opposite (as my sensors are different). So to make the balance
we make the side sensors opposite using “NOT” operation.
 So, now the Sensors sequence can be in the following way-
0 0 0 0: All the sensors are on brighter surface, so Dead End.
0 1 1 0: The side sensors are on brighter and middle are on black, so On Line.
0 1 1 1: The left most sensor is on bright & others are on black, this can happen
in two situations- 1. Only Right Turn & 2.Straight & Right Junction.
1 1 1 0: The right most sensor is on bright & others are on black, this can happen
in two situations- 1. Only Left Turn & 2.Straight & Left Junction.
1 1 1 1: All the sensors are on black. There may be 3 possibilities –
1. The End reached,
2. T junction (means both left & right junction) or
3. Cross / 4-way Junction (means all left, right & forward junction).
Behaviours
The robot will make its move considering the sensor inputs
with the help of Arduino.
1. “0 0 0 0”: The Robot will always take U- turn until it finds “0 1 1 0” sequence.
2. “0 1 1 0”: The Robot will always move forward till the sequence changes.
3. “0 1 1 1”: The Robot will move forward just one inch & then check the
sequence of the sensors again.
If it’s “0 0 0 0”, then Turn Right till it finds “0 1 1 0” sequence.
Else if it’s “0 1 1 0”, Go Straight (as it follows left hand rule).
4. “1 1 1 0”: The Robot will always Turn Left till it finds “0 1 1 0” sequence.
5. “1 1 1 1”: The Robot will move forward just one inch & then check the
sequence of the sensors again.
If it’s “1 1 1 1”, then Stop. Else Turn Left.
 In this way, the Robot can found the way out of the
maze if no loops are there.
 But there may be shorter paths to the end if the robot
takes U-turns. For this, we will traverse the maze two
times.
 In the first try, the Robot will record the paths taken by
the Robot in Junctions & and replace bad paths with
suitable turns.
 It will record L for Left, S for Straight & U for U- Turn.
 The next time, the Robot will simply follow the stored
path. That time it will take the short path to the End.
 If there is only Right Turn or only Left Turn, we don’t
store the paths. It will only happen at Junctions.
Path Replacement
 If the Robot takes Left Turn from a junction and then
found a Dead End, so it’ll make U- Turn & come back
to the same junction & again will take Left Turn, that
actually means it will Go Straight from that junction.
So that extra distance covered is of no use. So simply
we have to replace the Left – U – Left with Straight.
 If the Robot takes Straight from a junction and then
found a Dead End, so it’ll make U- Turn & come back
to the same junction & will take Left Turn, that actually
means it will Turn Right from that junction.
So that extra distance covered is of no use.
So simply we have to replace the Straight – U – Left
with Right.
To find the shortest path, there are two path replacement cases
 So, whenever we find S-U-L in the path array (a
structure where the paths are stored), we replace it
with R, & if we find L-U-L, then replace with S.
 If the robot finds the End, then it will store D & when
replaying, it will stop at D.
 In the Program of Arduino, First we traverse the maze
in the above algorithm & store & replace the paths
taken by it.
 If the End arrives, then we stop the robot & call the
replay function (a function created by me to follow the
paths stored) repeatedly.
 So, following this Algorithm, the Robot can solve a
Line Maze with no loops.
Issue Faced & Solutions
 I was provided with 2 IR sensors, but with only two, I
couldn’t give the conditions. So, I brought another two.
 The IR sensors weren’t balanced at first, they were giving
faulty readings for that distance. I have adjusted the
potentiometers on each of the IR Sensors & balanced.
 Still after completing the circuit, the motors didn’t run.
I checked the input wires & they were giving the +5V
voltages, also the Motor was powered. To overcome it, I
connected the L298N Ground to the Arduino Ground and
it worked!
 The speed was too slow. I added two batteries in series &
the speed increases certainly.
 The batteries were draining fast as the motor driver
module was connected for long. I placed a switch for this.
 As there are 4 sensors, so the sequence conditions are
very big. For this, I used an array and store the inputs &
took a variable to identify the sequences.
 The reading process is very big & lengthy. So we used a
read function and called it when needed.
 The IR sensors are of two different types. So I used NOT
functions in two input;
 The T junction & Crossway made a very big frustration.
I solved it by forwarding the robot by just some length &
checking the sequence there.
 The Short Path finding was also a nightmare.
For this, I stored the paths taken in an character array &
then a replay function & in that I followed the array.
During Assembling During Programming
Extra Items needed
 I was provided Chassis, Cluster, Wheels, DC Motors, Motor Driver
Module, 2 IR Sensors, Arduino, Bread board & Jumper Wires.
 The Motor Driver Module get faulty after some using,
so I get a L298N Motor Driver Module from Amazon.
 To maintain the conditions, I brought another two IR Sensors.
 To make all the connections, I brought extra Jumper Wires.
 To Power all the items, I brought 4 9V batteries.
Conclusions
 The maze-solver robot performs perfectly and solves any open loop line maze without any error.
This shows that the algorithm has been implemented perfectly and there are no errors in the program as well.
 But the robot cannot solve any closed loop maze. Several tests were done on the robot to come to these conclusions.
The knowledge gained from this project will have a significant impact on future work.
 For future we are looking forward to make the maze-solver may complete any type of maze. May it be an open loop type
or closed loop type.
References
 Line Maze Works by Richard T. Vanoy II (pololu.com)
 Maze Solver Archives – cyberneticzoo.com
 https://www.arduino.cc
 https://create.arduino.cc/projecthub/mjrobot/maze-solver-robot-using-artificialintelligence-4318cf
 https://maker.pro/projects/arduino/make-line-follower-robot
Special thanks to Eckovation Robotics Online Certification Course

Line Maze Solver Presentation

  • 1.
    Line Maze Solver AProject on Soujanya Chatterjee Eckovation Robotics Online Certification Course Presented By: Project Under:
  • 2.
    Contents  Background History Introduction  Components  Circuit Diagram  Building Procedure  Algorithm  Issue Faced & Solutions  Conclusions  References
  • 3.
    Background History  Inthe middle of the 20th century, Maze Solving problems became an important field of Robotics.  In the year of 1972, editors of IEEE Spectrum magazine came up with the concept of micro-mouse, which is a small microprocessor controlled vehicle with self-intelligence and capability to navigate a critical maze.  Then in May 1977, the fast US Micro-mouse contest, called “Amazing Micro-mouse Maze Contest” was announced by IEEE Spectrum.  From then, this type of contest became more popular and many type of maze solving robots are developed every year.
  • 4.
    Introduction  Robots areexpected to be intelligent and one of the way to test this intelligence is to check whether they can solve a maze or not.  Maze solving is an important field of robotics and is based on one of the most important areas of robotics, which is Decision Making Algorithm.  As this robot will be placed in an unknown place and it requires to have a good decision making capability. A maze solver must navigate from the starting end of the maze to the end of the maze, but the path taken by the robot to solve the maze may not be same every time.  The robot solves the maze made out of lines i.e. two dimensional maze. The line is of black color and the background is of brighter shade.
  • 5.
    Components The hardware componentswhich were used to build the maze solver robot are 1. Arduino Uno Microcontroller 2. Four Infrared Sensors (IR sensor) 3. L298N Motor Driver for driving the 2 DC motors which are connected to the wheels. 4. The power supply is provided with the help of four 9V batteries. One for IR Sensors & one for Arduino & two in series for the Motor Driver. This course sent me a kit which contained Arduino Uno, two IR Sensors, DC Motors, Wheels, Chassis and all the necessary components.
  • 6.
    Arduino  Arduino isthe heart of this project. All program of this project is stored in its microprocessor. It is an open source hardware development board based on the ATmega328.  It has 14 digital input/output pins (of which 6 can be used as PWM outputs), 6 analog inputs, a 16 MHz ceramic resonator, a USB connection, a power jack, an ICSP header and a reset button.  Arduino is coded in Arduino IDE installed on PC & the code is uploaded to Arduino via USB cable. The codes always contain two functions, 1: Setup – to assign the pins to input/outputs etc. 2: Loop – a function which executed repeatedly. The codes can have infinite functions created by users and called them in the loop function.
  • 7.
    IR Sensors  IRSensors or Infrared Sensors are electronic components which senses black on brighter surface.  IR sensor calculates the reflectance of the surface beneath it. The basic idea is that black has a lesser value of reflectance (as black absorbs light) as compared to other lighter shades. This low value of reflectance is a parameter for detection of path.  In this project, I’ve used four IR Sensors to send signals to Arduino & based on them, the Arduino controls the DC Motors to control the movement of the Robot Car.  I’ve used two types of IR Sensors in this project, two I was given in the kit, two I bought from Amazon.
  • 8.
    L298N Motor DriverModule  L298 is a 46V, 2A Stepper Motor/Dual DC Motor Driver module which can drive bipolar stepper motor, and in our case, two DC motors at the same time.  Each L298 has two H-Bridges. Each H-Bridge can supply 2A current.  It has a heat sink for better heat dissipation and fly back diodes for protection from back EMF.
  • 9.
  • 10.
    The Maze  Thismaze is designed by me.  The robot will solve it by passing through it from start to stop.  And then, it will follow the shortest path.  The maze has straight line, T junctions, Cross Junctions & Dead Ends
  • 11.
    Building Procedure  Firstwe connected the DC Motors with the wheels and attached them to the chassis. Then attached the Cluster to the Chassis. Then took a breadboard and attached it to the chassis using double ended tape.  Attached the Arduino and L298 Module to it. Then we connected the 4 IR Sensors in front of the chassis. Attached a battery in the chassis & powered all the IR Sensors with the battery. Connected motors to the outputs of L298 Module. Take two batteries connected in series and placed them on chassis. Connected the 12V pin of L298 with the battery positive. Placed a switch between Battery negative & L298 Ground.  Connected IR ground to the Arduino ground Placed a Battery in the chassis with Arduino battery cable attached to it & connected it to Arduino to power that. Connected the outputs of IR Sensors from left to right to Arduino pins – 2, 3, 4 & 5. Connected the Input pins of Motors in the following way- Input 1 to Arduino pin 10 Input 2 to Arduino pin 9 Input 3 to Arduino pin 8 & Input 4 to Arduino pin 7
  • 12.
    Algorithm  The algorithmused is Left Hand Rule.  What it means is that we will turn left whenever it is possible and turn right only when we are at an intersection and there is no other path to follow.  So, it will turn left over straight & turn straight over right if no left path is there.  If there is no junction, the robot will simply follow the line.  During the path, 8 possibilities can be encountered by the Robot.
  • 13.
    Algorithm  IR sensorsare connected in line. They will have many combinations  Firstly, the left & right end sensors output “1” if there is brighter surface & output “0” if on black surface. The sensors on center do the opposite (as my sensors are different). So to make the balance we make the side sensors opposite using “NOT” operation.  So, now the Sensors sequence can be in the following way- 0 0 0 0: All the sensors are on brighter surface, so Dead End. 0 1 1 0: The side sensors are on brighter and middle are on black, so On Line. 0 1 1 1: The left most sensor is on bright & others are on black, this can happen in two situations- 1. Only Right Turn & 2.Straight & Right Junction. 1 1 1 0: The right most sensor is on bright & others are on black, this can happen in two situations- 1. Only Left Turn & 2.Straight & Left Junction. 1 1 1 1: All the sensors are on black. There may be 3 possibilities – 1. The End reached, 2. T junction (means both left & right junction) or 3. Cross / 4-way Junction (means all left, right & forward junction).
  • 14.
    Behaviours The robot willmake its move considering the sensor inputs with the help of Arduino. 1. “0 0 0 0”: The Robot will always take U- turn until it finds “0 1 1 0” sequence. 2. “0 1 1 0”: The Robot will always move forward till the sequence changes. 3. “0 1 1 1”: The Robot will move forward just one inch & then check the sequence of the sensors again. If it’s “0 0 0 0”, then Turn Right till it finds “0 1 1 0” sequence. Else if it’s “0 1 1 0”, Go Straight (as it follows left hand rule). 4. “1 1 1 0”: The Robot will always Turn Left till it finds “0 1 1 0” sequence. 5. “1 1 1 1”: The Robot will move forward just one inch & then check the sequence of the sensors again. If it’s “1 1 1 1”, then Stop. Else Turn Left.  In this way, the Robot can found the way out of the maze if no loops are there.  But there may be shorter paths to the end if the robot takes U-turns. For this, we will traverse the maze two times.  In the first try, the Robot will record the paths taken by the Robot in Junctions & and replace bad paths with suitable turns.  It will record L for Left, S for Straight & U for U- Turn.  The next time, the Robot will simply follow the stored path. That time it will take the short path to the End.  If there is only Right Turn or only Left Turn, we don’t store the paths. It will only happen at Junctions.
  • 15.
    Path Replacement  Ifthe Robot takes Left Turn from a junction and then found a Dead End, so it’ll make U- Turn & come back to the same junction & again will take Left Turn, that actually means it will Go Straight from that junction. So that extra distance covered is of no use. So simply we have to replace the Left – U – Left with Straight.  If the Robot takes Straight from a junction and then found a Dead End, so it’ll make U- Turn & come back to the same junction & will take Left Turn, that actually means it will Turn Right from that junction. So that extra distance covered is of no use. So simply we have to replace the Straight – U – Left with Right. To find the shortest path, there are two path replacement cases  So, whenever we find S-U-L in the path array (a structure where the paths are stored), we replace it with R, & if we find L-U-L, then replace with S.  If the robot finds the End, then it will store D & when replaying, it will stop at D.  In the Program of Arduino, First we traverse the maze in the above algorithm & store & replace the paths taken by it.  If the End arrives, then we stop the robot & call the replay function (a function created by me to follow the paths stored) repeatedly.  So, following this Algorithm, the Robot can solve a Line Maze with no loops.
  • 16.
    Issue Faced &Solutions  I was provided with 2 IR sensors, but with only two, I couldn’t give the conditions. So, I brought another two.  The IR sensors weren’t balanced at first, they were giving faulty readings for that distance. I have adjusted the potentiometers on each of the IR Sensors & balanced.  Still after completing the circuit, the motors didn’t run. I checked the input wires & they were giving the +5V voltages, also the Motor was powered. To overcome it, I connected the L298N Ground to the Arduino Ground and it worked!  The speed was too slow. I added two batteries in series & the speed increases certainly.  The batteries were draining fast as the motor driver module was connected for long. I placed a switch for this.  As there are 4 sensors, so the sequence conditions are very big. For this, I used an array and store the inputs & took a variable to identify the sequences.  The reading process is very big & lengthy. So we used a read function and called it when needed.  The IR sensors are of two different types. So I used NOT functions in two input;  The T junction & Crossway made a very big frustration. I solved it by forwarding the robot by just some length & checking the sequence there.  The Short Path finding was also a nightmare. For this, I stored the paths taken in an character array & then a replay function & in that I followed the array. During Assembling During Programming
  • 17.
    Extra Items needed I was provided Chassis, Cluster, Wheels, DC Motors, Motor Driver Module, 2 IR Sensors, Arduino, Bread board & Jumper Wires.  The Motor Driver Module get faulty after some using, so I get a L298N Motor Driver Module from Amazon.  To maintain the conditions, I brought another two IR Sensors.  To make all the connections, I brought extra Jumper Wires.  To Power all the items, I brought 4 9V batteries.
  • 18.
    Conclusions  The maze-solverrobot performs perfectly and solves any open loop line maze without any error. This shows that the algorithm has been implemented perfectly and there are no errors in the program as well.  But the robot cannot solve any closed loop maze. Several tests were done on the robot to come to these conclusions. The knowledge gained from this project will have a significant impact on future work.  For future we are looking forward to make the maze-solver may complete any type of maze. May it be an open loop type or closed loop type.
  • 19.
    References  Line MazeWorks by Richard T. Vanoy II (pololu.com)  Maze Solver Archives – cyberneticzoo.com  https://www.arduino.cc  https://create.arduino.cc/projecthub/mjrobot/maze-solver-robot-using-artificialintelligence-4318cf  https://maker.pro/projects/arduino/make-line-follower-robot Special thanks to Eckovation Robotics Online Certification Course