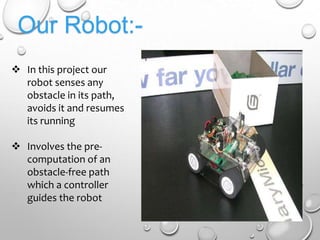
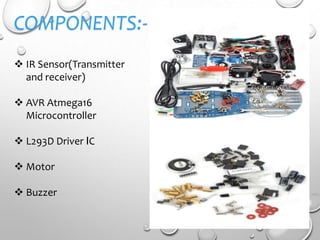
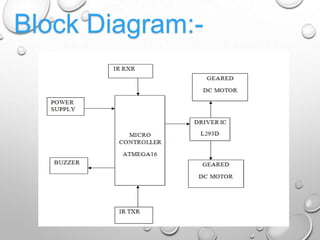
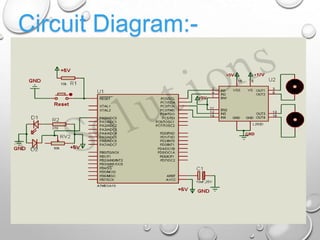
SlideShare a Scribd company logo
R. Srikanth (10QF1A0455)
D. Naresh (10QF1A0409)
S. Srinivas (10QF1A0456)
Ms P. Kranthi
 The word robotics is used to
collectively define a field in
engineering that covers the
mimicking of various human
characteristics.
 It must be able to perform certain
tasks we set for it.
 The desired task must be achieved
within some given limitations.
 It may be human controlled or
automatic.
What is “Robotics”?
Mobile robots perform various
ways of tasks to serve humans
No human guidance is required
This sort of project is very much
useful in the industries where
the automated supervision is
required
Why Robotics?
 In this project our
robot senses any
obstacle in its path,
avoids it and resumes
its running
 Involves the pre-
computation of an
obstacle-free path
which a controller
guides the robot
Our Robot:-
 IR Sensor(Transmitter
and receiver)
 AVR Atmega16
Microcontroller
 L293D Driver IC
 Motor
 Buzzer
COMPONENTS:-
Block Diagram:-
Circuit Diagram:-
 (IR) sensors based on reflected
amplitude of the surrounding
objects
 Non-linear and depends on the
reflectance characteristics of
the object surface
 IR sensors able to accurately
measure distances with
reduced response times
IR Sensors:-
What is a Microcontroller?
 A microcontroller (MCU/μC) is a small computer on a single IC
consisting internally of a relatively simple CPU, clock, timers, I/O
ports, and memory.
 It can be programmed to control numerous other electronic
devices using its on chip peripherals.
AVR Atmega16 Microcontroller:-
 They are fast.
 Executes most of the instructions in single execution cycle.
 4 times faster than PIC
 Consume less power
 Can be operated in different power saving modes.
Why ATMEGA?
ATmega Features:-
 16 KB Flash memory
 1 KB of SRAM
 Up to 16 MHz clock
 Four 8-bit I/O ports
 ADC, Timers, Serial Interface etc.
 40 pin DIP, operates at 5V
 Flash: Flash memory to store the
program written. Flash memory
is non-volatile i.e., it retains the
program even if the power is cut-
off.
 EEPROM: This is also a non-
volatile memory used to store
data like values of certain
variables.
 SRAM: Static Random Access
Memory, this is the volatile
memory of microcontroller i.e.
data is lost as soon as power is
turned off.
ATmega MEMORY:-
 Step1: Initialization of I/O ports.
 Step2: Set Direction as Forward/ Backward/ Left/ Right.
 Step3: check if any obstacle is detected according to that change the
motion of Robot. If no then Robot will goes in forward direction.
 Step4: Wait for some time.
 Step5: go to step 3 to repeat the process.
 Step7: Wait for some time.
 Step 8: End
ALGORITHM
FLOW CHART:-
 The L293D is a quadruple half H-bridge bidirectional motor driver IC
 Can drive current of up to 600mA with voltage range of 4.5 to 36
volts
 Drive small DC-Geared motors, bipolar stepper motor
L293D Driver IC
 Free running torque &
current are ideally zero
 Increased load implies,
increased torque, current
drawn & power
consumption
 Power supplied by a motor is
the product of output
shaft's rotational velocity &
torque
 Can run in both directions
D.C Geared Motor:-
 Whenever robot senses any obstacle automatically diverts
its position to left or right and follows the path without
human guidance.
 The programming of the microcontroller is easy.
 It is a low cost circuit
Advantages:-
 It is time consuming project.
 It is use for short distance only.
 It is not recommended to keep the range very long
because this would cause the ROBOT to keep moving
forward and backward as it senses any obstacle, even far
away from it.
 It is not in human control
Disadvantages:-
 Adding a Camera
 Use as a fire fighting robot
Future Scope Of This Project:-
Obstacle Avoidance Robot

More Related Content

What's hot

Obstacle detection Robot using Ultrasonic Sensor and Arduino UNO
Obstacle detection Robot using Ultrasonic Sensor and Arduino UNOObstacle detection Robot using Ultrasonic Sensor and Arduino UNO
Obstacle detection Robot using Ultrasonic Sensor and Arduino UNOSanjay Kumar
 
Obstacle Avoidance Robot (Powered by Arduino)
Obstacle Avoidance Robot (Powered by Arduino)Obstacle Avoidance Robot (Powered by Arduino)
Obstacle Avoidance Robot (Powered by Arduino)Amanullah Mahmood
 
Obstacle Avoiding Robot Report Robot23
Obstacle Avoiding Robot Report Robot23Obstacle Avoiding Robot Report Robot23
Obstacle Avoiding Robot Report Robot23Abhijeet kapse
 
Obstacle Avoidance Robot
Obstacle Avoidance RobotObstacle Avoidance Robot
Obstacle Avoidance RobotYash Sati
 
Obstacle avoiding car project slide
Obstacle avoiding car project slideObstacle avoiding car project slide
Obstacle avoiding car project slideShourovSarkerJoy
 
Line follower robot
Line follower robotLine follower robot
Line follower robotPriya Hada
 
OBSTACLE AVOIDACE ROBOT USING ARDUINO UNO AND ULTRASONIC SENSOR
OBSTACLE AVOIDACE ROBOT USING ARDUINO UNO AND ULTRASONIC SENSOROBSTACLE AVOIDACE ROBOT USING ARDUINO UNO AND ULTRASONIC SENSOR
OBSTACLE AVOIDACE ROBOT USING ARDUINO UNO AND ULTRASONIC SENSORLeTsKnOw1
 
Bluetooth Controlled Robot/Car
Bluetooth Controlled Robot/CarBluetooth Controlled Robot/Car
Bluetooth Controlled Robot/CarVarun A M
 
Gesture Control Robot
Gesture Control RobotGesture Control Robot
Gesture Control Robotnikhilsaini25
 
line following robot ppt
line following robot pptline following robot ppt
line following robot pptSuchit Moon
 
AUTOMATIC RAILWAY GATE CONTROL SYSTEM
AUTOMATIC RAILWAY GATE CONTROL SYSTEMAUTOMATIC RAILWAY GATE CONTROL SYSTEM
AUTOMATIC RAILWAY GATE CONTROL SYSTEMJOLLUSUDARSHANREDDY
 
Final report obstacle avoiding roboat
Final report obstacle avoiding roboatFinal report obstacle avoiding roboat
Final report obstacle avoiding roboatShubham Thakur
 
GESTURE CONTROL ROBOT
GESTURE CONTROL ROBOTGESTURE CONTROL ROBOT
GESTURE CONTROL ROBOTSatyam Kumar
 
Gesture control robot using by Ardiuno
Gesture control robot using by ArdiunoGesture control robot using by Ardiuno
Gesture control robot using by ArdiunoSudhir Kumar
 
Automatic railway gate control using arduino uno
Automatic railway gate control using arduino unoAutomatic railway gate control using arduino uno
Automatic railway gate control using arduino unoselvalakshmi24
 

What's hot (20)

Obstacle detection Robot using Ultrasonic Sensor and Arduino UNO
Obstacle detection Robot using Ultrasonic Sensor and Arduino UNOObstacle detection Robot using Ultrasonic Sensor and Arduino UNO
Obstacle detection Robot using Ultrasonic Sensor and Arduino UNO
 
Obstacle Avoidance Robot (Powered by Arduino)
Obstacle Avoidance Robot (Powered by Arduino)Obstacle Avoidance Robot (Powered by Arduino)
Obstacle Avoidance Robot (Powered by Arduino)
 
Obstacle Avoiding Robot Report Robot23
Obstacle Avoiding Robot Report Robot23Obstacle Avoiding Robot Report Robot23
Obstacle Avoiding Robot Report Robot23
 
Obstacle avoiding robot(Lab report)
Obstacle  avoiding  robot(Lab report)Obstacle  avoiding  robot(Lab report)
Obstacle avoiding robot(Lab report)
 
Obstacle Avoidance Robot
Obstacle Avoidance RobotObstacle Avoidance Robot
Obstacle Avoidance Robot
 
Obstacle avoiding car project slide
Obstacle avoiding car project slideObstacle avoiding car project slide
Obstacle avoiding car project slide
 
Gesture control car
Gesture control carGesture control car
Gesture control car
 
Line follower robot
Line follower robotLine follower robot
Line follower robot
 
Line follower robot
Line follower robotLine follower robot
Line follower robot
 
OBSTACLE AVOIDACE ROBOT USING ARDUINO UNO AND ULTRASONIC SENSOR
OBSTACLE AVOIDACE ROBOT USING ARDUINO UNO AND ULTRASONIC SENSOROBSTACLE AVOIDACE ROBOT USING ARDUINO UNO AND ULTRASONIC SENSOR
OBSTACLE AVOIDACE ROBOT USING ARDUINO UNO AND ULTRASONIC SENSOR
 
Bluetooth Controlled Robot/Car
Bluetooth Controlled Robot/CarBluetooth Controlled Robot/Car
Bluetooth Controlled Robot/Car
 
Gesture Control Robot
Gesture Control RobotGesture Control Robot
Gesture Control Robot
 
line following robot ppt
line following robot pptline following robot ppt
line following robot ppt
 
Line follower robot
Line follower robotLine follower robot
Line follower robot
 
AUTOMATIC RAILWAY GATE CONTROL SYSTEM
AUTOMATIC RAILWAY GATE CONTROL SYSTEMAUTOMATIC RAILWAY GATE CONTROL SYSTEM
AUTOMATIC RAILWAY GATE CONTROL SYSTEM
 
Obstacle Avoiding Robot Using Micro Controller
Obstacle Avoiding Robot Using Micro ControllerObstacle Avoiding Robot Using Micro Controller
Obstacle Avoiding Robot Using Micro Controller
 
Final report obstacle avoiding roboat
Final report obstacle avoiding roboatFinal report obstacle avoiding roboat
Final report obstacle avoiding roboat
 
GESTURE CONTROL ROBOT
GESTURE CONTROL ROBOTGESTURE CONTROL ROBOT
GESTURE CONTROL ROBOT
 
Gesture control robot using by Ardiuno
Gesture control robot using by ArdiunoGesture control robot using by Ardiuno
Gesture control robot using by Ardiuno
 
Automatic railway gate control using arduino uno
Automatic railway gate control using arduino unoAutomatic railway gate control using arduino uno
Automatic railway gate control using arduino uno
 

Similar to Obstacle Avoidance Robot

ROBOTIC ARM WITH VOICE CONTROLLED AND IMAGE PROCESSING (1)
ROBOTIC ARM WITH VOICE CONTROLLED AND IMAGE PROCESSING (1)ROBOTIC ARM WITH VOICE CONTROLLED AND IMAGE PROCESSING (1)
ROBOTIC ARM WITH VOICE CONTROLLED AND IMAGE PROCESSING (1)Jayan Kant Duggal
 
Understanding robotics: Introductory Event | GDSC RCCIIT
Understanding robotics: Introductory Event | GDSC RCCIITUnderstanding robotics: Introductory Event | GDSC RCCIIT
Understanding robotics: Introductory Event | GDSC RCCIITGDSCRCCIITTeam
 
Design, Implementation and Control of a Humanoid Robot for Obstacle Avoidance...
Design, Implementation and Control of a Humanoid Robot for Obstacle Avoidance...Design, Implementation and Control of a Humanoid Robot for Obstacle Avoidance...
Design, Implementation and Control of a Humanoid Robot for Obstacle Avoidance...IOSR Journals
 
IRJET - The Line Follower -and- Pick and Place Robot
IRJET - The Line Follower -and- Pick and Place RobotIRJET - The Line Follower -and- Pick and Place Robot
IRJET - The Line Follower -and- Pick and Place RobotIRJET Journal
 
Young Buggy Robot - Project IETE
Young Buggy Robot - Project IETEYoung Buggy Robot - Project IETE
Young Buggy Robot - Project IETEGargi Kapadia
 
AUTOMATIC RAILWAY GATE AND SIGNALLING SYSTEM
AUTOMATIC RAILWAY GATE AND SIGNALLING SYSTEMAUTOMATIC RAILWAY GATE AND SIGNALLING SYSTEM
AUTOMATIC RAILWAY GATE AND SIGNALLING SYSTEMBiprajitSarkar
 
Autonomous vacuum cleaning robot
Autonomous vacuum cleaning robotAutonomous vacuum cleaning robot
Autonomous vacuum cleaning robotMohit Nagar
 
Iaetsd autonomous pick and place rover for long distance
Iaetsd autonomous  pick and place rover for long distanceIaetsd autonomous  pick and place rover for long distance
Iaetsd autonomous pick and place rover for long distanceIaetsd Iaetsd
 

Similar to Obstacle Avoidance Robot (20)

Obstacle observing
Obstacle observingObstacle observing
Obstacle observing
 
Presentation1
Presentation1Presentation1
Presentation1
 
ROBOTIC ARM WITH VOICE CONTROLLED AND IMAGE PROCESSING (1)
ROBOTIC ARM WITH VOICE CONTROLLED AND IMAGE PROCESSING (1)ROBOTIC ARM WITH VOICE CONTROLLED AND IMAGE PROCESSING (1)
ROBOTIC ARM WITH VOICE CONTROLLED AND IMAGE PROCESSING (1)
 
Understanding robotics: Introductory Event | GDSC RCCIIT
Understanding robotics: Introductory Event | GDSC RCCIITUnderstanding robotics: Introductory Event | GDSC RCCIIT
Understanding robotics: Introductory Event | GDSC RCCIIT
 
LINE FOLLOWER ROBOT | J4RV4I1010
LINE FOLLOWER ROBOT | J4RV4I1010LINE FOLLOWER ROBOT | J4RV4I1010
LINE FOLLOWER ROBOT | J4RV4I1010
 
Design, Implementation and Control of a Humanoid Robot for Obstacle Avoidance...
Design, Implementation and Control of a Humanoid Robot for Obstacle Avoidance...Design, Implementation and Control of a Humanoid Robot for Obstacle Avoidance...
Design, Implementation and Control of a Humanoid Robot for Obstacle Avoidance...
 
F0554050
F0554050F0554050
F0554050
 
Design, Implementation and Control of a Humanoid Robot for Obstacle Avoidance...
Design, Implementation and Control of a Humanoid Robot for Obstacle Avoidance...Design, Implementation and Control of a Humanoid Robot for Obstacle Avoidance...
Design, Implementation and Control of a Humanoid Robot for Obstacle Avoidance...
 
Line Following Robot
Line Following RobotLine Following Robot
Line Following Robot
 
Line maze solver
Line maze solverLine maze solver
Line maze solver
 
Robowar
RobowarRobowar
Robowar
 
Swarm robotics ppt
Swarm robotics pptSwarm robotics ppt
Swarm robotics ppt
 
IRJET - The Line Follower -and- Pick and Place Robot
IRJET - The Line Follower -and- Pick and Place RobotIRJET - The Line Follower -and- Pick and Place Robot
IRJET - The Line Follower -and- Pick and Place Robot
 
FYP template.pptx
FYP template.pptxFYP template.pptx
FYP template.pptx
 
Young Buggy Robot - Project IETE
Young Buggy Robot - Project IETEYoung Buggy Robot - Project IETE
Young Buggy Robot - Project IETE
 
AUTOMATIC RAILWAY GATE AND SIGNALLING SYSTEM
AUTOMATIC RAILWAY GATE AND SIGNALLING SYSTEMAUTOMATIC RAILWAY GATE AND SIGNALLING SYSTEM
AUTOMATIC RAILWAY GATE AND SIGNALLING SYSTEM
 
Autonomous vacuum cleaning robot
Autonomous vacuum cleaning robotAutonomous vacuum cleaning robot
Autonomous vacuum cleaning robot
 
A046030106
A046030106A046030106
A046030106
 
Project PPT.pptx
Project PPT.pptxProject PPT.pptx
Project PPT.pptx
 
Iaetsd autonomous pick and place rover for long distance
Iaetsd autonomous  pick and place rover for long distanceIaetsd autonomous  pick and place rover for long distance
Iaetsd autonomous pick and place rover for long distance
 

Recently uploaded

Home assignment II on Spectroscopy 2024 Answers.pdf
Home assignment II on Spectroscopy 2024 Answers.pdfHome assignment II on Spectroscopy 2024 Answers.pdf
Home assignment II on Spectroscopy 2024 Answers.pdfTamralipta Mahavidyalaya
 
Sha'Carri Richardson Presentation 202345
Sha'Carri Richardson Presentation 202345Sha'Carri Richardson Presentation 202345
Sha'Carri Richardson Presentation 202345beazzy04
 
2024_Student Session 2_ Set Plan Preparation.pptx
2024_Student Session 2_ Set Plan Preparation.pptx2024_Student Session 2_ Set Plan Preparation.pptx
2024_Student Session 2_ Set Plan Preparation.pptxmansk2
 
How to Break the cycle of negative Thoughts
How to Break the cycle of negative ThoughtsHow to Break the cycle of negative Thoughts
How to Break the cycle of negative ThoughtsCol Mukteshwar Prasad
 
Instructions for Submissions thorugh G- Classroom.pptx
Instructions for Submissions thorugh G- Classroom.pptxInstructions for Submissions thorugh G- Classroom.pptx
Instructions for Submissions thorugh G- Classroom.pptxJheel Barad
 
The Benefits and Challenges of Open Educational Resources
The Benefits and Challenges of Open Educational ResourcesThe Benefits and Challenges of Open Educational Resources
The Benefits and Challenges of Open Educational Resourcesaileywriter
 
Fish and Chips - have they had their chips
Fish and Chips - have they had their chipsFish and Chips - have they had their chips
Fish and Chips - have they had their chipsGeoBlogs
 
PART A. Introduction to Costumer Service
PART A. Introduction to Costumer ServicePART A. Introduction to Costumer Service
PART A. Introduction to Costumer ServicePedroFerreira53928
 
Basic Civil Engg Notes_Chapter-6_Environment Pollution & Engineering
Basic Civil Engg Notes_Chapter-6_Environment Pollution & EngineeringBasic Civil Engg Notes_Chapter-6_Environment Pollution & Engineering
Basic Civil Engg Notes_Chapter-6_Environment Pollution & EngineeringDenish Jangid
 
Accounting and finance exit exam 2016 E.C.pdf
Accounting and finance exit exam 2016 E.C.pdfAccounting and finance exit exam 2016 E.C.pdf
Accounting and finance exit exam 2016 E.C.pdfYibeltalNibretu
 
Application of Matrices in real life. Presentation on application of matrices
Application of Matrices in real life. Presentation on application of matricesApplication of Matrices in real life. Presentation on application of matrices
Application of Matrices in real life. Presentation on application of matricesRased Khan
 
Basic phrases for greeting and assisting costumers
Basic phrases for greeting and assisting costumersBasic phrases for greeting and assisting costumers
Basic phrases for greeting and assisting costumersPedroFerreira53928
 
Phrasal Verbs.XXXXXXXXXXXXXXXXXXXXXXXXXX
Phrasal Verbs.XXXXXXXXXXXXXXXXXXXXXXXXXXPhrasal Verbs.XXXXXXXXXXXXXXXXXXXXXXXXXX
Phrasal Verbs.XXXXXXXXXXXXXXXXXXXXXXXXXXMIRIAMSALINAS13
 
Salient features of Environment protection Act 1986.pptx
Salient features of Environment protection Act 1986.pptxSalient features of Environment protection Act 1986.pptx
Salient features of Environment protection Act 1986.pptxakshayaramakrishnan21
 
Solid waste management & Types of Basic civil Engineering notes by DJ Sir.pptx
Solid waste management & Types of Basic civil Engineering notes by DJ Sir.pptxSolid waste management & Types of Basic civil Engineering notes by DJ Sir.pptx
Solid waste management & Types of Basic civil Engineering notes by DJ Sir.pptxDenish Jangid
 
Additional Benefits for Employee Website.pdf
Additional Benefits for Employee Website.pdfAdditional Benefits for Employee Website.pdf
Additional Benefits for Employee Website.pdfjoachimlavalley1
 
Matatag-Curriculum and the 21st Century Skills Presentation.pptx
Matatag-Curriculum and the 21st Century Skills Presentation.pptxMatatag-Curriculum and the 21st Century Skills Presentation.pptx
Matatag-Curriculum and the 21st Century Skills Presentation.pptxJenilouCasareno
 

Recently uploaded (20)

B.ed spl. HI pdusu exam paper-2023-24.pdf
B.ed spl. HI pdusu exam paper-2023-24.pdfB.ed spl. HI pdusu exam paper-2023-24.pdf
B.ed spl. HI pdusu exam paper-2023-24.pdf
 
Home assignment II on Spectroscopy 2024 Answers.pdf
Home assignment II on Spectroscopy 2024 Answers.pdfHome assignment II on Spectroscopy 2024 Answers.pdf
Home assignment II on Spectroscopy 2024 Answers.pdf
 
Sha'Carri Richardson Presentation 202345
Sha'Carri Richardson Presentation 202345Sha'Carri Richardson Presentation 202345
Sha'Carri Richardson Presentation 202345
 
2024_Student Session 2_ Set Plan Preparation.pptx
2024_Student Session 2_ Set Plan Preparation.pptx2024_Student Session 2_ Set Plan Preparation.pptx
2024_Student Session 2_ Set Plan Preparation.pptx
 
How to Break the cycle of negative Thoughts
How to Break the cycle of negative ThoughtsHow to Break the cycle of negative Thoughts
How to Break the cycle of negative Thoughts
 
Instructions for Submissions thorugh G- Classroom.pptx
Instructions for Submissions thorugh G- Classroom.pptxInstructions for Submissions thorugh G- Classroom.pptx
Instructions for Submissions thorugh G- Classroom.pptx
 
The Benefits and Challenges of Open Educational Resources
The Benefits and Challenges of Open Educational ResourcesThe Benefits and Challenges of Open Educational Resources
The Benefits and Challenges of Open Educational Resources
 
Fish and Chips - have they had their chips
Fish and Chips - have they had their chipsFish and Chips - have they had their chips
Fish and Chips - have they had their chips
 
Operations Management - Book1.p - Dr. Abdulfatah A. Salem
Operations Management - Book1.p  - Dr. Abdulfatah A. SalemOperations Management - Book1.p  - Dr. Abdulfatah A. Salem
Operations Management - Book1.p - Dr. Abdulfatah A. Salem
 
PART A. Introduction to Costumer Service
PART A. Introduction to Costumer ServicePART A. Introduction to Costumer Service
PART A. Introduction to Costumer Service
 
Introduction to Quality Improvement Essentials
Introduction to Quality Improvement EssentialsIntroduction to Quality Improvement Essentials
Introduction to Quality Improvement Essentials
 
Basic Civil Engg Notes_Chapter-6_Environment Pollution & Engineering
Basic Civil Engg Notes_Chapter-6_Environment Pollution & EngineeringBasic Civil Engg Notes_Chapter-6_Environment Pollution & Engineering
Basic Civil Engg Notes_Chapter-6_Environment Pollution & Engineering
 
Accounting and finance exit exam 2016 E.C.pdf
Accounting and finance exit exam 2016 E.C.pdfAccounting and finance exit exam 2016 E.C.pdf
Accounting and finance exit exam 2016 E.C.pdf
 
Application of Matrices in real life. Presentation on application of matrices
Application of Matrices in real life. Presentation on application of matricesApplication of Matrices in real life. Presentation on application of matrices
Application of Matrices in real life. Presentation on application of matrices
 
Basic phrases for greeting and assisting costumers
Basic phrases for greeting and assisting costumersBasic phrases for greeting and assisting costumers
Basic phrases for greeting and assisting costumers
 
Phrasal Verbs.XXXXXXXXXXXXXXXXXXXXXXXXXX
Phrasal Verbs.XXXXXXXXXXXXXXXXXXXXXXXXXXPhrasal Verbs.XXXXXXXXXXXXXXXXXXXXXXXXXX
Phrasal Verbs.XXXXXXXXXXXXXXXXXXXXXXXXXX
 
Salient features of Environment protection Act 1986.pptx
Salient features of Environment protection Act 1986.pptxSalient features of Environment protection Act 1986.pptx
Salient features of Environment protection Act 1986.pptx
 
Solid waste management & Types of Basic civil Engineering notes by DJ Sir.pptx
Solid waste management & Types of Basic civil Engineering notes by DJ Sir.pptxSolid waste management & Types of Basic civil Engineering notes by DJ Sir.pptx
Solid waste management & Types of Basic civil Engineering notes by DJ Sir.pptx
 
Additional Benefits for Employee Website.pdf
Additional Benefits for Employee Website.pdfAdditional Benefits for Employee Website.pdf
Additional Benefits for Employee Website.pdf
 
Matatag-Curriculum and the 21st Century Skills Presentation.pptx
Matatag-Curriculum and the 21st Century Skills Presentation.pptxMatatag-Curriculum and the 21st Century Skills Presentation.pptx
Matatag-Curriculum and the 21st Century Skills Presentation.pptx
 

Obstacle Avoidance Robot

  • 1. R. Srikanth (10QF1A0455) D. Naresh (10QF1A0409) S. Srinivas (10QF1A0456) Ms P. Kranthi
  • 2.  The word robotics is used to collectively define a field in engineering that covers the mimicking of various human characteristics.  It must be able to perform certain tasks we set for it.  The desired task must be achieved within some given limitations.  It may be human controlled or automatic. What is “Robotics”?
  • 3. Mobile robots perform various ways of tasks to serve humans No human guidance is required This sort of project is very much useful in the industries where the automated supervision is required Why Robotics?
  • 4.  In this project our robot senses any obstacle in its path, avoids it and resumes its running  Involves the pre- computation of an obstacle-free path which a controller guides the robot Our Robot:-
  • 5.  IR Sensor(Transmitter and receiver)  AVR Atmega16 Microcontroller  L293D Driver IC  Motor  Buzzer COMPONENTS:-
  • 8.  (IR) sensors based on reflected amplitude of the surrounding objects  Non-linear and depends on the reflectance characteristics of the object surface  IR sensors able to accurately measure distances with reduced response times IR Sensors:-
  • 9. What is a Microcontroller?  A microcontroller (MCU/μC) is a small computer on a single IC consisting internally of a relatively simple CPU, clock, timers, I/O ports, and memory.  It can be programmed to control numerous other electronic devices using its on chip peripherals. AVR Atmega16 Microcontroller:-
  • 10.  They are fast.  Executes most of the instructions in single execution cycle.  4 times faster than PIC  Consume less power  Can be operated in different power saving modes. Why ATMEGA?
  • 11. ATmega Features:-  16 KB Flash memory  1 KB of SRAM  Up to 16 MHz clock  Four 8-bit I/O ports  ADC, Timers, Serial Interface etc.  40 pin DIP, operates at 5V
  • 12.  Flash: Flash memory to store the program written. Flash memory is non-volatile i.e., it retains the program even if the power is cut- off.  EEPROM: This is also a non- volatile memory used to store data like values of certain variables.  SRAM: Static Random Access Memory, this is the volatile memory of microcontroller i.e. data is lost as soon as power is turned off. ATmega MEMORY:-
  • 13.  Step1: Initialization of I/O ports.  Step2: Set Direction as Forward/ Backward/ Left/ Right.  Step3: check if any obstacle is detected according to that change the motion of Robot. If no then Robot will goes in forward direction.  Step4: Wait for some time.  Step5: go to step 3 to repeat the process.  Step7: Wait for some time.  Step 8: End ALGORITHM
  • 15.  The L293D is a quadruple half H-bridge bidirectional motor driver IC  Can drive current of up to 600mA with voltage range of 4.5 to 36 volts  Drive small DC-Geared motors, bipolar stepper motor L293D Driver IC
  • 16.  Free running torque & current are ideally zero  Increased load implies, increased torque, current drawn & power consumption  Power supplied by a motor is the product of output shaft's rotational velocity & torque  Can run in both directions D.C Geared Motor:-
  • 17.  Whenever robot senses any obstacle automatically diverts its position to left or right and follows the path without human guidance.  The programming of the microcontroller is easy.  It is a low cost circuit Advantages:-
  • 18.  It is time consuming project.  It is use for short distance only.  It is not recommended to keep the range very long because this would cause the ROBOT to keep moving forward and backward as it senses any obstacle, even far away from it.  It is not in human control Disadvantages:-
  • 19.  Adding a Camera  Use as a fire fighting robot Future Scope Of This Project:-

Editor's Notes

  1. Animated text flying in by letter(Basic)To reproduce the text effects on this slide, do the following:On the Home tab, in theSlides group, click Layout, and then click Blank.On the Insert tab, in the Text group, click Text Box, and then on the slide, drag to draw the text box. Enter text in the text box, select the text, and then on the Home tab, in the Font group, select Corbel from the Font list, enter 50 in the Font Size list, and click Bold.On the Home tab, in the Paragraph group, click Center to center the text.Select the text box. Under Drawing Tools, on the Format tab, in the WordArt Styles, click on the Format Text Effects: Text Box dialog box launcher. In the Format Text Effects dialog box, in the left pane, click Text Fill. In the Text Fill pane, select Solid Fill, and in the Color list, select Olive Green, Accent 3 (first row, seventh option from the left).Also in the Format Text Effects dialog box, in the left pane, click 3-D Format. In the 3-D Format pane, do the following:Under Bevel, do the following:In the Top list, under Bevel, select Angle (second row, first option from the left). In Top, under Width, enter 1.5 pt. In Top, under Height, enter1.5 pt.Under Depth, in the Color list, select Automatic, and in the Depth text box, enter 2.5ptUnder Contour, in the Color list, select Olive Green, Accent 3 (first row, seventh option from the left).Under Surface, do the following:In the Material list, under Translucent, select Powder (first option from the left).In the Lighting list, under Special, select Flat (first option from the left).In the Angle box, enter 315°.On the slide, select the text box, and then on the Home tab, in the Drawing group, click Arrange, and then under Position Objects, point to Align, and do the following:Click Align to Slide.Click Align Middle.Click Align Center.To reproduce the animation effects on this slide, do the following:On the slide, select the text box and then on the Animations tab, in the Animation group, click the More arrow on the Animation Effects Gallery, and under Entrance, click Fly In. To modify the effect, on the Animations tab, do the following: In the Timing group, do the following:In the Start list, select WithPrevious.In the Durations list, select 00.50.In the Animation group, click Effect Options and under Direction, click From Left.In the Advanced Animation group, click Animation Pane. Then in the Animation Pane, do the following:Click the arrow next to the fly-in effect and click Effect Options.In the Fly In dialog box, on the Effects tab, under Enhancements, in the AnimateText box, select ByLetters.Under Enhancements, in the % delay between letters box, enter 6.In the Advanced Animation group, click AddAnimation, then under Exit, select FlyOut. To modify the effect, on the Animations tab, do the following: In the Timing group, do the following:In the Start list, select AfterPrevious.In the Durations list, select 00.50.In the Delay list, select 01.50.In the Animation group, click Effect Options and under Direction, click To Right.In the Advanced Animation group, click Animation Pane. Then in the Animation Pane, do the following:Click the arrow next to the fly-in effect and click Effect Options.In the Fly Out dialog box, on the Effects tab, under Enhancements, in the AnimateText box, select ByLetters.Under Enhancements, in the % delay between letters box, enter 6.Select the fly out exit effect, and under Modify: Fly Out, do the following:In the Start list, select AfterPrevious. In the Direction list, select ToRight. In the Speed list, select Fast. Click the arrow next to the fly out exit effect, and select Effect Options. In the FlyOut dialog box, do the following:On the Effect tab, in the Animate Text list, select By Letters. Also on the Effect tab, in the % delay between letters box, enter 6.On the Timing tab, in the Delay box, enter 1.5.To reproduce the background on this slide, do the following: Right-click the slide background area, and then click Format Background. In the Format Background dialog box, click Fill in the left pane, select Gradient fill in the Fill pane, and then do the following:In the Type list, select Radial.Click the button next to Direction, and then click From Center (third option from the left).Under Gradient stops, click Add or Remove until two stops appear on the slider, then customize the gradient stops as follows:Select Stop 1 from the slider, and then do the following:In the Position box, enter 0%.Click the button next to Color, and then click Black, Text 1, Lighter 50% (second row, second option from the left).Select Stop 2 from the slider, and then do the following: In the Position box, enter 100%.Click the button next to Color, and then click Black, Text 1 (first row, second option from the left).
  2. Animated text flying in by letter(Basic)To reproduce the text effects on this slide, do the following:On the Home tab, in theSlides group, click Layout, and then click Blank.On the Insert tab, in the Text group, click Text Box, and then on the slide, drag to draw the text box. Enter text in the text box, select the text, and then on the Home tab, in the Font group, select Corbel from the Font list, enter 50 in the Font Size list, and click Bold.On the Home tab, in the Paragraph group, click Center to center the text.Select the text box. Under Drawing Tools, on the Format tab, in the WordArt Styles, click on the Format Text Effects: Text Box dialog box launcher. In the Format Text Effects dialog box, in the left pane, click Text Fill. In the Text Fill pane, select Solid Fill, and in the Color list, select Olive Green, Accent 3 (first row, seventh option from the left).Also in the Format Text Effects dialog box, in the left pane, click 3-D Format. In the 3-D Format pane, do the following:Under Bevel, do the following:In the Top list, under Bevel, select Angle (second row, first option from the left). In Top, under Width, enter 1.5 pt. In Top, under Height, enter1.5 pt.Under Depth, in the Color list, select Automatic, and in the Depth text box, enter 2.5ptUnder Contour, in the Color list, select Olive Green, Accent 3 (first row, seventh option from the left).Under Surface, do the following:In the Material list, under Translucent, select Powder (first option from the left).In the Lighting list, under Special, select Flat (first option from the left).In the Angle box, enter 315°.On the slide, select the text box, and then on the Home tab, in the Drawing group, click Arrange, and then under Position Objects, point to Align, and do the following:Click Align to Slide.Click Align Middle.Click Align Center.To reproduce the animation effects on this slide, do the following:On the slide, select the text box and then on the Animations tab, in the Animation group, click the More arrow on the Animation Effects Gallery, and under Entrance, click Fly In. To modify the effect, on the Animations tab, do the following: In the Timing group, do the following:In the Start list, select WithPrevious.In the Durations list, select 00.50.In the Animation group, click Effect Options and under Direction, click From Left.In the Advanced Animation group, click Animation Pane. Then in the Animation Pane, do the following:Click the arrow next to the fly-in effect and click Effect Options.In the Fly In dialog box, on the Effects tab, under Enhancements, in the AnimateText box, select ByLetters.Under Enhancements, in the % delay between letters box, enter 6.In the Advanced Animation group, click AddAnimation, then under Exit, select FlyOut. To modify the effect, on the Animations tab, do the following: In the Timing group, do the following:In the Start list, select AfterPrevious.In the Durations list, select 00.50.In the Delay list, select 01.50.In the Animation group, click Effect Options and under Direction, click To Right.In the Advanced Animation group, click Animation Pane. Then in the Animation Pane, do the following:Click the arrow next to the fly-in effect and click Effect Options.In the Fly Out dialog box, on the Effects tab, under Enhancements, in the AnimateText box, select ByLetters.Under Enhancements, in the % delay between letters box, enter 6.Select the fly out exit effect, and under Modify: Fly Out, do the following:In the Start list, select AfterPrevious. In the Direction list, select ToRight. In the Speed list, select Fast. Click the arrow next to the fly out exit effect, and select Effect Options. In the FlyOut dialog box, do the following:On the Effect tab, in the Animate Text list, select By Letters. Also on the Effect tab, in the % delay between letters box, enter 6.On the Timing tab, in the Delay box, enter 1.5.To reproduce the background on this slide, do the following: Right-click the slide background area, and then click Format Background. In the Format Background dialog box, click Fill in the left pane, select Gradient fill in the Fill pane, and then do the following:In the Type list, select Radial.Click the button next to Direction, and then click From Center (third option from the left).Under Gradient stops, click Add or Remove until two stops appear on the slider, then customize the gradient stops as follows:Select Stop 1 from the slider, and then do the following:In the Position box, enter 0%.Click the button next to Color, and then click Black, Text 1, Lighter 50% (second row, second option from the left).Select Stop 2 from the slider, and then do the following: In the Position box, enter 100%.Click the button next to Color, and then click Black, Text 1 (first row, second option from the left).
  3. Animated text flying in by letter(Basic)To reproduce the text effects on this slide, do the following:On the Home tab, in theSlides group, click Layout, and then click Blank.On the Insert tab, in the Text group, click Text Box, and then on the slide, drag to draw the text box. Enter text in the text box, select the text, and then on the Home tab, in the Font group, select Corbel from the Font list, enter 50 in the Font Size list, and click Bold.On the Home tab, in the Paragraph group, click Center to center the text.Select the text box. Under Drawing Tools, on the Format tab, in the WordArt Styles, click on the Format Text Effects: Text Box dialog box launcher. In the Format Text Effects dialog box, in the left pane, click Text Fill. In the Text Fill pane, select Solid Fill, and in the Color list, select Olive Green, Accent 3 (first row, seventh option from the left).Also in the Format Text Effects dialog box, in the left pane, click 3-D Format. In the 3-D Format pane, do the following:Under Bevel, do the following:In the Top list, under Bevel, select Angle (second row, first option from the left). In Top, under Width, enter 1.5 pt. In Top, under Height, enter1.5 pt.Under Depth, in the Color list, select Automatic, and in the Depth text box, enter 2.5ptUnder Contour, in the Color list, select Olive Green, Accent 3 (first row, seventh option from the left).Under Surface, do the following:In the Material list, under Translucent, select Powder (first option from the left).In the Lighting list, under Special, select Flat (first option from the left).In the Angle box, enter 315°.On the slide, select the text box, and then on the Home tab, in the Drawing group, click Arrange, and then under Position Objects, point to Align, and do the following:Click Align to Slide.Click Align Middle.Click Align Center.To reproduce the animation effects on this slide, do the following:On the slide, select the text box and then on the Animations tab, in the Animation group, click the More arrow on the Animation Effects Gallery, and under Entrance, click Fly In. To modify the effect, on the Animations tab, do the following: In the Timing group, do the following:In the Start list, select WithPrevious.In the Durations list, select 00.50.In the Animation group, click Effect Options and under Direction, click From Left.In the Advanced Animation group, click Animation Pane. Then in the Animation Pane, do the following:Click the arrow next to the fly-in effect and click Effect Options.In the Fly In dialog box, on the Effects tab, under Enhancements, in the AnimateText box, select ByLetters.Under Enhancements, in the % delay between letters box, enter 6.In the Advanced Animation group, click AddAnimation, then under Exit, select FlyOut. To modify the effect, on the Animations tab, do the following: In the Timing group, do the following:In the Start list, select AfterPrevious.In the Durations list, select 00.50.In the Delay list, select 01.50.In the Animation group, click Effect Options and under Direction, click To Right.In the Advanced Animation group, click Animation Pane. Then in the Animation Pane, do the following:Click the arrow next to the fly-in effect and click Effect Options.In the Fly Out dialog box, on the Effects tab, under Enhancements, in the AnimateText box, select ByLetters.Under Enhancements, in the % delay between letters box, enter 6.Select the fly out exit effect, and under Modify: Fly Out, do the following:In the Start list, select AfterPrevious. In the Direction list, select ToRight. In the Speed list, select Fast. Click the arrow next to the fly out exit effect, and select Effect Options. In the FlyOut dialog box, do the following:On the Effect tab, in the Animate Text list, select By Letters. Also on the Effect tab, in the % delay between letters box, enter 6.On the Timing tab, in the Delay box, enter 1.5.To reproduce the background on this slide, do the following: Right-click the slide background area, and then click Format Background. In the Format Background dialog box, click Fill in the left pane, select Gradient fill in the Fill pane, and then do the following:In the Type list, select Radial.Click the button next to Direction, and then click From Center (third option from the left).Under Gradient stops, click Add or Remove until two stops appear on the slider, then customize the gradient stops as follows:Select Stop 1 from the slider, and then do the following:In the Position box, enter 0%.Click the button next to Color, and then click Black, Text 1, Lighter 50% (second row, second option from the left).Select Stop 2 from the slider, and then do the following: In the Position box, enter 100%.Click the button next to Color, and then click Black, Text 1 (first row, second option from the left).
  4. Animated text flying in by letter(Basic)To reproduce the text effects on this slide, do the following:On the Home tab, in theSlides group, click Layout, and then click Blank.On the Insert tab, in the Text group, click Text Box, and then on the slide, drag to draw the text box. Enter text in the text box, select the text, and then on the Home tab, in the Font group, select Corbel from the Font list, enter 50 in the Font Size list, and click Bold.On the Home tab, in the Paragraph group, click Center to center the text.Select the text box. Under Drawing Tools, on the Format tab, in the WordArt Styles, click on the Format Text Effects: Text Box dialog box launcher. In the Format Text Effects dialog box, in the left pane, click Text Fill. In the Text Fill pane, select Solid Fill, and in the Color list, select Olive Green, Accent 3 (first row, seventh option from the left).Also in the Format Text Effects dialog box, in the left pane, click 3-D Format. In the 3-D Format pane, do the following:Under Bevel, do the following:In the Top list, under Bevel, select Angle (second row, first option from the left). In Top, under Width, enter 1.5 pt. In Top, under Height, enter1.5 pt.Under Depth, in the Color list, select Automatic, and in the Depth text box, enter 2.5ptUnder Contour, in the Color list, select Olive Green, Accent 3 (first row, seventh option from the left).Under Surface, do the following:In the Material list, under Translucent, select Powder (first option from the left).In the Lighting list, under Special, select Flat (first option from the left).In the Angle box, enter 315°.On the slide, select the text box, and then on the Home tab, in the Drawing group, click Arrange, and then under Position Objects, point to Align, and do the following:Click Align to Slide.Click Align Middle.Click Align Center.To reproduce the animation effects on this slide, do the following:On the slide, select the text box and then on the Animations tab, in the Animation group, click the More arrow on the Animation Effects Gallery, and under Entrance, click Fly In. To modify the effect, on the Animations tab, do the following: In the Timing group, do the following:In the Start list, select WithPrevious.In the Durations list, select 00.50.In the Animation group, click Effect Options and under Direction, click From Left.In the Advanced Animation group, click Animation Pane. Then in the Animation Pane, do the following:Click the arrow next to the fly-in effect and click Effect Options.In the Fly In dialog box, on the Effects tab, under Enhancements, in the AnimateText box, select ByLetters.Under Enhancements, in the % delay between letters box, enter 6.In the Advanced Animation group, click AddAnimation, then under Exit, select FlyOut. To modify the effect, on the Animations tab, do the following: In the Timing group, do the following:In the Start list, select AfterPrevious.In the Durations list, select 00.50.In the Delay list, select 01.50.In the Animation group, click Effect Options and under Direction, click To Right.In the Advanced Animation group, click Animation Pane. Then in the Animation Pane, do the following:Click the arrow next to the fly-in effect and click Effect Options.In the Fly Out dialog box, on the Effects tab, under Enhancements, in the AnimateText box, select ByLetters.Under Enhancements, in the % delay between letters box, enter 6.Select the fly out exit effect, and under Modify: Fly Out, do the following:In the Start list, select AfterPrevious. In the Direction list, select ToRight. In the Speed list, select Fast. Click the arrow next to the fly out exit effect, and select Effect Options. In the FlyOut dialog box, do the following:On the Effect tab, in the Animate Text list, select By Letters. Also on the Effect tab, in the % delay between letters box, enter 6.On the Timing tab, in the Delay box, enter 1.5.To reproduce the background on this slide, do the following: Right-click the slide background area, and then click Format Background. In the Format Background dialog box, click Fill in the left pane, select Gradient fill in the Fill pane, and then do the following:In the Type list, select Radial.Click the button next to Direction, and then click From Center (third option from the left).Under Gradient stops, click Add or Remove until two stops appear on the slider, then customize the gradient stops as follows:Select Stop 1 from the slider, and then do the following:In the Position box, enter 0%.Click the button next to Color, and then click Black, Text 1, Lighter 50% (second row, second option from the left).Select Stop 2 from the slider, and then do the following: In the Position box, enter 100%.Click the button next to Color, and then click Black, Text 1 (first row, second option from the left).
  5. Animated text flying in by letter(Basic)To reproduce the text effects on this slide, do the following:On the Home tab, in theSlides group, click Layout, and then click Blank.On the Insert tab, in the Text group, click Text Box, and then on the slide, drag to draw the text box. Enter text in the text box, select the text, and then on the Home tab, in the Font group, select Corbel from the Font list, enter 50 in the Font Size list, and click Bold.On the Home tab, in the Paragraph group, click Center to center the text.Select the text box. Under Drawing Tools, on the Format tab, in the WordArt Styles, click on the Format Text Effects: Text Box dialog box launcher. In the Format Text Effects dialog box, in the left pane, click Text Fill. In the Text Fill pane, select Solid Fill, and in the Color list, select Olive Green, Accent 3 (first row, seventh option from the left).Also in the Format Text Effects dialog box, in the left pane, click 3-D Format. In the 3-D Format pane, do the following:Under Bevel, do the following:In the Top list, under Bevel, select Angle (second row, first option from the left). In Top, under Width, enter 1.5 pt. In Top, under Height, enter1.5 pt.Under Depth, in the Color list, select Automatic, and in the Depth text box, enter 2.5ptUnder Contour, in the Color list, select Olive Green, Accent 3 (first row, seventh option from the left).Under Surface, do the following:In the Material list, under Translucent, select Powder (first option from the left).In the Lighting list, under Special, select Flat (first option from the left).In the Angle box, enter 315°.On the slide, select the text box, and then on the Home tab, in the Drawing group, click Arrange, and then under Position Objects, point to Align, and do the following:Click Align to Slide.Click Align Middle.Click Align Center.To reproduce the animation effects on this slide, do the following:On the slide, select the text box and then on the Animations tab, in the Animation group, click the More arrow on the Animation Effects Gallery, and under Entrance, click Fly In. To modify the effect, on the Animations tab, do the following: In the Timing group, do the following:In the Start list, select WithPrevious.In the Durations list, select 00.50.In the Animation group, click Effect Options and under Direction, click From Left.In the Advanced Animation group, click Animation Pane. Then in the Animation Pane, do the following:Click the arrow next to the fly-in effect and click Effect Options.In the Fly In dialog box, on the Effects tab, under Enhancements, in the AnimateText box, select ByLetters.Under Enhancements, in the % delay between letters box, enter 6.In the Advanced Animation group, click AddAnimation, then under Exit, select FlyOut. To modify the effect, on the Animations tab, do the following: In the Timing group, do the following:In the Start list, select AfterPrevious.In the Durations list, select 00.50.In the Delay list, select 01.50.In the Animation group, click Effect Options and under Direction, click To Right.In the Advanced Animation group, click Animation Pane. Then in the Animation Pane, do the following:Click the arrow next to the fly-in effect and click Effect Options.In the Fly Out dialog box, on the Effects tab, under Enhancements, in the AnimateText box, select ByLetters.Under Enhancements, in the % delay between letters box, enter 6.Select the fly out exit effect, and under Modify: Fly Out, do the following:In the Start list, select AfterPrevious. In the Direction list, select ToRight. In the Speed list, select Fast. Click the arrow next to the fly out exit effect, and select Effect Options. In the FlyOut dialog box, do the following:On the Effect tab, in the Animate Text list, select By Letters. Also on the Effect tab, in the % delay between letters box, enter 6.On the Timing tab, in the Delay box, enter 1.5.To reproduce the background on this slide, do the following: Right-click the slide background area, and then click Format Background. In the Format Background dialog box, click Fill in the left pane, select Gradient fill in the Fill pane, and then do the following:In the Type list, select Radial.Click the button next to Direction, and then click From Center (third option from the left).Under Gradient stops, click Add or Remove until two stops appear on the slider, then customize the gradient stops as follows:Select Stop 1 from the slider, and then do the following:In the Position box, enter 0%.Click the button next to Color, and then click Black, Text 1, Lighter 50% (second row, second option from the left).Select Stop 2 from the slider, and then do the following: In the Position box, enter 100%.Click the button next to Color, and then click Black, Text 1 (first row, second option from the left).
  6. Animated text flying in by letter(Basic)To reproduce the text effects on this slide, do the following:On the Home tab, in theSlides group, click Layout, and then click Blank.On the Insert tab, in the Text group, click Text Box, and then on the slide, drag to draw the text box. Enter text in the text box, select the text, and then on the Home tab, in the Font group, select Corbel from the Font list, enter 50 in the Font Size list, and click Bold.On the Home tab, in the Paragraph group, click Center to center the text.Select the text box. Under Drawing Tools, on the Format tab, in the WordArt Styles, click on the Format Text Effects: Text Box dialog box launcher. In the Format Text Effects dialog box, in the left pane, click Text Fill. In the Text Fill pane, select Solid Fill, and in the Color list, select Olive Green, Accent 3 (first row, seventh option from the left).Also in the Format Text Effects dialog box, in the left pane, click 3-D Format. In the 3-D Format pane, do the following:Under Bevel, do the following:In the Top list, under Bevel, select Angle (second row, first option from the left). In Top, under Width, enter 1.5 pt. In Top, under Height, enter1.5 pt.Under Depth, in the Color list, select Automatic, and in the Depth text box, enter 2.5ptUnder Contour, in the Color list, select Olive Green, Accent 3 (first row, seventh option from the left).Under Surface, do the following:In the Material list, under Translucent, select Powder (first option from the left).In the Lighting list, under Special, select Flat (first option from the left).In the Angle box, enter 315°.On the slide, select the text box, and then on the Home tab, in the Drawing group, click Arrange, and then under Position Objects, point to Align, and do the following:Click Align to Slide.Click Align Middle.Click Align Center.To reproduce the animation effects on this slide, do the following:On the slide, select the text box and then on the Animations tab, in the Animation group, click the More arrow on the Animation Effects Gallery, and under Entrance, click Fly In. To modify the effect, on the Animations tab, do the following: In the Timing group, do the following:In the Start list, select WithPrevious.In the Durations list, select 00.50.In the Animation group, click Effect Options and under Direction, click From Left.In the Advanced Animation group, click Animation Pane. Then in the Animation Pane, do the following:Click the arrow next to the fly-in effect and click Effect Options.In the Fly In dialog box, on the Effects tab, under Enhancements, in the AnimateText box, select ByLetters.Under Enhancements, in the % delay between letters box, enter 6.In the Advanced Animation group, click AddAnimation, then under Exit, select FlyOut. To modify the effect, on the Animations tab, do the following: In the Timing group, do the following:In the Start list, select AfterPrevious.In the Durations list, select 00.50.In the Delay list, select 01.50.In the Animation group, click Effect Options and under Direction, click To Right.In the Advanced Animation group, click Animation Pane. Then in the Animation Pane, do the following:Click the arrow next to the fly-in effect and click Effect Options.In the Fly Out dialog box, on the Effects tab, under Enhancements, in the AnimateText box, select ByLetters.Under Enhancements, in the % delay between letters box, enter 6.Select the fly out exit effect, and under Modify: Fly Out, do the following:In the Start list, select AfterPrevious. In the Direction list, select ToRight. In the Speed list, select Fast. Click the arrow next to the fly out exit effect, and select Effect Options. In the FlyOut dialog box, do the following:On the Effect tab, in the Animate Text list, select By Letters. Also on the Effect tab, in the % delay between letters box, enter 6.On the Timing tab, in the Delay box, enter 1.5.To reproduce the background on this slide, do the following: Right-click the slide background area, and then click Format Background. In the Format Background dialog box, click Fill in the left pane, select Gradient fill in the Fill pane, and then do the following:In the Type list, select Radial.Click the button next to Direction, and then click From Center (third option from the left).Under Gradient stops, click Add or Remove until two stops appear on the slider, then customize the gradient stops as follows:Select Stop 1 from the slider, and then do the following:In the Position box, enter 0%.Click the button next to Color, and then click Black, Text 1, Lighter 50% (second row, second option from the left).Select Stop 2 from the slider, and then do the following: In the Position box, enter 100%.Click the button next to Color, and then click Black, Text 1 (first row, second option from the left).
  7. Animated text flying in by letter(Basic)To reproduce the text effects on this slide, do the following:On the Home tab, in theSlides group, click Layout, and then click Blank.On the Insert tab, in the Text group, click Text Box, and then on the slide, drag to draw the text box. Enter text in the text box, select the text, and then on the Home tab, in the Font group, select Corbel from the Font list, enter 50 in the Font Size list, and click Bold.On the Home tab, in the Paragraph group, click Center to center the text.Select the text box. Under Drawing Tools, on the Format tab, in the WordArt Styles, click on the Format Text Effects: Text Box dialog box launcher. In the Format Text Effects dialog box, in the left pane, click Text Fill. In the Text Fill pane, select Solid Fill, and in the Color list, select Olive Green, Accent 3 (first row, seventh option from the left).Also in the Format Text Effects dialog box, in the left pane, click 3-D Format. In the 3-D Format pane, do the following:Under Bevel, do the following:In the Top list, under Bevel, select Angle (second row, first option from the left). In Top, under Width, enter 1.5 pt. In Top, under Height, enter1.5 pt.Under Depth, in the Color list, select Automatic, and in the Depth text box, enter 2.5ptUnder Contour, in the Color list, select Olive Green, Accent 3 (first row, seventh option from the left).Under Surface, do the following:In the Material list, under Translucent, select Powder (first option from the left).In the Lighting list, under Special, select Flat (first option from the left).In the Angle box, enter 315°.On the slide, select the text box, and then on the Home tab, in the Drawing group, click Arrange, and then under Position Objects, point to Align, and do the following:Click Align to Slide.Click Align Middle.Click Align Center.To reproduce the animation effects on this slide, do the following:On the slide, select the text box and then on the Animations tab, in the Animation group, click the More arrow on the Animation Effects Gallery, and under Entrance, click Fly In. To modify the effect, on the Animations tab, do the following: In the Timing group, do the following:In the Start list, select WithPrevious.In the Durations list, select 00.50.In the Animation group, click Effect Options and under Direction, click From Left.In the Advanced Animation group, click Animation Pane. Then in the Animation Pane, do the following:Click the arrow next to the fly-in effect and click Effect Options.In the Fly In dialog box, on the Effects tab, under Enhancements, in the AnimateText box, select ByLetters.Under Enhancements, in the % delay between letters box, enter 6.In the Advanced Animation group, click AddAnimation, then under Exit, select FlyOut. To modify the effect, on the Animations tab, do the following: In the Timing group, do the following:In the Start list, select AfterPrevious.In the Durations list, select 00.50.In the Delay list, select 01.50.In the Animation group, click Effect Options and under Direction, click To Right.In the Advanced Animation group, click Animation Pane. Then in the Animation Pane, do the following:Click the arrow next to the fly-in effect and click Effect Options.In the Fly Out dialog box, on the Effects tab, under Enhancements, in the AnimateText box, select ByLetters.Under Enhancements, in the % delay between letters box, enter 6.Select the fly out exit effect, and under Modify: Fly Out, do the following:In the Start list, select AfterPrevious. In the Direction list, select ToRight. In the Speed list, select Fast. Click the arrow next to the fly out exit effect, and select Effect Options. In the FlyOut dialog box, do the following:On the Effect tab, in the Animate Text list, select By Letters. Also on the Effect tab, in the % delay between letters box, enter 6.On the Timing tab, in the Delay box, enter 1.5.To reproduce the background on this slide, do the following: Right-click the slide background area, and then click Format Background. In the Format Background dialog box, click Fill in the left pane, select Gradient fill in the Fill pane, and then do the following:In the Type list, select Radial.Click the button next to Direction, and then click From Center (third option from the left).Under Gradient stops, click Add or Remove until two stops appear on the slider, then customize the gradient stops as follows:Select Stop 1 from the slider, and then do the following:In the Position box, enter 0%.Click the button next to Color, and then click Black, Text 1, Lighter 50% (second row, second option from the left).Select Stop 2 from the slider, and then do the following: In the Position box, enter 100%.Click the button next to Color, and then click Black, Text 1 (first row, second option from the left).
  8. Animated text flying in by letter(Basic)To reproduce the text effects on this slide, do the following:On the Home tab, in theSlides group, click Layout, and then click Blank.On the Insert tab, in the Text group, click Text Box, and then on the slide, drag to draw the text box. Enter text in the text box, select the text, and then on the Home tab, in the Font group, select Corbel from the Font list, enter 50 in the Font Size list, and click Bold.On the Home tab, in the Paragraph group, click Center to center the text.Select the text box. Under Drawing Tools, on the Format tab, in the WordArt Styles, click on the Format Text Effects: Text Box dialog box launcher. In the Format Text Effects dialog box, in the left pane, click Text Fill. In the Text Fill pane, select Solid Fill, and in the Color list, select Olive Green, Accent 3 (first row, seventh option from the left).Also in the Format Text Effects dialog box, in the left pane, click 3-D Format. In the 3-D Format pane, do the following:Under Bevel, do the following:In the Top list, under Bevel, select Angle (second row, first option from the left). In Top, under Width, enter 1.5 pt. In Top, under Height, enter1.5 pt.Under Depth, in the Color list, select Automatic, and in the Depth text box, enter 2.5ptUnder Contour, in the Color list, select Olive Green, Accent 3 (first row, seventh option from the left).Under Surface, do the following:In the Material list, under Translucent, select Powder (first option from the left).In the Lighting list, under Special, select Flat (first option from the left).In the Angle box, enter 315°.On the slide, select the text box, and then on the Home tab, in the Drawing group, click Arrange, and then under Position Objects, point to Align, and do the following:Click Align to Slide.Click Align Middle.Click Align Center.To reproduce the animation effects on this slide, do the following:On the slide, select the text box and then on the Animations tab, in the Animation group, click the More arrow on the Animation Effects Gallery, and under Entrance, click Fly In. To modify the effect, on the Animations tab, do the following: In the Timing group, do the following:In the Start list, select WithPrevious.In the Durations list, select 00.50.In the Animation group, click Effect Options and under Direction, click From Left.In the Advanced Animation group, click Animation Pane. Then in the Animation Pane, do the following:Click the arrow next to the fly-in effect and click Effect Options.In the Fly In dialog box, on the Effects tab, under Enhancements, in the AnimateText box, select ByLetters.Under Enhancements, in the % delay between letters box, enter 6.In the Advanced Animation group, click AddAnimation, then under Exit, select FlyOut. To modify the effect, on the Animations tab, do the following: In the Timing group, do the following:In the Start list, select AfterPrevious.In the Durations list, select 00.50.In the Delay list, select 01.50.In the Animation group, click Effect Options and under Direction, click To Right.In the Advanced Animation group, click Animation Pane. Then in the Animation Pane, do the following:Click the arrow next to the fly-in effect and click Effect Options.In the Fly Out dialog box, on the Effects tab, under Enhancements, in the AnimateText box, select ByLetters.Under Enhancements, in the % delay between letters box, enter 6.Select the fly out exit effect, and under Modify: Fly Out, do the following:In the Start list, select AfterPrevious. In the Direction list, select ToRight. In the Speed list, select Fast. Click the arrow next to the fly out exit effect, and select Effect Options. In the FlyOut dialog box, do the following:On the Effect tab, in the Animate Text list, select By Letters. Also on the Effect tab, in the % delay between letters box, enter 6.On the Timing tab, in the Delay box, enter 1.5.To reproduce the background on this slide, do the following: Right-click the slide background area, and then click Format Background. In the Format Background dialog box, click Fill in the left pane, select Gradient fill in the Fill pane, and then do the following:In the Type list, select Radial.Click the button next to Direction, and then click From Center (third option from the left).Under Gradient stops, click Add or Remove until two stops appear on the slider, then customize the gradient stops as follows:Select Stop 1 from the slider, and then do the following:In the Position box, enter 0%.Click the button next to Color, and then click Black, Text 1, Lighter 50% (second row, second option from the left).Select Stop 2 from the slider, and then do the following: In the Position box, enter 100%.Click the button next to Color, and then click Black, Text 1 (first row, second option from the left).
  9. Animated text flying in by letter(Basic)To reproduce the text effects on this slide, do the following:On the Home tab, in theSlides group, click Layout, and then click Blank.On the Insert tab, in the Text group, click Text Box, and then on the slide, drag to draw the text box. Enter text in the text box, select the text, and then on the Home tab, in the Font group, select Corbel from the Font list, enter 50 in the Font Size list, and click Bold.On the Home tab, in the Paragraph group, click Center to center the text.Select the text box. Under Drawing Tools, on the Format tab, in the WordArt Styles, click on the Format Text Effects: Text Box dialog box launcher. In the Format Text Effects dialog box, in the left pane, click Text Fill. In the Text Fill pane, select Solid Fill, and in the Color list, select Olive Green, Accent 3 (first row, seventh option from the left).Also in the Format Text Effects dialog box, in the left pane, click 3-D Format. In the 3-D Format pane, do the following:Under Bevel, do the following:In the Top list, under Bevel, select Angle (second row, first option from the left). In Top, under Width, enter 1.5 pt. In Top, under Height, enter1.5 pt.Under Depth, in the Color list, select Automatic, and in the Depth text box, enter 2.5ptUnder Contour, in the Color list, select Olive Green, Accent 3 (first row, seventh option from the left).Under Surface, do the following:In the Material list, under Translucent, select Powder (first option from the left).In the Lighting list, under Special, select Flat (first option from the left).In the Angle box, enter 315°.On the slide, select the text box, and then on the Home tab, in the Drawing group, click Arrange, and then under Position Objects, point to Align, and do the following:Click Align to Slide.Click Align Middle.Click Align Center.To reproduce the animation effects on this slide, do the following:On the slide, select the text box and then on the Animations tab, in the Animation group, click the More arrow on the Animation Effects Gallery, and under Entrance, click Fly In. To modify the effect, on the Animations tab, do the following: In the Timing group, do the following:In the Start list, select WithPrevious.In the Durations list, select 00.50.In the Animation group, click Effect Options and under Direction, click From Left.In the Advanced Animation group, click Animation Pane. Then in the Animation Pane, do the following:Click the arrow next to the fly-in effect and click Effect Options.In the Fly In dialog box, on the Effects tab, under Enhancements, in the AnimateText box, select ByLetters.Under Enhancements, in the % delay between letters box, enter 6.In the Advanced Animation group, click AddAnimation, then under Exit, select FlyOut. To modify the effect, on the Animations tab, do the following: In the Timing group, do the following:In the Start list, select AfterPrevious.In the Durations list, select 00.50.In the Delay list, select 01.50.In the Animation group, click Effect Options and under Direction, click To Right.In the Advanced Animation group, click Animation Pane. Then in the Animation Pane, do the following:Click the arrow next to the fly-in effect and click Effect Options.In the Fly Out dialog box, on the Effects tab, under Enhancements, in the AnimateText box, select ByLetters.Under Enhancements, in the % delay between letters box, enter 6.Select the fly out exit effect, and under Modify: Fly Out, do the following:In the Start list, select AfterPrevious. In the Direction list, select ToRight. In the Speed list, select Fast. Click the arrow next to the fly out exit effect, and select Effect Options. In the FlyOut dialog box, do the following:On the Effect tab, in the Animate Text list, select By Letters. Also on the Effect tab, in the % delay between letters box, enter 6.On the Timing tab, in the Delay box, enter 1.5.To reproduce the background on this slide, do the following: Right-click the slide background area, and then click Format Background. In the Format Background dialog box, click Fill in the left pane, select Gradient fill in the Fill pane, and then do the following:In the Type list, select Radial.Click the button next to Direction, and then click From Center (third option from the left).Under Gradient stops, click Add or Remove until two stops appear on the slider, then customize the gradient stops as follows:Select Stop 1 from the slider, and then do the following:In the Position box, enter 0%.Click the button next to Color, and then click Black, Text 1, Lighter 50% (second row, second option from the left).Select Stop 2 from the slider, and then do the following: In the Position box, enter 100%.Click the button next to Color, and then click Black, Text 1 (first row, second option from the left).
  10. Animated text flying in by letter(Basic)To reproduce the text effects on this slide, do the following:On the Home tab, in theSlides group, click Layout, and then click Blank.On the Insert tab, in the Text group, click Text Box, and then on the slide, drag to draw the text box. Enter text in the text box, select the text, and then on the Home tab, in the Font group, select Corbel from the Font list, enter 50 in the Font Size list, and click Bold.On the Home tab, in the Paragraph group, click Center to center the text.Select the text box. Under Drawing Tools, on the Format tab, in the WordArt Styles, click on the Format Text Effects: Text Box dialog box launcher. In the Format Text Effects dialog box, in the left pane, click Text Fill. In the Text Fill pane, select Solid Fill, and in the Color list, select Olive Green, Accent 3 (first row, seventh option from the left).Also in the Format Text Effects dialog box, in the left pane, click 3-D Format. In the 3-D Format pane, do the following:Under Bevel, do the following:In the Top list, under Bevel, select Angle (second row, first option from the left). In Top, under Width, enter 1.5 pt. In Top, under Height, enter1.5 pt.Under Depth, in the Color list, select Automatic, and in the Depth text box, enter 2.5ptUnder Contour, in the Color list, select Olive Green, Accent 3 (first row, seventh option from the left).Under Surface, do the following:In the Material list, under Translucent, select Powder (first option from the left).In the Lighting list, under Special, select Flat (first option from the left).In the Angle box, enter 315°.On the slide, select the text box, and then on the Home tab, in the Drawing group, click Arrange, and then under Position Objects, point to Align, and do the following:Click Align to Slide.Click Align Middle.Click Align Center.To reproduce the animation effects on this slide, do the following:On the slide, select the text box and then on the Animations tab, in the Animation group, click the More arrow on the Animation Effects Gallery, and under Entrance, click Fly In. To modify the effect, on the Animations tab, do the following: In the Timing group, do the following:In the Start list, select WithPrevious.In the Durations list, select 00.50.In the Animation group, click Effect Options and under Direction, click From Left.In the Advanced Animation group, click Animation Pane. Then in the Animation Pane, do the following:Click the arrow next to the fly-in effect and click Effect Options.In the Fly In dialog box, on the Effects tab, under Enhancements, in the AnimateText box, select ByLetters.Under Enhancements, in the % delay between letters box, enter 6.In the Advanced Animation group, click AddAnimation, then under Exit, select FlyOut. To modify the effect, on the Animations tab, do the following: In the Timing group, do the following:In the Start list, select AfterPrevious.In the Durations list, select 00.50.In the Delay list, select 01.50.In the Animation group, click Effect Options and under Direction, click To Right.In the Advanced Animation group, click Animation Pane. Then in the Animation Pane, do the following:Click the arrow next to the fly-in effect and click Effect Options.In the Fly Out dialog box, on the Effects tab, under Enhancements, in the AnimateText box, select ByLetters.Under Enhancements, in the % delay between letters box, enter 6.Select the fly out exit effect, and under Modify: Fly Out, do the following:In the Start list, select AfterPrevious. In the Direction list, select ToRight. In the Speed list, select Fast. Click the arrow next to the fly out exit effect, and select Effect Options. In the FlyOut dialog box, do the following:On the Effect tab, in the Animate Text list, select By Letters. Also on the Effect tab, in the % delay between letters box, enter 6.On the Timing tab, in the Delay box, enter 1.5.To reproduce the background on this slide, do the following: Right-click the slide background area, and then click Format Background. In the Format Background dialog box, click Fill in the left pane, select Gradient fill in the Fill pane, and then do the following:In the Type list, select Radial.Click the button next to Direction, and then click From Center (third option from the left).Under Gradient stops, click Add or Remove until two stops appear on the slider, then customize the gradient stops as follows:Select Stop 1 from the slider, and then do the following:In the Position box, enter 0%.Click the button next to Color, and then click Black, Text 1, Lighter 50% (second row, second option from the left).Select Stop 2 from the slider, and then do the following: In the Position box, enter 100%.Click the button next to Color, and then click Black, Text 1 (first row, second option from the left).
  11. Animated text flying in by letter(Basic)To reproduce the text effects on this slide, do the following:On the Home tab, in theSlides group, click Layout, and then click Blank.On the Insert tab, in the Text group, click Text Box, and then on the slide, drag to draw the text box. Enter text in the text box, select the text, and then on the Home tab, in the Font group, select Corbel from the Font list, enter 50 in the Font Size list, and click Bold.On the Home tab, in the Paragraph group, click Center to center the text.Select the text box. Under Drawing Tools, on the Format tab, in the WordArt Styles, click on the Format Text Effects: Text Box dialog box launcher. In the Format Text Effects dialog box, in the left pane, click Text Fill. In the Text Fill pane, select Solid Fill, and in the Color list, select Olive Green, Accent 3 (first row, seventh option from the left).Also in the Format Text Effects dialog box, in the left pane, click 3-D Format. In the 3-D Format pane, do the following:Under Bevel, do the following:In the Top list, under Bevel, select Angle (second row, first option from the left). In Top, under Width, enter 1.5 pt. In Top, under Height, enter1.5 pt.Under Depth, in the Color list, select Automatic, and in the Depth text box, enter 2.5ptUnder Contour, in the Color list, select Olive Green, Accent 3 (first row, seventh option from the left).Under Surface, do the following:In the Material list, under Translucent, select Powder (first option from the left).In the Lighting list, under Special, select Flat (first option from the left).In the Angle box, enter 315°.On the slide, select the text box, and then on the Home tab, in the Drawing group, click Arrange, and then under Position Objects, point to Align, and do the following:Click Align to Slide.Click Align Middle.Click Align Center.To reproduce the animation effects on this slide, do the following:On the slide, select the text box and then on the Animations tab, in the Animation group, click the More arrow on the Animation Effects Gallery, and under Entrance, click Fly In. To modify the effect, on the Animations tab, do the following: In the Timing group, do the following:In the Start list, select WithPrevious.In the Durations list, select 00.50.In the Animation group, click Effect Options and under Direction, click From Left.In the Advanced Animation group, click Animation Pane. Then in the Animation Pane, do the following:Click the arrow next to the fly-in effect and click Effect Options.In the Fly In dialog box, on the Effects tab, under Enhancements, in the AnimateText box, select ByLetters.Under Enhancements, in the % delay between letters box, enter 6.In the Advanced Animation group, click AddAnimation, then under Exit, select FlyOut. To modify the effect, on the Animations tab, do the following: In the Timing group, do the following:In the Start list, select AfterPrevious.In the Durations list, select 00.50.In the Delay list, select 01.50.In the Animation group, click Effect Options and under Direction, click To Right.In the Advanced Animation group, click Animation Pane. Then in the Animation Pane, do the following:Click the arrow next to the fly-in effect and click Effect Options.In the Fly Out dialog box, on the Effects tab, under Enhancements, in the AnimateText box, select ByLetters.Under Enhancements, in the % delay between letters box, enter 6.Select the fly out exit effect, and under Modify: Fly Out, do the following:In the Start list, select AfterPrevious. In the Direction list, select ToRight. In the Speed list, select Fast. Click the arrow next to the fly out exit effect, and select Effect Options. In the FlyOut dialog box, do the following:On the Effect tab, in the Animate Text list, select By Letters. Also on the Effect tab, in the % delay between letters box, enter 6.On the Timing tab, in the Delay box, enter 1.5.To reproduce the background on this slide, do the following: Right-click the slide background area, and then click Format Background. In the Format Background dialog box, click Fill in the left pane, select Gradient fill in the Fill pane, and then do the following:In the Type list, select Radial.Click the button next to Direction, and then click From Center (third option from the left).Under Gradient stops, click Add or Remove until two stops appear on the slider, then customize the gradient stops as follows:Select Stop 1 from the slider, and then do the following:In the Position box, enter 0%.Click the button next to Color, and then click Black, Text 1, Lighter 50% (second row, second option from the left).Select Stop 2 from the slider, and then do the following: In the Position box, enter 100%.Click the button next to Color, and then click Black, Text 1 (first row, second option from the left).
  12. Animated text flying in by letter(Basic)To reproduce the text effects on this slide, do the following:On the Home tab, in theSlides group, click Layout, and then click Blank.On the Insert tab, in the Text group, click Text Box, and then on the slide, drag to draw the text box. Enter text in the text box, select the text, and then on the Home tab, in the Font group, select Corbel from the Font list, enter 50 in the Font Size list, and click Bold.On the Home tab, in the Paragraph group, click Center to center the text.Select the text box. Under Drawing Tools, on the Format tab, in the WordArt Styles, click on the Format Text Effects: Text Box dialog box launcher. In the Format Text Effects dialog box, in the left pane, click Text Fill. In the Text Fill pane, select Solid Fill, and in the Color list, select Olive Green, Accent 3 (first row, seventh option from the left).Also in the Format Text Effects dialog box, in the left pane, click 3-D Format. In the 3-D Format pane, do the following:Under Bevel, do the following:In the Top list, under Bevel, select Angle (second row, first option from the left). In Top, under Width, enter 1.5 pt. In Top, under Height, enter1.5 pt.Under Depth, in the Color list, select Automatic, and in the Depth text box, enter 2.5ptUnder Contour, in the Color list, select Olive Green, Accent 3 (first row, seventh option from the left).Under Surface, do the following:In the Material list, under Translucent, select Powder (first option from the left).In the Lighting list, under Special, select Flat (first option from the left).In the Angle box, enter 315°.On the slide, select the text box, and then on the Home tab, in the Drawing group, click Arrange, and then under Position Objects, point to Align, and do the following:Click Align to Slide.Click Align Middle.Click Align Center.To reproduce the animation effects on this slide, do the following:On the slide, select the text box and then on the Animations tab, in the Animation group, click the More arrow on the Animation Effects Gallery, and under Entrance, click Fly In. To modify the effect, on the Animations tab, do the following: In the Timing group, do the following:In the Start list, select WithPrevious.In the Durations list, select 00.50.In the Animation group, click Effect Options and under Direction, click From Left.In the Advanced Animation group, click Animation Pane. Then in the Animation Pane, do the following:Click the arrow next to the fly-in effect and click Effect Options.In the Fly In dialog box, on the Effects tab, under Enhancements, in the AnimateText box, select ByLetters.Under Enhancements, in the % delay between letters box, enter 6.In the Advanced Animation group, click AddAnimation, then under Exit, select FlyOut. To modify the effect, on the Animations tab, do the following: In the Timing group, do the following:In the Start list, select AfterPrevious.In the Durations list, select 00.50.In the Delay list, select 01.50.In the Animation group, click Effect Options and under Direction, click To Right.In the Advanced Animation group, click Animation Pane. Then in the Animation Pane, do the following:Click the arrow next to the fly-in effect and click Effect Options.In the Fly Out dialog box, on the Effects tab, under Enhancements, in the AnimateText box, select ByLetters.Under Enhancements, in the % delay between letters box, enter 6.Select the fly out exit effect, and under Modify: Fly Out, do the following:In the Start list, select AfterPrevious. In the Direction list, select ToRight. In the Speed list, select Fast. Click the arrow next to the fly out exit effect, and select Effect Options. In the FlyOut dialog box, do the following:On the Effect tab, in the Animate Text list, select By Letters. Also on the Effect tab, in the % delay between letters box, enter 6.On the Timing tab, in the Delay box, enter 1.5.To reproduce the background on this slide, do the following: Right-click the slide background area, and then click Format Background. In the Format Background dialog box, click Fill in the left pane, select Gradient fill in the Fill pane, and then do the following:In the Type list, select Radial.Click the button next to Direction, and then click From Center (third option from the left).Under Gradient stops, click Add or Remove until two stops appear on the slider, then customize the gradient stops as follows:Select Stop 1 from the slider, and then do the following:In the Position box, enter 0%.Click the button next to Color, and then click Black, Text 1, Lighter 50% (second row, second option from the left).Select Stop 2 from the slider, and then do the following: In the Position box, enter 100%.Click the button next to Color, and then click Black, Text 1 (first row, second option from the left).
  13. Animated text flying in by letter(Basic)To reproduce the text effects on this slide, do the following:On the Home tab, in theSlides group, click Layout, and then click Blank.On the Insert tab, in the Text group, click Text Box, and then on the slide, drag to draw the text box. Enter text in the text box, select the text, and then on the Home tab, in the Font group, select Corbel from the Font list, enter 50 in the Font Size list, and click Bold.On the Home tab, in the Paragraph group, click Center to center the text.Select the text box. Under Drawing Tools, on the Format tab, in the WordArt Styles, click on the Format Text Effects: Text Box dialog box launcher. In the Format Text Effects dialog box, in the left pane, click Text Fill. In the Text Fill pane, select Solid Fill, and in the Color list, select Olive Green, Accent 3 (first row, seventh option from the left).Also in the Format Text Effects dialog box, in the left pane, click 3-D Format. In the 3-D Format pane, do the following:Under Bevel, do the following:In the Top list, under Bevel, select Angle (second row, first option from the left). In Top, under Width, enter 1.5 pt. In Top, under Height, enter1.5 pt.Under Depth, in the Color list, select Automatic, and in the Depth text box, enter 2.5ptUnder Contour, in the Color list, select Olive Green, Accent 3 (first row, seventh option from the left).Under Surface, do the following:In the Material list, under Translucent, select Powder (first option from the left).In the Lighting list, under Special, select Flat (first option from the left).In the Angle box, enter 315°.On the slide, select the text box, and then on the Home tab, in the Drawing group, click Arrange, and then under Position Objects, point to Align, and do the following:Click Align to Slide.Click Align Middle.Click Align Center.To reproduce the animation effects on this slide, do the following:On the slide, select the text box and then on the Animations tab, in the Animation group, click the More arrow on the Animation Effects Gallery, and under Entrance, click Fly In. To modify the effect, on the Animations tab, do the following: In the Timing group, do the following:In the Start list, select WithPrevious.In the Durations list, select 00.50.In the Animation group, click Effect Options and under Direction, click From Left.In the Advanced Animation group, click Animation Pane. Then in the Animation Pane, do the following:Click the arrow next to the fly-in effect and click Effect Options.In the Fly In dialog box, on the Effects tab, under Enhancements, in the AnimateText box, select ByLetters.Under Enhancements, in the % delay between letters box, enter 6.In the Advanced Animation group, click AddAnimation, then under Exit, select FlyOut. To modify the effect, on the Animations tab, do the following: In the Timing group, do the following:In the Start list, select AfterPrevious.In the Durations list, select 00.50.In the Delay list, select 01.50.In the Animation group, click Effect Options and under Direction, click To Right.In the Advanced Animation group, click Animation Pane. Then in the Animation Pane, do the following:Click the arrow next to the fly-in effect and click Effect Options.In the Fly Out dialog box, on the Effects tab, under Enhancements, in the AnimateText box, select ByLetters.Under Enhancements, in the % delay between letters box, enter 6.Select the fly out exit effect, and under Modify: Fly Out, do the following:In the Start list, select AfterPrevious. In the Direction list, select ToRight. In the Speed list, select Fast. Click the arrow next to the fly out exit effect, and select Effect Options. In the FlyOut dialog box, do the following:On the Effect tab, in the Animate Text list, select By Letters. Also on the Effect tab, in the % delay between letters box, enter 6.On the Timing tab, in the Delay box, enter 1.5.To reproduce the background on this slide, do the following: Right-click the slide background area, and then click Format Background. In the Format Background dialog box, click Fill in the left pane, select Gradient fill in the Fill pane, and then do the following:In the Type list, select Radial.Click the button next to Direction, and then click From Center (third option from the left).Under Gradient stops, click Add or Remove until two stops appear on the slider, then customize the gradient stops as follows:Select Stop 1 from the slider, and then do the following:In the Position box, enter 0%.Click the button next to Color, and then click Black, Text 1, Lighter 50% (second row, second option from the left).Select Stop 2 from the slider, and then do the following: In the Position box, enter 100%.Click the button next to Color, and then click Black, Text 1 (first row, second option from the left).
  14. Animated text flying in by letter(Basic)To reproduce the text effects on this slide, do the following:On the Home tab, in theSlides group, click Layout, and then click Blank.On the Insert tab, in the Text group, click Text Box, and then on the slide, drag to draw the text box. Enter text in the text box, select the text, and then on the Home tab, in the Font group, select Corbel from the Font list, enter 50 in the Font Size list, and click Bold.On the Home tab, in the Paragraph group, click Center to center the text.Select the text box. Under Drawing Tools, on the Format tab, in the WordArt Styles, click on the Format Text Effects: Text Box dialog box launcher. In the Format Text Effects dialog box, in the left pane, click Text Fill. In the Text Fill pane, select Solid Fill, and in the Color list, select Olive Green, Accent 3 (first row, seventh option from the left).Also in the Format Text Effects dialog box, in the left pane, click 3-D Format. In the 3-D Format pane, do the following:Under Bevel, do the following:In the Top list, under Bevel, select Angle (second row, first option from the left). In Top, under Width, enter 1.5 pt. In Top, under Height, enter1.5 pt.Under Depth, in the Color list, select Automatic, and in the Depth text box, enter 2.5ptUnder Contour, in the Color list, select Olive Green, Accent 3 (first row, seventh option from the left).Under Surface, do the following:In the Material list, under Translucent, select Powder (first option from the left).In the Lighting list, under Special, select Flat (first option from the left).In the Angle box, enter 315°.On the slide, select the text box, and then on the Home tab, in the Drawing group, click Arrange, and then under Position Objects, point to Align, and do the following:Click Align to Slide.Click Align Middle.Click Align Center.To reproduce the animation effects on this slide, do the following:On the slide, select the text box and then on the Animations tab, in the Animation group, click the More arrow on the Animation Effects Gallery, and under Entrance, click Fly In. To modify the effect, on the Animations tab, do the following: In the Timing group, do the following:In the Start list, select WithPrevious.In the Durations list, select 00.50.In the Animation group, click Effect Options and under Direction, click From Left.In the Advanced Animation group, click Animation Pane. Then in the Animation Pane, do the following:Click the arrow next to the fly-in effect and click Effect Options.In the Fly In dialog box, on the Effects tab, under Enhancements, in the AnimateText box, select ByLetters.Under Enhancements, in the % delay between letters box, enter 6.In the Advanced Animation group, click AddAnimation, then under Exit, select FlyOut. To modify the effect, on the Animations tab, do the following: In the Timing group, do the following:In the Start list, select AfterPrevious.In the Durations list, select 00.50.In the Delay list, select 01.50.In the Animation group, click Effect Options and under Direction, click To Right.In the Advanced Animation group, click Animation Pane. Then in the Animation Pane, do the following:Click the arrow next to the fly-in effect and click Effect Options.In the Fly Out dialog box, on the Effects tab, under Enhancements, in the AnimateText box, select ByLetters.Under Enhancements, in the % delay between letters box, enter 6.Select the fly out exit effect, and under Modify: Fly Out, do the following:In the Start list, select AfterPrevious. In the Direction list, select ToRight. In the Speed list, select Fast. Click the arrow next to the fly out exit effect, and select Effect Options. In the FlyOut dialog box, do the following:On the Effect tab, in the Animate Text list, select By Letters. Also on the Effect tab, in the % delay between letters box, enter 6.On the Timing tab, in the Delay box, enter 1.5.To reproduce the background on this slide, do the following: Right-click the slide background area, and then click Format Background. In the Format Background dialog box, click Fill in the left pane, select Gradient fill in the Fill pane, and then do the following:In the Type list, select Radial.Click the button next to Direction, and then click From Center (third option from the left).Under Gradient stops, click Add or Remove until two stops appear on the slider, then customize the gradient stops as follows:Select Stop 1 from the slider, and then do the following:In the Position box, enter 0%.Click the button next to Color, and then click Black, Text 1, Lighter 50% (second row, second option from the left).Select Stop 2 from the slider, and then do the following: In the Position box, enter 100%.Click the button next to Color, and then click Black, Text 1 (first row, second option from the left).
  15. Animated text flying in by letter(Basic)To reproduce the text effects on this slide, do the following:On the Home tab, in theSlides group, click Layout, and then click Blank.On the Insert tab, in the Text group, click Text Box, and then on the slide, drag to draw the text box. Enter text in the text box, select the text, and then on the Home tab, in the Font group, select Corbel from the Font list, enter 50 in the Font Size list, and click Bold.On the Home tab, in the Paragraph group, click Center to center the text.Select the text box. Under Drawing Tools, on the Format tab, in the WordArt Styles, click on the Format Text Effects: Text Box dialog box launcher. In the Format Text Effects dialog box, in the left pane, click Text Fill. In the Text Fill pane, select Solid Fill, and in the Color list, select Olive Green, Accent 3 (first row, seventh option from the left).Also in the Format Text Effects dialog box, in the left pane, click 3-D Format. In the 3-D Format pane, do the following:Under Bevel, do the following:In the Top list, under Bevel, select Angle (second row, first option from the left). In Top, under Width, enter 1.5 pt. In Top, under Height, enter1.5 pt.Under Depth, in the Color list, select Automatic, and in the Depth text box, enter 2.5ptUnder Contour, in the Color list, select Olive Green, Accent 3 (first row, seventh option from the left).Under Surface, do the following:In the Material list, under Translucent, select Powder (first option from the left).In the Lighting list, under Special, select Flat (first option from the left).In the Angle box, enter 315°.On the slide, select the text box, and then on the Home tab, in the Drawing group, click Arrange, and then under Position Objects, point to Align, and do the following:Click Align to Slide.Click Align Middle.Click Align Center.To reproduce the animation effects on this slide, do the following:On the slide, select the text box and then on the Animations tab, in the Animation group, click the More arrow on the Animation Effects Gallery, and under Entrance, click Fly In. To modify the effect, on the Animations tab, do the following: In the Timing group, do the following:In the Start list, select WithPrevious.In the Durations list, select 00.50.In the Animation group, click Effect Options and under Direction, click From Left.In the Advanced Animation group, click Animation Pane. Then in the Animation Pane, do the following:Click the arrow next to the fly-in effect and click Effect Options.In the Fly In dialog box, on the Effects tab, under Enhancements, in the AnimateText box, select ByLetters.Under Enhancements, in the % delay between letters box, enter 6.In the Advanced Animation group, click AddAnimation, then under Exit, select FlyOut. To modify the effect, on the Animations tab, do the following: In the Timing group, do the following:In the Start list, select AfterPrevious.In the Durations list, select 00.50.In the Delay list, select 01.50.In the Animation group, click Effect Options and under Direction, click To Right.In the Advanced Animation group, click Animation Pane. Then in the Animation Pane, do the following:Click the arrow next to the fly-in effect and click Effect Options.In the Fly Out dialog box, on the Effects tab, under Enhancements, in the AnimateText box, select ByLetters.Under Enhancements, in the % delay between letters box, enter 6.Select the fly out exit effect, and under Modify: Fly Out, do the following:In the Start list, select AfterPrevious. In the Direction list, select ToRight. In the Speed list, select Fast. Click the arrow next to the fly out exit effect, and select Effect Options. In the FlyOut dialog box, do the following:On the Effect tab, in the Animate Text list, select By Letters. Also on the Effect tab, in the % delay between letters box, enter 6.On the Timing tab, in the Delay box, enter 1.5.To reproduce the background on this slide, do the following: Right-click the slide background area, and then click Format Background. In the Format Background dialog box, click Fill in the left pane, select Gradient fill in the Fill pane, and then do the following:In the Type list, select Radial.Click the button next to Direction, and then click From Center (third option from the left).Under Gradient stops, click Add or Remove until two stops appear on the slider, then customize the gradient stops as follows:Select Stop 1 from the slider, and then do the following:In the Position box, enter 0%.Click the button next to Color, and then click Black, Text 1, Lighter 50% (second row, second option from the left).Select Stop 2 from the slider, and then do the following: In the Position box, enter 100%.Click the button next to Color, and then click Black, Text 1 (first row, second option from the left).
  16. Animated text flying in by letter(Basic)To reproduce the text effects on this slide, do the following:On the Home tab, in theSlides group, click Layout, and then click Blank.On the Insert tab, in the Text group, click Text Box, and then on the slide, drag to draw the text box. Enter text in the text box, select the text, and then on the Home tab, in the Font group, select Corbel from the Font list, enter 50 in the Font Size list, and click Bold.On the Home tab, in the Paragraph group, click Center to center the text.Select the text box. Under Drawing Tools, on the Format tab, in the WordArt Styles, click on the Format Text Effects: Text Box dialog box launcher. In the Format Text Effects dialog box, in the left pane, click Text Fill. In the Text Fill pane, select Solid Fill, and in the Color list, select Olive Green, Accent 3 (first row, seventh option from the left).Also in the Format Text Effects dialog box, in the left pane, click 3-D Format. In the 3-D Format pane, do the following:Under Bevel, do the following:In the Top list, under Bevel, select Angle (second row, first option from the left). In Top, under Width, enter 1.5 pt. In Top, under Height, enter1.5 pt.Under Depth, in the Color list, select Automatic, and in the Depth text box, enter 2.5ptUnder Contour, in the Color list, select Olive Green, Accent 3 (first row, seventh option from the left).Under Surface, do the following:In the Material list, under Translucent, select Powder (first option from the left).In the Lighting list, under Special, select Flat (first option from the left).In the Angle box, enter 315°.On the slide, select the text box, and then on the Home tab, in the Drawing group, click Arrange, and then under Position Objects, point to Align, and do the following:Click Align to Slide.Click Align Middle.Click Align Center.To reproduce the animation effects on this slide, do the following:On the slide, select the text box and then on the Animations tab, in the Animation group, click the More arrow on the Animation Effects Gallery, and under Entrance, click Fly In. To modify the effect, on the Animations tab, do the following: In the Timing group, do the following:In the Start list, select WithPrevious.In the Durations list, select 00.50.In the Animation group, click Effect Options and under Direction, click From Left.In the Advanced Animation group, click Animation Pane. Then in the Animation Pane, do the following:Click the arrow next to the fly-in effect and click Effect Options.In the Fly In dialog box, on the Effects tab, under Enhancements, in the AnimateText box, select ByLetters.Under Enhancements, in the % delay between letters box, enter 6.In the Advanced Animation group, click AddAnimation, then under Exit, select FlyOut. To modify the effect, on the Animations tab, do the following: In the Timing group, do the following:In the Start list, select AfterPrevious.In the Durations list, select 00.50.In the Delay list, select 01.50.In the Animation group, click Effect Options and under Direction, click To Right.In the Advanced Animation group, click Animation Pane. Then in the Animation Pane, do the following:Click the arrow next to the fly-in effect and click Effect Options.In the Fly Out dialog box, on the Effects tab, under Enhancements, in the AnimateText box, select ByLetters.Under Enhancements, in the % delay between letters box, enter 6.Select the fly out exit effect, and under Modify: Fly Out, do the following:In the Start list, select AfterPrevious. In the Direction list, select ToRight. In the Speed list, select Fast. Click the arrow next to the fly out exit effect, and select Effect Options. In the FlyOut dialog box, do the following:On the Effect tab, in the Animate Text list, select By Letters. Also on the Effect tab, in the % delay between letters box, enter 6.On the Timing tab, in the Delay box, enter 1.5.To reproduce the background on this slide, do the following: Right-click the slide background area, and then click Format Background. In the Format Background dialog box, click Fill in the left pane, select Gradient fill in the Fill pane, and then do the following:In the Type list, select Radial.Click the button next to Direction, and then click From Center (third option from the left).Under Gradient stops, click Add or Remove until two stops appear on the slider, then customize the gradient stops as follows:Select Stop 1 from the slider, and then do the following:In the Position box, enter 0%.Click the button next to Color, and then click Black, Text 1, Lighter 50% (second row, second option from the left).Select Stop 2 from the slider, and then do the following: In the Position box, enter 100%.Click the button next to Color, and then click Black, Text 1 (first row, second option from the left).
  17. Animated text flying in by letter(Basic)To reproduce the text effects on this slide, do the following:On the Home tab, in theSlides group, click Layout, and then click Blank.On the Insert tab, in the Text group, click Text Box, and then on the slide, drag to draw the text box. Enter text in the text box, select the text, and then on the Home tab, in the Font group, select Corbel from the Font list, enter 50 in the Font Size list, and click Bold.On the Home tab, in the Paragraph group, click Center to center the text.Select the text box. Under Drawing Tools, on the Format tab, in the WordArt Styles, click on the Format Text Effects: Text Box dialog box launcher. In the Format Text Effects dialog box, in the left pane, click Text Fill. In the Text Fill pane, select Solid Fill, and in the Color list, select Olive Green, Accent 3 (first row, seventh option from the left).Also in the Format Text Effects dialog box, in the left pane, click 3-D Format. In the 3-D Format pane, do the following:Under Bevel, do the following:In the Top list, under Bevel, select Angle (second row, first option from the left). In Top, under Width, enter 1.5 pt. In Top, under Height, enter1.5 pt.Under Depth, in the Color list, select Automatic, and in the Depth text box, enter 2.5ptUnder Contour, in the Color list, select Olive Green, Accent 3 (first row, seventh option from the left).Under Surface, do the following:In the Material list, under Translucent, select Powder (first option from the left).In the Lighting list, under Special, select Flat (first option from the left).In the Angle box, enter 315°.On the slide, select the text box, and then on the Home tab, in the Drawing group, click Arrange, and then under Position Objects, point to Align, and do the following:Click Align to Slide.Click Align Middle.Click Align Center.To reproduce the animation effects on this slide, do the following:On the slide, select the text box and then on the Animations tab, in the Animation group, click the More arrow on the Animation Effects Gallery, and under Entrance, click Fly In. To modify the effect, on the Animations tab, do the following: In the Timing group, do the following:In the Start list, select WithPrevious.In the Durations list, select 00.50.In the Animation group, click Effect Options and under Direction, click From Left.In the Advanced Animation group, click Animation Pane. Then in the Animation Pane, do the following:Click the arrow next to the fly-in effect and click Effect Options.In the Fly In dialog box, on the Effects tab, under Enhancements, in the AnimateText box, select ByLetters.Under Enhancements, in the % delay between letters box, enter 6.In the Advanced Animation group, click AddAnimation, then under Exit, select FlyOut. To modify the effect, on the Animations tab, do the following: In the Timing group, do the following:In the Start list, select AfterPrevious.In the Durations list, select 00.50.In the Delay list, select 01.50.In the Animation group, click Effect Options and under Direction, click To Right.In the Advanced Animation group, click Animation Pane. Then in the Animation Pane, do the following:Click the arrow next to the fly-in effect and click Effect Options.In the Fly Out dialog box, on the Effects tab, under Enhancements, in the AnimateText box, select ByLetters.Under Enhancements, in the % delay between letters box, enter 6.Select the fly out exit effect, and under Modify: Fly Out, do the following:In the Start list, select AfterPrevious. In the Direction list, select ToRight. In the Speed list, select Fast. Click the arrow next to the fly out exit effect, and select Effect Options. In the FlyOut dialog box, do the following:On the Effect tab, in the Animate Text list, select By Letters. Also on the Effect tab, in the % delay between letters box, enter 6.On the Timing tab, in the Delay box, enter 1.5.To reproduce the background on this slide, do the following: Right-click the slide background area, and then click Format Background. In the Format Background dialog box, click Fill in the left pane, select Gradient fill in the Fill pane, and then do the following:In the Type list, select Radial.Click the button next to Direction, and then click From Center (third option from the left).Under Gradient stops, click Add or Remove until two stops appear on the slider, then customize the gradient stops as follows:Select Stop 1 from the slider, and then do the following:In the Position box, enter 0%.Click the button next to Color, and then click Black, Text 1, Lighter 50% (second row, second option from the left).Select Stop 2 from the slider, and then do the following: In the Position box, enter 100%.Click the button next to Color, and then click Black, Text 1 (first row, second option from the left).