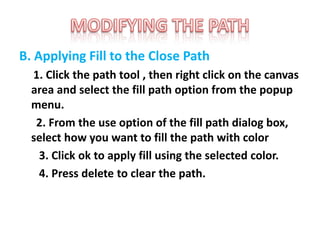
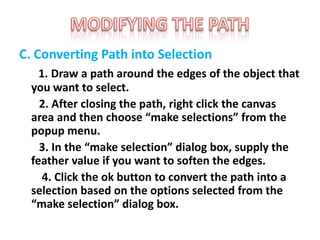
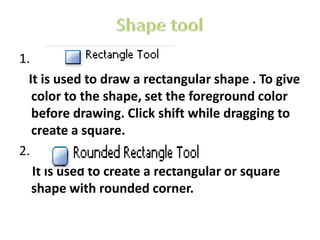
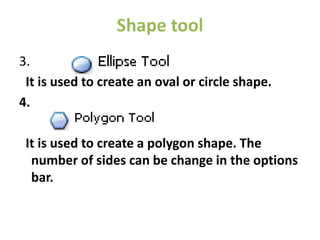
The document describes various tools and functions in Photoshop related to shapes, paths, and selections. It discusses tools for drawing shapes and paths with precision, moving and modifying anchor points, applying strokes and fills, and converting paths to selections. Specific steps are outlined for applying strokes to paths, filling closed paths, and converting paths to selections. Tools are also described for drawing basic shapes like rectangles, ovals, polygons, as well as custom shapes from a library of designs.
2. 1.
It lets you create straight lines and smooth
flowing curves with greater precision. Other
tools in this set are used to add and remove
anchor points.
5. a. Unselected Anchor point
An anchor point without a fill.
b. Direction Line
It defines the shapes and size of the curve
segment.
c. Segment
A straight or curve line that starts and end
with an anchor point.
6. d. Direction point
It is located at the end of each direction line.
It is used to modify the direction line.
e. Selected Anchor point
An anchor point is selected when it is filled
with black.
7. 2.
Used to move shapes and selections showing
anchor points and direction lines.
3.
It is used to drag an anchor point to change
the shape of your path.
8. A. Applying Stroke to the Path
1. Select the brush tool and set the size, style,
hardness, opacity and the foreground color.
2. Select the path tool and right click on the canvas.
In the popup menu, select the stroke path option
to display the stroke path dialog box. Ensure that
the brush option is selected.
3. When the stroke is applied, right click then select
delete path.
9. B. Applying Fill to the Close Path
1. Click the path tool , then right click on the canvas
area and select the fill path option from the popup
menu.
2. From the use option of the fill path dialog box,
select how you want to fill the path with color
3. Click ok to apply fill using the selected color.
4. Press delete to clear the path.
10. C. Converting Path into Selection
1. Draw a path around the edges of the object that
you want to select.
2. After closing the path, right click the canvas
area and then choose “make selections” from the
popup menu.
3. In the “make selection” dialog box, supply the
feather value if you want to soften the edges.
4. Click the ok button to convert the path into a
selection based on the options selected from the
“make selection” dialog box.
11. 1.
It is used to add/create text horizontally on your
layer.
2.
It is used to add/create text vertically on your
layer.
3.
It is used to add/create text horizontally with
mask on your layer.
12. 1.
It is used to draw a rectangular shape . To give
color to the shape, set the foreground color
before drawing. Click shift while dragging to
create a square.
2.
It is used to create a rectangular or square
shape with rounded corner.
13. Shape tool
3.
It is used to create an oval or circle shape.
4.
It is used to create a polygon shape. The
number of sides can be change in the options
bar.
14. Shape tool
5.
It is used to draw objects or things with straight
edges.
6.
It is used to draw custom shapes. Plenty of
choices of pre designed shapes in the options
bar. Click the dropdown menu and choose the
type of design you want to use, like animals,
arrows, shapes, frames, talk bubbles,
ornaments, etc.