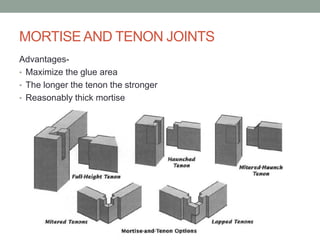
JOINERIES AND CONSTRUCTION
AMEESHI GOENKA
RESOURCES
• Rodale’s Illustrated Cabinet-making
• The New Best of Fine Woodworking – Furniture making
• Wood Joints in Classical Japanese Architecture
MORTISEAND TENON JOINTS
Advantages-
• Maximize the glue area
• The longer the tenon the stronger
• Reasonably thick mortise
OFFSET TENONS
• The size of the
mortise follows the
size of the tenon.
• The bigger the tenon
the better it would be,
keeping in mind the
mortise walls are not
too thin.
• It has a fourth
shoulder which some
craftsmen consider it
as an additional
benefit.
STEP-1
• Selection of which
joinery to make- tenon
and mortise
• Selection of wood for
joinery- timber
• Size of timber- 100mm X
70mm
• Length of timber-1.5 ft
• Other tools used-
various chisels, hand
saw, circular saw,
hammer and other
machines.
STEP-2
• After the materials were bought, the timber piece was cut into four
equal pieces vertically on the circular saw, hence, maintaining the
length.
• Three pieces were then cleaned and given a smooth finish to avoid
cuts while working. The remaining piece was not to be used.
• To make the tenons, I took two wooden pieces, drew a 5mm offset
(like a box) on the top surface of the wooden pieces and the lines
were extended downwards to a distance of 25mm on every side of
the wood.
• The circular saw and the hand saw was used to cut through the offset
lines, remove 5mm of material, to make the tenons.
• A 45 degree angle was cut through the top surface of the tenons to
one of the sides so that both the pieces would fit perfectly inside the
mortise.
• The tenons were finely cleaned and made smooth to give it a clean
and friendly finish.
• To make the mortise, using another wooden piece, measure the tenon
heads (before making the 45 degree cut) and draw the same, placed
centrally and at least 20mm below the top, on two adjacent sides of
the wooden piece.
• The vertical machine driller was used to make the holes on both sides
of the wooden piece to 25mm depth (not through and through). After
which the chisels and hammer was employed to make precise right
angle cuts for the square tenons to fit perfectly.
• The finishing was done using sand paper.
STEP-3
• To fit the tenons properly into the mortise was a trial and error
procedure. The tenons were rasped and checked to fit the mortise at
least five times before it fit almost perfectly.
THANK YOU

Joineries and construction

  • 1.
  • 2.
    RESOURCES • Rodale’s IllustratedCabinet-making • The New Best of Fine Woodworking – Furniture making • Wood Joints in Classical Japanese Architecture
  • 3.
    MORTISEAND TENON JOINTS Advantages- •Maximize the glue area • The longer the tenon the stronger • Reasonably thick mortise
  • 4.
    OFFSET TENONS • Thesize of the mortise follows the size of the tenon. • The bigger the tenon the better it would be, keeping in mind the mortise walls are not too thin. • It has a fourth shoulder which some craftsmen consider it as an additional benefit.
  • 5.
    STEP-1 • Selection ofwhich joinery to make- tenon and mortise • Selection of wood for joinery- timber • Size of timber- 100mm X 70mm • Length of timber-1.5 ft • Other tools used- various chisels, hand saw, circular saw, hammer and other machines.
  • 6.
    STEP-2 • After thematerials were bought, the timber piece was cut into four equal pieces vertically on the circular saw, hence, maintaining the length. • Three pieces were then cleaned and given a smooth finish to avoid cuts while working. The remaining piece was not to be used. • To make the tenons, I took two wooden pieces, drew a 5mm offset (like a box) on the top surface of the wooden pieces and the lines were extended downwards to a distance of 25mm on every side of the wood. • The circular saw and the hand saw was used to cut through the offset lines, remove 5mm of material, to make the tenons. • A 45 degree angle was cut through the top surface of the tenons to one of the sides so that both the pieces would fit perfectly inside the mortise.
  • 7.
    • The tenonswere finely cleaned and made smooth to give it a clean and friendly finish. • To make the mortise, using another wooden piece, measure the tenon heads (before making the 45 degree cut) and draw the same, placed centrally and at least 20mm below the top, on two adjacent sides of the wooden piece. • The vertical machine driller was used to make the holes on both sides of the wooden piece to 25mm depth (not through and through). After which the chisels and hammer was employed to make precise right angle cuts for the square tenons to fit perfectly. • The finishing was done using sand paper.
  • 8.
    STEP-3 • To fitthe tenons properly into the mortise was a trial and error procedure. The tenons were rasped and checked to fit the mortise at least five times before it fit almost perfectly.
  • 10.