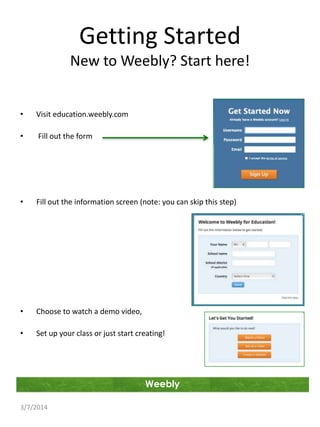
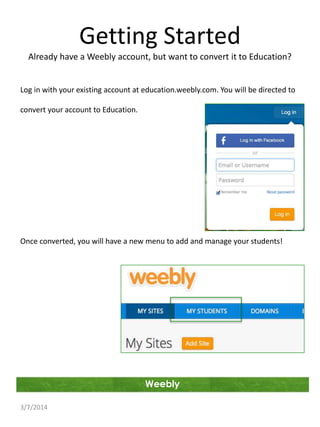
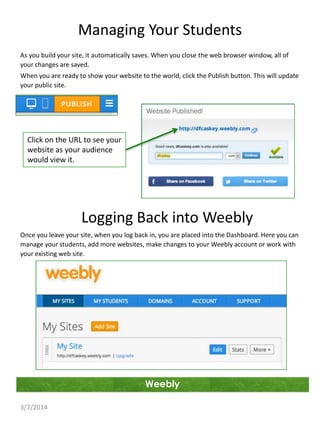
Introduction To Weebly
Every Educator’s Favorite Website Design Tool

Weebly
3/7/2014
Why Weebly
• Drag and Drop
• Free Account
• Multimedia Features
• Blogging Options

• No Adds
• Beautiful Themes
• Managed, Protected Environment for Students

Weebly
3/7/2014
Getting Started
New to Weebly? Start here!
•

Visit education.weebly.com

•

Fill out the form

•

Fill out the information screen (note: you can skip this step)

•

Choose to watch a demo video,

•

Set up your class or just start creating!

Weebly
3/7/2014
Getting Started
Already have a Weebly account, but want to convert it to Education?

Log in with your existing account at education.weebly.com. You will be directed to
convert your account to Education.

Once converted, you will have a new menu to add and manage your students!

Weebly
3/7/2014
Choose a Theme
A bit of advice – spend no more than 3 minutes choosing a theme. You can always
change it later. It even tells you that right up front. Note: some themes will allow
you to choose different color schemes.
1.

Select the theme you want, and click on the “Choose” button

2.

Choose a website domain

Choose to use a Subdomain of
Weebly, unless you want to
pay for your own domain.
3.

Choose to Plan or Build your site

Plan – Weebly walks you through the process
Build – You simply start creating

Weebly
3/7/2014
Adding Pages to Your Site
•

Adding pages to your website, adds depth. You can add a:

•

Standard Page – typical web page

•

Blog Page – posting chronologically, this layout lets your audience interact through
comments if you wish

•

External Link – no page is created, but you link to another website

Click to add pages
Name your page
Pages are
shown in
order that
they appear
in the
navigation
bar on your
site

You can hide the page from
navigation or even password
protect a page.

Drag pages to
reorder
them. Drag
pages to the
right, to
create submenus.

Weebly
3/7/2014
Adding Pages to Your Site

Copy Page allows you to create
multiple pages with the same
elements.

Tall Header:
This layout is the default for each new page. It includes a section at the top of the page where a
large header image can be uploaded.
Short Header:
This layout includes a header area at the top of the page as well. But as implied by the name,
this header is smaller than the default "Large Header" layout.
No Header:
You can probably see where this is going now. Where the Large and Small Header layouts each
have an area to upload a header image, this layout does not include any such area.
Landing Page:
The Landing Page layout includes space for a header image, a title, a subtitle message and an
action button that can be linked to any other page of your site. The Landing Page is a good
choice for a home page layout.

Weebly
3/7/2014
Adding Elements to Your Site
The beauty of Weebly comes in the “Drag & Drop” method of adding content. Content is broken
into several categories:
•

Basic – elements that let you add content to your site like text, images, titles

•

Structure – elements that dictate how your site will look like columns and divider lines

•

Media – adding enhancements like sound, video and embedded files.

Note: If you see an element with a star in the upper
left corner, this means this element is only available
in the Pro version of Weebly

Simply drag the desired element to a blank location in your page.
When you let go the element will stay, and will be ready for you to
add information.

Weebly
3/7/2014
Adding Elements to Your Site
The anatomy of an element…each element has:
•

Move/Copy option. This allows you to easily copy or move an element to another page

•

Move handle. This allows you to drag your element to another location on the same page

•

Delete. This removes the element completely. Be careful, there is no undo

•

Most elements have:

•

Option bubble. This appears once you have drug your element onto your page

•

Formatting toolbar. This will appear when you have an element with text
Move/Copy

Text element with text
formatting toolbar

Column element with option bubble to add
or remove columns

Weebly
3/7/2014

Handle

Delete
Adding Elements to Your Site
uploading images

Weebly
3/7/2014
Adding Elements to Your Site
uploading images

Weebly
3/7/2014
Publish Your Web Site
As you build your site, it automatically saves. When you close the web browser window, all of
your changes are saved.
When you are ready to show your website to the world, click the Publish button. This will update
your public site.

Click on the URL to see your
website as your audience
would view it.

Logging Back into Weebly
Once you leave your site, when you log back in, you are placed into the Dashboard. Here you can
manage your students, add more websites, make changes to your Weebly account or work with
your existing web site.

Weebly
3/7/2014
Managing Your Students
Create your class name and decide if your student websites will be private or public.

Add your students and create
their usernames and passwords

Class settings let you change
student accounts from public to
private, moderate student blog
comments, or delete a class.

Add additional classes to
classify student groups.

Weebly
3/7/2014
Managing Your Students
As you build your site, it automatically saves. When you close the web browser window, all of
your changes are saved.
When you are ready to show your website to the world, click the Publish button. This will update
your public site.

Click on the URL to see your
website as your audience
would view it.

Logging Back into Weebly
Once you leave your site, when you log back in, you are placed into the Dashboard. Here you can
manage your students, add more websites, make changes to your Weebly account or work with
your existing web site.

Weebly
3/7/2014

Intro to weebly

  • 1.
    Introduction To Weebly EveryEducator’s Favorite Website Design Tool Weebly 3/7/2014
  • 2.
    Why Weebly • Dragand Drop • Free Account • Multimedia Features • Blogging Options • No Adds • Beautiful Themes • Managed, Protected Environment for Students Weebly 3/7/2014
  • 3.
    Getting Started New toWeebly? Start here! • Visit education.weebly.com • Fill out the form • Fill out the information screen (note: you can skip this step) • Choose to watch a demo video, • Set up your class or just start creating! Weebly 3/7/2014
  • 4.
    Getting Started Already havea Weebly account, but want to convert it to Education? Log in with your existing account at education.weebly.com. You will be directed to convert your account to Education. Once converted, you will have a new menu to add and manage your students! Weebly 3/7/2014
  • 5.
    Choose a Theme Abit of advice – spend no more than 3 minutes choosing a theme. You can always change it later. It even tells you that right up front. Note: some themes will allow you to choose different color schemes. 1. Select the theme you want, and click on the “Choose” button 2. Choose a website domain Choose to use a Subdomain of Weebly, unless you want to pay for your own domain. 3. Choose to Plan or Build your site Plan – Weebly walks you through the process Build – You simply start creating Weebly 3/7/2014
  • 6.
    Adding Pages toYour Site • Adding pages to your website, adds depth. You can add a: • Standard Page – typical web page • Blog Page – posting chronologically, this layout lets your audience interact through comments if you wish • External Link – no page is created, but you link to another website Click to add pages Name your page Pages are shown in order that they appear in the navigation bar on your site You can hide the page from navigation or even password protect a page. Drag pages to reorder them. Drag pages to the right, to create submenus. Weebly 3/7/2014
  • 7.
    Adding Pages toYour Site Copy Page allows you to create multiple pages with the same elements. Tall Header: This layout is the default for each new page. It includes a section at the top of the page where a large header image can be uploaded. Short Header: This layout includes a header area at the top of the page as well. But as implied by the name, this header is smaller than the default "Large Header" layout. No Header: You can probably see where this is going now. Where the Large and Small Header layouts each have an area to upload a header image, this layout does not include any such area. Landing Page: The Landing Page layout includes space for a header image, a title, a subtitle message and an action button that can be linked to any other page of your site. The Landing Page is a good choice for a home page layout. Weebly 3/7/2014
  • 8.
    Adding Elements toYour Site The beauty of Weebly comes in the “Drag & Drop” method of adding content. Content is broken into several categories: • Basic – elements that let you add content to your site like text, images, titles • Structure – elements that dictate how your site will look like columns and divider lines • Media – adding enhancements like sound, video and embedded files. Note: If you see an element with a star in the upper left corner, this means this element is only available in the Pro version of Weebly Simply drag the desired element to a blank location in your page. When you let go the element will stay, and will be ready for you to add information. Weebly 3/7/2014
  • 9.
    Adding Elements toYour Site The anatomy of an element…each element has: • Move/Copy option. This allows you to easily copy or move an element to another page • Move handle. This allows you to drag your element to another location on the same page • Delete. This removes the element completely. Be careful, there is no undo • Most elements have: • Option bubble. This appears once you have drug your element onto your page • Formatting toolbar. This will appear when you have an element with text Move/Copy Text element with text formatting toolbar Column element with option bubble to add or remove columns Weebly 3/7/2014 Handle Delete
  • 10.
    Adding Elements toYour Site uploading images Weebly 3/7/2014
  • 11.
    Adding Elements toYour Site uploading images Weebly 3/7/2014
  • 12.
    Publish Your WebSite As you build your site, it automatically saves. When you close the web browser window, all of your changes are saved. When you are ready to show your website to the world, click the Publish button. This will update your public site. Click on the URL to see your website as your audience would view it. Logging Back into Weebly Once you leave your site, when you log back in, you are placed into the Dashboard. Here you can manage your students, add more websites, make changes to your Weebly account or work with your existing web site. Weebly 3/7/2014
  • 13.
    Managing Your Students Createyour class name and decide if your student websites will be private or public. Add your students and create their usernames and passwords Class settings let you change student accounts from public to private, moderate student blog comments, or delete a class. Add additional classes to classify student groups. Weebly 3/7/2014
  • 14.
    Managing Your Students Asyou build your site, it automatically saves. When you close the web browser window, all of your changes are saved. When you are ready to show your website to the world, click the Publish button. This will update your public site. Click on the URL to see your website as your audience would view it. Logging Back into Weebly Once you leave your site, when you log back in, you are placed into the Dashboard. Here you can manage your students, add more websites, make changes to your Weebly account or work with your existing web site. Weebly 3/7/2014