SlideShare a Scribd company logo
Get started with Sites
1. Create your site
Next: 2. Update and personalize your site
Want to get more out of Google apps at work or school? Sign up for a free G Suite trial
Let’s begin by creating and naming your site.
In this section, you learn how to:
1.1 Create your site
1.2 Name your site
1.3 Select a layout
1.4 Select a background image, header type, and theme
1.5 Add, reorder, and nest pages
1.6 Set up site navigation
1.1 Create your site
Choose an option:
 From the Sites homepage, at the top, click Create , or to choose a template, click Template
gallery and select a template.
 From Google Drive, click New More Google Sites.
Note: All Sites are stored in Drive. For more information on using Drive to organize your files, see Get started
with Drive.
1.2 Name your site
When you create a new site, it's added to Drive, just like other Drive files. Sites automatically saves every
change you make, but your site isn’t public until you publish it.
Name different parts of your site:
Site document name—Enter a unique name to keep track of your site. The site document name is only
visible to you.
Site name—The site name appears in the header and in the web or mobile window title bar after you
publish the site. You need to have 2 or more pages in your website for your site name to appear.
Page title—Each page in your site has a title, which appears at the top of the page. The page title also
appears in the navigation menu.
1.3 Select a layout
On the right, click Layouts and choose a different layout for your sections.
1.4 Select a background image, header type, and theme
Choose a look for your site. Each theme comes with a preset background, color scheme, and font selection. You
can adjust fonts, colors, and the background later, and you can always change the theme after the site is
created. If you need to make any changes, click Undo , or Redo .
Change the background image:
1. Go to Sites and open your site.
2. Point to the background image and click Change image .
3. Choose an option:
 To upload an image from your computer, click Upload.
 To choose an image from the gallery or another location, click Select image.
4. (Optional) To go back to the original background image, click Reset .
Change the header type:
1. Point to the background image and click Header type .
2. Choose an option:
 Cover
 Large banner
 Banner
 Title only
Change the theme and font style:
1. In the top-right corner, click Themes.
2. Select a theme option and choose a color.
3. Click Font style and select a style.
1.5 Add, reorder, and nest pages
Add pages for more content. Keep related information together by nesting pages. Nested pages appear as a
subtopic of another page.
Add pages:
1. In the top-right corner, click Pages point to Create .
2. Choose an option:
 To add a new page, click Add page . Name the page and click Done.
 To add a URL, click Add link .
Reorder or nest pages:
1. Click Pages.
2. Drag a page up or down in the list to reorder it.
3. Drag a page on top of another page to nest it.
4. (Optional) To un-nest a page, drag it to the bottom of the list.
Note: You can only nest a page five levels deep.
Choose page options:
Under Pages, select a page and next to it, click More and choose an option:
 Set it as the homepage.
 Duplicate the page.
 Rename the page.
 Create a subpage.
 Hide a page or subpage. You can’t hide the page that’s set as your homepage.
 Delete the page from the site. You can’t remove the page that’s set as your homepage.
1.6 Set up site navigation
If you've more than one page, visitors to your site use the navigation menu to jump to different pages. By default,
the navigation menu is at the top of your site. In the top-right corner, click your homepage to see the menu.
You can move the navigation menu to the left side if you want, but you need to have one or more pages on your
site to change where it appears.
Select a navigation mode:
1. Point to the site name and click Navigation settings Top navigation or Side navigation.
2. (Optional) To move the pages in the navigation menu, see 1.5 Add, reorder, and nest pages.
2. Update and personalize your site
Next: 3. Share and collaborate on Sites
Want to get more out of Google apps at work or school? Sign up for a free G Suite trial
Learn the basics of creating and editing content for your site.
In this section, you learn how to:
2.1 Add content to your site
2.2 Edit text
2.3 Edit sections
2.4 Edit images
2.5 Add a banner
2.6 Add a logo
2.7 Add content from another website
2.8 Move and resize content
2.1 Add content to your site
On the right, select the page that you want to add content to and choose an option:
Double-click the page where you want to add content.
Or, click Insert and choose the content you want to add.
Add titles and text.
Add content directly from the web, such as music and videos.
Add photos, designs, and other images.
Embed any file (From Drive) or the contents of a folder stored
in Drive. If you make changes to your files in Drive, the same
changes automatically show in Sites.
Add a table of contents.
Create and insert image carousels.
Add buttons which link to other content within your site, or to
an external URL.
Add a (horizontal) divider line to your page.
Add YouTube videos (such as product trailers or company
ads).
Add calendars (such as team or event calendars).
Add maps (such as office locations, event directions, or custom
maps).
Add anything from Docs, Slides, Sheets, Forms, or charts from
Sheets to your site. Any content you change in the source file
automatically updates on your site.
2.2 Edit text
To edit text or page titles, just click the box and enter new text. Or, from the toolbar above the text box,
select another option.
Editing options:
Titles and headings
Title Select a preset heading. Select Normal text for additional formatting
options.
Change the text alignment.
Insert a link for selected text.
Delete a title or text box.
Normal text
Select text and add bold or italics.
Add numbered or bulleted lists.
Go to more options.
Use the Code text style.
Select text and strikethrough it.
Select text and remove all formatting.
2.3 Edit sections
Point to a section to change it.
1. Change the background for each section—Click Style and select a style. You can also
select Image to add a background image.
2. Move a section—When you insert new content, it’s added to a new or existing section. To
move that section up or down, click Move section and drag the section where you want it.
3. Duplicate a section—Click Duplicate section . You can also copy and paste a section onto
another page in your site.
4. Add a footer—Scroll to the bottom of the page and click Add Footer . The footer appears
on all of the pages in your site. Point to the footer and click Edit footer to edit it. To hide
the footer on a page, point to it and click Hide footer on this page .
2.4 Edit images
Resize an image:
Select the image and then drag the sides or corners of the image. Hold the Shift key while dragging to keep
the image ratio.
Move an image:
Drag the image to a different part of the section or to a new section. You can place the image wherever you
see a highlighted area.
Note: Currently, you can’t place an image in a text box.
Crop an image:
1. Select the image and then select Crop .
2. Slide the dot to zoom in or out.
3. Drag the image to change the visible portion.
4. Click Done .
5. (Optional) To uncrop an image, select the image and click Uncrop .
Replace an image:
1. Select the image.
2. Click More Replace image Upload or Select image and choose a new image file.
Add alt text to an image:
1. Alt text appears when someone points over an image on your site.
2. Select the image and click More Add alt text.
3. Enter a description and click Apply.
2.5 Add a banner
1. In the top right corner, click Settings .
2. Click Announcement banner.
3. (Optional) To customize the color of the banner, click Banner color and select a color.
If Show banner isn't already toggled on, turn it on.
4. In the Announcement section, in the text box, enter your banner message.
5. (Optional) To create a button with a link on your banner, enter text in the Button label section
and enter a URL in the Link section. If you want the link to open in a new tab on your
browser, check the Open in new tab box.
6. To choose how you'd like to display the banner on your site, in the Visibility section,
select Home page only or All pages.
7. At the top right, near your profile image, click Publish.
2.6 Add a logo
Logos appear in the top navigation bar, next to the site name.
Note: Logo files can be in .jpg, .png, or .gif format. For best results, the logo height should be at least 112
px.
1. Point to the top of the page header and click Add logo .
2. Click Upload or Select.
3. Select the logo and click Open or Select.
4. (Optional) To change the color of the page header, under Background, click the Down
arrow and select a color.
5. (Optional) To select a theme color based on your logo, in the Edit logo window, select a
theme color.
2.7 Add content from another website
You can embed:
 Websites
 Web apps using Google Apps Script or App Maker
 Google Data Studio reports
Depending on what website you add, you might be able to customize how the site appears on your site.
Some allow a preview option or an option to see dynamically updated content. After you add content, you
might need to sign in again to see the update.
Add content from another website:
1. Open your site and on the right, click Insert Embed.
2. Choose an option:
 By URL—Paste the URL (link) you want to embed. Select Whole
page or Preview and click Insert.
 Embed code—Paste or enter the site HTML code you want to embed and
click Next Insert.
Note: If you can't add or preview content, contact the website's owner.
2.8 Move and resize content
Anything you insert is added as a content “tile” on the canvas grid. Tiles snap to the grid so it’s easy to
move, align, and edit them.
Move site content:
1. Point to the content you want to move until you see Move .
2. Drag the content to a highlighted area.
Resize site content:
1. Select the content you want to resize.
2. Drag the blue circles to resize.
Group objects:
You can connect text boxes and images together in a vertical group.
1. Add a photo and a text box to your site page.
2. Drag the text box to the top or bottom half of the object until a blue line appears.
3. To change the order of grouped objects, click the group you want to change.
4. Click the object you want to rearrange and on your keyboard, tap the Up or Down key.
Ungroup objects:
1. To ungroup text boxes and images, click the group you want to separate.
2. Click the object you want to remove from the group, and drag the object away from the group
3. Share and collaborate on Sites
Next: 4. Preview and publish your site
Want to get more out of Google apps at work or school? Sign up for a free G Suite trial
At any point while working on your site, you can share it with people in your organization to
collaborate on the content.
In this section, you learn how to:
3.1 Share and collaborate on Sites
1. Choose an option:
 To share a site from Sites, click Add people .
 To share a site from Drive, in Drive, select the site file and click Share .
2. Choose people to share your site with:
 To set permissions across your organization: Under Who has access,
click Change, select a sharing option, and click Save. You can then copy and
paste a link to the site into an email or chat message.
 To set permissions for individual people: In the Invite people box, enter the
names or email addresses of people in your organization you want to share your
site with then, click Send Done.
3. Change people’s permissions:
 To give permissions, click the Down arrow next to the person’s name and
select a permission level.
 To remove permissions, next to the person’s name, click Remove .
4. (Optional) To restrict editors from publishing, changing site access, or adding new people, click
the box next to Prevent editors from publishing, changing access and adding new people.
Click Save changes Done.
Stop sharing a site:
1. Open a site and at the top, click Share .
2. Under Who has access, find the person you want to remove.
3. Next to the person’s name, click Delete Save changes Done.
4. Preview and publish your site
Want to get more out of Google apps at work or school? Sign up for a free G Suite trial
You can preview a new site before you publish. When you’re ready, you can publish it only to
your organization or to the world.
In this section, you learn how to:
4.1 Preview your site
4.2 Publish your site for the first time
4.3 Change your site’s URL
4.4 Unpublish your site
4.5 Search in a site
4.1 Preview your site
If you’re viewing a site on a mobile device, the content automatically adjusts to fit the screen. You can preview
how your site appears on different devices.
1. Click Preview .
2. To see how your site looks on different devices, choose an option:
 Phone
 Tablet
 Large screen
3. Click Close to exit the preview screen.
4.2 Publish your site for the first time
When you publish your site for the first time, add a site name to complete the site URL. You can only use letters,
numbers, and dashes in the site name. The beginning of the URL includes your organization’s domain and can’t
be changed. You can continue to edit your site after you publish it. However, you need to republish the site to
see any new changes.
Publish your site:
1. Click Publish.
2. Add a name to the end of the URL. Certain terms, such as support and admin, can’t be used.
You’ll see a check mark at the end of the URL if it’s available.
3. Under Who can view my site, click Manage.
4. In the Share with others window, choose an option:
 Draft—To allow people in your domain or specific people to edit the draft version
of your site, click Change.
 Published—To allow people in your domain or specific people to view your
published site, click Change.
5. Click Done.
6. Click Publish. Visit your site's URL to confirm that your site published correctly.
Note: After you publish a site, you can share the published site by clicking Copy link Copy link and then
paste the link to someone in a chat or email message.
4.3 Change your site’s URL
You can change your site’s URL anytime. However, if you do, bookmarks to the old URL will no longer wor k.
1. Next to Publish, click the Down arrow Publish settings.
2. Enter a new URL.
3. Click Save.
4.4 Unpublish your site
If you no longer want your site to be available online, you can unpublish it. You can still access and update your
site content. You can also republish the site using the same URL or a different URL at any time. If people try to
visit your unpublished site, they’ll see an error message.
Unpublish your site:
Next to Publish, click the Down arrow Unpublish.
4.5 Search in a site
When a Google Sites website has more than one published page, you can search for what you want to find on
the published version.
1. Go to a Google Site website and at the top right, click Search .
2. Enter your search and press Enter.
Get started with sites

More Related Content

What's hot

How to add a page to a loudclick website
How to add a page to a loudclick websiteHow to add a page to a loudclick website
How to add a page to a loudclick websiteLoudClick.net
 
Sample ppt file_1000kb
Sample ppt file_1000kbSample ppt file_1000kb
Sample ppt file_1000kbjmchaves2287
 
Sample ppt file_1000kb
Sample ppt file_1000kbSample ppt file_1000kb
Sample ppt file_1000kbTom Kane
 
Sample Powerpoint File Upload
Sample Powerpoint File UploadSample Powerpoint File Upload
Sample Powerpoint File UploadBrandon Townsend
 
How to prepare a presentation
How to prepare a presentationHow to prepare a presentation
How to prepare a presentationAngel Sever
 
Practicepowerpoint
PracticepowerpointPracticepowerpoint
Practicepowerpointdavecooper82
 
Unit c adobe dreamweaver cs6
Unit c adobe dreamweaver cs6Unit c adobe dreamweaver cs6
Unit c adobe dreamweaver cs6Krista Lawrence
 
Unit f adobe dreamweaver cs6
Unit f adobe dreamweaver cs6Unit f adobe dreamweaver cs6
Unit f adobe dreamweaver cs6Krista Lawrence
 
Glogster for students
Glogster for studentsGlogster for students
Glogster for studentsK Covintree
 
Illustrator portrait project-final
Illustrator portrait project-finalIllustrator portrait project-final
Illustrator portrait project-finalDaniel Downs
 

What's hot (13)

How to add a page to a loudclick website
How to add a page to a loudclick websiteHow to add a page to a loudclick website
How to add a page to a loudclick website
 
Myppt 3
Myppt 3Myppt 3
Myppt 3
 
Sample ppt file_1000kb
Sample ppt file_1000kbSample ppt file_1000kb
Sample ppt file_1000kb
 
Sample ppt file_1000kb
Sample ppt file_1000kbSample ppt file_1000kb
Sample ppt file_1000kb
 
Sample Powerpoint File Upload
Sample Powerpoint File UploadSample Powerpoint File Upload
Sample Powerpoint File Upload
 
level of test
level of testlevel of test
level of test
 
How to prepare a presentation
How to prepare a presentationHow to prepare a presentation
How to prepare a presentation
 
Practicepowerpoint
PracticepowerpointPracticepowerpoint
Practicepowerpoint
 
Unit c adobe dreamweaver cs6
Unit c adobe dreamweaver cs6Unit c adobe dreamweaver cs6
Unit c adobe dreamweaver cs6
 
Unit f adobe dreamweaver cs6
Unit f adobe dreamweaver cs6Unit f adobe dreamweaver cs6
Unit f adobe dreamweaver cs6
 
Dreamweaver
DreamweaverDreamweaver
Dreamweaver
 
Glogster for students
Glogster for studentsGlogster for students
Glogster for students
 
Illustrator portrait project-final
Illustrator portrait project-finalIllustrator portrait project-final
Illustrator portrait project-final
 

Similar to Get started with sites

Mondo Guide V02 - WORD
Mondo Guide V02 - WORDMondo Guide V02 - WORD
Mondo Guide V02 - WORDMondoexplorer
 
SharePoint Web Parts
SharePoint Web PartsSharePoint Web Parts
SharePoint Web Partsmaddinapudi
 
How to create_a_site
How to create_a_siteHow to create_a_site
How to create_a_sitemastura71
 
Net4’s EasySite Builder Step By Step Guide to Create Business Website
Net4’s EasySite Builder Step By Step Guide to Create Business WebsiteNet4’s EasySite Builder Step By Step Guide to Create Business Website
Net4’s EasySite Builder Step By Step Guide to Create Business WebsiteNet4 India Ltd.
 
Net4’s EasySite Builder Step by Step Guide
Net4’s EasySite Builder Step by Step GuideNet4’s EasySite Builder Step by Step Guide
Net4’s EasySite Builder Step by Step GuidePallavi Vyas
 
Student's portfolio's creation
Student's portfolio's creationStudent's portfolio's creation
Student's portfolio's creationThanavathi C
 
A2WPress Woodberry Theme Documentation
A2WPress Woodberry Theme DocumentationA2WPress Woodberry Theme Documentation
A2WPress Woodberry Theme DocumentationA2WPress
 
A2WPress Dzonia Theme Documentation
A2WPress Dzonia Theme DocumentationA2WPress Dzonia Theme Documentation
A2WPress Dzonia Theme DocumentationA2WPress
 
A2WPress Cloriato Theme Documentation
A2WPress Cloriato Theme DocumentationA2WPress Cloriato Theme Documentation
A2WPress Cloriato Theme DocumentationA2WPress
 
Isocentre Help Create Page
Isocentre Help   Create PageIsocentre Help   Create Page
Isocentre Help Create Pageisocentre
 
Isocentre How to Create a Page
Isocentre How to Create a PageIsocentre How to Create a Page
Isocentre How to Create a PageSantam Chakraborty
 
Wordpress quickstart
Wordpress quickstartWordpress quickstart
Wordpress quickstartLeeCAVC
 
A2 w press coveradocs
A2 w press coveradocsA2 w press coveradocs
A2 w press coveradocsA2WPress
 
Website now guide client edition
Website now guide client editionWebsite now guide client edition
Website now guide client editionVWHOM
 
A2WPress Roadfighter Theme Documentation
A2WPress Roadfighter Theme DocumentationA2WPress Roadfighter Theme Documentation
A2WPress Roadfighter Theme DocumentationA2WPress
 
A2WPress GoldenEagle Theme Documentation
A2WPress GoldenEagle Theme DocumentationA2WPress GoldenEagle Theme Documentation
A2WPress GoldenEagle Theme DocumentationA2WPress
 
A2WPress Regal Theme Documentation
A2WPress Regal Theme DocumentationA2WPress Regal Theme Documentation
A2WPress Regal Theme DocumentationA2WPress
 
A2WPress Localbusiness Theme Documentation
A2WPress Localbusiness Theme DocumentationA2WPress Localbusiness Theme Documentation
A2WPress Localbusiness Theme DocumentationA2WPress
 

Similar to Get started with sites (20)

Mondo Guide V02 - WORD
Mondo Guide V02 - WORDMondo Guide V02 - WORD
Mondo Guide V02 - WORD
 
SharePoint Web Parts
SharePoint Web PartsSharePoint Web Parts
SharePoint Web Parts
 
Wix
WixWix
Wix
 
Creating a web page
Creating a web pageCreating a web page
Creating a web page
 
How to create_a_site
How to create_a_siteHow to create_a_site
How to create_a_site
 
Net4’s EasySite Builder Step By Step Guide to Create Business Website
Net4’s EasySite Builder Step By Step Guide to Create Business WebsiteNet4’s EasySite Builder Step By Step Guide to Create Business Website
Net4’s EasySite Builder Step By Step Guide to Create Business Website
 
Net4’s EasySite Builder Step by Step Guide
Net4’s EasySite Builder Step by Step GuideNet4’s EasySite Builder Step by Step Guide
Net4’s EasySite Builder Step by Step Guide
 
Student's portfolio's creation
Student's portfolio's creationStudent's portfolio's creation
Student's portfolio's creation
 
A2WPress Woodberry Theme Documentation
A2WPress Woodberry Theme DocumentationA2WPress Woodberry Theme Documentation
A2WPress Woodberry Theme Documentation
 
A2WPress Dzonia Theme Documentation
A2WPress Dzonia Theme DocumentationA2WPress Dzonia Theme Documentation
A2WPress Dzonia Theme Documentation
 
A2WPress Cloriato Theme Documentation
A2WPress Cloriato Theme DocumentationA2WPress Cloriato Theme Documentation
A2WPress Cloriato Theme Documentation
 
Isocentre Help Create Page
Isocentre Help   Create PageIsocentre Help   Create Page
Isocentre Help Create Page
 
Isocentre How to Create a Page
Isocentre How to Create a PageIsocentre How to Create a Page
Isocentre How to Create a Page
 
Wordpress quickstart
Wordpress quickstartWordpress quickstart
Wordpress quickstart
 
A2 w press coveradocs
A2 w press coveradocsA2 w press coveradocs
A2 w press coveradocs
 
Website now guide client edition
Website now guide client editionWebsite now guide client edition
Website now guide client edition
 
A2WPress Roadfighter Theme Documentation
A2WPress Roadfighter Theme DocumentationA2WPress Roadfighter Theme Documentation
A2WPress Roadfighter Theme Documentation
 
A2WPress GoldenEagle Theme Documentation
A2WPress GoldenEagle Theme DocumentationA2WPress GoldenEagle Theme Documentation
A2WPress GoldenEagle Theme Documentation
 
A2WPress Regal Theme Documentation
A2WPress Regal Theme DocumentationA2WPress Regal Theme Documentation
A2WPress Regal Theme Documentation
 
A2WPress Localbusiness Theme Documentation
A2WPress Localbusiness Theme DocumentationA2WPress Localbusiness Theme Documentation
A2WPress Localbusiness Theme Documentation
 

More from Boedi Santoso

More from Boedi Santoso (7)

praktik kupas tuntas AKM.pptx
praktik kupas tuntas AKM.pptxpraktik kupas tuntas AKM.pptx
praktik kupas tuntas AKM.pptx
 
B inggris sd
B inggris sdB inggris sd
B inggris sd
 
120920
120920120920
120920
 
listrik
listriklistrik
listrik
 
Bibliografi
BibliografiBibliografi
Bibliografi
 
Spekulasi asal usul atmosfer bumi
Spekulasi asal usul atmosfer bumiSpekulasi asal usul atmosfer bumi
Spekulasi asal usul atmosfer bumi
 
Metode pembelajaran gasing
Metode pembelajaran gasingMetode pembelajaran gasing
Metode pembelajaran gasing
 

Recently uploaded

slides CapTechTalks Webinar May 2024 Alexander Perry.pptx
slides CapTechTalks Webinar May 2024 Alexander Perry.pptxslides CapTechTalks Webinar May 2024 Alexander Perry.pptx
slides CapTechTalks Webinar May 2024 Alexander Perry.pptxCapitolTechU
 
Instructions for Submissions thorugh G- Classroom.pptx
Instructions for Submissions thorugh G- Classroom.pptxInstructions for Submissions thorugh G- Classroom.pptx
Instructions for Submissions thorugh G- Classroom.pptxJheel Barad
 
Danh sách HSG Bộ môn cấp trường - Cấp THPT.pdf
Danh sách HSG Bộ môn cấp trường - Cấp THPT.pdfDanh sách HSG Bộ môn cấp trường - Cấp THPT.pdf
Danh sách HSG Bộ môn cấp trường - Cấp THPT.pdfQucHHunhnh
 
Research Methods in Psychology | Cambridge AS Level | Cambridge Assessment In...
Research Methods in Psychology | Cambridge AS Level | Cambridge Assessment In...Research Methods in Psychology | Cambridge AS Level | Cambridge Assessment In...
Research Methods in Psychology | Cambridge AS Level | Cambridge Assessment In...Abhinav Gaur Kaptaan
 
Application of Matrices in real life. Presentation on application of matrices
Application of Matrices in real life. Presentation on application of matricesApplication of Matrices in real life. Presentation on application of matrices
Application of Matrices in real life. Presentation on application of matricesRased Khan
 
2024_Student Session 2_ Set Plan Preparation.pptx
2024_Student Session 2_ Set Plan Preparation.pptx2024_Student Session 2_ Set Plan Preparation.pptx
2024_Student Session 2_ Set Plan Preparation.pptxmansk2
 
The impact of social media on mental health and well-being has been a topic o...
The impact of social media on mental health and well-being has been a topic o...The impact of social media on mental health and well-being has been a topic o...
The impact of social media on mental health and well-being has been a topic o...sanghavirahi2
 
Keeping Your Information Safe with Centralized Security Services
Keeping Your Information Safe with Centralized Security ServicesKeeping Your Information Safe with Centralized Security Services
Keeping Your Information Safe with Centralized Security ServicesTechSoup
 
50 ĐỀ LUYỆN THI IOE LỚP 9 - NĂM HỌC 2022-2023 (CÓ LINK HÌNH, FILE AUDIO VÀ ĐÁ...
50 ĐỀ LUYỆN THI IOE LỚP 9 - NĂM HỌC 2022-2023 (CÓ LINK HÌNH, FILE AUDIO VÀ ĐÁ...50 ĐỀ LUYỆN THI IOE LỚP 9 - NĂM HỌC 2022-2023 (CÓ LINK HÌNH, FILE AUDIO VÀ ĐÁ...
50 ĐỀ LUYỆN THI IOE LỚP 9 - NĂM HỌC 2022-2023 (CÓ LINK HÌNH, FILE AUDIO VÀ ĐÁ...Nguyen Thanh Tu Collection
 
Salient features of Environment protection Act 1986.pptx
Salient features of Environment protection Act 1986.pptxSalient features of Environment protection Act 1986.pptx
Salient features of Environment protection Act 1986.pptxakshayaramakrishnan21
 
Additional Benefits for Employee Website.pdf
Additional Benefits for Employee Website.pdfAdditional Benefits for Employee Website.pdf
Additional Benefits for Employee Website.pdfjoachimlavalley1
 
MARUTI SUZUKI- A Successful Joint Venture in India.pptx
MARUTI SUZUKI- A Successful Joint Venture in India.pptxMARUTI SUZUKI- A Successful Joint Venture in India.pptx
MARUTI SUZUKI- A Successful Joint Venture in India.pptxbennyroshan06
 
Basic phrases for greeting and assisting costumers
Basic phrases for greeting and assisting costumersBasic phrases for greeting and assisting costumers
Basic phrases for greeting and assisting costumersPedroFerreira53928
 
Jose-Rizal-and-Philippine-Nationalism-National-Symbol-2.pptx
Jose-Rizal-and-Philippine-Nationalism-National-Symbol-2.pptxJose-Rizal-and-Philippine-Nationalism-National-Symbol-2.pptx
Jose-Rizal-and-Philippine-Nationalism-National-Symbol-2.pptxricssacare
 
Morse OER Some Benefits and Challenges.pptx
Morse OER Some Benefits and Challenges.pptxMorse OER Some Benefits and Challenges.pptx
Morse OER Some Benefits and Challenges.pptxjmorse8
 
INU_CAPSTONEDESIGN_비밀번호486_업로드용 발표자료.pdf
INU_CAPSTONEDESIGN_비밀번호486_업로드용 발표자료.pdfINU_CAPSTONEDESIGN_비밀번호486_업로드용 발표자료.pdf
INU_CAPSTONEDESIGN_비밀번호486_업로드용 발표자료.pdfbu07226
 
Basic Civil Engg Notes_Chapter-6_Environment Pollution & Engineering
Basic Civil Engg Notes_Chapter-6_Environment Pollution & EngineeringBasic Civil Engg Notes_Chapter-6_Environment Pollution & Engineering
Basic Civil Engg Notes_Chapter-6_Environment Pollution & EngineeringDenish Jangid
 

Recently uploaded (20)

slides CapTechTalks Webinar May 2024 Alexander Perry.pptx
slides CapTechTalks Webinar May 2024 Alexander Perry.pptxslides CapTechTalks Webinar May 2024 Alexander Perry.pptx
slides CapTechTalks Webinar May 2024 Alexander Perry.pptx
 
Instructions for Submissions thorugh G- Classroom.pptx
Instructions for Submissions thorugh G- Classroom.pptxInstructions for Submissions thorugh G- Classroom.pptx
Instructions for Submissions thorugh G- Classroom.pptx
 
Danh sách HSG Bộ môn cấp trường - Cấp THPT.pdf
Danh sách HSG Bộ môn cấp trường - Cấp THPT.pdfDanh sách HSG Bộ môn cấp trường - Cấp THPT.pdf
Danh sách HSG Bộ môn cấp trường - Cấp THPT.pdf
 
Research Methods in Psychology | Cambridge AS Level | Cambridge Assessment In...
Research Methods in Psychology | Cambridge AS Level | Cambridge Assessment In...Research Methods in Psychology | Cambridge AS Level | Cambridge Assessment In...
Research Methods in Psychology | Cambridge AS Level | Cambridge Assessment In...
 
Application of Matrices in real life. Presentation on application of matrices
Application of Matrices in real life. Presentation on application of matricesApplication of Matrices in real life. Presentation on application of matrices
Application of Matrices in real life. Presentation on application of matrices
 
2024_Student Session 2_ Set Plan Preparation.pptx
2024_Student Session 2_ Set Plan Preparation.pptx2024_Student Session 2_ Set Plan Preparation.pptx
2024_Student Session 2_ Set Plan Preparation.pptx
 
The impact of social media on mental health and well-being has been a topic o...
The impact of social media on mental health and well-being has been a topic o...The impact of social media on mental health and well-being has been a topic o...
The impact of social media on mental health and well-being has been a topic o...
 
Introduction to Quality Improvement Essentials
Introduction to Quality Improvement EssentialsIntroduction to Quality Improvement Essentials
Introduction to Quality Improvement Essentials
 
Keeping Your Information Safe with Centralized Security Services
Keeping Your Information Safe with Centralized Security ServicesKeeping Your Information Safe with Centralized Security Services
Keeping Your Information Safe with Centralized Security Services
 
50 ĐỀ LUYỆN THI IOE LỚP 9 - NĂM HỌC 2022-2023 (CÓ LINK HÌNH, FILE AUDIO VÀ ĐÁ...
50 ĐỀ LUYỆN THI IOE LỚP 9 - NĂM HỌC 2022-2023 (CÓ LINK HÌNH, FILE AUDIO VÀ ĐÁ...50 ĐỀ LUYỆN THI IOE LỚP 9 - NĂM HỌC 2022-2023 (CÓ LINK HÌNH, FILE AUDIO VÀ ĐÁ...
50 ĐỀ LUYỆN THI IOE LỚP 9 - NĂM HỌC 2022-2023 (CÓ LINK HÌNH, FILE AUDIO VÀ ĐÁ...
 
Salient features of Environment protection Act 1986.pptx
Salient features of Environment protection Act 1986.pptxSalient features of Environment protection Act 1986.pptx
Salient features of Environment protection Act 1986.pptx
 
Operations Management - Book1.p - Dr. Abdulfatah A. Salem
Operations Management - Book1.p  - Dr. Abdulfatah A. SalemOperations Management - Book1.p  - Dr. Abdulfatah A. Salem
Operations Management - Book1.p - Dr. Abdulfatah A. Salem
 
Additional Benefits for Employee Website.pdf
Additional Benefits for Employee Website.pdfAdditional Benefits for Employee Website.pdf
Additional Benefits for Employee Website.pdf
 
MARUTI SUZUKI- A Successful Joint Venture in India.pptx
MARUTI SUZUKI- A Successful Joint Venture in India.pptxMARUTI SUZUKI- A Successful Joint Venture in India.pptx
MARUTI SUZUKI- A Successful Joint Venture in India.pptx
 
Basic phrases for greeting and assisting costumers
Basic phrases for greeting and assisting costumersBasic phrases for greeting and assisting costumers
Basic phrases for greeting and assisting costumers
 
Jose-Rizal-and-Philippine-Nationalism-National-Symbol-2.pptx
Jose-Rizal-and-Philippine-Nationalism-National-Symbol-2.pptxJose-Rizal-and-Philippine-Nationalism-National-Symbol-2.pptx
Jose-Rizal-and-Philippine-Nationalism-National-Symbol-2.pptx
 
Morse OER Some Benefits and Challenges.pptx
Morse OER Some Benefits and Challenges.pptxMorse OER Some Benefits and Challenges.pptx
Morse OER Some Benefits and Challenges.pptx
 
INU_CAPSTONEDESIGN_비밀번호486_업로드용 발표자료.pdf
INU_CAPSTONEDESIGN_비밀번호486_업로드용 발표자료.pdfINU_CAPSTONEDESIGN_비밀번호486_업로드용 발표자료.pdf
INU_CAPSTONEDESIGN_비밀번호486_업로드용 발표자료.pdf
 
B.ed spl. HI pdusu exam paper-2023-24.pdf
B.ed spl. HI pdusu exam paper-2023-24.pdfB.ed spl. HI pdusu exam paper-2023-24.pdf
B.ed spl. HI pdusu exam paper-2023-24.pdf
 
Basic Civil Engg Notes_Chapter-6_Environment Pollution & Engineering
Basic Civil Engg Notes_Chapter-6_Environment Pollution & EngineeringBasic Civil Engg Notes_Chapter-6_Environment Pollution & Engineering
Basic Civil Engg Notes_Chapter-6_Environment Pollution & Engineering
 

Get started with sites

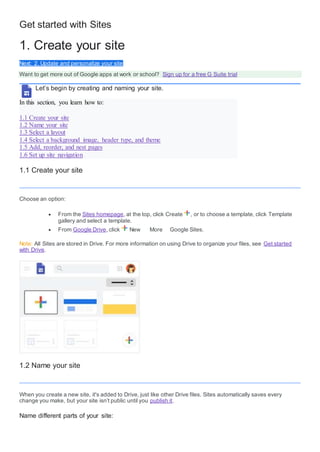
  • 1. Get started with Sites 1. Create your site Next: 2. Update and personalize your site Want to get more out of Google apps at work or school? Sign up for a free G Suite trial Let’s begin by creating and naming your site. In this section, you learn how to: 1.1 Create your site 1.2 Name your site 1.3 Select a layout 1.4 Select a background image, header type, and theme 1.5 Add, reorder, and nest pages 1.6 Set up site navigation 1.1 Create your site Choose an option:  From the Sites homepage, at the top, click Create , or to choose a template, click Template gallery and select a template.  From Google Drive, click New More Google Sites. Note: All Sites are stored in Drive. For more information on using Drive to organize your files, see Get started with Drive. 1.2 Name your site When you create a new site, it's added to Drive, just like other Drive files. Sites automatically saves every change you make, but your site isn’t public until you publish it. Name different parts of your site:
  • 2. Site document name—Enter a unique name to keep track of your site. The site document name is only visible to you. Site name—The site name appears in the header and in the web or mobile window title bar after you publish the site. You need to have 2 or more pages in your website for your site name to appear. Page title—Each page in your site has a title, which appears at the top of the page. The page title also appears in the navigation menu. 1.3 Select a layout On the right, click Layouts and choose a different layout for your sections. 1.4 Select a background image, header type, and theme Choose a look for your site. Each theme comes with a preset background, color scheme, and font selection. You can adjust fonts, colors, and the background later, and you can always change the theme after the site is created. If you need to make any changes, click Undo , or Redo . Change the background image: 1. Go to Sites and open your site. 2. Point to the background image and click Change image . 3. Choose an option:  To upload an image from your computer, click Upload.  To choose an image from the gallery or another location, click Select image. 4. (Optional) To go back to the original background image, click Reset . Change the header type: 1. Point to the background image and click Header type .
  • 3. 2. Choose an option:  Cover  Large banner  Banner  Title only Change the theme and font style: 1. In the top-right corner, click Themes. 2. Select a theme option and choose a color. 3. Click Font style and select a style. 1.5 Add, reorder, and nest pages Add pages for more content. Keep related information together by nesting pages. Nested pages appear as a subtopic of another page. Add pages: 1. In the top-right corner, click Pages point to Create . 2. Choose an option:  To add a new page, click Add page . Name the page and click Done.  To add a URL, click Add link . Reorder or nest pages: 1. Click Pages. 2. Drag a page up or down in the list to reorder it. 3. Drag a page on top of another page to nest it. 4. (Optional) To un-nest a page, drag it to the bottom of the list. Note: You can only nest a page five levels deep. Choose page options: Under Pages, select a page and next to it, click More and choose an option:  Set it as the homepage.  Duplicate the page.  Rename the page.
  • 4.  Create a subpage.  Hide a page or subpage. You can’t hide the page that’s set as your homepage.  Delete the page from the site. You can’t remove the page that’s set as your homepage. 1.6 Set up site navigation If you've more than one page, visitors to your site use the navigation menu to jump to different pages. By default, the navigation menu is at the top of your site. In the top-right corner, click your homepage to see the menu. You can move the navigation menu to the left side if you want, but you need to have one or more pages on your site to change where it appears. Select a navigation mode: 1. Point to the site name and click Navigation settings Top navigation or Side navigation. 2. (Optional) To move the pages in the navigation menu, see 1.5 Add, reorder, and nest pages.
  • 5. 2. Update and personalize your site Next: 3. Share and collaborate on Sites Want to get more out of Google apps at work or school? Sign up for a free G Suite trial Learn the basics of creating and editing content for your site. In this section, you learn how to: 2.1 Add content to your site 2.2 Edit text 2.3 Edit sections 2.4 Edit images 2.5 Add a banner 2.6 Add a logo 2.7 Add content from another website 2.8 Move and resize content 2.1 Add content to your site On the right, select the page that you want to add content to and choose an option: Double-click the page where you want to add content. Or, click Insert and choose the content you want to add. Add titles and text. Add content directly from the web, such as music and videos. Add photos, designs, and other images.
  • 6. Embed any file (From Drive) or the contents of a folder stored in Drive. If you make changes to your files in Drive, the same changes automatically show in Sites. Add a table of contents. Create and insert image carousels. Add buttons which link to other content within your site, or to an external URL. Add a (horizontal) divider line to your page. Add YouTube videos (such as product trailers or company ads). Add calendars (such as team or event calendars). Add maps (such as office locations, event directions, or custom maps). Add anything from Docs, Slides, Sheets, Forms, or charts from Sheets to your site. Any content you change in the source file automatically updates on your site. 2.2 Edit text To edit text or page titles, just click the box and enter new text. Or, from the toolbar above the text box, select another option. Editing options: Titles and headings Title Select a preset heading. Select Normal text for additional formatting options. Change the text alignment. Insert a link for selected text. Delete a title or text box. Normal text Select text and add bold or italics. Add numbered or bulleted lists. Go to more options. Use the Code text style. Select text and strikethrough it. Select text and remove all formatting. 2.3 Edit sections Point to a section to change it.
  • 7. 1. Change the background for each section—Click Style and select a style. You can also select Image to add a background image. 2. Move a section—When you insert new content, it’s added to a new or existing section. To move that section up or down, click Move section and drag the section where you want it. 3. Duplicate a section—Click Duplicate section . You can also copy and paste a section onto another page in your site. 4. Add a footer—Scroll to the bottom of the page and click Add Footer . The footer appears on all of the pages in your site. Point to the footer and click Edit footer to edit it. To hide the footer on a page, point to it and click Hide footer on this page . 2.4 Edit images Resize an image: Select the image and then drag the sides or corners of the image. Hold the Shift key while dragging to keep the image ratio. Move an image: Drag the image to a different part of the section or to a new section. You can place the image wherever you see a highlighted area. Note: Currently, you can’t place an image in a text box. Crop an image: 1. Select the image and then select Crop . 2. Slide the dot to zoom in or out. 3. Drag the image to change the visible portion. 4. Click Done . 5. (Optional) To uncrop an image, select the image and click Uncrop . Replace an image: 1. Select the image. 2. Click More Replace image Upload or Select image and choose a new image file. Add alt text to an image: 1. Alt text appears when someone points over an image on your site. 2. Select the image and click More Add alt text.
  • 8. 3. Enter a description and click Apply. 2.5 Add a banner 1. In the top right corner, click Settings . 2. Click Announcement banner. 3. (Optional) To customize the color of the banner, click Banner color and select a color. If Show banner isn't already toggled on, turn it on. 4. In the Announcement section, in the text box, enter your banner message. 5. (Optional) To create a button with a link on your banner, enter text in the Button label section and enter a URL in the Link section. If you want the link to open in a new tab on your browser, check the Open in new tab box. 6. To choose how you'd like to display the banner on your site, in the Visibility section, select Home page only or All pages. 7. At the top right, near your profile image, click Publish. 2.6 Add a logo Logos appear in the top navigation bar, next to the site name. Note: Logo files can be in .jpg, .png, or .gif format. For best results, the logo height should be at least 112 px. 1. Point to the top of the page header and click Add logo . 2. Click Upload or Select. 3. Select the logo and click Open or Select. 4. (Optional) To change the color of the page header, under Background, click the Down arrow and select a color. 5. (Optional) To select a theme color based on your logo, in the Edit logo window, select a theme color.
  • 9. 2.7 Add content from another website You can embed:  Websites  Web apps using Google Apps Script or App Maker  Google Data Studio reports Depending on what website you add, you might be able to customize how the site appears on your site. Some allow a preview option or an option to see dynamically updated content. After you add content, you might need to sign in again to see the update. Add content from another website: 1. Open your site and on the right, click Insert Embed. 2. Choose an option:  By URL—Paste the URL (link) you want to embed. Select Whole page or Preview and click Insert.  Embed code—Paste or enter the site HTML code you want to embed and click Next Insert. Note: If you can't add or preview content, contact the website's owner. 2.8 Move and resize content Anything you insert is added as a content “tile” on the canvas grid. Tiles snap to the grid so it’s easy to move, align, and edit them. Move site content:
  • 10. 1. Point to the content you want to move until you see Move . 2. Drag the content to a highlighted area. Resize site content: 1. Select the content you want to resize. 2. Drag the blue circles to resize. Group objects: You can connect text boxes and images together in a vertical group. 1. Add a photo and a text box to your site page. 2. Drag the text box to the top or bottom half of the object until a blue line appears. 3. To change the order of grouped objects, click the group you want to change. 4. Click the object you want to rearrange and on your keyboard, tap the Up or Down key. Ungroup objects: 1. To ungroup text boxes and images, click the group you want to separate. 2. Click the object you want to remove from the group, and drag the object away from the group
  • 11. 3. Share and collaborate on Sites Next: 4. Preview and publish your site Want to get more out of Google apps at work or school? Sign up for a free G Suite trial At any point while working on your site, you can share it with people in your organization to collaborate on the content. In this section, you learn how to: 3.1 Share and collaborate on Sites 3.1 Share and collaborate on Sites 1. Choose an option:  To share a site from Sites, click Add people .  To share a site from Drive, in Drive, select the site file and click Share . 2. Choose people to share your site with:  To set permissions across your organization: Under Who has access, click Change, select a sharing option, and click Save. You can then copy and paste a link to the site into an email or chat message.  To set permissions for individual people: In the Invite people box, enter the names or email addresses of people in your organization you want to share your site with then, click Send Done. 3. Change people’s permissions:  To give permissions, click the Down arrow next to the person’s name and select a permission level.  To remove permissions, next to the person’s name, click Remove . 4. (Optional) To restrict editors from publishing, changing site access, or adding new people, click the box next to Prevent editors from publishing, changing access and adding new people. Click Save changes Done. Stop sharing a site: 1. Open a site and at the top, click Share . 2. Under Who has access, find the person you want to remove. 3. Next to the person’s name, click Delete Save changes Done.
  • 12. 4. Preview and publish your site Want to get more out of Google apps at work or school? Sign up for a free G Suite trial You can preview a new site before you publish. When you’re ready, you can publish it only to your organization or to the world. In this section, you learn how to: 4.1 Preview your site 4.2 Publish your site for the first time 4.3 Change your site’s URL 4.4 Unpublish your site 4.5 Search in a site 4.1 Preview your site If you’re viewing a site on a mobile device, the content automatically adjusts to fit the screen. You can preview how your site appears on different devices. 1. Click Preview . 2. To see how your site looks on different devices, choose an option:  Phone  Tablet  Large screen 3. Click Close to exit the preview screen. 4.2 Publish your site for the first time When you publish your site for the first time, add a site name to complete the site URL. You can only use letters, numbers, and dashes in the site name. The beginning of the URL includes your organization’s domain and can’t be changed. You can continue to edit your site after you publish it. However, you need to republish the site to see any new changes. Publish your site:
  • 13. 1. Click Publish. 2. Add a name to the end of the URL. Certain terms, such as support and admin, can’t be used. You’ll see a check mark at the end of the URL if it’s available. 3. Under Who can view my site, click Manage. 4. In the Share with others window, choose an option:  Draft—To allow people in your domain or specific people to edit the draft version of your site, click Change.  Published—To allow people in your domain or specific people to view your published site, click Change. 5. Click Done. 6. Click Publish. Visit your site's URL to confirm that your site published correctly. Note: After you publish a site, you can share the published site by clicking Copy link Copy link and then paste the link to someone in a chat or email message. 4.3 Change your site’s URL You can change your site’s URL anytime. However, if you do, bookmarks to the old URL will no longer wor k. 1. Next to Publish, click the Down arrow Publish settings. 2. Enter a new URL. 3. Click Save. 4.4 Unpublish your site If you no longer want your site to be available online, you can unpublish it. You can still access and update your site content. You can also republish the site using the same URL or a different URL at any time. If people try to visit your unpublished site, they’ll see an error message. Unpublish your site:
  • 14. Next to Publish, click the Down arrow Unpublish. 4.5 Search in a site When a Google Sites website has more than one published page, you can search for what you want to find on the published version. 1. Go to a Google Site website and at the top right, click Search . 2. Enter your search and press Enter.