The document provides guidance on using Web Parts in SharePoint to display and arrange content on websites. It describes how to add, modify, and delete Web Parts. Key Web Parts mentioned are the Image Web Part for displaying images, Content Editor Web Part for text content, and Page Viewer Web Part for documents/spreadsheets. Instructions are provided for customizing the appearance of Web Parts by changing titles, sizes, and views.
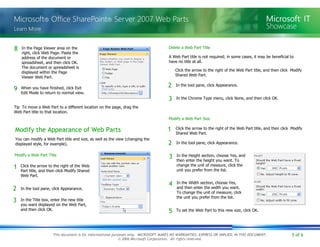
![Web Parts are content “containers” used to display information on your site. Use Web Parts to arrange text, related links, calendars, images, Document Libraries, other Web pages, and more. This guide references SharePoint Server 2007. Topics in this guide include: 1 2 Add a Web Part Delete a Web Part Display Content on Your Site Add Customized Content Modify the Appearance of Web Parts Add a Web Part Click Site Actions, and then click Edit Page. At the top of the zone in which you want to add the Web Part, click Add a Web Part. In the Add Web Parts to [ zone ] dialog box, select the check box of the Web Part you want to add —this example uses the Image Web Part —and then c lick Add. The Image Web Part is displayed in the zone. Tip Here’s another way to view the Web Parts list: I n the Add Web Parts to [ zone ] dialog box, click Advanced Web Part Gallery and options. In the tool pane, click the Web Part collection called [your team site name] Gallery. The Web Parts list is displayed alphabetically.](https://image.slidesharecdn.com/sharepointwebparts-1214827004787473-9/85/SharePoint-Web-Parts-1-320.jpg)
![Web Parts are content “containers” used to display information on your site. Use Web Parts to arrange text, related links, calendars, images, Document Libraries, other Web pages, and more. This guide references SharePoint Server 2007. Topics in this guide include: 1 2 Add a Web Part Delete a Web Part Display Content on Your Site Add Customized Content Modify the Appearance of Web Parts Add a Web Part Click Site Actions, and then click Edit Page. At the top of the zone in which you want to add the Web Part, click Add a Web Part. In the Add Web Parts to [ zone ] dialog box, select the check box of the Web Part you want to add —this example uses the Image Web Part —and then c lick Add. The Image Web Part is displayed in the zone. Tip Here’s another way to view the Web Parts list: I n the Add Web Parts to [ zone ] dialog box, click Advanced Web Part Gallery and options. In the tool pane, click the Web Part collection called [your team site name] Gallery. The Web Parts list is displayed alphabetically.](https://image.slidesharecdn.com/sharepointwebparts-1214827004787473-9/75/SharePoint-Web-Parts-1-2048.jpg)
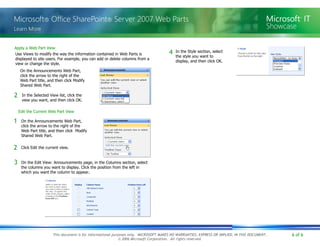
![4 When you have finished, click Exit Edit Mode to return to the default view. 5 In the tool pane, under Image Link, enter the image URL or path, and then click OK. When you close a Web Part, the Web Part is removed from the page. You can restore closed Web Parts later, as needed. 1 Click Site Actions, and then click Edit Page. Click the in the title bar of the Web Part you want to close. The Web Part is removed from the page. 2 1 To restore a closed Web Part to the page, click Site Actions, and then click Edit Page. Drag the Web Part title from the list to the desired zone location. 3 Restore a Closed Web Part 4 When you have finished, click Exit Edit Mode to return to normal view. 3 When you have finished, click Exit Edit Mode to return to normal view. In any zone, click Add a Web Part. I n the Add Web Parts to [ zone ] dialog box, click Advanced Web Part gallery and options. The Web Part you closed appears in the Closed Web Parts collection. 2 1 2 3 Click Site Actions, and then click Edit Page. In the edit menu of the Web Part you want to delete, click Delete, and then click OK. When you delete a Web Part, the Web Part is permanently removed from the page. When you have finished, click Exit Edit Mode to return to normal view. 3 In the edit menu of the Image Web Part, click Modify Shared Web Part. Close a Web Part Delete a Web Part](https://image.slidesharecdn.com/sharepointwebparts-1214827004787473-9/85/SharePoint-Web-Parts-2-320.jpg)
![1 Click Site Actions, and then click Edit Page. 2 Drag the Web Part heading to the desired zone location. 3 When you have finished, click Exit Edit Mode to return to normal view. With Web Parts, among other actions, you can add images to the home page of your site, display data on a spreadsheet, and add content such as custom formatted text. Three commonly used Web Parts are: Image Web Part: Displays an image such as a banner or logo on a Web page. Content Editor Web Part: Displays text content on your site. Page Viewer Web Part: Displays a linked file, folder, or Web page. Display Content on Your Site Display a Banner or Logo In the left navigation menu (Quick Launch), click either Documents or Pictures, depending on where the image is stored. 5 4 If the image is in a Document Library: Copy the address of the image by right-clicking the file name, and then clicking Copy Shortcut. The shortcut is now copied to the clipboard. -OR- If the image is in a Picture Library: Click the image thumbnail to view the full image. Copy the address of the image by right-clicking the picture name, and then clicking Copy Shortcut. The shortcut is now copied to the clipboard. 6 Go to the Home page, click Site Actions, and then click Edit Page. Use the Image Web Part to add a banner or logo to the home page of your site. You must first upload the image to a library. 2 3 On the Upload Document: [Document Library] page or the Add Picture: [Picture Library] page, click Browse to find the image to upload. Select the file in the Choose file window, click Open, and then click OK. 1 Navigate to the document or picture library in which you want to store the image. On the Upload menu, click Upload Document. Note You will use the image address in step 9. At the top of the zone in which you want the Image Web Part, click Add a Web Part. In the Add Web Parts to [ zone ] dialog box, scroll down to the Miscellaneous section, select Image Web Part, and then click Add. 7 Note There are many more Web Parts available in SharePoint Server 2007. Move a Web Part](https://image.slidesharecdn.com/sharepointwebparts-1214827004787473-9/85/SharePoint-Web-Parts-3-320.jpg)
![2 When you’ve uploaded your Microsoft © Office Word 2007 document, Microsoft © Office Excel © 2007 spreadsheet, or Web page, use the Page Viewer Web Part to display it. This Web Part can also be used to view a Web site. 1 3 4 5 Open the document or spreadsheet and save it as a Web page. On your site, click Documents, and then click the folder in your Document Library where you will store the Web page you just created. Click Upload and then click Upload Document. Click Browse, and find your document. Click your document, click Open, and then click OK. Copy the address of the file you uploaded by right-clicking the file name, and then clicking Copy Shortcut. You will need this address in step 9. Display a Document or Spreadsheet Go to the Home page, click Site Actions, and then click Edit Page. Add Customized Content Use the Content Editor Web Part to display text content on your site. The Content Editor also enables you to add images, links, or tables. At the top of the zone in which you want to display text, click Add a Web Part. In the Add Web Parts to [ zone ] dialog box, scroll to the Miscellaneous section, select the Content Editor Web Part check box, and then click Add. 2 1 Go to the Home page, click Site Actions, and then click Edit Page. 4 Compose a message and apply text formatting, or insert a picture or table. When you have finished, click OK. In the tool pane, click OK. The text message is displayed within the Content Editor Web Part. 5 3 In the Content Editor Web Part, click open the tool pane. In the tool pane, click Rich Text Editor. 6 7 At the top of the zone in which you want the Page Viewer Web Part, click Add a Web Part. In the Add Web Parts to [ zone ] dialog box, scroll to the Miscellaneous section, select the Page Viewer Web Part check box, and then click Add. In the Page Viewer Web Part, click open the tool pane. 8 9 In the Image area on the right, paste the address of the image, and then click OK. The image is displayed within the Image Web Part. In the Image Web Part, click open the tool pane. When you have finished, click Exit Edit Mode to return to normal view. 6](https://image.slidesharecdn.com/sharepointwebparts-1214827004787473-9/85/SharePoint-Web-Parts-4-320.jpg)