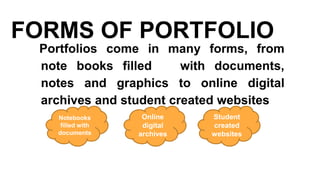
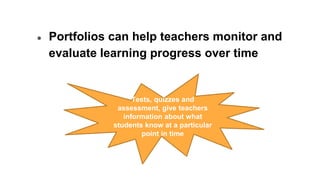
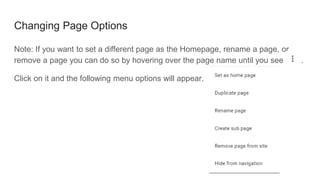
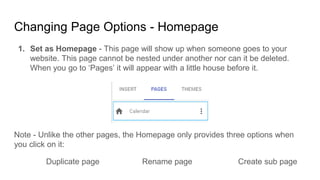
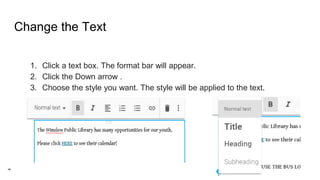
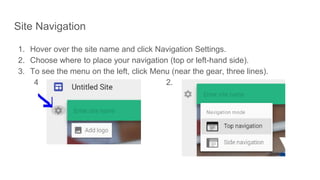
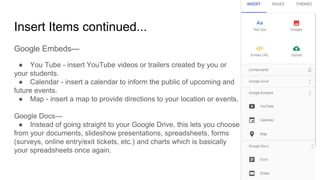
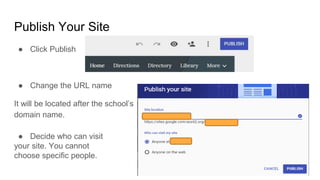
Portfolio/Google Site
Creation
Presenter: Dr.C.Thanavathi
M.A., M.Phil., M.Ed., M.Phil., DGT, DCA, CTE, B.A., (Eng.) PGDHE, SET, Ph.D.,
Assistant Professor of History,
M.Ed. Coordinator,
V.O.C.College of Education,Thoothukudi-628 008.
Tamil Nadu. India.
9629256771
thanavathic@thanavathi-edu.in
http://thanavathi-edu.in/index.html
INTRODUCTION
The portfolio is not the easiest type of
assessment to implement, but it can be a
very effective tool. Portfolios show the
cumulative efforts and learning of a
particular student over time. They offer
valuable data about students improvement.
PORTFOLIO
DEFINITION
A student portfolio is a compilation of
academic work and other forms of educational
evidence assembled for the purpose of
evaluating course quality, learning progress and
academic achievement over time.
FORMS OF PORTFOLIO
Portfolios come in many forms, from
note books filled with documents,
notes and graphics to online digital
archives and student created websites
Notebooks
filled with
documents
Online
digital
archives
Student
created
websites
DIGITAL PORTFOLIO
Online portfolios are often
called as digital portfolios or
e-portfolios
USES OF PORTFOLIO
● Student portfolios are most effective when they
are used to evaluate student learning progress
and achievement
When portfolios are used to
document and evaluate the
knowledge of the student,
teachers can use them to
adopt instructional strategies
● Portfolios can help teachers monitor and
evaluate learning progress over time
Tests, quizzes and
assessment, give teachers
information about what
students know at a particular
point in time
● Portfolios help teachers determine whether
students can apply what they have learned to
new problems and different subject areas.
A test can help teachers determine,
for eg., if students have learned a
specific mathematical skill, can able
to apply that skill to complex problem
in Economics, Geography, Civics
● Portfolios can encourage students to take
more ownership and responsibility over the
learning process.
Portfolios are a way for
students to critique and
evaluate their own work
and academic progress
Keep it
simple
Start
with a
single
unit
Determining
a goal
Creating
a check
list
Explaining
the process
CONCLUSION
Portfolio is a very valuable and meaningful
evaluation tool that effectively assesses
student learning. Along with the student
reflection the data provides the valuable
information about how each student learns
and what is important to him or her in the
learning process.
STEPS TO CREATE
BLOG
https://www.slideshare.net/thna1581981/weblog-thanavathi
3/3/2022
Why Use Google Sites?
Google Sites is free but basic.
There are definitely better, more customizable
website builders but they cost money.
Intranet
communication
Y
ourown
high-quality
without learningdesign
or programming.
lookgreatoneveryscreen
access_collaboration
practically
anything
impactfulteamsites
Before You Begin
As with most things, try to have a plan in mind.
● Brainstorm ideas for pages
● Sketch out the setup for each page
○ How many columns?
○ Column width? It shows lines for ‘tile’ width.
○ How many sections in each column?
It is a good idea to have this ahead of time when
creating your site.
First Steps
1. Sign in to your Google Account.
2. Click on the nine squares in the upper right-hand margin.
1. This will bring up a list of Google Apps such as what you
will see on the next slide.
● From Google Drive, click New > More > Google Sites.
Google Apps
● Click on Sites.
*At this point, if you had already created a Google Site,
It will show up here. I have a few in the classic sites,
which will appear first.
Classic and New Google Sites
What first shows is
the classic sites.
● Click on
New Google Sites.
New Google Sites
If you have started one it will look similar to this.
● In the bottom right-hand corner of the New Google Site page you will see this
image. Click on it.
Starting a new site
* Unlike the Classic Google Sites, the New Google Sites does not “Publish” your new site by default.
You do not have to worry about it becoming public until you either share it or publish it yourself.
* When you create a new site, a file is added to Drive, just like other Drive files. Sites automatically
saves every change you make.
* At any point of the creation/editing process, you can view the site as if you were visiting the page.
Just click the eye near the top right of the page.…
Your New Untitled Site “Home” Page
Choose a Theme
1. Click on THEMES in the right-hand margin. This can be changed at a later
date if you want.
2. Select a theme option and choose a color.
1. ‘Simple’ is used on the Thanavathi site with the gray-blue color.
2. ‘Vision’ is used on the Portfolio site with custom color #726868 (gray )
3. Click Font style and select a style. Each theme will offer different font styles.
1. ‘Classic” is used on the Thanavathi site
2. ‘Bold’ is used on the Portfolio site
Name different parts of your site
1. Site document name—(Starts off as Untitled Site) Enter a unique name to
keep track of your site. The site document name is only visible to you.
2. Site name—(Top left of site page) The site name appears in the header and
in the web or mobile window title bar after you publish the site. You need to
have 2 or more pages in your website for your site name to appear.
3. Page title—Each page in your site has a title, which appears at the top of the
page. The page title also appears in the navigation menu. This will be shown
later in the presentation.
Adding a Background Image
Change Image: Upload or Select Image
1. Upload an Image saved to your computer’s hard drive
1. Click on Upload
2. Find the image you want to use and click on it.
1. On an Apple device it will be under “
2. On a Windows PC it will be under “Pictures” most likely.
3. If you double-click on the image it should appear on your slide. Otherwise, you can click open
after you have chosen the image.
2. Select Image and then click Select.
1. Gallery - stock photos
2. By URL - enter the website address of the photo
3. Search - use Google search to find a picture
4. Your Albums - find a picture in your online Google library
5. Google Drive - select a photo you already have saved to your Google Drive
3. To go back to the original background image, click
Header Type
Change the header type:
1. Hover over the background image and click Header type .
2. Choose an option:
○ Large banner
○ Banner
○ Title only
Adding More Content to Your Website
The next several slides will cover:
● Adding pages (About, Directory, Calendar, Gallery, and etc.)
● Reordering and ‘Nesting’ pages
● Changing Page Options
● Change the text on your site
● Site Navigation
Adding Pages
1. In the top-right corner, click 1. Pages > 2. Add page.
1. Name the page and click Done.
Reorder or nest pages
Keep related information together by nesting pages. Nested pages appear as a
subtopic of another page.
1. Click Pages.
2. Drag a page up or down in the list to reorder it.
3. Drag a page on top of another page to nest it.
4. To un-nest a page, drag it to the bottom of the list.
● You can only nest a page one level; you can’t
nest the homepage.
Changing Page Options
Note: If you want to set a different page as the Homepage, rename a page, or
remove a page you can do so by hovering over the page name until you see .
Click on it and the following menu options will appear.
Changing Page Options - Homepage
1. Set as Homepage - This page will show up when someone goes to your
website. This page cannot be nested under another nor can it be deleted.
When you go to ‘Pages’ it will appear with a little house before it.
Note - Unlike the other pages, the Homepage only provides three options when
you click on it:
Duplicate page Rename page Create sub page
Changing Page Options - continued
Duplicate page - Clicking on this will give you a copy of the page and name it
‘Copy of …’. You will then have to rename it. This option is
useful if you have it set up similarly to the page you want
to create.
Rename page - This will allow you to change the name.
Good reasons to change the name include:
● Copy of …
● You looked at the Homepage and the header was too large.
Changing Page Options - continued
Create sub page - This will put a ‘nested’ page under the page you are on. This
allows you to keep related information together.
Remove page from site - Deletes this page only from your site.
Hide from navigation - You will be able to see the page / sub
page, but others viewing your site will not be able to see it.
This is good if you are working on the page and do not want
others to see it yet, but you do want the rest of the site visible
to the public.
Change the Text
1. Click a text box. The format bar will appear.
2. Click the Down arrow .
3. Choose the style you want. The style will be applied to the text.
Change the Text continued...
As with many Google Drive Apps, you can make your text Bold, Italics, change the
alignment, add a numbered or bulleted list. You can include a link to a text box or
a section of text (seen above HERE).
Unfortunately, at this time the new Google sites does not allow you to change the
font and size of text outside the drop-down menu provided.
Site Navigation
1. Hover over the site name and click Navigation Settings.
2. Choose where to place your navigation (top or left-hand side).
3. To see the menu on the left, click Menu (near the gear, three lines).
4. 2.
Content
In this section you will learn how to add content to
your pages.
1. Select the page that you want to add content to.
2. Click Insert or double-click on the page where
you want to add content.
1. Choose the content you want to add:
Insert Items
Text box—Add titles and text. It shows up at the bottom of the column you are on,
but you may move it by moving the mouse until you see
Images—Add images, music, and videos directly from the web.
Embed URL—Use a website address to add photos, designs, and other images.
Upload—Upload photos, videos, PDFs, or other documents from your device.
Components—Add a (horizontal) divider line to your page.
Google Drive—Embed any file or the contents of a folder stored in Drive. If you
make changes to your files in Drive, the same changes automatically show in
Sites.
Insert Items continued...
Google Embeds—
● You Tube - insert YouTube videos or trailers created by you or
your students.
● Calendar - insert a calendar to inform the public of upcoming and
future events.
● Map - insert a map to provide directions to your location or events.
Google Docs—
● Instead of going straight to your Google Drive, this lets you choose
from your documents, slideshow presentations, spreadsheets, forms
(surveys, online entry/exit tickets, etc.) and charts which is basically
your spreadsheets once again.
Edit Sections
1. Hover over a section to change it. A box will appear around it. Click to edit.
2. To change the background for each section: Click the first box which is Style
(could show Normal text) A drop-down will appear; select a style.
3. You can also select Image to add a background image.
4. Any time you see three dots stacked on top of each other there are other
options to choose from.
Additional Resource
Sites Cheat Sheet
Do as much as you can this week. PLEASE do not publish your site yet.
When we come back (To be determined by YOU), we will go over any questions
you may still have. We will also look at changing the URL (website address)
Preview Your Site
● Site should automatically adjust to a device. Check it out...
○ Mobile cell phone
○ Tablet
○ Laptop
○ Desktop
● Click Preview
● Choose an option: phone, tablet, or large screen.
● Click Close X to exit the preview.
Publish Your Site
● Click Publish
● Change the URL name
It will be located after the school’s
domain name.
● Decide who can visit
your site. You cannot
choose specific people.
Publish Your Site continued...
● If you click ‘Anyone on the
web, you’ll have another option
to check off.
● Click Publish when ready
● Click Cancel if unsure.
If you click to ‘request public search engines to not display my site’ but you want it
on the school’s website, please send the URL to Paula Vigue (WES) or your
school’s webmaster.
Questions and Answers
Q - Can you change the font style and size to anything like you can in a
document?
A - Unfortunately, no. You are only given a few options at this time.
Q - Can you change the background of a section once you have published it?
A - Yes you can. Click on the section and then look for the icons shown below.
Change the background color or add a background image
Make a duplicate copy of the section.
Delete the section.
Send feedback to Google
Q - If you choose to request search engines to not display, can people still find it?
A - Yes. Some search engines may still find your site, but it would not be as easy.
Q - If you have your site published to anyone at the school domain, can parents
access the site?
A - My understanding is that if the parents work to the school, yes, but if not, they
would not be able to access the site unless they go through their child’s Google
account.
Q - Why are there so few choices for styles, fonts, and themes?
A - Because the site is to be accessed by any device, many of the complicated
features have been removed.
THANK YOU
https://sites.google.com/view/thanav
athidigitalsite/home

Student's portfolio's creation

  • 1.
    Portfolio/Google Site Creation Presenter: Dr.C.Thanavathi M.A.,M.Phil., M.Ed., M.Phil., DGT, DCA, CTE, B.A., (Eng.) PGDHE, SET, Ph.D., Assistant Professor of History, M.Ed. Coordinator, V.O.C.College of Education,Thoothukudi-628 008. Tamil Nadu. India. 9629256771 thanavathic@thanavathi-edu.in http://thanavathi-edu.in/index.html
  • 2.
    INTRODUCTION The portfolio isnot the easiest type of assessment to implement, but it can be a very effective tool. Portfolios show the cumulative efforts and learning of a particular student over time. They offer valuable data about students improvement.
  • 3.
    PORTFOLIO DEFINITION A student portfoliois a compilation of academic work and other forms of educational evidence assembled for the purpose of evaluating course quality, learning progress and academic achievement over time.
  • 4.
    FORMS OF PORTFOLIO Portfolioscome in many forms, from note books filled with documents, notes and graphics to online digital archives and student created websites Notebooks filled with documents Online digital archives Student created websites
  • 5.
    DIGITAL PORTFOLIO Online portfoliosare often called as digital portfolios or e-portfolios
  • 6.
    USES OF PORTFOLIO ●Student portfolios are most effective when they are used to evaluate student learning progress and achievement When portfolios are used to document and evaluate the knowledge of the student, teachers can use them to adopt instructional strategies
  • 7.
    ● Portfolios canhelp teachers monitor and evaluate learning progress over time Tests, quizzes and assessment, give teachers information about what students know at a particular point in time
  • 8.
    ● Portfolios helpteachers determine whether students can apply what they have learned to new problems and different subject areas. A test can help teachers determine, for eg., if students have learned a specific mathematical skill, can able to apply that skill to complex problem in Economics, Geography, Civics
  • 9.
    ● Portfolios canencourage students to take more ownership and responsibility over the learning process. Portfolios are a way for students to critique and evaluate their own work and academic progress
  • 10.
    Keep it simple Start with a single unit Determining agoal Creating a check list Explaining the process
  • 11.
    CONCLUSION Portfolio is avery valuable and meaningful evaluation tool that effectively assesses student learning. Along with the student reflection the data provides the valuable information about how each student learns and what is important to him or her in the learning process.
  • 12.
  • 15.
    Why Use GoogleSites? Google Sites is free but basic. There are definitely better, more customizable website builders but they cost money. Intranet communication Y ourown high-quality without learningdesign or programming. lookgreatoneveryscreen access_collaboration practically anything impactfulteamsites
  • 17.
    Before You Begin Aswith most things, try to have a plan in mind. ● Brainstorm ideas for pages ● Sketch out the setup for each page ○ How many columns? ○ Column width? It shows lines for ‘tile’ width. ○ How many sections in each column? It is a good idea to have this ahead of time when creating your site.
  • 18.
    First Steps 1. Signin to your Google Account. 2. Click on the nine squares in the upper right-hand margin. 1. This will bring up a list of Google Apps such as what you will see on the next slide. ● From Google Drive, click New > More > Google Sites.
  • 19.
    Google Apps ● Clickon Sites. *At this point, if you had already created a Google Site, It will show up here. I have a few in the classic sites, which will appear first.
  • 20.
    Classic and NewGoogle Sites What first shows is the classic sites. ● Click on New Google Sites.
  • 21.
    New Google Sites Ifyou have started one it will look similar to this.
  • 22.
    ● In thebottom right-hand corner of the New Google Site page you will see this image. Click on it. Starting a new site * Unlike the Classic Google Sites, the New Google Sites does not “Publish” your new site by default. You do not have to worry about it becoming public until you either share it or publish it yourself. * When you create a new site, a file is added to Drive, just like other Drive files. Sites automatically saves every change you make. * At any point of the creation/editing process, you can view the site as if you were visiting the page. Just click the eye near the top right of the page.…
  • 23.
    Your New UntitledSite “Home” Page
  • 24.
    Choose a Theme 1.Click on THEMES in the right-hand margin. This can be changed at a later date if you want. 2. Select a theme option and choose a color. 1. ‘Simple’ is used on the Thanavathi site with the gray-blue color. 2. ‘Vision’ is used on the Portfolio site with custom color #726868 (gray ) 3. Click Font style and select a style. Each theme will offer different font styles. 1. ‘Classic” is used on the Thanavathi site 2. ‘Bold’ is used on the Portfolio site
  • 25.
    Name different partsof your site 1. Site document name—(Starts off as Untitled Site) Enter a unique name to keep track of your site. The site document name is only visible to you. 2. Site name—(Top left of site page) The site name appears in the header and in the web or mobile window title bar after you publish the site. You need to have 2 or more pages in your website for your site name to appear. 3. Page title—Each page in your site has a title, which appears at the top of the page. The page title also appears in the navigation menu. This will be shown later in the presentation.
  • 26.
  • 27.
    Change Image: Uploador Select Image 1. Upload an Image saved to your computer’s hard drive 1. Click on Upload 2. Find the image you want to use and click on it. 1. On an Apple device it will be under “ 2. On a Windows PC it will be under “Pictures” most likely. 3. If you double-click on the image it should appear on your slide. Otherwise, you can click open after you have chosen the image. 2. Select Image and then click Select. 1. Gallery - stock photos 2. By URL - enter the website address of the photo 3. Search - use Google search to find a picture 4. Your Albums - find a picture in your online Google library 5. Google Drive - select a photo you already have saved to your Google Drive 3. To go back to the original background image, click
  • 28.
    Header Type Change theheader type: 1. Hover over the background image and click Header type . 2. Choose an option: ○ Large banner ○ Banner ○ Title only
  • 29.
    Adding More Contentto Your Website The next several slides will cover: ● Adding pages (About, Directory, Calendar, Gallery, and etc.) ● Reordering and ‘Nesting’ pages ● Changing Page Options ● Change the text on your site ● Site Navigation
  • 30.
    Adding Pages 1. Inthe top-right corner, click 1. Pages > 2. Add page. 1. Name the page and click Done.
  • 31.
    Reorder or nestpages Keep related information together by nesting pages. Nested pages appear as a subtopic of another page. 1. Click Pages. 2. Drag a page up or down in the list to reorder it. 3. Drag a page on top of another page to nest it. 4. To un-nest a page, drag it to the bottom of the list. ● You can only nest a page one level; you can’t nest the homepage.
  • 32.
    Changing Page Options Note:If you want to set a different page as the Homepage, rename a page, or remove a page you can do so by hovering over the page name until you see . Click on it and the following menu options will appear.
  • 33.
    Changing Page Options- Homepage 1. Set as Homepage - This page will show up when someone goes to your website. This page cannot be nested under another nor can it be deleted. When you go to ‘Pages’ it will appear with a little house before it. Note - Unlike the other pages, the Homepage only provides three options when you click on it: Duplicate page Rename page Create sub page
  • 34.
    Changing Page Options- continued Duplicate page - Clicking on this will give you a copy of the page and name it ‘Copy of …’. You will then have to rename it. This option is useful if you have it set up similarly to the page you want to create. Rename page - This will allow you to change the name. Good reasons to change the name include: ● Copy of … ● You looked at the Homepage and the header was too large.
  • 35.
    Changing Page Options- continued Create sub page - This will put a ‘nested’ page under the page you are on. This allows you to keep related information together. Remove page from site - Deletes this page only from your site. Hide from navigation - You will be able to see the page / sub page, but others viewing your site will not be able to see it. This is good if you are working on the page and do not want others to see it yet, but you do want the rest of the site visible to the public.
  • 36.
    Change the Text 1.Click a text box. The format bar will appear. 2. Click the Down arrow . 3. Choose the style you want. The style will be applied to the text.
  • 37.
    Change the Textcontinued... As with many Google Drive Apps, you can make your text Bold, Italics, change the alignment, add a numbered or bulleted list. You can include a link to a text box or a section of text (seen above HERE). Unfortunately, at this time the new Google sites does not allow you to change the font and size of text outside the drop-down menu provided.
  • 38.
    Site Navigation 1. Hoverover the site name and click Navigation Settings. 2. Choose where to place your navigation (top or left-hand side). 3. To see the menu on the left, click Menu (near the gear, three lines). 4. 2.
  • 39.
    Content In this sectionyou will learn how to add content to your pages. 1. Select the page that you want to add content to. 2. Click Insert or double-click on the page where you want to add content. 1. Choose the content you want to add:
  • 40.
    Insert Items Text box—Addtitles and text. It shows up at the bottom of the column you are on, but you may move it by moving the mouse until you see Images—Add images, music, and videos directly from the web. Embed URL—Use a website address to add photos, designs, and other images. Upload—Upload photos, videos, PDFs, or other documents from your device. Components—Add a (horizontal) divider line to your page. Google Drive—Embed any file or the contents of a folder stored in Drive. If you make changes to your files in Drive, the same changes automatically show in Sites.
  • 41.
    Insert Items continued... GoogleEmbeds— ● You Tube - insert YouTube videos or trailers created by you or your students. ● Calendar - insert a calendar to inform the public of upcoming and future events. ● Map - insert a map to provide directions to your location or events. Google Docs— ● Instead of going straight to your Google Drive, this lets you choose from your documents, slideshow presentations, spreadsheets, forms (surveys, online entry/exit tickets, etc.) and charts which is basically your spreadsheets once again.
  • 42.
    Edit Sections 1. Hoverover a section to change it. A box will appear around it. Click to edit. 2. To change the background for each section: Click the first box which is Style (could show Normal text) A drop-down will appear; select a style. 3. You can also select Image to add a background image. 4. Any time you see three dots stacked on top of each other there are other options to choose from.
  • 43.
    Additional Resource Sites CheatSheet Do as much as you can this week. PLEASE do not publish your site yet. When we come back (To be determined by YOU), we will go over any questions you may still have. We will also look at changing the URL (website address)
  • 44.
    Preview Your Site ●Site should automatically adjust to a device. Check it out... ○ Mobile cell phone ○ Tablet ○ Laptop ○ Desktop ● Click Preview ● Choose an option: phone, tablet, or large screen. ● Click Close X to exit the preview.
  • 45.
    Publish Your Site ●Click Publish ● Change the URL name It will be located after the school’s domain name. ● Decide who can visit your site. You cannot choose specific people.
  • 46.
    Publish Your Sitecontinued... ● If you click ‘Anyone on the web, you’ll have another option to check off. ● Click Publish when ready ● Click Cancel if unsure. If you click to ‘request public search engines to not display my site’ but you want it on the school’s website, please send the URL to Paula Vigue (WES) or your school’s webmaster.
  • 47.
    Questions and Answers Q- Can you change the font style and size to anything like you can in a document? A - Unfortunately, no. You are only given a few options at this time. Q - Can you change the background of a section once you have published it? A - Yes you can. Click on the section and then look for the icons shown below. Change the background color or add a background image Make a duplicate copy of the section. Delete the section. Send feedback to Google
  • 48.
    Q - Ifyou choose to request search engines to not display, can people still find it? A - Yes. Some search engines may still find your site, but it would not be as easy. Q - If you have your site published to anyone at the school domain, can parents access the site? A - My understanding is that if the parents work to the school, yes, but if not, they would not be able to access the site unless they go through their child’s Google account. Q - Why are there so few choices for styles, fonts, and themes? A - Because the site is to be accessed by any device, many of the complicated features have been removed.
  • 49.