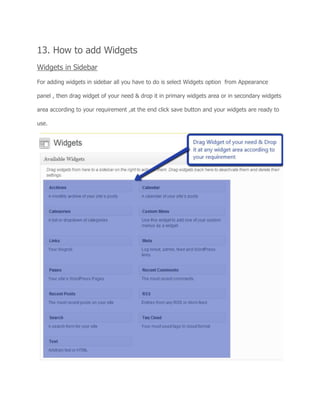
A2WPress Regal Complete Documentation
Like other themes on A2WPress, this Regal theme is also extremely
easy to install and setup and you’d love creating your website with this theme.
1. Beginning
Creating the Pages
You would need to build new pages from Add Page menu and select the Appropriate Template
for each page.
For “Blog” Choose the “Blog Template” from Page Attributes.
For “Gallery Page” Choose the “Gallery Template” from Page Attributes.
For “Fullwidth Page” Choose the “Fullwidth Template” from Page Attributes.
For “Contact Page” Choose the “Contact Us Template” from Page Attributes.
2. Configuring Homepage
Specifying Logo & Favicon
Please go to "Appearance -> Theme Options" in A2WPress admin and enter the URL paths of
your logo and favicon into the appropriate fields under "General Settings":
Sliders on homepage
Just Upload the Images to the Slider from the Themes Options Panel and the images would
start to appear on the Home Page of the Website.
Slider heading, Heading link and description can be easily inserted with the help of the
option given below.
Video in slider
You can also add video in slider, just paste your video url.
Snapshot of Regal Home Page
While adding slider one thing you have to remember is paste ?wmode=transparent just after
your video embed code
For example
Your video embed code:- <iframe title="YouTube video player" width="480" height="390"
src="http://www.youtube.com/embed/lzQgAR_J1PI?wmode=transparent" frameborder="0"
wmode="Opaque">
3. Home page settings
You can write home page Headings and its description from “Home Page settings section”.
4. Social logos
Write the link of the social icons in the text box, which will show in the footer
5. Styling Options
We have provided eight color options with Regal theme , you can change them according to
your requirement.
6. Footer Settings
Write the content in the text it will show in the right side of the footer
7. Building Gallery
Gallery Layout
To create a gallery page all you have to do is select the appropriate Gallery Template from the
Page Attributes.
As soon as you upload the images using Upload Image button. Just save the Changes and cut
this window.
After that select gallery template & click at publish button , your gallery page is ready and
images would be shown under the gallery page.
8. Building Fullwidth
Fullwidth Layout
Similar to the Gallery Page, to create a Fullwidth page all you have to do is select the
appropriate Fullwidth Template from the Page Attributes.
9. Building Blog
Blog Layout
Similar to the Gallery Page, To create a blog page all you have to do is select the appropriate
Blog Template from the Page Attributes. All your blog posts will be displayed in the Blog Page.
You can change the page in which you want to show the posts by altering the posts page in the
Reading section.
10. Contact Page
Contact Layout
To create a Contact page all you have to do is select the appropriate Contact Template from the
Page Attributes.
11. Building Menus
Menu with Menu Manager
Regal Theme had a prebuilt feature of displaying all the pages and subpages in the menu.
However you can also built a custom menu using the Menus option under the “Appearance”
Section.
You can also change the order of the menu according to your requirement by simply drag and
drop the menu items.
12. Building Dropdown Menus
For making dropdown menus all you have to do is add new page
Then name it for eg. Submenu 1 and set any of your pre developed page as a parent page for
which you want to create dropdown, after that select template & click publish button.
Similar process you can follow making multiple Submenus
13. How to add Widgets
Widgets in Sidebar
For adding widgets in sidebar all you have to do is select Widgets option from Appearance
panel , then drag widget of your need & drop it in primary widgets area or in secondary widgets
area according to your requirement ,at the end click save button and your widgets are ready to
use.
Additional Assistance.
You can click here to watch the Video Demo Available in the Membership Area.
Better still, click here if you wish to Hire Professionals to assist you with customizations.

A2WPress Regal Theme Documentation

  • 1.
    A2WPress Regal CompleteDocumentation Like other themes on A2WPress, this Regal theme is also extremely easy to install and setup and you’d love creating your website with this theme. 1. Beginning Creating the Pages You would need to build new pages from Add Page menu and select the Appropriate Template for each page. For “Blog” Choose the “Blog Template” from Page Attributes. For “Gallery Page” Choose the “Gallery Template” from Page Attributes. For “Fullwidth Page” Choose the “Fullwidth Template” from Page Attributes. For “Contact Page” Choose the “Contact Us Template” from Page Attributes.
  • 2.
    2. Configuring Homepage SpecifyingLogo & Favicon Please go to "Appearance -> Theme Options" in A2WPress admin and enter the URL paths of your logo and favicon into the appropriate fields under "General Settings":
  • 3.
    Sliders on homepage JustUpload the Images to the Slider from the Themes Options Panel and the images would start to appear on the Home Page of the Website. Slider heading, Heading link and description can be easily inserted with the help of the option given below.
  • 4.
    Video in slider Youcan also add video in slider, just paste your video url. Snapshot of Regal Home Page
  • 5.
    While adding sliderone thing you have to remember is paste ?wmode=transparent just after your video embed code For example Your video embed code:- <iframe title="YouTube video player" width="480" height="390" src="http://www.youtube.com/embed/lzQgAR_J1PI?wmode=transparent" frameborder="0" wmode="Opaque"> 3. Home page settings You can write home page Headings and its description from “Home Page settings section”.
  • 6.
    4. Social logos Writethe link of the social icons in the text box, which will show in the footer
  • 7.
    5. Styling Options Wehave provided eight color options with Regal theme , you can change them according to your requirement.
  • 8.
    6. Footer Settings Writethe content in the text it will show in the right side of the footer
  • 9.
    7. Building Gallery GalleryLayout To create a gallery page all you have to do is select the appropriate Gallery Template from the Page Attributes.
  • 10.
    As soon asyou upload the images using Upload Image button. Just save the Changes and cut this window. After that select gallery template & click at publish button , your gallery page is ready and images would be shown under the gallery page.
  • 12.
    8. Building Fullwidth FullwidthLayout Similar to the Gallery Page, to create a Fullwidth page all you have to do is select the appropriate Fullwidth Template from the Page Attributes.
  • 14.
    9. Building Blog BlogLayout Similar to the Gallery Page, To create a blog page all you have to do is select the appropriate Blog Template from the Page Attributes. All your blog posts will be displayed in the Blog Page. You can change the page in which you want to show the posts by altering the posts page in the Reading section.
  • 16.
    10. Contact Page ContactLayout To create a Contact page all you have to do is select the appropriate Contact Template from the Page Attributes.
  • 18.
    11. Building Menus Menuwith Menu Manager Regal Theme had a prebuilt feature of displaying all the pages and subpages in the menu. However you can also built a custom menu using the Menus option under the “Appearance” Section. You can also change the order of the menu according to your requirement by simply drag and drop the menu items.
  • 19.
    12. Building DropdownMenus For making dropdown menus all you have to do is add new page Then name it for eg. Submenu 1 and set any of your pre developed page as a parent page for which you want to create dropdown, after that select template & click publish button.
  • 21.
    Similar process youcan follow making multiple Submenus
  • 22.
    13. How toadd Widgets Widgets in Sidebar For adding widgets in sidebar all you have to do is select Widgets option from Appearance panel , then drag widget of your need & drop it in primary widgets area or in secondary widgets area according to your requirement ,at the end click save button and your widgets are ready to use.
  • 23.
    Additional Assistance. You canclick here to watch the Video Demo Available in the Membership Area. Better still, click here if you wish to Hire Professionals to assist you with customizations.