1. autodesk360.com
Guide to Getting Started in A360
Excited about the new A360? Wondering where to start? You’ve come to the right place. The first thing to do is log into A360 Team. If you haven’t created an account yet, sign up here.
Now that you have a site created, let’s sign in and take a quick look at the site navigation.
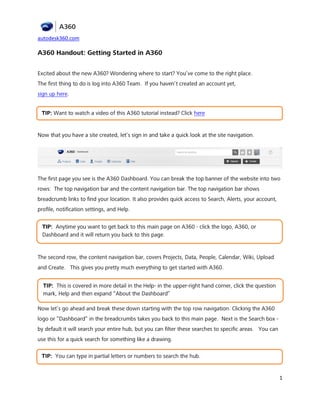
The first page you see is the A360 Dashboard. You can break the top banner of the website into two rows: The top navigation bar and the content navigation bar. The top navigation bar shows breadcrumb links to find your location. It also provides quick access to Search, Alerts, your account, profile, notification settings, and Help.
The second row, the content navigation bar, covers Projects, Data, People, Calendar, Wiki, Upload and Create. This gives you pretty much everything to get started with A360.
TIP: Anytime you want to get back to this main page on A360 - click the logo, A360, or Dashboard and it will return you back to this page.
TIP: This is covered in more detail in the Help- in the upper-right hand corner, click the question mark, Help and then expand “About the Dashboard”
TIP: Want to watch a video of this A360 tutorial instead? Click here 1
2. autodesk360.com
Now let’s go ahead and break these down starting with the top row navigation. Clicking the A360 logo or “Dashboard” in the breadcrumbs takes you back to this main page. Next is the Search box - by default it will search your entire hub, but you can filter these searches to specific areas. You can use this for a quick search for something like a drawing.
Maybe you uploaded a drawing file and you wanted to find it quickly. You could just type in part of the name of that drawing file - in my example, I have a house floor plan and I just type the first three letters of the drawing name and it shows up.
TIP: You can type in partial letters or numbers to search the hub. 2
3. autodesk360.com
Next up we have the Progress icon. You can use this to check the status is of your data uploads - in my screen shot; you see that I copied successfully 47 files to Bud.
Next to Progress, we have the Alerts icon. This bell-shaped icon is where you will find notifications from others that have posted comments or comments from people that you may be following. You can refresh the notifications by clicking the arrows or you can also mark all alerts as read.
TIP: When you have a new hub there may not be many notifications at all. 3
4. autodesk360.com
After Alerts, we find your sign in settings, and this is where you can configure your profile, adjust settings for your hub, invite others to the hub, and administer the Team hub.
This next part is my favorite, it’s the Help section. You will notice the icon is a question mark in a circle. Click that and take a look at all the options.
Once Help is open, be sure to check out the Videos - sometimes a picture is worth a thousand words, so a video must be worth even more. We would suggest that you first take a look at the “What is A360?” video and the “Autodesk 360 Tour”. It will give you more details about what we just covered. Once you have completed those two videos, take a look at the other Getting Started videos:
TIP: When you click the Help option, it will open a new tab in your browser. 4
5. autodesk360.com
• To create a project
• To upload files to a project
• To invite people to a project
Let’s move on to the second row, the content navigation bar, and talk about these options. We can break this down into two main sections.
5
6. autodesk360.com
On the left, Project, Data, People, Calendar, and Wiki covers the first part. On the right, we have Upload and Create for the second part. The first part is getting into the power of A360 and Projects. Once you have multiple projects created, you can see them by clicking on “Project”. This gives you a list of all projects available on your hub.
6
7. autodesk360.com
Clicking “Data” gives you a list of all the data in your hub. You can see the names of the files, the owner of the data, and they type of data that is displayed. You also see size and last modified.
TIP: You can click the name of any of the projects to go to that project. So if your project is called Bud, you click Bud to open that project in the data view. 7
8. autodesk360.com
“People” gives you a list of all the people that are part of your Team hub. This is a new hub, so you only see me. But as you invite others to your Team hub, you will be able to see a complete list of them here.
On the People page, you can also view the people that you are following and people that are following you.
TIP: If you have someone that you are interested in keeping up with what they are doing on the hub, you would follow them. Then you will get updates about them in the hub activity feed and also notifications. 8
9. autodesk360.com
As you create more projects and invite more people to your Team hub, you may want to sort by name. You also can toggle the view between list and thumbnail views. And you can also invite people to your hub or specifically to a project.
Next up we have Calendar. This is a standard calendar that you can update with information on projects or other items you are working on. It has both the Calendar and Agenda views. A read-only copy on the calendar can also be exported out to your calendar application or service. Once you click Export you will see what the options are. You can also find out more details in the Help.
TIP: You may want to invite people at the project level so that they are invited to that specific project that they are working on. 9
10. autodesk360.com
The Wiki is a great place to post information that you may want to allow multiple people to view or edit. You can post training information, meeting notes, or lists of materials. There are a lot of options with the Wiki.
TIP: You can create Wiki pages specific to projects once you are in the Project view, click Wiki. If you haven’t created a Wiki yet, click the “Create New Page”. 10
11. autodesk360.com
Once you have created the basic Wiki page, you can give it a title, and compose the text. You have multiple formatting tools.
We are down to the last two options: “Upload” and “Create”. If you click Upload, you can browse to files and folders you want to upload. You can drag and drop items to the target zone.
TIP: For drag and drop you want to use Chrome or Firefox.
11
12. autodesk360.com
When you click the “Create” button, you have multiple options: Project, Message, Link, Event, Poll and Page.
Each of these icons has a specific task. Project creates a project. Message enables you to post a message on the hub or project. Link enables you to create a link to share with people. Event creates an event for your calendar. Poll lets you gather feedback and Page enables you to create a page for a Wiki.
Now go back to the Help and watch the Getting Started videos.
Earlier we talked about searching from the hub. Now let’s take a look at searching a model from in the viewer. We will start by going to a Project that has drawings in the Data folder.
12
13. autodesk360.com
Click Data to view the data that you have uploaded in your project. In my case, I have three drawings already uploaded.
TIP: Click the different list views to change how you view the data. 13
14. autodesk360.com
Next, click the drawing and view it. In the viewer, you can manipulate the view of your model. On the left side, you see a Search box, comments, upload history, and basic details.
In the top right corner of the viewer are more options. Share, Actions, Tags, Information, Download and X to exit the viewer.
TIP: Mouse over the bottom of the viewer to reveal the viewer toolbar. 14
15. autodesk360.com
Grayed out on the bottom of the viewer are more controls - Orbit, Pan, Zoom, Camera, Explode Model, Reset Model, Settings and my favorite…Full screen view!
Let’s take a look at the search capabilities. In the upper left corner of the viewer, we will type in “wheel”. Notice all instances of “wheels” are returned and also see a dialog box that shows details of what is shown in the viewer.
TIP: There are two ways to locate drawing objects in the viewer. From the Search box and using the Model Structure tool on the viewer toolbar. 15
16. autodesk360.com
In the viewer, under the model, mouse over the toolbar and click on “Model Structure.” This brings up a dialog box that shows all the objects in the file.
Start clicking the text in the dialog box and notice it displays parts in the model.
16
17. autodesk360.com
In some cases, you may not know the name of the part you want to isolate in the model, so click the part itself in the model.
TIP: You can select multiple parts by using the CTRL key while clicking more parts. 17
18. autodesk360.com
Now that you have selected multiple parts, right click the model and select “Isolate”. Note that you have several options here, including Hide Selected, Show All Objects and Focus. Play around with these options to see how they work.
Once you click “Isolate” you will see the rest of the model dim.
TIP: To show the entire model again, right click and select “Show All Objects.” 18
19. autodesk360.com
That was a quick look at the many ways to view and search your models. Now go take A360 for a test drive and upload some of your own drawings and models.
Still stuck? Don’t sweat it! Here are some quick links for answers:
Got questions or an idea to share? Post them here: www.autodesk.com/community-a360 19
20. autodesk360.com
Bookmark the A360 Help page to view video tutorials: http://www.autodesk.com/a360-help
20