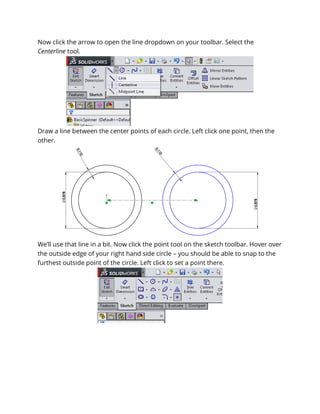
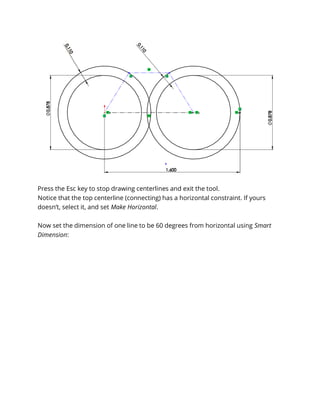
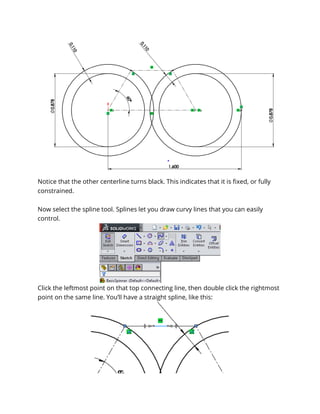
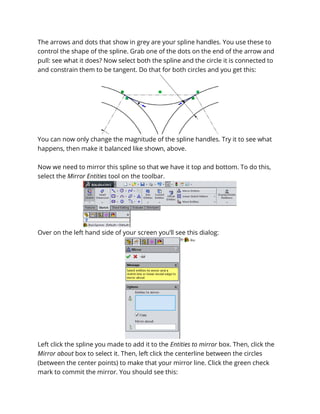
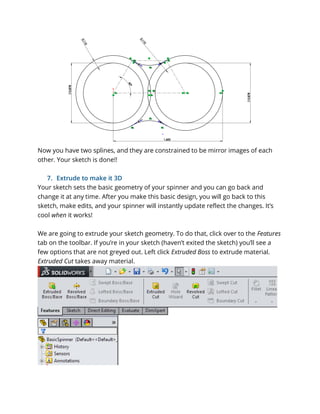
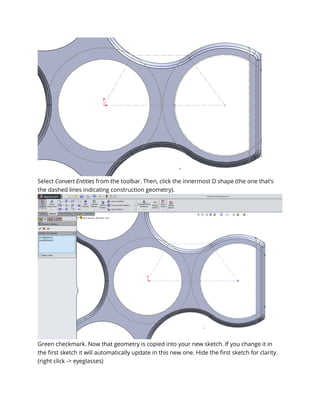
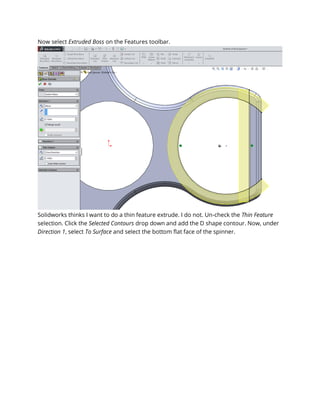
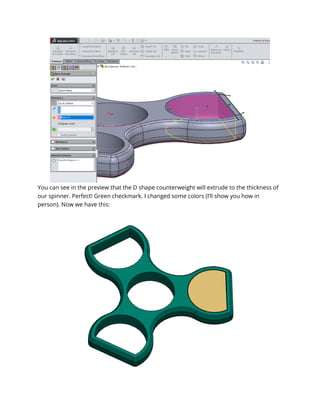
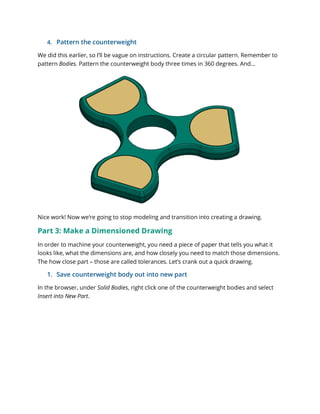
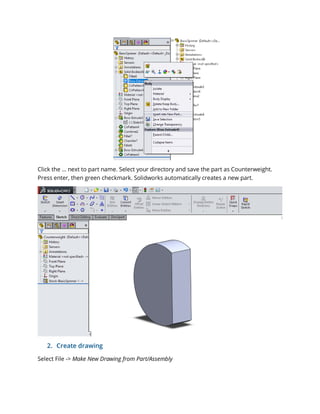
SlideShare a Scribd company logo
1 of 40
Download to read offline
Solidworks Spinner Design
Adventures in Manufacturing
This tutorial will guide you through the steps to design a spinner in Solidworks.
We’ll start by modeling a basic spinner, then, we’ll design our own counterweights
to be machined. We’ll make a dimensioned print for the counterweight, which you
will use while machining. Last, I’ll do some customization that can help guide you
while you customize your spinner design.
This document was created for the Adventures in Manufacturing summer camp and was made
possible by funds allocated by Clackamas ESD. This document is licensed under a Creative
Commons Attribution 4.0 license. You may change this document as you see fit for your needs
and you may use it for commercial use. Please give credit to OpenFab PDX and provide a link to
OpenFab’s resources page (link below) in the version you create. If you would like an editable
.docx file, please check my website: www.openfabpdx.com/resources
1. Sketch your spinner on paper.
The best habit you can have as a CAD junkie is to sketch things before you start
modeling on the computer. This is true whether you are copying something or
creating something totally new. Don’t worry AT ALL about making a nice-looking
sketch or recording all the dimensions. You can always go back and add info if
needed. First, sketch a plain old spinner. While you’re sketching, think about
something you might want to do to make your spinner different from most. Jot
down any notes you think of, along with a quick sketch.
2. Open Solidworks.
I’m using Solidworks 2015 for this tutorial. You’re probably using a different version.
Most of the tools we use will be the same, but the user interface may look different.
3. Select file>>new, and then click to select a new part.
4. Take a minute to orient to the workspace.
Solidworks is complicated. There are a lot of buttons. It’s both powerful and
overwhelming! Let’s take a minute to discuss what’s what (I’ll do this in person).
First, show the planes by right clicking them in the browser and left clicking on the
eyeglass icon show.
Now you can navigate the 3D space. Left click to select an object or feature and
right click to open a menu of options. The middle mouse button is your
navigating button. Hold it and move the mouse to rotate the view. Hold the
Ctrl + middle mouse to pan the view. Zoom in and out by scrolling the wheel.
Moving the view so that you can see what you need to see is super important!
Practice navigating the space whenever you can. Eventually it will be second nature
and you’ll spin things around on a screen like a professional engineer.
5. Create a sketch.
We will make our spinner by sketching it and then performing an extrude operation
to make our sketch 3-dimensional. All sketches happen on a flat plane or face. This
one will be on the Front Plane.
Right click the Front Plane and click on the Sketch symbol.
Sometimes it’s hard to know if you are in a sketch or not. If you see that you have
the option to Exit Sketch, then you’re in one. That looks like this
in the top left corner and like this
on the top right hand corner. You will click Exit Sketch in either corner (not the red X)
to save the sketch and exit the sketch environment, but don’t do that yet.
6. Draw your spinner (but only a part)
We’re going to draw one leg of the spinner that contains the center bearing and
counterweight. Then, after we extrude the sketch, we’ll use a pattern feature to
make the other legs.
Start by drawing circles. Click the circle tool in the Sketch toolbar. Highlighted here:
Now, hover your mouse curser over the origin point. It should snap to the origin.
Left click to set the center of your circle. Then drag the mouse out to about 0.5”
radius and left click to set the size of the circle. Don’t worry about exact dimensions.
Now, select the Smart Dimension tool from the toolbar.
Click the edge of your circle, then left click again off to the side to bring up the
Smart Dimension box. Our bearings are 22mm in diameter. Set your diameter to be
a bit bigger: 22.3mm will do the trick. Even if you’re designing in inches, go ahead
and type in “22.3mm”. Solidworks will convert it to inches for you.
Great! This circle represents the hole that your bearing will press into. Now, draw
more circles and add dimensions to match the image below. To dimension between
circles, select Smart Dimension, click the edge of one circle, then click the edge of the
other, then left click off to the side to bring up the dialog box.
Left click and hold the center of the right hand circles. Notice how you can move it
all around? We want to lock it in place. First, we’ll apply a horizontal constraint, then
a dimension.
Click the center point of one set of circles. Then press and hold the Ctrl key. Click
the other center point. Release the control key and a menu should pop up. If it
doesn’t right click the point you just selected. From that menu, click the horizontal
line that means Make Horizontal.
Little green symbols by the points should pop up. These are your sketch
constraints.
Now click the arrow to open the line dropdown on your toolbar. Select the
Centerline tool.
Draw a line between the center points of each circle. Left click one point, then the
other.
We’ll use that line in a bit. Now click the point tool on the sketch toolbar. Hover over
the outside edge of your right hand side circle – you should be able to snap to the
furthest outside point of the circle. Left click to set a point there.
Now select the Smart Dimension tool again. Set a dimension of 1.6” from the center
of the left hand circle (at the origin) to that outermost edge. This sets the overall
size of your spinner. For me, 1.6” makes it bigger than I would like. We’re going to
change that dimension later.
These two sets of circles represent the plastic that will hold your bearing and
counterweight in place. For now, we’re going to design for another bearing as a
counterweight. Later we’ll change the sketch to use the custom counterweight.
Now let’s sketch in the curve that joins these two. We’ll model a spline curve, and
then mirror that spline to connect on both sides. First, we need to find the points
where we want the splines to connect to the outer circles. I did some experimenting
and will guide you through the simplest approach for a three-lobed spinner.
Draw a centerline on each circle set and a connecting centerline, like this:
Press the Esc key to stop drawing centerlines and exit the tool.
Notice that the top centerline (connecting) has a horizontal constraint. If yours
doesn’t, select it, and set Make Horizontal.
Now set the dimension of one line to be 60 degrees from horizontal using Smart
Dimension:
Notice that the other centerline turns black. This indicates that it is fixed, or fully
constrained.
Now select the spline tool. Splines let you draw curvy lines that you can easily
control.
Click the leftmost point on that top connecting line, then double click the rightmost
point on the same line. You’ll have a straight spline, like this:
The arrows and dots that show in grey are your spline handles. You use these to
control the shape of the spline. Grab one of the dots on the end of the arrow and
pull: see what it does? Now select both the spline and the circle it is connected to
and constrain them to be tangent. Do that for both circles and you get this:
You can now only change the magnitude of the spline handles. Try it to see what
happens, then make it balanced like shown, above.
Now we need to mirror this spline so that we have it top and bottom. To do this,
select the Mirror Entities tool on the toolbar.
Over on the left hand side of your screen you’ll see this dialog:
Left click the spline you made to add it to the Entities to mirror box. Then, click the
Mirror about box to select it. Then, left click the centerline between the circles
(between the center points) to make that your mirror line. Click the green check
mark to commit the mirror. You should see this:
Now you have two splines, and they are constrained to be mirror images of each
other. Your sketch is done!!
7. Extrude to make it 3D
Your sketch sets the basic geometry of your spinner and you can go back and
change it at any time. After you make this basic design, you will go back to this
sketch, make edits, and your spinner will instantly update reflect the changes. It’s
cool when it works!
We are going to extrude your sketch geometry. To do that, click over to the Features
tab on the toolbar. If you’re in your sketch (haven’t exited the sketch) you’ll see a
few options that are not greyed out. Left click Extruded Boss to extrude material.
Extruded Cut takes away material.
My Extruded Boss dialog is shown below. Make yours match by selecting Mid Plane
for Direction 1, set D1, your total extrusion depth, to 7mm (the thickness of the
bearing), then click on the box under Selected Contours and left click all of the areas
you wish to extrude. These are shown in pink, below.
Click the checkmark to close the dialog and commit the extrude. Now you should
see one leg of your spinner! This extruded object is called a body.
8. Pattern the body
Now we will use the Circular Pattern tool to pattern the body we just made. Click the
dropdown arrow under Linear Pattern and select Circular Pattern.
Once the pattern dialog pops up, notice that if you hover over the input boxes
Solidworks will tell you what it wants there. Click the check mark next to Bodies.
This will pattern the solid body you just made, not a face or feature. Next, select the
bearing hole centered at the origin as the pattern axis. Select the solid body as the
body to be patterned. Tell Solidworks to pattern 3 instances over 360 degrees. My
dialog looks like this:
Click the checkmark to commit and pattern the body. Notice now that you have
three solid bodies listed in your browser:
9. Combine the bodies to form a single body
Now we will use the Combine tool to make our three bodies a single body. Under
the Direct Editing toolbar, select the Combine tool.
In the dialog, make sure Add is the operation. Then left click on the three separate
bodies to add them in the Bodies to Combine box.
Green checkmark to commit.
10. Refine your edges
We’re basically done! You could print this as is and have a working spinner. Let’s
add some features on the edges to make the spinner a little nicer in the hand. We
will be using the Fillet and Chamfer tools in the Direct Editing toolbar. First, select the
Chamfer tool.
Select any exterior edges (not the hole edges). Solidworks will automatically select
the tangent edges, which should select the full loop around the spinner. Let me
know if it doesn’t! Enter 0.05” for the dimension. Green checkmark to commit.
Now select the Fillet tool. Select the innermost two edges on the outside faces of
the spinner, I.E. the ones that wouldn’t touch the table if you set it down.
Enter 0.1” for the dimension. Green checkmark to commit.
Nice work! This would be a good, standard spinner that would use three bearings
as counterweights.
But we want to design counterweights to machine…
Part 2: Counterweights and Making Changes
1. Go back in time.
Solidworks and other parametric modeling programs give you the ability to go back
and change any sketches or features that you created. It’s awesome, and a
complete pain! Solidworks is notorious for throwing what feels like thousands of
broken features at you after you make a hole smaller early in your timeline. You will
get a taste of both the power of this approach and the pain.
The browser on the left hand side of your screen contains a lot of information.
We’re only going to use the Design Tree, which is what you have displayed now. The
Design Tree has a blue line at the bottom. You can move it – try hovering over the
line. You should see your mouse cursor change to pinchy fingers. When you see
that, left click and hold, and drag that line above the Fillet and Chamfer features we
made.
You’ll see that the features grey out and the spinner no longer shows them. Now,
leave the timeline bar where it is. We want to edit the first sketch we made.
Solidworks hid that sketch under the Extruded Boss feature. Click the + sign next to
that first Boss-Extrude feature. Now left or right click the sketch and select Edit
Sketch. If your view doesn’t automatically center on the sketch, press Ctrl-8.
Start by deleting the length constraint (1.6), the 0.11” dimension on the right hand
side, and change the diameter of the right hand circle to 0.95”.
Now add a vertical line on the counterweight side.
Add a point and dimension as shown:
0.95
Now draw another circle and two more vertical lines:
Dimension as shown. I have added five dimensions here to constrain the
counterweight side.
Let’s clean this up a little…select the Trim Entities tool from the toolbar.
Now left click and hold, then swipe the cursor over the three arc segments outside of your
furthest out vertical line. You end up with this:
OK, let’s take a minute. What’s going on here?
The center bearing side is the same. On the counterweight side we now have a D shaped
counterweight that you will machine. The innermost D shape is the counterweight,
dimensioned as 0.95” in diameter and 0.7” from the flat face. Then, we have an offset of
0.010” that gives some space for a good fit with the 3D print. Lastly, we give 0.110” for the
print material thickness.
For now, let’s make the counterweight outline construction geometry. Select the sketch
elements (circle and line) that make up the innermost D shape. Select Construction
Geometry to convert. Now these won’t “count” as geometry that you can extrude.
Now your sketch should look like this:
Exit sketch and let’s see what happens! Here’s what I got:
Well, that looks kind of cool, but it’s not quite what I want. We’re missing the outer leg that
closes off the D shape. We need to edit the Boss-Extrude feature.
2. Fix rebuild errors.
Right click the Boss-Extrude in the browser and select Edit Feature.
Hmm…there are a lot of colors here… What’s going on is that Solidworks isn’t sure what
sketch profiles we want to use for our extrude feature. Let’s just start fresh – right click in
the Selected Contours box and select Clear Selections. Then, click each area that we want to
extrude to add to the Selected Contours.
Green checkmark to exit the feature and rebuild. You should see this:
If you don’t, take a closer look – what sketch contours are not being extruded? Edit Feature
again and add the missing contours to the existing list.
Now let’s move all the way forward in our timeline. Grab that blue line in the browser and
pull it down to the end.
I got my first feature failure! The red lettering indicates that there is a broken feature. In
this case, Solidworks thinks that the Fillet feature is broken. But – if we look at the model,
we can see that there are not chamfers where there should be. Why is that? Let’s Edit
Feature for the Chamfer feature.
What I notice is that the chamfer does not propagate around the spinner. This is because
we have sharp corners on the ends of the D shape – the chamfer won’t continue past a
sharp corner. We have two options: 1. Simply select the other edges to force chamfers on
all edges. 2. Add fillets on the sharp edges to allow the chamfer to propagate. I like option
2, but you can do either. Here’s what you get with option 1:
Not bad. But I’d like to see what it looks like with rounded corners. So exit the chamfer
feature. Move the timeline above the chamfer feature and select Fillet to create a new fillet
feature. Add 0.1” radius fillets to all exterior corners:
Green checkmark and then pull the timeline past the chamfer feature. You should get this:
Compare this to option 1. Which do you like? If you go with this option, you can now pull
the timeline to the end and the last fillet should automatically update correctly.
Nice work! Your spinner is ready to print for a D shaped counterweight!
3. Extrude the counterweight
Now let’s extrude the counterweight. This is easy. Create a new sketch on the top/front face
of the spinner. Click Sketch on the Sketch toolbar and then left click the top of the spinner
to select that flat face. Now we will project the counterweight geometry we created in our
first sketch. To do that, right click that first sketch in the browser (remember it’s hiding
under the Boss-Extrude). Select the eyeglasses symbol to Show the sketch. You can see now
that the sketch is visible in grey:
Select Convert Entities from the toolbar. Then, click the innermost D shape (the one that’s
the dashed lines indicating construction geometry).
Green checkmark. Now that geometry is copied into your new sketch. If you change it in
the first sketch it will automatically update in this new one. Hide the first sketch for clarity.
(right click -> eyeglasses)
Now select Extruded Boss on the Features toolbar.
Solidworks thinks I want to do a thin feature extrude. I do not. Un-check the Thin Feature
selection. Click the Selected Contours drop down and add the D shape contour. Now, under
Direction 1, select To Surface and select the bottom flat face of the spinner.
You can see in the preview that the D shape counterweight will extrude to the thickness of
our spinner. Perfect! Green checkmark. I changed some colors (I’ll show you how in
person). Now we have this:
4. Pattern the counterweight
We did this earlier, so I’ll be vague on instructions. Create a circular pattern. Remember to
pattern Bodies. Pattern the counterweight body three times in 360 degrees. And…
Nice work! Now we’re going to stop modeling and transition into creating a drawing.
Part 3: Make a Dimensioned Drawing
In order to machine your counterweight, you need a piece of paper that tells you what it
looks like, what the dimensions are, and how closely you need to match those dimensions.
The how close part – those are called tolerances. Let’s crank out a quick drawing.
1. Save counterweight body out into new part
In the browser, under Solid Bodies, right click one of the counterweight bodies and select
Insert into New Part.
Click the … next to part name. Select your directory and save the part as Counterweight.
Press enter, then green checkmark. Solidworks automatically creates a new part.
2. Create drawing
Select File -> Make New Drawing from Part/Assembly
From the menu, un-check Only show standard formats if you need to, and select A (ANSI)
Landscape format.
Press OK and you’re ready to put views on your drawing.
3. Place views
From the right hand side, left click and hold the Front view, or whichever view is straight-on
the D shape.
Place the following views, and arrange them in about these positions:
Now let’s add dimensions. We want to fully define all dimensions of this part. That includes
the diameter, the thickness, and some way to define the flat section. What is the best way
to define that flat? We could do the length of the flat, the distance of the flat from the
diameter (how much material is machined off), the distance from the circle center point, or
the distance from the opposite outer edge to the flat. Always try to choose dimensions that
are easy to measure and validate! For us, that’s the distance from the flat to the opposite
edge.
Use the smart dimension tool, much like you do in sketches. Note that for the flat
measurement you need to add a point on the outer edge. Do not dimension the isometric
view in the top right corner. That’s there mainly as a reference image.
Now this isn’t the only way to dimension this part, but it makes sense to me. I like to spread
my dimensions out to several views if possible. The fewer dimensions on any single view,
the easier the print is to read.
4. Add tolerances
Most prints use a default tolerance that corresponds to how many significant figures a
given dimension contains. We’re going to add tolerances to each dimension for clarity. To
do that, double click the dimension to which you’d like to add a tolerance. We can use
symmetric tolerances, but take a look at all the options.
Here’s what I chose as my tolerances. Remember that if your counterweights are very
different in mass your spinner won’t spin smoothly!
5. Edit title block and print attributes
Right click anywhere on your print and select Edit Sheet Format. The drawings disappear
and the boxes at the bottom show blue. Now you edit them and add information. Most
boxes contain text boxes – double click them to edit.
To my print I deleted the drawing number, added a title, marked it revision 1, put my
initials and today’s date, and specified a material and finish.
Now right click again and select Edit Sheet. You’re done! Save the drawing as Counterweight,
then Save As a pdf. Print the pdf and have a neighbor review your print for accuracy, typos,
etc. Have the reviewer initial and date in the appropriate boxes.
Part 4: Make an Assembly
Solidworks has three types of files: parts, drawings, and assemblies. Assemblies are as they
sound – a collection of parts arranged together. We don’t need to make one, but let’s do it
quickly for kicks.
1. Create an Assembly
Go back to your spinner part, where you did all the design work. You can close the drawing
and counterweight windows. Once you’re back at the spinner, select File  Make Assembly
from Part/Assembly.
Don’t click anything! Read the message that pops up in the dialog.
Simply hit OK or green checkmark. The spinner will come into the assembly and locate at
the origin (which is perfect). Save the assembly.
The spinner contains counterweights, but we need a bearing and bearing caps. We don’t
need to model the bearing, let’s find it on the internet.
2. Import a bearing model
Go to www.mcmaster.com in a web browser. Search for “608 bearing” and find your
favorite. Find the download CAD link on the part detail page and select “3D-Solidworks”
from the file type options. Download the file.
Now, back in your assembly, click on Insert Components. Click browse, and find your
downloaded bearing file. Once you click OK to select the file, notice that you can wave your
mouse around on the screen to place the bearing. Then, bring your mouse back over the
dialog box. The bearing should snap into place at the origin. That’s what we want, so green
checkmark it.
3. Make some caps
Spinner body, counterweights, bearing – you just need caps for the bearing. Here my
instruction ends! You can find some files of caps on my website. Or design your own. Figure
out how to do that in the context of your assembly.

More Related Content

What's hot

Lesson revolve
Lesson revolveLesson revolve
Lesson revolveMr_Burns
 
Drawing and selecting
Drawing and selectingDrawing and selecting
Drawing and selectingSanthiNivas
 
Lesson loft
Lesson loftLesson loft
Lesson loftMr_Burns
 
Working with google sketch up
Working with google sketch upWorking with google sketch up
Working with google sketch upBaptec
 
Illustrator's basic shapes part 1
Illustrator's basic shapes part 1Illustrator's basic shapes part 1
Illustrator's basic shapes part 1Jerry Arnold
 
Illustrator's basic shapes part 2 & combining shapes
Illustrator's basic shapes part 2 & combining shapesIllustrator's basic shapes part 2 & combining shapes
Illustrator's basic shapes part 2 & combining shapesJerry Arnold
 
Google sketchup8
Google sketchup8Google sketchup8
Google sketchup8Trianz King
 
DUSPviz Rhino 3D Workshop
DUSPviz Rhino 3D WorkshopDUSPviz Rhino 3D Workshop
DUSPviz Rhino 3D WorkshopDUSPviz
 
Drawing geometric figures
Drawing geometric figuresDrawing geometric figures
Drawing geometric figuresSanthiNivas
 
Photoshop dimensional looking sphere
Photoshop dimensional looking spherePhotoshop dimensional looking sphere
Photoshop dimensional looking sphereJerry Arnold
 
Solid works motion_tutorial_2010
Solid works motion_tutorial_2010Solid works motion_tutorial_2010
Solid works motion_tutorial_2010Rahman Hakim
 
Lesson 7 123 design
Lesson 7 123 designLesson 7 123 design
Lesson 7 123 designCDI Aljeer
 
Introduction to Rhino
Introduction to RhinoIntroduction to Rhino
Introduction to RhinoNYCCTfab
 
Blender and Bezier Curves for 3D Printing
Blender and Bezier Curves for 3D PrintingBlender and Bezier Curves for 3D Printing
Blender and Bezier Curves for 3D PrintingVickyTGAW
 

What's hot (19)

Unit Work Planes
Unit Work PlanesUnit Work Planes
Unit Work Planes
 
Lesson revolve
Lesson revolveLesson revolve
Lesson revolve
 
Drawing and selecting
Drawing and selectingDrawing and selecting
Drawing and selecting
 
Lesson loft
Lesson loftLesson loft
Lesson loft
 
Working with google sketch up
Working with google sketch upWorking with google sketch up
Working with google sketch up
 
Illustrator's basic shapes part 1
Illustrator's basic shapes part 1Illustrator's basic shapes part 1
Illustrator's basic shapes part 1
 
ABISOLA CUBE upload
ABISOLA CUBE uploadABISOLA CUBE upload
ABISOLA CUBE upload
 
Illustrator's basic shapes part 2 & combining shapes
Illustrator's basic shapes part 2 & combining shapesIllustrator's basic shapes part 2 & combining shapes
Illustrator's basic shapes part 2 & combining shapes
 
Google sketchup8
Google sketchup8Google sketchup8
Google sketchup8
 
Nava 01
Nava 01Nava 01
Nava 01
 
DUSPviz Rhino 3D Workshop
DUSPviz Rhino 3D WorkshopDUSPviz Rhino 3D Workshop
DUSPviz Rhino 3D Workshop
 
Drawing geometric figures
Drawing geometric figuresDrawing geometric figures
Drawing geometric figures
 
Photoshop dimensional looking sphere
Photoshop dimensional looking spherePhotoshop dimensional looking sphere
Photoshop dimensional looking sphere
 
Image manipulation - Photoshop
Image manipulation - PhotoshopImage manipulation - Photoshop
Image manipulation - Photoshop
 
Solid works motion_tutorial_2010
Solid works motion_tutorial_2010Solid works motion_tutorial_2010
Solid works motion_tutorial_2010
 
Lesson6
Lesson6Lesson6
Lesson6
 
Lesson 7 123 design
Lesson 7 123 designLesson 7 123 design
Lesson 7 123 design
 
Introduction to Rhino
Introduction to RhinoIntroduction to Rhino
Introduction to Rhino
 
Blender and Bezier Curves for 3D Printing
Blender and Bezier Curves for 3D PrintingBlender and Bezier Curves for 3D Printing
Blender and Bezier Curves for 3D Printing
 

Similar to AiM Spinner Design Tutorial in Solidworks

Google sketchup8
Google sketchup8Google sketchup8
Google sketchup8Trianz King
 
Educ 215 final- how to guide
Educ 215 final- how to guideEduc 215 final- how to guide
Educ 215 final- how to guidesmemontech
 
Intro to Inventor with MugTree
Intro to Inventor with MugTreeIntro to Inventor with MugTree
Intro to Inventor with MugTreekrysia
 
Inkscape Beginner Tutorial: How to Make a Yoga Class Flyer
Inkscape Beginner Tutorial: How to Make a Yoga Class FlyerInkscape Beginner Tutorial: How to Make a Yoga Class Flyer
Inkscape Beginner Tutorial: How to Make a Yoga Class FlyerFlyer Tutor
 
Sketchup-Handbook.pdf
Sketchup-Handbook.pdfSketchup-Handbook.pdf
Sketchup-Handbook.pdfAhmad Maher
 
how to use design by software.pptx
how to use design by software.pptxhow to use design by software.pptx
how to use design by software.pptxNitinKumar12570
 
Volumize tutorial final
Volumize tutorial finalVolumize tutorial final
Volumize tutorial finalDouglas Moore
 
How to Make Shapes in Photoshop CC 2024.
How to Make Shapes in Photoshop CC 2024.How to Make Shapes in Photoshop CC 2024.
How to Make Shapes in Photoshop CC 2024.Zenith Clipping
 
learn sketchup (for the beginners)
learn sketchup (for the beginners)learn sketchup (for the beginners)
learn sketchup (for the beginners)Moksha Bhatia
 
Using AutoDesk Inventor to create a Trinket box
Using AutoDesk Inventor to create a Trinket boxUsing AutoDesk Inventor to create a Trinket box
Using AutoDesk Inventor to create a Trinket boxkrysia
 
Tutorial 1 - Computer Aided Design (Final Release)
Tutorial 1 - Computer Aided Design (Final Release)Tutorial 1 - Computer Aided Design (Final Release)
Tutorial 1 - Computer Aided Design (Final Release)Charling Li
 
How to Use the Photoshop Pen Tool – Photoshop Beginner Tutorial
How to Use the Photoshop Pen Tool – Photoshop Beginner TutorialHow to Use the Photoshop Pen Tool – Photoshop Beginner Tutorial
How to Use the Photoshop Pen Tool – Photoshop Beginner TutorialTowab Muhammad Yusuf
 
Corel draw 12 notes
Corel draw 12 notesCorel draw 12 notes
Corel draw 12 notesSirajRock
 
Photoshop Tutorial Booklet
Photoshop Tutorial BookletPhotoshop Tutorial Booklet
Photoshop Tutorial BookletGraveney School
 
Edit images using selection in Adobe Photoshop.pptx
Edit images using selection in Adobe Photoshop.pptxEdit images using selection in Adobe Photoshop.pptx
Edit images using selection in Adobe Photoshop.pptxMarvin Santiago
 
Adobe illustrator 2
Adobe illustrator 2Adobe illustrator 2
Adobe illustrator 2ilaazmil2
 

Similar to AiM Spinner Design Tutorial in Solidworks (20)

Google sketchup8
Google sketchup8Google sketchup8
Google sketchup8
 
Educ 215 final- how to guide
Educ 215 final- how to guideEduc 215 final- how to guide
Educ 215 final- how to guide
 
mastercam_full
mastercam_fullmastercam_full
mastercam_full
 
Intro to Inventor with MugTree
Intro to Inventor with MugTreeIntro to Inventor with MugTree
Intro to Inventor with MugTree
 
Custom wheel (1)
Custom wheel (1)Custom wheel (1)
Custom wheel (1)
 
Inkscape Beginner Tutorial: How to Make a Yoga Class Flyer
Inkscape Beginner Tutorial: How to Make a Yoga Class FlyerInkscape Beginner Tutorial: How to Make a Yoga Class Flyer
Inkscape Beginner Tutorial: How to Make a Yoga Class Flyer
 
Sketchup-Handbook.pdf
Sketchup-Handbook.pdfSketchup-Handbook.pdf
Sketchup-Handbook.pdf
 
how to use design by software.pptx
how to use design by software.pptxhow to use design by software.pptx
how to use design by software.pptx
 
Volumize tutorial final
Volumize tutorial finalVolumize tutorial final
Volumize tutorial final
 
Graphics
GraphicsGraphics
Graphics
 
How to Make Shapes in Photoshop CC 2024.
How to Make Shapes in Photoshop CC 2024.How to Make Shapes in Photoshop CC 2024.
How to Make Shapes in Photoshop CC 2024.
 
learn sketchup (for the beginners)
learn sketchup (for the beginners)learn sketchup (for the beginners)
learn sketchup (for the beginners)
 
Using AutoDesk Inventor to create a Trinket box
Using AutoDesk Inventor to create a Trinket boxUsing AutoDesk Inventor to create a Trinket box
Using AutoDesk Inventor to create a Trinket box
 
Tutorial 1 - Computer Aided Design (Final Release)
Tutorial 1 - Computer Aided Design (Final Release)Tutorial 1 - Computer Aided Design (Final Release)
Tutorial 1 - Computer Aided Design (Final Release)
 
How to Use the Photoshop Pen Tool – Photoshop Beginner Tutorial
How to Use the Photoshop Pen Tool – Photoshop Beginner TutorialHow to Use the Photoshop Pen Tool – Photoshop Beginner Tutorial
How to Use the Photoshop Pen Tool – Photoshop Beginner Tutorial
 
Creo parametric-quick-start
Creo parametric-quick-startCreo parametric-quick-start
Creo parametric-quick-start
 
Corel draw 12 notes
Corel draw 12 notesCorel draw 12 notes
Corel draw 12 notes
 
Photoshop Tutorial Booklet
Photoshop Tutorial BookletPhotoshop Tutorial Booklet
Photoshop Tutorial Booklet
 
Edit images using selection in Adobe Photoshop.pptx
Edit images using selection in Adobe Photoshop.pptxEdit images using selection in Adobe Photoshop.pptx
Edit images using selection in Adobe Photoshop.pptx
 
Adobe illustrator 2
Adobe illustrator 2Adobe illustrator 2
Adobe illustrator 2
 

Recently uploaded

Oxy acetylene welding presentation note.
Oxy acetylene welding presentation note.Oxy acetylene welding presentation note.
Oxy acetylene welding presentation note.eptoze12
 
Microscopic Analysis of Ceramic Materials.pptx
Microscopic Analysis of Ceramic Materials.pptxMicroscopic Analysis of Ceramic Materials.pptx
Microscopic Analysis of Ceramic Materials.pptxpurnimasatapathy1234
 
Application of Residue Theorem to evaluate real integrations.pptx
Application of Residue Theorem to evaluate real integrations.pptxApplication of Residue Theorem to evaluate real integrations.pptx
Application of Residue Theorem to evaluate real integrations.pptx959SahilShah
 
Architect Hassan Khalil Portfolio for 2024
Architect Hassan Khalil Portfolio for 2024Architect Hassan Khalil Portfolio for 2024
Architect Hassan Khalil Portfolio for 2024hassan khalil
 
chaitra-1.pptx fake news detection using machine learning
chaitra-1.pptx  fake news detection using machine learningchaitra-1.pptx  fake news detection using machine learning
chaitra-1.pptx fake news detection using machine learningmisbanausheenparvam
 
Call Us ≽ 8377877756 ≼ Call Girls In Shastri Nagar (Delhi)
Call Us ≽ 8377877756 ≼ Call Girls In Shastri Nagar (Delhi)Call Us ≽ 8377877756 ≼ Call Girls In Shastri Nagar (Delhi)
Call Us ≽ 8377877756 ≼ Call Girls In Shastri Nagar (Delhi)dollysharma2066
 
GDSC ASEB Gen AI study jams presentation
GDSC ASEB Gen AI study jams presentationGDSC ASEB Gen AI study jams presentation
GDSC ASEB Gen AI study jams presentationGDSCAESB
 
CCS355 Neural Network & Deep Learning UNIT III notes and Question bank .pdf
CCS355 Neural Network & Deep Learning UNIT III notes and Question bank .pdfCCS355 Neural Network & Deep Learning UNIT III notes and Question bank .pdf
CCS355 Neural Network & Deep Learning UNIT III notes and Question bank .pdfAsst.prof M.Gokilavani
 
Gurgaon ✡️9711147426✨Call In girls Gurgaon Sector 51 escort service
Gurgaon ✡️9711147426✨Call In girls Gurgaon Sector 51 escort serviceGurgaon ✡️9711147426✨Call In girls Gurgaon Sector 51 escort service
Gurgaon ✡️9711147426✨Call In girls Gurgaon Sector 51 escort servicejennyeacort
 
Churning of Butter, Factors affecting .
Churning of Butter, Factors affecting  .Churning of Butter, Factors affecting  .
Churning of Butter, Factors affecting .Satyam Kumar
 
Concrete Mix Design - IS 10262-2019 - .pptx
Concrete Mix Design - IS 10262-2019 - .pptxConcrete Mix Design - IS 10262-2019 - .pptx
Concrete Mix Design - IS 10262-2019 - .pptxKartikeyaDwivedi3
 
Decoding Kotlin - Your guide to solving the mysterious in Kotlin.pptx
Decoding Kotlin - Your guide to solving the mysterious in Kotlin.pptxDecoding Kotlin - Your guide to solving the mysterious in Kotlin.pptx
Decoding Kotlin - Your guide to solving the mysterious in Kotlin.pptxJoão Esperancinha
 
What are the advantages and disadvantages of membrane structures.pptx
What are the advantages and disadvantages of membrane structures.pptxWhat are the advantages and disadvantages of membrane structures.pptx
What are the advantages and disadvantages of membrane structures.pptxwendy cai
 
INFLUENCE OF NANOSILICA ON THE PROPERTIES OF CONCRETE
INFLUENCE OF NANOSILICA ON THE PROPERTIES OF CONCRETEINFLUENCE OF NANOSILICA ON THE PROPERTIES OF CONCRETE
INFLUENCE OF NANOSILICA ON THE PROPERTIES OF CONCRETEroselinkalist12
 
APPLICATIONS-AC/DC DRIVES-OPERATING CHARACTERISTICS
APPLICATIONS-AC/DC DRIVES-OPERATING CHARACTERISTICSAPPLICATIONS-AC/DC DRIVES-OPERATING CHARACTERISTICS
APPLICATIONS-AC/DC DRIVES-OPERATING CHARACTERISTICSKurinjimalarL3
 
HARMONY IN THE NATURE AND EXISTENCE - Unit-IV
HARMONY IN THE NATURE AND EXISTENCE - Unit-IVHARMONY IN THE NATURE AND EXISTENCE - Unit-IV
HARMONY IN THE NATURE AND EXISTENCE - Unit-IVRajaP95
 

Recently uploaded (20)

Oxy acetylene welding presentation note.
Oxy acetylene welding presentation note.Oxy acetylene welding presentation note.
Oxy acetylene welding presentation note.
 
Microscopic Analysis of Ceramic Materials.pptx
Microscopic Analysis of Ceramic Materials.pptxMicroscopic Analysis of Ceramic Materials.pptx
Microscopic Analysis of Ceramic Materials.pptx
 
Application of Residue Theorem to evaluate real integrations.pptx
Application of Residue Theorem to evaluate real integrations.pptxApplication of Residue Theorem to evaluate real integrations.pptx
Application of Residue Theorem to evaluate real integrations.pptx
 
Architect Hassan Khalil Portfolio for 2024
Architect Hassan Khalil Portfolio for 2024Architect Hassan Khalil Portfolio for 2024
Architect Hassan Khalil Portfolio for 2024
 
chaitra-1.pptx fake news detection using machine learning
chaitra-1.pptx  fake news detection using machine learningchaitra-1.pptx  fake news detection using machine learning
chaitra-1.pptx fake news detection using machine learning
 
Call Us ≽ 8377877756 ≼ Call Girls In Shastri Nagar (Delhi)
Call Us ≽ 8377877756 ≼ Call Girls In Shastri Nagar (Delhi)Call Us ≽ 8377877756 ≼ Call Girls In Shastri Nagar (Delhi)
Call Us ≽ 8377877756 ≼ Call Girls In Shastri Nagar (Delhi)
 
GDSC ASEB Gen AI study jams presentation
GDSC ASEB Gen AI study jams presentationGDSC ASEB Gen AI study jams presentation
GDSC ASEB Gen AI study jams presentation
 
CCS355 Neural Network & Deep Learning UNIT III notes and Question bank .pdf
CCS355 Neural Network & Deep Learning UNIT III notes and Question bank .pdfCCS355 Neural Network & Deep Learning UNIT III notes and Question bank .pdf
CCS355 Neural Network & Deep Learning UNIT III notes and Question bank .pdf
 
Gurgaon ✡️9711147426✨Call In girls Gurgaon Sector 51 escort service
Gurgaon ✡️9711147426✨Call In girls Gurgaon Sector 51 escort serviceGurgaon ✡️9711147426✨Call In girls Gurgaon Sector 51 escort service
Gurgaon ✡️9711147426✨Call In girls Gurgaon Sector 51 escort service
 
Churning of Butter, Factors affecting .
Churning of Butter, Factors affecting  .Churning of Butter, Factors affecting  .
Churning of Butter, Factors affecting .
 
Concrete Mix Design - IS 10262-2019 - .pptx
Concrete Mix Design - IS 10262-2019 - .pptxConcrete Mix Design - IS 10262-2019 - .pptx
Concrete Mix Design - IS 10262-2019 - .pptx
 
Call Us -/9953056974- Call Girls In Vikaspuri-/- Delhi NCR
Call Us -/9953056974- Call Girls In Vikaspuri-/- Delhi NCRCall Us -/9953056974- Call Girls In Vikaspuri-/- Delhi NCR
Call Us -/9953056974- Call Girls In Vikaspuri-/- Delhi NCR
 
Decoding Kotlin - Your guide to solving the mysterious in Kotlin.pptx
Decoding Kotlin - Your guide to solving the mysterious in Kotlin.pptxDecoding Kotlin - Your guide to solving the mysterious in Kotlin.pptx
Decoding Kotlin - Your guide to solving the mysterious in Kotlin.pptx
 
🔝9953056974🔝!!-YOUNG call girls in Rajendra Nagar Escort rvice Shot 2000 nigh...
🔝9953056974🔝!!-YOUNG call girls in Rajendra Nagar Escort rvice Shot 2000 nigh...🔝9953056974🔝!!-YOUNG call girls in Rajendra Nagar Escort rvice Shot 2000 nigh...
🔝9953056974🔝!!-YOUNG call girls in Rajendra Nagar Escort rvice Shot 2000 nigh...
 
Design and analysis of solar grass cutter.pdf
Design and analysis of solar grass cutter.pdfDesign and analysis of solar grass cutter.pdf
Design and analysis of solar grass cutter.pdf
 
POWER SYSTEMS-1 Complete notes examples
POWER SYSTEMS-1 Complete notes  examplesPOWER SYSTEMS-1 Complete notes  examples
POWER SYSTEMS-1 Complete notes examples
 
What are the advantages and disadvantages of membrane structures.pptx
What are the advantages and disadvantages of membrane structures.pptxWhat are the advantages and disadvantages of membrane structures.pptx
What are the advantages and disadvantages of membrane structures.pptx
 
INFLUENCE OF NANOSILICA ON THE PROPERTIES OF CONCRETE
INFLUENCE OF NANOSILICA ON THE PROPERTIES OF CONCRETEINFLUENCE OF NANOSILICA ON THE PROPERTIES OF CONCRETE
INFLUENCE OF NANOSILICA ON THE PROPERTIES OF CONCRETE
 
APPLICATIONS-AC/DC DRIVES-OPERATING CHARACTERISTICS
APPLICATIONS-AC/DC DRIVES-OPERATING CHARACTERISTICSAPPLICATIONS-AC/DC DRIVES-OPERATING CHARACTERISTICS
APPLICATIONS-AC/DC DRIVES-OPERATING CHARACTERISTICS
 
HARMONY IN THE NATURE AND EXISTENCE - Unit-IV
HARMONY IN THE NATURE AND EXISTENCE - Unit-IVHARMONY IN THE NATURE AND EXISTENCE - Unit-IV
HARMONY IN THE NATURE AND EXISTENCE - Unit-IV
 

AiM Spinner Design Tutorial in Solidworks

  • 1. Solidworks Spinner Design Adventures in Manufacturing This tutorial will guide you through the steps to design a spinner in Solidworks. We’ll start by modeling a basic spinner, then, we’ll design our own counterweights to be machined. We’ll make a dimensioned print for the counterweight, which you will use while machining. Last, I’ll do some customization that can help guide you while you customize your spinner design. This document was created for the Adventures in Manufacturing summer camp and was made possible by funds allocated by Clackamas ESD. This document is licensed under a Creative Commons Attribution 4.0 license. You may change this document as you see fit for your needs and you may use it for commercial use. Please give credit to OpenFab PDX and provide a link to OpenFab’s resources page (link below) in the version you create. If you would like an editable .docx file, please check my website: www.openfabpdx.com/resources 1. Sketch your spinner on paper. The best habit you can have as a CAD junkie is to sketch things before you start modeling on the computer. This is true whether you are copying something or creating something totally new. Don’t worry AT ALL about making a nice-looking sketch or recording all the dimensions. You can always go back and add info if needed. First, sketch a plain old spinner. While you’re sketching, think about something you might want to do to make your spinner different from most. Jot down any notes you think of, along with a quick sketch. 2. Open Solidworks. I’m using Solidworks 2015 for this tutorial. You’re probably using a different version. Most of the tools we use will be the same, but the user interface may look different.
  • 2. 3. Select file>>new, and then click to select a new part. 4. Take a minute to orient to the workspace. Solidworks is complicated. There are a lot of buttons. It’s both powerful and overwhelming! Let’s take a minute to discuss what’s what (I’ll do this in person). First, show the planes by right clicking them in the browser and left clicking on the eyeglass icon show.
  • 3. Now you can navigate the 3D space. Left click to select an object or feature and right click to open a menu of options. The middle mouse button is your navigating button. Hold it and move the mouse to rotate the view. Hold the Ctrl + middle mouse to pan the view. Zoom in and out by scrolling the wheel. Moving the view so that you can see what you need to see is super important! Practice navigating the space whenever you can. Eventually it will be second nature and you’ll spin things around on a screen like a professional engineer. 5. Create a sketch. We will make our spinner by sketching it and then performing an extrude operation to make our sketch 3-dimensional. All sketches happen on a flat plane or face. This one will be on the Front Plane. Right click the Front Plane and click on the Sketch symbol. Sometimes it’s hard to know if you are in a sketch or not. If you see that you have the option to Exit Sketch, then you’re in one. That looks like this
  • 4. in the top left corner and like this on the top right hand corner. You will click Exit Sketch in either corner (not the red X) to save the sketch and exit the sketch environment, but don’t do that yet. 6. Draw your spinner (but only a part) We’re going to draw one leg of the spinner that contains the center bearing and counterweight. Then, after we extrude the sketch, we’ll use a pattern feature to make the other legs. Start by drawing circles. Click the circle tool in the Sketch toolbar. Highlighted here: Now, hover your mouse curser over the origin point. It should snap to the origin. Left click to set the center of your circle. Then drag the mouse out to about 0.5” radius and left click to set the size of the circle. Don’t worry about exact dimensions.
  • 5. Now, select the Smart Dimension tool from the toolbar. Click the edge of your circle, then left click again off to the side to bring up the Smart Dimension box. Our bearings are 22mm in diameter. Set your diameter to be a bit bigger: 22.3mm will do the trick. Even if you’re designing in inches, go ahead and type in “22.3mm”. Solidworks will convert it to inches for you. Great! This circle represents the hole that your bearing will press into. Now, draw more circles and add dimensions to match the image below. To dimension between
  • 6. circles, select Smart Dimension, click the edge of one circle, then click the edge of the other, then left click off to the side to bring up the dialog box. Left click and hold the center of the right hand circles. Notice how you can move it all around? We want to lock it in place. First, we’ll apply a horizontal constraint, then a dimension. Click the center point of one set of circles. Then press and hold the Ctrl key. Click the other center point. Release the control key and a menu should pop up. If it doesn’t right click the point you just selected. From that menu, click the horizontal line that means Make Horizontal. Little green symbols by the points should pop up. These are your sketch constraints.
  • 7. Now click the arrow to open the line dropdown on your toolbar. Select the Centerline tool. Draw a line between the center points of each circle. Left click one point, then the other. We’ll use that line in a bit. Now click the point tool on the sketch toolbar. Hover over the outside edge of your right hand side circle – you should be able to snap to the furthest outside point of the circle. Left click to set a point there.
  • 8. Now select the Smart Dimension tool again. Set a dimension of 1.6” from the center of the left hand circle (at the origin) to that outermost edge. This sets the overall size of your spinner. For me, 1.6” makes it bigger than I would like. We’re going to change that dimension later. These two sets of circles represent the plastic that will hold your bearing and counterweight in place. For now, we’re going to design for another bearing as a counterweight. Later we’ll change the sketch to use the custom counterweight. Now let’s sketch in the curve that joins these two. We’ll model a spline curve, and then mirror that spline to connect on both sides. First, we need to find the points where we want the splines to connect to the outer circles. I did some experimenting and will guide you through the simplest approach for a three-lobed spinner. Draw a centerline on each circle set and a connecting centerline, like this:
  • 9. Press the Esc key to stop drawing centerlines and exit the tool. Notice that the top centerline (connecting) has a horizontal constraint. If yours doesn’t, select it, and set Make Horizontal. Now set the dimension of one line to be 60 degrees from horizontal using Smart Dimension:
  • 10. Notice that the other centerline turns black. This indicates that it is fixed, or fully constrained. Now select the spline tool. Splines let you draw curvy lines that you can easily control. Click the leftmost point on that top connecting line, then double click the rightmost point on the same line. You’ll have a straight spline, like this:
  • 11. The arrows and dots that show in grey are your spline handles. You use these to control the shape of the spline. Grab one of the dots on the end of the arrow and pull: see what it does? Now select both the spline and the circle it is connected to and constrain them to be tangent. Do that for both circles and you get this: You can now only change the magnitude of the spline handles. Try it to see what happens, then make it balanced like shown, above. Now we need to mirror this spline so that we have it top and bottom. To do this, select the Mirror Entities tool on the toolbar. Over on the left hand side of your screen you’ll see this dialog: Left click the spline you made to add it to the Entities to mirror box. Then, click the Mirror about box to select it. Then, left click the centerline between the circles (between the center points) to make that your mirror line. Click the green check mark to commit the mirror. You should see this:
  • 12. Now you have two splines, and they are constrained to be mirror images of each other. Your sketch is done!! 7. Extrude to make it 3D Your sketch sets the basic geometry of your spinner and you can go back and change it at any time. After you make this basic design, you will go back to this sketch, make edits, and your spinner will instantly update reflect the changes. It’s cool when it works! We are going to extrude your sketch geometry. To do that, click over to the Features tab on the toolbar. If you’re in your sketch (haven’t exited the sketch) you’ll see a few options that are not greyed out. Left click Extruded Boss to extrude material. Extruded Cut takes away material.
  • 13. My Extruded Boss dialog is shown below. Make yours match by selecting Mid Plane for Direction 1, set D1, your total extrusion depth, to 7mm (the thickness of the bearing), then click on the box under Selected Contours and left click all of the areas you wish to extrude. These are shown in pink, below. Click the checkmark to close the dialog and commit the extrude. Now you should see one leg of your spinner! This extruded object is called a body. 8. Pattern the body Now we will use the Circular Pattern tool to pattern the body we just made. Click the dropdown arrow under Linear Pattern and select Circular Pattern.
  • 14. Once the pattern dialog pops up, notice that if you hover over the input boxes Solidworks will tell you what it wants there. Click the check mark next to Bodies. This will pattern the solid body you just made, not a face or feature. Next, select the bearing hole centered at the origin as the pattern axis. Select the solid body as the body to be patterned. Tell Solidworks to pattern 3 instances over 360 degrees. My dialog looks like this: Click the checkmark to commit and pattern the body. Notice now that you have three solid bodies listed in your browser:
  • 15. 9. Combine the bodies to form a single body Now we will use the Combine tool to make our three bodies a single body. Under the Direct Editing toolbar, select the Combine tool. In the dialog, make sure Add is the operation. Then left click on the three separate bodies to add them in the Bodies to Combine box.
  • 16. Green checkmark to commit. 10. Refine your edges We’re basically done! You could print this as is and have a working spinner. Let’s add some features on the edges to make the spinner a little nicer in the hand. We will be using the Fillet and Chamfer tools in the Direct Editing toolbar. First, select the Chamfer tool.
  • 17. Select any exterior edges (not the hole edges). Solidworks will automatically select the tangent edges, which should select the full loop around the spinner. Let me know if it doesn’t! Enter 0.05” for the dimension. Green checkmark to commit. Now select the Fillet tool. Select the innermost two edges on the outside faces of the spinner, I.E. the ones that wouldn’t touch the table if you set it down. Enter 0.1” for the dimension. Green checkmark to commit. Nice work! This would be a good, standard spinner that would use three bearings as counterweights. But we want to design counterweights to machine…
  • 18. Part 2: Counterweights and Making Changes 1. Go back in time. Solidworks and other parametric modeling programs give you the ability to go back and change any sketches or features that you created. It’s awesome, and a complete pain! Solidworks is notorious for throwing what feels like thousands of broken features at you after you make a hole smaller early in your timeline. You will get a taste of both the power of this approach and the pain. The browser on the left hand side of your screen contains a lot of information. We’re only going to use the Design Tree, which is what you have displayed now. The Design Tree has a blue line at the bottom. You can move it – try hovering over the line. You should see your mouse cursor change to pinchy fingers. When you see that, left click and hold, and drag that line above the Fillet and Chamfer features we made. You’ll see that the features grey out and the spinner no longer shows them. Now, leave the timeline bar where it is. We want to edit the first sketch we made. Solidworks hid that sketch under the Extruded Boss feature. Click the + sign next to that first Boss-Extrude feature. Now left or right click the sketch and select Edit Sketch. If your view doesn’t automatically center on the sketch, press Ctrl-8.
  • 19. Start by deleting the length constraint (1.6), the 0.11” dimension on the right hand side, and change the diameter of the right hand circle to 0.95”. Now add a vertical line on the counterweight side. Add a point and dimension as shown: 0.95
  • 20. Now draw another circle and two more vertical lines: Dimension as shown. I have added five dimensions here to constrain the counterweight side.
  • 21. Let’s clean this up a little…select the Trim Entities tool from the toolbar. Now left click and hold, then swipe the cursor over the three arc segments outside of your furthest out vertical line. You end up with this:
  • 22. OK, let’s take a minute. What’s going on here? The center bearing side is the same. On the counterweight side we now have a D shaped counterweight that you will machine. The innermost D shape is the counterweight, dimensioned as 0.95” in diameter and 0.7” from the flat face. Then, we have an offset of 0.010” that gives some space for a good fit with the 3D print. Lastly, we give 0.110” for the print material thickness. For now, let’s make the counterweight outline construction geometry. Select the sketch elements (circle and line) that make up the innermost D shape. Select Construction Geometry to convert. Now these won’t “count” as geometry that you can extrude.
  • 23. Now your sketch should look like this: Exit sketch and let’s see what happens! Here’s what I got:
  • 24. Well, that looks kind of cool, but it’s not quite what I want. We’re missing the outer leg that closes off the D shape. We need to edit the Boss-Extrude feature. 2. Fix rebuild errors. Right click the Boss-Extrude in the browser and select Edit Feature. Hmm…there are a lot of colors here… What’s going on is that Solidworks isn’t sure what sketch profiles we want to use for our extrude feature. Let’s just start fresh – right click in
  • 25. the Selected Contours box and select Clear Selections. Then, click each area that we want to extrude to add to the Selected Contours. Green checkmark to exit the feature and rebuild. You should see this:
  • 26. If you don’t, take a closer look – what sketch contours are not being extruded? Edit Feature again and add the missing contours to the existing list. Now let’s move all the way forward in our timeline. Grab that blue line in the browser and pull it down to the end. I got my first feature failure! The red lettering indicates that there is a broken feature. In this case, Solidworks thinks that the Fillet feature is broken. But – if we look at the model, we can see that there are not chamfers where there should be. Why is that? Let’s Edit Feature for the Chamfer feature. What I notice is that the chamfer does not propagate around the spinner. This is because we have sharp corners on the ends of the D shape – the chamfer won’t continue past a
  • 27. sharp corner. We have two options: 1. Simply select the other edges to force chamfers on all edges. 2. Add fillets on the sharp edges to allow the chamfer to propagate. I like option 2, but you can do either. Here’s what you get with option 1: Not bad. But I’d like to see what it looks like with rounded corners. So exit the chamfer feature. Move the timeline above the chamfer feature and select Fillet to create a new fillet feature. Add 0.1” radius fillets to all exterior corners: Green checkmark and then pull the timeline past the chamfer feature. You should get this:
  • 28. Compare this to option 1. Which do you like? If you go with this option, you can now pull the timeline to the end and the last fillet should automatically update correctly. Nice work! Your spinner is ready to print for a D shaped counterweight! 3. Extrude the counterweight Now let’s extrude the counterweight. This is easy. Create a new sketch on the top/front face of the spinner. Click Sketch on the Sketch toolbar and then left click the top of the spinner to select that flat face. Now we will project the counterweight geometry we created in our first sketch. To do that, right click that first sketch in the browser (remember it’s hiding under the Boss-Extrude). Select the eyeglasses symbol to Show the sketch. You can see now that the sketch is visible in grey:
  • 29. Select Convert Entities from the toolbar. Then, click the innermost D shape (the one that’s the dashed lines indicating construction geometry). Green checkmark. Now that geometry is copied into your new sketch. If you change it in the first sketch it will automatically update in this new one. Hide the first sketch for clarity. (right click -> eyeglasses)
  • 30. Now select Extruded Boss on the Features toolbar. Solidworks thinks I want to do a thin feature extrude. I do not. Un-check the Thin Feature selection. Click the Selected Contours drop down and add the D shape contour. Now, under Direction 1, select To Surface and select the bottom flat face of the spinner.
  • 31. You can see in the preview that the D shape counterweight will extrude to the thickness of our spinner. Perfect! Green checkmark. I changed some colors (I’ll show you how in person). Now we have this:
  • 32. 4. Pattern the counterweight We did this earlier, so I’ll be vague on instructions. Create a circular pattern. Remember to pattern Bodies. Pattern the counterweight body three times in 360 degrees. And… Nice work! Now we’re going to stop modeling and transition into creating a drawing. Part 3: Make a Dimensioned Drawing In order to machine your counterweight, you need a piece of paper that tells you what it looks like, what the dimensions are, and how closely you need to match those dimensions. The how close part – those are called tolerances. Let’s crank out a quick drawing. 1. Save counterweight body out into new part In the browser, under Solid Bodies, right click one of the counterweight bodies and select Insert into New Part.
  • 33. Click the … next to part name. Select your directory and save the part as Counterweight. Press enter, then green checkmark. Solidworks automatically creates a new part. 2. Create drawing Select File -> Make New Drawing from Part/Assembly
  • 34. From the menu, un-check Only show standard formats if you need to, and select A (ANSI) Landscape format. Press OK and you’re ready to put views on your drawing. 3. Place views
  • 35. From the right hand side, left click and hold the Front view, or whichever view is straight-on the D shape. Place the following views, and arrange them in about these positions:
  • 36. Now let’s add dimensions. We want to fully define all dimensions of this part. That includes the diameter, the thickness, and some way to define the flat section. What is the best way to define that flat? We could do the length of the flat, the distance of the flat from the diameter (how much material is machined off), the distance from the circle center point, or the distance from the opposite outer edge to the flat. Always try to choose dimensions that are easy to measure and validate! For us, that’s the distance from the flat to the opposite edge. Use the smart dimension tool, much like you do in sketches. Note that for the flat measurement you need to add a point on the outer edge. Do not dimension the isometric view in the top right corner. That’s there mainly as a reference image. Now this isn’t the only way to dimension this part, but it makes sense to me. I like to spread my dimensions out to several views if possible. The fewer dimensions on any single view, the easier the print is to read. 4. Add tolerances
  • 37. Most prints use a default tolerance that corresponds to how many significant figures a given dimension contains. We’re going to add tolerances to each dimension for clarity. To do that, double click the dimension to which you’d like to add a tolerance. We can use symmetric tolerances, but take a look at all the options. Here’s what I chose as my tolerances. Remember that if your counterweights are very different in mass your spinner won’t spin smoothly! 5. Edit title block and print attributes Right click anywhere on your print and select Edit Sheet Format. The drawings disappear and the boxes at the bottom show blue. Now you edit them and add information. Most boxes contain text boxes – double click them to edit.
  • 38. To my print I deleted the drawing number, added a title, marked it revision 1, put my initials and today’s date, and specified a material and finish. Now right click again and select Edit Sheet. You’re done! Save the drawing as Counterweight, then Save As a pdf. Print the pdf and have a neighbor review your print for accuracy, typos, etc. Have the reviewer initial and date in the appropriate boxes. Part 4: Make an Assembly Solidworks has three types of files: parts, drawings, and assemblies. Assemblies are as they sound – a collection of parts arranged together. We don’t need to make one, but let’s do it quickly for kicks. 1. Create an Assembly Go back to your spinner part, where you did all the design work. You can close the drawing and counterweight windows. Once you’re back at the spinner, select File  Make Assembly from Part/Assembly. Don’t click anything! Read the message that pops up in the dialog.
  • 39. Simply hit OK or green checkmark. The spinner will come into the assembly and locate at the origin (which is perfect). Save the assembly. The spinner contains counterweights, but we need a bearing and bearing caps. We don’t need to model the bearing, let’s find it on the internet. 2. Import a bearing model Go to www.mcmaster.com in a web browser. Search for “608 bearing” and find your favorite. Find the download CAD link on the part detail page and select “3D-Solidworks” from the file type options. Download the file. Now, back in your assembly, click on Insert Components. Click browse, and find your downloaded bearing file. Once you click OK to select the file, notice that you can wave your mouse around on the screen to place the bearing. Then, bring your mouse back over the dialog box. The bearing should snap into place at the origin. That’s what we want, so green checkmark it.
  • 40. 3. Make some caps Spinner body, counterweights, bearing – you just need caps for the bearing. Here my instruction ends! You can find some files of caps on my website. Or design your own. Figure out how to do that in the context of your assembly.