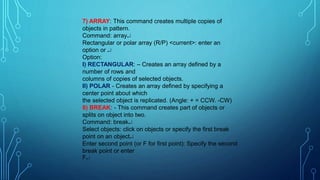
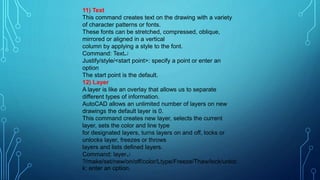
AUTOCAD-ELECTRICAL
COMPUTER AIDED DRAWING (CAD)
Computer Aided Drawing /Drafting is a process of
preparing a drawing of an object on the screen of a
computer.
There are various types of drawings required in different fields of
engineering and science.
 In the field of mechanical engineering the drawing of machine
components and layouts are prepared.
 In the field of civil engineering plans and layouts of buildings are
prepared.
 In all other fields of engineering use of computer is made for drawing and
drafting.
 The Auto-CAD is used by the designers, painters, Civil,
Mechanical, Electrical, Electronics, Civil engineers in
their field.
 Line, curves, text and filling point are the essential
elements used for preparation of any drawing on the
screen.
 Computer aided drafting is done by the operators by
placing the mouse pointer at the desired location and
then executing the command to draw the graphic
elements using different methods.
UTILITY
COMMANDS
The utility commands are
those commands which
control the
basic functions of
AutoCAD.
 HELP: Lists all the Auto-CAD
commands.
 END: Returns to the main menu
and updates (saves) the drawings file.
 SAVE: Saves the current drawing
and remains in the drawing editor
screen
for further editing.
 LIMITS: Allows changing the
upper and lower limits of the drawing
area
while working on a drawing.
ORTHO: Constrains cursor movement to the horizontal or
vertical.(F8)
OSNAP: Allows to select specify points on an object.
e.g. endpoints, midpoints, intersection etc.(F3)
POLAR: Allows cursor movement to the horizontal or
vertical.(F10)
DRAW/BASIC COMMANDS OF AutoCAD
(Drawing Entities)
(10, 10)
(5, 5)
POINT
Plot a point at the location (8, 6)
Command: point 
Point: 8, 6 
LINE
Lines can be drawn by any one of the following three
methods using LINE command.
(a) Using Absolute Co-ordinates:
Drawing a line from point (5, 5) to point (10, 10).
Command: Line 
From point: 5, 5(select the point by mouse or
Enter the Co-ordinates by keyboard) 
To Point: 10, 10 
To Point: 
(0, 0)
(8,6)
(7, 10)
(2, 2)
(1, 2)
(1, 8)
(b) Using Relative Co-ordinates
Draw a line from point (2, 2) to point 5 units in X-axis
and 8 units in Y-axis relative to first co-ordinate.
Command: Line
From point: 2, 2
To point: @ 5, 8
To point: 
(c) Using Polar Co-ordinates
Draw a line from point (1, 2) to a length of 6 units at 90
degree.
Command: Line
From point: 1, 2
To point:@690
To point: 
(10, 10)
(30, 20)
PLINE
A polyline is a connected sequence of line and arc
segments.
Draw a thick line of width 2 units from (8, 4) to (6, 7) using
pline
command.
Command: pline
From point: 8, 4
Arc/close/Half width/length/undo/width/ Endpoint of line
: width
Width: 2
Next point: 6, 7
Next point: 
A box drawn by using pline will act as one object instead
of four
discrete lines.
RECTANGLE
Draw a rectangle defined by diagonal points (10, 10)
and (30, 20).
Command: Rectang
First Corner: 10, 10 
Second Corner: 30, 20 
CIRCLE
Circle can be drawn by any one of following five
methods using circle command.
(a)Using Centre and Radius:
Draw a circle with centre (6, 6) and radius 5 units.
Command: circle
3P/2P/TTR/centre point : 6, 6 
Diameter/radius : 5 
(b) Using Centre and diameter:
Draw a circle with centre (6, 17) and diameter 10 units.
Command: circle
3p/2p/TTR/centre point : 6, 17 
Diameter/radius : D 
Diameter: 10 
(c) Using given three points: (3P)
Draw a circle with using given three points (5, 30), (7, 26),
(10, 25).
Command: circle
3P/2P/TTR/centre point : 3 P 
First point: (5, 30) 
Second point: (7, 26) 
Third point: (10, 25) 
(d) Using given two points: (2P)
Draw a circle with using given two points (7, 35) & (7, 47).
Command: circle
3P/2P/TTR/centre point : 2 P 
First point on diameter: (7, 35) 
Second point on diameter: (7, 47) 
(7, 26)
(10, 25)
(5, 30)
(7, 47)
(7, 35)
(e) Using Tangent, Tangent and Radius (TTR):
Draw a circle with radius 2 units and two existing
line as tangents.
Take:
For line 1: (16, 4) to point (19, 9)
For line 2: (20, 2) to point (21, 7)
Command: circle
3P/2P/TTR/centre point : TTR 
Enter Tangent spec: line 1 (pick up using mouse)
Enter Tangent spec: line 2 (pick up using mouse)
Radius: 2
(“Spec” means specifications)
Line 1
Line 2
ELLIPSE:
ELLIPSE can be drawn by any one of following
two methods using ellipse command.
(a) Using first axis end points and other axis
distance:
Draw an ellipse using major axis end point (10, 20)
(65, 20) and minor axis end point (35, 35).
Command: ellipse 
<Axis end point 1>/ Centre: 10, 20
Axis end point 2: 65, 20
<Other axis distance>/ Rotation: 35, 35
.
ARC
Arcs are partial circles and can be drawn in eight different
methods using ARC
command. Some of them are follows:
(a) Using three given points
Draw an arc using the given three points: (75, 50), (55,
90),
(105,110).
Command: arc 
Centre/<Start point>: 75, 50 
Centre/end/<Second point>: 55, 90 
End point: 105,110 
(b) Using Start points, centre and end point (SCE)
Draw an arc using start point (240, 20), centre point (250,
60)
and end point (250,100).
Command: arc 
Centre/<Start point>: 240, 20 
Centre/end/<Second point>: C 
Centre point: 250, 60 
Angle/length of chord/<end point>:
250,100
Polygon
The polygon command draws regular polygons with 3 to
1024 sides. Any polygon can be drawn by following three
method using polygon commands.
(a) Using radius of given circle in which polygon is
inscribed:
Draw a polygon of eight sides with centre (50, 50)
inscribed
in a circle of radius 40 units.
Command: polygon 
Number of sides: 8 
Edge/<centre of polygon>: 50, 50 
Inscribed in circle/circum-scribed about circle (I/C): I 
Radius of circle: 40
EDIT COMMANDS AND OTHER ADDITIONAL
COMMANDS
These commands are used to edit or modify the drawing.
1) ERASE- This command removes objects from a
drawing.
Command: erase
Select objects: click on objects
2) MOVE: This command displaces objects to a specified
distance in a
specified direction.
Command: move
Select objects: click on objects
Base point or displacement: specify a base point
Second point or displacement: specify a point or
3) COPY: - This command is similar to move command,
but it places
copies of the related object at the specified
displacements.
Command: copy
Select objects: click on objects
<Base point or displacement>/multiple:
specify a point for a single copy or enter m for multiple
copies
<Second point of displacement>: specify a point or P
(For placement multiple copies)
4) ROTATE: - This command moves object about a base
point.
Command: rotate
Select objects: click on objects
Base point: specify a point
<Rotation angle>/Reference: Specify an angle or enter or
specify a point
5) MIRROR: - This command creates a mirror image of
objects.
Command: mirror
Select objects: click on objects
First point of mirror line: Specify a point
Second point: Specify a point
Delete old objects? <N>: Enter Y or N, or
6) SCALE: This command enlarges or reduces selected
objects equally in X, Y,
Z direction.
Command: Scale
Select objects: click on objects
Base point: specify a point
< Scale factor>/ Reference: specify a scale or enter R.
Scale factor>1 – Enlarges the objects.
Scale factor<1 – Shrinks the objects.
Reference length<1>: specify a distance or
New length: specify a distance 
If the new length is longer than the reference length, the
objects are enlarged.
7) ARRAY: This command creates multiple copies of
objects in pattern.
Command: array
Rectangular or polar array (R/P) <current>: enter an
option or 
Option:
I) RECTANGULAR: – Creates an array defined by a
number of rows and
columns of copies of selected objects.
II) POLAR - Creates an array defined by specifying a
center point about which
the selected object is replicated. (Angle: + = CCW. -CW)
8) BREAK: - This command creates part of objects or
splits on object into two.
Command: break
Select objects: click on objects or specify the first break
point on an object
Enter second point (or F for first point): Specify the second
break point or enter
F
9) TRIM: -
This command trims objects at a cutting edge defined by
other objects.
Command: trim
Select cutting edges: Click on cutting edges (lines) 
Select edges: Click on object to be trimmed.
<Select object to trim>/project/ edge/undo: select an
object, enter an option or 
10) DIMENSIONING
The dimensions are inserted in the drawing by use of Dim
command. There are
various types of dimensions used their AutoCAD.
(I) Linear Dimensions: Horizontal, Vertical, aligned (for
inclined
dimensions), Rotated (for inclined dimensions).
(II) Angular dimensions: For angular dimensioning of
objects.
(III) Radial dimensions: For radial dimensioning of arc or
circle.
(IV) Diametral dimensions: For diametral dimensioning
of circle.
(V) Ordinate dimensions: For ordinate dimensioning of
objects.
11) Text
This command creates text on the drawing with a variety
of character patterns or fonts.
These fonts can be stretched, compressed, oblique,
mirrored or aligned in a vertical
column by applying a style to the font.
Command: Text
Justify/style/<start point>: specify a point or enter an
option
The start point is the default.
12) Layer
A layer is like an overlay that allows us to separate
different types of information.
AutoCAD allows an unlimited number of layers on new
drawings the default layer is 0.
This command creates new layer, selects the current
layer, sets the color and line type
for designated layers, turns layers on and off, locks or
unlocks layer, freezes or throws
layers and lists defined layers.
Command: layer
?/make/set/new/on/off/color/Ltype/Freeze/Thaw/lock/unloc
k: enter an option.
HATCHING
 Hatching is used to add shaded patterns to objects and
shapes within an Autocad drawing. Hatch patterns can be
used to indicate a material to be used, such as a concrete
hatch.
 You will pick:
 Pattern
 Scale
 points
TOP 10 REASONS TO MOVE FROM AUTOCAD
TO AUTOCAD ELECTRICAL
 1. Comprehensive Symbol Libraries
 2. Automatic Wire Numbering and Component Tagging
 3. Automatic Project Reports
 4. Real-Time Error Checking
 5. Real-Time Coil and Contact Cross-Referencing
 6. Create Smart Panel Layout Drawings
 7. Electrical-Specific Drafting Features
 8. Automatically Create PLC I/O Drawings from
Spreadsheets
 9. Share Drawings with Customers and Suppliers
 10. Reuse Existing Drawings

Autocad electrical

  • 1.
  • 2.
    COMPUTER AIDED DRAWING(CAD) Computer Aided Drawing /Drafting is a process of preparing a drawing of an object on the screen of a computer. There are various types of drawings required in different fields of engineering and science.  In the field of mechanical engineering the drawing of machine components and layouts are prepared.  In the field of civil engineering plans and layouts of buildings are prepared.  In all other fields of engineering use of computer is made for drawing and drafting.
  • 3.
     The Auto-CADis used by the designers, painters, Civil, Mechanical, Electrical, Electronics, Civil engineers in their field.  Line, curves, text and filling point are the essential elements used for preparation of any drawing on the screen.  Computer aided drafting is done by the operators by placing the mouse pointer at the desired location and then executing the command to draw the graphic elements using different methods.
  • 4.
    UTILITY COMMANDS The utility commandsare those commands which control the basic functions of AutoCAD.  HELP: Lists all the Auto-CAD commands.  END: Returns to the main menu and updates (saves) the drawings file.  SAVE: Saves the current drawing and remains in the drawing editor screen for further editing.  LIMITS: Allows changing the upper and lower limits of the drawing area while working on a drawing.
  • 5.
    ORTHO: Constrains cursormovement to the horizontal or vertical.(F8) OSNAP: Allows to select specify points on an object. e.g. endpoints, midpoints, intersection etc.(F3) POLAR: Allows cursor movement to the horizontal or vertical.(F10)
  • 6.
    DRAW/BASIC COMMANDS OFAutoCAD (Drawing Entities) (10, 10) (5, 5) POINT Plot a point at the location (8, 6) Command: point  Point: 8, 6  LINE Lines can be drawn by any one of the following three methods using LINE command. (a) Using Absolute Co-ordinates: Drawing a line from point (5, 5) to point (10, 10). Command: Line  From point: 5, 5(select the point by mouse or Enter the Co-ordinates by keyboard)  To Point: 10, 10  To Point:  (0, 0) (8,6)
  • 7.
    (7, 10) (2, 2) (1,2) (1, 8) (b) Using Relative Co-ordinates Draw a line from point (2, 2) to point 5 units in X-axis and 8 units in Y-axis relative to first co-ordinate. Command: Line From point: 2, 2 To point: @ 5, 8 To point:  (c) Using Polar Co-ordinates Draw a line from point (1, 2) to a length of 6 units at 90 degree. Command: Line From point: 1, 2 To point:@690 To point: 
  • 8.
    (10, 10) (30, 20) PLINE Apolyline is a connected sequence of line and arc segments. Draw a thick line of width 2 units from (8, 4) to (6, 7) using pline command. Command: pline From point: 8, 4 Arc/close/Half width/length/undo/width/ Endpoint of line : width Width: 2 Next point: 6, 7 Next point:  A box drawn by using pline will act as one object instead of four discrete lines. RECTANGLE Draw a rectangle defined by diagonal points (10, 10) and (30, 20). Command: Rectang First Corner: 10, 10  Second Corner: 30, 20 
  • 9.
    CIRCLE Circle can bedrawn by any one of following five methods using circle command. (a)Using Centre and Radius: Draw a circle with centre (6, 6) and radius 5 units. Command: circle 3P/2P/TTR/centre point : 6, 6  Diameter/radius : 5  (b) Using Centre and diameter: Draw a circle with centre (6, 17) and diameter 10 units. Command: circle 3p/2p/TTR/centre point : 6, 17  Diameter/radius : D  Diameter: 10 
  • 10.
    (c) Using giventhree points: (3P) Draw a circle with using given three points (5, 30), (7, 26), (10, 25). Command: circle 3P/2P/TTR/centre point : 3 P  First point: (5, 30)  Second point: (7, 26)  Third point: (10, 25)  (d) Using given two points: (2P) Draw a circle with using given two points (7, 35) & (7, 47). Command: circle 3P/2P/TTR/centre point : 2 P  First point on diameter: (7, 35)  Second point on diameter: (7, 47)  (7, 26) (10, 25) (5, 30) (7, 47) (7, 35)
  • 11.
    (e) Using Tangent,Tangent and Radius (TTR): Draw a circle with radius 2 units and two existing line as tangents. Take: For line 1: (16, 4) to point (19, 9) For line 2: (20, 2) to point (21, 7) Command: circle 3P/2P/TTR/centre point : TTR  Enter Tangent spec: line 1 (pick up using mouse) Enter Tangent spec: line 2 (pick up using mouse) Radius: 2 (“Spec” means specifications) Line 1 Line 2
  • 12.
    ELLIPSE: ELLIPSE can bedrawn by any one of following two methods using ellipse command. (a) Using first axis end points and other axis distance: Draw an ellipse using major axis end point (10, 20) (65, 20) and minor axis end point (35, 35). Command: ellipse  <Axis end point 1>/ Centre: 10, 20 Axis end point 2: 65, 20 <Other axis distance>/ Rotation: 35, 35 .
  • 13.
    ARC Arcs are partialcircles and can be drawn in eight different methods using ARC command. Some of them are follows: (a) Using three given points Draw an arc using the given three points: (75, 50), (55, 90), (105,110). Command: arc  Centre/<Start point>: 75, 50  Centre/end/<Second point>: 55, 90  End point: 105,110  (b) Using Start points, centre and end point (SCE) Draw an arc using start point (240, 20), centre point (250, 60) and end point (250,100). Command: arc  Centre/<Start point>: 240, 20  Centre/end/<Second point>: C  Centre point: 250, 60  Angle/length of chord/<end point>: 250,100
  • 14.
    Polygon The polygon commanddraws regular polygons with 3 to 1024 sides. Any polygon can be drawn by following three method using polygon commands. (a) Using radius of given circle in which polygon is inscribed: Draw a polygon of eight sides with centre (50, 50) inscribed in a circle of radius 40 units. Command: polygon  Number of sides: 8  Edge/<centre of polygon>: 50, 50  Inscribed in circle/circum-scribed about circle (I/C): I  Radius of circle: 40
  • 15.
    EDIT COMMANDS ANDOTHER ADDITIONAL COMMANDS These commands are used to edit or modify the drawing. 1) ERASE- This command removes objects from a drawing. Command: erase Select objects: click on objects 2) MOVE: This command displaces objects to a specified distance in a specified direction. Command: move Select objects: click on objects Base point or displacement: specify a base point Second point or displacement: specify a point or
  • 16.
    3) COPY: -This command is similar to move command, but it places copies of the related object at the specified displacements. Command: copy Select objects: click on objects <Base point or displacement>/multiple: specify a point for a single copy or enter m for multiple copies <Second point of displacement>: specify a point or P (For placement multiple copies) 4) ROTATE: - This command moves object about a base point. Command: rotate Select objects: click on objects Base point: specify a point <Rotation angle>/Reference: Specify an angle or enter or specify a point
  • 17.
    5) MIRROR: -This command creates a mirror image of objects. Command: mirror Select objects: click on objects First point of mirror line: Specify a point Second point: Specify a point Delete old objects? <N>: Enter Y or N, or 6) SCALE: This command enlarges or reduces selected objects equally in X, Y, Z direction. Command: Scale Select objects: click on objects Base point: specify a point < Scale factor>/ Reference: specify a scale or enter R. Scale factor>1 – Enlarges the objects. Scale factor<1 – Shrinks the objects. Reference length<1>: specify a distance or New length: specify a distance  If the new length is longer than the reference length, the objects are enlarged.
  • 18.
    7) ARRAY: Thiscommand creates multiple copies of objects in pattern. Command: array Rectangular or polar array (R/P) <current>: enter an option or  Option: I) RECTANGULAR: – Creates an array defined by a number of rows and columns of copies of selected objects. II) POLAR - Creates an array defined by specifying a center point about which the selected object is replicated. (Angle: + = CCW. -CW) 8) BREAK: - This command creates part of objects or splits on object into two. Command: break Select objects: click on objects or specify the first break point on an object Enter second point (or F for first point): Specify the second break point or enter F
  • 19.
    9) TRIM: - Thiscommand trims objects at a cutting edge defined by other objects. Command: trim Select cutting edges: Click on cutting edges (lines)  Select edges: Click on object to be trimmed. <Select object to trim>/project/ edge/undo: select an object, enter an option or  10) DIMENSIONING The dimensions are inserted in the drawing by use of Dim command. There are various types of dimensions used their AutoCAD. (I) Linear Dimensions: Horizontal, Vertical, aligned (for inclined dimensions), Rotated (for inclined dimensions). (II) Angular dimensions: For angular dimensioning of objects. (III) Radial dimensions: For radial dimensioning of arc or circle. (IV) Diametral dimensions: For diametral dimensioning of circle. (V) Ordinate dimensions: For ordinate dimensioning of objects.
  • 20.
    11) Text This commandcreates text on the drawing with a variety of character patterns or fonts. These fonts can be stretched, compressed, oblique, mirrored or aligned in a vertical column by applying a style to the font. Command: Text Justify/style/<start point>: specify a point or enter an option The start point is the default. 12) Layer A layer is like an overlay that allows us to separate different types of information. AutoCAD allows an unlimited number of layers on new drawings the default layer is 0. This command creates new layer, selects the current layer, sets the color and line type for designated layers, turns layers on and off, locks or unlocks layer, freezes or throws layers and lists defined layers. Command: layer ?/make/set/new/on/off/color/Ltype/Freeze/Thaw/lock/unloc k: enter an option.
  • 21.
    HATCHING  Hatching isused to add shaded patterns to objects and shapes within an Autocad drawing. Hatch patterns can be used to indicate a material to be used, such as a concrete hatch.  You will pick:  Pattern  Scale  points
  • 22.
    TOP 10 REASONSTO MOVE FROM AUTOCAD TO AUTOCAD ELECTRICAL  1. Comprehensive Symbol Libraries  2. Automatic Wire Numbering and Component Tagging  3. Automatic Project Reports  4. Real-Time Error Checking  5. Real-Time Coil and Contact Cross-Referencing  6. Create Smart Panel Layout Drawings  7. Electrical-Specific Drafting Features  8. Automatically Create PLC I/O Drawings from Spreadsheets  9. Share Drawings with Customers and Suppliers  10. Reuse Existing Drawings