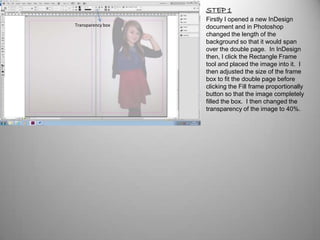
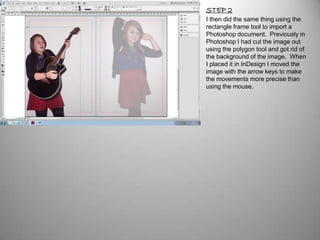
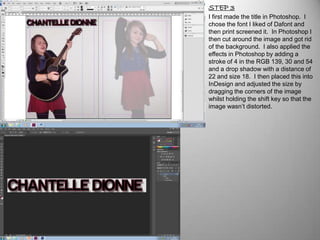
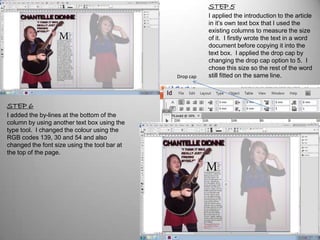
DOUBLE PAGE SPREAD STEP BY
          STEP
STEP 1
                   Firstly I opened a new InDesign
Transparency box   document and in Photoshop
                   changed the length of the
                   background so that it would span
                   over the double page. In InDesign
                   then, I click the Rectangle Frame
                   tool and placed the image into it. I
                   then adjusted the size of the frame
                   box to fit the double page before
                   clicking the Fill frame proportionally
                   button so that the image completely
                   filled the box. I then changed the
                   transparency of the image to 40%.
STEP 2
I then did the same thing using the
rectangle frame tool to import a
Photoshop document. Previously in
Photoshop I had cut the image out
using the polygon tool and got rid of
the background of the image. When
I placed it in InDesign I moved the
image with the arrow keys to make
the movements more precise than
using the mouse.
STEP 3
I first made the title in Photoshop. I
chose the font I liked of Dafont and
then print screened it. In Photoshop I
then cut around the image and got rid
of the background. I also applied the
effects in Photoshop by adding a
stroke of 4 in the RGB 139, 30 and 54
and a drop shadow with a distance of
22 and size 18. I then placed this into
InDesign and adjusted the size by
dragging the corners of the image
whilst holding the shift key so that the
image wasn’t distorted.
STEP 4
I then applied the sub-heading using
the Type tool. I then applied a stroke
to the text so that it matched the title
by on a smaller scale. I did this by
clicking stroke at the side of the
page and adjusting it to 1pt. I then
clicked ‘colour’ in the stroke option
and manually changed the colour
using the RGB codes. I adjusted the
text so that it fit between the title and
image without overlapping. I did this
by using the arrow keys.
STEP 5
                                                         I applied the introduction to the article
                                                         in it’s own text box that I used the
                                                         existing columns to measure the size
                                                         of it. I firstly wrote the text in a word
                                                         document before copying it into the
                                                         text box. I applied the drop cap by
                                                         changing the drop cap option to 5. I
                                                         chose this size so the rest of the word
                                              Drop cap   still fitted on the same line.


STEP 6
I added the by-lines at the bottom of the
column by using another text box using the
type tool. I changed the colour using the
RGB codes 139, 30 and 54 and also
changed the font size using the tool bar at
the top of the page.
STEP 7
To put the main text in the article, I first
wrote it in in a word document. I made
a text box and added columns it by
adjusting the column button at the top
to 3. I then spaced the text out and
changed the font and colour of the
questions. I changed the font to Arial
12 as the answers were in Minion Pro.
I also added a ‘Q&A’ title and changed
the font of that. I also added a stroke of
1pt in black so it was the opposite of
the sub-title on the other page.
STEP 8
            To then add the secondary image I
            first opened it in a new Photoshop
            and cut around the image using the
            Polygon tool to be more precise. I
            then cropped the image and got rid of
            the background. When I imported the
            photo I adjusted it so it was in line
            with the side of the page. I then used
            the wrap text tool so the text fitted
            around the image.


Wrap text
STEP 9
Finally, I added the page number
using another text box and matched
it the house style.

Double page spread step by step

  • 1.
    DOUBLE PAGE SPREADSTEP BY STEP
  • 2.
    STEP 1 Firstly I opened a new InDesign Transparency box document and in Photoshop changed the length of the background so that it would span over the double page. In InDesign then, I click the Rectangle Frame tool and placed the image into it. I then adjusted the size of the frame box to fit the double page before clicking the Fill frame proportionally button so that the image completely filled the box. I then changed the transparency of the image to 40%.
  • 3.
    STEP 2 I thendid the same thing using the rectangle frame tool to import a Photoshop document. Previously in Photoshop I had cut the image out using the polygon tool and got rid of the background of the image. When I placed it in InDesign I moved the image with the arrow keys to make the movements more precise than using the mouse.
  • 4.
    STEP 3 I firstmade the title in Photoshop. I chose the font I liked of Dafont and then print screened it. In Photoshop I then cut around the image and got rid of the background. I also applied the effects in Photoshop by adding a stroke of 4 in the RGB 139, 30 and 54 and a drop shadow with a distance of 22 and size 18. I then placed this into InDesign and adjusted the size by dragging the corners of the image whilst holding the shift key so that the image wasn’t distorted.
  • 5.
    STEP 4 I thenapplied the sub-heading using the Type tool. I then applied a stroke to the text so that it matched the title by on a smaller scale. I did this by clicking stroke at the side of the page and adjusting it to 1pt. I then clicked ‘colour’ in the stroke option and manually changed the colour using the RGB codes. I adjusted the text so that it fit between the title and image without overlapping. I did this by using the arrow keys.
  • 6.
    STEP 5 I applied the introduction to the article in it’s own text box that I used the existing columns to measure the size of it. I firstly wrote the text in a word document before copying it into the text box. I applied the drop cap by changing the drop cap option to 5. I chose this size so the rest of the word Drop cap still fitted on the same line. STEP 6 I added the by-lines at the bottom of the column by using another text box using the type tool. I changed the colour using the RGB codes 139, 30 and 54 and also changed the font size using the tool bar at the top of the page.
  • 7.
    STEP 7 To putthe main text in the article, I first wrote it in in a word document. I made a text box and added columns it by adjusting the column button at the top to 3. I then spaced the text out and changed the font and colour of the questions. I changed the font to Arial 12 as the answers were in Minion Pro. I also added a ‘Q&A’ title and changed the font of that. I also added a stroke of 1pt in black so it was the opposite of the sub-title on the other page.
  • 8.
    STEP 8 To then add the secondary image I first opened it in a new Photoshop and cut around the image using the Polygon tool to be more precise. I then cropped the image and got rid of the background. When I imported the photo I adjusted it so it was in line with the side of the page. I then used the wrap text tool so the text fitted around the image. Wrap text
  • 9.
    STEP 9 Finally, Iadded the page number using another text box and matched it the house style.