Photo retouching tips and tricks in photoshopRemon Mia
If you want to redefine the foreground and background colors, use the Eyedropper tool to select the foreground color, and then switch the position with the background color, maybe by using the shortcut X, and pick up the next color. But there is an easier way. First, define the foreground color just as you’re accustomed to, but then define the background color by holding the Alt/Option key. Instead of changing the foreground color, you’ll redefine the background color with just one click.
https://goo.gl/pwqYM7
A layer style is one or more effects applied to a layer or layer group. You can apply one of the preset styles provided with Photoshop or create a custom style using the Layer Style dialog box. The layer effects icon appears to the right of the layer's name in the Layers panel.
A layer style is one or more effects applied to a layer or layer group. You can apply one of the preset styles provided with Photoshop or create a custom style using the Layer Style dialog box. The layer effects icon appears to the right of the layer's name in the Layers panel.
Do you need to change the backdrop for the model? It is now very simple to change the background, the sky, the eyes, the hair, and the skin color. Do you want to isolate the subject and sharpen just the person’s face while leaving the background alone? With Photoshop’s tools and plugins for image masking, editing photographs is simple.
Language has advanced to the point where we now refer to the act of modifying images using the verb “photoshop.” In reference to the workflow, we frequently hear expressions like “try photoshopping it out” or “photoshop something into the picture.” This mainly refers to modifying an image in photo Image Masking editing software utilizing masking tools and layers. The world has been handed a potent set of tools by the Photoshop software to radically alter photos. It has opened up a whole new universe of editing options for photographs.
But today, in addition to Photoshop, there are many more editing software programs that provide a variety of useful masking techniques, advancing the editing procedure even further. With its simple, uncluttered user interface and all the features you need, Luminar Neo achieves the same result and is a fantastic photo masking tool. It serves as an illustration of how, while masking photographs, you may go beyond the fundamentals and explore other realms.
A handbook for beginners who want to learn Photoshop. This handbook contains details about some tools, shortcuts, layout, interface and some photo editing steps.
Adobe Premiere Pro: How to Use Drop Shadow Effect?
The Drop Shadow Effect in Adobe Premiere Pro is a useful tool that can add depth and dimension to your video clips. With this effect, you can create the illusion of a shadow behind an object or text, giving it a more realistic and three-dimensional appearance.
Mastering Premiere Pro: Tips and Tricks for Beginners (Youtube Channel)
In this article, we will discuss how to use the Drop Shadow Effect in Adobe Premiere Pro.
Step 1: Import your footage The first step is to import the footage that you want to use in your video. Make sure that the footage is selected.
Step 2: Create a new adjustment layer To apply the Drop Shadow Effect, you will need to create a new adjustment layer. To do this, go to the Project panel and click on the New Item icon. From the drop-down menu, select Adjustment Layer. This will create a new adjustment layer in your project.
Step 3: Apply the Drop Shadow Effect To apply the Drop Shadow Effect, drag the adjustment layer onto the timeline above the clip that you want to add the effect to. Then, go to the Effects panel and search for Drop Shadow. Drag the effect onto the adjustment layer.
Step 4: Adjust the settings After applying the Drop Shadow Effect, you can adjust the settings to achieve the desired effect. The settings that you can adjust include Distance, Angle, Opacity, Softness, and Color.
Distance: This setting controls how far the shadow is cast from the object. Increase the distance to make the shadow appear further away from the object.
Angle: This setting controls the angle of the shadow. You can adjust the angle to make the shadow appear to come from a different direction.
Opacity: This setting controls the opacity of the shadow. Increase the opacity to make the shadow more visible.
Softness: This setting controls the softness of the shadow. Increase the softness to make the shadow appear more diffuse and less defined.
Color: This setting controls the color of the shadow. You can choose a different color for the shadow, depending on the look that you want to achieve.
Step 5: Fine-tune the settings After adjusting the settings, you may need to fine-tune them to achieve the desired effect. You can preview the effect in the Program Monitor to see how it looks.
Step 6: Save your settings as a preset If you want to save your Drop Shadow settings as a preset, you can do so by clicking on the menu icon in the Effects Controls panel and selecting Save Preset. Give your preset a name and click OK. You can then apply the preset to other clips in your project.
In conclusion, the Drop Shadow Effect in Adobe Premiere Pro is a powerful tool that can add depth and dimension to your video clips. By following these steps, you can create realistic shadows behind objects or text, giving your videos a more professional look.
Dig imag unit 3 module 2 working with the color picker and swatches palette
Dig imag unit 6 module 1 working with layer masks
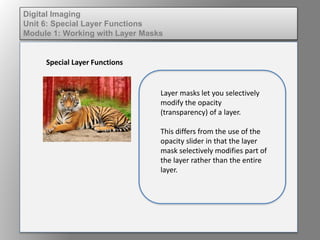
1. Digital Imaging
Unit 6: Special Layer Functions
Module 1: Working with Layer Masks
Special Layer Functions
Layer masks let you selectively
modify the opacity
(transparency) of a layer.
This differs from the use of the
opacity slider in that the layer
mask selectively modifies part of
the layer rather than the entire
layer.
2. Digital Imaging
Unit 6: Special Layer Functions
Module 1: Working with Layer Masks
Special Layer Functions
To add a layer mask, first select
the layer you wish to mask in the
Layers palette.
Under the layer menu, choose
layer Mask > Reveal all.
When done, a mask appears
next to the thumbnail of the
layer in the layers palette.
3. Digital Imaging
Unit 6: Special Layer Functions
Module 1: Working with Layer Masks
Special Layer Functions
Select the mask in the layer.
Next, select a paintbrush and a
brush from the brushes palette.
Make sure the foreground color
is set to black.
Begin “painting” in the mask to
create a layer mask and reveal
the layer below.
4. Digital Imaging
Unit 6: Special Layer Functions
Module 1: Working with Layer Masks
Special Layer Functions
When you are happy with the layer mask, go under the Layer
Menu > Layer Mask > Apply to combine the mask and the layer.