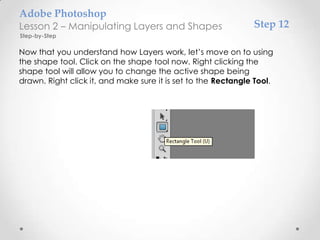
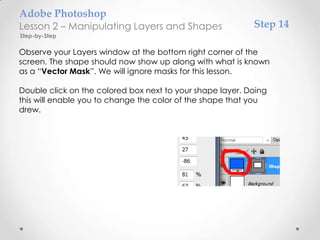
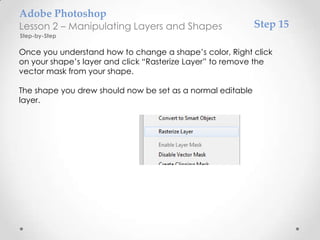
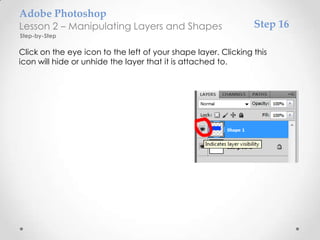
SlideShare a Scribd company logo
Adobe Photoshop
             Lesson 2
  Manipulating Layers and Shapes
           By Antonio Cribari
Adobe Photoshop
Lesson 2 – Manipulating Layers and Shapes


   Objective: You will learn how to work with Layers and shapes in
   Adobe Photoshop. This will allow for more creativity and
   flexibility in your work.


   Requirements: You must have Adobe Photoshop CS3 or higher.
   (The interface is not exactly same for older versions)
Adobe Photoshop
Lesson 2 – Manipulating Layers and Shapes            Step 1
Step-by-Step

For this lesson, we will be focusing on the layers
tab at the bottom right corner of the screen.
(this tab should be open by default)

Start out by creating a 500 x 500 px blank
canvas. Take note of the Layers window. A
New layer should have been created that is
entitled “background” and is a locked layer.
For now, leave this layer alone.
Adobe Photoshop
Lesson 2 – Manipulating Layers and Shapes                    Step 2
Step-by-Step

Let’s Create a new layer. Click on Layer -> New -> New Layer. . .
Adobe Photoshop
Lesson 2 – Manipulating Layers and Shapes                             Step 3
Step-by-Step

You should now see a new window entitled “New Layer”. For the
sake of this lesson, use the name “My First New Layer” as the New
Layer’s name.


                              (Use the following settings as shown in the picture)
Adobe Photoshop
Lesson 2 – Manipulating Layers and Shapes               Step 4
Step-by-Step

Go ahead and draw something using the brush tool with the new
layer active. For this example, I will draw a square.
Adobe Photoshop
Lesson 2 – Manipulating Layers and Shapes                              Step 5
Step-by-Step

Now use the Move Tool and try dragging your new drawing around.

Tip: The letters in parentheses next to tools are keyboard shortcuts to activate
that specified tool. Learn these shortcuts to enable you to work faster in
Adobe Photoshop.
Adobe Photoshop
Lesson 2 – Manipulating Layers and Shapes                     Step 6
Step-by-Step

The reason you can move your drawing around is because you
drew on an empty layer. Empty Layers are 100% transparent by
default, and this allows for complex manipulation when making
graphics.

Now let’s try duplicating the layer that you drew on. This will make a
second instance of your layer.
Right click on “My New Layer” and click on “Duplicate Layer…”
Adobe Photoshop
Lesson 2 – Manipulating Layers and Shapes                    Step 7
Step-by-Step

You should now see a window similar to the one showed below. You
can change the name of this layer if you want, but I will leave it as
“My New Layer copy” for the sake of this example.
Adobe Photoshop
Lesson 2 – Manipulating Layers and Shapes                     Step 8
Step-by-Step

Now that you have duplicated your first layer, observe the layers
dialog box at the bottom right corner of the screen. It should look
similar to the picture shown below. Select your duplicated
layer, and try moving it around using the Move Tool.

Since you have two instances of this layer, you are able to move
one around, and the other will remain still.

Move your duplicated layer enough so you
can tell the two apart from each other.
Adobe Photoshop
Lesson 2 – Manipulating Layers and Shapes                      Step 9
Step-by-Step

Right click on the duplicated layer that should appear above the
original layer. Right click it and select Merge Down.

Doing this will merge the selected layer with the layer below it.
Adobe Photoshop
Lesson 2 – Manipulating Layers and Shapes                 Step 10
Step-by-Step

Try moving the merged layers. They should now both move
together as one layer.
Adobe Photoshop
Lesson 2 – Manipulating Layers and Shapes                     Step 11
Step-by-Step

Try experimenting with layers to learn how they work. For now, you
have been taught the basics of creating and manipulating layers.
Let’s learn one more function.

Right click on your merged layer, and click Delete Layer to
remove the layer from your canvas.
Adobe Photoshop
Lesson 2 – Manipulating Layers and Shapes                      Step 12
Step-by-Step

Now that you understand how Layers work, let’s move on to using
the shape tool. Click on the shape tool now. Right clicking the
shape tool will allow you to change the active shape being
drawn. Right click it, and make sure it is set to the Rectangle Tool.
Adobe Photoshop
Lesson 2 – Manipulating Layers and Shapes                  Step 13
Step-by-Step

With the Rectangle Tool active, draw a rectangle in your canvas.
Adobe Photoshop
Lesson 2 – Manipulating Layers and Shapes                  Step 14
Step-by-Step

Observe your Layers window at the bottom right corner of the
screen. The shape should now show up along with what is known
as a “Vector Mask”. We will ignore masks for this lesson.

Double click on the colored box next to your shape layer. Doing
this will enable you to change the color of the shape that you
drew.
Adobe Photoshop
Lesson 2 – Manipulating Layers and Shapes                   Step 15
Step-by-Step

Once you understand how to change a shape’s color, Right click
on your shape’s layer and click “Rasterize Layer” to remove the
vector mask from your shape.

The shape you drew should now be set as a normal editable
layer.
Adobe Photoshop
Lesson 2 – Manipulating Layers and Shapes                       Step 16
Step-by-Step

Click on the eye icon to the left of your shape layer. Clicking this
icon will hide or unhide the layer that it is attached to.
Adobe Photoshop
Lesson 2 – Manipulating Layers and Shapes                    Step 17
Step-by-Step

Now try changing the Opacity levels with the Shape layer active.
Change this to a value of 50% or lower. This will make your active
layer translucent or entirely transparent depending on your set
values.
Adobe Photoshop
Lesson 2 – Manipulating Layers and Shapes                      Completed
Conclusion

This concludes Lesson 2, and you should now be able to work more
efficiently using layers and shapes. Here is a list of what you should
understand from this lesson.

•   Location of Layers Tab
•   How to make empty New Layers
•   How to move layers freely using the Move Tool
•   How to Duplicate, Merge, and Delete Layers
•   How to draw with the Shape Tool (specifically the Rectangle Tool)
•   How to change the color of a Shape Tool Layer
•   How to Rasterize a Layer (Removing unnecessary properties of a layer)
•   How to Hide layers
•   How to change the opacity of a layer (visibility)
Adobe Photoshop
Lesson 2 – Manipulating Layers and Shapes                        Review
On-Your-Own

Now that you know how to work with layers in Adobe
Photoshop, complete the following tasks below. You may refer to the
lesson at any time for help.


1.   Create a 350 x 500 canvas project
2.   Create a New Layer, name it “Smile”
3.   Draw a smiley face in that new layer with 37% Opacity
4.   Create a green rectangle with the opacity of 55%
5.   Rasterize the rectangle layer
6.   Create a new layer and name it “unknown”
7.   Draw a blue rectangle and hide its layer.
8.   Delete the layer entitled “Smile”

 This concludes the exercise for Manipulating Layers and Shapes. Move on to
      Lesson 3 when you feel you have a strong understanding of Lesson 2.

More Related Content

What's hot

TUTORIAL ON PHOTOSHOP
TUTORIAL ON PHOTOSHOPTUTORIAL ON PHOTOSHOP
TUTORIAL ON PHOTOSHOP
Anamika Chauhan
 
Adobe Photoshop Basics - Session 1
Adobe Photoshop Basics - Session 1Adobe Photoshop Basics - Session 1
Adobe Photoshop Basics - Session 1xneptune
 
Adobe Photoshop CS6 tutorial 2013
Adobe Photoshop CS6 tutorial 2013Adobe Photoshop CS6 tutorial 2013
Adobe Photoshop CS6 tutorial 2013
Jessie Doan
 
Session 3 working with selection
Session 3   working with selectionSession 3   working with selection
Session 3 working with selection
John Josef Jimenez
 
Photoshop layers
Photoshop layersPhotoshop layers
Photoshop layers
Marche Ygar
 
DAY 1 - Introduction to Photo Editing and Photoshop CS6
DAY 1 - Introduction to Photo Editing and Photoshop CS6DAY 1 - Introduction to Photo Editing and Photoshop CS6
DAY 1 - Introduction to Photo Editing and Photoshop CS6
Sef Cambaliza
 
The Selection Tools
The Selection ToolsThe Selection Tools
The Selection Tools
Sef Cambaliza
 
Basic exercises for photoshop
Basic exercises for photoshopBasic exercises for photoshop
Basic exercises for photoshop
Pauline Torion
 
Photoshop
PhotoshopPhotoshop
Photoshop
Azhagu meenatchi
 
Adobe Photoshop Basics - Session 3
Adobe Photoshop Basics - Session 3Adobe Photoshop Basics - Session 3
Adobe Photoshop Basics - Session 3xneptune
 
DUSPviz Intro to Photoshop - 2013
DUSPviz Intro to Photoshop - 2013DUSPviz Intro to Photoshop - 2013
DUSPviz Intro to Photoshop - 2013
DUSPviz
 
Adobe Photoshop Basics - Session 2
Adobe Photoshop Basics - Session 2Adobe Photoshop Basics - Session 2
Adobe Photoshop Basics - Session 2xneptune
 
Photoshop Introduction
Photoshop IntroductionPhotoshop Introduction
Photoshop Introduction
Z Hoeben
 
Photoshop 101
Photoshop 101Photoshop 101
Photoshop 101
AndresPalomoBlanco
 
Adobe Photoshop Basics - Session 4
Adobe Photoshop Basics - Session 4Adobe Photoshop Basics - Session 4
Adobe Photoshop Basics - Session 4xneptune
 
Create 3D Type in Photoshop CS6
Create 3D Type in Photoshop CS6Create 3D Type in Photoshop CS6
Create 3D Type in Photoshop CS6
marcusbyrne
 
DAY 2 - Starting in Photoshop (Images and Layers)
DAY 2 - Starting in Photoshop (Images and Layers)DAY 2 - Starting in Photoshop (Images and Layers)
DAY 2 - Starting in Photoshop (Images and Layers)
Sef Cambaliza
 
Photoshop Guide
Photoshop GuidePhotoshop Guide
Photoshop Guide
Marco Hernández
 

What's hot (20)

Adobe Photoshop Tools
Adobe Photoshop ToolsAdobe Photoshop Tools
Adobe Photoshop Tools
 
TUTORIAL ON PHOTOSHOP
TUTORIAL ON PHOTOSHOPTUTORIAL ON PHOTOSHOP
TUTORIAL ON PHOTOSHOP
 
Adobe Photoshop Basics - Session 1
Adobe Photoshop Basics - Session 1Adobe Photoshop Basics - Session 1
Adobe Photoshop Basics - Session 1
 
Adobe Photoshop CS6 tutorial 2013
Adobe Photoshop CS6 tutorial 2013Adobe Photoshop CS6 tutorial 2013
Adobe Photoshop CS6 tutorial 2013
 
Adobe Photoshop
Adobe PhotoshopAdobe Photoshop
Adobe Photoshop
 
Session 3 working with selection
Session 3   working with selectionSession 3   working with selection
Session 3 working with selection
 
Photoshop layers
Photoshop layersPhotoshop layers
Photoshop layers
 
DAY 1 - Introduction to Photo Editing and Photoshop CS6
DAY 1 - Introduction to Photo Editing and Photoshop CS6DAY 1 - Introduction to Photo Editing and Photoshop CS6
DAY 1 - Introduction to Photo Editing and Photoshop CS6
 
The Selection Tools
The Selection ToolsThe Selection Tools
The Selection Tools
 
Basic exercises for photoshop
Basic exercises for photoshopBasic exercises for photoshop
Basic exercises for photoshop
 
Photoshop
PhotoshopPhotoshop
Photoshop
 
Adobe Photoshop Basics - Session 3
Adobe Photoshop Basics - Session 3Adobe Photoshop Basics - Session 3
Adobe Photoshop Basics - Session 3
 
DUSPviz Intro to Photoshop - 2013
DUSPviz Intro to Photoshop - 2013DUSPviz Intro to Photoshop - 2013
DUSPviz Intro to Photoshop - 2013
 
Adobe Photoshop Basics - Session 2
Adobe Photoshop Basics - Session 2Adobe Photoshop Basics - Session 2
Adobe Photoshop Basics - Session 2
 
Photoshop Introduction
Photoshop IntroductionPhotoshop Introduction
Photoshop Introduction
 
Photoshop 101
Photoshop 101Photoshop 101
Photoshop 101
 
Adobe Photoshop Basics - Session 4
Adobe Photoshop Basics - Session 4Adobe Photoshop Basics - Session 4
Adobe Photoshop Basics - Session 4
 
Create 3D Type in Photoshop CS6
Create 3D Type in Photoshop CS6Create 3D Type in Photoshop CS6
Create 3D Type in Photoshop CS6
 
DAY 2 - Starting in Photoshop (Images and Layers)
DAY 2 - Starting in Photoshop (Images and Layers)DAY 2 - Starting in Photoshop (Images and Layers)
DAY 2 - Starting in Photoshop (Images and Layers)
 
Photoshop Guide
Photoshop GuidePhotoshop Guide
Photoshop Guide
 

Viewers also liked

Adobe Photoshop CS4 Beyond Basics welcome & course outline (2010)
Adobe Photoshop CS4 Beyond Basics welcome & course outline (2010)Adobe Photoshop CS4 Beyond Basics welcome & course outline (2010)
Adobe Photoshop CS4 Beyond Basics welcome & course outline (2010)Matteo Wyllyamz
 
приём в октябрята
приём в октябрятаприём в октябрята
приём в октябрятаSokol194
 
Examen trimestral karenmenjivar
Examen trimestral karenmenjivarExamen trimestral karenmenjivar
Examen trimestral karenmenjivar
sanchesmenjivark
 
Simple animasi
Simple animasi Simple animasi
Simple animasi
Ulul Azmi Lomuber Rezqi
 
顔の印象を一気に変えるアイブロウ(眉毛)における4つのパターン 先生:宇城 ゆかり
顔の印象を一気に変えるアイブロウ(眉毛)における4つのパターン 先生:宇城 ゆかり顔の印象を一気に変えるアイブロウ(眉毛)における4つのパターン 先生:宇城 ゆかり
顔の印象を一気に変えるアイブロウ(眉毛)における4つのパターン 先生:宇城 ゆかり
schoowebcampus
 
ใบงานสำรวจตนเอง M6
ใบงานสำรวจตนเอง M6ใบงานสำรวจตนเอง M6
ใบงานสำรวจตนเอง M6
Mai Pattraporn
 
Canada
CanadaCanada
Electromagnetic fieldtheory zahnsolutionsmanual
Electromagnetic fieldtheory zahnsolutionsmanualElectromagnetic fieldtheory zahnsolutionsmanual
Electromagnetic fieldtheory zahnsolutionsmanual
ashokkdk
 
Continuous Delivery in Oracle ADF Projekten
Continuous Delivery in Oracle ADF ProjektenContinuous Delivery in Oracle ADF Projekten
Continuous Delivery in Oracle ADF Projekten
enpit GmbH & Co. KG
 
Ponsetti,bermudez,nellen,gaido
Ponsetti,bermudez,nellen,gaidoPonsetti,bermudez,nellen,gaido
Ponsetti,bermudez,nellen,gaidoaledalmasso
 
April Newsletter
April NewsletterApril Newsletter
April Newsletter
mjcunny
 
Gn archives eps 1 lab_rats sample
Gn archives eps 1 lab_rats sampleGn archives eps 1 lab_rats sample
Gn archives eps 1 lab_rats sampleDaniel Ruke
 
Matthew Cunningham Sept Newsletter
Matthew Cunningham Sept NewsletterMatthew Cunningham Sept Newsletter
Matthew Cunningham Sept Newsletter
mjcunny
 

Viewers also liked (16)

Adobe Photoshop
Adobe PhotoshopAdobe Photoshop
Adobe Photoshop
 
Adobe Photoshop CS4 Beyond Basics welcome & course outline (2010)
Adobe Photoshop CS4 Beyond Basics welcome & course outline (2010)Adobe Photoshop CS4 Beyond Basics welcome & course outline (2010)
Adobe Photoshop CS4 Beyond Basics welcome & course outline (2010)
 
приём в октябрята
приём в октябрятаприём в октябрята
приём в октябрята
 
Examen trimestral karenmenjivar
Examen trimestral karenmenjivarExamen trimestral karenmenjivar
Examen trimestral karenmenjivar
 
Simple animasi
Simple animasi Simple animasi
Simple animasi
 
顔の印象を一気に変えるアイブロウ(眉毛)における4つのパターン 先生:宇城 ゆかり
顔の印象を一気に変えるアイブロウ(眉毛)における4つのパターン 先生:宇城 ゆかり顔の印象を一気に変えるアイブロウ(眉毛)における4つのパターン 先生:宇城 ゆかり
顔の印象を一気に変えるアイブロウ(眉毛)における4つのパターン 先生:宇城 ゆかり
 
ใบงานสำรวจตนเอง M6
ใบงานสำรวจตนเอง M6ใบงานสำรวจตนเอง M6
ใบงานสำรวจตนเอง M6
 
Canada
CanadaCanada
Canada
 
Electromagnetic fieldtheory zahnsolutionsmanual
Electromagnetic fieldtheory zahnsolutionsmanualElectromagnetic fieldtheory zahnsolutionsmanual
Electromagnetic fieldtheory zahnsolutionsmanual
 
Continuous Delivery in Oracle ADF Projekten
Continuous Delivery in Oracle ADF ProjektenContinuous Delivery in Oracle ADF Projekten
Continuous Delivery in Oracle ADF Projekten
 
Gambar apk
Gambar apkGambar apk
Gambar apk
 
Ponsetti,bermudez,nellen,gaido
Ponsetti,bermudez,nellen,gaidoPonsetti,bermudez,nellen,gaido
Ponsetti,bermudez,nellen,gaido
 
April Newsletter
April NewsletterApril Newsletter
April Newsletter
 
Gn archives eps 1 lab_rats sample
Gn archives eps 1 lab_rats sampleGn archives eps 1 lab_rats sample
Gn archives eps 1 lab_rats sample
 
Matthew Cunningham Sept Newsletter
Matthew Cunningham Sept NewsletterMatthew Cunningham Sept Newsletter
Matthew Cunningham Sept Newsletter
 
COMPANY PROFILE
COMPANY PROFILECOMPANY PROFILE
COMPANY PROFILE
 

Similar to Photoshop Lesson 2

Pop Art Technique
Pop Art TechniquePop Art Technique
Pop Art Technique
sullivanlaura
 
Computer Science.pptx
Computer Science.pptxComputer Science.pptx
Computer Science.pptx
Marvin Santiago
 
Ps zen mj
Ps zen mjPs zen mj
Ps zen mj
Mohammed Jogie
 
217 quick guide to photoshop cs6
217 quick guide to photoshop cs6217 quick guide to photoshop cs6
217 quick guide to photoshop cs6
Rodel Morales
 
Idiots guide-to-photoshop
Idiots guide-to-photoshopIdiots guide-to-photoshop
Idiots guide-to-photoshopMarcela Conroy
 
Layer management3
 Layer management3 Layer management3
Layer management3
kerbong_15
 
Layer management3
 Layer management3 Layer management3
Layer management3kerbong_15
 
Digital work station intro
Digital work station introDigital work station intro
Digital work station intro
Whitney Brooks
 
Cours photoshop
Cours photoshopCours photoshop
Cours photoshop
mohamednacim
 
adobephotoshop_frerking
adobephotoshop_frerking adobephotoshop_frerking
adobephotoshop_frerking
Agung Yuwono
 
Gateway To Adobe Photoshop
Gateway To Adobe PhotoshopGateway To Adobe Photoshop
Gateway To Adobe PhotoshopBUDNET
 
How to Turn a Picture Into a Line Drawing in Photoshop
How to Turn a Picture Into a Line Drawing in PhotoshopHow to Turn a Picture Into a Line Drawing in Photoshop
How to Turn a Picture Into a Line Drawing in Photoshop
Zenith Clipping
 
How to Blur Background in Photoshop 2023
How to Blur Background in Photoshop 2023How to Blur Background in Photoshop 2023
How to Blur Background in Photoshop 2023
Zenith Clipping
 
DAY2_SUPERHERO.pptx
DAY2_SUPERHERO.pptxDAY2_SUPERHERO.pptx
DAY2_SUPERHERO.pptx
PoddarWorks
 
Fajardo, winfreya m. 11 caritas, abm
Fajardo, winfreya m. 11  caritas, abmFajardo, winfreya m. 11  caritas, abm
Fajardo, winfreya m. 11 caritas, abm
shanneprincesspanamb
 
Adobe Illustrator CS6 Primer
Adobe Illustrator CS6 PrimerAdobe Illustrator CS6 Primer
Adobe Illustrator CS6 Primer
NYCCTfab
 
Adobe photoshop
Adobe photoshopAdobe photoshop
Adobe photoshop
Happy You
 
Presentation for posterising technique
Presentation for posterising techniquePresentation for posterising technique
Presentation for posterising technique
cedannatt
 
Presentation for posterising technique
Presentation for posterising techniquePresentation for posterising technique
Presentation for posterising technique
cedannatt
 

Similar to Photoshop Lesson 2 (20)

Pop Art Technique
Pop Art TechniquePop Art Technique
Pop Art Technique
 
Computer Science.pptx
Computer Science.pptxComputer Science.pptx
Computer Science.pptx
 
Ps zen mj
Ps zen mjPs zen mj
Ps zen mj
 
217 quick guide to photoshop cs6
217 quick guide to photoshop cs6217 quick guide to photoshop cs6
217 quick guide to photoshop cs6
 
Idiots guide-to-photoshop
Idiots guide-to-photoshopIdiots guide-to-photoshop
Idiots guide-to-photoshop
 
Adobe photoshop
Adobe photoshopAdobe photoshop
Adobe photoshop
 
Layer management3
 Layer management3 Layer management3
Layer management3
 
Layer management3
 Layer management3 Layer management3
Layer management3
 
Digital work station intro
Digital work station introDigital work station intro
Digital work station intro
 
Cours photoshop
Cours photoshopCours photoshop
Cours photoshop
 
adobephotoshop_frerking
adobephotoshop_frerking adobephotoshop_frerking
adobephotoshop_frerking
 
Gateway To Adobe Photoshop
Gateway To Adobe PhotoshopGateway To Adobe Photoshop
Gateway To Adobe Photoshop
 
How to Turn a Picture Into a Line Drawing in Photoshop
How to Turn a Picture Into a Line Drawing in PhotoshopHow to Turn a Picture Into a Line Drawing in Photoshop
How to Turn a Picture Into a Line Drawing in Photoshop
 
How to Blur Background in Photoshop 2023
How to Blur Background in Photoshop 2023How to Blur Background in Photoshop 2023
How to Blur Background in Photoshop 2023
 
DAY2_SUPERHERO.pptx
DAY2_SUPERHERO.pptxDAY2_SUPERHERO.pptx
DAY2_SUPERHERO.pptx
 
Fajardo, winfreya m. 11 caritas, abm
Fajardo, winfreya m. 11  caritas, abmFajardo, winfreya m. 11  caritas, abm
Fajardo, winfreya m. 11 caritas, abm
 
Adobe Illustrator CS6 Primer
Adobe Illustrator CS6 PrimerAdobe Illustrator CS6 Primer
Adobe Illustrator CS6 Primer
 
Adobe photoshop
Adobe photoshopAdobe photoshop
Adobe photoshop
 
Presentation for posterising technique
Presentation for posterising techniquePresentation for posterising technique
Presentation for posterising technique
 
Presentation for posterising technique
Presentation for posterising techniquePresentation for posterising technique
Presentation for posterising technique
 

More from TonyC445

Hector SFM 3
Hector SFM 3Hector SFM 3
Hector SFM 3TonyC445
 
Hector SFM 1
Hector SFM 1Hector SFM 1
Hector SFM 1TonyC445
 
Hector SFM 2
Hector SFM 2Hector SFM 2
Hector SFM 2TonyC445
 
SFM Lesson 3
SFM Lesson 3SFM Lesson 3
SFM Lesson 3TonyC445
 
SFM Lesson 2
SFM Lesson 2SFM Lesson 2
SFM Lesson 2TonyC445
 
SFM Lesson 1
SFM Lesson 1SFM Lesson 1
SFM Lesson 1TonyC445
 
HTML Lesson 1
HTML Lesson 1HTML Lesson 1
HTML Lesson 1TonyC445
 
HTML Lesson 2
HTML Lesson 2HTML Lesson 2
HTML Lesson 2TonyC445
 
HTML Lesson 3
HTML Lesson 3HTML Lesson 3
HTML Lesson 3TonyC445
 

More from TonyC445 (9)

Hector SFM 3
Hector SFM 3Hector SFM 3
Hector SFM 3
 
Hector SFM 1
Hector SFM 1Hector SFM 1
Hector SFM 1
 
Hector SFM 2
Hector SFM 2Hector SFM 2
Hector SFM 2
 
SFM Lesson 3
SFM Lesson 3SFM Lesson 3
SFM Lesson 3
 
SFM Lesson 2
SFM Lesson 2SFM Lesson 2
SFM Lesson 2
 
SFM Lesson 1
SFM Lesson 1SFM Lesson 1
SFM Lesson 1
 
HTML Lesson 1
HTML Lesson 1HTML Lesson 1
HTML Lesson 1
 
HTML Lesson 2
HTML Lesson 2HTML Lesson 2
HTML Lesson 2
 
HTML Lesson 3
HTML Lesson 3HTML Lesson 3
HTML Lesson 3
 

Recently uploaded

Synthetic Fiber Construction in lab .pptx
Synthetic Fiber Construction in lab .pptxSynthetic Fiber Construction in lab .pptx
Synthetic Fiber Construction in lab .pptx
Pavel ( NSTU)
 
Overview on Edible Vaccine: Pros & Cons with Mechanism
Overview on Edible Vaccine: Pros & Cons with MechanismOverview on Edible Vaccine: Pros & Cons with Mechanism
Overview on Edible Vaccine: Pros & Cons with Mechanism
DeeptiGupta154
 
Adversarial Attention Modeling for Multi-dimensional Emotion Regression.pdf
Adversarial Attention Modeling for Multi-dimensional Emotion Regression.pdfAdversarial Attention Modeling for Multi-dimensional Emotion Regression.pdf
Adversarial Attention Modeling for Multi-dimensional Emotion Regression.pdf
Po-Chuan Chen
 
Phrasal Verbs.XXXXXXXXXXXXXXXXXXXXXXXXXX
Phrasal Verbs.XXXXXXXXXXXXXXXXXXXXXXXXXXPhrasal Verbs.XXXXXXXXXXXXXXXXXXXXXXXXXX
Phrasal Verbs.XXXXXXXXXXXXXXXXXXXXXXXXXX
MIRIAMSALINAS13
 
How to Make a Field invisible in Odoo 17
How to Make a Field invisible in Odoo 17How to Make a Field invisible in Odoo 17
How to Make a Field invisible in Odoo 17
Celine George
 
Lapbook sobre os Regimes Totalitários.pdf
Lapbook sobre os Regimes Totalitários.pdfLapbook sobre os Regimes Totalitários.pdf
Lapbook sobre os Regimes Totalitários.pdf
Jean Carlos Nunes Paixão
 
The Roman Empire A Historical Colossus.pdf
The Roman Empire A Historical Colossus.pdfThe Roman Empire A Historical Colossus.pdf
The Roman Empire A Historical Colossus.pdf
kaushalkr1407
 
A Strategic Approach: GenAI in Education
A Strategic Approach: GenAI in EducationA Strategic Approach: GenAI in Education
A Strategic Approach: GenAI in Education
Peter Windle
 
Chapter 3 - Islamic Banking Products and Services.pptx
Chapter 3 - Islamic Banking Products and Services.pptxChapter 3 - Islamic Banking Products and Services.pptx
Chapter 3 - Islamic Banking Products and Services.pptx
Mohd Adib Abd Muin, Senior Lecturer at Universiti Utara Malaysia
 
Unit 8 - Information and Communication Technology (Paper I).pdf
Unit 8 - Information and Communication Technology (Paper I).pdfUnit 8 - Information and Communication Technology (Paper I).pdf
Unit 8 - Information and Communication Technology (Paper I).pdf
Thiyagu K
 
CACJapan - GROUP Presentation 1- Wk 4.pdf
CACJapan - GROUP Presentation 1- Wk 4.pdfCACJapan - GROUP Presentation 1- Wk 4.pdf
CACJapan - GROUP Presentation 1- Wk 4.pdf
camakaiclarkmusic
 
Thesis Statement for students diagnonsed withADHD.ppt
Thesis Statement for students diagnonsed withADHD.pptThesis Statement for students diagnonsed withADHD.ppt
Thesis Statement for students diagnonsed withADHD.ppt
EverAndrsGuerraGuerr
 
Supporting (UKRI) OA monographs at Salford.pptx
Supporting (UKRI) OA monographs at Salford.pptxSupporting (UKRI) OA monographs at Salford.pptx
Supporting (UKRI) OA monographs at Salford.pptx
Jisc
 
CLASS 11 CBSE B.St Project AIDS TO TRADE - INSURANCE
CLASS 11 CBSE B.St Project AIDS TO TRADE - INSURANCECLASS 11 CBSE B.St Project AIDS TO TRADE - INSURANCE
CLASS 11 CBSE B.St Project AIDS TO TRADE - INSURANCE
BhavyaRajput3
 
Acetabularia Information For Class 9 .docx
Acetabularia Information For Class 9  .docxAcetabularia Information For Class 9  .docx
Acetabularia Information For Class 9 .docx
vaibhavrinwa19
 
Additional Benefits for Employee Website.pdf
Additional Benefits for Employee Website.pdfAdditional Benefits for Employee Website.pdf
Additional Benefits for Employee Website.pdf
joachimlavalley1
 
aaaaaaaaaaaaaaaaaaaaaaaaaaaaaaaaaaaaaaaaa
aaaaaaaaaaaaaaaaaaaaaaaaaaaaaaaaaaaaaaaaaaaaaaaaaaaaaaaaaaaaaaaaaaaaaaaaaaaaaaaaaa
aaaaaaaaaaaaaaaaaaaaaaaaaaaaaaaaaaaaaaaaa
siemaillard
 
The geography of Taylor Swift - some ideas
The geography of Taylor Swift - some ideasThe geography of Taylor Swift - some ideas
The geography of Taylor Swift - some ideas
GeoBlogs
 
Polish students' mobility in the Czech Republic
Polish students' mobility in the Czech RepublicPolish students' mobility in the Czech Republic
Polish students' mobility in the Czech Republic
Anna Sz.
 
Embracing GenAI - A Strategic Imperative
Embracing GenAI - A Strategic ImperativeEmbracing GenAI - A Strategic Imperative
Embracing GenAI - A Strategic Imperative
Peter Windle
 

Recently uploaded (20)

Synthetic Fiber Construction in lab .pptx
Synthetic Fiber Construction in lab .pptxSynthetic Fiber Construction in lab .pptx
Synthetic Fiber Construction in lab .pptx
 
Overview on Edible Vaccine: Pros & Cons with Mechanism
Overview on Edible Vaccine: Pros & Cons with MechanismOverview on Edible Vaccine: Pros & Cons with Mechanism
Overview on Edible Vaccine: Pros & Cons with Mechanism
 
Adversarial Attention Modeling for Multi-dimensional Emotion Regression.pdf
Adversarial Attention Modeling for Multi-dimensional Emotion Regression.pdfAdversarial Attention Modeling for Multi-dimensional Emotion Regression.pdf
Adversarial Attention Modeling for Multi-dimensional Emotion Regression.pdf
 
Phrasal Verbs.XXXXXXXXXXXXXXXXXXXXXXXXXX
Phrasal Verbs.XXXXXXXXXXXXXXXXXXXXXXXXXXPhrasal Verbs.XXXXXXXXXXXXXXXXXXXXXXXXXX
Phrasal Verbs.XXXXXXXXXXXXXXXXXXXXXXXXXX
 
How to Make a Field invisible in Odoo 17
How to Make a Field invisible in Odoo 17How to Make a Field invisible in Odoo 17
How to Make a Field invisible in Odoo 17
 
Lapbook sobre os Regimes Totalitários.pdf
Lapbook sobre os Regimes Totalitários.pdfLapbook sobre os Regimes Totalitários.pdf
Lapbook sobre os Regimes Totalitários.pdf
 
The Roman Empire A Historical Colossus.pdf
The Roman Empire A Historical Colossus.pdfThe Roman Empire A Historical Colossus.pdf
The Roman Empire A Historical Colossus.pdf
 
A Strategic Approach: GenAI in Education
A Strategic Approach: GenAI in EducationA Strategic Approach: GenAI in Education
A Strategic Approach: GenAI in Education
 
Chapter 3 - Islamic Banking Products and Services.pptx
Chapter 3 - Islamic Banking Products and Services.pptxChapter 3 - Islamic Banking Products and Services.pptx
Chapter 3 - Islamic Banking Products and Services.pptx
 
Unit 8 - Information and Communication Technology (Paper I).pdf
Unit 8 - Information and Communication Technology (Paper I).pdfUnit 8 - Information and Communication Technology (Paper I).pdf
Unit 8 - Information and Communication Technology (Paper I).pdf
 
CACJapan - GROUP Presentation 1- Wk 4.pdf
CACJapan - GROUP Presentation 1- Wk 4.pdfCACJapan - GROUP Presentation 1- Wk 4.pdf
CACJapan - GROUP Presentation 1- Wk 4.pdf
 
Thesis Statement for students diagnonsed withADHD.ppt
Thesis Statement for students diagnonsed withADHD.pptThesis Statement for students diagnonsed withADHD.ppt
Thesis Statement for students diagnonsed withADHD.ppt
 
Supporting (UKRI) OA monographs at Salford.pptx
Supporting (UKRI) OA monographs at Salford.pptxSupporting (UKRI) OA monographs at Salford.pptx
Supporting (UKRI) OA monographs at Salford.pptx
 
CLASS 11 CBSE B.St Project AIDS TO TRADE - INSURANCE
CLASS 11 CBSE B.St Project AIDS TO TRADE - INSURANCECLASS 11 CBSE B.St Project AIDS TO TRADE - INSURANCE
CLASS 11 CBSE B.St Project AIDS TO TRADE - INSURANCE
 
Acetabularia Information For Class 9 .docx
Acetabularia Information For Class 9  .docxAcetabularia Information For Class 9  .docx
Acetabularia Information For Class 9 .docx
 
Additional Benefits for Employee Website.pdf
Additional Benefits for Employee Website.pdfAdditional Benefits for Employee Website.pdf
Additional Benefits for Employee Website.pdf
 
aaaaaaaaaaaaaaaaaaaaaaaaaaaaaaaaaaaaaaaaa
aaaaaaaaaaaaaaaaaaaaaaaaaaaaaaaaaaaaaaaaaaaaaaaaaaaaaaaaaaaaaaaaaaaaaaaaaaaaaaaaaa
aaaaaaaaaaaaaaaaaaaaaaaaaaaaaaaaaaaaaaaaa
 
The geography of Taylor Swift - some ideas
The geography of Taylor Swift - some ideasThe geography of Taylor Swift - some ideas
The geography of Taylor Swift - some ideas
 
Polish students' mobility in the Czech Republic
Polish students' mobility in the Czech RepublicPolish students' mobility in the Czech Republic
Polish students' mobility in the Czech Republic
 
Embracing GenAI - A Strategic Imperative
Embracing GenAI - A Strategic ImperativeEmbracing GenAI - A Strategic Imperative
Embracing GenAI - A Strategic Imperative
 

Photoshop Lesson 2

  • 1. Adobe Photoshop Lesson 2 Manipulating Layers and Shapes By Antonio Cribari
  • 2. Adobe Photoshop Lesson 2 – Manipulating Layers and Shapes Objective: You will learn how to work with Layers and shapes in Adobe Photoshop. This will allow for more creativity and flexibility in your work. Requirements: You must have Adobe Photoshop CS3 or higher. (The interface is not exactly same for older versions)
  • 3. Adobe Photoshop Lesson 2 – Manipulating Layers and Shapes Step 1 Step-by-Step For this lesson, we will be focusing on the layers tab at the bottom right corner of the screen. (this tab should be open by default) Start out by creating a 500 x 500 px blank canvas. Take note of the Layers window. A New layer should have been created that is entitled “background” and is a locked layer. For now, leave this layer alone.
  • 4. Adobe Photoshop Lesson 2 – Manipulating Layers and Shapes Step 2 Step-by-Step Let’s Create a new layer. Click on Layer -> New -> New Layer. . .
  • 5. Adobe Photoshop Lesson 2 – Manipulating Layers and Shapes Step 3 Step-by-Step You should now see a new window entitled “New Layer”. For the sake of this lesson, use the name “My First New Layer” as the New Layer’s name. (Use the following settings as shown in the picture)
  • 6. Adobe Photoshop Lesson 2 – Manipulating Layers and Shapes Step 4 Step-by-Step Go ahead and draw something using the brush tool with the new layer active. For this example, I will draw a square.
  • 7. Adobe Photoshop Lesson 2 – Manipulating Layers and Shapes Step 5 Step-by-Step Now use the Move Tool and try dragging your new drawing around. Tip: The letters in parentheses next to tools are keyboard shortcuts to activate that specified tool. Learn these shortcuts to enable you to work faster in Adobe Photoshop.
  • 8. Adobe Photoshop Lesson 2 – Manipulating Layers and Shapes Step 6 Step-by-Step The reason you can move your drawing around is because you drew on an empty layer. Empty Layers are 100% transparent by default, and this allows for complex manipulation when making graphics. Now let’s try duplicating the layer that you drew on. This will make a second instance of your layer. Right click on “My New Layer” and click on “Duplicate Layer…”
  • 9. Adobe Photoshop Lesson 2 – Manipulating Layers and Shapes Step 7 Step-by-Step You should now see a window similar to the one showed below. You can change the name of this layer if you want, but I will leave it as “My New Layer copy” for the sake of this example.
  • 10. Adobe Photoshop Lesson 2 – Manipulating Layers and Shapes Step 8 Step-by-Step Now that you have duplicated your first layer, observe the layers dialog box at the bottom right corner of the screen. It should look similar to the picture shown below. Select your duplicated layer, and try moving it around using the Move Tool. Since you have two instances of this layer, you are able to move one around, and the other will remain still. Move your duplicated layer enough so you can tell the two apart from each other.
  • 11. Adobe Photoshop Lesson 2 – Manipulating Layers and Shapes Step 9 Step-by-Step Right click on the duplicated layer that should appear above the original layer. Right click it and select Merge Down. Doing this will merge the selected layer with the layer below it.
  • 12. Adobe Photoshop Lesson 2 – Manipulating Layers and Shapes Step 10 Step-by-Step Try moving the merged layers. They should now both move together as one layer.
  • 13. Adobe Photoshop Lesson 2 – Manipulating Layers and Shapes Step 11 Step-by-Step Try experimenting with layers to learn how they work. For now, you have been taught the basics of creating and manipulating layers. Let’s learn one more function. Right click on your merged layer, and click Delete Layer to remove the layer from your canvas.
  • 14. Adobe Photoshop Lesson 2 – Manipulating Layers and Shapes Step 12 Step-by-Step Now that you understand how Layers work, let’s move on to using the shape tool. Click on the shape tool now. Right clicking the shape tool will allow you to change the active shape being drawn. Right click it, and make sure it is set to the Rectangle Tool.
  • 15. Adobe Photoshop Lesson 2 – Manipulating Layers and Shapes Step 13 Step-by-Step With the Rectangle Tool active, draw a rectangle in your canvas.
  • 16. Adobe Photoshop Lesson 2 – Manipulating Layers and Shapes Step 14 Step-by-Step Observe your Layers window at the bottom right corner of the screen. The shape should now show up along with what is known as a “Vector Mask”. We will ignore masks for this lesson. Double click on the colored box next to your shape layer. Doing this will enable you to change the color of the shape that you drew.
  • 17. Adobe Photoshop Lesson 2 – Manipulating Layers and Shapes Step 15 Step-by-Step Once you understand how to change a shape’s color, Right click on your shape’s layer and click “Rasterize Layer” to remove the vector mask from your shape. The shape you drew should now be set as a normal editable layer.
  • 18. Adobe Photoshop Lesson 2 – Manipulating Layers and Shapes Step 16 Step-by-Step Click on the eye icon to the left of your shape layer. Clicking this icon will hide or unhide the layer that it is attached to.
  • 19. Adobe Photoshop Lesson 2 – Manipulating Layers and Shapes Step 17 Step-by-Step Now try changing the Opacity levels with the Shape layer active. Change this to a value of 50% or lower. This will make your active layer translucent or entirely transparent depending on your set values.
  • 20. Adobe Photoshop Lesson 2 – Manipulating Layers and Shapes Completed Conclusion This concludes Lesson 2, and you should now be able to work more efficiently using layers and shapes. Here is a list of what you should understand from this lesson. • Location of Layers Tab • How to make empty New Layers • How to move layers freely using the Move Tool • How to Duplicate, Merge, and Delete Layers • How to draw with the Shape Tool (specifically the Rectangle Tool) • How to change the color of a Shape Tool Layer • How to Rasterize a Layer (Removing unnecessary properties of a layer) • How to Hide layers • How to change the opacity of a layer (visibility)
  • 21. Adobe Photoshop Lesson 2 – Manipulating Layers and Shapes Review On-Your-Own Now that you know how to work with layers in Adobe Photoshop, complete the following tasks below. You may refer to the lesson at any time for help. 1. Create a 350 x 500 canvas project 2. Create a New Layer, name it “Smile” 3. Draw a smiley face in that new layer with 37% Opacity 4. Create a green rectangle with the opacity of 55% 5. Rasterize the rectangle layer 6. Create a new layer and name it “unknown” 7. Draw a blue rectangle and hide its layer. 8. Delete the layer entitled “Smile” This concludes the exercise for Manipulating Layers and Shapes. Move on to Lesson 3 when you feel you have a strong understanding of Lesson 2.