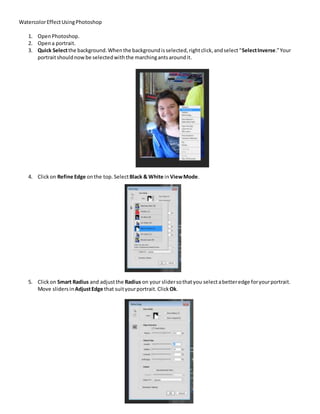
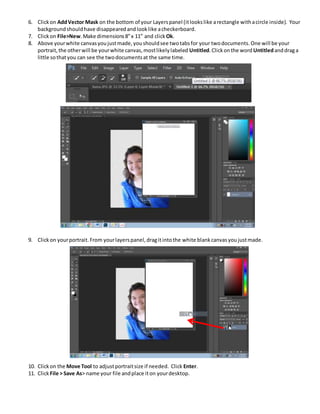
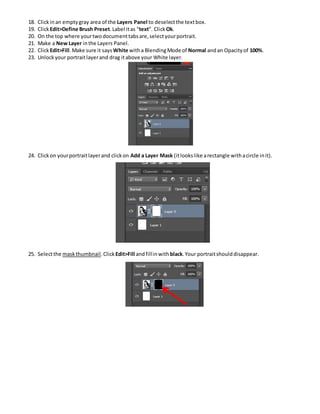
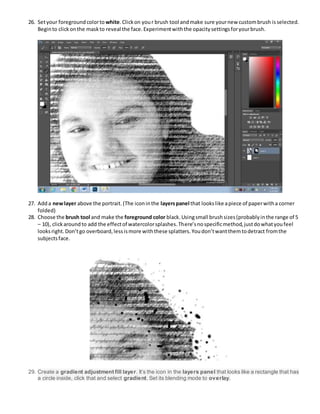
WatercolorEffectUsingPhotoshop
1. OpenPhotoshop.
2. Opena portrait.
3. Quick Selectthe background.Whenthe backgroundisselected,rightclick,andselect“SelectInverse.”Your
portraitshouldnowbe selectedwiththe marchingantsaroundit.
4. Clickon Refine Edge onthe top. SelectBlack & White inViewMode.
5. Clickon Smart Radius and adjustthe Radius on your slidersothatyou selectabetteredge foryourportrait.
Move slidersin AdjustEdge that suityourportrait. ClickOk.
6. Clickon AddVector Mask on the bottom of your Layerspanel (itlookslike arectangle withacircle inside). Your
backgroundshouldhave disappearedandlooklike acheckerboard.
7. Clickon File>New.Make dimensions8”x 11” and clickOk.
8. Above yourwhite canvasyoujustmade,youshouldsee twotabsfor your twodocuments.One will be your
portrait,the otherwill be yourwhite canvas,mostlikelylabeled Untitled.Clickonthe word Untitledanddraga
little sothatyou can see the twodocumentsat the same time.
9. Clickon yourportrait.From yourlayerspanel,dragitintothe white blankcanvasyoujustmade.
10. Clickon the Move Tool to adjustportraitsize if needed. Click Enter.
11. ClickFile > Save As> name your file andplace iton yourdesktop.
12. Up above where the twodocumenttabsare, clickthe ‘x’to close bothfiles.Whenaskingtosave eitherof these
files,selectNo.
13. ClickFile>Openandopenyourportraityoujust editedwiththe whitebackground.
14. ClickImage>Adjustments>Desaturate.Yourportraitshouldbe blackand white.
15. ClickImage>Adjust>Levelstoup the contrast.Try to get some verydarkdarks and verylightlights,without
losingthe image.Click Ok.
16. ClickFile>New.Make yourcanvas 700 x 700 pixels.Youshouldseeablankwhite square.
17. Clickon the Text tool and make a textbox overthe entire square.Selectthe foregroundcolortoblack,the font
to Edwardian Script, and the fontsize to 10. Type intothe box and fill inwithrandomtext.
18. Clickinan emptygray area of the Layers Panel to deselectthe textbox.
19. ClickEdit>Define Brush Preset.Label itas “text”. Click Ok.
20. On the top where yourtwodocumenttabsare,selectyourportrait.
21. Make a New Layer inthe Layers Panel.
22. ClickEdit>Fill.Make sure it says White witha BlendingMode of Normal andan Opacityof 100%.
23. Unlockyour portraitlayerand drag itabove your White layer.
24. Clickon yourportraitlayerand clickon Add a Layer Mask (itlookslike arectangle withacircle init).
25. Selectthe maskthumbnail.Click Edit>Fill andfillinwith black.Your portraitshoulddisappear.
26. Setyour foregroundcolorto white.Clickon your brush tool andmake sure yournew custombrush isselected.
Beginto clickonthe maskto reveal the face.Experimentwiththe opacitysettingsforyourbrush.
27. Adda newlayer above the portrait.(The iconinthe layerspanel that lookslike apiece of paperwitha corner
folded)
28. Choose the brush tool and make the foreground color black.Usingsmall brushsizes(probablyinthe range of 5
– 10), clickaroundto add the effectof watercolorsplashes.There’snospecificmethod,justdowhatyoufeel
looksright.Don’tgo overboard,lessismore withthese splatters.Youdon’twantthemtodetract fromthe
subjectsface.
29. Create a gradient adjustment fill layer. It’s the icon in the layers panel that looks like a rectangle that has
a circle inside, click that and select gradient. Set its blending mode to overlay.
30. You can choose any colors you prefer, I selected one of the defaults.
31. Setits blendingmode to overlay.

Watercolor effect using photoshop

  • 1.
    WatercolorEffectUsingPhotoshop 1. OpenPhotoshop. 2. Openaportrait. 3. Quick Selectthe background.Whenthe backgroundisselected,rightclick,andselect“SelectInverse.”Your portraitshouldnowbe selectedwiththe marchingantsaroundit. 4. Clickon Refine Edge onthe top. SelectBlack & White inViewMode. 5. Clickon Smart Radius and adjustthe Radius on your slidersothatyou selectabetteredge foryourportrait. Move slidersin AdjustEdge that suityourportrait. ClickOk.
  • 2.
    6. Clickon AddVectorMask on the bottom of your Layerspanel (itlookslike arectangle withacircle inside). Your backgroundshouldhave disappearedandlooklike acheckerboard. 7. Clickon File>New.Make dimensions8”x 11” and clickOk. 8. Above yourwhite canvasyoujustmade,youshouldsee twotabsfor your twodocuments.One will be your portrait,the otherwill be yourwhite canvas,mostlikelylabeled Untitled.Clickonthe word Untitledanddraga little sothatyou can see the twodocumentsat the same time. 9. Clickon yourportrait.From yourlayerspanel,dragitintothe white blankcanvasyoujustmade. 10. Clickon the Move Tool to adjustportraitsize if needed. Click Enter. 11. ClickFile > Save As> name your file andplace iton yourdesktop.
  • 3.
    12. Up abovewhere the twodocumenttabsare, clickthe ‘x’to close bothfiles.Whenaskingtosave eitherof these files,selectNo. 13. ClickFile>Openandopenyourportraityoujust editedwiththe whitebackground. 14. ClickImage>Adjustments>Desaturate.Yourportraitshouldbe blackand white. 15. ClickImage>Adjust>Levelstoup the contrast.Try to get some verydarkdarks and verylightlights,without losingthe image.Click Ok. 16. ClickFile>New.Make yourcanvas 700 x 700 pixels.Youshouldseeablankwhite square. 17. Clickon the Text tool and make a textbox overthe entire square.Selectthe foregroundcolortoblack,the font to Edwardian Script, and the fontsize to 10. Type intothe box and fill inwithrandomtext.
  • 4.
    18. Clickinan emptygrayarea of the Layers Panel to deselectthe textbox. 19. ClickEdit>Define Brush Preset.Label itas “text”. Click Ok. 20. On the top where yourtwodocumenttabsare,selectyourportrait. 21. Make a New Layer inthe Layers Panel. 22. ClickEdit>Fill.Make sure it says White witha BlendingMode of Normal andan Opacityof 100%. 23. Unlockyour portraitlayerand drag itabove your White layer. 24. Clickon yourportraitlayerand clickon Add a Layer Mask (itlookslike arectangle withacircle init). 25. Selectthe maskthumbnail.Click Edit>Fill andfillinwith black.Your portraitshoulddisappear.
  • 5.
    26. Setyour foregroundcolortowhite.Clickon your brush tool andmake sure yournew custombrush isselected. Beginto clickonthe maskto reveal the face.Experimentwiththe opacitysettingsforyourbrush. 27. Adda newlayer above the portrait.(The iconinthe layerspanel that lookslike apiece of paperwitha corner folded) 28. Choose the brush tool and make the foreground color black.Usingsmall brushsizes(probablyinthe range of 5 – 10), clickaroundto add the effectof watercolorsplashes.There’snospecificmethod,justdowhatyoufeel looksright.Don’tgo overboard,lessismore withthese splatters.Youdon’twantthemtodetract fromthe subjectsface. 29. Create a gradient adjustment fill layer. It’s the icon in the layers panel that looks like a rectangle that has a circle inside, click that and select gradient. Set its blending mode to overlay.
  • 6.
    30. You canchoose any colors you prefer, I selected one of the defaults. 31. Setits blendingmode to overlay.