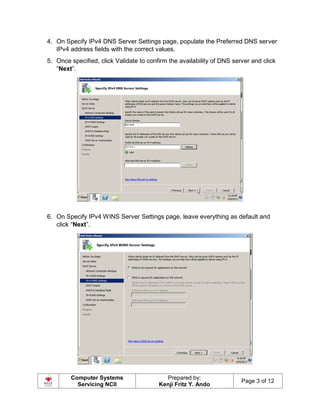
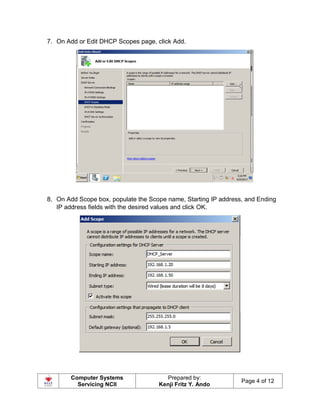
Computer Systems
Servicing NCII
Prepared by:
Kenji Fritz Y. Ando
Page 1 of 12
Set Up DHCP in Windows Server 2008 R2
1. Fire up the Server Manager, right click on roles, and then select add roles.
2. You will be prompted with the normal “Before You Begin” screen, and after
clicking Next you’ll be able to choose DHCP Server.
Computer Systems
Servicing NCII
Prepared by:
Kenji Fritz Y. Ando
Page 2 of 12
3. Next you’ll want to select the network connection to bind the DHCP protocol to.
Computer Systems
Servicing NCII
Prepared by:
Kenji Fritz Y. Ando
Page 3 of 12
4. On Specify IPv4 DNS Server Settings page, populate the Preferred DNS server
IPv4 address fields with the correct values.
5. Once specified, click Validate to confirm the availability of DNS server and click
“Next”.
6. On Specify IPv4 WINS Server Settings page, leave everything as default and
click “Next”.
Computer Systems
Servicing NCII
Prepared by:
Kenji Fritz Y. Ando
Page 4 of 12
7. On Add or Edit DHCP Scopes page, click Add.
8. On Add Scope box, populate the Scope name, Starting IP address, and Ending
IP address fields with the desired values and click OK.
Computer Systems
Servicing NCII
Prepared by:
Kenji Fritz Y. Ando
Page 5 of 12
9. Back on Add or Edit DHCP Scope page, click “Next”.
10.On Configure DHCPv6 Stateless Mode page, click “Disable DHCPv6” and click
“Next”.
Computer Systems
Servicing NCII
Prepared by:
Kenji Fritz Y. Ando
Page 6 of 12
11.On Authorize DHCP Server page, make sure that the Use current credentials
radio button is selected. Alternatively, Use alternate credentials radio button can
also be selected to specify the domain admin credentials that is to be allowed to
authorize DHCP server in AD DS.
12.The confirmation screen where you can finally click “Install”.
Computer Systems
Servicing NCII
Prepared by:
Kenji Fritz Y. Ando
Page 7 of 12
13.Once installed, click Close on the Installation Results page.
Computer Systems
Servicing NCII
Prepared by:
Kenji Fritz Y. Ando
Page 8 of 12
14.Close Server Manager window when done.
How to check if DCHP Server is working?
1. Go to the Network icon at the lower right, right click and Open Network and
Sharing Center.
Computer Systems
Servicing NCII
Prepared by:
Kenji Fritz Y. Ando
Page 9 of 12
2. Click “Local Area Connection”
3. Click “Properties”
Computer Systems
Servicing NCII
Prepared by:
Kenji Fritz Y. Ando
Page 10 of 12
4. Double click “Internet Protocol Version 4 (TCP/IPv4)”
5. From static address, click “Obtain an IP address automatically” and click “OK”.
Computer Systems
Servicing NCII
Prepared by:
Kenji Fritz Y. Ando
Page 11 of 12
6. Click “Details”
Computer Systems
Servicing NCII
Prepared by:
Kenji Fritz Y. Ando
Page 12 of 12
7. IP address should be within the range of the configured DHCP Scope.

CSS Module 6 - Configure a DHCP Server

  • 1.
    Computer Systems Servicing NCII Preparedby: Kenji Fritz Y. Ando Page 1 of 12 Set Up DHCP in Windows Server 2008 R2 1. Fire up the Server Manager, right click on roles, and then select add roles. 2. You will be prompted with the normal “Before You Begin” screen, and after clicking Next you’ll be able to choose DHCP Server.
  • 2.
    Computer Systems Servicing NCII Preparedby: Kenji Fritz Y. Ando Page 2 of 12 3. Next you’ll want to select the network connection to bind the DHCP protocol to.
  • 3.
    Computer Systems Servicing NCII Preparedby: Kenji Fritz Y. Ando Page 3 of 12 4. On Specify IPv4 DNS Server Settings page, populate the Preferred DNS server IPv4 address fields with the correct values. 5. Once specified, click Validate to confirm the availability of DNS server and click “Next”. 6. On Specify IPv4 WINS Server Settings page, leave everything as default and click “Next”.
  • 4.
    Computer Systems Servicing NCII Preparedby: Kenji Fritz Y. Ando Page 4 of 12 7. On Add or Edit DHCP Scopes page, click Add. 8. On Add Scope box, populate the Scope name, Starting IP address, and Ending IP address fields with the desired values and click OK.
  • 5.
    Computer Systems Servicing NCII Preparedby: Kenji Fritz Y. Ando Page 5 of 12 9. Back on Add or Edit DHCP Scope page, click “Next”. 10.On Configure DHCPv6 Stateless Mode page, click “Disable DHCPv6” and click “Next”.
  • 6.
    Computer Systems Servicing NCII Preparedby: Kenji Fritz Y. Ando Page 6 of 12 11.On Authorize DHCP Server page, make sure that the Use current credentials radio button is selected. Alternatively, Use alternate credentials radio button can also be selected to specify the domain admin credentials that is to be allowed to authorize DHCP server in AD DS. 12.The confirmation screen where you can finally click “Install”.
  • 7.
    Computer Systems Servicing NCII Preparedby: Kenji Fritz Y. Ando Page 7 of 12 13.Once installed, click Close on the Installation Results page.
  • 8.
    Computer Systems Servicing NCII Preparedby: Kenji Fritz Y. Ando Page 8 of 12 14.Close Server Manager window when done. How to check if DCHP Server is working? 1. Go to the Network icon at the lower right, right click and Open Network and Sharing Center.
  • 9.
    Computer Systems Servicing NCII Preparedby: Kenji Fritz Y. Ando Page 9 of 12 2. Click “Local Area Connection” 3. Click “Properties”
  • 10.
    Computer Systems Servicing NCII Preparedby: Kenji Fritz Y. Ando Page 10 of 12 4. Double click “Internet Protocol Version 4 (TCP/IPv4)” 5. From static address, click “Obtain an IP address automatically” and click “OK”.
  • 11.
    Computer Systems Servicing NCII Preparedby: Kenji Fritz Y. Ando Page 11 of 12 6. Click “Details”
  • 12.
    Computer Systems Servicing NCII Preparedby: Kenji Fritz Y. Ando Page 12 of 12 7. IP address should be within the range of the configured DHCP Scope.