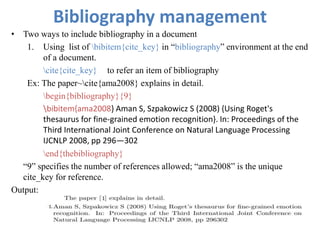
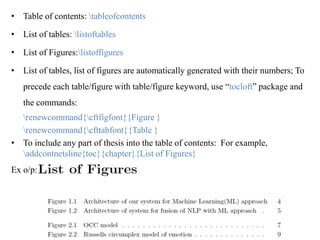
Downloaded 142 times


![Basics of Typesetting
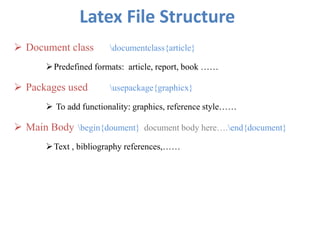
Document Class: documentclass[options]{class}
Ex: documentclass[11pt,twoside,a4paper]{article}
class: specifies type of the document and exists in ‘.cls’ format. Some
predefined classes are:
Article: for scientific journals, presentations, invitations…….
IEEEtran: for IEEE transactions format articles
Report : for longer reports having several chapters
…………………
Options: customizes the behavior of document class. Some Common options:
10pt or 11pt: main font of the document
A4paper or letter paper: size of the paper
Onecolumn or twocolumn: typeset document in one or two columns
………………….](https://image.slidesharecdn.com/mymaterial-latex1-140813000752-phpapp02/85/documents-writing-with-LATEX-26-320.jpg)
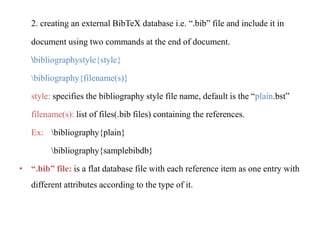
![ Use packages: usepackage[options]{package (s)}
Ex: usepackage[margin=2cm]{geometry}
Package: enhance the capabilities of Latex and exists in ‘.sty’ format. Some
popular and necessary packages are:
graphicx: to include images into document
Amsmath: to improve the mathematical equations environments
rotating: to rotate the text with options of 90o, 270o etc.
geometry: for setting the page layout (width, height, margins etc.)
url: for formatting email addresses, directory paths etc.
………….
Options: keywords to trigger special features of packages
for url package: obeyspaces--- to allow spaces in url, hyphens---to allow
breaks of url at hyphens.
......................](https://image.slidesharecdn.com/mymaterial-latex1-140813000752-phpapp02/85/documents-writing-with-LATEX-27-320.jpg)
![ Main Body: The document content between begin{document}..end{document}.
Basic commands for typesetting:
newline or to start new line
newpage to start new page
bf or textbf{..} to get bold font
emph or textit{..} or it to get italics
ul or underline{...} to underline the text
output reserved characters (#, $, %, ^, &, _, {, }, ~, ) using backslash ‘’
Comments using % character---ignores rest of current line,
line break, all whitespace at the beginning of next line.
For multi-line comments use “comment” environment (begin{comment}
…..end{comment}) from “Verbatim” package.
Any environment in Latex is of format: begin{evironment}[args]{args}…
end{environemnt} where arguments in [] are optional but in {} are mandatory.](https://image.slidesharecdn.com/mymaterial-latex1-140813000752-phpapp02/85/documents-writing-with-LATEX-28-320.jpg)


![Lists
• Three types of lists: itemize, enumerate, description
• “itemize” provide bulleted lists.
begin{itemize}
item first item
item second item
item third item
end{itemize}
• “enumerate” is for ordered lists with numerals (1,2,3…..); Use “enumerate”
package for different types of orders(alphabets, roman numbers etc.)
begin{enumerate}[i]
item first item
item second item
item third item
end{enumerate}](https://image.slidesharecdn.com/mymaterial-latex1-140813000752-phpapp02/85/documents-writing-with-LATEX-39-320.jpg)
![• “description” is useful for glossary; allows to pass item label by passing
optional argument
begin{description}
item[first] first item
item[second] second item
item [third] third item
end{description}
• Nested lists:
begin{enumerate}
item first item
begin{enumerate}
item first sub item
item second sub item
end{enumerate}
item second item
end{enumerate}](https://image.slidesharecdn.com/mymaterial-latex1-140813000752-phpapp02/85/documents-writing-with-LATEX-40-320.jpg)
![• Fractions: frac{numerator}{denominator}
Ex: frac{n!}{k!(n-k)!}
• Roots: sqrt[magnitude] {}
Ex: sqrt{x}
sqrt[n]{1+x+x^2+x^3+ldots}
• Add text to equations: using text{…}
Ex: 50 text{apples} times 100 text{apples}= text{lots of apples}^2
• list of Latex symbols can be inserted directly from Texmaker directly or can be find
out in http://www.artofproblemsolving.com/Wiki/index.php/LaTeX:Symbols
(or) by using “detexify” (http://detexify.kirelabs.org)
• More about math environment from “amsmath” documentation
[ftp://ftp.ams.org/pub/tex/doc/amsmath/amsldoc.pdf ]](https://image.slidesharecdn.com/mymaterial-latex1-140813000752-phpapp02/85/documents-writing-with-LATEX-42-320.jpg)
![Importing Graphics
• Two ways to include graphics in Latex document
– Creating graphics
– Importing graphics: most usual way to include pictures
• For dvi output format , Latex supports “.eps” figures; for pdf output, it
supports “.pdf”, “.png”, “.jpg” figures.
• Use “graphicx” package.
• Use the command: includegraphics[attr1=val1, ..., attrn=valn]{imagename}
attributes are: width, height
keepaspectratio either true or false
scale to reduce the size
angle to rotate the image
trim has 4 values l,b,r,t to crop from 4 sides
clip should be true for working of the trim](https://image.slidesharecdn.com/mymaterial-latex1-140813000752-phpapp02/85/documents-writing-with-LATEX-43-320.jpg)
![• To include an image use “figure” environment , it allows to specify position of the
image, caption and label to the picture.
position:- h:current position, t: top , b:bottom, p: special page, !:determine good float
position, H: exactly at current position
Caption: to give the automatic numbering and description for the image
label: to give unique name in a document
Ex:
begin{figure}[p]
centering
includegraphics[width=0.8textwidth]{image.png}
label{fig:sampleimage}
caption{an awesome image of a chick}
end{figure}](https://image.slidesharecdn.com/mymaterial-latex1-140813000752-phpapp02/85/documents-writing-with-LATEX-44-320.jpg)
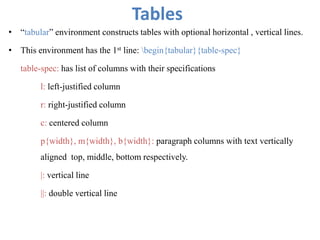
![• some commands needed while constructing table
[width] starts new row, with optional argument of additional vertical
space after a row
hline horizontal line
cline{i-j} partial horizontal line starts with column i, and ends with column j
& column separator
• Ex: begin{tabular}{ |l|c||r| }
hline
1 & 2 & 3 hline
4 & 5 & 6 cline{2-3}
7 & 8 & 9 hline
end{tabular}
• Define multiple columns : use *{number of columns}{column-spec} in table-spec
Ex: begin{tabular}{l*{6}{c}r} creates table with one left justified
column, 6 centered columns, one right justified column.](https://image.slidesharecdn.com/mymaterial-latex1-140813000752-phpapp02/85/documents-writing-with-LATEX-46-320.jpg)
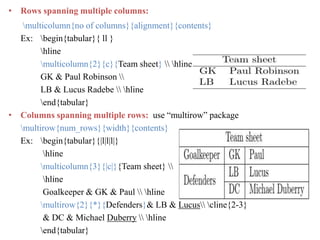
![• “table” environment is for position of the table, label, caption support.
Syntax:
begin{table}[position specifier]
centering
begin{tabular}{l}
……….
end{tabular}
caption{This table shows some data}
label{tab:myfirsttable}
end{table}
• Position specifier value can be h, t, b, p, !; default value is tbp
• Excel spread sheets can be imported using “excel2latex” package, and
openoffice spread sheets using “clac2latex” package;
• Latex also has support for importing from other softwares using different
packages.](https://image.slidesharecdn.com/mymaterial-latex1-140813000752-phpapp02/85/documents-writing-with-LATEX-48-320.jpg)
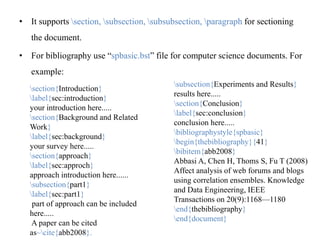
![• Multiple citations: use the command
cite{citekey1,citekey2,citekey3…}
• No cite: to appear a reference in the bibliography without referencing in the
main text nocite{cite_key} command can be used.
• Author-year format of referencing: use “natbib” package for different styles
of author-year, numeric citation formats.
usepackage[options]{natbib}
It provides different style files: plainnat.bst, arrrvnat.bst, rmpaps.bst etc…
provides different citation commands: citet{}, citep{}, citet*{} etc…
options: authoryear for author-year style
square [] around citation numbers
super superscripted numeric citations etc…..
Ex:](https://image.slidesharecdn.com/mymaterial-latex1-140813000752-phpapp02/85/documents-writing-with-LATEX-53-320.jpg)
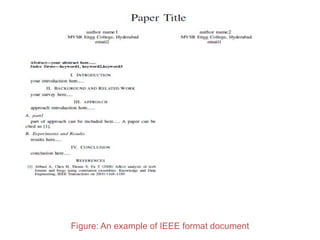
![Creating IEEE format document
• For this “IEEEtran.cls” is used.
Ex: documentclass[9pt, conference]{IEEEtran}
• IEEEtran and its support files can be downloaded from IEEEwebsite:
http://www.ieee.org/
• IEEEtran supports different modes: conference, journal, technote, peerreview...
• It supports two text column formats: one column, two column
two paper sizes: a4paper, letter paper
two layouts: oneside, twoside
• It provides slightly different commands than from a usual article and report.](https://image.slidesharecdn.com/mymaterial-latex1-140813000752-phpapp02/85/documents-writing-with-LATEX-58-320.jpg)


The document discusses how to write documents using LaTeX. It covers installing LaTeX and related programs, the basic structure of LaTeX documents, formatting text, inserting images and tables, writing mathematical equations, and guidelines for writing documents like theses and papers in IEEE format. LaTeX is a document preparation system built on top of TeX that allows users to focus on writing content rather than layout, and makes it easy to include images, citations, cross-references, and mathematical equations.