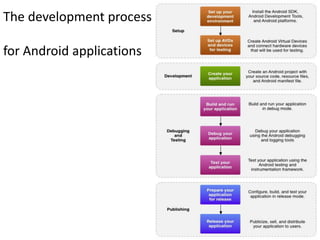
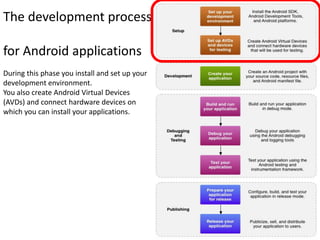
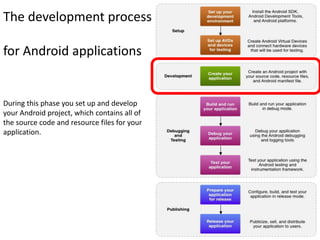
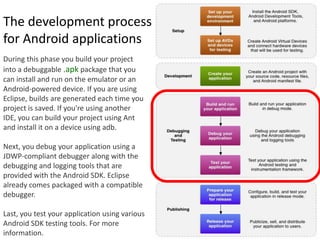
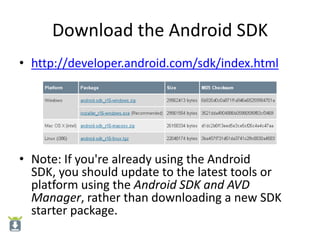
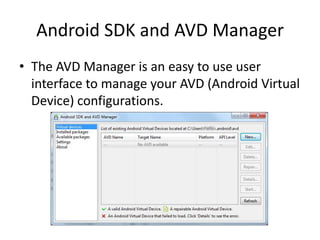
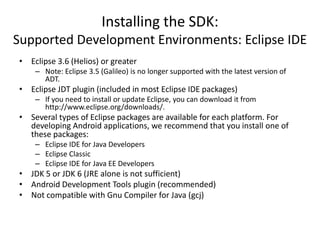
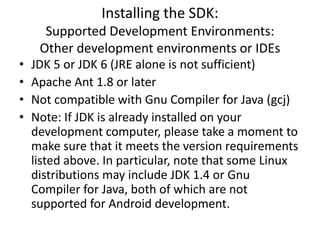
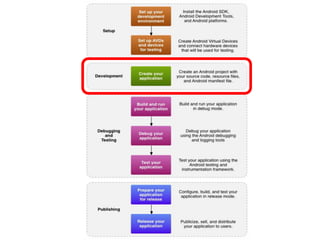
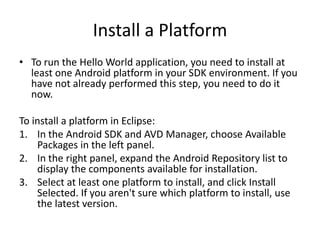
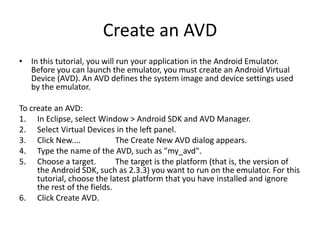
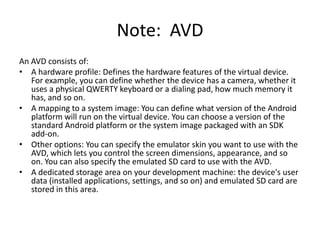
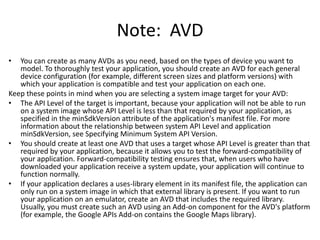
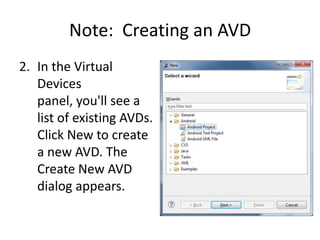
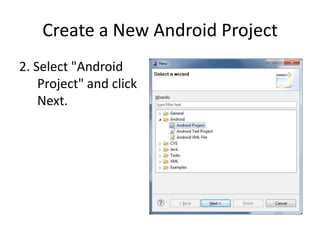
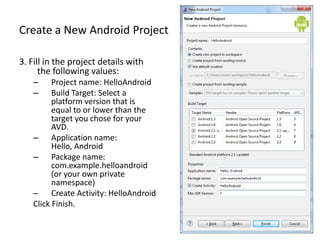
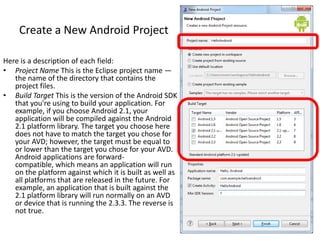
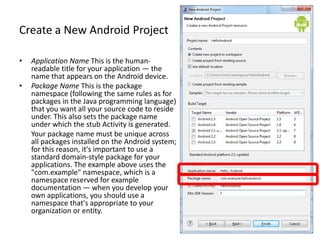
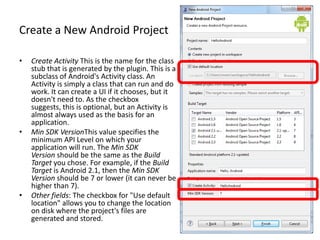
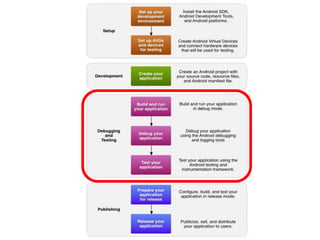
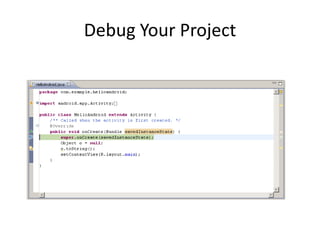
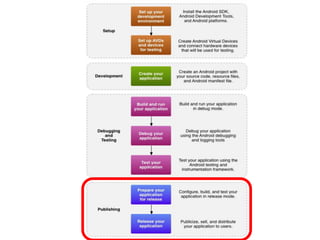
Arief Hamdani Gunawan
The development process

for Android applications
The development process

for Android applications
During this phase you install and set up your
development environment.
You also create Android Virtual Devices
(AVDs) and connect hardware devices on
which you can install your applications.
The development process

for Android applications


During this phase you set up and develop
your Android project, which contains all of
the source code and resource files for your
application.
The development process
for Android applications
During this phase you build your project
into a debuggable .apk package that you
can install and run on the emulator or an
Android-powered device. If you are using
Eclipse, builds are generated each time you
project is saved. If you're using another
IDE, you can build your project using Ant
and install it on a device using adb.

Next, you debug your application using a
JDWP-compliant debugger along with the
debugging and logging tools that are
provided with the Android SDK. Eclipse
already comes packaged with a compatible
debugger.

Last, you test your application using various
Android SDK testing tools. For more
information.
The development process

for Android applications


During this phase you configure and build
your application for release and distribute
your application to users.
Essential command line tools (1/2)
When developing in IDEs or editors other than
  Eclipse, be familiar with all of the tools
  below, because you will have to run them from
  the command line.
• android Create and update Android projects and
  create, move, and delete AVDs.
• Android Emulator Run your Android applications
  on an emulated Android platform.
• Android Debug BridgeInterface with your
  emulator or connected device (install apps, shell
  the device, issue commands, etc.).
Essential command line tools (2/2)
In addition to the above tools that are included with the SDK, you need the
    following open source and third-party tools:
• Ant To compile and build your Android project into an installable .apk file.
• Keytool To generate a keystore and private key, used to sign your .apk file.
    Keytool is part of the JDK.Jarsigner (or similar signing tool)To sign your .
• apk file with a private key generated by Keytool. Jarsigner is part of the
    JDK.
• If you are using Eclipse and ADT, tools such as adb and android are
    automatically called by Eclipse and ADT so you don't have to manually
    invoke these tools. You need to be familiar with adb, however, because
    certain functions are not accessible from Eclipse, such as the adb shell
    commands. You might also need to call Keytool and Jarsigner to sign your
    applications, but you can set up Eclipse to do this automatically as well.
Other Third-Party Development Tools:
          Developing in IntelliJ IDEA
• IntelliJ IDEA is a powerful Java IDE from JetBrains
  that provides full-cycle Android development
  support in both the free Community Edition and
  the Ultimate edition.
• The IDE ensures compatibility with the latest
  Android SDK and offers a smart code editor with
  completion, quick navigation between code and
  resources, a graphical debugger, unit testing
  support using Android Testing Framework, and
  the ability to run applications in either the
  emulator or a USB-connected device.
Developing in IntelliJ IDEA
Download the Android SDK
• http://developer.android.com/sdk/index.html


• Note: If you're already using the Android
  SDK, you should update to the latest tools or
  platform using the Android SDK and AVD
  Manager, rather than downloading a new SDK
  starter package.
Android SDK and AVD Manager
• The AVD Manager is an easy to use user
  interface to manage your AVD (Android Virtual
  Device) configurations.
Download the Android SDK
1. Prepare your development computer and ensure it
   meets the system requirements.
2. Install the SDK starter package from the table above.
   (If you're on Windows, download the installer for help
   with the initial setup.)
3. Install the Android Development Tools (ADT) Plugin
   for Eclipse (if you'll be developing in Eclipse).
4. Add Android platforms and other components to your
   SDK.
5. Explore the contents of the Android SDK (optional).
Android Design: UI Overview
              Home, All Apps, and Recents
http://developer.android.com/design/get-started/ui-overview.html
Android Design: System Bars
Status Bar, Navigation Bar, and Combined Bar
Installing the SDK:
   Preparing Your Development Computer
• Before getting started with the Android SDK, take a moment to
  confirm that your development computer meets the System
  Requirements. In particular, you might need to install the JDK, if you
  don't have it already.
• If you will be developing in Eclipse with the Android Development
  Tools (ADT) Plugin—the recommended path if you are new to
  Android—make sure that you have a suitable version of Eclipse
  installed on your computer as described in the System
  Requirements document. If you need to install Eclipse, you can
  download it from this location:
  http://www.eclipse.org/downloads/
• The "Eclipse Classic" version is recommended. Otherwise, a Java or
  RCP version of Eclipse is recommended.
Installing the SDK:
System Requirements: Supported Operating Systems
 • Windows XP (32-bit), Vista (32- or 64-bit), or
   Windows 7 (32- or 64-bit)
 • Mac OS X 10.5.8 or later (x86 only)
 • Linux (tested on Ubuntu Linux, Lucid Lynx)
    – GNU C Library (glibc) 2.7 or later is required.
    – On Ubuntu Linux, version 8.04 or later is required.
    – 64-bit distributions must be capable of running
      32-bit applications.
Installing the SDK:
Supported Development Environments: Eclipse IDE
• Eclipse 3.6 (Helios) or greater
    – Note: Eclipse 3.5 (Galileo) is no longer supported with the latest version of
      ADT.
• Eclipse JDT plugin (included in most Eclipse IDE packages)
    – If you need to install or update Eclipse, you can download it from
      http://www.eclipse.org/downloads/.
• Several types of Eclipse packages are available for each platform. For
  developing Android applications, we recommend that you install one of
  these packages:
    – Eclipse IDE for Java Developers
    – Eclipse Classic
    – Eclipse IDE for Java EE Developers
• JDK 5 or JDK 6 (JRE alone is not sufficient)
• Android Development Tools plugin (recommended)
• Not compatible with Gnu Compiler for Java (gcj)
Installing the SDK:
      Supported Development Environments:
     Other development environments or IDEs
•   JDK 5 or JDK 6 (JRE alone is not sufficient)
•   Apache Ant 1.8 or later
•   Not compatible with Gnu Compiler for Java (gcj)
•   Note: If JDK is already installed on your
    development computer, please take a moment to
    make sure that it meets the version requirements
    listed above. In particular, note that some Linux
    distributions may include JDK 1.4 or Gnu
    Compiler for Java, both of which are not
    supported for Android development.
Hello World
• As a developer, you know that the first impression of a
  development framework is how easy it is to write "Hello, World."
  Well, on Android, it's pretty easy. It's particularly easy if you're using
  Eclipse as your IDE, because we've provided a great plugin that
  handles your project creation and management to greatly speed up
  your development cycles.
• This tutorial assumes that you're using Eclipse. If you're using the
  command line, see Building and Running from the Command Line.
  You can then return to this tutorial and ignore anything about
  Eclipse.
• Before you start, you should already have the SDK installed, and if
  you're using Eclipse, you should have installed the ADT plugin as
  well. If you have not installed these, see Installing the Android SDK
  and return here when you've completed the installation.
Install a Platform
• To run the Hello World application, you need to install at
  least one Android platform in your SDK environment. If you
  have not already performed this step, you need to do it
  now.

To install a platform in Eclipse:
1. In the Android SDK and AVD Manager, choose Available
    Packages in the left panel.
2. In the right panel, expand the Android Repository list to
    display the components available for installation.
3. Select at least one platform to install, and click Install
    Selected. If you aren't sure which platform to install, use
    the latest version.
Create an AVD
• In this tutorial, you will run your application in the Android Emulator.
  Before you can launch the emulator, you must create an Android Virtual
  Device (AVD). An AVD defines the system image and device settings used
  by the emulator.

To create an AVD:
1. In Eclipse, select Window > Android SDK and AVD Manager.
2. Select Virtual Devices in the left panel.
3. Click New....             The Create New AVD dialog appears.
4. Type the name of the AVD, such as "my_avd".
5. Choose a target.          The target is the platform (that is, the version of
     the Android SDK, such as 2.3.3) you want to run on the emulator. For this
     tutorial, choose the latest platform that you have installed and ignore
     the rest of the fields.
6. Click Create AVD.
Note: AVD
An AVD consists of:
• A hardware profile: Defines the hardware features of the virtual device.
   For example, you can define whether the device has a camera, whether it
   uses a physical QWERTY keyboard or a dialing pad, how much memory it
   has, and so on.
• A mapping to a system image: You can define what version of the Android
   platform will run on the virtual device. You can choose a version of the
   standard Android platform or the system image packaged with an SDK
   add-on.
• Other options: You can specify the emulator skin you want to use with the
   AVD, which lets you control the screen dimensions, appearance, and so
   on. You can also specify the emulated SD card to use with the AVD.
• A dedicated storage area on your development machine: the device's user
   data (installed applications, settings, and so on) and emulated SD card are
   stored in this area.
Note: AVD
•  You can create as many AVDs as you need, based on the types of device you want to
   model. To thoroughly test your application, you should create an AVD for each general
   device configuration (for example, different screen sizes and platform versions) with
   which your application is compatible and test your application on each one.
Keep these points in mind when you are selecting a system image target for your AVD:
• The API Level of the target is important, because your application will not be able to run
   on a system image whose API Level is less than that required by your application, as
   specified in the minSdkVersion attribute of the application's manifest file. For more
   information about the relationship between system API Level and application
   minSdkVersion, see Specifying Minimum System API Version.
• You should create at least one AVD that uses a target whose API Level is greater than that
   required by your application, because it allows you to test the forward-compatibility of
   your application. Forward-compatibility testing ensures that, when users who have
   downloaded your application receive a system update, your application will continue to
   function normally.
• If your application declares a uses-library element in its manifest file, the application can
   only run on a system image in which that external library is present. If you want to run
   your application on an emulator, create an AVD that includes the required library.
   Usually, you must create such an AVD using an Add-on component for the AVD's platform
   (for example, the Google APIs Add-on contains the Google Maps library).
Note: Creating an AVD
• You can create as many AVDs as you would like to
  test on. It is recommended that you test your
  applications on all API levels higher than the
  target API level for your application.
To create an AVD:
1. Start the AVD Manager:
     In Eclipse: select Window > Android SDK and AVD
     Manager, or click the Android SDK and AVD Manager
     icon in the Eclipse toolbar.
     In other IDEs: Navigate to your SDK's tools/ directory
     and execute the android tool with no arguments.
Note: Creating an AVD
2. In the Virtual
   Devices
   panel, you'll see a
   list of existing AVDs.
   Click New to create
   a new AVD. The
   Create New AVD
   dialog appears.
Note: Creating an AVD
3. Fill in the details for the AVD.
   Give it a name, a platform target, an SD card size, and a skin (HVGA
   is default). You can also add specific hardware features of the
   emulated device by clicking the New... button and selecting the
   feature.
   Note: Be sure to define a target for your AVD that satisfies your
   application's Build Target (the AVD platform target must have an API
   Level equal to or greater than the API Level that your application
   compiles against).
4. Click Create AVD.
   Your AVD is now ready and you can either close the SDK and AVD
   Manager, create more AVDs, or launch an emulator with the AVD by
   selecting a device and clicking Start.
Create a New Android Project
• After you've created an AVD you can move to the
   next step and start a new Android project in
   Eclipse.
1. In Eclipse, select File > New > Project....
   If the ADT Plugin for Eclipse has been successfully
   installed, the resulting dialog should have a folder
   labeled "Android" which should contain "Android
   Project". (After you create one or more Android
   projects, an entry for "Android XML File" will also
   be available.)
Create a New Android Project
2. Select "Android
    Project" and click
    Next.
Create a New Android Project

3. Fill in the project details with
      the following values:
   –     Project name: HelloAndroid
   –     Build Target: Select a
         platform version that is
         equal to or lower than the
         target you chose for your
         AVD.
   – Application name:
         Hello, Android
   – Package name:
         com.example.helloandroid
         (or your own private
         namespace)
   – Create Activity: HelloAndroid
   Click Finish.
Create a New Android Project

Here is a description of each field:
• Project Name This is the Eclipse project name —
   the name of the directory that contains the
   project files.
• Build Target This is the version of the Android SDK
   that you're using to build your application. For
   example, if you choose Android 2.1, your
   application will be compiled against the Android
   2.1 platform library. The target you choose here
   does not have to match the target you chose for
   your AVD; however, the target must be equal to
   or lower than the target you chose for your AVD.
   Android applications are forward-
   compatible, which means an application will run
   on the platform against which it is built as well as
   all platforms that are released in the future. For
   example, an application that is built against the
   2.1 platform library will run normally on an AVD
   or device that is running the 2.3.3. The reverse is
   not true.
Create a New Android Project

•   Application Name This is the human-
    readable title for your application — the
    name that appears on the Android device.
•   Package Name This is the package
    namespace (following the same rules as for
    packages in the Java programming language)
    that you want all your source code to reside
    under. This also sets the package name
    under which the stub Activity is generated.
    Your package name must be unique across
    all packages installed on the Android system;
    for this reason, it's important to use a
    standard domain-style package for your
    applications. The example above uses the
    "com.example" namespace, which is a
    namespace reserved for example
    documentation — when you develop your
    own applications, you should use a
    namespace that's appropriate to your
    organization or entity.
Create a New Android Project

•   Create Activity This is the name for the class
    stub that is generated by the plugin. This is a
    subclass of Android's Activity class. An
    Activity is simply a class that can run and do
    work. It can create a UI if it chooses, but it
    doesn't need to. As the checkbox
    suggests, this is optional, but an Activity is
    almost always used as the basis for an
    application.
•   Min SDK VersionThis value specifies the
    minimum API Level on which your
    application will run. The Min SDK
    Version should be the same as the Build
    Target you chose. For example, if the Build
    Target is Android 2.1, then the Min SDK
    Version should be 7 or lower (it can never be
    higher than 7).
•   Other fields: The checkbox for "Use default
    location" allows you to change the location
    on disk where the project's files are
    generated and stored.
HelloAndroid.java
• Your Android project is now ready. It should
  be visible in the Package Explorer on the left.
• Open the HelloAndroid.java file, located
  inside HelloAndroid > src >
  com.example.helloandroid).

• It should look like this:
HelloAndroid.java
package com.example.helloandroid;
  import android.app.Activity;
  import android.os.Bundle;
  public class HelloAndroid extends Activity {
    /** Called when the activity is first created. */
    @Override
    public void onCreate(Bundle savedInstanceState) {
      super.onCreate(savedInstanceState);
      setContentView(R.layout.main);
    }
  }
HelloAndroid.java
• Notice that the class is based on the Activity class.
• An Activity is a single application entity that is used to
  perform actions.
• An application may have many separate activities, but the
  user interacts with them one at a time.
• The onCreate() method is called by the Android system
  when your Activity starts — it is where you should perform
  all initialization and UI setup.
• An activity is not required to have a user interface, but
  usually does.

• Now let's modify some code!
Construct the UI
• Take a look at the revised code below and
  then make the same changes to your
  HelloAndroid class.
• The bold items are lines that have been
  added.
Construct the UI
package com.example.helloandroid;
  import android.app.Activity;
  import android.os.Bundle;
  import android.widget.TextView;
  public class HelloAndroid extends Activity {
    /** Called when the activity is first created. */
    @Override
    public void onCreate(Bundle savedInstanceState) {
      super.onCreate(savedInstanceState);
      TextView tv = new TextView(this);
      tv.setText("Hello, Android");
      setContentView(tv);
    }
  }
Android UI
•   An Android user interface is composed of hierarchies of objects called Views.
    A View is a drawable object used as an element in your UI layout, such as a
    button, image, or (in this case) a text label. Each of these objects is a subclass of
    the View class and the subclass that handles text is TextView.
•   In this change, you create a TextView with the class constructor, which accepts an
    Android Context instance as its parameter. A Context is a handle to the system; it
    provides services like resolving resources, obtaining access to databases and
    preferences, and so on. The Activity class inherits from Context, and because your
    HelloAndroid class is a subclass of Activity, it is also a Context. So, you can
    pass this as your Context reference to the TextView.
•   Next, you define the text content with setText().
•   Finally, you pass the TextView to setContentView() in order to display it as the
    content for the Activity UI. If your Activity doesn't call this method, then no UI is
    present and the system will display a blank screen.
•   There it is — "Hello, World" in Android! The next step, of course, is to see it
    running.
Run the Application
The Eclipse plugin makes it easy to run your applications:
Select Run > Run.
1. Select "Android Application".
2. To learn more about creating and editing run configurations in
     Eclipse, refer to Developing In Eclipse, with ADT.
The Eclipse plugin automatically creates a new run configuration for
   your project and then launches the Android Emulator.
Depending on your environment, the Android emulator might take
   several minutes to boot fully, so please be patient. When the
   emulator is booted, the Eclipse plugin installs your application and
   launches the default Activity.
You should now see something like this:
Run the Application
     • The "Hello, Android" you see in the grey
       bar is actually the application title.
     • The Eclipse plugin creates this
       automatically (the string is defined in
       the res/values/strings.xml file and
       referenced by your
       AndroidManifest.xml file).
     • The text below the title is the actual
       text that you have created in the
       TextView object.
     • That concludes the basic "Hello World"
       tutorial, but you should continue
       reading for some more valuable
       information about developing Android
       applications.
Upgrade the UI to an XML Layout
• The "Hello, World" example you just completed uses what
  is called a "programmatic" UI layout. This means that you
  constructed and built your application's UI directly in
  source code. If you've done much UI programming, you're
  probably familiar with how brittle that approach can
  sometimes be: small changes in layout can result in big
  source-code headaches. It's also easy to forget to properly
  connect Views together, which can result in errors in your
  layout and wasted time debugging your code.
• That's why Android provides an alternate UI construction
  model: XML-based layout files. The easiest way to explain
  this concept is to show an example. Here's an XML layout
  file that is identical in behavior to the programmatically-
  constructed example:
Upgrade the UI to an XML Layout
<?xml version="1.0" encoding="utf-8"?>
  <TextView
  xmlns:android="http://schemas.android.com/
  apk/res/android"
   android:id="@+id/textview"
   android:layout_width="fill_parent"
   android:layout_height="fill_parent"
   android:text="@string/hello"/>
Upgrade the UI to an XML Layout
• The general structure of an Android XML layout file is simple: it's a
  tree of XML elements, wherein each node is the name of a View
  class (this example, however, is just one View element). You can use
  the name of any class that extends View as an element in your XML
  layouts, including custom View classes you define in your own code.
  This structure makes it easy to quickly build up UIs, using a more
  simple structure and syntax than you would use in a programmatic
  layout. This model is inspired by the web development
  model, wherein you can separate the presentation of your
  application (its UI) from the application logic used to fetch and fill in
  data.
• In the above XML example, there's just one View element: the
  TextView, which has five XML attributes. Here's a summary of what
  they mean:
Upgrade the UI to an XML Layout
Attribute               Meaning
xmlns:android           This is an XML namespace declaration that tells the Android tools that you
                        are going to refer to common attributes defined in the Android namespace.
                        The outermost tag in every Android layout file must have this attribute.

android:id           This attribute assigns a unique identifier to the TextView element. You can
                     use the assigned ID to reference this View from your source code or from
                     other XML resource declarations.
android:layout_width This attribute defines how much of the available width on the screen this
                     View should consume. In this case, it's the only View so you want it to take
                     up the entire screen, which is what a value of "fill_parent" means.

android:layout_height This is just like android:layout_width, except that it refers to available
                      screen height.
android:text          This sets the text that the TextView should display. In this example, you use
                      a string resource instead of a hard-coded string value. Thehello string is
                      defined in the res/values/strings.xml file. This is the recommended practice
                      for inserting strings to your application, because it makes the localization of
                      your application to other languages graceful, without need to hard-code
                      changes to the layout file.
Debug Your Project
• The Android Plugin for Eclipse also has
  excellent integration with the Eclipse
  debugger.
• To demonstrate this, introduce a bug into your
  code.
• Change your HelloAndroid source code to look
  like this:
Debug Your Project
package com.example.helloandroid;
  import android.app.Activity;
  import android.os.Bundle;
  public class HelloAndroid extends Activity {
    /** Called when the activity is first created. */
    @Override
    public void onCreate(Bundle savedInstanceState) {
      super.onCreate(savedInstanceState);
      Object o = null;
      o.toString();
      setContentView(R.layout.main);
    }
  }
Debug Your Project
• This change simply
  introduces a
  NullPointerException into
  your code.
• If you run your
  application again, you'll
  eventually see this:

•   Press "Force Quit" to
    terminate the
    application and close
    the emulator window.
Debug Your Project
• To find out more about the error, set a breakpoint
  in your source code on the line Object o = null;
  (double-click on the marker bar next to the
  source code line).
• Then select Run > Debug History > Hello, Android
  from the menu to enter debug mode. Your app
  will restart in the emulator, but this time it will
  suspend when it reaches the breakpoint you set.
• You can then step through the code in Eclipse's
  Debug Perspective, just as you would for any
  other application.
Debug Your Project
Publish
Before you can publish software on the Android
  Market, you must do three things:
• Create a developer profile
• Agree to the Android Market Developer
  Distribution Agreement
• Pay a registration fee ( $25.00) with your
  credit card (using Google Checkout)
https://market.android.com/publish
Monetizing Your App
• Apart from offering paid apps, there are a
  number of other ways to monetize your mobile
  applications.
• We may examine a number of typical methods
  (more lessons are to come) and their associated
  technical best practices.
• Obviously, each application is different and you
  should experiment with different combinations of
  these and other monetization methods to
  determine what works best for you.
Monetizing Your App
• Try it out: Download the sample app at
  – http://developer.android.com/shareables/training
    /MobileAds.zip


• Advertising without Compromising User
  Experience
  – https://developer.android.com/training/monetizat
    ion/ads-and-ux.html
03 Beginning Android Application Development

03 Beginning Android Application Development

  • 2.
  • 3.
    The development process forAndroid applications
  • 4.
    The development process forAndroid applications During this phase you install and set up your development environment. You also create Android Virtual Devices (AVDs) and connect hardware devices on which you can install your applications.
  • 5.
    The development process forAndroid applications During this phase you set up and develop your Android project, which contains all of the source code and resource files for your application.
  • 6.
    The development process forAndroid applications During this phase you build your project into a debuggable .apk package that you can install and run on the emulator or an Android-powered device. If you are using Eclipse, builds are generated each time you project is saved. If you're using another IDE, you can build your project using Ant and install it on a device using adb. Next, you debug your application using a JDWP-compliant debugger along with the debugging and logging tools that are provided with the Android SDK. Eclipse already comes packaged with a compatible debugger. Last, you test your application using various Android SDK testing tools. For more information.
  • 7.
    The development process forAndroid applications During this phase you configure and build your application for release and distribute your application to users.
  • 9.
    Essential command linetools (1/2) When developing in IDEs or editors other than Eclipse, be familiar with all of the tools below, because you will have to run them from the command line. • android Create and update Android projects and create, move, and delete AVDs. • Android Emulator Run your Android applications on an emulated Android platform. • Android Debug BridgeInterface with your emulator or connected device (install apps, shell the device, issue commands, etc.).
  • 10.
    Essential command linetools (2/2) In addition to the above tools that are included with the SDK, you need the following open source and third-party tools: • Ant To compile and build your Android project into an installable .apk file. • Keytool To generate a keystore and private key, used to sign your .apk file. Keytool is part of the JDK.Jarsigner (or similar signing tool)To sign your . • apk file with a private key generated by Keytool. Jarsigner is part of the JDK. • If you are using Eclipse and ADT, tools such as adb and android are automatically called by Eclipse and ADT so you don't have to manually invoke these tools. You need to be familiar with adb, however, because certain functions are not accessible from Eclipse, such as the adb shell commands. You might also need to call Keytool and Jarsigner to sign your applications, but you can set up Eclipse to do this automatically as well.
  • 11.
    Other Third-Party DevelopmentTools: Developing in IntelliJ IDEA • IntelliJ IDEA is a powerful Java IDE from JetBrains that provides full-cycle Android development support in both the free Community Edition and the Ultimate edition. • The IDE ensures compatibility with the latest Android SDK and offers a smart code editor with completion, quick navigation between code and resources, a graphical debugger, unit testing support using Android Testing Framework, and the ability to run applications in either the emulator or a USB-connected device.
  • 12.
  • 13.
    Download the AndroidSDK • http://developer.android.com/sdk/index.html • Note: If you're already using the Android SDK, you should update to the latest tools or platform using the Android SDK and AVD Manager, rather than downloading a new SDK starter package.
  • 14.
    Android SDK andAVD Manager • The AVD Manager is an easy to use user interface to manage your AVD (Android Virtual Device) configurations.
  • 15.
    Download the AndroidSDK 1. Prepare your development computer and ensure it meets the system requirements. 2. Install the SDK starter package from the table above. (If you're on Windows, download the installer for help with the initial setup.) 3. Install the Android Development Tools (ADT) Plugin for Eclipse (if you'll be developing in Eclipse). 4. Add Android platforms and other components to your SDK. 5. Explore the contents of the Android SDK (optional).
  • 16.
    Android Design: UIOverview Home, All Apps, and Recents http://developer.android.com/design/get-started/ui-overview.html
  • 17.
    Android Design: SystemBars Status Bar, Navigation Bar, and Combined Bar
  • 18.
    Installing the SDK: Preparing Your Development Computer • Before getting started with the Android SDK, take a moment to confirm that your development computer meets the System Requirements. In particular, you might need to install the JDK, if you don't have it already. • If you will be developing in Eclipse with the Android Development Tools (ADT) Plugin—the recommended path if you are new to Android—make sure that you have a suitable version of Eclipse installed on your computer as described in the System Requirements document. If you need to install Eclipse, you can download it from this location: http://www.eclipse.org/downloads/ • The "Eclipse Classic" version is recommended. Otherwise, a Java or RCP version of Eclipse is recommended.
  • 19.
    Installing the SDK: SystemRequirements: Supported Operating Systems • Windows XP (32-bit), Vista (32- or 64-bit), or Windows 7 (32- or 64-bit) • Mac OS X 10.5.8 or later (x86 only) • Linux (tested on Ubuntu Linux, Lucid Lynx) – GNU C Library (glibc) 2.7 or later is required. – On Ubuntu Linux, version 8.04 or later is required. – 64-bit distributions must be capable of running 32-bit applications.
  • 20.
    Installing the SDK: SupportedDevelopment Environments: Eclipse IDE • Eclipse 3.6 (Helios) or greater – Note: Eclipse 3.5 (Galileo) is no longer supported with the latest version of ADT. • Eclipse JDT plugin (included in most Eclipse IDE packages) – If you need to install or update Eclipse, you can download it from http://www.eclipse.org/downloads/. • Several types of Eclipse packages are available for each platform. For developing Android applications, we recommend that you install one of these packages: – Eclipse IDE for Java Developers – Eclipse Classic – Eclipse IDE for Java EE Developers • JDK 5 or JDK 6 (JRE alone is not sufficient) • Android Development Tools plugin (recommended) • Not compatible with Gnu Compiler for Java (gcj)
  • 21.
    Installing the SDK: Supported Development Environments: Other development environments or IDEs • JDK 5 or JDK 6 (JRE alone is not sufficient) • Apache Ant 1.8 or later • Not compatible with Gnu Compiler for Java (gcj) • Note: If JDK is already installed on your development computer, please take a moment to make sure that it meets the version requirements listed above. In particular, note that some Linux distributions may include JDK 1.4 or Gnu Compiler for Java, both of which are not supported for Android development.
  • 23.
    Hello World • Asa developer, you know that the first impression of a development framework is how easy it is to write "Hello, World." Well, on Android, it's pretty easy. It's particularly easy if you're using Eclipse as your IDE, because we've provided a great plugin that handles your project creation and management to greatly speed up your development cycles. • This tutorial assumes that you're using Eclipse. If you're using the command line, see Building and Running from the Command Line. You can then return to this tutorial and ignore anything about Eclipse. • Before you start, you should already have the SDK installed, and if you're using Eclipse, you should have installed the ADT plugin as well. If you have not installed these, see Installing the Android SDK and return here when you've completed the installation.
  • 24.
    Install a Platform •To run the Hello World application, you need to install at least one Android platform in your SDK environment. If you have not already performed this step, you need to do it now. To install a platform in Eclipse: 1. In the Android SDK and AVD Manager, choose Available Packages in the left panel. 2. In the right panel, expand the Android Repository list to display the components available for installation. 3. Select at least one platform to install, and click Install Selected. If you aren't sure which platform to install, use the latest version.
  • 25.
    Create an AVD •In this tutorial, you will run your application in the Android Emulator. Before you can launch the emulator, you must create an Android Virtual Device (AVD). An AVD defines the system image and device settings used by the emulator. To create an AVD: 1. In Eclipse, select Window > Android SDK and AVD Manager. 2. Select Virtual Devices in the left panel. 3. Click New.... The Create New AVD dialog appears. 4. Type the name of the AVD, such as "my_avd". 5. Choose a target. The target is the platform (that is, the version of the Android SDK, such as 2.3.3) you want to run on the emulator. For this tutorial, choose the latest platform that you have installed and ignore the rest of the fields. 6. Click Create AVD.
  • 26.
    Note: AVD An AVDconsists of: • A hardware profile: Defines the hardware features of the virtual device. For example, you can define whether the device has a camera, whether it uses a physical QWERTY keyboard or a dialing pad, how much memory it has, and so on. • A mapping to a system image: You can define what version of the Android platform will run on the virtual device. You can choose a version of the standard Android platform or the system image packaged with an SDK add-on. • Other options: You can specify the emulator skin you want to use with the AVD, which lets you control the screen dimensions, appearance, and so on. You can also specify the emulated SD card to use with the AVD. • A dedicated storage area on your development machine: the device's user data (installed applications, settings, and so on) and emulated SD card are stored in this area.
  • 27.
    Note: AVD • You can create as many AVDs as you need, based on the types of device you want to model. To thoroughly test your application, you should create an AVD for each general device configuration (for example, different screen sizes and platform versions) with which your application is compatible and test your application on each one. Keep these points in mind when you are selecting a system image target for your AVD: • The API Level of the target is important, because your application will not be able to run on a system image whose API Level is less than that required by your application, as specified in the minSdkVersion attribute of the application's manifest file. For more information about the relationship between system API Level and application minSdkVersion, see Specifying Minimum System API Version. • You should create at least one AVD that uses a target whose API Level is greater than that required by your application, because it allows you to test the forward-compatibility of your application. Forward-compatibility testing ensures that, when users who have downloaded your application receive a system update, your application will continue to function normally. • If your application declares a uses-library element in its manifest file, the application can only run on a system image in which that external library is present. If you want to run your application on an emulator, create an AVD that includes the required library. Usually, you must create such an AVD using an Add-on component for the AVD's platform (for example, the Google APIs Add-on contains the Google Maps library).
  • 28.
    Note: Creating anAVD • You can create as many AVDs as you would like to test on. It is recommended that you test your applications on all API levels higher than the target API level for your application. To create an AVD: 1. Start the AVD Manager: In Eclipse: select Window > Android SDK and AVD Manager, or click the Android SDK and AVD Manager icon in the Eclipse toolbar. In other IDEs: Navigate to your SDK's tools/ directory and execute the android tool with no arguments.
  • 29.
    Note: Creating anAVD 2. In the Virtual Devices panel, you'll see a list of existing AVDs. Click New to create a new AVD. The Create New AVD dialog appears.
  • 30.
    Note: Creating anAVD 3. Fill in the details for the AVD. Give it a name, a platform target, an SD card size, and a skin (HVGA is default). You can also add specific hardware features of the emulated device by clicking the New... button and selecting the feature. Note: Be sure to define a target for your AVD that satisfies your application's Build Target (the AVD platform target must have an API Level equal to or greater than the API Level that your application compiles against). 4. Click Create AVD. Your AVD is now ready and you can either close the SDK and AVD Manager, create more AVDs, or launch an emulator with the AVD by selecting a device and clicking Start.
  • 31.
    Create a NewAndroid Project • After you've created an AVD you can move to the next step and start a new Android project in Eclipse. 1. In Eclipse, select File > New > Project.... If the ADT Plugin for Eclipse has been successfully installed, the resulting dialog should have a folder labeled "Android" which should contain "Android Project". (After you create one or more Android projects, an entry for "Android XML File" will also be available.)
  • 32.
    Create a NewAndroid Project 2. Select "Android Project" and click Next.
  • 33.
    Create a NewAndroid Project 3. Fill in the project details with the following values: – Project name: HelloAndroid – Build Target: Select a platform version that is equal to or lower than the target you chose for your AVD. – Application name: Hello, Android – Package name: com.example.helloandroid (or your own private namespace) – Create Activity: HelloAndroid Click Finish.
  • 34.
    Create a NewAndroid Project Here is a description of each field: • Project Name This is the Eclipse project name — the name of the directory that contains the project files. • Build Target This is the version of the Android SDK that you're using to build your application. For example, if you choose Android 2.1, your application will be compiled against the Android 2.1 platform library. The target you choose here does not have to match the target you chose for your AVD; however, the target must be equal to or lower than the target you chose for your AVD. Android applications are forward- compatible, which means an application will run on the platform against which it is built as well as all platforms that are released in the future. For example, an application that is built against the 2.1 platform library will run normally on an AVD or device that is running the 2.3.3. The reverse is not true.
  • 35.
    Create a NewAndroid Project • Application Name This is the human- readable title for your application — the name that appears on the Android device. • Package Name This is the package namespace (following the same rules as for packages in the Java programming language) that you want all your source code to reside under. This also sets the package name under which the stub Activity is generated. Your package name must be unique across all packages installed on the Android system; for this reason, it's important to use a standard domain-style package for your applications. The example above uses the "com.example" namespace, which is a namespace reserved for example documentation — when you develop your own applications, you should use a namespace that's appropriate to your organization or entity.
  • 36.
    Create a NewAndroid Project • Create Activity This is the name for the class stub that is generated by the plugin. This is a subclass of Android's Activity class. An Activity is simply a class that can run and do work. It can create a UI if it chooses, but it doesn't need to. As the checkbox suggests, this is optional, but an Activity is almost always used as the basis for an application. • Min SDK VersionThis value specifies the minimum API Level on which your application will run. The Min SDK Version should be the same as the Build Target you chose. For example, if the Build Target is Android 2.1, then the Min SDK Version should be 7 or lower (it can never be higher than 7). • Other fields: The checkbox for "Use default location" allows you to change the location on disk where the project's files are generated and stored.
  • 37.
    HelloAndroid.java • Your Androidproject is now ready. It should be visible in the Package Explorer on the left. • Open the HelloAndroid.java file, located inside HelloAndroid > src > com.example.helloandroid). • It should look like this:
  • 38.
    HelloAndroid.java package com.example.helloandroid; import android.app.Activity; import android.os.Bundle; public class HelloAndroid extends Activity { /** Called when the activity is first created. */ @Override public void onCreate(Bundle savedInstanceState) { super.onCreate(savedInstanceState); setContentView(R.layout.main); } }
  • 39.
    HelloAndroid.java • Notice thatthe class is based on the Activity class. • An Activity is a single application entity that is used to perform actions. • An application may have many separate activities, but the user interacts with them one at a time. • The onCreate() method is called by the Android system when your Activity starts — it is where you should perform all initialization and UI setup. • An activity is not required to have a user interface, but usually does. • Now let's modify some code!
  • 40.
    Construct the UI •Take a look at the revised code below and then make the same changes to your HelloAndroid class. • The bold items are lines that have been added.
  • 41.
    Construct the UI packagecom.example.helloandroid; import android.app.Activity; import android.os.Bundle; import android.widget.TextView; public class HelloAndroid extends Activity { /** Called when the activity is first created. */ @Override public void onCreate(Bundle savedInstanceState) { super.onCreate(savedInstanceState); TextView tv = new TextView(this); tv.setText("Hello, Android"); setContentView(tv); } }
  • 42.
    Android UI • An Android user interface is composed of hierarchies of objects called Views. A View is a drawable object used as an element in your UI layout, such as a button, image, or (in this case) a text label. Each of these objects is a subclass of the View class and the subclass that handles text is TextView. • In this change, you create a TextView with the class constructor, which accepts an Android Context instance as its parameter. A Context is a handle to the system; it provides services like resolving resources, obtaining access to databases and preferences, and so on. The Activity class inherits from Context, and because your HelloAndroid class is a subclass of Activity, it is also a Context. So, you can pass this as your Context reference to the TextView. • Next, you define the text content with setText(). • Finally, you pass the TextView to setContentView() in order to display it as the content for the Activity UI. If your Activity doesn't call this method, then no UI is present and the system will display a blank screen. • There it is — "Hello, World" in Android! The next step, of course, is to see it running.
  • 44.
    Run the Application TheEclipse plugin makes it easy to run your applications: Select Run > Run. 1. Select "Android Application". 2. To learn more about creating and editing run configurations in Eclipse, refer to Developing In Eclipse, with ADT. The Eclipse plugin automatically creates a new run configuration for your project and then launches the Android Emulator. Depending on your environment, the Android emulator might take several minutes to boot fully, so please be patient. When the emulator is booted, the Eclipse plugin installs your application and launches the default Activity. You should now see something like this:
  • 45.
    Run the Application • The "Hello, Android" you see in the grey bar is actually the application title. • The Eclipse plugin creates this automatically (the string is defined in the res/values/strings.xml file and referenced by your AndroidManifest.xml file). • The text below the title is the actual text that you have created in the TextView object. • That concludes the basic "Hello World" tutorial, but you should continue reading for some more valuable information about developing Android applications.
  • 46.
    Upgrade the UIto an XML Layout • The "Hello, World" example you just completed uses what is called a "programmatic" UI layout. This means that you constructed and built your application's UI directly in source code. If you've done much UI programming, you're probably familiar with how brittle that approach can sometimes be: small changes in layout can result in big source-code headaches. It's also easy to forget to properly connect Views together, which can result in errors in your layout and wasted time debugging your code. • That's why Android provides an alternate UI construction model: XML-based layout files. The easiest way to explain this concept is to show an example. Here's an XML layout file that is identical in behavior to the programmatically- constructed example:
  • 47.
    Upgrade the UIto an XML Layout <?xml version="1.0" encoding="utf-8"?> <TextView xmlns:android="http://schemas.android.com/ apk/res/android" android:id="@+id/textview" android:layout_width="fill_parent" android:layout_height="fill_parent" android:text="@string/hello"/>
  • 48.
    Upgrade the UIto an XML Layout • The general structure of an Android XML layout file is simple: it's a tree of XML elements, wherein each node is the name of a View class (this example, however, is just one View element). You can use the name of any class that extends View as an element in your XML layouts, including custom View classes you define in your own code. This structure makes it easy to quickly build up UIs, using a more simple structure and syntax than you would use in a programmatic layout. This model is inspired by the web development model, wherein you can separate the presentation of your application (its UI) from the application logic used to fetch and fill in data. • In the above XML example, there's just one View element: the TextView, which has five XML attributes. Here's a summary of what they mean:
  • 49.
    Upgrade the UIto an XML Layout Attribute Meaning xmlns:android This is an XML namespace declaration that tells the Android tools that you are going to refer to common attributes defined in the Android namespace. The outermost tag in every Android layout file must have this attribute. android:id This attribute assigns a unique identifier to the TextView element. You can use the assigned ID to reference this View from your source code or from other XML resource declarations. android:layout_width This attribute defines how much of the available width on the screen this View should consume. In this case, it's the only View so you want it to take up the entire screen, which is what a value of "fill_parent" means. android:layout_height This is just like android:layout_width, except that it refers to available screen height. android:text This sets the text that the TextView should display. In this example, you use a string resource instead of a hard-coded string value. Thehello string is defined in the res/values/strings.xml file. This is the recommended practice for inserting strings to your application, because it makes the localization of your application to other languages graceful, without need to hard-code changes to the layout file.
  • 50.
    Debug Your Project •The Android Plugin for Eclipse also has excellent integration with the Eclipse debugger. • To demonstrate this, introduce a bug into your code. • Change your HelloAndroid source code to look like this:
  • 51.
    Debug Your Project packagecom.example.helloandroid; import android.app.Activity; import android.os.Bundle; public class HelloAndroid extends Activity { /** Called when the activity is first created. */ @Override public void onCreate(Bundle savedInstanceState) { super.onCreate(savedInstanceState); Object o = null; o.toString(); setContentView(R.layout.main); } }
  • 52.
    Debug Your Project •This change simply introduces a NullPointerException into your code. • If you run your application again, you'll eventually see this: • Press "Force Quit" to terminate the application and close the emulator window.
  • 53.
    Debug Your Project •To find out more about the error, set a breakpoint in your source code on the line Object o = null; (double-click on the marker bar next to the source code line). • Then select Run > Debug History > Hello, Android from the menu to enter debug mode. Your app will restart in the emulator, but this time it will suspend when it reaches the breakpoint you set. • You can then step through the code in Eclipse's Debug Perspective, just as you would for any other application.
  • 54.
  • 56.
    Publish Before you canpublish software on the Android Market, you must do three things: • Create a developer profile • Agree to the Android Market Developer Distribution Agreement • Pay a registration fee ( $25.00) with your credit card (using Google Checkout) https://market.android.com/publish
  • 57.
    Monetizing Your App •Apart from offering paid apps, there are a number of other ways to monetize your mobile applications. • We may examine a number of typical methods (more lessons are to come) and their associated technical best practices. • Obviously, each application is different and you should experiment with different combinations of these and other monetization methods to determine what works best for you.
  • 58.
    Monetizing Your App •Try it out: Download the sample app at – http://developer.android.com/shareables/training /MobileAds.zip • Advertising without Compromising User Experience – https://developer.android.com/training/monetizat ion/ads-and-ux.html