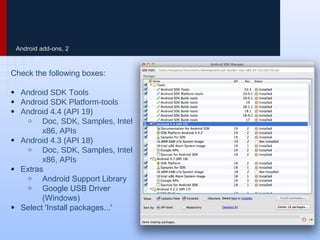
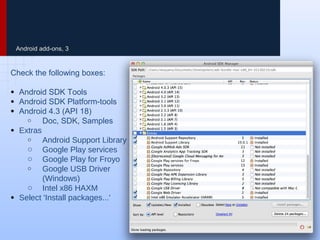
Android Application
Development
Environment Setup
by Ian Pinto founder @ iPnova
Android Bundle
Setting up the Development Environment
Eclipse -- Why?
Eclipse is the official development environment
Google recommends for Android.
When developing apps for Android, we will need
Java SDK, Android SDK as well as the Android
Eclipse IDE.
Fortunately, this can be installed altogether
using the ADT Bundle.
Installing the Java SDK
If you don’t have the Java 6 SDK, let’s install that first.
1. Go to Oracle JDK 6 Downloads page
2. Choose your platform, note that 32-bit and 64-bit versions
are both available
3. Download and install the JDK 6, Java Development Kit
(NOT just the JRE)
Installing the Android SDK
Download the ADT Bundle which includes a standalone
Eclipse already set up with the Android SDK:
1. Download the ADT Bundle
http://developer.android.com/sdk/index.html
2. Unzip the bundle into a folder
3. Move the bundle folder to any directory, such as a
"developer" directory in your home folder
4. Navigate to the "eclipse" folder to launch eclipse app
Android add-ons, 1
1. In Eclipse, click on Window and
open the Android SDK Manager.
2. Refer to the following 2 slides to
ensure that you've installed the
packages that you need.
Android add-ons, 2
Check the following boxes:
● Android SDK Tools
● Android SDK Platform-tools
● Android 4.4 (API 19)
o Doc, SDK, Samples, Intel
x86, APIs
● Android 4.3 (API 18)
o Doc, SDK, Samples, Intel
x86, APIs
● Extras
o Android Support Library
o Google USB Driver
(Windows)
● Select 'Install packages...'
Android add-ons, 3
Check the following boxes:
● Android SDK Tools
● Android SDK Platform-tools
● Android 4.3 (API 18)
o Doc, SDK, Samples
● Extras
o Android Support Library
o Google Play services
o Google Play for Froyo
o Google USB Driver
(Windows)
o Intel x86 HAXM
● Select 'Install packages...'
Android emulators
Running Android Apps in Eclipse
Emulator -- Why?
Android Development requires us to try the apps
we are building while they are being built.
While this can be done by plugging in an Android device,
usually it is easier to use an Emulator.
An Emulator runs the app in a virtual Android on our
computer through Eclipse.
We need to install the Intel x86 HAXM emulator in order to
have a smooth emulator experience while testing complex
applications.
Install Intel x86 Accelerator
1. Download
Intel HAXM Emulator installer
2. Run the installer executable
and a wizard will be
displayed
3. Hit Next and select at least
512 MB for memory and
continue to hit Next
4. Verify the installation
completes successfully.
Note: Make sure to download
the available hotfix on the
HAXM website for your platform.
Troubleshoot: Intel HAXM
In order for Intel HAXM to work, your computer must support
virtualization. In some cases, computers support virtualization,
but it is not enabled in the bios. In this case, when you try to
install Intel HAXM, it will say something like:
"Your hardware supports virtualization, but it is not enabled.
Restart your computer, navigate to your BIOS system settings and
enable virtualization."
Enable VT Guide:
http://www.microsoft.com/windows/virtual-pc/support/configure-bios.as
Setup Virtual Devices
1. In Eclipse, select Window
→ Android Virtual Device
Manager
2. Select New... on the right
menu.
3. AVD Name: Main
4. Device: Nexus S
5. Target: 4.3
6. CPU: Intel Atom (x86)
7. Check Use Host GPU
8. Click OK
Don't See Intel x86 for CPU?
Be sure you have fully restarted
eclipse after running the Intel
x86 HAXM installer.
Launch Android Emulator
For the emulator that you create, try clicking on "Start..." to launch.
Starting the emulator for the first time make take a few minutes. Don't
close the window once it has booted.
Check for "fast virt mode"
If Intel HAXM is set up correctly, as you launch the emulator, you
should see the text, "HAX is working and emulator runs in fast virt
mode".
Git
Version control with Eclipse
Git -- Why?
When developing software, we should always use
version control to manage our code.
Version control with Git is a way to backup our code, create a
version history as we make changes and collaborate on code
with other developers.
For our purposes, we will be using GitHub to store our code.
GitHub is a free service for managing our code and saving a
backup in the cloud.
We will also download and run our first Android application
using Git.
Setup Git Client
1. Download the client from
http://www.sourcetreeapp.co
m
2. Install the sourcetree client for your
platform and launch the application.
3. Follow the setup wizard, verify your
name and email, and enter your
Github account details (optional).
Note: Or you can just use git from
the command-line. If you already
know git, this is recommended!
Clone HelloWorldDemo
1. Open SourceTree
2. Click File → New / Clone
a. Select Source Path as
https://github.com/thecodepath/android_hello_world.git
b. Select a Destination Path within Eclipse Workspace
3. Confirm the repository is listed within SourceTree UI
Import HelloWorldDemo
1. In Eclipse, select File →
Import...
2. In the dialog, select the Android
folder and then Existing Android
Code Into Workspace
3. Select Browse... and select the
android_hello_demo path cloned
through SourceTree
4. Click "Finish" to Load the Project
Wrapping Up
Ensuring Setup is Complete
In Review
We have now finished setting up our Android
environment including:
● Java and Android SDK
● Eclipse IDE
● Android Emulator
● Git Source Control
● Our First Android Application
Now let's verify that our installation is complete by running
the app in Eclipse.
Confirm Installation
1. In Eclipse, expand
android_hello_world project.
2. Right-click on
android_hello_world and select
Run As → Android Application
3. Emulator should startup, and
eventually load in separate
window
4. You should see the application
running in the emulator!
Thank You
by Ian Pinto
founder @ iPnova
ipnova@ianpinto.com

Android Application Development Environment Setup

  • 1.
  • 2.
    Android Bundle Setting upthe Development Environment
  • 3.
    Eclipse -- Why? Eclipseis the official development environment Google recommends for Android. When developing apps for Android, we will need Java SDK, Android SDK as well as the Android Eclipse IDE. Fortunately, this can be installed altogether using the ADT Bundle.
  • 4.
    Installing the JavaSDK If you don’t have the Java 6 SDK, let’s install that first. 1. Go to Oracle JDK 6 Downloads page 2. Choose your platform, note that 32-bit and 64-bit versions are both available 3. Download and install the JDK 6, Java Development Kit (NOT just the JRE)
  • 5.
    Installing the AndroidSDK Download the ADT Bundle which includes a standalone Eclipse already set up with the Android SDK: 1. Download the ADT Bundle http://developer.android.com/sdk/index.html 2. Unzip the bundle into a folder 3. Move the bundle folder to any directory, such as a "developer" directory in your home folder 4. Navigate to the "eclipse" folder to launch eclipse app
  • 6.
    Android add-ons, 1 1.In Eclipse, click on Window and open the Android SDK Manager. 2. Refer to the following 2 slides to ensure that you've installed the packages that you need.
  • 7.
    Android add-ons, 2 Checkthe following boxes: ● Android SDK Tools ● Android SDK Platform-tools ● Android 4.4 (API 19) o Doc, SDK, Samples, Intel x86, APIs ● Android 4.3 (API 18) o Doc, SDK, Samples, Intel x86, APIs ● Extras o Android Support Library o Google USB Driver (Windows) ● Select 'Install packages...'
  • 8.
    Android add-ons, 3 Checkthe following boxes: ● Android SDK Tools ● Android SDK Platform-tools ● Android 4.3 (API 18) o Doc, SDK, Samples ● Extras o Android Support Library o Google Play services o Google Play for Froyo o Google USB Driver (Windows) o Intel x86 HAXM ● Select 'Install packages...'
  • 9.
  • 10.
    Emulator -- Why? AndroidDevelopment requires us to try the apps we are building while they are being built. While this can be done by plugging in an Android device, usually it is easier to use an Emulator. An Emulator runs the app in a virtual Android on our computer through Eclipse. We need to install the Intel x86 HAXM emulator in order to have a smooth emulator experience while testing complex applications.
  • 11.
    Install Intel x86Accelerator 1. Download Intel HAXM Emulator installer 2. Run the installer executable and a wizard will be displayed 3. Hit Next and select at least 512 MB for memory and continue to hit Next 4. Verify the installation completes successfully. Note: Make sure to download the available hotfix on the HAXM website for your platform.
  • 12.
    Troubleshoot: Intel HAXM Inorder for Intel HAXM to work, your computer must support virtualization. In some cases, computers support virtualization, but it is not enabled in the bios. In this case, when you try to install Intel HAXM, it will say something like: "Your hardware supports virtualization, but it is not enabled. Restart your computer, navigate to your BIOS system settings and enable virtualization." Enable VT Guide: http://www.microsoft.com/windows/virtual-pc/support/configure-bios.as
  • 13.
    Setup Virtual Devices 1.In Eclipse, select Window → Android Virtual Device Manager 2. Select New... on the right menu. 3. AVD Name: Main 4. Device: Nexus S 5. Target: 4.3 6. CPU: Intel Atom (x86) 7. Check Use Host GPU 8. Click OK Don't See Intel x86 for CPU? Be sure you have fully restarted eclipse after running the Intel x86 HAXM installer.
  • 14.
    Launch Android Emulator Forthe emulator that you create, try clicking on "Start..." to launch. Starting the emulator for the first time make take a few minutes. Don't close the window once it has booted.
  • 15.
    Check for "fastvirt mode" If Intel HAXM is set up correctly, as you launch the emulator, you should see the text, "HAX is working and emulator runs in fast virt mode".
  • 16.
  • 17.
    Git -- Why? Whendeveloping software, we should always use version control to manage our code. Version control with Git is a way to backup our code, create a version history as we make changes and collaborate on code with other developers. For our purposes, we will be using GitHub to store our code. GitHub is a free service for managing our code and saving a backup in the cloud. We will also download and run our first Android application using Git.
  • 18.
    Setup Git Client 1.Download the client from http://www.sourcetreeapp.co m 2. Install the sourcetree client for your platform and launch the application. 3. Follow the setup wizard, verify your name and email, and enter your Github account details (optional). Note: Or you can just use git from the command-line. If you already know git, this is recommended!
  • 19.
    Clone HelloWorldDemo 1. OpenSourceTree 2. Click File → New / Clone a. Select Source Path as https://github.com/thecodepath/android_hello_world.git b. Select a Destination Path within Eclipse Workspace 3. Confirm the repository is listed within SourceTree UI
  • 20.
    Import HelloWorldDemo 1. InEclipse, select File → Import... 2. In the dialog, select the Android folder and then Existing Android Code Into Workspace 3. Select Browse... and select the android_hello_demo path cloned through SourceTree 4. Click "Finish" to Load the Project
  • 21.
  • 22.
    In Review We havenow finished setting up our Android environment including: ● Java and Android SDK ● Eclipse IDE ● Android Emulator ● Git Source Control ● Our First Android Application Now let's verify that our installation is complete by running the app in Eclipse.
  • 23.
    Confirm Installation 1. InEclipse, expand android_hello_world project. 2. Right-click on android_hello_world and select Run As → Android Application 3. Emulator should startup, and eventually load in separate window 4. You should see the application running in the emulator!
  • 24.
    Thank You by IanPinto founder @ iPnova ipnova@ianpinto.com