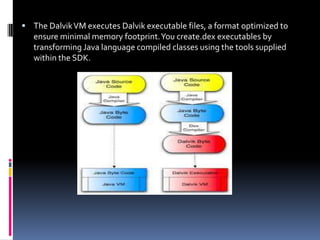
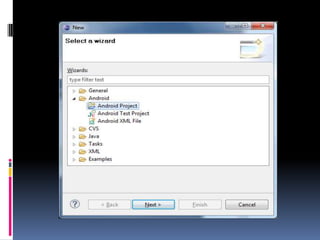
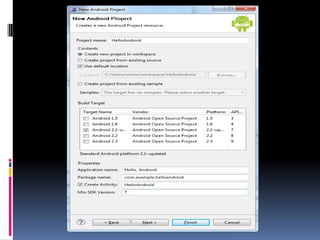
ANDROID
History
 Android is a software stack for mobile devices that includes an operating
   system and applications.


 Android's mobile operating system is based on a modified version of the
   Linux kernel.


 Google and other members of the Open Handset Alliance collaborated
   on Android's development and release.
Features
   Storage
   Messaging
   Web browser
   Java support
   Media support
   Market
   Bluetooth
   Video calling
Android phones do better than the
iPhone

  Market
  Google integration
  Open Source
Introduction

 What is Android?
  •   A software platform and operating system for mobile devices

  •   Based on the Linux kernel

  •   Developed by Open Handset Alliance (OHA) and later google

  •   Allows writing managed code in the Java language

  •   The Open Handset Alliance (OHA) is a collection of more than
      50 technology companies, including hardware manufacturers,
      mobile carriers, and software developers
What is the Open Handset Alliance (OHA)?
 The first Android mobile handset, the T-Mobile G1, was
  released in the United States in October 2008.    By the end of
  2009 over 20 Android-compatible handsets had been launched
  or announced in more       than 26 countries on 32 different
  carrier networks.

 Rather than being a mobile OS created for a single hardware
  implementation, Android is designed to support a large variety
  of hardware platforms, from WVGA (Wide Quarter Video
  Graphics Array) phones with hard keyboards to QVGA ( Quarter
  Video Graphics Array)devices with resistive touchscreens.

 Beyond that, with no licensing fees or proprietary software, the
  cost of Android handsets, and is comparatively low.
Android SDK
 The Android software development kit (SDK) includes everything you
   need to start developing, testing, and debugging Android applications.

    Development Tools
    The Android Emulator
    Full Documentation
    Sample Code
    Online Support
Dalvik Virtual Machine – DVM
 One of the key elements of Android is the Dalvik virtual machine. Rather
    than use a traditional Java virtual machine (VM) such as Java ME (Java
    Mobile Edition)
    Android uses its own custom VM designed to ensure that multiple
    instances run efficiently on a single device.
 The Dalvik VM uses the device’s underlying Linux kernel to handle
    functionality including security, threading, and process and memory
    management.
 All Android hardware and system service access is managed using Dalvik
    as a middle tier.
 The Dalvik VM executes Dalvik executable files, a format optimized to
   ensure minimal memory footprint. You create.dex executables by
   transforming Java language compiled classes using the tools supplied
   within the SDK.
Installing Android
 What You Need to Begin
 Because Android applications run within the Dalvik virtual
   machine, you can write them on any platform that supports the
   developer tools. This currently includes the following:
    Microsoft Windows (XP or Vista)
    Mac OS X 10.4.8 or later (Intel chips only)
    Linux
 To get started, you’ll need to download and install the following:
   The Android SDK
   Java Development Kit (JDK) 5 or 6
 You can download the latest JDK from Sun at
     http://java.sun.com/javase/downloads/index.jsp
   If you already have a JDK installed, make sure that it meets the version requirements listed
    above, and note that the Java runtime environment (JRE) is not sufficient.

 Downloading and Installing the SDK
     http://developer.android.com/sdk/index.html


       Download android-sdk_r10-windows.zip file
        ZIP file containing the API libraries, developer tools, documentation, and several
        sample applications and API demos that highlight the use of particular API features.
        Install it by unzipping the SDK into a SDK in C drive.
Developing with Eclipse
 First Download Eclipse from http://www.eclipse.org/downloads/


 Download and Unzip this file in to your directory (C:).
 Double-click on the file c:eclipseeclipse.exe
Creating Hello World
 After you've created an AVD, the next step is to start a new
  Android project in Eclipse.
 From Eclipse, select File > New > Project.
 If the ADT Plugin for Eclipse has been successfully installed,
  the resulting dialog should have a folder labeled "Android"
  which should contain "Android Project". (After you create
  one or more Android projects, an entry for "Android XML
  File" will also be available.)
 Select "Android Project" and click Next.
 Fill in the project details with the following values:
    Project name: HelloAndroid
    Application name: Hello, Android
    Package name: com.example.helloandroid (or your
     own private namespace)
    Create Activity: HelloAndroid
 Click Finish.
   Here is a description of each field:
   Project Name : This is the Eclipse Project name — the name of the directory
    that will contain the project files.
   Application Name : This is the human-readable title for your application — the
    name that will appear on the Android device.
   Package Name : This is the package namespace (following the same rules as
    for packages in the Java programming language) that you want all your source
    code to reside under. This also sets the package name under which the stub
    Activity will be generated.
   Your package name must be unique across all packages installed on the
    Android system; for this reason, it's important to use a standard domain-style
    package for your applications.
 Create Activity : This is the name for the class stub that will be
   generated by the plug-in. This will be a subclass of Android's Activity
   class. An Activity is simply a class that can run and do work. It can create
   a UI if it chooses, but it doesn't need to. As the checkbox suggests, this is
   optional, but an Activity is almost always used as the basis for an
   application.
 Min SDK Version : This value specifies the minimum API Level required
   by your application. For more information, see Android API Levels.
 Other fields : The checkbox for "Use default location" allows you to
   change the location on disk where the project's files will be generated
   and stored. "Build Target" is the platform target that your application will
   be compiled against (this should be selected automatically, based on
   your Min SDK Version).
 You will see the following files created automatically by the SDK.
 src : It contains the source packages and java source files. In our src folder
   it currently contains the package com.helloAndroid. The package further
   contains the java file “helloAndroid.java”.
 gen : It contains the auto generated java files. You do not modify that.
 Android 1.6 : It contains the particular SDK libraries being used for the
   current project.
 res : It is one of the other important content folders.
   It contains three subfolders for images
     drawable –hdpi ,
     drawable –ldpi,
     drawable –mdpi.
    Layout : The layout contains the main.xml which is called when the application is
     started.
    values : Contained in the values folder is used to define strings to be used

      within the applications.
   AndroidManifest.xml :
 Types of Android Applications
 Most of the applications you create in Android will fall into one of the
   following categories:

      Foreground An application that’s useful only when it’s in the foreground and is
       effectively suspended when it’s not visible.map are common examples.
    Background An application with limited interaction that, apart from when
     being configured, spends most of its lifetime hidden. Examples include
     call screening applications and SMS auto-responders.
    Widget Some applications are represented only as a home-screen widget.
 Android Asset Packaging Tool (AAPT)
  Constructs the distributable Android package files (.apk).
  The following diagram depicts the components involved in building and
  running an application:


  Android Debug Bridge (ADB)
  The ADB is a client-server application that provides a link to a running
  emulator. It lets you copy files, install compiled application packages (.apk),
  and run shell commands.
Layouts
  LinearLayout Organizes its children either horizontally or vertically.
  TableLayout Organizes its children in tabular form.
  RelativeLayout : Organizes its children relative to one another or to the
   parent.
  FrameLayout : Allows you to dynamically change the control(s) in the
   layout.
The Android Widget Toolbox
 Android supplies a toolbox of standard Views to help you create
  simple interfaces. By using these controls, you can simplify your
  development and provide consistency between applications.
 The following list highlights some of the more familiar toolbox
  controls:

    TextView :
     A standard read only text label. It supports multiline display, string
     formatting, and automatic word wrapping.
    EditText :
     An editable text entry box. It accepts multiline entry and word
       wrapping.
    ListView :
     A View Group that creates and manages a group of Views used to
     display the items in a List. The standard ListView displays the
     string value of an array of objects using a Text View for each item.
 Button :
  Standard push-button


 CheckBox :
  Two-state button represented with a checked or unchecked box


 RadioButton :
  Two-state grouped buttons. Presents the user with a number of binary
  options of which only one can be selected at a time.
Thanks
Nirav

Android Basic

  • 1.
  • 2.
    History  Android isa software stack for mobile devices that includes an operating system and applications.  Android's mobile operating system is based on a modified version of the Linux kernel.  Google and other members of the Open Handset Alliance collaborated on Android's development and release.
  • 3.
    Features Storage  Messaging  Web browser  Java support  Media support  Market  Bluetooth  Video calling
  • 4.
    Android phones dobetter than the iPhone  Market  Google integration  Open Source
  • 5.
    Introduction  What isAndroid? • A software platform and operating system for mobile devices • Based on the Linux kernel • Developed by Open Handset Alliance (OHA) and later google • Allows writing managed code in the Java language • The Open Handset Alliance (OHA) is a collection of more than 50 technology companies, including hardware manufacturers, mobile carriers, and software developers
  • 6.
    What is theOpen Handset Alliance (OHA)?
  • 7.
     The firstAndroid mobile handset, the T-Mobile G1, was released in the United States in October 2008. By the end of 2009 over 20 Android-compatible handsets had been launched or announced in more than 26 countries on 32 different carrier networks.  Rather than being a mobile OS created for a single hardware implementation, Android is designed to support a large variety of hardware platforms, from WVGA (Wide Quarter Video Graphics Array) phones with hard keyboards to QVGA ( Quarter Video Graphics Array)devices with resistive touchscreens.  Beyond that, with no licensing fees or proprietary software, the cost of Android handsets, and is comparatively low.
  • 8.
    Android SDK  TheAndroid software development kit (SDK) includes everything you need to start developing, testing, and debugging Android applications.  Development Tools  The Android Emulator  Full Documentation  Sample Code  Online Support
  • 9.
    Dalvik Virtual Machine– DVM  One of the key elements of Android is the Dalvik virtual machine. Rather than use a traditional Java virtual machine (VM) such as Java ME (Java Mobile Edition)  Android uses its own custom VM designed to ensure that multiple instances run efficiently on a single device.  The Dalvik VM uses the device’s underlying Linux kernel to handle functionality including security, threading, and process and memory management.  All Android hardware and system service access is managed using Dalvik as a middle tier.
  • 10.
     The DalvikVM executes Dalvik executable files, a format optimized to ensure minimal memory footprint. You create.dex executables by transforming Java language compiled classes using the tools supplied within the SDK.
  • 11.
    Installing Android  WhatYou Need to Begin  Because Android applications run within the Dalvik virtual machine, you can write them on any platform that supports the developer tools. This currently includes the following:  Microsoft Windows (XP or Vista)  Mac OS X 10.4.8 or later (Intel chips only)  Linux  To get started, you’ll need to download and install the following:  The Android SDK  Java Development Kit (JDK) 5 or 6
  • 12.
     You candownload the latest JDK from Sun at  http://java.sun.com/javase/downloads/index.jsp  If you already have a JDK installed, make sure that it meets the version requirements listed above, and note that the Java runtime environment (JRE) is not sufficient.  Downloading and Installing the SDK  http://developer.android.com/sdk/index.html Download android-sdk_r10-windows.zip file ZIP file containing the API libraries, developer tools, documentation, and several sample applications and API demos that highlight the use of particular API features. Install it by unzipping the SDK into a SDK in C drive.
  • 13.
    Developing with Eclipse First Download Eclipse from http://www.eclipse.org/downloads/  Download and Unzip this file in to your directory (C:).  Double-click on the file c:eclipseeclipse.exe
  • 14.
    Creating Hello World After you've created an AVD, the next step is to start a new Android project in Eclipse.  From Eclipse, select File > New > Project.  If the ADT Plugin for Eclipse has been successfully installed, the resulting dialog should have a folder labeled "Android" which should contain "Android Project". (After you create one or more Android projects, an entry for "Android XML File" will also be available.)  Select "Android Project" and click Next.
  • 16.
     Fill inthe project details with the following values:  Project name: HelloAndroid  Application name: Hello, Android  Package name: com.example.helloandroid (or your own private namespace)  Create Activity: HelloAndroid  Click Finish.
  • 18.
    Here is a description of each field:  Project Name : This is the Eclipse Project name — the name of the directory that will contain the project files.  Application Name : This is the human-readable title for your application — the name that will appear on the Android device.  Package Name : This is the package namespace (following the same rules as for packages in the Java programming language) that you want all your source code to reside under. This also sets the package name under which the stub Activity will be generated.  Your package name must be unique across all packages installed on the Android system; for this reason, it's important to use a standard domain-style package for your applications.
  • 19.
     Create Activity: This is the name for the class stub that will be generated by the plug-in. This will be a subclass of Android's Activity class. An Activity is simply a class that can run and do work. It can create a UI if it chooses, but it doesn't need to. As the checkbox suggests, this is optional, but an Activity is almost always used as the basis for an application.  Min SDK Version : This value specifies the minimum API Level required by your application. For more information, see Android API Levels.  Other fields : The checkbox for "Use default location" allows you to change the location on disk where the project's files will be generated and stored. "Build Target" is the platform target that your application will be compiled against (this should be selected automatically, based on your Min SDK Version).
  • 20.
     You willsee the following files created automatically by the SDK.
  • 21.
     src :It contains the source packages and java source files. In our src folder it currently contains the package com.helloAndroid. The package further contains the java file “helloAndroid.java”.  gen : It contains the auto generated java files. You do not modify that.  Android 1.6 : It contains the particular SDK libraries being used for the current project.  res : It is one of the other important content folders. It contains three subfolders for images drawable –hdpi , drawable –ldpi, drawable –mdpi.  Layout : The layout contains the main.xml which is called when the application is started.  values : Contained in the values folder is used to define strings to be used within the applications. AndroidManifest.xml :
  • 22.
     Types ofAndroid Applications  Most of the applications you create in Android will fall into one of the following categories:  Foreground An application that’s useful only when it’s in the foreground and is effectively suspended when it’s not visible.map are common examples.  Background An application with limited interaction that, apart from when being configured, spends most of its lifetime hidden. Examples include call screening applications and SMS auto-responders.  Widget Some applications are represented only as a home-screen widget.
  • 23.
     Android AssetPackaging Tool (AAPT) Constructs the distributable Android package files (.apk). The following diagram depicts the components involved in building and running an application: Android Debug Bridge (ADB) The ADB is a client-server application that provides a link to a running emulator. It lets you copy files, install compiled application packages (.apk), and run shell commands.
  • 24.
    Layouts  LinearLayoutOrganizes its children either horizontally or vertically.  TableLayout Organizes its children in tabular form.  RelativeLayout : Organizes its children relative to one another or to the parent.  FrameLayout : Allows you to dynamically change the control(s) in the layout.
  • 25.
    The Android WidgetToolbox  Android supplies a toolbox of standard Views to help you create simple interfaces. By using these controls, you can simplify your development and provide consistency between applications.  The following list highlights some of the more familiar toolbox controls:  TextView : A standard read only text label. It supports multiline display, string formatting, and automatic word wrapping.  EditText : An editable text entry box. It accepts multiline entry and word wrapping.  ListView : A View Group that creates and manages a group of Views used to display the items in a List. The standard ListView displays the string value of an array of objects using a Text View for each item.
  • 26.
     Button : Standard push-button  CheckBox : Two-state button represented with a checked or unchecked box  RadioButton : Two-state grouped buttons. Presents the user with a number of binary options of which only one can be selected at a time.
  • 27.