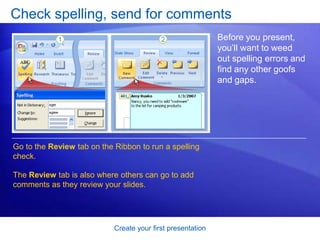
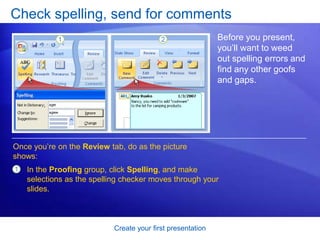
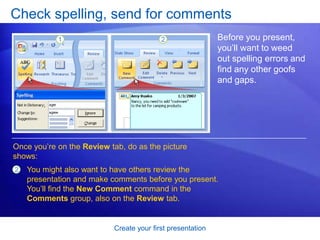
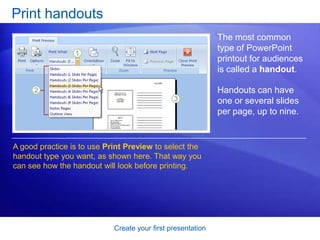
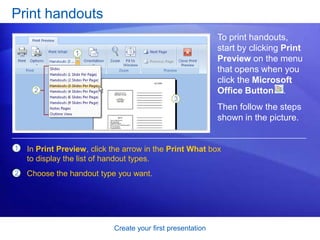
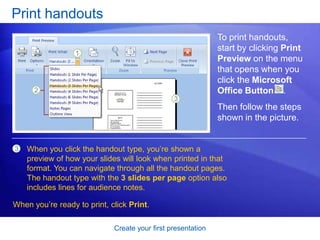
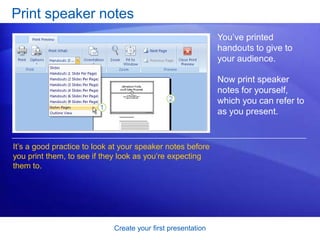
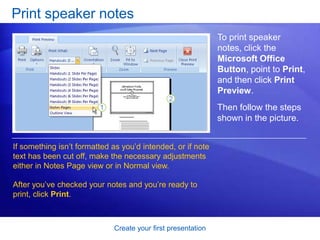
This document provides instructions for creating a PowerPoint presentation. It discusses getting familiar with the PowerPoint workspace, adding and formatting text on slides, inserting pictures and other elements, choosing and applying themes, and preparing a presentation for delivery. The final sections cover previewing the presentation, checking for spelling errors, collecting comments from reviewers, and printing handouts for audience members. The overall purpose is to guide users through the basic steps of assembling and refining their first PowerPoint presentation.
Ms powerpoint 2007 presentation by sarmad balochSarmad Baloch
Ms powerpoint 2007 presentation by sarmad baloch
I AM SARMAD KHOSA
BSIT (5TH A)
(ISP)
FACEBOOK PAGLE::
https://www.facebook.com/LAUGHINGHLAUGHTER/
YOUTUBE CHANNEL:::
https://www.youtube.com/channel/UCUjaIeS-DHI9xv-ZnBpx2hQ
Ms powerpoint 2007 presentation by sarmad balochSarmad Baloch
Ms powerpoint 2007 presentation by sarmad baloch
I AM SARMAD KHOSA
BSIT (5TH A)
(ISP)
FACEBOOK PAGLE::
https://www.facebook.com/LAUGHINGHLAUGHTER/
YOUTUBE CHANNEL:::
https://www.youtube.com/channel/UCUjaIeS-DHI9xv-ZnBpx2hQ
PowerPoint is a presentation software package. With PowerPoint, you can easily create slide shows. Trainers and other presenters use slide shows to illustrate their presentations.
Creating Effective PowerPoint® Presentations
Microsoft® PowerPoint® is a tool for creating dynamic oral presentations. An effective PowerPoint® presentation has maximum impact on an audience in minimal time. If you have been assigned a PowerPoint® in addition to an essay or instead of an essay, here are the key similarities [+] and differences [x] between these two forms:
Table 1
Elements of an Essay and a PowerPoint Presentation
Elements
Essay
PowerPoint®
Design
x Text-based, regular black font, one inch margins, double spacing
+ Visual design: color, theme, and layout options; art and multimedia options
Title
+ Title page
+ Title slide
Introduction
+ Topic, issue, thesis statement
+ Slide title (topic); key points
Body
+ Paragraphs featuring one point each
+ Slides featuring one point each
Conclusion
+ Recap of main point, final thoughts
+ Slide listing recap of main points
Paragraphs
+ Unified and cohesive paragraphs with topic and concluding sentences
x Unordered (bulleted) lists or a captioned image to convey key points
Sentences
Complete sentences
x One-line fragments; unordered list (bullet points).
Lists
x Occasionally used to separate elements in a sentence.
+Lists are the building blocks of a PowerPoint®.
Visuals/art
+ Tables, charts, and graphs display data and research results and make a paper visually appealing.
+ Images, art, tables, charts, and graphs increase the impact and visual appeal of a presentation.
In-text citations
+ Quotes, paraphrases, summaries, and visuals require in-text citations.
+ Quotes, paraphrases, and summaries, and visuals require in-text citations.
Reference list
+ Last page lists full-citation references.
+ Last slide lists full-citation references
GETTING STARTED WITH SLIDES
Similar to drafting an essay, when creating a PowerPoint®, you need to define your topic and focus, determine your audience, and know your purpose--whether you are informing, educating, entertaining, or persuading.
Another essential step that takes as much time when creating a PowerPoint® as it does when writing an essay is to research your subject matter and prewrite your ideas. A next step is to make an informal outline to organize your ideas and establish a clear beginning middle and end. With the groundwork complete and content prepared, you are ready to create Slide 1.
Slide 1
1. New presentations begin with a title slide. Follow the directions given in the text placeholders beginning with “click to add title” (Figure 2).
2. Then, in the next box, add your subtitle. You may also use this area to provide your name and the university name per APA guidelines or any other information required on your title slide.
3. Since a PowerPoint® accompanies an oral presentation, you may want to add speaker notes in the notes pane to elaborate on the points on each slide.
Figure 1
PowerPoint® Side 1. Click to Add Title
Important: PowerPoint® has older versions and newer, PC and Mac. Shown in Figure 1 is Microsoft® PowerPoint® 2013 for Win ...
This PDF will show you a lesson about how to use MS power point 2010 . Actually , this version is different a little bit from MS power point 2007 so, it is important to differentiate between them .
Neuro-symbolic is not enough, we need neuro-*semantic*Frank van Harmelen
Neuro-symbolic (NeSy) AI is on the rise. However, simply machine learning on just any symbolic structure is not sufficient to really harvest the gains of NeSy. These will only be gained when the symbolic structures have an actual semantics. I give an operational definition of semantics as “predictable inference”.
All of this illustrated with link prediction over knowledge graphs, but the argument is general.
GraphRAG is All You need? LLM & Knowledge GraphGuy Korland
Guy Korland, CEO and Co-founder of FalkorDB, will review two articles on the integration of language models with knowledge graphs.
1. Unifying Large Language Models and Knowledge Graphs: A Roadmap.
https://arxiv.org/abs/2306.08302
2. Microsoft Research's GraphRAG paper and a review paper on various uses of knowledge graphs:
https://www.microsoft.com/en-us/research/blog/graphrag-unlocking-llm-discovery-on-narrative-private-data/
GDG Cloud Southlake #33: Boule & Rebala: Effective AppSec in SDLC using Deplo...James Anderson
Effective Application Security in Software Delivery lifecycle using Deployment Firewall and DBOM
The modern software delivery process (or the CI/CD process) includes many tools, distributed teams, open-source code, and cloud platforms. Constant focus on speed to release software to market, along with the traditional slow and manual security checks has caused gaps in continuous security as an important piece in the software supply chain. Today organizations feel more susceptible to external and internal cyber threats due to the vast attack surface in their applications supply chain and the lack of end-to-end governance and risk management.
The software team must secure its software delivery process to avoid vulnerability and security breaches. This needs to be achieved with existing tool chains and without extensive rework of the delivery processes. This talk will present strategies and techniques for providing visibility into the true risk of the existing vulnerabilities, preventing the introduction of security issues in the software, resolving vulnerabilities in production environments quickly, and capturing the deployment bill of materials (DBOM).
Speakers:
Bob Boule
Robert Boule is a technology enthusiast with PASSION for technology and making things work along with a knack for helping others understand how things work. He comes with around 20 years of solution engineering experience in application security, software continuous delivery, and SaaS platforms. He is known for his dynamic presentations in CI/CD and application security integrated in software delivery lifecycle.
Gopinath Rebala
Gopinath Rebala is the CTO of OpsMx, where he has overall responsibility for the machine learning and data processing architectures for Secure Software Delivery. Gopi also has a strong connection with our customers, leading design and architecture for strategic implementations. Gopi is a frequent speaker and well-known leader in continuous delivery and integrating security into software delivery.
Let's dive deeper into the world of ODC! Ricardo Alves (OutSystems) will join us to tell all about the new Data Fabric. After that, Sezen de Bruijn (OutSystems) will get into the details on how to best design a sturdy architecture within ODC.
Epistemic Interaction - tuning interfaces to provide information for AI supportAlan Dix
Paper presented at SYNERGY workshop at AVI 2024, Genoa, Italy. 3rd June 2024
https://alandix.com/academic/papers/synergy2024-epistemic/
As machine learning integrates deeper into human-computer interactions, the concept of epistemic interaction emerges, aiming to refine these interactions to enhance system adaptability. This approach encourages minor, intentional adjustments in user behaviour to enrich the data available for system learning. This paper introduces epistemic interaction within the context of human-system communication, illustrating how deliberate interaction design can improve system understanding and adaptation. Through concrete examples, we demonstrate the potential of epistemic interaction to significantly advance human-computer interaction by leveraging intuitive human communication strategies to inform system design and functionality, offering a novel pathway for enriching user-system engagements.
UiPath Test Automation using UiPath Test Suite series, part 4DianaGray10
Welcome to UiPath Test Automation using UiPath Test Suite series part 4. In this session, we will cover Test Manager overview along with SAP heatmap.
The UiPath Test Manager overview with SAP heatmap webinar offers a concise yet comprehensive exploration of the role of a Test Manager within SAP environments, coupled with the utilization of heatmaps for effective testing strategies.
Participants will gain insights into the responsibilities, challenges, and best practices associated with test management in SAP projects. Additionally, the webinar delves into the significance of heatmaps as a visual aid for identifying testing priorities, areas of risk, and resource allocation within SAP landscapes. Through this session, attendees can expect to enhance their understanding of test management principles while learning practical approaches to optimize testing processes in SAP environments using heatmap visualization techniques
What will you get from this session?
1. Insights into SAP testing best practices
2. Heatmap utilization for testing
3. Optimization of testing processes
4. Demo
Topics covered:
Execution from the test manager
Orchestrator execution result
Defect reporting
SAP heatmap example with demo
Speaker:
Deepak Rai, Automation Practice Lead, Boundaryless Group and UiPath MVP
DevOps and Testing slides at DASA ConnectKari Kakkonen
My and Rik Marselis slides at 30.5.2024 DASA Connect conference. We discuss about what is testing, then what is agile testing and finally what is Testing in DevOps. Finally we had lovely workshop with the participants trying to find out different ways to think about quality and testing in different parts of the DevOps infinity loop.
Smart TV Buyer Insights Survey 2024 by 91mobiles.pdf91mobiles
91mobiles recently conducted a Smart TV Buyer Insights Survey in which we asked over 3,000 respondents about the TV they own, aspects they look at on a new TV, and their TV buying preferences.
The Art of the Pitch: WordPress Relationships and SalesLaura Byrne
Clients don’t know what they don’t know. What web solutions are right for them? How does WordPress come into the picture? How do you make sure you understand scope and timeline? What do you do if sometime changes?
All these questions and more will be explored as we talk about matching clients’ needs with what your agency offers without pulling teeth or pulling your hair out. Practical tips, and strategies for successful relationship building that leads to closing the deal.
Software Delivery At the Speed of AI: Inflectra Invests In AI-Powered QualityInflectra
In this insightful webinar, Inflectra explores how artificial intelligence (AI) is transforming software development and testing. Discover how AI-powered tools are revolutionizing every stage of the software development lifecycle (SDLC), from design and prototyping to testing, deployment, and monitoring.
Learn about:
• The Future of Testing: How AI is shifting testing towards verification, analysis, and higher-level skills, while reducing repetitive tasks.
• Test Automation: How AI-powered test case generation, optimization, and self-healing tests are making testing more efficient and effective.
• Visual Testing: Explore the emerging capabilities of AI in visual testing and how it's set to revolutionize UI verification.
• Inflectra's AI Solutions: See demonstrations of Inflectra's cutting-edge AI tools like the ChatGPT plugin and Azure Open AI platform, designed to streamline your testing process.
Whether you're a developer, tester, or QA professional, this webinar will give you valuable insights into how AI is shaping the future of software delivery.
3. Create your first presentation
Create your slides
This is a glimpse of
the PowerPoint
window.
This lesson will give
you an introduction to
the window and help
you feel comfortable
working there.
You’ll also see how to add new slides, choose a layout
for a slide, and add text as well as reuse slides from
another presentation.
Finally, you’ll find out how to prepare notes as you
create the show, to refer to when you present.
4. Create your first presentation
Get to know your workspace
This is the view that
first opens in
PowerPoint. It’s called
Normal view.
You work here to
create slides.
1
2
The slide pane is the big area in the middle. You work
directly on the slide in this space.
On the slide, the boxes with the dotted borders are
called placeholders. Here’s where you type your text,
insert art, or add other content.
There are three main areas of Normal view.
5. Create your first presentation
Get to know your workspace
This is the view that
first opens in
PowerPoint. It’s called
Normal view.
You work here to
create slides.
On the left are small, or thumbnail, versions of the
slides in your presentation, with the one you’re working
on highlighted. This area is the Slides tab.
There are three main areas of Normal view.
3
6. Create your first presentation
Get to know your workspace
This is the view that
first opens in
PowerPoint. It’s called
Normal view.
You work here to
create slides.
In the bottom area is the notes pane, where you type
the notes that you’ll refer to while you present.
There are three main areas of Normal view.
4
7. Create your first presentation
Add new slides
When PowerPoint
opens, there’s only
one slide in the show.
You add the other
slides.
The most obvious way to add a new slide is by clicking
New Slide on the Home tab, as the picture shows.
8. Create your first presentation
Add new slides
When PowerPoint
opens, there’s only
one slide in the show.
You add the other
slides.
There are two ways to use the New Slide button:
1 If you click the top part of the button, where the slide
icon is, a new slide is immediately added beneath the
slide that’s selected on the Slides tab.
9. Create your first presentation
Add new slides
When PowerPoint
opens, there’s only
one slide in the show.
You add the other
slides.
There are two ways to use the New Slide button:
2 If you click the bottom part of the button, you get a
gallery of layouts for the slide. You choose a layout, and
the slide is inserted with that layout.
10. Create your first presentation
Add new slides
If you add a slide
without choosing a
layout, PowerPoint
applies one
automatically.
You can change it if you want: Right-click the slide that
has the layout you want to replace, and then point to
Layout.
11. Create your first presentation
Pick layouts for slides
A slide layout
arranges your slide
content.
For example, you may
want both a list and a
picture on the slide, or
a picture and a
caption.
Layouts contain different types of placeholders and
placeholder arrangements to support whatever your
content is.
12. Create your first presentation
Pick layouts for slides
The picture shows the
layouts that
PowerPoint starts with
automatically.
1
2
The Title Slide layout, shown here as it looks in the
layouts gallery, is applied to the first slide in the show
(the one that’s already there when you start).
On the slide, the Title Slide layout contains placeholders
for a title and subtitle.
13. Create your first presentation
Pick layouts for slides
The picture shows the
layouts that
PowerPoint starts with
automatically.
The layout you’ll probably use the most for other slides is
called Title and Content, shown here as it looks in the
layouts gallery.
3
4 On the slide, this layout has a placeholder for the slide
title, and a second, all-purpose placeholder that contains
text as well as several icons.
14. Create your first presentation
Type your text
In the all-purpose
placeholder shown
previously, you can
add graphic elements
or text.
Let’s talk about text.
1
2
You can use different levels of text within bulleted lists to
make minor points under major points.
On the Ribbon, use commands in the Font group to
change character formatting, such as font color and size.
The default formatting for text is a bulleted list.
15. Create your first presentation
Type your text
In the all-purpose
placeholder shown
previously, you can
add graphic elements
or text.
Let’s talk about text.
3 Use commands in the Paragraph group to change
paragraph formatting, such as list formatting, text
indentation, and line spacing.
The default formatting for text is a bulleted list.
16. Create your first presentation
Insert slides from another presentation
You may need to use
slides from an existing
presentation in your
show.
Here’s how to do it.
1
2
On the Home tab, click the arrow next to New Slide, as
if you were going to insert a new slide and choose a
layout for it first.
Below the layout gallery, click Reuse Slides.
17. Create your first presentation
Insert slides from another presentation
You may need to use
slides from an existing
presentation in your
show.
This is how to do it.
3 In the Reuse Slides task pane, under Insert slide from,
click Browse to find the presentation or slide library that
has the slides you want. Then click the arrow to open
those slides in the task pane.
18. Create your first presentation
Insert slides from another presentation
You may need to use
slides from an existing
presentation in your
show.
This is how to do it.
When you find the slide you want, take notice of the
Keep source formatting check box at the very bottom
of the pane. If you want to retain the exact look of the
slides you’re inserting, be sure this check box is selected
before you insert the slide.
4
19. Create your first presentation
Insert slides from another presentation
You may need to use
slides from an existing
presentation in your
show.
This is how to do it.
Click each slide you want to insert. Each one is copied
into the open presentation, below the currently selected
slide or below your cursor, if you’ve positioned it beneath
a slide thumbnail.
5
20. Create your first presentation
Create speaker notes
Use speaker notes to
elaborate on the
points on a slide.
Good notes can help
you keep your
audience engaged
and prevent text
overload on the slide.
1
2
As you develop the content on your slides, type your
notes in the notes pane, below the slide.
You can enlarge the notes pane so that it’s easier to
work in by dragging the split bar.
21. Create your first presentation
Create speaker notes
Use speaker notes to
elaborate on the
points on a slide.
Good notes can help
you keep your
audience engaged
and prevent text
overload on the slide.
3 Your notes are saved in a notes page, which contains a
copy of the slide along with the notes. This is the page
you print to refer to as you give the presentation.
22. Create your first presentation
Suggestions for practice
1. Get familiar with the areas of the PowerPoint window.
2. Type text.
3. Add new slides.
4. Navigate and add more text.
5. Use text indents and formatting.
6. Work with text automatic text fit.
7. Type and view notes.
Online practice (requires PowerPoint 2007)
24. Create your first presentation
Choose a theme, add more content
As a color scheme for
your presentation,
basic black will do the
job.
But how about when
you’re in the mood for
more color and a
vibrant design?
Go straight to the PowerPoint themes gallery and try
out what’s there. Choosing a theme is no harder than
flipping a switch.
You can also put other elements on your slides, such
as pictures and captions, then handily align them so
that everything is neatly arranged.
25. Create your first presentation
The beauty of themes
Every presentation
has a theme.
Some are just more
colorful than others.
The theme determines the look and colors of your slides
and gives your presentation a consistent appearance.
Here, you see three title slides that have the same
content but that use different themes.
26. Create your first presentation
The beauty of themes
Every presentation
has a theme.
Some are just more
colorful than others.
A theme includes these elements, offered as a package:
• Background design
• Color scheme
• Font types and sizes
• Placeholder positions
27. Create your first presentation
The beauty of themes
The color scheme
affects background
colors, font colors, fill
colors for shapes,
border colors,
hyperlinks, and slide
elements like tables
and charts.
And if you have placeholders, the theme honors the
layout you’ve chosen; it just moves things around a little.
28. Create your first presentation
Choose a theme
Every new
presentation starts out
with the default theme,
called Office Theme.
To find and apply
another one, start by
clicking the Design
tab on the Ribbon.
1
2
Theme samples, in the form of the small thumbnails you
see here, will show in the Themes group.
To see additional themes, click the More button on the
right of the group.
29. Create your first presentation
Choose a theme
Every new
presentation starts out
with the default theme,
called Office Theme.
To find and apply
another one, start by
clicking the Design
tab on the Ribbon.
3 When you point to any theme thumbnail, a preview of it
is shown on the slide.
Click a thumbnail to apply that theme to all your slides.
You can also apply the theme only to the slides you
have selected.
30. Create your first presentation
Insert pictures and things, part 1
Now you’ll learn two
methods for inserting
pictures and other
non-text items into
slides.
The first method is to click an icon in a placeholder,
which you got a glimpse of in the first lesson.
31. Create your first presentation
Insert pictures and things, part 1
Now you’ll learn two
methods for inserting
pictures and other
non-text items into
slides.
1
2
Click the Clip Art icon in the placeholder.
The Clip Art task pane opens. There, type a keyword in
the Search for box that suggests the sort of clip you
want. Then click Go.
The picture illustrates how to insert a piece of clip art:
32. Create your first presentation
Insert pictures and things, part 1
Now you’ll learn two
methods for inserting
pictures and other
non-text items into
slides.
The picture illustrates how to insert a piece of clip art:
Clips appear that fit the keyword. Click one of them to
insert it into the slide. The picture is automatically sized
and positioned within the placeholder.
3
33. Create your first presentation
Insert pictures and things, part 2
Another way to insert
slide items is to use
the Insert tab on the
Ribbon.
All of the things you could insert from the slide pane are
also available on the Insert tab, plus more—including
shapes, hyperlinks, text boxes, headers and footers, and
media clips such as sounds.
34. Create your first presentation
Insert pictures and things, part 2
The picture shows the
array of things
available on the Insert
tab.
A typical thing to insert
is a text box, as
shown.
1
2
Text boxes are handy when you want to add text
somewhere and need another placeholder for it, such as
for a picture caption. On the Insert tab, click Text Box.
Draw the box on the slide and type in it.
35. Create your first presentation
Insert pictures and things, part 2
What’s the better
method?
Since you have two
choices for how to
insert some things,
which one is
recommended?
It mostly comes down to what you find handiest. One
thing to consider is how you want the inserted item to be
positioned on the slide.
36. Create your first presentation
Edit slide elements
After inserting a
picture, you may want
to make adjustments
such as resizing,
cropping, or changing
the brightness.
Use Picture Tools for
this.
1
2
So, select the picture.
Picture Tools appear above the Ribbon. Use options on
the Format tab to work with the picture.
Picture Tools are available when the picture is selected.
37. Create your first presentation
Edit slide elements
There are tools for the
range of things you
can insert, from
tables, charts, and
SmartArt™ graphics to
text boxes and
shapes, sounds, and
videos.
Just select the inserted item to see the relevant tab on
the Ribbon.
38. Create your first presentation
Arrange slide elements
Once you’ve put all
the things that you
want on the slide, you
need to align them so
they look just right.
For example, in this picture, the text box with the caption
will look best once it’s aligned evenly with the picture—
either flush left, or correctly centered.
39. Create your first presentation
Arrange slide elements
You use the Arrange
commands to align
slide elements.
1
2
3
To align the caption so it’s flush left with the picture, first
select both placeholders.
In Picture Tools, find the Arrange group on the Format
tab.
Click the Align button, and then click Align Left.
40. Create your first presentation
Suggestions for practice
1. Choose a new theme.
2. Insert a picture.
3. Resize the picture.
4. Add a caption.
5. Align the picture and caption.
6. Bonus: Add an animation effect.
Online practice (requires PowerPoint 2007)
42. Create your first presentation
Proof, print, and prep for the show
You’ve learned the
essentials for creating
a slide show.
Now imagine that your
presentation is ready,
and you want to
prepare to present it.
You’ll need to preview it, run a spelling check, get input
from others, and check your handouts and notes
before printing them.
Then you can use the PowerPoint packaging feature
to place your presentation on a CD or on the computer
you’ll use to present.
43. Create your first presentation
Preview on your computer
As you create a show,
you can preview it at
any time in Slide
Show view.
This view gives you an
idea of how the slides
will look and behave
when projected.
1
2
To open Slide Show view, click the Slide Show tab, and
click a command in the Start Slide Show group—to
start on the first slide or current slide.
Slide Show view fills your computer screen.
44. Create your first presentation
Preview on your computer
As you create a show,
you can preview it at
any time in Slide
Show view.
This view gives you an
idea of how the slides
will look and behave
when projected.
3 One way to navigate from slide to slide is to use the
Slide Show toolbar, at the bottom-left of the screen.
To get out of Slide Show view at any point, press ESC.
This returns you to the view you left, which is typically
Normal view.
4
45. Create your first presentation
• Press F5 to start on the first slide.
• Press SHIFT+F5 to start on the current slide.
Preview on your computer
Here are some other ways to open Slide Show view:
When you do this, the show begins on the slide that’s currently
selected on the Slides tab.
• Click the Slide Show button in the lower-right portion of the
PowerPoint window, next to the Zoom slider.
• Click the Slide Show button on the View tab. The show begins on
the first slide no matter which slide is currently selected.
46. Create your first presentation
Check spelling, send for comments
Before you present,
you’ll want to weed
out spelling errors and
find any other goofs
and gaps.
Go to the Review tab on the Ribbon to run a spelling
check.
The Review tab is also where others can go to add
comments as they review your slides.
47. Create your first presentation
Check spelling, send for comments
Before you present,
you’ll want to weed
out spelling errors and
find any other goofs
and gaps.
Once you’re on the Review tab, do as the picture
shows:
1 In the Proofing group, click Spelling, and make
selections as the spelling checker moves through your
slides.
48. Create your first presentation
Check spelling, send for comments
Before you present,
you’ll want to weed
out spelling errors and
find any other goofs
and gaps.
Once you’re on the Review tab, do as the picture
shows:
2 You might also want to have others review the
presentation and make comments before you present.
You’ll find the New Comment command in the
Comments group, also on the Review tab.
49. Create your first presentation
Print handouts
The most common
type of PowerPoint
printout for audiences
is called a handout.
Handouts can have
one or several slides
per page, up to nine.
A good practice is to use Print Preview to select the
handout type you want, as shown here. That way you
can see how the handout will look before printing.
50. Create your first presentation
Print handouts
To print handouts,
start by clicking Print
Preview on the menu
that opens when you
click the Microsoft
Office Button .
1
2
In Print Preview, click the arrow in the Print What box
to display the list of handout types.
Choose the handout type you want.
Then follow the steps
shown in the picture.
51. Create your first presentation
Print handouts
To print handouts,
start by clicking Print
Preview on the menu
that opens when you
click the Microsoft
Office Button .
When you click the handout type, you’re shown a
preview of how your slides will look when printed in that
format. You can navigate through all the handout pages.
The handout type with the 3 slides per page option also
includes lines for audience notes.
Then follow the steps
shown in the picture.
3
When you’re ready to print, click Print.
52. Create your first presentation
Print speaker notes
You’ve printed
handouts to give to
your audience.
Now print speaker
notes for yourself,
which you can refer to
as you present.
It’s a good practice to look at your speaker notes before
you print them, to see if they look as you’re expecting
them to.
53. Create your first presentation
Print speaker notes
To print speaker
notes, click the
Microsoft Office
Button, point to Print,
and then click Print
Preview.
1
2
Select Notes Pages in the Print What list.
Your notes pages are shown in the preview window,
starting with the first slide (unless you specify otherwise).
Then follow the steps
shown in the picture.
54. Create your first presentation
Print speaker notes
If something isn’t formatted as you’d intended, or if note
text has been cut off, make the necessary adjustments
either in Notes Page view or in Normal view.
After you’ve checked your notes and you’re ready to
print, click Print.
To print speaker
notes, click the
Microsoft Office
Button, point to Print,
and then click Print
Preview.
Then follow the steps
shown in the picture.
55. Create your first presentation
Add footer text to handouts and notes
Print Preview also
affords you the chance
to add or adjust
footers in your
handouts and notes.
By default, printed handouts and notes have page
numbers.
But they can show other things, such as footer text.
56. Create your first presentation
Add footer text to handouts and notes
Follow these steps if
you want your
printouts to show
other content.
1
2
Click Options, and then click Header and Footer.
To show footer text, such as “Draft” or “Confidential,”
select the Footer option, and then type the text you want
in the box.
57. Create your first presentation
Add footer text to handouts and notes
Follow these steps if
you want your
printouts to show
other content.
The selections you make on the Notes and Handouts
tab in the Header and Footer dialog box apply to your
handouts and your notes pages.
58. Create your first presentation
Color options for printing
Depending on what
kind of printer you’re
using, you can print
your presentation in
Color, Grayscale, or
Pure Black and White.
Here’s how to select an option for printing:
1 Under Print Preview, click Options, and point to
Color/Grayscale. Then select from the menu. Your
slides will be previewed and printed with that choice
applied.
59. Create your first presentation
Color options for printing
Depending on what
kind of printer you’re
using, you can print
your presentation in
Color, Grayscale, or
Pure Black and White.
Here’s how to select an option for printing:
The first preview example shows a slide that will be
printed in color.
2
3 The second preview example shows a slide that will be
printed in grayscale.
60. Create your first presentation
Color options for printing
Depending on what
kind of printer you’re
using, you can print
your presentation in
Color, Grayscale, or
Pure Black and White.
Here’s how to select an option for printing:
The last preview example shows a slide that will be
printed in pure black and white.
4
61. Create your first presentation
Package the presentation
The PowerPoint
Package for CD
feature bundles your
presentation file and
any other files you
need and copies them
into one folder or
directly to a CD.
If you copy your files to a folder, you can burn the folder
to a CD later.
You can also copy the files to a network server that you
have access to from your presenting computer.
62. Create your first presentation
Package the presentation
The picture shows
how to package your
presentation and
related files.
1 Click the Microsoft Office Button.
Point to Publish, and click Package for CD.
In the dialog box that opens, make selections for what
you want to be included in the package, and copy your
file or files to either a folder or a CD.
2
3
63. Create your first presentation
Package the presentation
The picture shows
how to package your
presentation and
related files.
Important: Always save your presentation before
packaging it to a folder or CD.
64. Create your first presentation
• To package and then copy to a CD from PowerPoint, you must be
running Microsoft Windows® XP or later on your computer, and you
must have a CD burner.
• If you’re running Microsoft Windows 2000, you can still use this
feature to package the presentation files to a folder, and then use a
third-party program to burn the folder to a CD.
Package the presentation
Requirements for packaging to a CD
65. Create your first presentation
Suggestions for practice
1. Preview the show on your computer.
2. Run a spelling check.
3. Send the presentation for comments.
4. Prepare to print handouts.
5. Choose a color setting and print handouts.
6. Check your notes in Notes Page view.
7. Package the presentation.
Online practice (requires PowerPoint 2007)