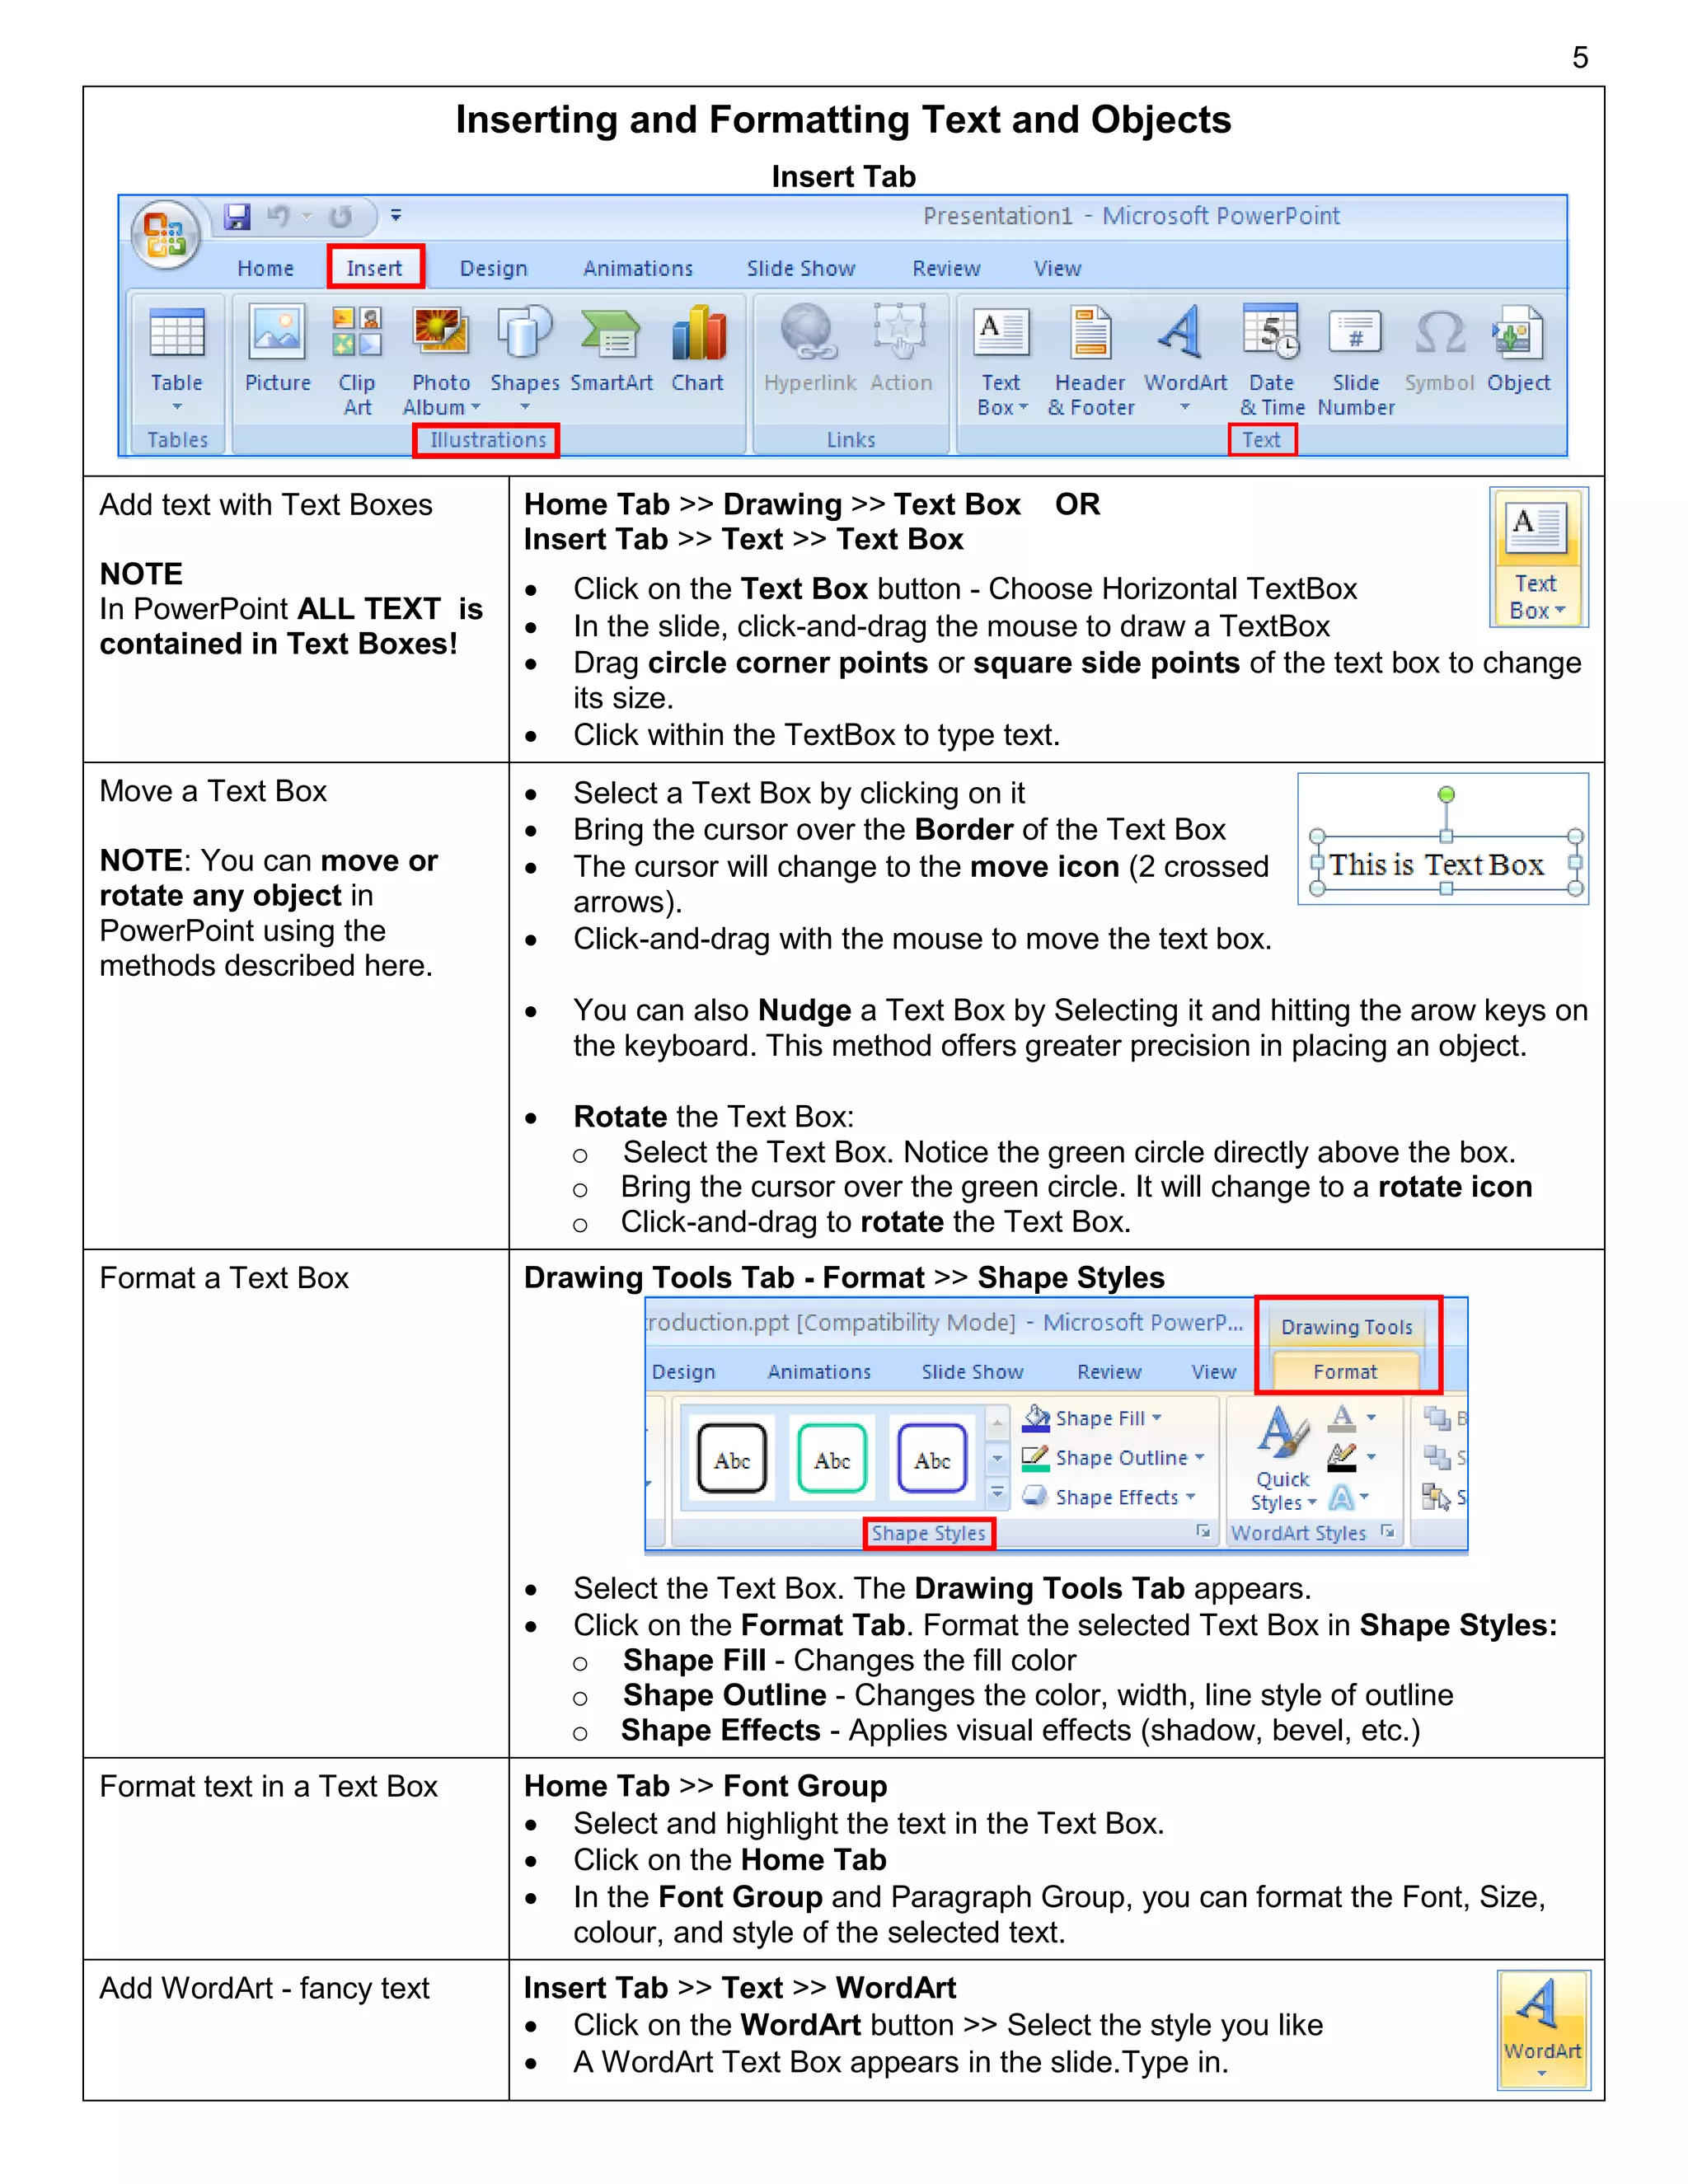
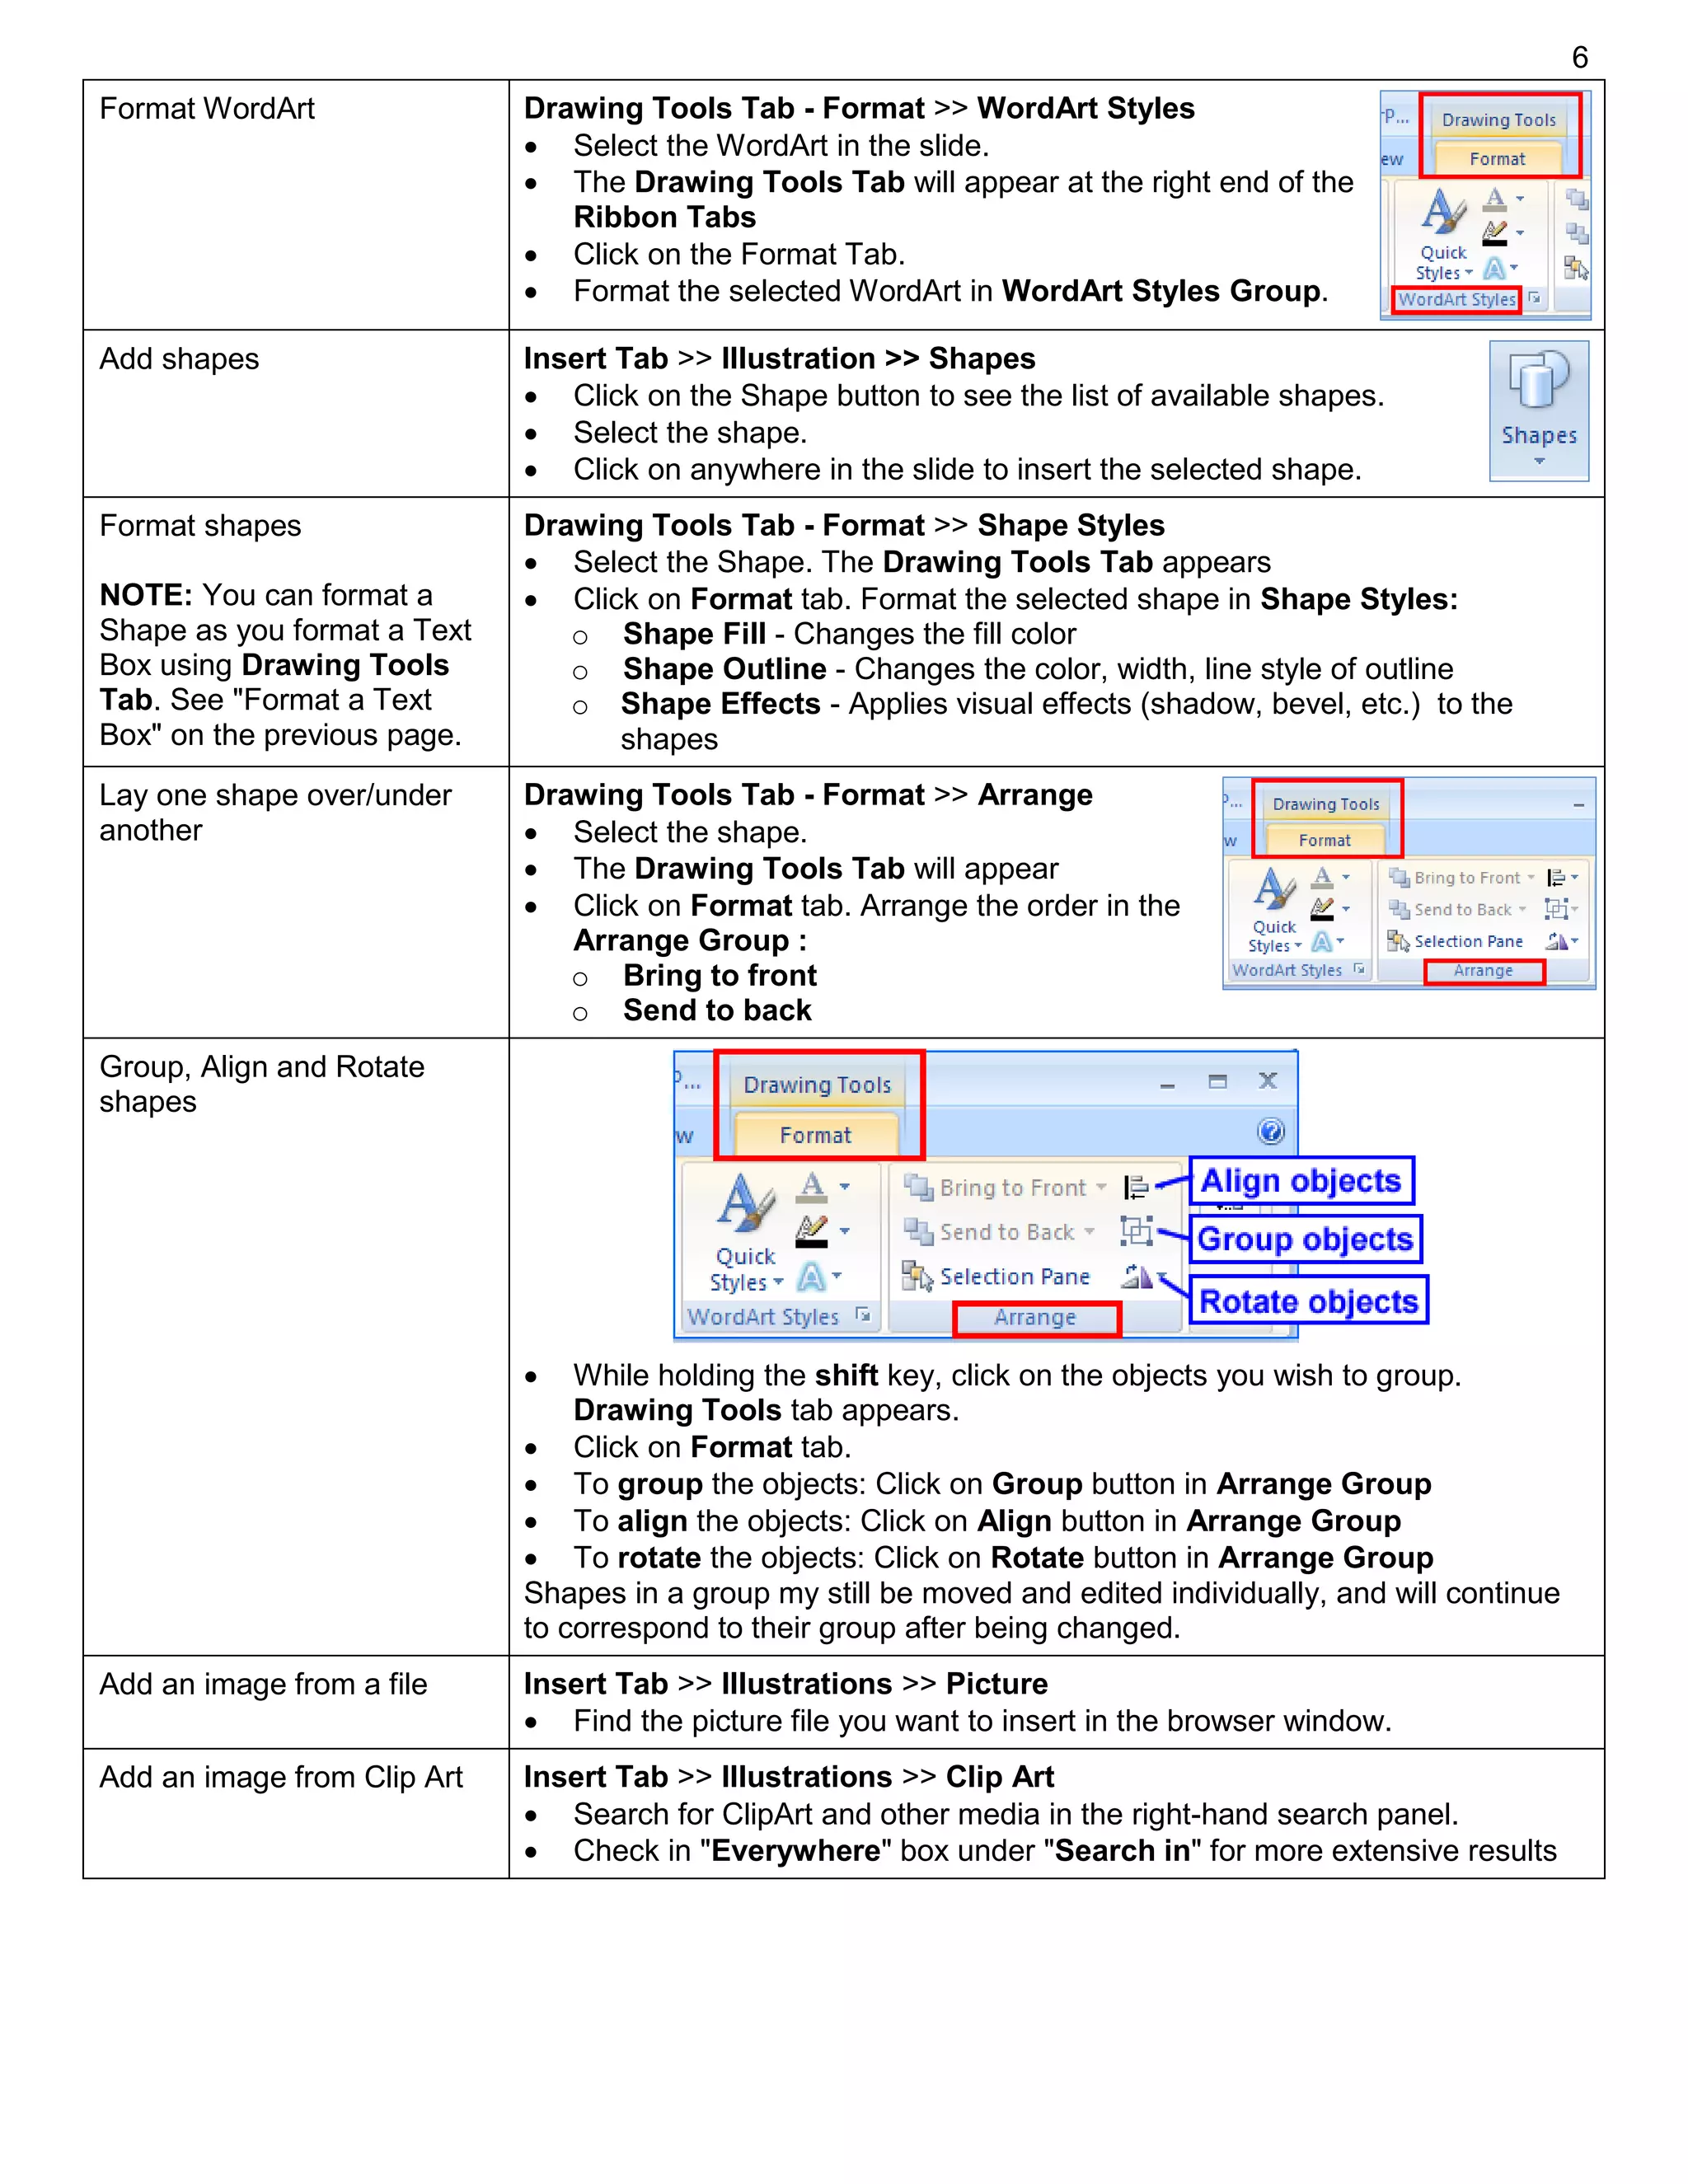
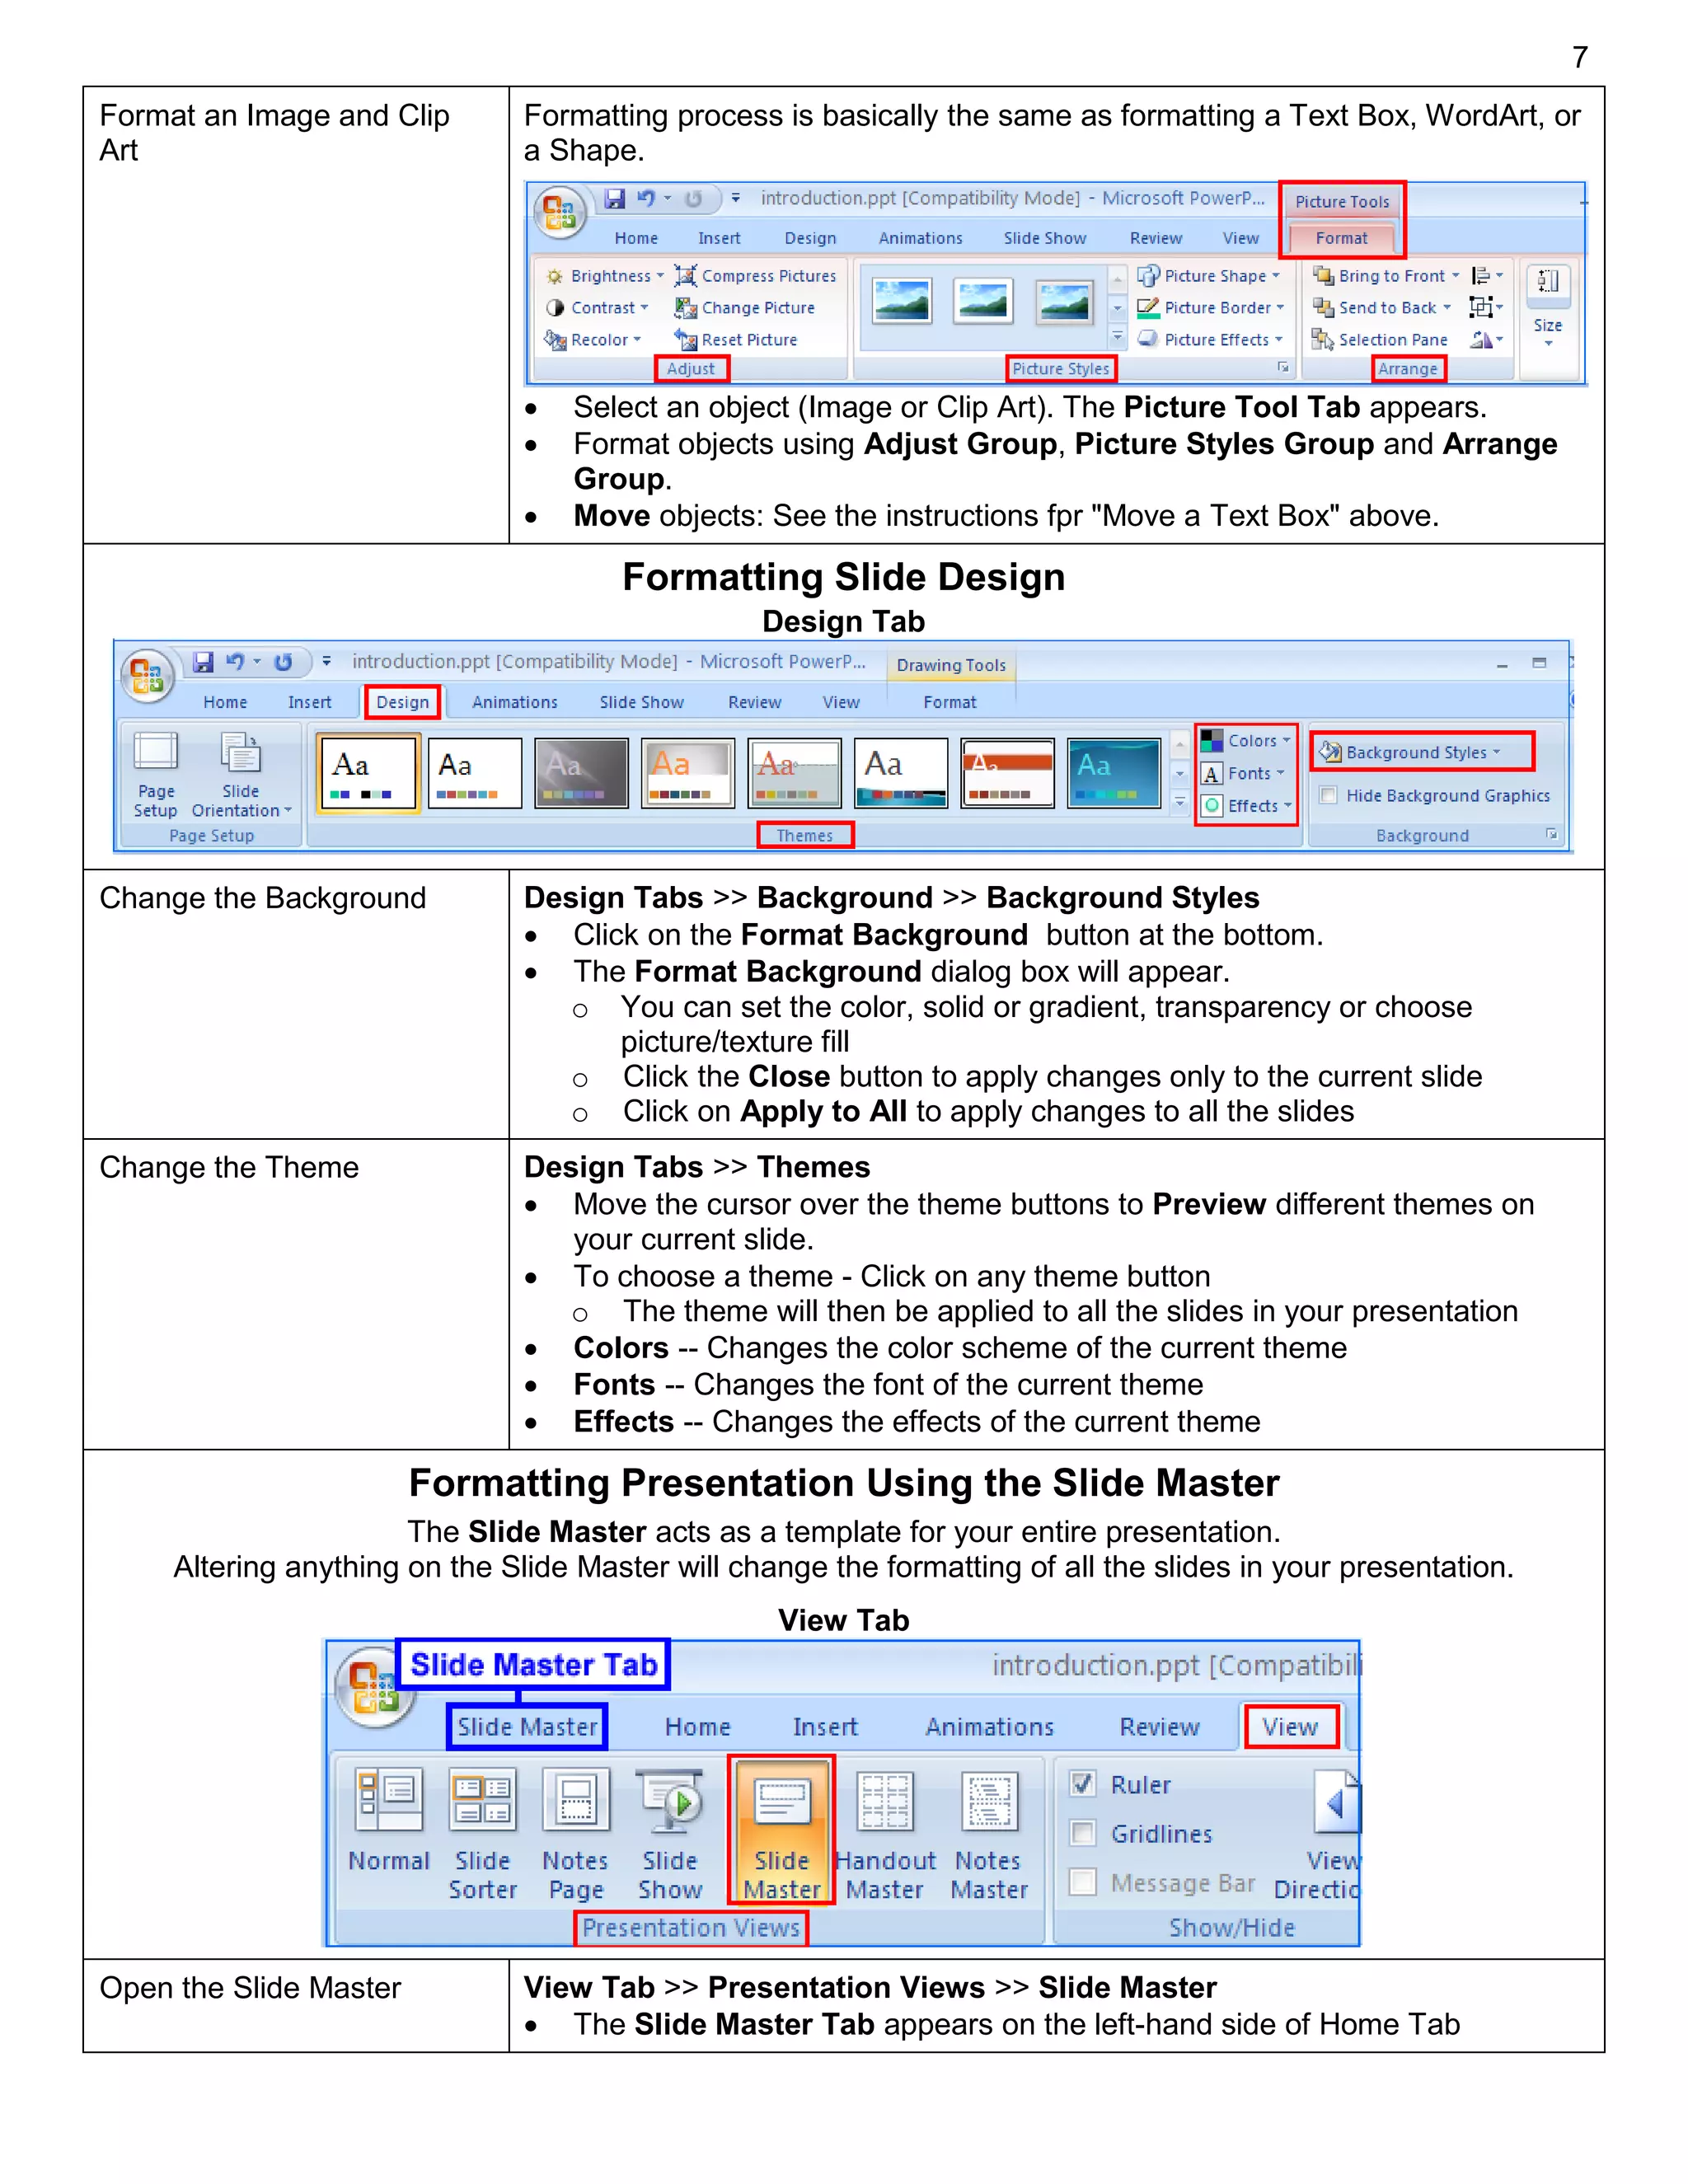
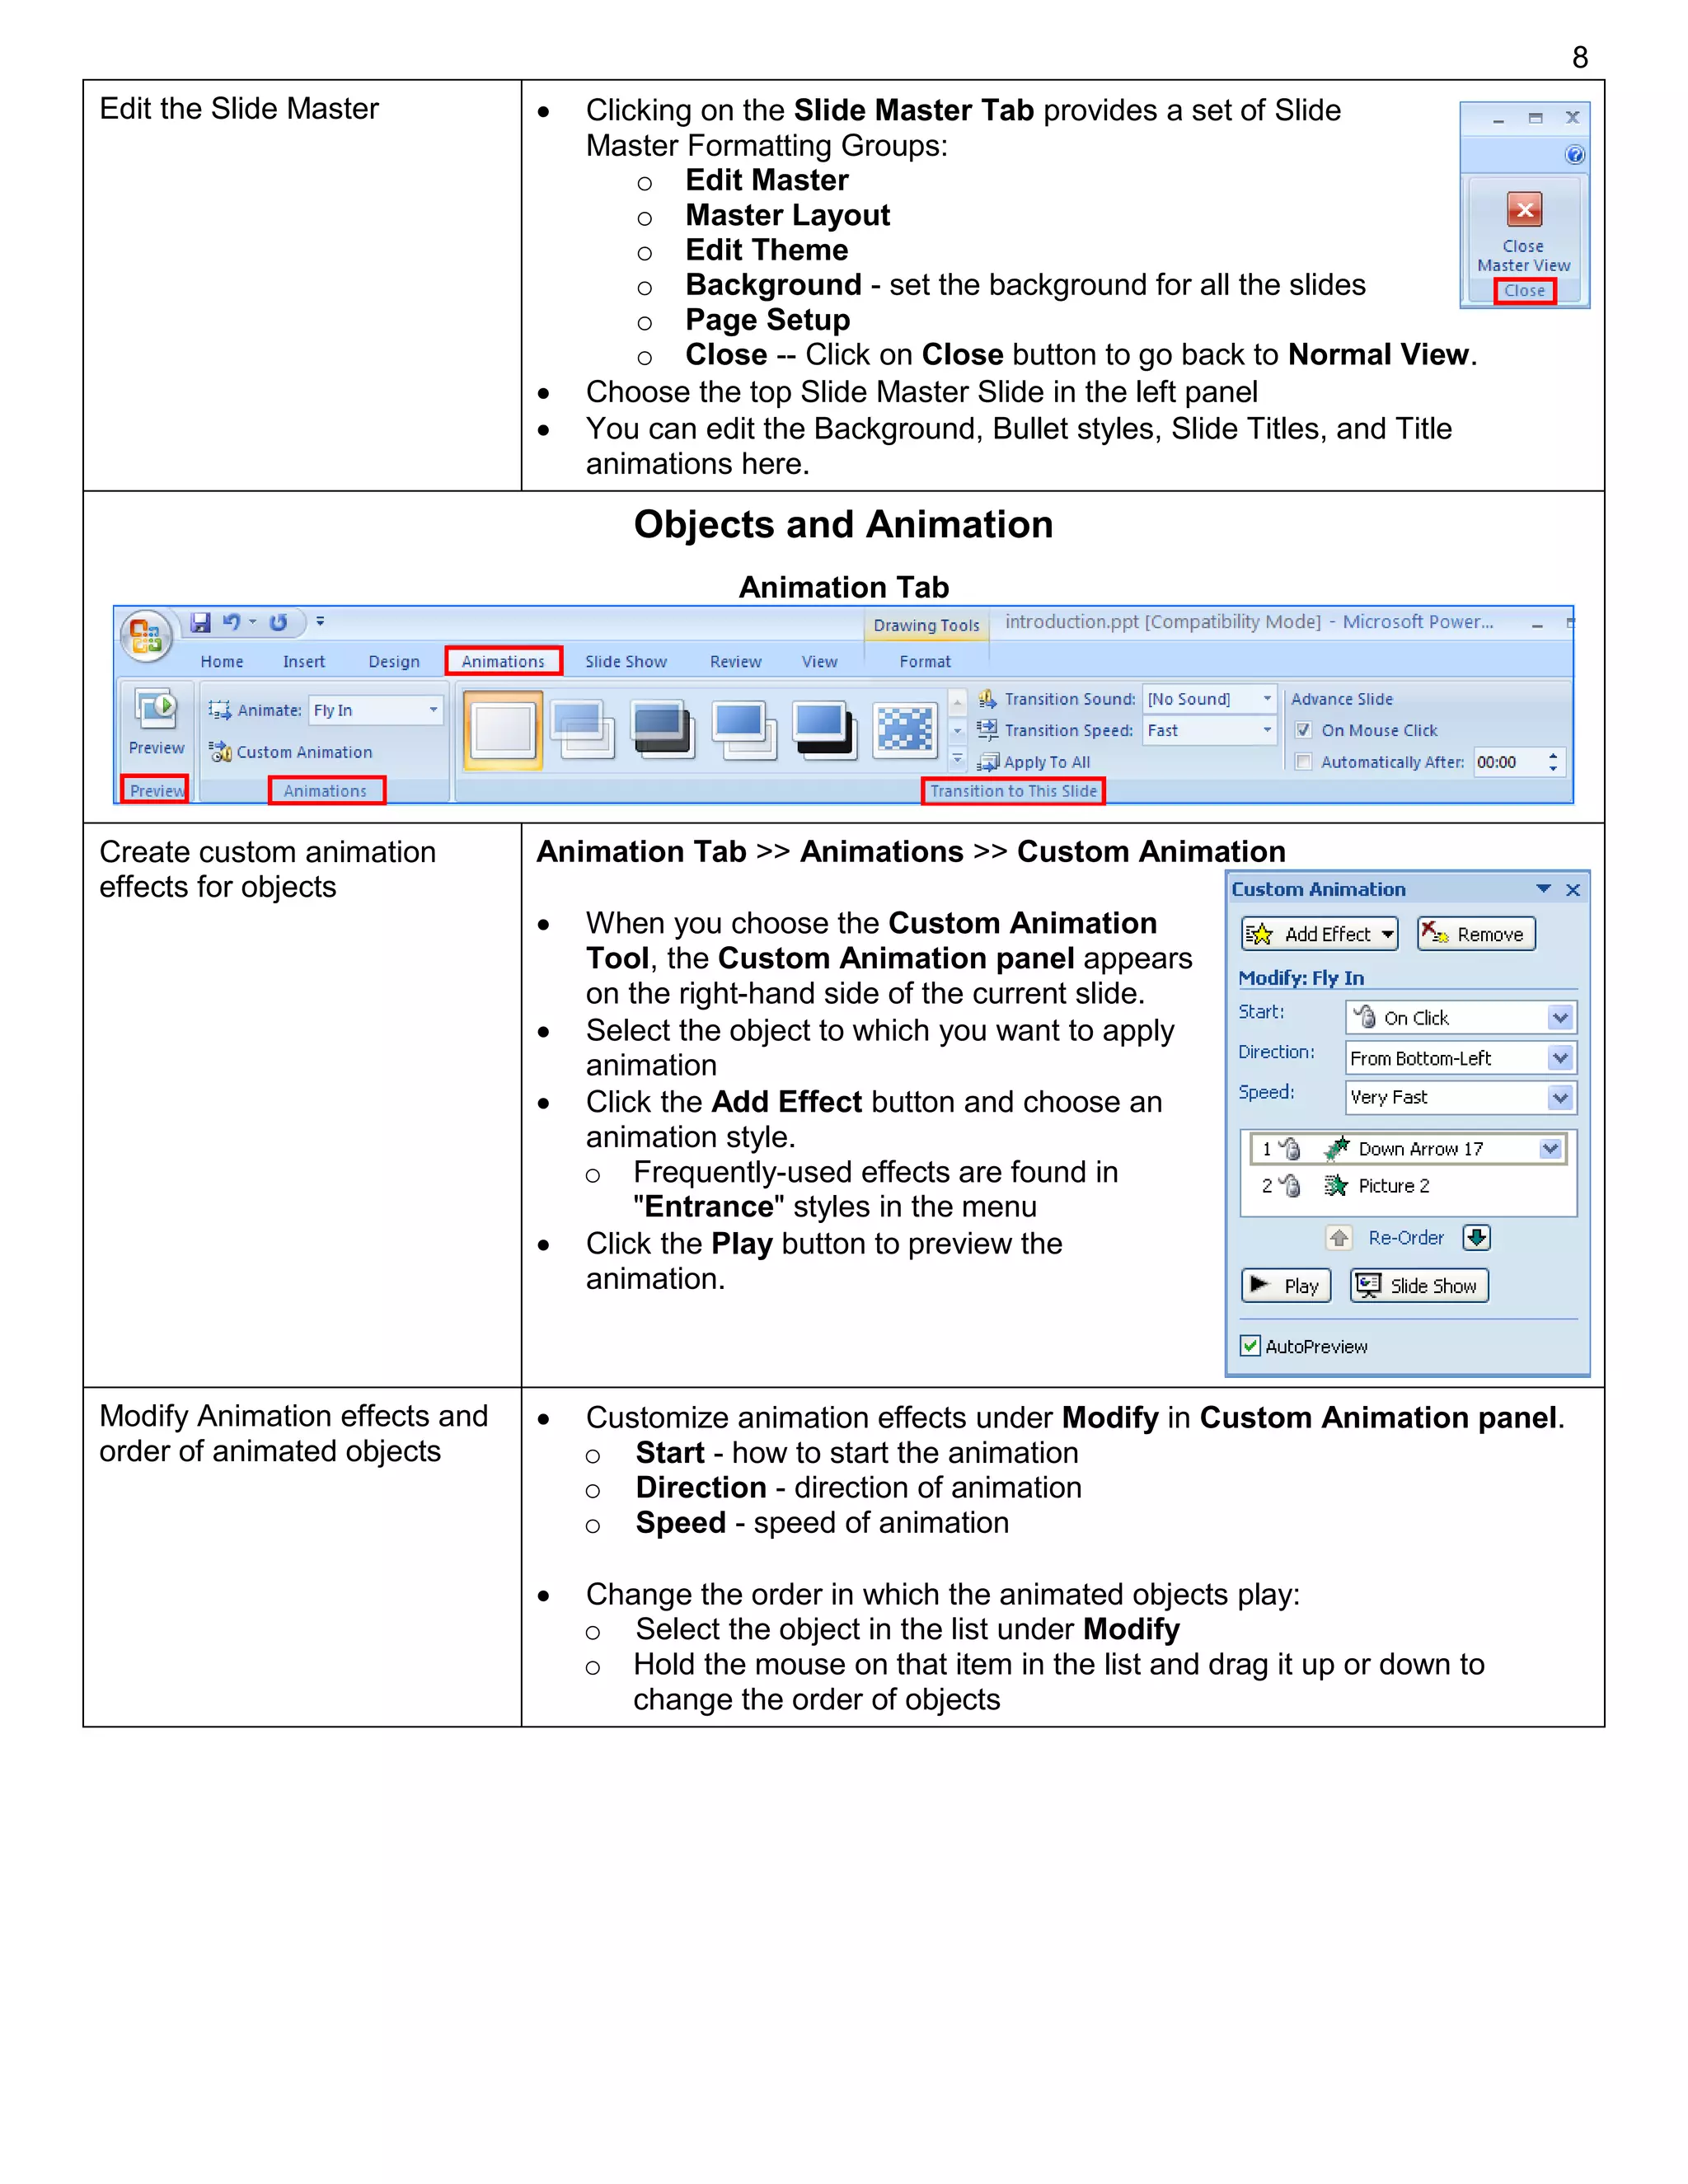
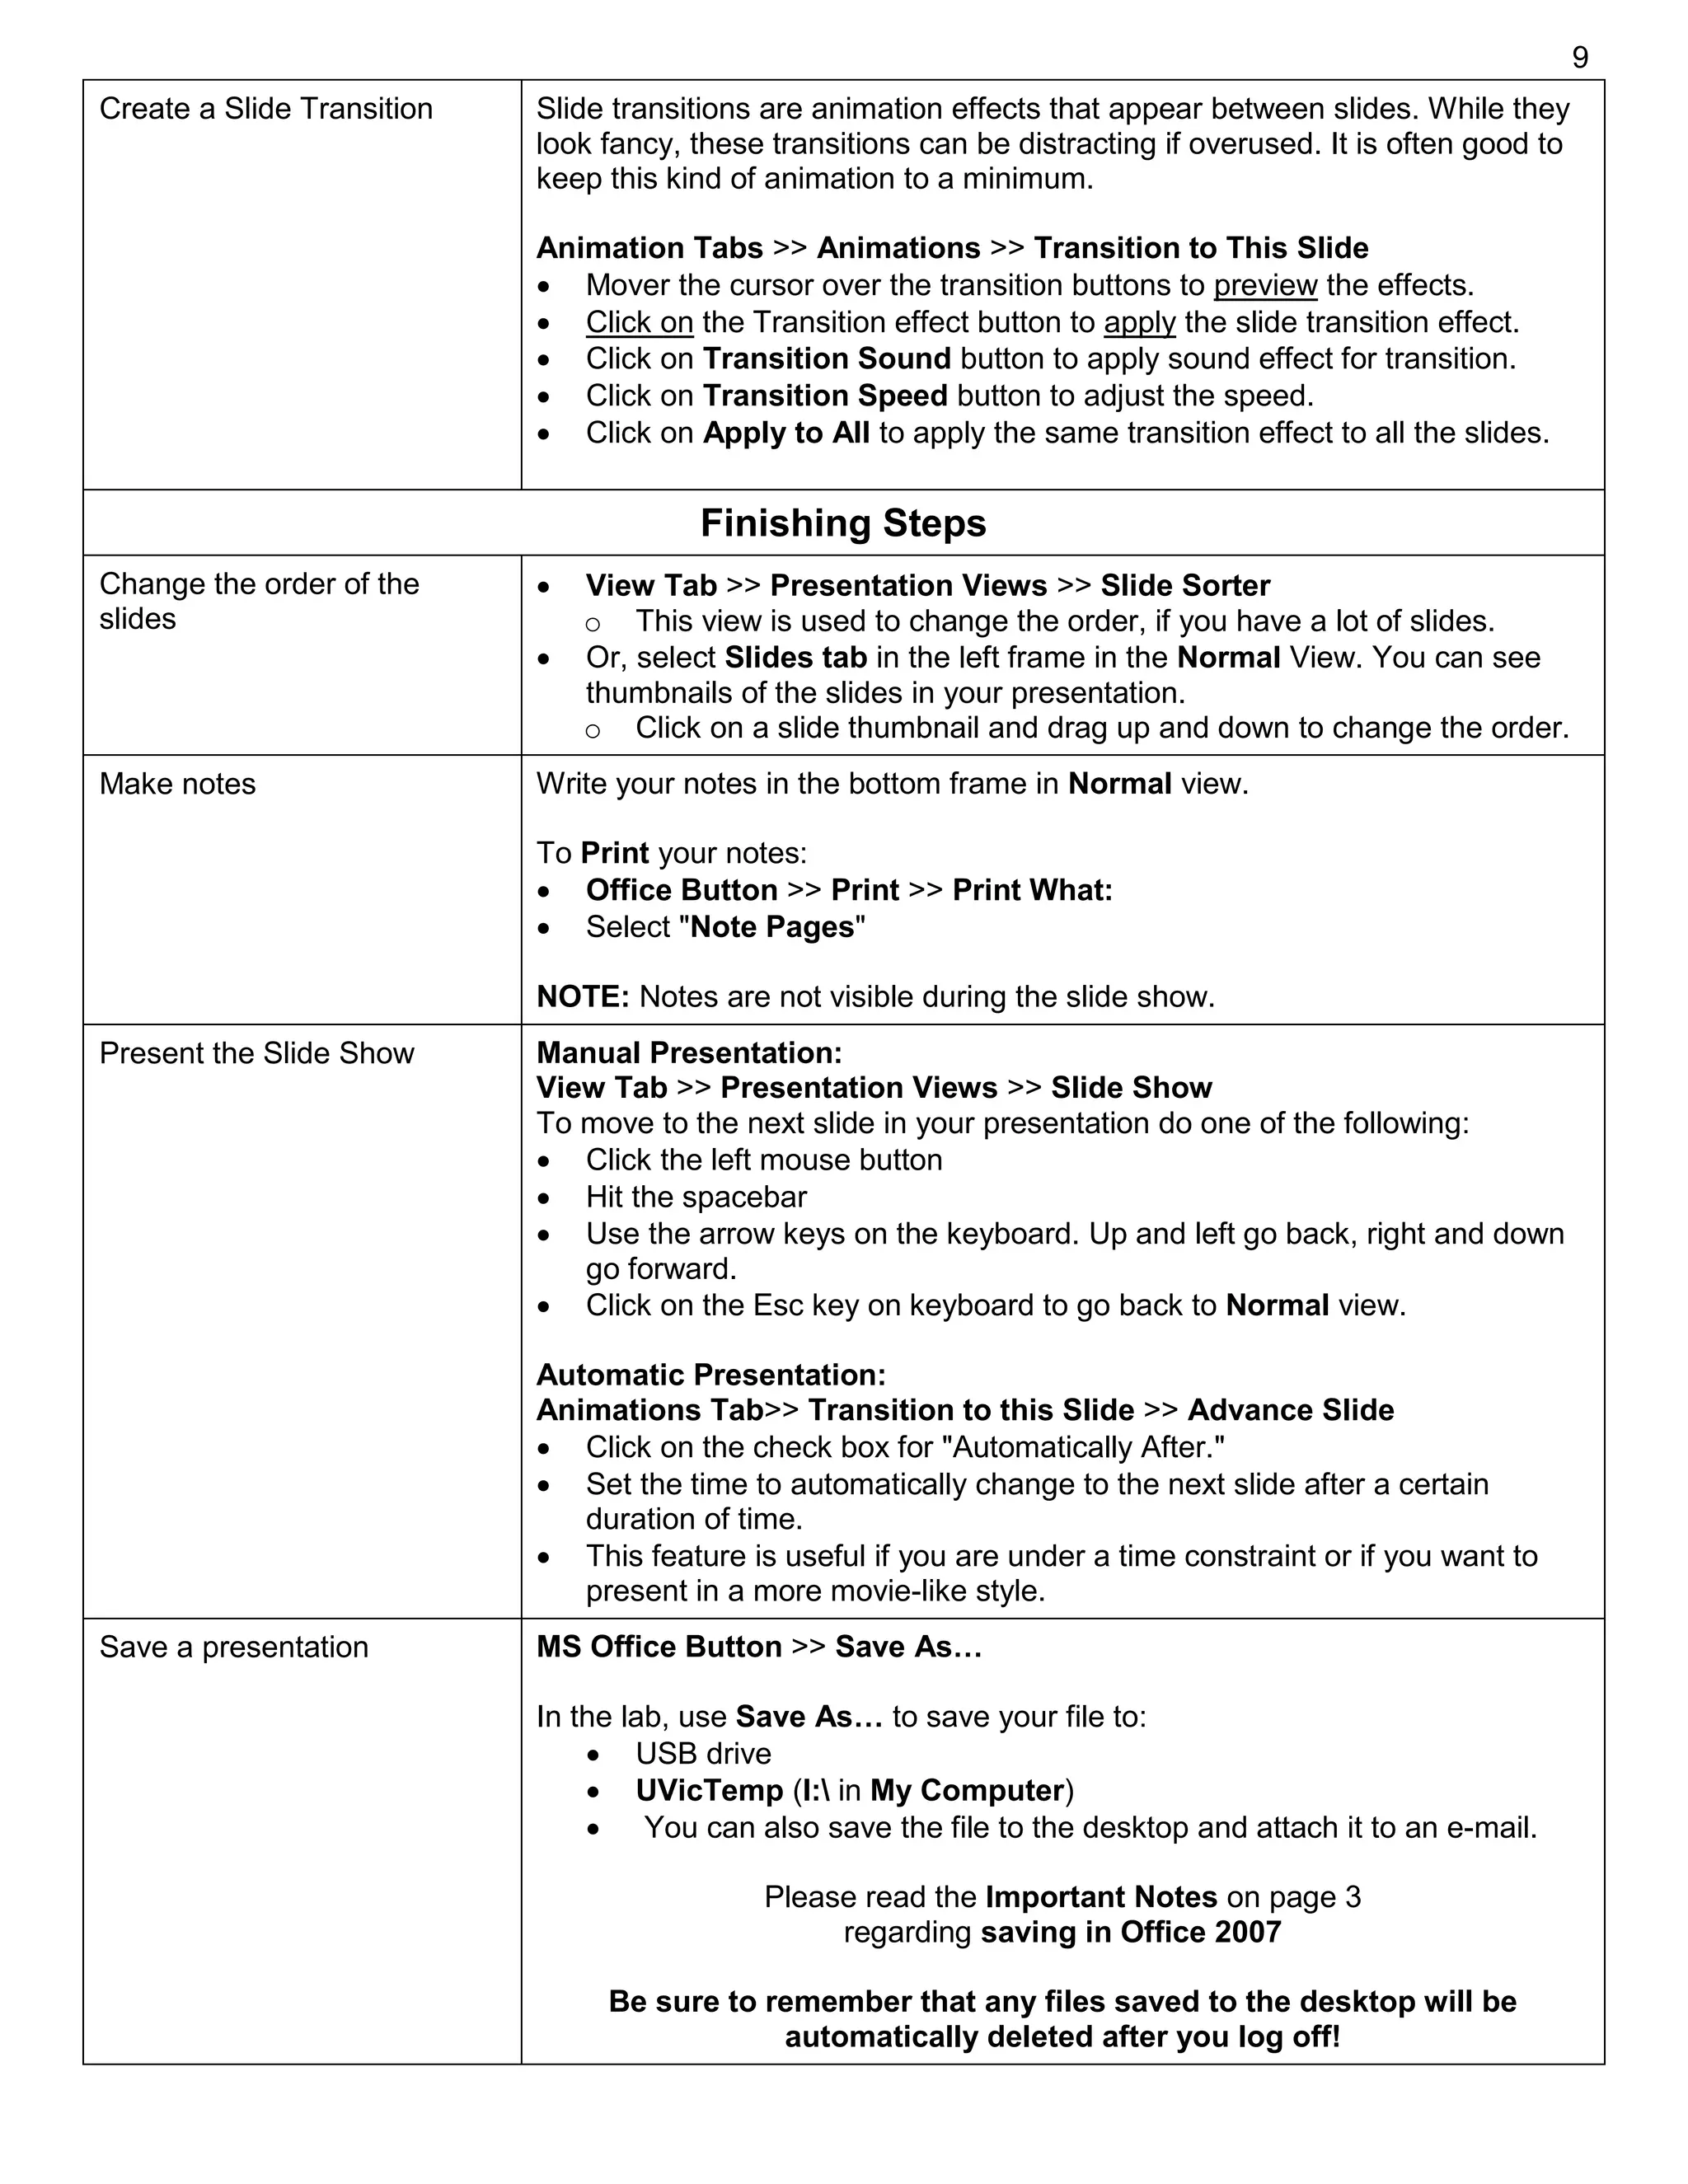
This document provides instructions for creating and formatting a basic PowerPoint presentation using Microsoft PowerPoint 2007. It discusses how to add and arrange slides, insert text boxes and objects, apply formatting and animation, customize slide design, and use the slide master view. The tutorial also covers how to set slide transitions, change the slide order, add notes, and present the slide show. The instructions aim to familiarize users with the main interface and tools in PowerPoint 2007.
This document provides an overview of creating and formatting electronic presentations using Microsoft PowerPoint 2007. It discusses starting a new presentation from a blank slide or template, adding and formatting text, inserting graphics, tables, charts, and multimedia. Transition effects between slides and modifying slide properties are also covered. The document is intended as a tutorial or guide for using basic features of PowerPoint 2007.
PowerPoint 2007 introduced a new interface with tools organized into tabs and groups on a ribbon. It provides interactive online demos to help users transition from older versions. The tutorial covers the basic layout of the new interface and how to perform common tasks like creating and saving presentations. It emphasizes keeping content clear and simple over excessive formatting.
This document provides an overview of the basic functionality of Microsoft PowerPoint. It describes the main PowerPoint window including the title bar, ribbons, status bar, and different views. It explains how to start PowerPoint and save presentations. The main ribbons - Home, Insert, Design, and Animations - are outlined and their key functions described, including inserting slides, text, pictures, and animations. Formatting options for fonts, bullets, and alignments are also covered.
Essential training on microsoft office power point 2007ashok_142
This document provides instructions for creating and formatting presentations in PowerPoint 2007. It covers how to create new presentations from templates, existing presentations, or outlines. It also describes how to add and format slides, insert media like pictures and video clips, add transitions and animations, and provides tips for effective presentations.
The document describes the basic PowerPoint workspace and its key components. The workspace includes elements like the title bar, menu bar, standard toolbar, formatting toolbar, outline/slide tab, slide pane, task pane, notes pane, view buttons, and drawing toolbar. It also explains the different views in PowerPoint including normal view, slide sorter view, outline view, and slide show view. Placeholders are described as invisible boxes that hold text, titles, or other objects on slides.
This document will provide you with step-by-step instructions on how to use some of the new tools and how to find some of the old tools that you grew to know. This document is by no means an all inclusive step-by-step guide to PowerPoint 2007; it was designed for the novice.
This document provides guidance on using PowerPoint effectively for presentations. It discusses the various toolbars in PowerPoint and how to use them. It also offers tips on creating slides, such as using simple designs with short bullet points, consistent formatting, and colors. The document emphasizes keeping content concise and using visual elements like images, charts and animation effects sparingly to reinforce key points.
1. The document outlines features of Microsoft PowerPoint including presentations, the ribbon interface, slide views, themes, and working with content such as entering text, copying and pasting, and checking spelling.
2. It also discusses adding graphics to slides by inserting pictures and clip art. Directions are provided for locating, selecting, and positioning images on slides.
3. The agenda covers PowerPoint, creating slides, and inserting graphics. Key areas like the ribbon, slide navigation, saving presentations, adding and formatting slides are summarized.
Microsoft office power_point_2007_tutorialMizuhashi Yuki
Microsoft PowerPoint can be used to create interactive presentations. This tutorial explains how to open PowerPoint, save presentations, format slides using themes and layouts, insert objects like clip art, pictures and tables, and print presentations. It provides step-by-step instructions on the PowerPoint interface and tools for creating and modifying slides on PC. Screenshots illustrate where to find various options to launch PowerPoint, apply slide designs, adjust slide layouts and insert images, charts, and other objects.
This document provides an overview of the training course for Microsoft PowerPoint 2007. It discusses the new Ribbon interface and how to navigate and use its tabs and groups. It also covers how to perform common tasks like adding slides, choosing layouts and themes, inserting pictures and diagrams, and applying basic animations and formatting. The training is meant to help users get up to speed with the updated user interface and complete tasks they are accustomed to in PowerPoint.
PowerPoint is a presentation tool used to create slideshows and communicate ideas visually. It allows users to create new presentations from templates, add text, images, tables and other media to slides. The document discusses how to start PowerPoint, use various templates to create presentations, insert slides, add objects, work in different views and some other presentation software alternatives to PowerPoint.
This document provides an overview of Module 1 of the MS PowerPoint 2010 Essential Training course. It covers topics like the basic PowerPoint interface and elements, how to create and work with presentations, and how to format slides. Key points covered include how to change views, insert and modify slides, apply themes and backgrounds, and use the slide sorter view to rearrange slides. The goal of the module is to learn fundamental PowerPoint skills like navigation, layouts, and basic formatting and organization.
This document provides a high-level overview of new features in Microsoft Office 2007, including the introduction of the ribbon interface across Outlook, Word, and Excel. Key changes discussed include the ribbon replacing traditional menus and toolbars, with tabs and groups organizing commands. Dialog box launchers allow access to additional options. The ribbon and new keyboard shortcuts aim to make commands more accessible and tasks more efficient to complete. Training resources are provided to help users adjust to the significant interface changes.
The document provides an overview of the key features and functions in Microsoft Word 2007, including:
1) The three main features - Microsoft Office Button, Quick Access Toolbar, and Ribbon - contain many of the functions from previous versions of Word.
2) The Ribbon has seven tabs (Home, Insert, etc.) that contain groups of features to perform tasks when developing documents.
3) Formatting options allow customizing text features like font, style, size, color as well as paragraph alignment, indentation, borders and styles.
The document provides guidance on how to work with PowerPoint 2013 presentations when collaborating with people using older versions of PowerPoint. It advises saving presentations in the older file format or using the Compatibility Pack to allow editing in older versions. The Compatibility Checker tool identifies unsupported features so they can be removed to avoid issues. Presentations containing new features will prompt downloads of the Compatibility Pack or display warnings to users of older versions.
This document provides an overview of how to use Microsoft PowerPoint, including opening and saving presentations, formatting slides, using toolbars and objects, choosing auto layouts, and accessing help. It discusses opening and saving presentations, formatting slides through design, transitions, and animations options. It also explains how to use toolbars, objects, auto layout, and help features in PowerPoint.
This document introduces the new Ribbon interface in Microsoft Office 2007 programs like Word and Excel. It explains that the Ribbon replaces menus and toolbars and contains tabs with groups of related commands. It describes the three parts of the Ribbon - tabs, groups, and commands. It provides details on how commands are organized and how previews and additional options can be accessed. It also mentions other new features like the Microsoft Office Button, templates when creating new files, and improved keyboard shortcuts known as Key Tips.
Training Slides of Microsoft® Office Word 2007 Skills & Compentencies Training .
For further information regarding the course, please contact:
info@asia-masters.com
www.asia-masters.com
This document provides an introduction and overview of Microsoft PowerPoint 2003. It discusses the basic concepts of PowerPoint including what presentations and slides are. It covers how to perform common tasks in PowerPoint like opening, creating, and saving presentations. It also discusses the various windows and views within PowerPoint like the title bar, menu bar, slide pane, and outlines tab. Finally, it provides information on working with presentations by inserting text, slides, images and more.
PC Literacy & E-learning Training workshop & presentationEdumax Solutions
The document provides information about a training workshop on PC literacy and e-learning skills. It outlines the expected outcomes of the workshop, which include learning about computer basics, using Microsoft Word to create documents, using Microsoft Excel to create documents, and using multimedia objects in teaching. It then provides details about different types of computers, computer components, functions of a computer, and input and output devices. The document also discusses storage devices, computer networks, mouse skills, and how to save work in Microsoft Word and Excel.
Microsoft Office is a suite of desktop applications, servers and services introduced in 1989. It originally included Word, Excel and PowerPoint. Over time, Office applications have integrated shared features.
The current versions are Office 2013 for Windows and Office 2011 for Mac. Office 2013 was released in October 2012 and includes updated versions of Word, Excel, PowerPoint and other applications.
Word is a word processor that was previously the main Office application. It saves documents in the .docx format and is available for Windows and Mac. The first version of Word was released in 1983 for MS-DOS and introduced the mouse.
Microsoft Word 2013 is a popular word processing program used to create professional documents. It allows users to create new blank documents or templates, save files in various formats, check spelling and find synonyms. Advanced features include mail merge to send personalized documents, adding comments, automatic tables of contents and indexes. Word provides formatting tools for text, pages, tables and charts to organize information.
PowerPoint 2013 is a slide show presentation program developed by Microsoft that allows users to create and deliver professional presentations. It offers tools for word processing, outlining, drawing, graphing, and presentation management. The document discusses how to create and open presentations in PowerPoint, save files, customize slides, apply themes, insert images, tables, charts, videos and other media, animate objects, and present slideshows. It also covers more advanced topics like grouping objects, customizing tables and charts, using SmartArt graphics, and applying slide timings and transitions.
This document provides instructions for inserting various advanced elements into PowerPoint presentations, including pictures, WordArt, shapes, animations, audio, video, tables, and charts. It explains how to insert each element and modify properties like size, color, effects. Animations can be applied and customized using options like entrance, exit, emphasis effects. Multiple animations can be added to single objects. [END SUMMARY]
Learning target:
- Identify Microsoft Office 2016.
- Recognize the functions and parts of Word 2016.
- Create a new document.
- How to open an existing document.
- How to save your document.
This document provides instructions on how to use various features in Microsoft Word, including WordArt, clip art, shapes, page borders, and inserting blank pages. It explains that WordArt allows you to add decorative text styles to documents and can be customized. Clip art can be searched for and inserted. Shapes can have their fill and 3D effects customized. Borders can be added to pages, text, tables, objects and pictures. Blank pages can be inserted anywhere in a document.
This document provides an overview of the Microsoft Word user interface. It describes the main sections of the Word window including the ribbon, quick access toolbar, and other areas. Key points covered include:
- The ribbon contains tabs that group commands by activity type and reduces clutter by only showing relevant tabs.
- The ribbon appearance depends on monitor resolution, with higher resolution showing larger icons.
- The quick access toolbar provides quick access to commonly used commands and can be minimized.
- The Office button provides access to backstage views for opening, saving, and printing documents.
- The ribbon includes tabs for formatting text, pages, illustrations and other document elements.
NVMdurance uses machine learning to characterize NAND flash chips before use and develop optimal register settings over the lifetime of the chips. Their Pathfinder software determines safe register value paths, while their Navigator software running on the controller chooses optimal paths based on health monitoring to increase endurance up to 25x. Higher error correction coding allows even longer lifetimes by enabling weaker register settings earlier.
Haiku Deck is a presentation platform that allows users to create Haiku-style slideshows. The document encourages the reader to get started creating their own Haiku Deck presentation on SlideShare by providing a link to do so. It suggests the reader may find inspiration to create a Haiku Deck presentation on SlideShare.
2014 trends survey of child health care professionals on BreastfeedingGRIVEAS ASSOCIATES
A global online survey was conducted from September to December 2014 of 45,000 child healthcare professionals across 84 countries to identify trends in practices and guidelines related to various topics including breastfeeding. 667 healthcare experts responded, mostly general pediatricians (45.24%) working in general or children's hospitals or private practice. The document presents some results from the survey related to breastfeeding.
To make a compass, you will need a magnetized needle and a piece of paper. Magnetize a needle using a magnet from something like your backpack or pencil case. Place the needle on a piece of paper floating in calm water. The needle will slowly turn to point north and south, though you won't know the exact direction and will need to determine north and south based on the general sun location for your area. With a magnetized needle and something to float it on, you can create a simple compass to help with navigation in the wilderness.
En 3 oraciones o menos:
Esta es una factura con fecha, cliente, domicilio y detalles de cantidad, descuento, IVA y total a pagar por bienes o servicios. Se incluye información como número de identificación fiscal del cliente y forma de pago. Los detalles específicos como nombre del cliente, domicilio y conceptos no se proporcionan dado el formato abreviado solicitado.
The document summarizes a guided tour along the Shipwreck 4x4 Trail on the Diamond Coast of South Africa. The tour showcases seven shipwrecks along the coast and is led by a knowledgeable guide, Dudley Wessels, who shares the history and stories of the wrecks, local plants and animals. Key stops include the wrecks of the Piratiny, Arosa and Border ships. The tour also explores remote historical sites and allows time to appreciate the beautiful, unspoiled beaches and coastline.
This document is a resume for Srikanth Challapalli summarizing his experience and qualifications. He has over 9 years of experience in software development and project management using technologies like Java/J2EE, Hibernate, Spring, and web services. He is seeking a mid-senior level role in software engineering at a reputable tech or banking company. His experience includes several projects in roles such as lead developer and technical specialist at companies including Wells Fargo and JPMorgan Chase.
Fancourt is a luxury golf resort in South Africa known for its golf courses, but it also offers many activities for non-golfing families. The author's family enjoyed the spa, hiking trails, teen lounge, kids club, and bike riding during their stay. They were impressed by the high quality service and amenities available for guests of all ages. While the parents may not be skilled golfers, Fancourt provides a relaxing and entertaining resort experience.
Arntech Security - technical training series 1 completeAlison Budge
This document provides an overview of Lesson 1 of a technical training series on electricity from Arntech Security. The lesson aims to teach the basic concepts of electricity in a practical and theoretical manner. It covers topics like what electrical charge is and how it is formed, electric fields and their effect on charge, different types of electricity, and safety when working with electricity. The lesson introduces concepts like atoms, protons, electrons, conductors, insulators, static electricity, current electricity, AC and DC current. It emphasizes understanding these concepts in order to apply them to solving electrical problems.
Tami Norwood is seeking a position as a Regional Sales and Marketing Director. She has over 10 years of experience in senior living sales and marketing management. She has consistently exceeded sales goals and holds records for most move-ins. Norwood is trained in senior living sales techniques and has a background in healthcare, business management, and sales management.
This short document promotes the creation of Haiku Deck presentations on SlideShare by stating "Inspired?" and providing a button to "GET STARTED" making your own Haiku Deck presentation. It encourages the reader to try making presentations on the Haiku Deck platform hosted on SlideShare in a concise and engaging manner using just two words and a call to action.
Between September and December 2014 we have conducted a global online survey to 45,000 children healthcare professionals to identify discrepancies and regional trends on everyday practice, compliance with guidelines, education gaps and preferred education sources in a number of areas including, HPV and Meningitis Vaccinations, Rare Diseases, Breastfeeding and Skin Care.
667 healthcare experts, mostly general pediatricians (45.24%) responded from 84 countries. Most respondents were clinically active at general hospitals (29.89%), children’s hospitals (23.65%), private practice (18.7 %), university (17.77 %), and primary care (7.26%).
DNA barcoding can be useful for authenticating raw botanical materials but has significant limitations for finished botanical dietary supplements due to degradation of DNA during extraction. The New York Attorney General's investigation into supplement products inappropriately used DNA barcoding on extracts and may have lacked sufficient knowledge of testing complex botanical products. Without details on methodology, reference sequences, and quality controls, the conclusions that many products lacked labeled ingredients cannot be validated. DNA testing must be performed appropriately according to limitations of materials and methods to produce reliable results.
2014 trends survey of child health care professionals on HPV vaccinations GRIVEAS ASSOCIATES
Between September and December 2014 we have conducted a global online survey to 45,000 children healthcare professionals to identify discrepancies and regional trends on everyday practice, compliance with guidelines, education gaps and preferred education sources in a number of areas including, HPV and Meningitis Vaccinations, Rare Diseases, Breastfeeding and Skincare.
667 healthcare experts, mostly general pediatricians (45.24%) responded from 84 countries. Most respondents were clinically active at general hospitals (29.89%), children’s hospitals (23.65%), private practice (18.7 %), university (17.77 %), and primary care (7.26%).
The document provides formulas for fluid power, pumps, actuators, thermal properties, accumulators, and volume/capacity equivalents. Key formulas include:
- Fluid pressure (P) equals force (F) divided by area (A).
- Fluid flow rate (Q) equals volume (V) divided by time (T).
- Pump outlet flow equals rpm multiplied by pump displacement divided by 231.
- Cylinder force equals pressure multiplied by net cylinder area.
- Reservoir cooling capacity equals 2 times the temperature difference between reservoir walls and air multiplied by reservoir area.
PowerPoint is a presentation software package. With PowerPoint, you can easily create slide shows. Trainers and other presenters use slide shows to illustrate their presentations.
This document provides an overview of basic slide presentation concepts in PowerPoint, including how to create and save a new presentation, insert and modify slides, and change slide views. Key points covered are how to start a new presentation, add text to placeholders on slides, insert new slides using different layouts, copy and move slides within a presentation, and save a presentation for the first time or subsequently. The document concludes with a challenge to practice these basic skills in PowerPoint.
This document provides an overview of basic slide presentation concepts in PowerPoint, including:
- Slides contain placeholders that hold text, images, charts and more. Placeholders are arranged in different layouts.
- To insert a new slide, select a layout from the Home tab. Existing slide layouts can also be modified.
- Slides can be copied, moved, and deleted by selecting them and using commands on the Home tab.
- The PowerPoint window has different views for editing, sorting, and presenting slides.
- Presentations are saved using the Save or Save As commands under the File tab.
PowerPoint is presentation software that allows users to easily create slide shows. The PowerPoint window contains several key areas including the ribbon, which contains commands; slides where content is added; and placeholders that hold objects on slides. Users can customize their presentations with themes, backgrounds, animations, and transitions between slides. Presentations are created by adding text and objects to slides laid out using various layouts, and then run as a slide show.
Potential benefits of using presentation graphics include engaging multiple learning styles, increasing visual impact and audience focus, and enriching curriculum. Presentation software like PowerPoint allows users to annotate slides, analyze complex topics, and make presentations more interactive. Effective presentation requires practicing to maintain the right pace, using visuals that enhance messages, and testing presentations in advance.
The document provides instructions for using basic features in PowerPoint 2010, including creating and formatting slides, adding text, and customizing slide layouts and designs. Key points covered include how PowerPoint slides display information to audiences, the main components of the PowerPoint window, how to create and format text boxes, apply colors and borders, and change slide layouts and themes.
PowerPoint presentations allow users to create dynamic slide shows containing text, graphics, videos and other objects. They can be printed, displayed live or navigated through by the presenter. Microsoft PowerPoint is the most commonly used presentation software. It enables creation and sharing of presentations using diagrams, photos, animations and other visual elements to effectively communicate ideas. The interface includes tabs for formatting slides and viewing presentations in different modes like Normal, Slide Sorter and Reading View. Users can add text boxes, pictures and other content and then view the presentation to test it before an audience.
The document provides an agenda and overview of key MS PowerPoint features including:
1. Creating and saving presentations using templates, existing presentations, and Word outlines.
2. Customizing the ribbon, quick access toolbar, and themes.
3. Adding and formatting text, pictures, clipart, shapes, SmartArt, and photo albums.
4. Copying, pasting, undoing and redoing edits, and checking spelling.
MS PowerPoint allows users to create slide presentations. It has various tools like themes, transitions, animations and charts to make the presentation appealing. Users can add text, pictures, tables, graphs and other media to the slides. Slides can be viewed in different modes like Normal, Notes Page etc. PowerPoint offers customization options to modify the user interface and settings. Users can also add slide effects like transitions and animations to engage the audience during a presentation.
The document discusses some of the new features of Microsoft Word 2007, including the replacement of menus and toolbars with the ribbon user interface. It notes that the ribbon is now the central part of the interface in Word 2007 and all other Microsoft Office 2007 products. It also mentions that themes and content controls are common features across Office 2007 applications.
This document provides an overview of the key features and functions in Microsoft PowerPoint 2007 for creating and formatting presentations. It outlines how to start PowerPoint, create a new presentation, add and format text and slides, insert pictures, apply themes, and run and save the presentation. The document also describes more advanced features such as slide transitions, animation, master slides, printing, and links. It serves as a tutorial to help new users learn the basics of PowerPoint.
Microsoft PowerPoint is a presentation software that allows users to create slideshow presentations consisting of text, images, and other objects. It can be used to print handouts or create slides for in-person presentations. PowerPoint enables adding animation, sound effects, and other multimedia elements to engage audiences. Common tasks in PowerPoint include starting a new presentation, saving, opening, adding and formatting slides, customizing slide transitions and animations, and previewing the presentation in various viewing modes.
Microsoft PowerPoint is a presentation software that allows users to create slideshows with text, images, and other media. It can be used to give business presentations, classroom lectures, or other types of presentations. PowerPoint has various tools that allow users to customize slide layouts, add animation and multimedia elements, and transition between slides. The software provides different views for designing, organizing, and presenting slideshows.
This document provides an overview of creating and working with digital presentations in Microsoft PowerPoint. It defines what a presentation is, explores the different views available in PowerPoint for working with slides, and explains how to insert images, themes, and other design elements. The learning objectives, introduction, and several sessions describe the basic elements of a slide, how to create and save a presentation, and use templates. Views like normal, slide sorter, and reading view are covered, along with how to add titles and subtitles and change font styles.
The document provides instructions for creating a presentation in Microsoft PowerPoint. It discusses how to create slides, choose layouts and themes, add text and other content like pictures, and arrange elements on slides. It also covers how to preview the presentation, check for spelling errors, get feedback from others, and print handouts for audiences. The document is a tutorial that guides users through the basic functions for building a PowerPoint presentation.
This document provides an introduction and overview of Microsoft PowerPoint. It discusses the history and versatility of PowerPoint as a presentation tool. It then outlines the objectives and topics that will be covered, including navigating the interface, creating presentations from templates and from scratch, inserting and modifying objects like text, images, tables and charts, and applying transitions and animations. The document proceeds to cover these topics in detail over multiple pages, providing instructions on how to access different views and tools in PowerPoint and demonstrating how to perform tasks like customizing themes, adding and manipulating slides, and inserting various types of content into presentations.
This is a help feature which is not very useful in PowerPoint.
Proofing: This allows you to check spelling and grammar. PowerPoint is
not really meant for long-form writing.
Language: This allows you to change the language used for spell check.
So in summary, the Home tab contains all the basic formatting tools for
text, slides, drawing, and some editing features. It's the first place to look
when you want to format or manipulate slides.
Basic Concepts of Microsoft Power Point Raja Adapa
PowerPoint is a presentation program developed by Microsoft that is included in the Office suite. It allows users to create slideshows to present information in an engaging manner using graphics, animation and multimedia. Some key advantages include maintaining eye contact with audiences and highlighting important points. However, presentations can be ineffective if they have too small fonts, too much text, overly complex designs, too many slides or bullet points. PowerPoint has various views and tools to help create and format slides including templates, layouts and drawing tools. New presentations can be created from blank, template or auto content options.
1. PowerPoint is currently the most common software used for making visual aids for
presentations. It has been redesigned for the 2007 release with a much more user-friendly and
intuitive layout than its predecessors.
This tutorial will teach you the basic tools for making a PowerPoint presentation and familiarize
you with the new PowerPoint 2007 workspace.
Basic Tips
It is best to outline your entire presentation before working too much on the style and
layout of your presentation. When left to the end it is much less time consuming to work
on the style and format of your slides. Keep in mind the content of your presentation is the
most important part of it!
Keep your points short and straightforward. Points should be complimentary to your oral
presentation.
PowerPoint allows you to add a lot of distracting sounds and excessive animations to your
presentation. It is best to keep all animation as simple as possible and only use
sounds if absolutely necessary.
Stay away from unusual fonts. If you are presenting on an unfamiliar computer, the font
you have chosen may not work. Arial and Times New Roman are common fonts.
Think of contrast. If you use a dark background, use light-coloured text and vice versa.
Refrain from using backgrounds that will obscure your text colour.
Microsoft Interactive Online Demos
Microsoft has developed a series of online demo programs to assist people with the transition to
Office 2007.
Start the Guide for a program by clicking on that phrase on the webpages listed below
A new window will open in your web browser showing Office 2003
Use the familiar Toolbar from Office 2003 to find a Tool
A second window will appear to show you how to use the same Tool in Office 2007
The web address for the PowerPoint Guide is:
http://office.microsoft.com/en-us/powerpoint/HA101490761033.aspx
Microsoft PowerPoint 2007
2. 2
MS PowerPoint 2007 New Interface
When you open PowerPoint 2007, you will notice that it looks quite different from PowerPoint 2000 and
PowerPoint 2003. The same tools are all there, but they are arranged very differently and new features have
been added.
If you are already familiar with PowerPoint 2000 or 2003, it may take you a while to adjust to this new
arrangement of tools. This tutorial uses PowerPoint 2007 and you can use it as a quick reference guide for
most of the common tools.
Arrangement of Tools in PowerPoint 2007
MS OFFICE BUTTON contains the main File Functions:
New, Open, Save, Save as, Print, Print Preview, etc.
QUICK ACCESS TOOLBAR contains shortcuts to Save, Undo, and Repeat
RIBBON TABS - Each Ribbon Tab displays a Ribbon that
provides a set of Tool Groups. The Ribbon Tab and the Tool
Groups correspond to the Menu and Toolbar in previous
versions of Excel.
Tool Groups - Each Tool Group's name is shown at the
bottom of the Group
o Example - Home Tab
o Both the Clipboard and Font Tool Groups display their
names at the bottom of their Group (see image at right)
To Change Tool Groups click on the appropriate Ribbon Tab in the Ribbon
o Examples
Home Tab - Tool Groups for ClipBoard, Font, Alignment, and Cell Formatting
Insert Tab - Tool Groups for inserting Images, Charts, and Text Boxes
Dialog Box Launch Arrow
o Some Tool Groups have a small arrow in the bottom right-hand corner
o Clicking on this arrow will open a Dialog Box which offers
more options and settings related to that Tool Group
In PowerPoint 2007, you will find that tools with similar uses are organized so that they are usually found within
the same Tool Group or at least within one Ribbon. If you do not find a tool in the Ribbon you think it should be
in, try exploring the other Ribbon Tabs.
Dialog Box
Launch Arrow
3. 3
Getting Started
Create a new presentation MS Office Button >> New
A new Presentation window opens up
The MS Office Button is located in the top left corner of the
Word 2007 Window
To start a new file from scratch:
Choose “Blank Document” and press “Create”.
There are templates available on the left panel for creating a presentation of a
specific type (i.e. photo album or calendar).
Open an existing
presentation
MS Office Button >> Open
Find your presentation in the “Open” window.
PowerPoint 2007 will open files created with older versions of PowerPoint
(.ppt) as well as PowerPoint 2007 files (.pptx)
Open a file from a different
version or format
PowerPoint 2007 will automatically convert a document from a compatible
version of PowerPoint
Your document will open in Compatibility Mode
This will prevent you from using certain tools in Office 2007 which are not
compatible with Office 2000 or 2003
When you finish editing a document, be VERY CAREFUL to save any
converted documents in their original format
Please read the Important Notes below regarding saving in Office 2007.
IMPORTANT NOTES: Saving Documents in PowerPoint 2007
1. In the Computing Facilities, files on the Desktop are NOT SAVED when you log off.
ALWAYS use MS Office Button >> Save As... to save your file to a storage device or server
You can also save a file to the Desktop and then email it to yourself with the file as an attachment
2. If you are NOT running Office 2007 at home and you save a document as PowerPoint 2007 (*.pptx),
YOU WILL NOT BE ABLE TO OPEN IT AT HOME! (see step 3 below)
3. If you have Office 2000 or 2003 or you use a Mac at home or in the Computing Facilities
You will have to save your document as an older version
Go to MS Office Button >> Save As...
o At the bottom, there is a bar that asks you to “Save as Type:”
o Choose PowerPoint 97-2003 Document (*.ppt)
DO NOT CHOOSE “PowerPoint Document (*.pptx)”
4. If you are using a PC at home running Office 2000 or 2003
You can download the MS Office 2007 to Office 2003 Compatibility Pack from Microsoft's website
o http://www.microsoft.com/downloads/
o Under New Downloads, choose "Microsoft Office Compatibility Pack for Word..."
Even with the Compatibility Pack, you might lose data / formatting when you save as an older version
There is no Compatibility Pack available for Mac yet.
Save the current document MS Office Button >> Save
Please read the Important Notes above regarding saving in
Office 2007
Save a document under a
different name, version, or
format
MS Office Button >> Save As...
In the bars at the bottom of the Save As... Dialog Box:
o Give your document a new name in “File Name:”
o Select the version and format from “Save as type:”
4. 4
Add a new slide Home Tab >> Slides Group >> New Slide
Click on the New Slide Tool. It adds a new slide in the default layout "Title
and Content.”
Click on the arrow at the bottom corner of the New Slide Tool. You can
select the layout for the new slide from the .
Click the Layout button. You can select and change the slide layout.
Click the Delete button to delete the current slides.
Viewing Slides in PowerPoint 2007 Workspace
Layout of frames in “Normal
View”
When you first open a new presentation in PowerPoint the main window is in
Normal View and should show three frames:
The larger frame on the right shows the Current Slide.
The left frame has two tabs:
o Slides tab - displays the slides as thumbnails
o Outline tab - displays a written outline for each slide of your
presentation.
The bottom frame is for Notes to remind you of points for each slide.
The View tab
Different views allow you
to manage different
aspects of your
presentation.
View Tab >> Presentation Views Group
Normal View - Splits the window into Slide Frame, Notes, and the left frame
where you can choose either Slides Thumbnails or Outline. This allows you to
focus on a slide and see everything about the slide at once.
Slide Sorter - Gives thumbnails of all the slides in the presentation. This lets
you see the big picture. Allows you to sort, move, add and delete slides easily.
Useful near the end of a project
Notes Page - Displays a page layout of the notes and the slide. Allows you to
rearrange the notes and compare them to the content of your slide.
Slide Show - Plays the presentation from the beginning with animation.
Turn on/off visual guides View Tab >> Show/Hide Group >> Ruler
View Tab >> Show/Hide Group >> Gridlines
Gridlines and rulers are used to measure and line up objects on a slide.
We will return to the View Tab later in this tutorial to explain the uses of the Slide Master View.
View Tab
5. 5
Inserting and Formatting Text and Objects
Add text with Text Boxes
NOTE
In PowerPoint ALL TEXT is
contained in Text Boxes!
Home Tab >> Drawing >> Text Box OR
Insert Tab >> Text >> Text Box
Click on the Text Box button - Choose Horizontal TextBox
In the slide, click-and-drag the mouse to draw a TextBox
Drag circle corner points or square side points of the text box to change
its size.
Click within the TextBox to type text.
Move a Text Box
NOTE: You can move or
rotate any object in
PowerPoint using the
methods described here.
Select a Text Box by clicking on it
Bring the cursor over the Border of the Text Box
The cursor will change to the move icon (2 crossed
arrows).
Click-and-drag with the mouse to move the text box.
You can also Nudge a Text Box by Selecting it and hitting the arow keys on
the keyboard. This method offers greater precision in placing an object.
Rotate the Text Box:
o Select the Text Box. Notice the green circle directly above the box.
o Bring the cursor over the green circle. It will change to a rotate icon
o Click-and-drag to rotate the Text Box.
Format a Text Box Drawing Tools Tab - Format >> Shape Styles
Select the Text Box. The Drawing Tools Tab appears.
Click on the Format Tab. Format the selected Text Box in Shape Styles:
o Shape Fill - Changes the fill color
o Shape Outline - Changes the color, width, line style of outline
o Shape Effects - Applies visual effects (shadow, bevel, etc.)
Format text in a Text Box Home Tab >> Font Group
Select and highlight the text in the Text Box.
Click on the Home Tab
In the Font Group and Paragraph Group, you can format the Font, Size,
colour, and style of the selected text.
Add WordArt - fancy text Insert Tab >> Text >> WordArt
Click on the WordArt button >> Select the style you like
A WordArt Text Box appears in the slide.Type in.
Insert Tab
6. 6
Format WordArt Drawing Tools Tab - Format >> WordArt Styles
Select the WordArt in the slide.
The Drawing Tools Tab will appear at the right end of the
Ribbon Tabs
Click on the Format Tab.
Format the selected WordArt in WordArt Styles Group.
Add shapes Insert Tab >> Illustration >> Shapes
Click on the Shape button to see the list of available shapes.
Select the shape.
Click on anywhere in the slide to insert the selected shape.
Format shapes
NOTE: You can format a
Shape as you format a Text
Box using Drawing Tools
Tab. See "Format a Text
Box" on the previous page.
Drawing Tools Tab - Format >> Shape Styles
Select the Shape. The Drawing Tools Tab appears
Click on Format tab. Format the selected shape in Shape Styles:
o Shape Fill - Changes the fill color
o Shape Outline - Changes the color, width, line style of outline
o Shape Effects - Applies visual effects (shadow, bevel, etc.) to the
shapes
Lay one shape over/under
another
Drawing Tools Tab - Format >> Arrange
Select the shape.
The Drawing Tools Tab will appear
Click on Format tab. Arrange the order in the
Arrange Group :
o Bring to front
o Send to back
Group, Align and Rotate
shapes
While holding the shift key, click on the objects you wish to group.
Drawing Tools tab appears.
Click on Format tab.
To group the objects: Click on Group button in Arrange Group
To align the objects: Click on Align button in Arrange Group
To rotate the objects: Click on Rotate button in Arrange Group
Shapes in a group my still be moved and edited individually, and will continue
to correspond to their group after being changed.
Add an image from a file Insert Tab >> Illustrations >> Picture
Find the picture file you want to insert in the browser window.
Add an image from Clip Art Insert Tab >> Illustrations >> Clip Art
Search for ClipArt and other media in the right-hand search panel.
Check in "Everywhere" box under "Search in" for more extensive results
7. 7
Format an Image and Clip
Art
Formatting process is basically the same as formatting a Text Box, WordArt, or
a Shape.
Select an object (Image or Clip Art). The Picture Tool Tab appears.
Format objects using Adjust Group, Picture Styles Group and Arrange
Group.
Move objects: See the instructions fpr "Move a Text Box" above.
Formatting Slide Design
Change the Background Design Tabs >> Background >> Background Styles
Click on the Format Background button at the bottom.
The Format Background dialog box will appear.
o You can set the color, solid or gradient, transparency or choose
picture/texture fill
o Click the Close button to apply changes only to the current slide
o Click on Apply to All to apply changes to all the slides
Change the Theme Design Tabs >> Themes
Move the cursor over the theme buttons to Preview different themes on
your current slide.
To choose a theme - Click on any theme button
o The theme will then be applied to all the slides in your presentation
Colors -- Changes the color scheme of the current theme
Fonts -- Changes the font of the current theme
Effects -- Changes the effects of the current theme
Formatting Presentation Using the Slide Master
The Slide Master acts as a template for your entire presentation.
Altering anything on the Slide Master will change the formatting of all the slides in your presentation.
Open the Slide Master View Tab >> Presentation Views >> Slide Master
The Slide Master Tab appears on the left-hand side of Home Tab
Design Tab
View Tab
8. 8
Edit the Slide Master Clicking on the Slide Master Tab provides a set of Slide
Master Formatting Groups:
o Edit Master
o Master Layout
o Edit Theme
o Background - set the background for all the slides
o Page Setup
o Close -- Click on Close button to go back to Normal View.
Choose the top Slide Master Slide in the left panel
You can edit the Background, Bullet styles, Slide Titles, and Title
animations here.
Objects and Animation
Create custom animation
effects for objects
Animation Tab >> Animations >> Custom Animation
When you choose the Custom Animation
Tool, the Custom Animation panel appears
on the right-hand side of the current slide.
Select the object to which you want to apply
animation
Click the Add Effect button and choose an
animation style.
o Frequently-used effects are found in
"Entrance" styles in the menu
Click the Play button to preview the
animation.
Modify Animation effects and
order of animated objects
Customize animation effects under Modify in Custom Animation panel.
o Start - how to start the animation
o Direction - direction of animation
o Speed - speed of animation
Change the order in which the animated objects play:
o Select the object in the list under Modify
o Hold the mouse on that item in the list and drag it up or down to
change the order of objects
Animation Tab
9. 9
Create a Slide Transition Slide transitions are animation effects that appear between slides. While they
look fancy, these transitions can be distracting if overused. It is often good to
keep this kind of animation to a minimum.
Animation Tabs >> Animations >> Transition to This Slide
Mover the cursor over the transition buttons to preview the effects.
Click on the Transition effect button to apply the slide transition effect.
Click on Transition Sound button to apply sound effect for transition.
Click on Transition Speed button to adjust the speed.
Click on Apply to All to apply the same transition effect to all the slides.
Finishing Steps
Change the order of the
slides
View Tab >> Presentation Views >> Slide Sorter
o This view is used to change the order, if you have a lot of slides.
Or, select Slides tab in the left frame in the Normal View. You can see
thumbnails of the slides in your presentation.
o Click on a slide thumbnail and drag up and down to change the order.
Make notes Write your notes in the bottom frame in Normal view.
To Print your notes:
Office Button >> Print >> Print What:
Select "Note Pages"
NOTE: Notes are not visible during the slide show.
Present the Slide Show Manual Presentation:
View Tab >> Presentation Views >> Slide Show
To move to the next slide in your presentation do one of the following:
Click the left mouse button
Hit the spacebar
Use the arrow keys on the keyboard. Up and left go back, right and down
go forward.
Click on the Esc key on keyboard to go back to Normal view.
Automatic Presentation:
Animations Tab>> Transition to this Slide >> Advance Slide
Click on the check box for "Automatically After."
Set the time to automatically change to the next slide after a certain
duration of time.
This feature is useful if you are under a time constraint or if you want to
present in a more movie-like style.
Save a presentation MS Office Button >> Save As…
In the lab, use Save As… to save your file to:
USB drive
UVicTemp (I: in My Computer)
You can also save the file to the desktop and attach it to an e-mail.
Please read the Important Notes on page 3
regarding saving in Office 2007
Be sure to remember that any files saved to the desktop will be
automatically deleted after you log off!
10. 10
Additional notes
If you require technical help with getting your presentation ready (i.e. hooking up a laptop to the video data
projectors found in most classrooms) give Audio/Visual services a call (721-8292) and ask for a demo. If you
are giving a presentation in the computing facilities, you can test your presentation in one of the classrooms in
the facility. Confirming ahead of time that the equipment works with your laptop or CD and is ready to go
relieves a lot of stress on the day of your presentation.
To avoid confusing technical problems it is recommended to keep large sounds, pictures and video files in the
same folder as your presentation file. PowerPoint will look in the same folder as the presentation file or the
exact folder the file was originally kept for any files linked to the presentation (this includes drive letter).
Thank you for attending our Microsoft Office tutorial series.
This tutorial was written by staff in the Clearihue Computing Facility.
Feel free to contact us at 721-7684 or stop by the Facility at Clearihue A112 for further assistance.