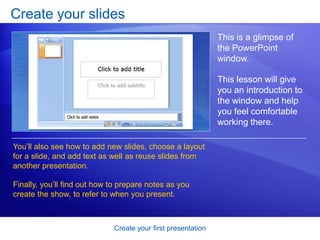
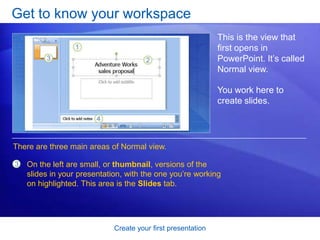
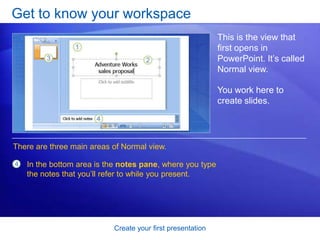
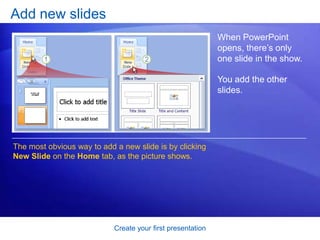
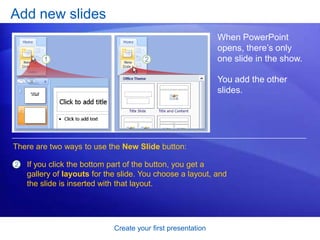
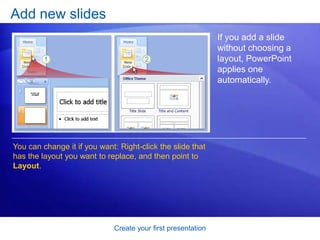
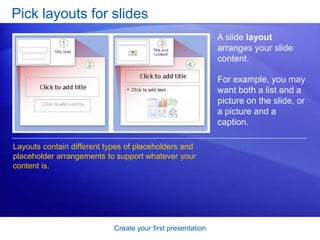
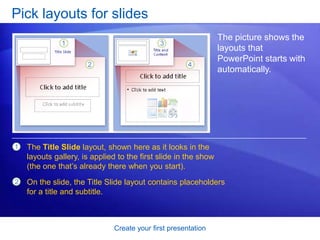
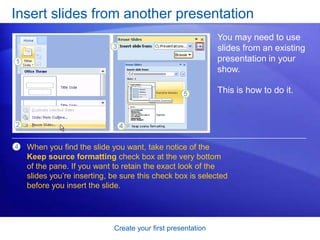
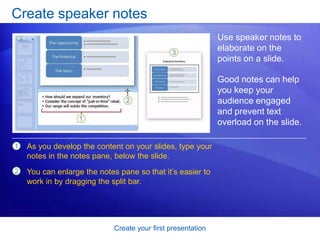
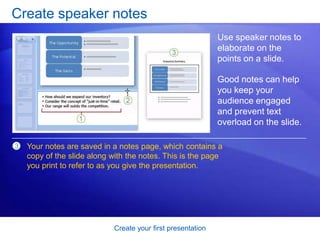
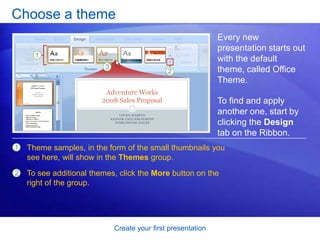
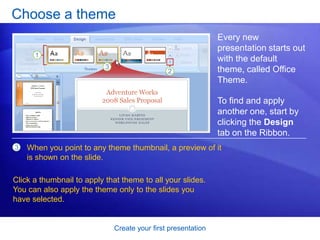
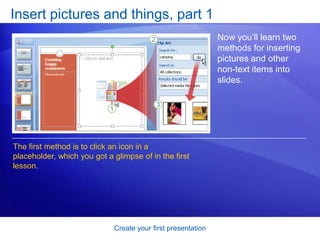
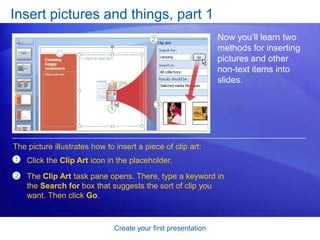
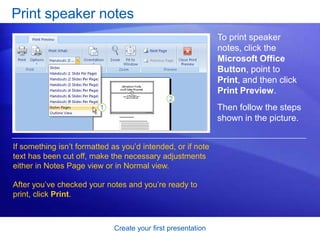
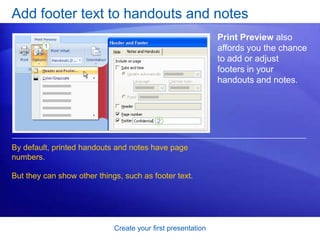
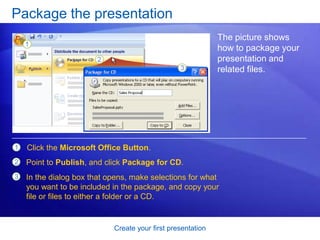
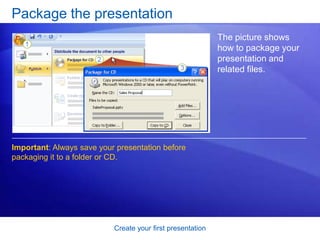
This document provides instructions for creating a basic presentation in Microsoft PowerPoint 2007. It discusses getting familiar with the PowerPoint window layout, adding new slides, choosing slide layouts, inserting text, inserting slides from other presentations, creating speaker notes, choosing a theme, and inserting pictures. The document contains screenshots and step-by-step directions to guide users through the process of setting up their first PowerPoint presentation.
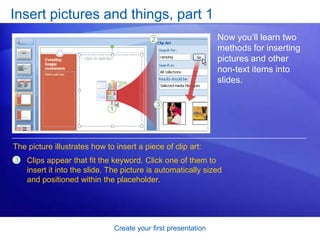
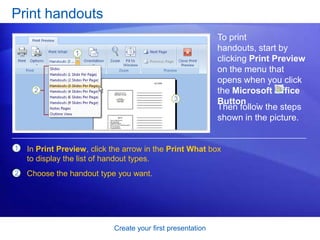
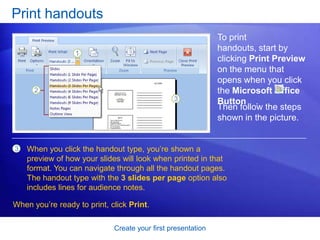
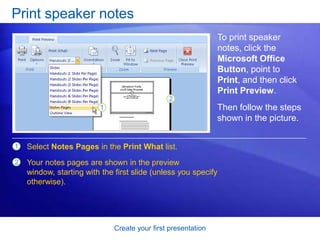
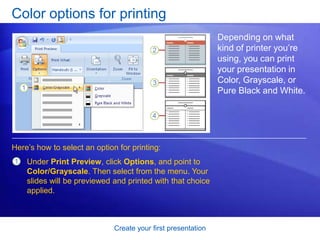
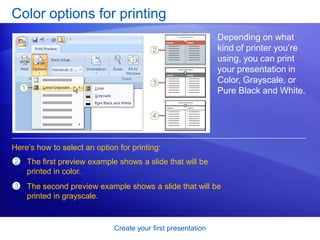
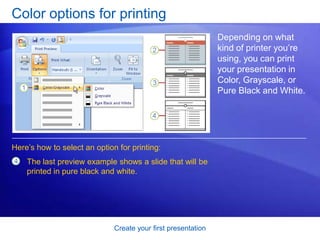
FellowBuddy.com is an innovative platform that brings students together to share notes, exam papers, study guides, project reports and presentation for upcoming exams.
We connect Students who have an understanding of course material with Students who need help.
Benefits:-
# Students can catch up on notes they missed because of an absence.
# Underachievers can find peer developed notes that break down lecture and study material in a way that they can understand
# Students can earn better grades, save time and study effectively
Our Vision & Mission – Simplifying Students Life
Our Belief – “The great breakthrough in your life comes when you realize it, that you can learn anything you need to learn; to accomplish any goal that you have set for yourself. This means there are no limits on what you can be, have or do.”
Like Us - https://www.facebook.com/FellowBuddycom
adrak lasnhsjkwkwkjwjjw whwjw whwukwjwbw w wuwkwww hsownwnwjwjwjj shjwjwjwkwkwkw w w e e ee r r r r r r e e r r r r r r r rr rrrr r r r r r r rrrrddrr e r r rd d d eedrededdddd d d d d e d dd d d d d d dd d dddddddddddd d d d d d d d d d de
An introduction to microsoft office 2007 lectureSukh Sandhu
Microsoft Office applications include Outlook, Word, Excel, PowerPoint, and Access. If you are new to this software or are upgrading from a previous version of Microsoft Office study this lecture to learn how to use them. Any questions, send those to me@sukh.co
PowerPoint is a presentation software package. With PowerPoint, you can easily create slide shows. Trainers and other presenters use slide shows to illustrate their presentations.
Creating Effective PowerPoint® Presentations
Microsoft® PowerPoint® is a tool for creating dynamic oral presentations. An effective PowerPoint® presentation has maximum impact on an audience in minimal time. If you have been assigned a PowerPoint® in addition to an essay or instead of an essay, here are the key similarities [+] and differences [x] between these two forms:
Table 1
Elements of an Essay and a PowerPoint Presentation
Elements
Essay
PowerPoint®
Design
x Text-based, regular black font, one inch margins, double spacing
+ Visual design: color, theme, and layout options; art and multimedia options
Title
+ Title page
+ Title slide
Introduction
+ Topic, issue, thesis statement
+ Slide title (topic); key points
Body
+ Paragraphs featuring one point each
+ Slides featuring one point each
Conclusion
+ Recap of main point, final thoughts
+ Slide listing recap of main points
Paragraphs
+ Unified and cohesive paragraphs with topic and concluding sentences
x Unordered (bulleted) lists or a captioned image to convey key points
Sentences
Complete sentences
x One-line fragments; unordered list (bullet points).
Lists
x Occasionally used to separate elements in a sentence.
+Lists are the building blocks of a PowerPoint®.
Visuals/art
+ Tables, charts, and graphs display data and research results and make a paper visually appealing.
+ Images, art, tables, charts, and graphs increase the impact and visual appeal of a presentation.
In-text citations
+ Quotes, paraphrases, summaries, and visuals require in-text citations.
+ Quotes, paraphrases, and summaries, and visuals require in-text citations.
Reference list
+ Last page lists full-citation references.
+ Last slide lists full-citation references
GETTING STARTED WITH SLIDES
Similar to drafting an essay, when creating a PowerPoint®, you need to define your topic and focus, determine your audience, and know your purpose--whether you are informing, educating, entertaining, or persuading.
Another essential step that takes as much time when creating a PowerPoint® as it does when writing an essay is to research your subject matter and prewrite your ideas. A next step is to make an informal outline to organize your ideas and establish a clear beginning middle and end. With the groundwork complete and content prepared, you are ready to create Slide 1.
Slide 1
1. New presentations begin with a title slide. Follow the directions given in the text placeholders beginning with “click to add title” (Figure 2).
2. Then, in the next box, add your subtitle. You may also use this area to provide your name and the university name per APA guidelines or any other information required on your title slide.
3. Since a PowerPoint® accompanies an oral presentation, you may want to add speaker notes in the notes pane to elaborate on the points on each slide.
Figure 1
PowerPoint® Side 1. Click to Add Title
Important: PowerPoint® has older versions and newer, PC and Mac. Shown in Figure 1 is Microsoft® PowerPoint® 2013 for Win ...
This PDF will show you a lesson about how to use MS power point 2010 . Actually , this version is different a little bit from MS power point 2007 so, it is important to differentiate between them .
Impress is the presentation (slide show) program included in LibreOffice. You can create slides that contain many different elements, including text, bulleted and numbered lists, tables, charts, and a wide range of graphic objects such as clip-art, drawings and photographs. Impress also includes a spelling checker, a thesaurus, text styles, and background styles.
What is Impress?
Starting a presentation.
Formatting a presentation.
Design a presentation.
Working with templates.
Search and Society: Reimagining Information Access for Radical FuturesBhaskar Mitra
The field of Information retrieval (IR) is currently undergoing a transformative shift, at least partly due to the emerging applications of generative AI to information access. In this talk, we will deliberate on the sociotechnical implications of generative AI for information access. We will argue that there is both a critical necessity and an exciting opportunity for the IR community to re-center our research agendas on societal needs while dismantling the artificial separation between the work on fairness, accountability, transparency, and ethics in IR and the rest of IR research. Instead of adopting a reactionary strategy of trying to mitigate potential social harms from emerging technologies, the community should aim to proactively set the research agenda for the kinds of systems we should build inspired by diverse explicitly stated sociotechnical imaginaries. The sociotechnical imaginaries that underpin the design and development of information access technologies needs to be explicitly articulated, and we need to develop theories of change in context of these diverse perspectives. Our guiding future imaginaries must be informed by other academic fields, such as democratic theory and critical theory, and should be co-developed with social science scholars, legal scholars, civil rights and social justice activists, and artists, among others.
Builder.ai Founder Sachin Dev Duggal's Strategic Approach to Create an Innova...Ramesh Iyer
In today's fast-changing business world, Companies that adapt and embrace new ideas often need help to keep up with the competition. However, fostering a culture of innovation takes much work. It takes vision, leadership and willingness to take risks in the right proportion. Sachin Dev Duggal, co-founder of Builder.ai, has perfected the art of this balance, creating a company culture where creativity and growth are nurtured at each stage.
Essentials of Automations: Optimizing FME Workflows with ParametersSafe Software
Are you looking to streamline your workflows and boost your projects’ efficiency? Do you find yourself searching for ways to add flexibility and control over your FME workflows? If so, you’re in the right place.
Join us for an insightful dive into the world of FME parameters, a critical element in optimizing workflow efficiency. This webinar marks the beginning of our three-part “Essentials of Automation” series. This first webinar is designed to equip you with the knowledge and skills to utilize parameters effectively: enhancing the flexibility, maintainability, and user control of your FME projects.
Here’s what you’ll gain:
- Essentials of FME Parameters: Understand the pivotal role of parameters, including Reader/Writer, Transformer, User, and FME Flow categories. Discover how they are the key to unlocking automation and optimization within your workflows.
- Practical Applications in FME Form: Delve into key user parameter types including choice, connections, and file URLs. Allow users to control how a workflow runs, making your workflows more reusable. Learn to import values and deliver the best user experience for your workflows while enhancing accuracy.
- Optimization Strategies in FME Flow: Explore the creation and strategic deployment of parameters in FME Flow, including the use of deployment and geometry parameters, to maximize workflow efficiency.
- Pro Tips for Success: Gain insights on parameterizing connections and leveraging new features like Conditional Visibility for clarity and simplicity.
We’ll wrap up with a glimpse into future webinars, followed by a Q&A session to address your specific questions surrounding this topic.
Don’t miss this opportunity to elevate your FME expertise and drive your projects to new heights of efficiency.
JMeter webinar - integration with InfluxDB and GrafanaRTTS
Watch this recorded webinar about real-time monitoring of application performance. See how to integrate Apache JMeter, the open-source leader in performance testing, with InfluxDB, the open-source time-series database, and Grafana, the open-source analytics and visualization application.
In this webinar, we will review the benefits of leveraging InfluxDB and Grafana when executing load tests and demonstrate how these tools are used to visualize performance metrics.
Length: 30 minutes
Session Overview
-------------------------------------------
During this webinar, we will cover the following topics while demonstrating the integrations of JMeter, InfluxDB and Grafana:
- What out-of-the-box solutions are available for real-time monitoring JMeter tests?
- What are the benefits of integrating InfluxDB and Grafana into the load testing stack?
- Which features are provided by Grafana?
- Demonstration of InfluxDB and Grafana using a practice web application
To view the webinar recording, go to:
https://www.rttsweb.com/jmeter-integration-webinar
Software Delivery At the Speed of AI: Inflectra Invests In AI-Powered QualityInflectra
In this insightful webinar, Inflectra explores how artificial intelligence (AI) is transforming software development and testing. Discover how AI-powered tools are revolutionizing every stage of the software development lifecycle (SDLC), from design and prototyping to testing, deployment, and monitoring.
Learn about:
• The Future of Testing: How AI is shifting testing towards verification, analysis, and higher-level skills, while reducing repetitive tasks.
• Test Automation: How AI-powered test case generation, optimization, and self-healing tests are making testing more efficient and effective.
• Visual Testing: Explore the emerging capabilities of AI in visual testing and how it's set to revolutionize UI verification.
• Inflectra's AI Solutions: See demonstrations of Inflectra's cutting-edge AI tools like the ChatGPT plugin and Azure Open AI platform, designed to streamline your testing process.
Whether you're a developer, tester, or QA professional, this webinar will give you valuable insights into how AI is shaping the future of software delivery.
DevOps and Testing slides at DASA ConnectKari Kakkonen
My and Rik Marselis slides at 30.5.2024 DASA Connect conference. We discuss about what is testing, then what is agile testing and finally what is Testing in DevOps. Finally we had lovely workshop with the participants trying to find out different ways to think about quality and testing in different parts of the DevOps infinity loop.
Dev Dives: Train smarter, not harder – active learning and UiPath LLMs for do...UiPathCommunity
💥 Speed, accuracy, and scaling – discover the superpowers of GenAI in action with UiPath Document Understanding and Communications Mining™:
See how to accelerate model training and optimize model performance with active learning
Learn about the latest enhancements to out-of-the-box document processing – with little to no training required
Get an exclusive demo of the new family of UiPath LLMs – GenAI models specialized for processing different types of documents and messages
This is a hands-on session specifically designed for automation developers and AI enthusiasts seeking to enhance their knowledge in leveraging the latest intelligent document processing capabilities offered by UiPath.
Speakers:
👨🏫 Andras Palfi, Senior Product Manager, UiPath
👩🏫 Lenka Dulovicova, Product Program Manager, UiPath
Smart TV Buyer Insights Survey 2024 by 91mobiles.pdf91mobiles
91mobiles recently conducted a Smart TV Buyer Insights Survey in which we asked over 3,000 respondents about the TV they own, aspects they look at on a new TV, and their TV buying preferences.
Connector Corner: Automate dynamic content and events by pushing a buttonDianaGray10
Here is something new! In our next Connector Corner webinar, we will demonstrate how you can use a single workflow to:
Create a campaign using Mailchimp with merge tags/fields
Send an interactive Slack channel message (using buttons)
Have the message received by managers and peers along with a test email for review
But there’s more:
In a second workflow supporting the same use case, you’ll see:
Your campaign sent to target colleagues for approval
If the “Approve” button is clicked, a Jira/Zendesk ticket is created for the marketing design team
But—if the “Reject” button is pushed, colleagues will be alerted via Slack message
Join us to learn more about this new, human-in-the-loop capability, brought to you by Integration Service connectors.
And...
Speakers:
Akshay Agnihotri, Product Manager
Charlie Greenberg, Host
Epistemic Interaction - tuning interfaces to provide information for AI supportAlan Dix
Paper presented at SYNERGY workshop at AVI 2024, Genoa, Italy. 3rd June 2024
https://alandix.com/academic/papers/synergy2024-epistemic/
As machine learning integrates deeper into human-computer interactions, the concept of epistemic interaction emerges, aiming to refine these interactions to enhance system adaptability. This approach encourages minor, intentional adjustments in user behaviour to enrich the data available for system learning. This paper introduces epistemic interaction within the context of human-system communication, illustrating how deliberate interaction design can improve system understanding and adaptation. Through concrete examples, we demonstrate the potential of epistemic interaction to significantly advance human-computer interaction by leveraging intuitive human communication strategies to inform system design and functionality, offering a novel pathway for enriching user-system engagements.
GDG Cloud Southlake #33: Boule & Rebala: Effective AppSec in SDLC using Deplo...James Anderson
Effective Application Security in Software Delivery lifecycle using Deployment Firewall and DBOM
The modern software delivery process (or the CI/CD process) includes many tools, distributed teams, open-source code, and cloud platforms. Constant focus on speed to release software to market, along with the traditional slow and manual security checks has caused gaps in continuous security as an important piece in the software supply chain. Today organizations feel more susceptible to external and internal cyber threats due to the vast attack surface in their applications supply chain and the lack of end-to-end governance and risk management.
The software team must secure its software delivery process to avoid vulnerability and security breaches. This needs to be achieved with existing tool chains and without extensive rework of the delivery processes. This talk will present strategies and techniques for providing visibility into the true risk of the existing vulnerabilities, preventing the introduction of security issues in the software, resolving vulnerabilities in production environments quickly, and capturing the deployment bill of materials (DBOM).
Speakers:
Bob Boule
Robert Boule is a technology enthusiast with PASSION for technology and making things work along with a knack for helping others understand how things work. He comes with around 20 years of solution engineering experience in application security, software continuous delivery, and SaaS platforms. He is known for his dynamic presentations in CI/CD and application security integrated in software delivery lifecycle.
Gopinath Rebala
Gopinath Rebala is the CTO of OpsMx, where he has overall responsibility for the machine learning and data processing architectures for Secure Software Delivery. Gopi also has a strong connection with our customers, leading design and architecture for strategic implementations. Gopi is a frequent speaker and well-known leader in continuous delivery and integrating security into software delivery.
"Impact of front-end architecture on development cost", Viktor TurskyiFwdays
I have heard many times that architecture is not important for the front-end. Also, many times I have seen how developers implement features on the front-end just following the standard rules for a framework and think that this is enough to successfully launch the project, and then the project fails. How to prevent this and what approach to choose? I have launched dozens of complex projects and during the talk we will analyze which approaches have worked for me and which have not.
3. Create your first presentation
Create your slides
This is a glimpse of
the PowerPoint
window.
This lesson will give
you an introduction to
the window and help
you feel comfortable
working there.
You’ll also see how to add new slides, choose a layout
for a slide, and add text as well as reuse slides from
another presentation.
Finally, you’ll find out how to prepare notes as you
create the show, to refer to when you present.
4. Create your first presentation
Get to know your workspace
This is the view that
first opens in
PowerPoint. It’s called
Normal view.
You work here to
create slides.
1
2
The slide pane is the big area in the middle. You work
directly on the slide in this space.
On the slide, the boxes with the dotted borders are
called placeholders. Here’s where you type your
text, insert art, or add other content.
There are three main areas of Normal view.
5. Create your first presentation
Get to know your workspace
This is the view that
first opens in
PowerPoint. It’s called
Normal view.
You work here to
create slides.
On the left are small, or thumbnail, versions of the
slides in your presentation, with the one you’re working
on highlighted. This area is the Slides tab.
There are three main areas of Normal view.
3
6. Create your first presentation
Get to know your workspace
This is the view that
first opens in
PowerPoint. It’s called
Normal view.
You work here to
create slides.
In the bottom area is the notes pane, where you type
the notes that you’ll refer to while you present.
There are three main areas of Normal view.
4
7. Create your first presentation
Add new slides
When PowerPoint
opens, there’s only
one slide in the show.
You add the other
slides.
The most obvious way to add a new slide is by clicking
New Slide on the Home tab, as the picture shows.
8. Create your first presentation
Add new slides
When PowerPoint
opens, there’s only
one slide in the show.
You add the other
slides.
There are two ways to use the New Slide button:
1 If you click the top part of the button, where the slide
icon is, a new slide is immediately added beneath the
slide that’s selected on the Slides tab.
9. Create your first presentation
Add new slides
When PowerPoint
opens, there’s only
one slide in the show.
You add the other
slides.
There are two ways to use the New Slide button:
2 If you click the bottom part of the button, you get a
gallery of layouts for the slide. You choose a layout, and
the slide is inserted with that layout.
10. Create your first presentation
Add new slides
If you add a slide
without choosing a
layout, PowerPoint
applies one
automatically.
You can change it if you want: Right-click the slide that
has the layout you want to replace, and then point to
Layout.
11. Create your first presentation
Pick layouts for slides
A slide layout
arranges your slide
content.
For example, you may
want both a list and a
picture on the slide, or
a picture and a
caption.
Layouts contain different types of placeholders and
placeholder arrangements to support whatever your
content is.
12. Create your first presentation
Pick layouts for slides
The picture shows the
layouts that
PowerPoint starts with
automatically.
1
2
The Title Slide layout, shown here as it looks in the
layouts gallery, is applied to the first slide in the show
(the one that’s already there when you start).
On the slide, the Title Slide layout contains placeholders
for a title and subtitle.
13. Create your first presentation
Pick layouts for slides
The picture shows the
layouts that
PowerPoint starts with
automatically.
The layout you’ll probably use the most for other slides is
called Title and Content, shown here as it looks in the
layouts gallery.
3
4 On the slide, this layout has a placeholder for the slide
title, and a second, all-purpose placeholder that contains
text as well as several icons.
14. Create your first presentation
Type your text
In the all-purpose
placeholder shown
previously, you can
add graphic elements
or text.
Let’s talk about text.
1
2
You can use different levels of text within bulleted lists to
make minor points under major points.
On the Ribbon, use commands in the Font group to
change character formatting, such as font color and size.
The default formatting for text is a bulleted list.
15. Create your first presentation
Type your text
In the all-purpose
placeholder shown
previously, you can
add graphic elements
or text.
Let’s talk about text.
3 Use commands in the Paragraph group to change
paragraph formatting, such as list formatting, text
indentation, and line spacing.
The default formatting for text is a bulleted list.
16. Create your first presentation
Insert slides from another presentation
You may need to use
slides from an existing
presentation in your
show.
Here’s how to do it.
1
2
On the Home tab, click the arrow next to New Slide, as
if you were going to insert a new slide and choose a
layout for it first.
Below the layout gallery, click Reuse Slides.
17. Create your first presentation
Insert slides from another presentation
You may need to use
slides from an existing
presentation in your
show.
This is how to do it.
3 In the Reuse Slides task pane, under Insert slide
from, click Browse to find the presentation or slide
library that has the slides you want. Then click the arrow
to open those slides in the task pane.
18. Create your first presentation
Insert slides from another presentation
You may need to use
slides from an existing
presentation in your
show.
This is how to do it.
When you find the slide you want, take notice of the
Keep source formatting check box at the very bottom
of the pane. If you want to retain the exact look of the
slides you’re inserting, be sure this check box is selected
before you insert the slide.
4
19. Create your first presentation
Insert slides from another presentation
You may need to use
slides from an existing
presentation in your
show.
This is how to do it.
Click each slide you want to insert. Each one is copied
into the open presentation, below the currently selected
slide or below your cursor, if you’ve positioned it beneath
a slide thumbnail.
5
20. Create your first presentation
Create speaker notes
Use speaker notes to
elaborate on the
points on a slide.
Good notes can help
you keep your
audience engaged
and prevent text
overload on the slide.
1
2
As you develop the content on your slides, type your
notes in the notes pane, below the slide.
You can enlarge the notes pane so that it’s easier to
work in by dragging the split bar.
21. Create your first presentation
Create speaker notes
Use speaker notes to
elaborate on the
points on a slide.
Good notes can help
you keep your
audience engaged
and prevent text
overload on the slide.
3 Your notes are saved in a notes page, which contains a
copy of the slide along with the notes. This is the page
you print to refer to as you give the presentation.
22. Create your first presentation
Suggestions for practice
1. Get familiar with the areas of the PowerPoint window.
2. Type text.
3. Add new slides.
4. Navigate and add more text.
5. Use text indents and formatting.
6. Work with text automatic text fit.
7. Type and view notes.
Online practice (requires PowerPoint 2007)
24. Create your first presentation
Choose a theme, add more content
As a color scheme for
your
presentation, basic
black will do the job.
But how about when
you’re in the mood for
more color and a
vibrant design?
Go straight to the PowerPoint themes gallery and try
out what’s there. Choosing a theme is no harder than
flipping a switch.
You can also put other elements on your slides, such
as pictures and captions, then handily align them so
that everything is neatly arranged.
25. Create your first presentation
The beauty of themes
Every presentation
has a theme.
Some are just more
colorful than others.
The theme determines the look and colors of your slides
and gives your presentation a consistent appearance.
Here, you see three title slides that have the same
content but that use different themes.
26. Create your first presentation
The beauty of themes
Every presentation
has a theme.
Some are just more
colorful than others.
A theme includes these elements, offered as a package:
• Background design
• Color scheme
• Font types and sizes
• Placeholder positions
27. Create your first presentation
The beauty of themes
The color scheme
affects background
colors, font colors, fill
colors for
shapes, border
colors, hyperlinks, and
slide elements like
tables and charts.
And if you have placeholders, the theme honors the
layout you’ve chosen; it just moves things around a little.
28. Create your first presentation
Choose a theme
Every new
presentation starts out
with the default
theme, called Office
Theme.
To find and apply
another one, start by
clicking the Design
tab on the Ribbon.
1
2
Theme samples, in the form of the small thumbnails you
see here, will show in the Themes group.
To see additional themes, click the More button on the
right of the group.
29. Create your first presentation
Choose a theme
Every new
presentation starts out
with the default
theme, called Office
Theme.
To find and apply
another one, start by
clicking the Design
tab on the Ribbon.
3 When you point to any theme thumbnail, a preview of it
is shown on the slide.
Click a thumbnail to apply that theme to all your slides.
You can also apply the theme only to the slides you
have selected.
30. Create your first presentation
Insert pictures and things, part 1
Now you’ll learn two
methods for inserting
pictures and other
non-text items into
slides.
The first method is to click an icon in a
placeholder, which you got a glimpse of in the first
lesson.
31. Create your first presentation
Insert pictures and things, part 1
Now you’ll learn two
methods for inserting
pictures and other
non-text items into
slides.
1
2
Click the Clip Art icon in the placeholder.
The Clip Art task pane opens. There, type a keyword in
the Search for box that suggests the sort of clip you
want. Then click Go.
The picture illustrates how to insert a piece of clip art:
32. Create your first presentation
Insert pictures and things, part 1
Now you’ll learn two
methods for inserting
pictures and other
non-text items into
slides.
The picture illustrates how to insert a piece of clip art:
Clips appear that fit the keyword. Click one of them to
insert it into the slide. The picture is automatically sized
and positioned within the placeholder.
3
33. Create your first presentation
Insert pictures and things, part 2
Another way to insert
slide items is to use
the Insert tab on the
Ribbon.
All of the things you could insert from the slide pane are
also available on the Insert tab, plus more—including
shapes, hyperlinks, text boxes, headers and footers, and
media clips such as sounds.
34. Create your first presentation
Insert pictures and things, part 2
The picture shows the
array of things
available on the Insert
tab.
A typical thing to insert
is a text box, as
shown.
1
2
Text boxes are handy when you want to add text
somewhere and need another placeholder for it, such as
for a picture caption. On the Insert tab, click Text Box.
Draw the box on the slide and type in it.
35. Create your first presentation
Insert pictures and things, part 2
What’s the better
method?
Since you have two
choices for how to
insert some
things, which one is
recommended?
It mostly comes down to what you find handiest. One
thing to consider is how you want the inserted item to be
positioned on the slide.
36. Create your first presentation
Edit slide elements
After inserting a
picture, you may want
to make adjustments
such as
resizing, cropping, or
changing the
brightness.
Use Picture Tools for
this.
1
2
So, select the picture.
Picture Tools appear above the Ribbon. Use options on
the Format tab to work with the picture.
Picture Tools are available when the picture is selected.
37. Create your first presentation
Edit slide elements
There are tools for the
range of things you
can insert, from
tables, charts, and
SmartArt™ graphics to
text boxes and
shapes, sounds, and
videos.
Just select the inserted item to see the relevant tab on
the Ribbon.
38. Create your first presentation
Arrange slide elements
Once you’ve put all
the things that you
want on the slide, you
need to align them so
they look just right.
For example, in this picture, the text box with the caption
will look best once it’s aligned evenly with the picture—
either flush left, or correctly centered.
39. Create your first presentation
Arrange slide elements
You use the Arrange
commands to align
slide elements.
1
2
3
To align the caption so it’s flush left with the picture, first
select both placeholders.
In Picture Tools, find the Arrange group on the Format
tab.
Click the Align button, and then click Align Left.
40. Create your first presentation
Suggestions for practice
1. Choose a new theme.
2. Insert a picture.
3. Resize the picture.
4. Add a caption.
5. Align the picture and caption.
6. Bonus: Add an animation effect.
Online practice (requires PowerPoint 2007)
42. Create your first presentation
Proof, print, and prep for the show
You’ve learned the
essentials for creating
a slide show.
Now imagine that your
presentation is
ready, and you want to
prepare to present it.
You’ll need to preview it, run a spelling check, get input
from others, and check your handouts and notes
before printing them.
Then you can use the PowerPoint packaging feature
to place your presentation on a CD or on the computer
you’ll use to present.
43. Create your first presentation
Preview on your computer
As you create a
show, you can preview
it at any time in Slide
Show view.
This view gives you an
idea of how the slides
will look and behave
when projected.
1
2
To open Slide Show view, click the Slide Show tab, and
click a command in the Start Slide Show group—to
start on the first slide or current slide.
Slide Show view fills your computer screen.
44. Create your first presentation
Preview on your computer
As you create a
show, you can preview
it at any time in Slide
Show view.
This view gives you an
idea of how the slides
will look and behave
when projected.
3 One way to navigate from slide to slide is to use the
Slide Show toolbar, at the bottom-left of the screen.
To get out of Slide Show view at any point, press ESC.
This returns you to the view you left, which is typically
Normal view.
4
45. Create your first presentation
• Press F5 to start on the first slide.
• Press SHIFT+F5 to start on the current slide.
Preview on your computer
Here are some other ways to open Slide Show view:
When you do this, the show begins on the slide that’s currently
selected on the Slides tab.
• Click the Slide Show button in the lower-right portion of the
PowerPoint window, next to the Zoom slider.
• Click the Slide Show button on the View tab. The show begins on
the first slide no matter which slide is currently selected.
46. Create your first presentation
Check spelling, send for comments
Before you
present, you’ll want to
weed out spelling
errors and find any
other goofs and gaps.
Go to the Review tab on the Ribbon to run a spelling
check.
The Review tab is also where others can go to add
comments as they review your slides.
47. Create your first presentation
Check spelling, send for comments
Before you
present, you’ll want to
weed out spelling
errors and find any
other goofs and gaps.
Once you’re on the Review tab, do as the picture
shows:
1 In the Proofing group, click Spelling, and make
selections as the spelling checker moves through your
slides.
48. Create your first presentation
Check spelling, send for comments
Before you
present, you’ll want to
weed out spelling
errors and find any
other goofs and gaps.
Once you’re on the Review tab, do as the picture
shows:
2 You might also want to have others review the
presentation and make comments before you present.
You’ll find the New Comment command in the
Comments group, also on the Review tab.
49. Create your first presentation
Print handouts
The most common
type of PowerPoint
printout for audiences
is called a handout.
Handouts can have
one or several slides
per page, up to nine.
A good practice is to use Print Preview to select the
handout type you want, as shown here. That way you
can see how the handout will look before printing.
50. Create your first presentation
Print handouts
To print
handouts, start by
clicking Print Preview
on the menu that
opens when you click
the Microsoft Office
Button .
1
2
In Print Preview, click the arrow in the Print What box
to display the list of handout types.
Choose the handout type you want.
Then follow the steps
shown in the picture.
51. Create your first presentation
Print handouts
To print
handouts, start by
clicking Print Preview
on the menu that
opens when you click
the Microsoft Office
Button .
When you click the handout type, you’re shown a
preview of how your slides will look when printed in that
format. You can navigate through all the handout pages.
The handout type with the 3 slides per page option also
includes lines for audience notes.
Then follow the steps
shown in the picture.
3
When you’re ready to print, click Print.
52. Create your first presentation
Print speaker notes
You’ve printed
handouts to give to
your audience.
Now print speaker
notes for
yourself, which you
can refer to as you
present.
It’s a good practice to look at your speaker notes before
you print them, to see if they look as you’re expecting
them to.
53. Create your first presentation
Print speaker notes
To print speaker
notes, click the
Microsoft Office
Button, point to
Print, and then click
Print Preview.
1
2
Select Notes Pages in the Print What list.
Your notes pages are shown in the preview
window, starting with the first slide (unless you specify
otherwise).
Then follow the steps
shown in the picture.
54. Create your first presentation
Print speaker notes
If something isn’t formatted as you’d intended, or if note
text has been cut off, make the necessary adjustments
either in Notes Page view or in Normal view.
After you’ve checked your notes and you’re ready to
print, click Print.
To print speaker
notes, click the
Microsoft Office
Button, point to
Print, and then click
Print Preview.
Then follow the steps
shown in the picture.
55. Create your first presentation
Add footer text to handouts and notes
Print Preview also
affords you the chance
to add or adjust
footers in your
handouts and notes.
By default, printed handouts and notes have page
numbers.
But they can show other things, such as footer text.
56. Create your first presentation
Add footer text to handouts and notes
Follow these steps if
you want your
printouts to show
other content.
1
2
Click Options, and then click Header and Footer.
To show footer text, such as “Draft” or “Confidential,”
select the Footer option, and then type the text you want
in the box.
57. Create your first presentation
Add footer text to handouts and notes
Follow these steps if
you want your
printouts to show
other content.
The selections you make on the Notes and Handouts
tab in the Header and Footer dialog box apply to your
handouts and your notes pages.
58. Create your first presentation
Color options for printing
Depending on what
kind of printer you’re
using, you can print
your presentation in
Color, Grayscale, or
Pure Black and White.
Here’s how to select an option for printing:
1 Under Print Preview, click Options, and point to
Color/Grayscale. Then select from the menu. Your
slides will be previewed and printed with that choice
applied.
59. Create your first presentation
Color options for printing
Depending on what
kind of printer you’re
using, you can print
your presentation in
Color, Grayscale, or
Pure Black and White.
Here’s how to select an option for printing:
The first preview example shows a slide that will be
printed in color.
2
3 The second preview example shows a slide that will be
printed in grayscale.
60. Create your first presentation
Color options for printing
Depending on what
kind of printer you’re
using, you can print
your presentation in
Color, Grayscale, or
Pure Black and White.
Here’s how to select an option for printing:
The last preview example shows a slide that will be
printed in pure black and white.
4
61. Create your first presentation
Package the presentation
The PowerPoint
Package for CD
feature bundles your
presentation file and
any other files you
need and copies them
into one folder or
directly to a CD.
If you copy your files to a folder, you can burn the folder
to a CD later.
You can also copy the files to a network server that you
have access to from your presenting computer.
62. Create your first presentation
Package the presentation
The picture shows
how to package your
presentation and
related files.
1 Click the Microsoft Office Button.
Point to Publish, and click Package for CD.
In the dialog box that opens, make selections for what
you want to be included in the package, and copy your
file or files to either a folder or a CD.
2
3
63. Create your first presentation
Package the presentation
The picture shows
how to package your
presentation and
related files.
Important: Always save your presentation before
packaging it to a folder or CD.
64. Create your first presentation
• To package and then copy to a CD from PowerPoint, you must be
running Microsoft Windows® XP or later on your computer, and you
must have a CD burner.
• If you’re running Microsoft Windows 2000, you can still use this
feature to package the presentation files to a folder, and then use a
third-party program to burn the folder to a CD.
Package the presentation
Requirements for packaging to a CD
65. Create your first presentation
Suggestions for practice
1. Preview the show on your computer.
2. Run a spelling check.
3. Send the presentation for comments.
4. Prepare to print handouts.
5. Choose a color setting and print handouts.
6. Check your notes in Notes Page view.
7. Package the presentation.
Online practice (requires PowerPoint 2007)