SlideShare a Scribd company logo
1 of 34
Constrain Proportions 
To draw a perfect square, we will select the Rectangle Tool. Hold Shift and drag to draw a square. Same for the circle, we will select the Ellipse Tool and hold Shift to drag out a circle. 
Resizing Shapes 
To resize shapes, select the shape using the Selection Tool and a bounding box will appear. Drag the corner anchor point to resize it. To constrain to proportion while resizing, hold Shift as you resize. Also hold Alt/Option if your want to resize from the same position. 
Rotating Shapes 
Select the shape with the Selection Tool and a bounding box will appear. Move your cursor near the anchor corner and a rotation icon will icon, click and turn it to rotate the square. To snap at 45 degrees increment, hold Shift and turn.
More Options for Shape Tools 
Select the Star Tool. Click once on the artboard and an option will pop up. Enter the same values below and click Ok. It will draw a star burst shape. This method can be used to bring out more options for shape tools. 
Drawing a Line 
Select the pencil tool and click and drag to draw a free hand line drawing. 
Closing Paths with Pencil Tool 
To close a path, hold Alt/Option as your Pencil Tool reaches the start point. A circle icon will appear next to the Pencil Tool to indicate path closure.
Smoothing Jaggy Lines 
Normally when you draw with the Pencil Tool, the path looks jaggy. To smoothen the parts that are jaggy, simply hold Alt/Option to turn the Pencil Tool to Smooth Tool. Then draw over the the area of the lines which you would like to smoothen. 
Reshaping Path 
To reshape a path, make sure your path is selected and use the Pencil Tool to redraw the parts you would like to reshape. Note that the start and end path must be close to the original path to make it work.
Pencil Tool Preferences 
You can turn on the Pencil Tool Preferences by double clicking on the Pencil Tool. You can change the fidelity and smoothness to find a combination that works for you. 
Fidelity: Determines how close the path is drawn to your mouse movement. Set it at a higher fidelity if your not good at drawing with your mouse. 
Smoothness: The higher you set for smoothness, the less anchor point it produces. Thus, producing a smoother line. 
Drawing Straight Lines 
Select the Pen Tool and click once to add the first anchor point. Move your mouse to the next position and click again to create the second point. The two anchor points will be connected together. Continue doing this to create a W shape as shown.To draw a new line, click the Selection Tool(The Black Arrow Icon) and click back the Pen Tool again. 
Closing a Path 
To close a path, click back the starting point to close the shape.
Drawing a Curved Line 
Click and drag to put out the handles to create a smooth anchor point. 
Changing Path Directions 
Click and drag to create a smooth anchor point. Without releasing your mouse, hold Alt/Option and drag the handle up to change the path direction.
Drawing a Circular Path 
Click and drag to create a smooth anchor point. Continue adding points and click back the starting point to close the path. 
Adding Anchor Points 
With the Pen Tool selected, go near the path where you want to add a new anchor point. A plus sign will appear next to the pen, click on the path to create a new anchor point.
Removing Anchor Points 
To remove point, move your Pen Tool close to an anchor. A minus sign will appear next to the pen. Click on the anchor point to delete it. 
Converting Anchor Points 
To convert a smooth anchor point to a sharp anchor point, move your Pen Tool near the anchor and hold Alt/Option and your Pen Tool will change to an arrow shape. Click on the smooth anchor to convert it to an anchor point. Click and drag on the anchor point again to change it back to a smooth anchor point. 
Moving Anchor Points 
Select the Direct Selection Tool and click and on anchor you want to move. Click and drag to change positions.
Changing Anchor Directions 
With the Pen Tool, you can quickly change the anchor directions. Hold Ctrl/Command to quickly change the Pen Tool to Direction Selection Tool. Select the anchor point you want to edit. The anchor handle will appear. Now release Ctrl/Command and hold Alt/Option to change it to Convert Anchor Tool. Click and drag the handles to change the direction.
Drawing an Old Key 
After learning the concepts of how the Pen Tool works, we will apply what you have learnt to create this ancient old key shape. For the right angles, hold Shift before adding anchor point to constrain it to 90-degree.
Final Illustration 
This is the final illustration. 
Tips for Using Pen Tool 
 Use as little anchor points your need to create your shape 
 Add anchor points where there is a change in direction of the line/curve 
 Use shortcuts like Alt/Option or Ctrl/Command to quickly swap to other tools to edit your path 
 Hold shift to lock your path while adding new anchor point for 45-degree increments. 
More Training for Pen Tool 
I have included more exercises for tracing using Pen Tool. Save it to your desktop and place it in illustrator by going to File>Place. Select the image and make sure Template is ticked. The image will now be faded and placed as a template. Now you can start practicing and don’t give up.
Applying Brush Stroke 
Select the Brush Tool and draw your object. Then go to your Brushes Palette and select the crayon brush to apply the effect. 
Calligraphy Brush Stroke 
To apply a calligraphy brush stroke, draw your path and select the calligraphy brush. Increase the Stroke to make it thicker.
Calligraphy Brush Options 
To make changes to your calligraphy brush, you can double click the Calligraphy Brush to pop up the calligraphic brush options. Drag the brush to change the angle in the thumbnail. Change the Diameter makes it thicker.
Create a Border Pattern 
Draw a rectangle and pick the border pattern. This will create a frame for it. 
Creating a New Pattern Brush 
To crate a new brush. Draw a Star and drag it to the Brushes Palette. A New Brush selection appears. Choose New Pattern Brush for it.
Applying Pattern Brush 
Draw a circle and apply our new brush stroke. 
Next draw a line path and apply the brush stroke. Double click the star brush from your brushes and set Scale and Spacing to 20% to get the effect below.
What is Compound Path? 
Compound path is made out of at least two objects. You can add, subtract and intersect shapes to form a compound path. 
Compound Path Cheat Sheet 
I have compiled a cheat sheet to show how it looks like using different functions of compound path. You can see the final effect after we applied the compound path to three colored circles. 
Creating an Ancient Key Using Compound Path 
In this tutorial, I will show you how to create an ancient key using compound paths rather than using Pen Tool in our previous tutorial.
Turning on the Grids 
Go to View>Show Grid to turn on the grids, then go and turn on Snap to Grid. With the grid and snapping turned on, you can easily snap objects to the grid. 
First draw a Circle using your Shape Tools, hold Alt/Option as you click and drag a new copy beside it.
Duplicate a new circle and place it on top. 
Next, select the Rectangle Tool and continue building up your key shape.
Swap the Fill and Stroke for the object, this will show you all the objects we have. 
Using the Selection Tool, select the whole shape and go to Window>Pathfinder to bring up the Pathfinder. Select Add to shape to combine the objects.
You can still make changes to the compound path at this stage. Try moving the top circle below to see how it works. To do this, double click with the Selection Tool to go into isolation mode to move the individual shapes. 
Next we will swap it back to black fill again, draw a circle in the middle which we will punch a new hole there. Select both shapes and select Subtract from shape area.
Here is the final illustration.
Filling Color Using Swatches 
To fill an object, open up your Swatches Palette. Select your object and pick any color from the swatches. 
Filling Color Using Color Picker 
Another way to fill color is by double clicking on the Fill in your Tool Palette. A Color Picker window will appear and you can pick your color.
Changing Fill and Stroke Using Control Palette 
You can also easily change fill, stroke color and stroke width by accessing your Control Palette at the top of your artboard. 
Stroke Caps 
The Stroke Caps determine the start and end points of a stroke. This applies to open paths only. You can choose between a Butt, Round, or Projecting cap. 
Miter Limit 
The stroke’s Miter Limit specifies the appearance for the joins in a shape. Notice how the joins look after we applied different miter settings to the stars.
Applying Gradient to Objects 
To apply gradient to your object, go to the Tool Palette and set it to Gradient Fill. 
Open up your Gradient and Color Palette. By default it is a Grayscale gradient. Click Options icon at the corner and change it to RGB mode. 
After we switched to RGB there will be slider and a color chart to pick the color. Choose a dark blue for it.
Do the same for the start point, change it to RGB and choose a light blue. 
To add a new gradient stop to the gradient, click right below the gradient ramp to create a new stop. Change it to white color. To remove it, you can drag the stop out of the Palette.
To change the direction of the gradient, select the Gradient Tool from the Tool Palette. Click and drag in the direction you want the gradient to follow. 
Radial Gradient 
To set it to radial gradient, Choose Radial instead of Linear.
Pattern Fill 
To create seamless pattern fill, we can choose the pattern fill from the Swatches. 
Conclusion 
Using radial and linear gradient, we can achieve alot of realism to our artwork. Radial patterns can add depth and volume to circle, and linear pattern can used to create volume for cylinders. Here is an example of gradients used to create a jingle bell.
As you start working on complicated illustrations, layers will start to build up. And you will have to group and arrange them so that you can move and edit the layers easily. I will show you an example of an illustration I did so that you can see how I name and group my layers. 
Layers Palette 
You can access your Layers Palette from Window>Layers. As you can see below, I have grouped my objects into 6 different layers. You can see the stacking order with the background at the bottom and towel at the top for my illustration. Below is a list of layer settings and their uses. 
Visibility Icon: Click to hide/unhide layer 
Lock Icon: Click the lock to lock the layer 
Layer Name: Double click to rename it 
Target Indicator: Click to select layer 
Delete Layer: Click to delete layer 
New Layer: Add new layer on top 
New Sublayer: Add new sublayer under Layer 1
Arranging Objects 
To bring a layer on top, select the layer and drag it to the top. Now the flower is at the top layer and covers the whole picture.
Grouping Objects 
By grouping objects, you can move them together rather than spend time selecting all the objects individually. Here is an example of a flower made up of 6 layers. By selecting my object and grouping them by pressing Ctrl/Command+G, I am able to group them together and move. To edit the grouped object, double click to go into isolation mode to edit the objects. If you want to ungroup them, press Ctrl+Shift+G/Command+Shift+G. 
Next, I duplicate a few more of my grouped flower and group them again to form my flower layer.
Appearance Palette 
The Appearance Palette shows what effect is applied to a layer. You can Add New Fill or Add New Stroke to the whole layer or individual objects. Go Windows>Appearance to open up your Appearance Palette. Let’s see how it looks when we apply a new fill. Click the option icon and choose Add New Fill. 
After we set the Fill with pink color, it turns the whole layer to pink.
Adding Transparency 
You can add transparency in Illustrator by lowering the opacity of objects so that underlying artwork becomes visible. Go Window>Transparency to open up your Transparency Window. Stack a few objects and set it to a lower opacity of 50% for the underlying color to show through. 
Blending Modes for Objects 
If you are familiar with Photoshop, you may have heard of Blending Modes. Blending modes let you vary the ways that the colors of objects blend with the colors of underlying objects. Here I have an example of 3 popular blending modes to show you the effect. I shall not go through how each blending mode in detail as it is quite technical for beginners. If your are interested, you can read Adobe livedocs here.
Button Reflection Using Screen 
Screen blending mode is one of my favourite as it allows me create reflection effortlessly. I will be showing you a popular technique on creating a button reflection using Screen. First draw a circle and apply a gradient of light to dark orange to it. 
Draw another circle on top and apply a gradient from black to white. 
Finally, select the black to white circle and change the blending mode to Screen. And you’re done!
Applying Graphic Styles 
Illustrator has some built in graphic styles which you are quickly apply to your objects. It is like a saved set of attributes. Once you have created an object style, you can apply it across different objects. 
To see the attributes of an graphic styles, go Window>Appearance. Here we can see that there are 3 fills with effects(fx icon) applied. We will learn more about using effects in the later lessons.

More Related Content

What's hot

Introduction to Photoshop
Introduction to PhotoshopIntroduction to Photoshop
Introduction to PhotoshopRhosebe Gaudia
 
Top 10 photoshop tools that you need to master photoshop
Top 10 photoshop tools that you need to master photoshopTop 10 photoshop tools that you need to master photoshop
Top 10 photoshop tools that you need to master photoshopWitsel Carry
 
Adope Photoshop Tool Bar (By: Shujaat Abbas)
Adope Photoshop Tool Bar (By: Shujaat Abbas)Adope Photoshop Tool Bar (By: Shujaat Abbas)
Adope Photoshop Tool Bar (By: Shujaat Abbas)Shujaat Abbas
 
Lesson 1 • Introduction to Photoshop
Lesson 1 • Introduction to PhotoshopLesson 1 • Introduction to Photoshop
Lesson 1 • Introduction to PhotoshopMarcio Sargento
 
Intro to Adobe Photoshop
Intro to Adobe PhotoshopIntro to Adobe Photoshop
Intro to Adobe PhotoshopDUSPviz
 
Adobe Illustrator: 6 Essential Tips and Tools
Adobe Illustrator: 6 Essential Tips and ToolsAdobe Illustrator: 6 Essential Tips and Tools
Adobe Illustrator: 6 Essential Tips and ToolsNguyet Minh
 
coreldrawX7_qucik_guide
coreldrawX7_qucik_guidecoreldrawX7_qucik_guide
coreldrawX7_qucik_guideSalah Ali
 
Photoshop CC
Photoshop CCPhotoshop CC
Photoshop CCRazwan2
 
Graphic design for marketing professionals
Graphic design for marketing professionalsGraphic design for marketing professionals
Graphic design for marketing professionalsJason Tham
 
Adobe Photoshop for Beginners
Adobe Photoshop for BeginnersAdobe Photoshop for Beginners
Adobe Photoshop for BeginnersMahmoud Salah
 
Intro to Adobe Illustrator
Intro to Adobe IllustratorIntro to Adobe Illustrator
Intro to Adobe IllustratorDUSPviz
 
How to design - Graphic design theory
How to design - Graphic design theoryHow to design - Graphic design theory
How to design - Graphic design theoryAbanoub Hanna
 
Adobe Photoshop
Adobe Photoshop Adobe Photoshop
Adobe Photoshop Mujeeb Riaz
 
Photoshop Introduction
Photoshop IntroductionPhotoshop Introduction
Photoshop IntroductionZ Hoeben
 
Basics Of Photoshop
Basics Of PhotoshopBasics Of Photoshop
Basics Of Photoshopkarimnadir
 
Introduction to Adobe Illustrator
Introduction to Adobe IllustratorIntroduction to Adobe Illustrator
Introduction to Adobe IllustratorJin Castor
 

What's hot (20)

Introduction to Photoshop
Introduction to PhotoshopIntroduction to Photoshop
Introduction to Photoshop
 
Top 10 photoshop tools that you need to master photoshop
Top 10 photoshop tools that you need to master photoshopTop 10 photoshop tools that you need to master photoshop
Top 10 photoshop tools that you need to master photoshop
 
Photoshop
PhotoshopPhotoshop
Photoshop
 
Corel Draw Introduction
Corel Draw IntroductionCorel Draw Introduction
Corel Draw Introduction
 
Adope Photoshop Tool Bar (By: Shujaat Abbas)
Adope Photoshop Tool Bar (By: Shujaat Abbas)Adope Photoshop Tool Bar (By: Shujaat Abbas)
Adope Photoshop Tool Bar (By: Shujaat Abbas)
 
Lesson 1 • Introduction to Photoshop
Lesson 1 • Introduction to PhotoshopLesson 1 • Introduction to Photoshop
Lesson 1 • Introduction to Photoshop
 
Photoshop 101
Photoshop 101Photoshop 101
Photoshop 101
 
Intro to Adobe Photoshop
Intro to Adobe PhotoshopIntro to Adobe Photoshop
Intro to Adobe Photoshop
 
Photoshop
PhotoshopPhotoshop
Photoshop
 
Adobe Illustrator: 6 Essential Tips and Tools
Adobe Illustrator: 6 Essential Tips and ToolsAdobe Illustrator: 6 Essential Tips and Tools
Adobe Illustrator: 6 Essential Tips and Tools
 
coreldrawX7_qucik_guide
coreldrawX7_qucik_guidecoreldrawX7_qucik_guide
coreldrawX7_qucik_guide
 
Photoshop CC
Photoshop CCPhotoshop CC
Photoshop CC
 
Graphic design for marketing professionals
Graphic design for marketing professionalsGraphic design for marketing professionals
Graphic design for marketing professionals
 
Adobe Photoshop for Beginners
Adobe Photoshop for BeginnersAdobe Photoshop for Beginners
Adobe Photoshop for Beginners
 
Intro to Adobe Illustrator
Intro to Adobe IllustratorIntro to Adobe Illustrator
Intro to Adobe Illustrator
 
How to design - Graphic design theory
How to design - Graphic design theoryHow to design - Graphic design theory
How to design - Graphic design theory
 
Adobe Photoshop
Adobe Photoshop Adobe Photoshop
Adobe Photoshop
 
Photoshop Introduction
Photoshop IntroductionPhotoshop Introduction
Photoshop Introduction
 
Basics Of Photoshop
Basics Of PhotoshopBasics Of Photoshop
Basics Of Photoshop
 
Introduction to Adobe Illustrator
Introduction to Adobe IllustratorIntroduction to Adobe Illustrator
Introduction to Adobe Illustrator
 

Viewers also liked

Illustrasi pengiklanan
Illustrasi pengiklananIllustrasi pengiklanan
Illustrasi pengiklananilaazmil2
 
212437478 astronomi-bola fadly gaulan
212437478 astronomi-bola fadly gaulan212437478 astronomi-bola fadly gaulan
212437478 astronomi-bola fadly gaulanfadlygaulan
 
Discover how Young Engineers is creating the next generation of engineers!
Discover how Young Engineers is creating the next generation of engineers!Discover how Young Engineers is creating the next generation of engineers!
Discover how Young Engineers is creating the next generation of engineers!Elizabeth Grafton
 
the balance of time and money by the public transportation
the balance of time and money by the public transportationthe balance of time and money by the public transportation
the balance of time and money by the public transportation有德 洪
 
Elemen rekabentuk
Elemen rekabentukElemen rekabentuk
Elemen rekabentukilaazmil2
 
Adobe photoshop 1
Adobe photoshop 1Adobe photoshop 1
Adobe photoshop 1ilaazmil2
 
Grafik persekitaran
Grafik persekitaranGrafik persekitaran
Grafik persekitaranilaazmil2
 
Illustrasi editorial
Illustrasi editorialIllustrasi editorial
Illustrasi editorialilaazmil2
 
DEVELOPMENT OF PARAFFIN BASED FUEL FOR HYBRID ROCKET MOTOR
DEVELOPMENT OF PARAFFIN BASED FUEL FOR HYBRID ROCKET MOTORDEVELOPMENT OF PARAFFIN BASED FUEL FOR HYBRID ROCKET MOTOR
DEVELOPMENT OF PARAFFIN BASED FUEL FOR HYBRID ROCKET MOTORJHUMKI NANDY
 
Ekler power point
Ekler power pointEkler power point
Ekler power pointEcem Taner
 

Viewers also liked (20)

Soalan erc431
Soalan erc431Soalan erc431
Soalan erc431
 
Illustrasi pengiklanan
Illustrasi pengiklananIllustrasi pengiklanan
Illustrasi pengiklanan
 
SWITZERLAND
SWITZERLANDSWITZERLAND
SWITZERLAND
 
212437478 astronomi-bola fadly gaulan
212437478 astronomi-bola fadly gaulan212437478 astronomi-bola fadly gaulan
212437478 astronomi-bola fadly gaulan
 
Discover how Young Engineers is creating the next generation of engineers!
Discover how Young Engineers is creating the next generation of engineers!Discover how Young Engineers is creating the next generation of engineers!
Discover how Young Engineers is creating the next generation of engineers!
 
Questionnaire
QuestionnaireQuestionnaire
Questionnaire
 
Giving Tuesday
Giving TuesdayGiving Tuesday
Giving Tuesday
 
Series ad
Series adSeries ad
Series ad
 
Uzemljivanje
UzemljivanjeUzemljivanje
Uzemljivanje
 
La practica
La practicaLa practica
La practica
 
the balance of time and money by the public transportation
the balance of time and money by the public transportationthe balance of time and money by the public transportation
the balance of time and money by the public transportation
 
Triangle tree challenge
Triangle tree challengeTriangle tree challenge
Triangle tree challenge
 
Elemen rekabentuk
Elemen rekabentukElemen rekabentuk
Elemen rekabentuk
 
Rca warna
Rca   warnaRca   warna
Rca warna
 
Rca warna
Rca   warnaRca   warna
Rca warna
 
Adobe photoshop 1
Adobe photoshop 1Adobe photoshop 1
Adobe photoshop 1
 
Grafik persekitaran
Grafik persekitaranGrafik persekitaran
Grafik persekitaran
 
Illustrasi editorial
Illustrasi editorialIllustrasi editorial
Illustrasi editorial
 
DEVELOPMENT OF PARAFFIN BASED FUEL FOR HYBRID ROCKET MOTOR
DEVELOPMENT OF PARAFFIN BASED FUEL FOR HYBRID ROCKET MOTORDEVELOPMENT OF PARAFFIN BASED FUEL FOR HYBRID ROCKET MOTOR
DEVELOPMENT OF PARAFFIN BASED FUEL FOR HYBRID ROCKET MOTOR
 
Ekler power point
Ekler power pointEkler power point
Ekler power point
 

Similar to Adobe illustrator 2

Illustrator's basic shapes part 2 & combining shapes
Illustrator's basic shapes part 2 & combining shapesIllustrator's basic shapes part 2 & combining shapes
Illustrator's basic shapes part 2 & combining shapesJerry Arnold
 
Educ 215 final- how to guide
Educ 215 final- how to guideEduc 215 final- how to guide
Educ 215 final- how to guidesmemontech
 
Ms art tools portfolio
Ms art tools portfolioMs art tools portfolio
Ms art tools portfoliovaughnjr
 
how to use design by software.pptx
how to use design by software.pptxhow to use design by software.pptx
how to use design by software.pptxNitinKumar12570
 
Lesson revolve
Lesson revolveLesson revolve
Lesson revolveMr_Burns
 
Edit images using selection in Adobe Photoshop.pptx
Edit images using selection in Adobe Photoshop.pptxEdit images using selection in Adobe Photoshop.pptx
Edit images using selection in Adobe Photoshop.pptxMarvin Santiago
 
learn sketchup (for the beginners)
learn sketchup (for the beginners)learn sketchup (for the beginners)
learn sketchup (for the beginners)Moksha Bhatia
 
DID Unit 5 - Illustrator Basics
DID Unit 5 - Illustrator BasicsDID Unit 5 - Illustrator Basics
DID Unit 5 - Illustrator BasicsMrLawler
 
Pepsi vector tutorial
Pepsi vector tutorialPepsi vector tutorial
Pepsi vector tutorialbalermm
 
Lesson 9 (Tools Palette 1)
Lesson 9 (Tools Palette 1)Lesson 9 (Tools Palette 1)
Lesson 9 (Tools Palette 1)Denden Amarante
 
Working with google sketch up
Working with google sketch upWorking with google sketch up
Working with google sketch upBaptec
 
Ms Paint Tutorial
Ms Paint TutorialMs Paint Tutorial
Ms Paint TutorialZ M
 
SolidWorks-Tutorial.pdf
SolidWorks-Tutorial.pdfSolidWorks-Tutorial.pdf
SolidWorks-Tutorial.pdfTanvirFaruque
 

Similar to Adobe illustrator 2 (20)

Illustrator's basic shapes part 2 & combining shapes
Illustrator's basic shapes part 2 & combining shapesIllustrator's basic shapes part 2 & combining shapes
Illustrator's basic shapes part 2 & combining shapes
 
Flash 5 toolbar
Flash 5 toolbarFlash 5 toolbar
Flash 5 toolbar
 
Educ 215 final- how to guide
Educ 215 final- how to guideEduc 215 final- how to guide
Educ 215 final- how to guide
 
Ms art tools portfolio
Ms art tools portfolioMs art tools portfolio
Ms art tools portfolio
 
how to use design by software.pptx
how to use design by software.pptxhow to use design by software.pptx
how to use design by software.pptx
 
Image manipulation - Photoshop
Image manipulation - PhotoshopImage manipulation - Photoshop
Image manipulation - Photoshop
 
Tutorial
TutorialTutorial
Tutorial
 
Lesson revolve
Lesson revolveLesson revolve
Lesson revolve
 
Edit images using selection in Adobe Photoshop.pptx
Edit images using selection in Adobe Photoshop.pptxEdit images using selection in Adobe Photoshop.pptx
Edit images using selection in Adobe Photoshop.pptx
 
Ai tool box 1
Ai tool box 1Ai tool box 1
Ai tool box 1
 
learn sketchup (for the beginners)
learn sketchup (for the beginners)learn sketchup (for the beginners)
learn sketchup (for the beginners)
 
(Sept6. )
(Sept6. )(Sept6. )
(Sept6. )
 
DID Unit 5 - Illustrator Basics
DID Unit 5 - Illustrator BasicsDID Unit 5 - Illustrator Basics
DID Unit 5 - Illustrator Basics
 
Pepsi vector tutorial
Pepsi vector tutorialPepsi vector tutorial
Pepsi vector tutorial
 
Graphics
GraphicsGraphics
Graphics
 
Lesson 9 (Tools Palette 1)
Lesson 9 (Tools Palette 1)Lesson 9 (Tools Palette 1)
Lesson 9 (Tools Palette 1)
 
Working with google sketch up
Working with google sketch upWorking with google sketch up
Working with google sketch up
 
Ms Paint Tutorial
Ms Paint TutorialMs Paint Tutorial
Ms Paint Tutorial
 
SolidWorks-Tutorial.pdf
SolidWorks-Tutorial.pdfSolidWorks-Tutorial.pdf
SolidWorks-Tutorial.pdf
 
Ip lesson3 notes -master
Ip lesson3 notes -masterIp lesson3 notes -master
Ip lesson3 notes -master
 

More from ilaazmil2

Pembungkusan
PembungkusanPembungkusan
Pembungkusanilaazmil2
 
Adobe photoshop 1
Adobe photoshop 1Adobe photoshop 1
Adobe photoshop 1ilaazmil2
 
Jalinan (texture)
Jalinan (texture)Jalinan (texture)
Jalinan (texture)ilaazmil2
 
Elemen rekabentuk
Elemen rekabentukElemen rekabentuk
Elemen rekabentukilaazmil2
 
Prinsip rekabentuk
Prinsip rekabentukPrinsip rekabentuk
Prinsip rekabentukilaazmil2
 
Proses penghasilan rekabentuk
Proses penghasilan rekabentukProses penghasilan rekabentuk
Proses penghasilan rekabentukilaazmil2
 
Pembungkusan
PembungkusanPembungkusan
Pembungkusanilaazmil2
 
Teknik asas melukis
Teknik asas melukisTeknik asas melukis
Teknik asas melukisilaazmil2
 
Pengenalan asas lukisan
Pengenalan asas lukisanPengenalan asas lukisan
Pengenalan asas lukisanilaazmil2
 
Media dan teknik
Media dan teknikMedia dan teknik
Media dan teknikilaazmil2
 
Warna dalam lukisan persembahan
Warna dalam lukisan persembahanWarna dalam lukisan persembahan
Warna dalam lukisan persembahanilaazmil2
 
Adobe indesign cs6
Adobe indesign cs6Adobe indesign cs6
Adobe indesign cs6ilaazmil2
 
Adobe illustrator 1
Adobe illustrator 1Adobe illustrator 1
Adobe illustrator 1ilaazmil2
 
Adobe illustrator cs6
Adobe illustrator cs6Adobe illustrator cs6
Adobe illustrator cs6ilaazmil2
 
Adobe photoshop cs6
Adobe photoshop cs6Adobe photoshop cs6
Adobe photoshop cs6ilaazmil2
 
Intro to news design and layout
Intro to news design and layoutIntro to news design and layout
Intro to news design and layoutilaazmil2
 
Identiti korporat
Identiti korporatIdentiti korporat
Identiti korporatilaazmil2
 

More from ilaazmil2 (20)

Pembungkusan
PembungkusanPembungkusan
Pembungkusan
 
Adobe photoshop 1
Adobe photoshop 1Adobe photoshop 1
Adobe photoshop 1
 
Jalinan (texture)
Jalinan (texture)Jalinan (texture)
Jalinan (texture)
 
Elemen rekabentuk
Elemen rekabentukElemen rekabentuk
Elemen rekabentuk
 
Prinsip rekabentuk
Prinsip rekabentukPrinsip rekabentuk
Prinsip rekabentuk
 
Proses penghasilan rekabentuk
Proses penghasilan rekabentukProses penghasilan rekabentuk
Proses penghasilan rekabentuk
 
Pembungkusan
PembungkusanPembungkusan
Pembungkusan
 
Teknik asas melukis
Teknik asas melukisTeknik asas melukis
Teknik asas melukis
 
Pengenalan asas lukisan
Pengenalan asas lukisanPengenalan asas lukisan
Pengenalan asas lukisan
 
Media dan teknik
Media dan teknikMedia dan teknik
Media dan teknik
 
Warna dalam lukisan persembahan
Warna dalam lukisan persembahanWarna dalam lukisan persembahan
Warna dalam lukisan persembahan
 
Adobe indesign cs6
Adobe indesign cs6Adobe indesign cs6
Adobe indesign cs6
 
Adobe illustrator 1
Adobe illustrator 1Adobe illustrator 1
Adobe illustrator 1
 
Adobe illustrator cs6
Adobe illustrator cs6Adobe illustrator cs6
Adobe illustrator cs6
 
Adobe photoshop cs6
Adobe photoshop cs6Adobe photoshop cs6
Adobe photoshop cs6
 
Risalah
RisalahRisalah
Risalah
 
Intro to news design and layout
Intro to news design and layoutIntro to news design and layout
Intro to news design and layout
 
Identiti korporat
Identiti korporatIdentiti korporat
Identiti korporat
 
Asas seni
Asas seniAsas seni
Asas seni
 
Illustrasi
IllustrasiIllustrasi
Illustrasi
 

Recently uploaded

Judging the Relevance and worth of ideas part 2.pptx
Judging the Relevance  and worth of ideas part 2.pptxJudging the Relevance  and worth of ideas part 2.pptx
Judging the Relevance and worth of ideas part 2.pptxSherlyMaeNeri
 
Incoming and Outgoing Shipments in 3 STEPS Using Odoo 17
Incoming and Outgoing Shipments in 3 STEPS Using Odoo 17Incoming and Outgoing Shipments in 3 STEPS Using Odoo 17
Incoming and Outgoing Shipments in 3 STEPS Using Odoo 17Celine George
 
ECONOMIC CONTEXT - PAPER 1 Q3: NEWSPAPERS.pptx
ECONOMIC CONTEXT - PAPER 1 Q3: NEWSPAPERS.pptxECONOMIC CONTEXT - PAPER 1 Q3: NEWSPAPERS.pptx
ECONOMIC CONTEXT - PAPER 1 Q3: NEWSPAPERS.pptxiammrhaywood
 
Choosing the Right CBSE School A Comprehensive Guide for Parents
Choosing the Right CBSE School A Comprehensive Guide for ParentsChoosing the Right CBSE School A Comprehensive Guide for Parents
Choosing the Right CBSE School A Comprehensive Guide for Parentsnavabharathschool99
 
Earth Day Presentation wow hello nice great
Earth Day Presentation wow hello nice greatEarth Day Presentation wow hello nice great
Earth Day Presentation wow hello nice greatYousafMalik24
 
ACC 2024 Chronicles. Cardiology. Exam.pdf
ACC 2024 Chronicles. Cardiology. Exam.pdfACC 2024 Chronicles. Cardiology. Exam.pdf
ACC 2024 Chronicles. Cardiology. Exam.pdfSpandanaRallapalli
 
Roles & Responsibilities in Pharmacovigilance
Roles & Responsibilities in PharmacovigilanceRoles & Responsibilities in Pharmacovigilance
Roles & Responsibilities in PharmacovigilanceSamikshaHamane
 
Full Stack Web Development Course for Beginners
Full Stack Web Development Course  for BeginnersFull Stack Web Development Course  for Beginners
Full Stack Web Development Course for BeginnersSabitha Banu
 
How to Add Barcode on PDF Report in Odoo 17
How to Add Barcode on PDF Report in Odoo 17How to Add Barcode on PDF Report in Odoo 17
How to Add Barcode on PDF Report in Odoo 17Celine George
 
Procuring digital preservation CAN be quick and painless with our new dynamic...
Procuring digital preservation CAN be quick and painless with our new dynamic...Procuring digital preservation CAN be quick and painless with our new dynamic...
Procuring digital preservation CAN be quick and painless with our new dynamic...Jisc
 
Proudly South Africa powerpoint Thorisha.pptx
Proudly South Africa powerpoint Thorisha.pptxProudly South Africa powerpoint Thorisha.pptx
Proudly South Africa powerpoint Thorisha.pptxthorishapillay1
 
Difference Between Search & Browse Methods in Odoo 17
Difference Between Search & Browse Methods in Odoo 17Difference Between Search & Browse Methods in Odoo 17
Difference Between Search & Browse Methods in Odoo 17Celine George
 
AMERICAN LANGUAGE HUB_Level2_Student'sBook_Answerkey.pdf
AMERICAN LANGUAGE HUB_Level2_Student'sBook_Answerkey.pdfAMERICAN LANGUAGE HUB_Level2_Student'sBook_Answerkey.pdf
AMERICAN LANGUAGE HUB_Level2_Student'sBook_Answerkey.pdfphamnguyenenglishnb
 
THEORIES OF ORGANIZATION-PUBLIC ADMINISTRATION
THEORIES OF ORGANIZATION-PUBLIC ADMINISTRATIONTHEORIES OF ORGANIZATION-PUBLIC ADMINISTRATION
THEORIES OF ORGANIZATION-PUBLIC ADMINISTRATIONHumphrey A Beña
 
call girls in Kamla Market (DELHI) 🔝 >༒9953330565🔝 genuine Escort Service 🔝✔️✔️
call girls in Kamla Market (DELHI) 🔝 >༒9953330565🔝 genuine Escort Service 🔝✔️✔️call girls in Kamla Market (DELHI) 🔝 >༒9953330565🔝 genuine Escort Service 🔝✔️✔️
call girls in Kamla Market (DELHI) 🔝 >༒9953330565🔝 genuine Escort Service 🔝✔️✔️9953056974 Low Rate Call Girls In Saket, Delhi NCR
 
Influencing policy (training slides from Fast Track Impact)
Influencing policy (training slides from Fast Track Impact)Influencing policy (training slides from Fast Track Impact)
Influencing policy (training slides from Fast Track Impact)Mark Reed
 

Recently uploaded (20)

Judging the Relevance and worth of ideas part 2.pptx
Judging the Relevance  and worth of ideas part 2.pptxJudging the Relevance  and worth of ideas part 2.pptx
Judging the Relevance and worth of ideas part 2.pptx
 
FINALS_OF_LEFT_ON_C'N_EL_DORADO_2024.pptx
FINALS_OF_LEFT_ON_C'N_EL_DORADO_2024.pptxFINALS_OF_LEFT_ON_C'N_EL_DORADO_2024.pptx
FINALS_OF_LEFT_ON_C'N_EL_DORADO_2024.pptx
 
Incoming and Outgoing Shipments in 3 STEPS Using Odoo 17
Incoming and Outgoing Shipments in 3 STEPS Using Odoo 17Incoming and Outgoing Shipments in 3 STEPS Using Odoo 17
Incoming and Outgoing Shipments in 3 STEPS Using Odoo 17
 
ECONOMIC CONTEXT - PAPER 1 Q3: NEWSPAPERS.pptx
ECONOMIC CONTEXT - PAPER 1 Q3: NEWSPAPERS.pptxECONOMIC CONTEXT - PAPER 1 Q3: NEWSPAPERS.pptx
ECONOMIC CONTEXT - PAPER 1 Q3: NEWSPAPERS.pptx
 
Choosing the Right CBSE School A Comprehensive Guide for Parents
Choosing the Right CBSE School A Comprehensive Guide for ParentsChoosing the Right CBSE School A Comprehensive Guide for Parents
Choosing the Right CBSE School A Comprehensive Guide for Parents
 
Earth Day Presentation wow hello nice great
Earth Day Presentation wow hello nice greatEarth Day Presentation wow hello nice great
Earth Day Presentation wow hello nice great
 
ACC 2024 Chronicles. Cardiology. Exam.pdf
ACC 2024 Chronicles. Cardiology. Exam.pdfACC 2024 Chronicles. Cardiology. Exam.pdf
ACC 2024 Chronicles. Cardiology. Exam.pdf
 
Roles & Responsibilities in Pharmacovigilance
Roles & Responsibilities in PharmacovigilanceRoles & Responsibilities in Pharmacovigilance
Roles & Responsibilities in Pharmacovigilance
 
Full Stack Web Development Course for Beginners
Full Stack Web Development Course  for BeginnersFull Stack Web Development Course  for Beginners
Full Stack Web Development Course for Beginners
 
How to Add Barcode on PDF Report in Odoo 17
How to Add Barcode on PDF Report in Odoo 17How to Add Barcode on PDF Report in Odoo 17
How to Add Barcode on PDF Report in Odoo 17
 
Procuring digital preservation CAN be quick and painless with our new dynamic...
Procuring digital preservation CAN be quick and painless with our new dynamic...Procuring digital preservation CAN be quick and painless with our new dynamic...
Procuring digital preservation CAN be quick and painless with our new dynamic...
 
TataKelola dan KamSiber Kecerdasan Buatan v022.pdf
TataKelola dan KamSiber Kecerdasan Buatan v022.pdfTataKelola dan KamSiber Kecerdasan Buatan v022.pdf
TataKelola dan KamSiber Kecerdasan Buatan v022.pdf
 
Proudly South Africa powerpoint Thorisha.pptx
Proudly South Africa powerpoint Thorisha.pptxProudly South Africa powerpoint Thorisha.pptx
Proudly South Africa powerpoint Thorisha.pptx
 
Difference Between Search & Browse Methods in Odoo 17
Difference Between Search & Browse Methods in Odoo 17Difference Between Search & Browse Methods in Odoo 17
Difference Between Search & Browse Methods in Odoo 17
 
AMERICAN LANGUAGE HUB_Level2_Student'sBook_Answerkey.pdf
AMERICAN LANGUAGE HUB_Level2_Student'sBook_Answerkey.pdfAMERICAN LANGUAGE HUB_Level2_Student'sBook_Answerkey.pdf
AMERICAN LANGUAGE HUB_Level2_Student'sBook_Answerkey.pdf
 
THEORIES OF ORGANIZATION-PUBLIC ADMINISTRATION
THEORIES OF ORGANIZATION-PUBLIC ADMINISTRATIONTHEORIES OF ORGANIZATION-PUBLIC ADMINISTRATION
THEORIES OF ORGANIZATION-PUBLIC ADMINISTRATION
 
YOUVE_GOT_EMAIL_PRELIMS_EL_DORADO_2024.pptx
YOUVE_GOT_EMAIL_PRELIMS_EL_DORADO_2024.pptxYOUVE_GOT_EMAIL_PRELIMS_EL_DORADO_2024.pptx
YOUVE_GOT_EMAIL_PRELIMS_EL_DORADO_2024.pptx
 
OS-operating systems- ch04 (Threads) ...
OS-operating systems- ch04 (Threads) ...OS-operating systems- ch04 (Threads) ...
OS-operating systems- ch04 (Threads) ...
 
call girls in Kamla Market (DELHI) 🔝 >༒9953330565🔝 genuine Escort Service 🔝✔️✔️
call girls in Kamla Market (DELHI) 🔝 >༒9953330565🔝 genuine Escort Service 🔝✔️✔️call girls in Kamla Market (DELHI) 🔝 >༒9953330565🔝 genuine Escort Service 🔝✔️✔️
call girls in Kamla Market (DELHI) 🔝 >༒9953330565🔝 genuine Escort Service 🔝✔️✔️
 
Influencing policy (training slides from Fast Track Impact)
Influencing policy (training slides from Fast Track Impact)Influencing policy (training slides from Fast Track Impact)
Influencing policy (training slides from Fast Track Impact)
 

Adobe illustrator 2

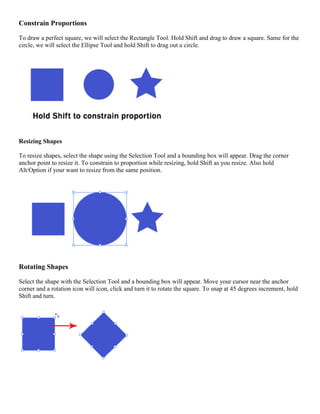
  • 1. Constrain Proportions To draw a perfect square, we will select the Rectangle Tool. Hold Shift and drag to draw a square. Same for the circle, we will select the Ellipse Tool and hold Shift to drag out a circle. Resizing Shapes To resize shapes, select the shape using the Selection Tool and a bounding box will appear. Drag the corner anchor point to resize it. To constrain to proportion while resizing, hold Shift as you resize. Also hold Alt/Option if your want to resize from the same position. Rotating Shapes Select the shape with the Selection Tool and a bounding box will appear. Move your cursor near the anchor corner and a rotation icon will icon, click and turn it to rotate the square. To snap at 45 degrees increment, hold Shift and turn.
  • 2. More Options for Shape Tools Select the Star Tool. Click once on the artboard and an option will pop up. Enter the same values below and click Ok. It will draw a star burst shape. This method can be used to bring out more options for shape tools. Drawing a Line Select the pencil tool and click and drag to draw a free hand line drawing. Closing Paths with Pencil Tool To close a path, hold Alt/Option as your Pencil Tool reaches the start point. A circle icon will appear next to the Pencil Tool to indicate path closure.
  • 3. Smoothing Jaggy Lines Normally when you draw with the Pencil Tool, the path looks jaggy. To smoothen the parts that are jaggy, simply hold Alt/Option to turn the Pencil Tool to Smooth Tool. Then draw over the the area of the lines which you would like to smoothen. Reshaping Path To reshape a path, make sure your path is selected and use the Pencil Tool to redraw the parts you would like to reshape. Note that the start and end path must be close to the original path to make it work.
  • 4. Pencil Tool Preferences You can turn on the Pencil Tool Preferences by double clicking on the Pencil Tool. You can change the fidelity and smoothness to find a combination that works for you. Fidelity: Determines how close the path is drawn to your mouse movement. Set it at a higher fidelity if your not good at drawing with your mouse. Smoothness: The higher you set for smoothness, the less anchor point it produces. Thus, producing a smoother line. Drawing Straight Lines Select the Pen Tool and click once to add the first anchor point. Move your mouse to the next position and click again to create the second point. The two anchor points will be connected together. Continue doing this to create a W shape as shown.To draw a new line, click the Selection Tool(The Black Arrow Icon) and click back the Pen Tool again. Closing a Path To close a path, click back the starting point to close the shape.
  • 5. Drawing a Curved Line Click and drag to put out the handles to create a smooth anchor point. Changing Path Directions Click and drag to create a smooth anchor point. Without releasing your mouse, hold Alt/Option and drag the handle up to change the path direction.
  • 6. Drawing a Circular Path Click and drag to create a smooth anchor point. Continue adding points and click back the starting point to close the path. Adding Anchor Points With the Pen Tool selected, go near the path where you want to add a new anchor point. A plus sign will appear next to the pen, click on the path to create a new anchor point.
  • 7. Removing Anchor Points To remove point, move your Pen Tool close to an anchor. A minus sign will appear next to the pen. Click on the anchor point to delete it. Converting Anchor Points To convert a smooth anchor point to a sharp anchor point, move your Pen Tool near the anchor and hold Alt/Option and your Pen Tool will change to an arrow shape. Click on the smooth anchor to convert it to an anchor point. Click and drag on the anchor point again to change it back to a smooth anchor point. Moving Anchor Points Select the Direct Selection Tool and click and on anchor you want to move. Click and drag to change positions.
  • 8. Changing Anchor Directions With the Pen Tool, you can quickly change the anchor directions. Hold Ctrl/Command to quickly change the Pen Tool to Direction Selection Tool. Select the anchor point you want to edit. The anchor handle will appear. Now release Ctrl/Command and hold Alt/Option to change it to Convert Anchor Tool. Click and drag the handles to change the direction.
  • 9. Drawing an Old Key After learning the concepts of how the Pen Tool works, we will apply what you have learnt to create this ancient old key shape. For the right angles, hold Shift before adding anchor point to constrain it to 90-degree.
  • 10. Final Illustration This is the final illustration. Tips for Using Pen Tool  Use as little anchor points your need to create your shape  Add anchor points where there is a change in direction of the line/curve  Use shortcuts like Alt/Option or Ctrl/Command to quickly swap to other tools to edit your path  Hold shift to lock your path while adding new anchor point for 45-degree increments. More Training for Pen Tool I have included more exercises for tracing using Pen Tool. Save it to your desktop and place it in illustrator by going to File>Place. Select the image and make sure Template is ticked. The image will now be faded and placed as a template. Now you can start practicing and don’t give up.
  • 11. Applying Brush Stroke Select the Brush Tool and draw your object. Then go to your Brushes Palette and select the crayon brush to apply the effect. Calligraphy Brush Stroke To apply a calligraphy brush stroke, draw your path and select the calligraphy brush. Increase the Stroke to make it thicker.
  • 12. Calligraphy Brush Options To make changes to your calligraphy brush, you can double click the Calligraphy Brush to pop up the calligraphic brush options. Drag the brush to change the angle in the thumbnail. Change the Diameter makes it thicker.
  • 13. Create a Border Pattern Draw a rectangle and pick the border pattern. This will create a frame for it. Creating a New Pattern Brush To crate a new brush. Draw a Star and drag it to the Brushes Palette. A New Brush selection appears. Choose New Pattern Brush for it.
  • 14. Applying Pattern Brush Draw a circle and apply our new brush stroke. Next draw a line path and apply the brush stroke. Double click the star brush from your brushes and set Scale and Spacing to 20% to get the effect below.
  • 15. What is Compound Path? Compound path is made out of at least two objects. You can add, subtract and intersect shapes to form a compound path. Compound Path Cheat Sheet I have compiled a cheat sheet to show how it looks like using different functions of compound path. You can see the final effect after we applied the compound path to three colored circles. Creating an Ancient Key Using Compound Path In this tutorial, I will show you how to create an ancient key using compound paths rather than using Pen Tool in our previous tutorial.
  • 16. Turning on the Grids Go to View>Show Grid to turn on the grids, then go and turn on Snap to Grid. With the grid and snapping turned on, you can easily snap objects to the grid. First draw a Circle using your Shape Tools, hold Alt/Option as you click and drag a new copy beside it.
  • 17. Duplicate a new circle and place it on top. Next, select the Rectangle Tool and continue building up your key shape.
  • 18.
  • 19. Swap the Fill and Stroke for the object, this will show you all the objects we have. Using the Selection Tool, select the whole shape and go to Window>Pathfinder to bring up the Pathfinder. Select Add to shape to combine the objects.
  • 20. You can still make changes to the compound path at this stage. Try moving the top circle below to see how it works. To do this, double click with the Selection Tool to go into isolation mode to move the individual shapes. Next we will swap it back to black fill again, draw a circle in the middle which we will punch a new hole there. Select both shapes and select Subtract from shape area.
  • 21. Here is the final illustration.
  • 22. Filling Color Using Swatches To fill an object, open up your Swatches Palette. Select your object and pick any color from the swatches. Filling Color Using Color Picker Another way to fill color is by double clicking on the Fill in your Tool Palette. A Color Picker window will appear and you can pick your color.
  • 23. Changing Fill and Stroke Using Control Palette You can also easily change fill, stroke color and stroke width by accessing your Control Palette at the top of your artboard. Stroke Caps The Stroke Caps determine the start and end points of a stroke. This applies to open paths only. You can choose between a Butt, Round, or Projecting cap. Miter Limit The stroke’s Miter Limit specifies the appearance for the joins in a shape. Notice how the joins look after we applied different miter settings to the stars.
  • 24. Applying Gradient to Objects To apply gradient to your object, go to the Tool Palette and set it to Gradient Fill. Open up your Gradient and Color Palette. By default it is a Grayscale gradient. Click Options icon at the corner and change it to RGB mode. After we switched to RGB there will be slider and a color chart to pick the color. Choose a dark blue for it.
  • 25. Do the same for the start point, change it to RGB and choose a light blue. To add a new gradient stop to the gradient, click right below the gradient ramp to create a new stop. Change it to white color. To remove it, you can drag the stop out of the Palette.
  • 26. To change the direction of the gradient, select the Gradient Tool from the Tool Palette. Click and drag in the direction you want the gradient to follow. Radial Gradient To set it to radial gradient, Choose Radial instead of Linear.
  • 27. Pattern Fill To create seamless pattern fill, we can choose the pattern fill from the Swatches. Conclusion Using radial and linear gradient, we can achieve alot of realism to our artwork. Radial patterns can add depth and volume to circle, and linear pattern can used to create volume for cylinders. Here is an example of gradients used to create a jingle bell.
  • 28. As you start working on complicated illustrations, layers will start to build up. And you will have to group and arrange them so that you can move and edit the layers easily. I will show you an example of an illustration I did so that you can see how I name and group my layers. Layers Palette You can access your Layers Palette from Window>Layers. As you can see below, I have grouped my objects into 6 different layers. You can see the stacking order with the background at the bottom and towel at the top for my illustration. Below is a list of layer settings and their uses. Visibility Icon: Click to hide/unhide layer Lock Icon: Click the lock to lock the layer Layer Name: Double click to rename it Target Indicator: Click to select layer Delete Layer: Click to delete layer New Layer: Add new layer on top New Sublayer: Add new sublayer under Layer 1
  • 29. Arranging Objects To bring a layer on top, select the layer and drag it to the top. Now the flower is at the top layer and covers the whole picture.
  • 30. Grouping Objects By grouping objects, you can move them together rather than spend time selecting all the objects individually. Here is an example of a flower made up of 6 layers. By selecting my object and grouping them by pressing Ctrl/Command+G, I am able to group them together and move. To edit the grouped object, double click to go into isolation mode to edit the objects. If you want to ungroup them, press Ctrl+Shift+G/Command+Shift+G. Next, I duplicate a few more of my grouped flower and group them again to form my flower layer.
  • 31. Appearance Palette The Appearance Palette shows what effect is applied to a layer. You can Add New Fill or Add New Stroke to the whole layer or individual objects. Go Windows>Appearance to open up your Appearance Palette. Let’s see how it looks when we apply a new fill. Click the option icon and choose Add New Fill. After we set the Fill with pink color, it turns the whole layer to pink.
  • 32. Adding Transparency You can add transparency in Illustrator by lowering the opacity of objects so that underlying artwork becomes visible. Go Window>Transparency to open up your Transparency Window. Stack a few objects and set it to a lower opacity of 50% for the underlying color to show through. Blending Modes for Objects If you are familiar with Photoshop, you may have heard of Blending Modes. Blending modes let you vary the ways that the colors of objects blend with the colors of underlying objects. Here I have an example of 3 popular blending modes to show you the effect. I shall not go through how each blending mode in detail as it is quite technical for beginners. If your are interested, you can read Adobe livedocs here.
  • 33. Button Reflection Using Screen Screen blending mode is one of my favourite as it allows me create reflection effortlessly. I will be showing you a popular technique on creating a button reflection using Screen. First draw a circle and apply a gradient of light to dark orange to it. Draw another circle on top and apply a gradient from black to white. Finally, select the black to white circle and change the blending mode to Screen. And you’re done!
  • 34. Applying Graphic Styles Illustrator has some built in graphic styles which you are quickly apply to your objects. It is like a saved set of attributes. Once you have created an object style, you can apply it across different objects. To see the attributes of an graphic styles, go Window>Appearance. Here we can see that there are 3 fills with effects(fx icon) applied. We will learn more about using effects in the later lessons.