
Recommended
More Related Content
What's hot
What's hot (19)
Similar to Editing an image and designing a digipak in Photoshop
Similar to Editing an image and designing a digipak in Photoshop (20)
More from amyawhittingham
More from amyawhittingham (19)
Recently uploaded
Recently uploaded (20)
Editing an image and designing a digipak in Photoshop
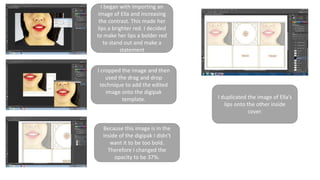
- 1. I began with importing an image of Ella and increasing the contrast. This made her lips a brighter red. I decided to make her lips a bolder red to stand out and make a statement I cropped the image and then used the drag and drop technique to add the edited image onto the digipak template. Because this image is in the inside of the digipak I didn’t want it to be too bold. Therefore I changed the opacity to be 37%. I duplicated the image of Ella’s lips onto the other inside cover.
- 2. I cropped the image and then used the drag and drop technique to add the edited image onto the digipak template. Once I scaled the image to a square, I changed the image to black and white.
- 3. I then began to add text, the artists name. I found the text from dafont.com and imported the text into Photoshop. I then used the text tool to create a path to start typing. Due to the background being a grey, I had to use the magic wand tool to get rid of the white that shadowed the text. I then scaled the text to be in proportion On this screenshot I added the title of the album underneath the artists name, in a different font.
- 4. On this part of the digipak I needed a different image of the artist to fill the square. I changed the image colour to black and white. I changed the redness to be brighter so that the lips were bolder. I then added the songs featuring on the album onto the back cover as well as the release date and the artist name. The last part was to add the barcode onto the template and the production logo.
- 5. For the inside fold of the digipak I used the shape tool and placed a square to match the template. I then changed the fill colour to be grey, this was to match the rest of the digipak and represent a background. On the grey square I added lyrics from the song we used for our music video.