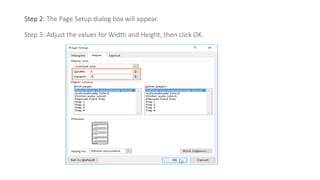
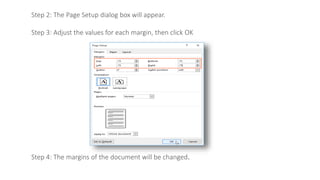
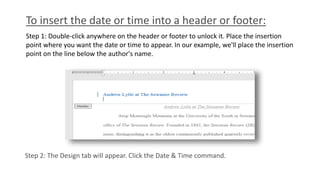
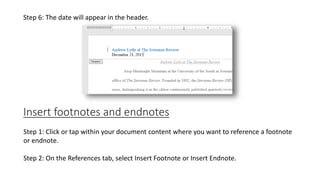
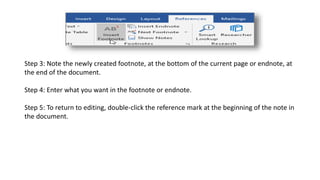
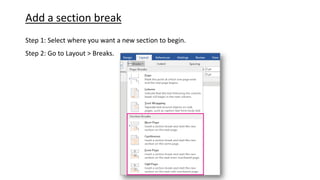
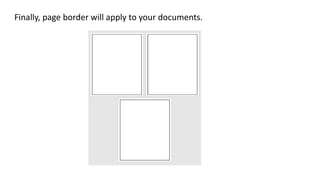
Page setup and sections
Presented by
Page orientation
Word offers two page orientation options: landscape and portrait. Landscape means the
page is oriented horizontally and Portrait means the page is oriented vertically.
To change page orientation:
Step 1: Select the Layout tab.
Step 2: Click the Orientation command in the Page Setup group.
Step 3: A drop-down menu will appear. Click either Portrait or Landscape to change the page
orientation.
Step 4: The page orientation of the document will be changed.
Page size
To change the page size:
Step 1: Select the Layout tab, then click the Size command.
Step 2: A drop-down menu will appear. The current page size is highlighted. Click the desired predefined page
size.
Step 3: The page size of the document will be changed.
To use a custom page size:
Step 1: From the Layout tab, click Size. Select More Paper Sizes from the drop-down menu.
Step 2: The Page Setup dialog box will appear.
Step 3: Adjust the values for Width and Height, then click OK.
Step 4: The page size of the document will be changed.
To format page margins:
Step 1: Select the Layout tab, then click the Margins command.
Step 2: A drop-down menu will appear. Click the predefined margin size you want.
Step 3: The margins of the document will be changed.
To use custom margins:.
Step 1: From the Layout tab, click Margins. Select Custom Margins from the drop-down
menu.
Step 2: The Page Setup dialog box will appear.
Step 3: Adjust the values for each margin, then click OK
Step 4: The margins of the document will be changed.
To create a header or footer:
Step 1: Double-click anywhere on the top or bottom margin of your document. In our
example, we'll double-click the top margin.
Step 2: The header or footer will open, and a Design tab will appear on the right side of the
Ribbon. The insertion point will appear in the header or footer.
Step 3: Type the desired information into the header or footer. In our example, we'll type
the author's name and the date.
Step 4: When you're finished, click Close Header and Footer. You can also press the Esc key.
Step 5: The header or footer text will appear.
To insert a preset header or footer:
Step 1: Select the Insert tab, then click the Header or Footer command. In our
example, we'll click the Header command.
Step 2: In the menu that appears, select the desired preset header or footer.
Step 3: The header or footer will appear. Many preset headers and footers contain text
placeholders called Content Control fields. These fields are good for adding information
like the document title, author's name, date, and page number.
Step 4: To edit a Content Control field, click it and type the desired information.
Step 5: When you're finished, click Close Header and Footer. You can also press the Esc
key.
 If you want to delete a Content Control field, right-click it and select Remove Content
Control from the menu that appears.
To insert the date or time into a header or footer:
Step 1: Double-click anywhere on the header or footer to unlock it. Place the insertion
point where you want the date or time to appear. In our example, we'll place the insertion
point on the line below the author's name.
Step 2: The Design tab will appear. Click the Date & Time command.
Step 3: The Date and Time dialog box will appear. Select the desired date or time format.
Step 4: Check the box next to Update automatically if you want the date to change every
time you open the document. If you don't want the date to change, leave this option
unchecked.
Step 5: Click OK.
Step 6: The date will appear in the header.
Insert footnotes and endnotes
Step 1: Click or tap within your document content where you want to reference a footnote
or endnote.
Step 2: On the References tab, select Insert Footnote or Insert Endnote.
Step 3: Note the newly created footnote, at the bottom of the current page or endnote, at
the end of the document.
Step 4: Enter what you want in the footnote or endnote.
Step 5: To return to editing, double-click the reference mark at the beginning of the note in
the document.
Add a section break
Step 1: Select where you want a new section to begin.
Step 2: Go to Layout > Breaks.
Step 3: Choose the type of section break you want:
 Next Page - Section break starts the new section on the following page.
 Continuous - Section break starts the new section on the same page. This type of
section break is often used to change the number of columns without starting a
new page.
 Even Page - Section break starts a new section on the next even-numbered page.
 Odd Page - Section break starts a new section on the next odd-numbered page.
Steps to Apply Page Border
Step 1: On the navigation menu click on the Design option.
Step 2: On the right side of the menu click on the Page Border option.
Step 3: A Border and Shading dialog box will open.
There are many options to choose page border style.
There are many options to choose page border style. Select option
according to you.
Step 5: Select on box option as shown:
You can also choose a different border style, color by simply clicking on
the style option and select your style as shown:
Step 6: Click on Apply to option as shown here:
There are 4 options:
Whole Document – By selecting this option page border will apply to all the
pages of your document.
This section – Page border will apply only on one page that is the current
page of the document.
This section – first page only – Page border will apply only in the first page,
remaining page remains without border
This section – all except first page – Page border will apply in all the pages
except the front or first page of your document.
Step 7: Then click on OK option.
Finally, page border will apply to your documents.

Page setup and sections presentation.pptx

  • 1.
    Page setup andsections Presented by
  • 2.
    Page orientation Word offerstwo page orientation options: landscape and portrait. Landscape means the page is oriented horizontally and Portrait means the page is oriented vertically. To change page orientation: Step 1: Select the Layout tab. Step 2: Click the Orientation command in the Page Setup group. Step 3: A drop-down menu will appear. Click either Portrait or Landscape to change the page orientation.
  • 3.
    Step 4: Thepage orientation of the document will be changed. Page size To change the page size: Step 1: Select the Layout tab, then click the Size command.
  • 4.
    Step 2: Adrop-down menu will appear. The current page size is highlighted. Click the desired predefined page size. Step 3: The page size of the document will be changed.
  • 5.
    To use acustom page size: Step 1: From the Layout tab, click Size. Select More Paper Sizes from the drop-down menu.
  • 6.
    Step 2: ThePage Setup dialog box will appear. Step 3: Adjust the values for Width and Height, then click OK.
  • 7.
    Step 4: Thepage size of the document will be changed. To format page margins: Step 1: Select the Layout tab, then click the Margins command.
  • 8.
    Step 2: Adrop-down menu will appear. Click the predefined margin size you want. Step 3: The margins of the document will be changed.
  • 9.
    To use custommargins:. Step 1: From the Layout tab, click Margins. Select Custom Margins from the drop-down menu.
  • 10.
    Step 2: ThePage Setup dialog box will appear. Step 3: Adjust the values for each margin, then click OK Step 4: The margins of the document will be changed.
  • 11.
    To create aheader or footer: Step 1: Double-click anywhere on the top or bottom margin of your document. In our example, we'll double-click the top margin.
  • 12.
    Step 2: Theheader or footer will open, and a Design tab will appear on the right side of the Ribbon. The insertion point will appear in the header or footer. Step 3: Type the desired information into the header or footer. In our example, we'll type the author's name and the date.
  • 13.
    Step 4: Whenyou're finished, click Close Header and Footer. You can also press the Esc key.
  • 14.
    Step 5: Theheader or footer text will appear. To insert a preset header or footer: Step 1: Select the Insert tab, then click the Header or Footer command. In our example, we'll click the Header command.
  • 15.
    Step 2: Inthe menu that appears, select the desired preset header or footer.
  • 16.
    Step 3: Theheader or footer will appear. Many preset headers and footers contain text placeholders called Content Control fields. These fields are good for adding information like the document title, author's name, date, and page number. Step 4: To edit a Content Control field, click it and type the desired information.
  • 17.
    Step 5: Whenyou're finished, click Close Header and Footer. You can also press the Esc key.  If you want to delete a Content Control field, right-click it and select Remove Content Control from the menu that appears.
  • 18.
    To insert thedate or time into a header or footer: Step 1: Double-click anywhere on the header or footer to unlock it. Place the insertion point where you want the date or time to appear. In our example, we'll place the insertion point on the line below the author's name. Step 2: The Design tab will appear. Click the Date & Time command.
  • 19.
    Step 3: TheDate and Time dialog box will appear. Select the desired date or time format. Step 4: Check the box next to Update automatically if you want the date to change every time you open the document. If you don't want the date to change, leave this option unchecked. Step 5: Click OK.
  • 20.
    Step 6: Thedate will appear in the header. Insert footnotes and endnotes Step 1: Click or tap within your document content where you want to reference a footnote or endnote. Step 2: On the References tab, select Insert Footnote or Insert Endnote.
  • 21.
    Step 3: Notethe newly created footnote, at the bottom of the current page or endnote, at the end of the document. Step 4: Enter what you want in the footnote or endnote. Step 5: To return to editing, double-click the reference mark at the beginning of the note in the document.
  • 22.
    Add a sectionbreak Step 1: Select where you want a new section to begin. Step 2: Go to Layout > Breaks.
  • 23.
    Step 3: Choosethe type of section break you want:  Next Page - Section break starts the new section on the following page.  Continuous - Section break starts the new section on the same page. This type of section break is often used to change the number of columns without starting a new page.  Even Page - Section break starts a new section on the next even-numbered page.  Odd Page - Section break starts a new section on the next odd-numbered page.
  • 24.
    Steps to ApplyPage Border Step 1: On the navigation menu click on the Design option. Step 2: On the right side of the menu click on the Page Border option.
  • 25.
    Step 3: ABorder and Shading dialog box will open.
  • 26.
    There are manyoptions to choose page border style. There are many options to choose page border style. Select option according to you.
  • 27.
    Step 5: Selecton box option as shown:
  • 28.
    You can alsochoose a different border style, color by simply clicking on the style option and select your style as shown:
  • 29.
    Step 6: Clickon Apply to option as shown here: There are 4 options: Whole Document – By selecting this option page border will apply to all the pages of your document. This section – Page border will apply only on one page that is the current page of the document. This section – first page only – Page border will apply only in the first page, remaining page remains without border This section – all except first page – Page border will apply in all the pages except the front or first page of your document.
  • 31.
    Step 7: Thenclick on OK option.
  • 32.
    Finally, page borderwill apply to your documents.