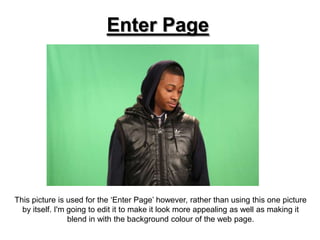
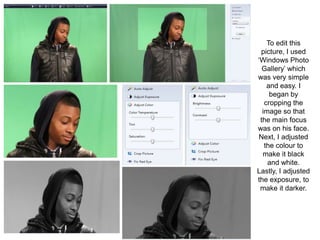
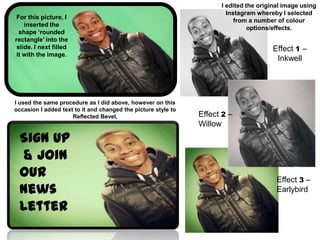
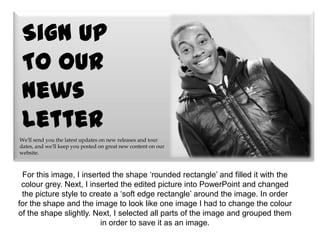
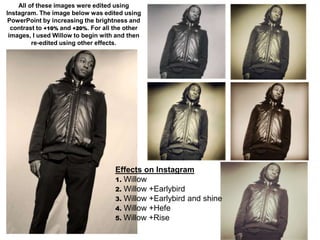
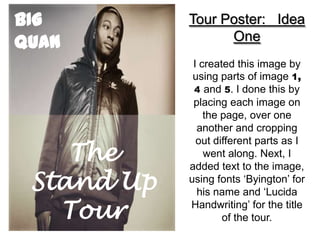
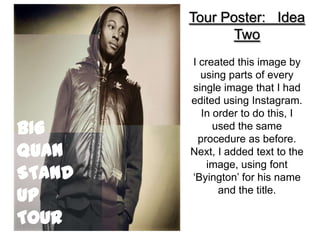
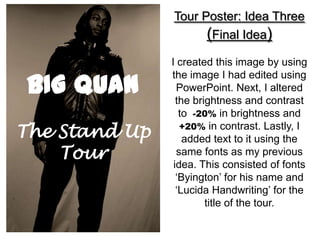
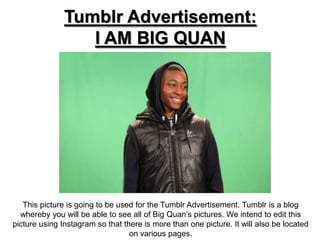
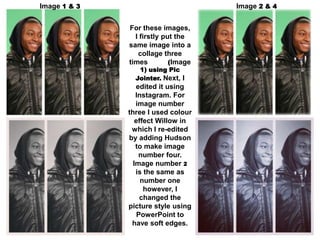
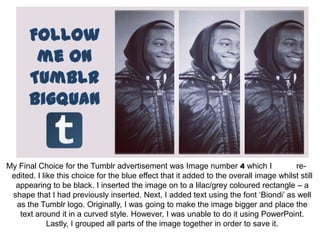
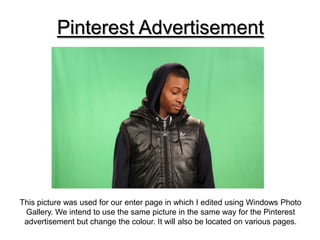
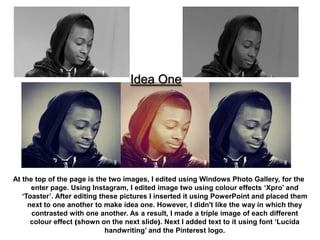
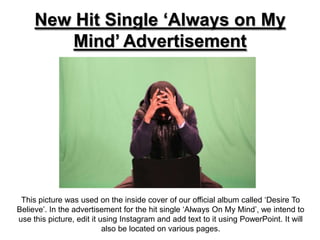
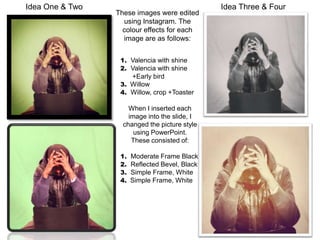
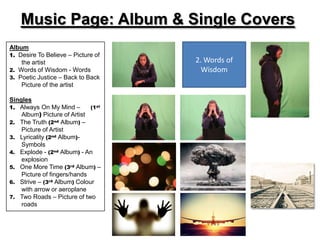
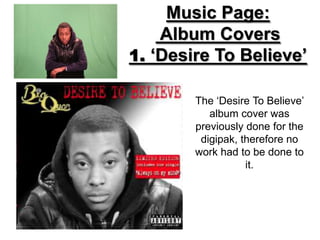
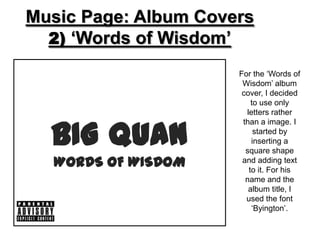
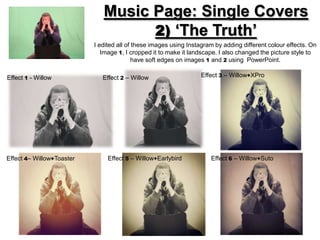
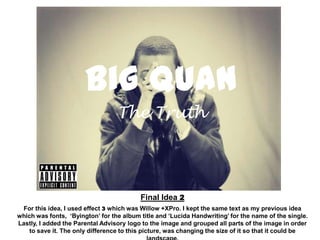
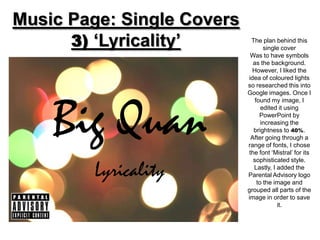
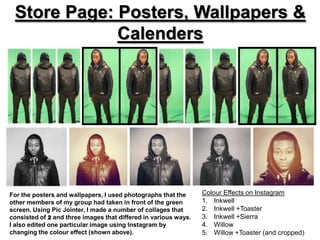
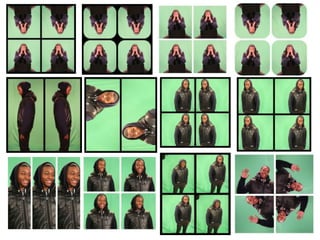
The document discusses plans for photographs to be used on a website. Pictures will be used as backgrounds, in advertisements for albums, singles, and social media. Methods for editing the pictures are described, including cropping, changing colors, and adding text in PowerPoint and Instagram. Ideas for album covers, single covers, and advertisements are presented with edited pictures and fonts for text.
The document provides a production log that summarizes various creative works for a video game, including logos, character designs, level designs, and more. Key details include designing the game's logo using warped text effects, creating pixel art characters and levels, animating cut scenes and menu screens in Photoshop, and adding sound effects to gameplay demos. The log demonstrates progress on visual and audio assets needed to develop the Kingdom of Xilo video game.
For her experiments, the student practiced various design techniques in Illustrator, Photoshop, and creating a movie poster. In Illustrator, she followed tutorials to create retro 3D text effects. In Photoshop, she designed a t-shirt with warped text and added a texture. For her movie poster, the student used stock images of an astronaut and space elements, applying adjustments like curves and levels to achieve a consistent blue tone. Overall, the experiments helped her learn software skills that will be applied to her final major project designs.
The document summarizes a production log for a student's fanzine project over 4 weeks. Some key details:
1) In the first week, the student created interview pages with images, text layouts, and effects like gradients and metallic text. They also started pages on record labels and streaming services.
2) In the second week, the student continued pages on interviews, labels, and added a page with fisheye photos and quotes. Backgrounds included torn paper and glitch effects.
3) Due to computer issues, the third week involved recreating lost work, and new pages on gender inequality and streaming services with colorful backgrounds and glitch text.
4) The final week
The document discusses the use of various new media technologies throughout the planning, research, construction, and evaluation stages of a student film project. Blogger was used for planning to organize ideas and media. Paint and Prezi were used to create storyboards and diagrams. SurveyMonkey created a questionnaire, and Facebook, Twitter, and an iPhone were used to conduct research. Excel analyzed questionnaire results. Adobe Premiere Elements edited footage, and Photoshop designed poster and magazine cover. YouTube hosted the completed trailer.
The document discusses the new media technologies used at various stages of a project. A more advanced camera was used, which provided better quality footage but was more difficult to operate. A reflector was also used to bounce light and reduce shadows, which took some practice to use effectively. An iPhone was used to send photos and record audio via apps, which were then uploaded to editing software. Final Cut Pro software was used for editing and the student became more proficient in its features. Photoshop and other design software presented initial challenges in editing images but skills improved with practice and help from others. Various online tools like Popplet, Prezi, Slideshare and Mahara were used for planning, presentations and blogging. YouTube
1) The document describes the process of designing a digi-pak album cover. Photographs were taken and edited using tools like the clone stamp and paintbrush tools to straighten images and reduce glare.
2) Text was added and formatted using different fonts and the warp text tool. Actions were used to add sepia and vintage color effects.
3) The back cover and interior pages were similarly designed using photographs edited to add frames, landscapes in doors, and candles. Actions were used to match the color scheme throughout.
4) The final product matched the original mock up except for excluding models, making the design more ambiguous and personal for the target audience.
This document provides an example of a proof of concept for a double page spread in a fanzine. It summarizes the creative process for designing the left page using a collage of cut out images with torn edges and overlays to give a homemade effect. For the right page, it placed a full image next to an interview text box to showcase the planned layout style. The goal was to experiment with the visual design to inform the overall style of the fanzine.
The document describes the process of editing images for a digipak cover. It discusses selecting two initial images, editing one in Photoshop Express to make the red facepaint pop against a monochrome background by increasing saturation and lowering exposure. Text was then added in Photoshop Pro and adjustments were made to positioning, spacing, sizing and colors until the designer was satisfied. Other images in the digipak were heavily edited to create variety and a feeling of recklessness. The final image chosen perfectly encapsulates the ideas behind the project by obscuring the model's face.
The document discusses the various media technologies used at different stages of creating coursework, including a music video and digipak. At the planning stage, the student used YouTube to research other works, SurveyMonkey for a survey, and WordCloud to analyze survey results. For construction, the student used Final Cut Pro to edit the music video, adjusting colors, brightness, and adding transitions. Photoshop was used to create graphics for the digipak from photos taken, and Microsoft Word was used to layout the digipak. The same technologies of Photoshop and Word were used for the magazine advertisement.
The document discusses the author's experiments with photography tutorials, lighting techniques, and photo editing in Photoshop. They found tutorials helpful for learning lighting positioning but struggled to replicate the exact setups. Through trial and error, they improved at creating shadows, depth, and different exposures. Photoshop experiments included adjusting lighting, converting images to black and white, adding gothic elements like bruising effects, and blending background elements. The author aims to apply these skills to create an effective horror-style final project involving a DVD cover and poster.
The document discusses the use of various new media technologies in the construction, research, planning and evaluation of a media project. It describes using a more advanced camera than the previous year, though some buttons were difficult to use initially. A reflector was used to control lighting and reduce shadows outdoors. An iPhone was used to send photos and record audio for the project. Final Cut Pro software was used for editing and the author became more proficient in its features. Photoshop and Prezi were new software that the author learned, though Photoshop background editing was challenging. Other tools discussed include Popplet, Slideshare, Mahara, Emaze, SurveyMonkey and YouTube.
This document summarizes the process of creating a poster for a music video. It begins with establishing a white background and adding colored strips. An image of a bmx biker is added along with a title. Effects are tested on different elements to make them more eye-catching. Additional bikes and colors are incorporated based on feedback. Lighting is used carefully when taking the main poster photo to highlight props like an umbrella. The final poster design is completed with positioning adjustments and a yellow background.
The student used various media technologies at different stages of their project. During research and planning, they relied heavily on Moodle to access course materials and templates. PowerPoint was used for initial presentations and gathering feedback. Google, YouTube, and Prezi supported research of case studies and inspiration. Communication between group members was done through Hotmail, WhatsApp, and group chats. When constructing their film, they used a Canon DSLR camera, tripod, dolly, microphone, and learned filming techniques. Final Cut Pro was used for editing, with challenges in lighting and lost audio. Photoshop supported poster creation, learning tools like cropping and layering. InDesign, Illustrator, and Blogger also contributed
I aligned cropped images from different people in an order that would look best, emphasizing their eyes by reducing saturation and painting color only on the eyes to make them stand out. I then overlaid a purple E4 tape image found online, erasing its original text to add my own matching the regular E4 branding style to make the poster look like a typical E4 feature.
The document provides a 10-day summary of a graphic designer's work creating various assets for a client. Over the 10 days, the designer created stat graphic templates, goal celebration gifs, and a social media banner. The work involved heavy photo editing, learning new techniques from tutorials, and making adjustments based on client feedback. While satisfied with the final products, the designer notes room for improving technical skills and allowing more planning time.
We created a poster in Photoshop to promote an exhibition called "Playing With Pigments". We found a simple image of paint splatters online and adjusted the brightness, hue, and saturation to match the theme's colors. We then added the exhibition title, location, date, and contact information using fonts that matched the client's branding and were easy to read against the background. The final poster had bright, eye-catching colors and clearly visible text information.
The document summarizes the post-production process for editing a smile campaign video using Premiere Pro. Key steps included:
1. Organizing video files and reviewing clips to select those to keep.
2. Loading selected clips into Premiere Pro and experimenting with the software during an initial editing period.
3. Arranging clips in timeline according to script, then making cuts and color corrections as needed.
4. Adding background music from a royalty-free site and syncing audio with video edits.
5. Further refining lighting and transitions between clips before exporting the final video.
This document summarizes revisions made to a magazine front cover design. The designer changed the color scheme to blue and orange with black as the main background color. A new font and main image were selected. Band names were changed to blue for better visibility. Additional text was added to demonstrate space in the new main image. The masthead, empty spaces, and lighter colors will need further revisions to improve the design according to magazine conventions.
The document describes the process of creating a movie poster in Adobe Photoshop. First, the background was made black and an image of a golden apple was found online and edited using tools like Bevel and Magic Wand. The apple image was placed in the center of the poster. Next, the title "Bodoni" was added below the apple in the same font with a gradient overlay. A tagline was also included at the top in the same style. Additional text like "Most anticipated" was spread out across the poster for consistency. Lastly, credits for the creators and actors were added in white text at the bottom.
This document summarizes Ella Potton's process for recreating two album covers for digipaks. For the first cover, she edited a similar photo by enhancing contrast and brightness to create a rigid sliced effect, then cropped the image and found matching fonts and colors in Word. For the second cover, she took a portrait, cropped the subject, darkened it, layered underneath a cityscape image for its lights, and added a thick black border and matching font in Word.
The document provides an evaluation of the student's unit 21 stop motion animation project using play-doh. Some key points:
- The student chose stop motion as they had not done it before and thought play-doh figures would appeal to their 6-20 year old target audience.
- Their storyboard included random sketches of objects they liked, like a rose representing a rugby team.
- Weaknesses included the camera moving too much and some figures taking too long to make.
- Strengths were unique figures, use of different colors, and matching music to scenes.
- Feedback noted the camera movement issue but praised the imagination, music use, and animation attempt.
1. The document describes Amy Watson's process for creating magazine covers and spreads in Photoshop and Publisher. It details how she adds images, effects, and text while cutting, pasting, resizing and repositioning elements.
2. For the cover, Amy cuts out characters from shows and pastes them on a gradient background. She adds shapes, logos and effects before customizing text colors, sizes and placement.
3. For the spreads, Amy pastes TV show images and cuts out characters. She adds backgrounds, logos and summaries before designing titles and page numbers using thick outlines and layers of text.
Charlotte Oliver outlines equipment and technical considerations for problem solving in video and photo projects. She discusses camera equipment like cameras, microphones, batteries, memory cards, and lighting equipment. She then covers lighting ratios and how aperture, shutter speed, and f-stops control light levels. Finally, she demonstrates experiments in Adobe Photoshop and InDesign to design a magazine front cover and double page spread for an Easter-themed cooking magazine.
The document discusses how new technologies were used in the construction, planning, research, and evaluation stages of a music video project.
It describes using a Canon camera to film shots for the music video. Final Cut Pro software was used to edit the video and add changing backgrounds. Pixlr software was used to design the digipak and magazine advert. Research involved analyzing other artists' work online. Evaluation questions were presented using tools like YouTube, Prezi, and PowerPoint.
The document describes the process of designing a DVD cover in Adobe Photoshop and InDesign. Key steps included editing photographs in Photoshop by cutting out sections, applying filters, and adjusting colors and brightness. Templates were also edited in Photoshop by removing unneeded areas. The edited images and templates were then placed in InDesign along with text. Multiple revisions were made to text size, color, positioning and effects to improve readability and cohesiveness with the overall design. Layers in InDesign were used to organize and position elements on the front and back covers.
The document describes the process of editing an original image in Photoshop for use on a digipak. Several edits were made to enhance features like contrast, brightness and saturation. Actions were added to manipulate the images further. Colors were adjusted and overlays were used to darken corners and edges. The edits created cohesion across images while emphasizing focal points and tying the visual design to the overall theme and message.
The document describes the iterative design process for a movie poster. It started with the original poster idea, which was then modified over several drafts by changing elements like the tagline, background colors, and adding effects. Key changes included splitting the photo into two sides, one in black and white, adding blurred lines and social media links. Design decisions were influenced by other posters examined for things like close-ups, color schemes, and facial expressions.
The document discusses how the author used various new media technologies in planning, constructing, and evaluating a music video project. Blogger was used to create an online diary of the planning process. Word documents and hyperlinks were embedded. YouTube videos and slideshows were also embedded. Cyberlink PowerDirector was used to add effects like pulsing beats and cropping clips. Stop frame animation was created using a DSLR camera. Lighting and image editing was done in Cyberlink PowerDirector. Serif PhotoPlus and PagePlus were used to design the CD cover, behind the CD images, and a magazine advertisement to promote the artist. Consistent branding was created across tasks.
The document summarizes two case studies - The Sven Callaway Show and Skeleton - that use different Web 2.0 tools in lessons. The Sven Callaway Show allows students to see multiple perspectives on issues and gain a holistic understanding through links to detailed information and statistics. It incorporates group activities for students to apply and evaluate their new knowledge. In contrast, Skeleton lacks activities for students to demonstrate understanding and higher-order thinking. It does not engage students in problem-solving or requiring them to organize and apply their new knowledge. While it provides accurate body part descriptions, students may get distracted without opportunities to discuss or work towards a shared task.
The document describes 4 locations - a bedroom with blinds and lights, a restaurant with tables and chairs, a park with trees and a bench, and a shopping center with escalators. In each location, the characters Shannon and Big Quan are seen from different camera angles, including high angle shots, over the shoulder shots, and reaction shots. The fourth location features a high angle shot looking down on Big Quan rapping and uses camera angles on the escalators to make him look big, powerful, and dominant.
The document summarizes audience feedback on a music video and ancillary tasks created to promote an artist. [1] The music video was generally well-received but could have benefited from more editing effects. [2] The digipak and website effectively captured the genre but the digipak could have included more information. [3] Receiving feedback helped the creators understand how to potentially improve their work and be more effective in promoting the artist.
ZA
Working capital management is important for business success. Gross working capital refers to total current assets, while net working capital is current assets minus current liabilities. Many factors affect a business's working capital requirements, including its nature, size, growth rate, production cycle, credit and purchasing policies, availability of materials and credit, profit levels, taxes, and price changes. Determining the optimal level of working capital is necessary.
Back To Basics Recruiting New Recruiter Trainingmdubois2010
The document provides an overview of the training goals and content for new recruiters at ACS. The 3-session training covers: understanding ACS's mission, structure, and lines of business; the new hire onboarding process including paperwork, compliance, and benefits; and job file compliance, applicant tracking tools, and recruiter resources. It also includes the staffing goals, leadership team, and customer care recruiting priorities.
Diana North is a freelance soprano and teacher based in Hampshire. She holds a BA and MA in Music Performance and teaches singing, piano, and recorder lessons individually. Diana has extensive experience performing oratorio and opera repertoire. She also works as an event planner, organizing music festivals and concerts.
Brian D. Wilson has over 25 years of experience in product development and engineering across multiple industries. He currently serves as the Director of Systems Engineering at Beckman-Coulter, where he leads the development of new diagnostic instrumentation. Prior to this role, he held several engineering management positions at Beckman-Coulter and Sanofi Diagnostics, managing teams and launching new products. He also has experience assisting companies with technology transfer programs and manufacturing modernization through roles at the Minnesota Advanced Manufacturing Technology Center and the U.S. Air Force.
Para crear una cuenta en Slideshare, se debe ingresar a la página web, completar un formulario con nombre de usuario, correo electrónico y contraseña, y luego subir el primer archivo seleccionando los archivos, título, etiquetas y categoría. Una vez publicado, el archivo estará disponible en la página dentro de unos minutos.
This story is about a curious girl who is happy exploring the world until others try to teach her how to be happier by making her obey. She starts to lose parts of herself and becomes sad and unable to breathe. An older lady hears the girl sobbing and hugs her, remembering what it was like to be curious. The lady realizes she wants to rediscover her own curiosity and happiness. She becomes herself again and is also very curious, exploring the world and feeling happy.
Sony Corporation of America owns Sony Music Entertainment, which operates under various subsidiaries in the United States. These include Sony Electronics, Sony Entertainment, and Sony Pictures Entertainment. Sony Music Entertainment also owns Columbia Records, RCA Records, and Epic Records. Epic Records promotes its artists through an official YouTube channel with over 172,000 video views and a large Twitter account with over 54,000 followers, linking to music videos and new releases. JLS also uses online media like Facebook, YouTube, Instagram and Twitter to promote their music, tickets, and engage with fans.
Encontro para exposição, debate e formulação de políticas e diálogo entre poder público e setor privado para incentivo a construção e gestão de cidades inteligentes e sustentáveis no Brasil e na América Latina. Mais detalhes em http://smartcities.cc
This document provides an overview of the services offered by dBLab, an acoustics consulting firm based in Portugal, Spain, and Madrid. They offer services in four main areas: 1) environmental noise mapping and workplace safety consulting; 2) architectural acoustics design for buildings; 3) accredited laboratory testing for noise, vibration, and other parameters; and 4) quality management consulting and product development. They have experience across various industries and sectors.
Brian D. Wilson has completed over 150 specialized training courses spanning from 1978 to present covering topics such as leadership, project management, engineering, quality management, manufacturing, and regulatory compliance. Some of the organizations he has received training from include ASME, Franklin Covey, Beckman-Coulter, Carnegie Mellon, and the Ken Blanchard Companies. The extensive list of courses demonstrates his commitment to continuously developing skills and staying knowledgeable across a wide range of subjects.
The document provides information about the main components of an automatic transmission system:
1) The torque converter which replaces the clutch and allows the engine to run when stopped.
2) Planetary gear sets which provide the various gear ratios through different component rotations.
3) The hydraulic system which uses pressurized transmission fluid to control the clutches and bands and shift gears.
n effort to provide you best content to our readers, the IndianPowerSector.com team has prepared a short report on Indian Power Distribution sector. The report gives an overview of present condition of Distribution sector and landmark steps of privatization. With more than INR 1.6 trillion of losses the Distribution sector is the leaking bucket which needs to be repaired.
The report is first in series of Distribution , we will bring to you the Report Card of each State and Private DisComs with IPS.com analysis. We invite all to be part of these reports as content sponsors.
The document describes three advertising pieces created by Zoe Woodbridge:
1) A bus stop advert featuring layered footprints on an image of Big Ben with a gradient effect.
2) A magazine advert made using a screenshot font on a homemade newspaper wrapped around a real newspaper with lighting effects drawing attention to a question.
3) A billboard advert made by removing references to Google from a screenshot and replacing them, adding lighting effects to highlight a documentary question on the altered image placed on a black background.
Step by step construction of double spread page (DPS)GKaur18
The document outlines the 9 step process for constructing a double-spread page (DPS) for a magazine. The steps include: 1) opening a blank canvas and turning it horizontal, 2) creating two drafts by editing images in Photoshop and experimenting with effects, 3) further editing one image to give it a darker mysterious effect, 4) executing a similar editing process for the second image, 5) pasting the images on the left side of the DPS and adding text on the right side, 6) changing the color scheme and beginning construction again with a different image, 7) using a different font for the headline and adding pulled quotes, 8) adding social media links and a small banner about a pull
The document describes the process of designing magazine pages in Photoshop using images and text. For the front cover, a photo of a wall was turned grey and a model image was placed over it. Levels were used to make the cover black and white. For the contents page, a corridor railing photo was darkened and a model image was isolated using the Quick Selection tool. Effects were added to images and text was placed using tools. A chapel cross photo was the background for a double-page spread, with model images isolated and adjusted over top, and text added in different colors.
1) The document describes the process of creating a magazine cover and double page spread over 3 days of production.
2) On day 1, the author edited photos for the cover in Photoshop, adding text over an earth-toned photo, and banners advertising the magazine contents.
3) On day 2, the author used polygon and pen tools to layout photos and text for the double page spread, experimenting with new tools.
4) On day 3, the author finished the double page spread layout and made final adjustments to the cover design.
Stages of Production - Double Page Spread ArticleGregoryMcLaney
Gregory McLaney documents the 11 step process for creating a double page spread article layout in Photoshop and InDesign. The steps include editing photographs, adding design elements like page numbers and mastheads, manipulating text, and using brushes and filters to link the two pages together with paint splatters. The final layout is designed to have a grungy, hip-hop aesthetic and feel cohesive across the spread.
This document discusses the editing of images for inclusion in a magazine. The author edited images in Photoshop to improve quality and make them more professional. Some images required cropping, adjusting levels and contrast, adding color overlays, or converting to black and white. Location images sometimes needed increased brightness. The goal was to have a variety of high quality, edited images that would appeal to the target audience for the magazine.
The document discusses editing a photo using Picnik by increasing exposure and contrast to make the model stand out, and increasing saturation and temperature to lighten white areas. The photo was then converted to black and white but the model's suit was left in color using a reverse effect. Picnik was used because the creator felt comfortable with the software and its effects section.
Through producing a music magazine, the student learned skills in Photoshop, InDesign, and photography. Prior experience with Photoshop and InDesign proved limited for magazine layout. Photoshop was too restrictive for cover design while InDesign allowed flexibility with images and boxes. Photography involved reviewing front covers and spreads to determine needed shots. Photoshop was used to remove backgrounds, edit images, and add effects like shadows and glows. InDesign skills like setting up double page spreads and inserting text boxes improved over the course of the project.
The document describes the process of creating a digipak design in Adobe Photoshop and Illustrator. First, a photo was edited in Photoshop by adjusting contrast, saturation, and color balance to emphasize blue tones. Next, a geometric pattern was drawn in Illustrator using shapes and tools. Then, the pattern was copied onto the photo in Photoshop, inverted to black lines on white, and duplicated across the image. Finally, noise and typography were added to complete the vintage, retro design for an indie music digipak.
The document summarizes the steps taken to edit a photo in Photoshop and layout the photo on a magazine contents page in InDesign. Key steps included:
1) Adjusting exposure levels, brightness, and contrast in Photoshop to improve the photo.
2) Using color correction tools to fix color distortions from previous edits.
3) Cropping the photo to make it more engaging for readers.
4) Adding headers, footers, page numbers and text boxes in InDesign to lay out the photo in a magazine-style contents page based on styles from reference magazines.
The document summarizes the progression of skills from an initial school magazine project to a more advanced music magazine project. Some key techniques used in the music magazine included:
1) Using multiple layers and overlapping images on the cover to create visual interest.
2) Adding shaped text boxes and tilting photographs and text boxes on the double-page spread for variety.
3) Gaining confidence using Publisher in addition to Photoshop to complete elements like the double-page spread.
This showed growth in skills and a willingness to experiment with more complex techniques and different programs over time.
The document describes the process of designing a contents page for a magazine in Photoshop and InDesign. Key steps include:
1. Creating the background in Photoshop using the same design as the front cover, and adding faded text.
2. Designing a white rectangle to hold content information, and styling it with effects.
3. Importing and positioning images, adding effects like beveling and shadows.
4. Adding the logo and sub-images, then linking the designs between Photoshop and InDesign for layout.
5. In InDesign, adding titles, subtitles, descriptions and final text using various fonts and colors.
The document describes the process of creating a magazine cover design. It involved taking a photo of a brick wall for the background, converting it to grayscale, and selectively coloring some of the bricks. Images were edited and cut out in Photoshop before being arranged on the background in InDesign. Text size and placement took some adjustments to balance with the large background image. Multiple layers were used in InDesign to structure the overlapping images and text.
The document summarizes the process of designing a magazine advertisement using Adobe Photoshop. First, the photographer selected an image and duplicated the background layer to edit without altering the original. Curves and levels were adjusted to enhance brightness and contrast. The image size was changed to fit a double page spread for the magazine. A sepia tone action was applied to give a vintage look. Text, shapes, and shadows were added. Noise and blur filters were applied to edges for a worn vintage effect. The final advertisement design is shown.
The document describes the process of creating a mock magazine cover in Photoshop. Key steps included:
1) Setting up the page size in Photoshop and resizing images to fit an A4 size.
2) Creating a masthead in PowerPoint and Photoshop by tracing an example, smoothing edges, and changing colors.
3) Importing the masthead into Photoshop and positioning it, resizing text and colors for the final cover.
4) Experimenting with layouts, such as text position and color, to improve how information stands out.
The document describes the process of creating a mock magazine cover in Photoshop. Key steps included:
1) Setting up the page size in Photoshop and resizing images to fit an A4 size.
2) Creating a masthead in PowerPoint and Photoshop by tracing an example, smoothing edges, and changing colors.
3) Importing the masthead into Photoshop and positioning it, resizing text and experimenting with layout and colors.
4) Realizing the main image needed to be on top of the masthead and using layers to fix the positioning.
The document discusses the development of an advertisement design for a magazine. It goes through several iterations:
1) The initial image features a woman with a kaleidoscope overlay background. Text and the Flume logo are added.
2) Feedback leads to editing the woman's colors to make her stand out more, though this style is inconsistent.
3) Reverting the woman back to the original colors ties the design together better. Adjusting the text contrast improves visibility.
4) A third edit experiments with adding designed text but it is deemed too "childish" and inconsistent with the Flume logo. Further feedback will be sought on the overall design.
The author edited two images for a poster using Photoshop and Pixlr Express. In Photoshop, the author felt comfortable using the tools and edited one image, adjusting the color balance. In Pixlr Express, the author had access to more advanced editing effects and used tools like the focal tool to focus on faces and the vibrance/contrast tools to darken backgrounds. For one image, the author additionally used airbrushing in Pixlr Express. The editing in both programs helped make the images creative and realistic while maintaining a horror theme for the poster.
The document describes the process of designing the cover and contents pages for a music magazine focused on the grime genre. Key steps included:
1. Importing a photo of a brick wall into Photoshop and editing it to create a colorful background for the magazine.
2. Designing the masthead in InDesign using a bold font in colors that complemented the background.
3. Placing the feature articles prominently on the left third of the cover to attract readers' attention on store shelves.
4. Including images, article previews, and using consistent colors and fonts throughout to maintain a cohesive design style across the magazine pages.
Olivia Dexter developed skills in photography, InDesign, and Photoshop while producing a music magazine. Initially, she used Photoshop but found it limiting for magazine layouts. She then learned to use InDesign, which provided more flexibility for positioning images and boxes on pages like the cover. In photography, Olivia reviewed images from other magazines to determine what was needed for her magazine and guide photo shoots.
Similar to Website Preparations - Photograph Plans (20)
This video summarizes the music video for the song "Co-Sign" by the R&B group SWV. The video portrays the three members of SWV having found love and settled down with husbands in happy homes. Through a narrative structure, it shows each woman's lifestyle individually and together with their husbands. The target audience is portrayed as adults ages 25-55 who are beginning families or happily married with children. The video aims to show love and family in a positive light.
The document provides an analysis of Andrew Goodwin's theory on music videos. It discusses the 6 key features of Goodwin's theory, which include genre characteristics, the relationship between lyrics and visuals, the relationship between music and visuals, demands of record labels, references to looking, and intertextual references. It also summarizes Goodwin's perspective that audiences analyze music videos through thought beats, narrative/performance, star image, relation of visuals to song, and technical aspects.
The document summarizes the setup and filming of a music video. It describes attaching lights to stands to light the bedroom setting, testing lighting in different areas, setting up the camera, and filming characters chilling in the bedroom and at two additional locations - a local park and shopping center. It notes that the lighting, room colors, and actors' comfort level made the footage look natural and realistic.
Evaluation of a2 students media websiteLarelleShay
The document evaluates an A2 student band's website called "The XYZs" that was created using WiX website builder software. The evaluator found the website to be well-designed and professionally made, with consistent layout, color scheme, and branding across all pages. Specific elements like the home page, band profiles, and merchandise page were highlighted as strong examples of the students' creativity and attention to detail in representing their band online.
Evaluation of A2 Students Media WebsiteLarelleShay
The document evaluates an A2 student music group's website created using WiX. The evaluator found that the website demonstrated advanced website design skills and resembled professional artist sites. Key aspects noted were the consistent layout, color scheme, logo placement, and purposeful content on each page. While most pages were detailed and creative, the watch page was more basic. Overall, the website effectively promoted the group and would influence the evaluator's own group website design.
Evaluation of a2 students media websiteLarelleShay
The document evaluates an A2 student band's website called "The XYZs" that was created using WiX website builder software. The evaluator found that the website demonstrated professional design principles through features like consistent page layout, color scheme, and logo placement. Most pages provided clear and detailed information through creative elements like news feeds and merchandise designs. However, the watch page lacked the effort seen on other pages. Overall, the website effectively promoted the band and will influence the evaluator's future website design work.
Music videos originated from illustrated songs in the late 19th century that synchronized images to live music performances. In the 1920s-1930s, animated cartoons and musical films incorporated popular songs of the time. The Beatles' films in the 1960s helped establish music videos as a way to promote music without the artist being present. The launch of MTV in 1981 focused exclusively on music videos and helped popularize the format.
The document describes the process of constructing a website for an artist named Big Quan using the WIX website builder. Key steps included choosing a template, editing pages, adding images and text, linking pages, and customizing colors and fonts. Challenges included figuring out how to add features like buttons, galleries, and forms. The end result was a multi-page website for promoting Big Quan's music, news, videos and connecting with fans.
1. The document outlines a photo plan for a digipack featuring 4 pictures of an artist.
2. Picture 1 will serve as the background on the front cover showing the artist's direct address.
3. Picture 2 will similarly background the back cover without direct address alongside track listings.
The document describes the process of constructing a website for a musician named Big Quan using the WIX website builder. Key steps included choosing a template, editing pages, adding content like images and text, and linking pages. Functions like adding headers, menus, and galleries were utilized. Testing different designs and getting help from tutorials was part of iterating on the site layout and features. Screenshots provide examples of the constructed home and enter pages. The overview covers customizing each page like About, News, Music, Gallery, Video, Connect and Store sections.
The document describes the process of setting up lighting equipment for a music video shoot. It discusses attaching lights to stands and positioning them on either side of the bed to properly light the characters. It also mentions testing the lighting to ensure the characters could be seen clearly. Further, it provides details about checking the camera with the lighting and preparing to start filming with the actors. Finally, it outlines additional locations that were used to film different scenes for the narrative of the music video.
Website Research - Analysis of Genre WebsitesLarelleShay
Beyonce's official website is very clear and well structured while also being creative and interesting to viewers. It uses a color scheme of black, white, and gray that contrasts well. The home page features pictures of Beyonce to engage viewers and advertisements of new albums and DVDs. Navigation is easy through clear labeling and structure across pages for news, music, events, videos, photos, and more. The store page links to another website, maintaining the overall organized layout while portraying a more stylish side of Beyonce. Overall, the website focuses on her fame and personality through bold images and limited text that keeps viewers exploring different features.
Website Research - Analysis of Genre WebsitesLarelleShay
Beyonce's official website is very clear and well structured. It uses a color scheme of white, black and grey that contrasts well. The home page features interesting pictures of Beyonce and advertisements. News and media pages provide updates in lists with images and videos. The store, tour and community pages allow interactions. Overall, the website reflects Beyonce's style while maintaining an easy to navigate structure.
The ASAP MOB website has a clear and consistent structure throughout with a black, white, grey and blue color scheme. The Store Page has a different layout and colors to make it more interesting. Overall, the website is well designed and organized. Some aspects that could be used in the author's own work include the consistent navigation, global comment system, and sign-in options using various social media accounts.
The ASAP MOB website is well structured with a clear layout. It contains pages for news, music, tours, lyrics, forums, and a store. The home page displays recent posts about performances and interviews. The music page lists albums that can be downloaded. The forums page allows users to sign in with various online accounts. The store page links to a separate website for purchasing merchandise.
The document summarizes a website for a music artist. It discusses different pages commonly found on music artist websites, including home, biography, news, music, videos, tours, and store pages. It then analyzes and compares the layout, design, and features of websites for two artists - one more basic and the other more sophisticated. The more sophisticated website, belonging to Madonna, incorporates consistent branding across pages along with interactive elements and is tailored for an international audience.
The document summarizes a student's design for a CD digipak promoting the single "Give Me Novocaine" by Green Day. The student created a cohesive design with consistent use of red, black, green and white colors and a typewriter font. Each page is simplistic yet eye-catching, containing images, lyrics, credits and other details that relate meaningfully to the band and music. The design reflects creativity and thought on the student's part to effectively showcase and promote the single through the digipak.
This PowerPoint document contains 7 different logo design ideas created by the artist and their group. The key features they aimed for in the logo designs were for them to be bold, eye-catching, and concise. Each design utilizes different elements like fonts, shapes, lines, and colors and were inspired by things like magazines, newspapers, street art, and graffiti in order to create logos that were original, creative, and reflected the artist's style.
1. Website Preparations
Photograph Plans
For the website there are a range of pictures that will be included. Some of
these will be used as backgrounds for the web pages, whilst others will
incorporated into:
• Advertisements for the Newsletter, Tour, Album release, new hit single
and online sites such as Tumblr and Pinterest
• Additional Album and Single Covers
• Wallpapers
• Posters
• Stickers
• General Pictures
2. Enter Page
This picture is used for the ‘Enter Page’ however, rather than using this one picture
by itself. I'm going to edit it to make it look more appealing as well as making it
blend in with the background colour of the web page.
3. To edit this
picture, I used
‘Windows Photo
Gallery’ which
was very simple
and easy. I
began by
cropping the
image so that
the main focus
was on his face.
Next, I adjusted
the colour to
make it black
and white.
Lastly, I adjusted
the exposure, to
make it darker.
4. Home Page: Sign Up to
Newsletter Advertisement
This picture will be used in order to advertise the Newsletter. It will also
be located on various pages. Our plan, is to edit this picture using
Instagram, and add text to it using PowerPoint.
5. I edited the original image using
Instagram whereby I selected
For this picture, I
from a number of colour
inserted the
options/effects.
shape ‘rounded
rectangle’ into the
slide. I next filled Effect 1 –
it with the image.
Inkwell
I used the same procedure as I did above, however on this
occasion I added text to it and changed the picture style to
Reflected Bevel. Effect 2 –
Willow
Sign Up
& Join
Our Effect 3 –
News Earlybird
Letter
6. Sign Up
To our
News Letter
We'll send you the latest updates on new releases and tour
dates, and we'll keep you posted on great new content on our
website.
For this image, I inserted the edited picture into PowerPoint and added text to
it. I also changed the picture style to create a ‘soft edge rectangle’ around the
image. Lastly, I selected all parts of the image and grouped them in order to
save it as an image.
7. Sign Up
To our
News
Letter
We'll send you the latest updates on new releases and tour
dates, and we'll keep you posted on great new content on our
website.
For this image, I inserted the shape ‘rounded rectangle’ and filled it with the
colour grey. Next, I inserted the edited picture into PowerPoint and changed
the picture style to create a ‘soft edge rectangle’ around the image. In order
for the shape and the image to look like one image I had to change the colour
of the shape slightly. Next, I selected all parts of the image and grouped them
in order to save it as an image.
8. Tour Page – Stand Up Tour
Advertisement
One of these three pictures will be used as the overall picture for his ‘Stand
Up’ tour advertisement and edited using Instagram. It will also be located on
various pages. On the tour page, we are going to use one of the pictures
also as a background image.
9. All of these images were edited using
Instagram. The image below was edited using
PowerPoint by increasing the brightness and
contrast to +10% and +20%. For all the other
images, I used Willow to begin with and then
re-edited using other effects.
Effects on Instagram
1. Willow
2. Willow +Earlybird
3. Willow +Earlybird and shine
4. Willow +Hefe
5. Willow +Rise
10. BIG Tour Poster: Idea
QUAN One
I created this image by
using parts of image 1,
4 and 5. I done this by
placing each image on
the page, over one
another and cropping
The
out different parts as I
went along. Next, I
added text to the image,
Stand Up using fonts ‘Byington’ for
his name and ‘Lucida
Tour Handwriting’ for the title
of the tour.
11. Tour Poster: Idea
Two
I created this image by
using parts of every
single image that I had
edited using Instagram.
In order to do this, I
BIG used the same
procedure as before.
QUAN Next, I added text to the
image, using font
STAND ‘Byington’ for his name
UP and the title.
TOUR
12. Tour Poster: Idea Three
(Final Idea)
I created this image by using
BIG QUAN
the image I had edited using
PowerPoint. Next, I altered
the brightness and contrast
to -20% in brightness and
The Stand Up +20% in contrast. Lastly, I
added text to it using the
Tour same fonts as my previous
idea. This consisted of fonts
‘Byington’ for his name and
‘Lucida Handwriting’ for the
title of the tour.
13. Tumblr Advertisement:
I AM BIG QUAN
This picture is going to be used for the Tumblr Advertisement. Tumblr is a blog
whereby you will be able to see all of Big Quan’s pictures. We intend to edit this
picture using Instagram so that there is more than one picture. It will also be located
on various pages.
14. Image 1 & 3 Image 2 & 4
For these images,
I firstly put the
same image into a
collage three
times (Image
1) using Pic
Jointer. Next, I
edited it using
Instagram. For
image number
three I used colour
effect Willow in
which I re-edited
by adding Hudson
to make image
number four.
Image number 2
is the same as
number one
however, I
changed the
picture style using
PowerPoint to
have soft edges.
15. My Final Choice for the Tumblr advertisement was Image number 4 which I re-
edited. I like this choice for the blue effect that it added to the overall image whilst still
appearing to be black. I inserted the image on to a lilac/grey coloured rectangle – a
shape that I had previously inserted. Next, I added text using the font ‘Biondi’ as well
as the Tumblr logo. Originally, I was going to make the image bigger and place the
text around it in a curved style. However, I was unable to do it using PowerPoint.
Lastly, I grouped all parts of the image together in order to save it.
16. Pinterest Advertisement
This picture was used for our enter page in which I edited using Windows Photo
Gallery. We intend to use the same picture in the same way for the Pinterest
advertisement but change the colour. It will also be located on various pages.
17. Idea One
At the top of the page is the two images, I edited using Windows Photo Gallery, for the
enter page. Using Instagram, I edited image two using colour effects ‘Xpro’ and
‘Toaster’. After editing these pictures I inserted it using PowerPoint and placed them
next to one another to make idea one. However, I didn't like the way in which they
contrasted with one another. As a result, I made a triple image of each different
colour effect (shown on the next slide). Next I added text to it using font ‘Lucida
handwriting’ and the Pinterest logo.
19. BQ MERCH Idea Four
Available Now (Final Idea)
I created another
idea for the
Pinterest
advertisement
however used
one image rather
than three. Lastly,
I added the text
and the logo as
before and
grouped all parts
of the image so
that I can save it.
20. Brand New Album Release
‘Desire To Believe’ Advertisement
This picture was used for our official album cover called ‘Desire To Believe. In
the advertisement we intend to use the same album cover and add text to it using
PowerPoint. It will also be located on various pages.
21.
22. New Hit Single ‘Always on My
Mind’ Advertisement
This picture was used on the inside cover of our official album called ‘Desire To
Believe’. In the advertisement for the hit single ‘Always On My Mind’, we intend to
use this picture, edit it using Instagram and add text to it using PowerPoint. It will
also be located on various pages.
23. Idea One & Two Idea Three & Four
These images were edited
using Instagram. The
colour effects for each
image are as follows:
1. Valencia with shine
2. Valencia with shine
+Early bird
3. Willow
4. Willow, crop +Toaster
When I inserted each
image into the slide, I
changed the picture style
using PowerPoint.
These consisted of:
1. Moderate Frame Black
2. Reflected Bevel, Black
3. Simple Frame, White
4. Simple Frame, White
24. Final Idea
1
For my final idea, I chose
Idea four because I felt the
colour effect on the image
made it look very vintage. It
also looked like something
you would see on the album
covers of artists today. To
finalise my single cover, I
added the parental advisory
and iTunes logo to signify to
the audience the type of
single it was as well as
having the option to
download it on ITunes. The
font I used for this image
was ‘Byington’.
25. Final Idea
2
Whilst choosing
fonts for my single
cover, I used the
font ‘Lucida
handwriting’ once
again for the name
of the song. I made
a second option so
that I could see how
it would look once I
changed the font.
26. Music Page: Album & Single Covers
Album
1. Desire To Believe – Picture of
the artist 2. Words of
2. Words of Wisdom - Words Wisdom
3. Poetic Justice – Back to Back
Picture of the artist
Singles
1. Always On My Mind – (1st
Album) Picture of Artist
2. The Truth (2nd Album) –
Picture of Artist
3. Lyricality (2nd Album)-
Symbols
4. Explode - (2nd Album) - An
explosion
5. One More Time (3rd Album) –
Picture of fingers/hands
6. Strive – (3rd Album) Colour
with arrow or aeroplane
7. Two Roads – Picture of two
roads
27. Music Page:
Album Covers
1. ‘Desire To Believe’
The ‘Desire To Believe’
album cover was
previously done for the
digipak, therefore no
work had to be done to
it.
28. Music Page: Album Covers
2) ‘Words of Wisdom’
For the ‘Words of
Wisdom’ album
cover, I decided
to use only
letters rather
BIG QUAN
than a image. I
started by
inserting a
square shape
WORDS OF WISDOM and adding text
to it. For his
name and the
album title, I
used the font
‘Byington’.
29. Music Page: Album Covers
3) ‘Poetic Justice’
For the Poetic Justice album,
we intend to use one image
but reverse it to make it look
like two images using the
programmes Instagram and
Pic Jointer.
To begin with I made a For my third idea, I used idea
collage of two images using number 2 and adjusted the
Pic Jointer. I done this by colour and exposure on
inserting two images into the Windows Photo Gallery. I felt
collage, and reversing the that this idea looked very
right image. Next I added a unique and modern, so
black frame to it (idea 1) and therefore chose it to be my
then a white frame (idea 2). final idea.
30. Final Idea
1
For this idea, I added
Big Quan
text using the font
‘Byington’ for his
name and ‘Edwardian
script’ for the album
Poetic
title. Next, I added the
Parental Advisory
logo so that the
Justice
viewer can know
what type of album it
is.
31. Final Idea 2
For this idea, I used
the font ‘Vivaldi’
because I wanted to
Big Quan
see the how the
album cover would
look if there was a
variety of texts. for
Poetic Justice the album title. Next, I
added the Parental
Advisory logo to the
bottom right corner,
so that the viewer can
know what type of
album it is.
32. Final Idea 3
For this idea, I used
the font ‘Bradley Hand
ITC’ for the album title.
Big Quan
Next, I added the
Parental Advisory logo,
so that the viewer can
know what type of
Poetic Justice
album it is.
33. Final Idea
4
For this idea, I used
Big Quan
the font ‘Lucida
Handwriting’. for the
album title. Next, I
added the Parental
Poetic Justice
Advisory logo to the
bottom right corner,
so that the viewer can
know what type of
album it is.
34. Music Page: Single
Covers
1) ‘Always On My Mind’
The same process that I applied for the new hit single advertisement, was
applied to the ‘Always On My Mind’ single cover. However, I removed the
Parental Advisory and Download on ITunes Logo.
35. Music Page: Single Covers
2) ‘The Truth’
I edited all of these images using Instagram by adding different colour effects. On
Image 1, I cropped it to make it landscape. I also changed the picture style to
have soft edges on images 1 and 2 using PowerPoint.
Effect 1 - Willow Effect 2 – Willow Effect 3 – Willow+XPro
Effect 4– Willow+Toaster Effect 5 – Willow+Earlybird Effect 6 – Willow+Suto
36. Final Idea 1
For this idea, I used
effects 3 to 6. I think
overall, this concept
was very good
because it was fairly
Big Quan
creative. Next, I
added text to it using
the fonts, ‘Byington’
for the album title
and ‘Lucida
Handwriting’ for the
The Truth name of the single.
Lastly, I added the
Parental Advisory
logo to the image
and grouped all parts
of the image in order
to save it. Final Idea
1 was the single
cover that I used in
my website.
37. Final Idea 2
For this idea, I used
effects 3 which was
Willow +XPro. I kept
the same text as my
Big Quan
previous ideam
which was fonts,
‘Byington’ for the
album title and
‘Lucida Handwriting’
for the name of the
The Truth single. Lastly, I
added the Parental
Advisory logo to the
image and grouped
all parts of the image
in order to save it.
38. Big Quan
The Truth
Final Idea 2
For this idea, I used effect 3 which was Willow +XPro. I kept the same text as my previous idea
which was fonts, ‘Byington’ for the album title and ‘Lucida Handwriting’ for the name of the single.
Lastly, I added the Parental Advisory logo to the image and grouped all parts of the image in order
to save it. The only difference to this picture, was changing the size of it so that it could be
39. Music Page: Single Covers
3) ‘Lyricality’ The plan behind this
single cover
Was to have symbols
as the background.
However, I liked the
idea of coloured lights
so researched this into
Google images. Once I
Big Quan
found my image, I
edited it using
PowerPoint by
increasing the
brightness to 40%.
After going through a
range of fonts, I chose
the font ‘Mistral’ for its
sophisticated style.
Lyricality Lastly, I added the
Parental Advisory logo
to the image and
grouped all parts of the
image in order to save
it.
40. Music Page: Single Covers
4) ‘Explode’
The plan behind this
single cover was to have
an explosion as the
background which linked
Big
to the name of the song. I
researched this into
Google images and
inserted it into PowerPoint.
After going through a
range of fonts, I chose the
font ‘Carbon Block’
because it contrasted well
Quan
with the image. Lastly, I
added the Parental
Advisory logo to the image
and grouped all parts of
the image in order to save
it.
explode
41. Music Page: Single Covers The plan behind this
single cover was to
have hands or fingers
5) ‘One More Chance’ as the background to
signify the artist
wanting one more
________. However,
after looking on Google
images I found a better
image which was of a
person who had their
hands firmly placed
behind a blurred
screen. I thought this
image looked really
effective and so
inserted it into
PowerPoint. I chose
Big Quan
the font ‘Biondi’
because it was bold
and was straight to the
point – just like the
name of the single.
One more chance Lastly, I added the
Parental Advisory logo
to the image and
grouped all parts of the
image in order to save
it.
42. Music Page: Single
Covers The plan behind this single
cover was to have either
6) ‘Strive’
arrows or an
aeroplane in the sky as
the background to
emphasise the word
‘strive’ – meaning in this
context reaching for a
Big Quan goal. I researched
‘aeroplanes’ into Google
images yet found nothing
great. Adding the word
STRIVE
‘Tumblr’ to it resulted in
many more images which
is how I found this image. I
chose the fonts ‘Neuropol’
for his name and ‘Biondi’
for the name of the single
because it reminded me of
the big bold letters you
would normally see on a
aeroplane. Lastly, I added
the Parental Advisory logo
to the image and grouped
all parts of the image in
order to save it.
43. Music Page: Single
Covers The plan behind this single
cover was to have two
7) ‘Two Roads’ lonely roads as the
background image which
would link with the single title.
The image I imagined was
not one that came up on
Google images. However
after a while of searching I
came across rail way tracks
that had a sepia effect to it.
Using PowerPoint I added a
Big Quan
border around the image.
Next, I added text to it using
the fonts ‘Neuropol’ but
positioned it in various places
before choosing to have it in
Two roads the middle. I still felt that this
idea as a whole wasn’t good
enough so I therefore added
a border to it which I felt
looked quite effective. Lastly,
I added the Parental Advisory
logo to the image and
grouped all parts of the
image in order to save it.
44. Store Page: Posters, Wallpapers &
Calenders
For the posters and wallpapers, I used photographs that the Colour Effects on Instagram
other members of my group had taken in front of the green 1. Inkwell
screen. Using Pic Jointer, I made a number of collages that 2. Inkwell +Toaster
consisted of 2 and three images that differed in various ways. 3. Inkwell +Sierra
I also edited one particular image using Instagram by 4. Willow
changing the colour effect (shown above). 5. Willow +Toaster (and cropped)
45.
46. Big Quan Final Idea
1
My first idea
consisted of parts
of images 1, 2 and
3. I created this by
placing each image
on top of one
another and
cropping the parts
that I didn’t want,
out. Next, I added
text to the image
using the font
‘Byington’. Lastly, I
selected all parts of
the image and
grouped it, in order
2013 Calender to save it.
47. Big Quan Final Idea 2
My first idea
consisted of parts
of images 5 which I
enlarged to the
size of my previous
idea. Next, I added
text to the image
using the same
font as my last idea
- ‘Byington’. Lastly,
I selected all parts
of the image and
grouped it, in order
to save it.
2013
Calendar