The document provides instructions for drawing geometric shapes like cones and spheres in SketchUp. It describes two methods for drawing a cone - by resizing a cylinder face or using the Follow Me tool. For drawing a cone using the Follow Me tool, the steps are to draw a circle base, lines to form a triangle, select the circle as the path, and use Follow Me to complete the cone shape. To draw a sphere, the instructions are to draw circles for the base path and profile, select the base as the path, use Follow Me to generate the sphere surface, and remove the base circle. Experience with tools like Circle, Move, Push/Pull, Follow Me, and Line is recommended before attempting these advanced shape
toolbars and axis , how to import file from autocad to sketchup , basic tools of sketchup , how to extrude walls , how to make a window (quick way ) , how to see dimensions, commands - position camera, walk and look around. All this can be learned in this presentation. A guide for beginners.
toolbars and axis , how to import file from autocad to sketchup , basic tools of sketchup , how to extrude walls , how to make a window (quick way ) , how to see dimensions, commands - position camera, walk and look around. All this can be learned in this presentation. A guide for beginners.
SketchUp is valued for its versatility and ease of use.Kenz47
SketchUp is a widely used 3D modeling software known for its intuitive interface and powerful capabilities. Developed by Trimble Inc., it's utilized in various industries including architecture, interior design, landscape architecture, civil and mechanical engineering, film, and video game design.
This tutorial will guide you through the steps to design a fidget spinner in Solidworks. We'll start by modeling a basic spinner, then we'll design our own counterweights to be machined. We'll make a dimensioned print for the counterweight, too! We'll end by creating an assembly for the spinner and I'll give you some next steps to take your design further.
How to Make a Web 2.0 Play Button in Adobe Illustrator CS6ZillionDesigns
Check out our extremely easy step-by-step guide to making a Play Button in Adobe Illustrator. We promise our guide helps you learn how to create 3D buttons without a design generator no matter what their shape. Visit our blog for more tips and tutorials. http//www.zilliondesigns.com/blog
A- LES CONCEPTS
Comprehension du bim.
Travailler dans différentes vues.
Classement et hierarchie des éléments dans Revit.
B-L'ENVIRONNEMENT DE TRAVAIL
Page des fichiers rescents et grand R.
Le ruban.
Fenêtre des propriétés.
Explorateur du projet.
Navigation dans un modèle.(zoom, rotation et panoramique).
Selection des objets, et verouillage.
C-DEMARRAGE D'UN PROJET.
Les gabarits.
Travail collaboratif.
Configuration d'un nouveau projet.
Manipulation des niveaux.
Manipulation des files de projet.
Utilisation des cotes temporaires.
C- MODELISATION PAR OBJETS:
Ajout des murs.
Propriété et type de murs.
Utilisation des accroches.
Ajouts de poteaux et poutres.
Ajout de portes et fenêtres.
Ajout d'élements de plomberie et d'électricité.
Utilisation de la jonction entre murs.
Utilisation des contraintes.
D- LIENS, IMPORTS ET GROUPES:
Lier fichiers DWG/DXF/SKP
Création de topogrpahie d'un site à partir d'un fichier.
Création et gestion des groupes.
Création et gestion des liens Revit.
Utilisation du partage d'emplacement.
E- MODELISATION PAR ESQUISSE:
Sols., toits et plafonds.
Toit par extrusion.
Ouvertures.
F-ESCALIERS.
Edition avancée d'escalier.
Edition avancée de gardes corps.
G- EDITION AVANCEE DES MURS:
Création d'un nouveau type de murs..
Création et gestion des murs empilés.
Création et gestion des murs rideaux.
.
H- GESTION DES GRAPHISMES:
Gestion du style des objets.
Gestion du remplacement de la visibilité et du graphisme des éléments.
Création et application des gabarits de vue.
Cacher et isoler les éléments.
Cadrage de la vue.
Plage de vue et entendues.
Vue isométrique d'une selection.
Option d'affichage des graphismes.
I- PIECES:
Création et gestion des pièces.
J- NOMENCLATURE ET ETIQUETTES:
Gestion des étiquettes.
Création et gestion des nomenclatures.
Modification des nomenclatures.
Enrichissement des VCCTP par les nomenclatures.
K-ANNOTATIONS.
Textes.
Dimensions
Symboles.
Légendes.
Détails.
Définir ses annotations.
L- PARAMETRIQUE ET FAMILLES
Utilisation des paramètres en mode projet.
Concept de famille.
Création d'une famille.
Utilisation des contraintes.
Utilisation des formes solides.
M- FEUILLE, IMPRESSION, PUBLICATION:
Création d'une feuille d'impression.
Export CAO.
Publication.
Impression PDF.
N- TRUCS ET ASTUCES.
A découvrir en formation.
ClippingNext is a well-known image editing company that offers a variety of services, including multiple clipping paths. They have been in the industry for many years and are recognized for their professional and high-quality work. the company Clipping next also offers image editing, image background removal, clipping path, cropping and resizing, color correction, headshot retouching services. You can use their image editing service to enhance or customize images for various purposes
This 7-second Brain Wave Ritual Attracts Money To You.!nirahealhty
Discover the power of a simple 7-second brain wave ritual that can attract wealth and abundance into your life. By tapping into specific brain frequencies, this technique helps you manifest financial success effortlessly. Ready to transform your financial future? Try this powerful ritual and start attracting money today!
1.Wireless Communication System_Wireless communication is a broad term that i...JeyaPerumal1
Wireless communication involves the transmission of information over a distance without the help of wires, cables or any other forms of electrical conductors.
Wireless communication is a broad term that incorporates all procedures and forms of connecting and communicating between two or more devices using a wireless signal through wireless communication technologies and devices.
Features of Wireless Communication
The evolution of wireless technology has brought many advancements with its effective features.
The transmitted distance can be anywhere between a few meters (for example, a television's remote control) and thousands of kilometers (for example, radio communication).
Wireless communication can be used for cellular telephony, wireless access to the internet, wireless home networking, and so on.
ER(Entity Relationship) Diagram for online shopping - TAEHimani415946
https://bit.ly/3KACoyV
The ER diagram for the project is the foundation for the building of the database of the project. The properties, datatypes, and attributes are defined by the ER diagram.
Multi-cluster Kubernetes Networking- Patterns, Projects and GuidelinesSanjeev Rampal
Talk presented at Kubernetes Community Day, New York, May 2024.
Technical summary of Multi-Cluster Kubernetes Networking architectures with focus on 4 key topics.
1) Key patterns for Multi-cluster architectures
2) Architectural comparison of several OSS/ CNCF projects to address these patterns
3) Evolution trends for the APIs of these projects
4) Some design recommendations & guidelines for adopting/ deploying these solutions.
1. APONTAMENTOS SKETCH UP 8 PRO
Drawing a cone
Advanced tasks, such as drawing a cone or sphere, require experience with several
SketchUp tools and features. You should be competent with the following tools and
features before attempting to draw a cone:
• The Circle tool
• The Move tool
• The Push/Pull tool
• The Follow-Me tool
• The Line tool
• Inference
Drawing a cone by resizing a cylinder face
One common way to draw a cone is:
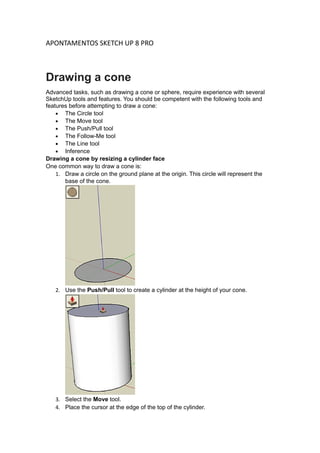
1. Draw a circle on the ground plane at the origin. This circle will represent the
base of the cone.
2. Use the Push/Pull tool to create a cylinder at the height of your cone.
3. Select the Move tool.
4. Place the cursor at the edge of the top of the cylinder.
2. 5. Move the cursor around the edge until you find one of the cardinal points (a
point that is aligned with the red or green axis). The edge of the circle will not
highlight when the cursor is on a cardinal point. Cardinal points act as resize
handles.
6. Click the mouse button when the cursor is over a cardinal point on the edge of
the top of the cylinder.
7. Move the cursor toward the center of the cylinder. A cone begins to take shape.
Drawing a cone using the Follow-Me tool
One common way to draw a cone is:
1. Draw a circle on the ground plane at the origin. This circle will represent the
base of the cone.
2. Use the Orbit tool to orbit so that your view is looking over the top of the circle
(not directly down on the circle).
3. Use the Line tool to draw a line up the blue axis from middle of the circle to the
height of your cone.
4. Use the Line tool to draw a line from the top of the previous line to the edge of
the circle. This line will form the second line of a triangle.
5. Use the Line tool to join the last line to the bottom of the first line, creating a
solid triangular face.
3. 6. Select the edge of the circle on the ground plane. This is your path.
7. Select the Follow-Me tool.
8. Click on the solid triangular face. A cone is created.
Note: The bottom face of the cone is eliminated when you use the Follow Me
tool to create a cone. Draw a line from endpoint to endpoint of any segment
along the circumference of the cone's base to recreate the bottom face.
4. rawing a sphere
Advanced tasks, such as drawing a cone or sphere, require experience with several SketchUp
tools and features. You should be competent with the following tools and features before
attempting to draw a sphere:
• The Circle tool
• The Select tool
• The Follow-Me tool
• The Eraser tool
• Inference
Watch this video for further information about this process:
How do I draw a sphere?
One way to draw a sphere is to use the following steps:
1. Draw a circle on the ground plane at the origin. This circle will be used as a path used
to draw the sphere. The size of this circle does not matter.
2. Move the cursor to the origin. The cursor should snap to the origin.
3. Move the cursor up the blue axis (above the circle on the ground plane). The cursor
should turn green or red.
5. 4. Press and hold the Shift key to lock the Circle tool in the green or red inference
direction.
5. Draw a circle, smaller than the first, perpendicular to the circle on the ground plane (this
represents the profile of the sphere).
6. Select the edge of the circle on the ground plane. This is your path.
7. Select the Follow-Me tool.
8. Click on the profile of the sphere. A sphere is created.