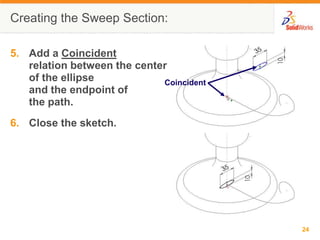
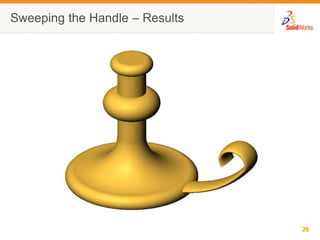
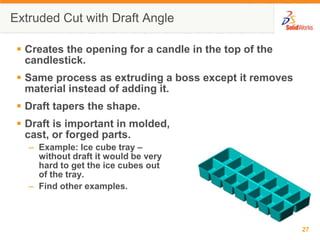
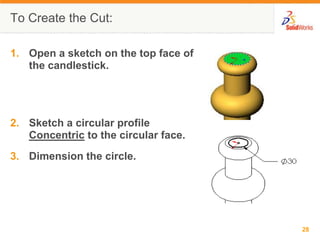
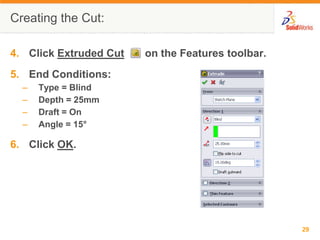
Teaching SolidWorks Software
Lesson 9
                               Peters Township High School
                                      Mr. Burns & Mr. Walsh
                                              CADD Online


                                        Image courtesy of National Optical Astronomy
                                        Observatory, operated by the Association of Universities
                                        for Research in Astronomy, under cooperative
                                        agreement with the National Science Foundation.
Revolve Feature Overview

 A Revolve feature is created by rotating a 2D profile
  sketch around an axis of revolution.
 The profile sketch can use a sketch line or a centerline
  as the axis of revolution.
 The profile sketch cannot cross the axis of revolution.


               Good        Good        No Good

                                                             2
Creating a Revolve Feature

1. Select a sketch plane.
2. Sketch a 2D profile.                       Centerline

3. (Optional) Sketch a centerline.
  –   The axis of revolution must be in the
      sketch with the profile. It cannot be
      in a separate sketch.
  –   The profile must not cross the
      centerline.


                                                      3
Creating a Revolve Feature

4. Click Revolved Boss/Base              .
5. Specify the angle of rotation and click
   OK.
  –   The default angle is 360°, which is right
      99+% of the time.


                                                  4
Creating a Revolve Feature

6. The sketch is revolved around
   the axis of revolution, creating
   the feature.


                                      5
Sketching Arcs – 3 Point Arc

    A 3 Point Arc creates an arc through three points – the
     start, end and midpoint.

To Create a 3 Point Arc:

1.   Click 3 Point Arc     on the Sketch Tools toolbar.
2.   Point to the arc start location and
     click the left mouse button.
3.   Move the pointer to the arc end location.
4.   Click the left mouse button again.


                                                               6
Creating a 3 Point Arc:

5. Drag the arc midpoint to
   establish the radius and
   direction (convex vs. concave).
6. Click the left mouse button a
   third time.


                                     7
Sketching Arcs – Tangent Arc

 The Tangent Arc tool    creates an arc
  that has a smooth transition to an
  existing sketch entity.                  Not Tangent
 Saves the work of sketching an arc and
  then manually adding a geometric
  relation to make it tangent.
                                           Tangent
 Start point of the arc must connect to
  an existing sketch entity.


                                           Not Tangent


                                                         8
To Create a Tangent Arc:
                                        Arc is tangent to
1. Click Tangent Arc    on the            existing line
   Sketch Tools toolbar.
2. Point to the arc start location,
   and click the left mouse
   button.
3. Drag to create the arc.
  –   The arc angle and radius values
      are displayed on the pointer
      when creating arcs.               Arc is tangent to
                                          existing arc
4. Click the left mouse button.


                                                       9
Pointer Feedback

  As you sketch, the pointer provides feedback and
   information about alignment to sketch entities and
   model geometry.


      Horizontal              Midpoint

      Vertical                Intersection
      Parallel                Endpoint, Vertex or Centerpoint
      Perpendicular           On
      Tangent


                                                                10
Inferencing

  Dotted lines appear when you
   sketch, showing alignment                                 Orange
   with other geometry.
  This alignment information                         Blue
   is called inferencing.
  Inference lines are two different colors: orange and
   blue.
   – Orange inference lines capture and add a geometric
     relation such as Tangent.
   – Blue lines show alignment and serve as an aid to
     sketching, but do not actually capture and add a
     geometric relation.
      (Note: Orange inference lines may appear as yellow in the
     SolidWorks graphics view. Orange is used here to aid
     visibility.)                                                     11
Ellipse Sketch Tool

 Used to create the sweep section for the handle of the
  candlestick.
 An Ellipse has two axes:
  – Major axis, labeled A
    at the right.
  – Minor axis labeled B
    at the right.

 Sketching an ellipse is a two-step operation, similar to
  sketching a 3 Point Arc.


                                                             12
To Sketch an Ellipse:

 1. Click Tools, Sketch Entity, Ellipse.
   –   Tip: You can use Tools, Customize to add the Ellipse
       tool    to the Sketch Tools toolbar.

 2. Position the pointer at the center of the ellipse.
 3. Click the left mouse
    button, and then move
    the pointer horizontally
    to define the major axis.
 4. Click the left mouse
    button a second time.


                                                              13
Sketching an Ellipse:

5. Move the pointer vertically to
   define the minor axis.


6. Click the left mouse button a
   third time. This completes
   sketching the ellipse.


                                    14
Fully Defining an Ellipse

Requires 4 pieces of information:

 Location of the center:
  – Either dimension the center or locate it with a
    geometric relation such as Coincident.

 Length of the major axis.
 Length of the minor axis.
 Orientation of the major axis.
  – Even though the ellipse at the right is
    dimensioned, and its center is located
    coincident to the origin, it is free to rotate until
    the orientation of the major axis is defined.


                                                           15
More About Ellipses

 The major axis does not have to be
  horizontal.
 You can dimension half the major
  and/ or minor axis.
  – It is like dimensioning the radius of a
    circle instead of the diameter.

 You do not have to use a geometric
  relation to orient the major axis.
  – A dimension works fine.


                                              16
Trimming Sketch Geometry

 The Trim tool   is used to delete a sketch segment.
 Power trim   is the quickest and most intuitive
  method. Other methods are useful in certain
  circumstances.
 With Power trim, segments are deleted up to their
  intersection with another sketch entity.
 The entire sketch segment is deleted if it does not
  intersect any other sketch entity.
 To use Power trim, click and drag the pointer over the
  segment(s) to be removed. Multiple segments can be
  deleted in one operation.
                                                           17
To Trim a Sketch Entity:

1. Click Trim     on the Sketch
   Tools toolbar.
2. Select Power trim    .
3. Position the pointer
   adjacent to the segment to
   be trimmed, and click and
   hold the left mouse button.
4. Drag the cursor across the
   segment, and release the
   mouse button.
5. The segment is deleted.

                                  18
Sweep Overview

 The Sweep feature is created by
  moving a 2D profile along a path.
                                      Section
 A Sweep feature is used to create
  the handle on the candlestick.
 The Sweep feature requires two         Path
  sketches:
  – Sweep Path
  – Sweep Section


                                                19
Sweep Overview – Rules

 The sweep path is a set of sketched curves contained in
  a sketch, a curve, or a set of model edges.
 The sweep section must be a closed contour.
 The start point of the path must lie on the plane of the
  sweep section.
 The section, path or the resulting solid cannot be self-
  intersecting.


                                                             20
Sweep Overview – Tips

 Make the sweep path first. Then make the section.
 Create small cross sections away from other part
  geometry.
 Then move the sweep section into position by adding a
  Coincident or Pierce relation to the end of the sweep
  path.


                                                          21
To Create the Sweep Path:

1. Open a sketch on the
   Front plane.
2. Sketch the Sweep path
   using the Line and
   Tangent Arc sketch
   tools.
3. Dimension as shown.
4. Close the sketch.


                            22
To Create the Sweep Section:

1. Open a sketch on the Right plane.
2. Sketch the Sweep section
   using the Ellipse sketch
   tool.
3. Add a Horizontal relation
   between the center of the ellipse
   and one end of the
   major axis.                         Horizontal

4. Dimension the major and
   minor axes of the ellipse.


                                                    23
Creating the Sweep Section:

5. Add a Coincident
   relation between the center
   of the ellipse            Coincident
   and the endpoint of
   the path.
6. Close the sketch.


                                          24
To Sweep the Handle:

1. Click Swept Boss/Base    on the
   Features toolbar.
2. Select the Sweep path sketch.
3. Select the Sweep section sketch.
4. Click OK.


                                      25
Sweeping the Handle – Results


                                26
Extruded Cut with Draft Angle

  Creates the opening for a candle in the top of the
   candlestick.
  Same process as extruding a boss except it removes
   material instead of adding it.
  Draft tapers the shape.
  Draft is important in molded,
   cast, or forged parts.
   – Example: Ice cube tray –
     without draft it would be very
     hard to get the ice cubes out
     of the tray.
   – Find other examples.


                                                        27
To Create the Cut:

1. Open a sketch on the top face of
   the candlestick.


2. Sketch a circular profile
   Concentric to the circular face.
3. Dimension the circle.


                                      28
Creating the Cut:

4. Click Extruded Cut   on the Features toolbar.
5. End Conditions:
  –   Type = Blind
  –   Depth = 25mm
  –   Draft = On
  –   Angle = 15°

6. Click OK.


                                                   29
Best Practice – Keep it Simple

  Do not use a sweep feature
   when a revolve or extrude
   will work.
  Sweeping a circle along a
   circular path appears to
   give the same result as a
   revolve feature.
                                        Revolve
  However, the revolve feature:
   – Is mathematically less complex
   – Is easier to sketch – one sketch
     vs. two


                                        Sweep
                                                  30

Lessonrevolve

  • 1.
    Teaching SolidWorks Software Lesson9 Peters Township High School Mr. Burns & Mr. Walsh CADD Online Image courtesy of National Optical Astronomy Observatory, operated by the Association of Universities for Research in Astronomy, under cooperative agreement with the National Science Foundation.
  • 2.
    Revolve Feature Overview A Revolve feature is created by rotating a 2D profile sketch around an axis of revolution.  The profile sketch can use a sketch line or a centerline as the axis of revolution.  The profile sketch cannot cross the axis of revolution. Good Good No Good 2
  • 3.
    Creating a RevolveFeature 1. Select a sketch plane. 2. Sketch a 2D profile. Centerline 3. (Optional) Sketch a centerline. – The axis of revolution must be in the sketch with the profile. It cannot be in a separate sketch. – The profile must not cross the centerline. 3
  • 4.
    Creating a RevolveFeature 4. Click Revolved Boss/Base . 5. Specify the angle of rotation and click OK. – The default angle is 360°, which is right 99+% of the time. 4
  • 5.
    Creating a RevolveFeature 6. The sketch is revolved around the axis of revolution, creating the feature. 5
  • 6.
    Sketching Arcs –3 Point Arc  A 3 Point Arc creates an arc through three points – the start, end and midpoint. To Create a 3 Point Arc: 1. Click 3 Point Arc on the Sketch Tools toolbar. 2. Point to the arc start location and click the left mouse button. 3. Move the pointer to the arc end location. 4. Click the left mouse button again. 6
  • 7.
    Creating a 3Point Arc: 5. Drag the arc midpoint to establish the radius and direction (convex vs. concave). 6. Click the left mouse button a third time. 7
  • 8.
    Sketching Arcs –Tangent Arc  The Tangent Arc tool creates an arc that has a smooth transition to an existing sketch entity. Not Tangent  Saves the work of sketching an arc and then manually adding a geometric relation to make it tangent. Tangent  Start point of the arc must connect to an existing sketch entity. Not Tangent 8
  • 9.
    To Create aTangent Arc: Arc is tangent to 1. Click Tangent Arc on the existing line Sketch Tools toolbar. 2. Point to the arc start location, and click the left mouse button. 3. Drag to create the arc. – The arc angle and radius values are displayed on the pointer when creating arcs. Arc is tangent to existing arc 4. Click the left mouse button. 9
  • 10.
    Pointer Feedback As you sketch, the pointer provides feedback and information about alignment to sketch entities and model geometry. Horizontal Midpoint Vertical Intersection Parallel Endpoint, Vertex or Centerpoint Perpendicular On Tangent 10
  • 11.
    Inferencing  Dottedlines appear when you sketch, showing alignment Orange with other geometry.  This alignment information Blue is called inferencing.  Inference lines are two different colors: orange and blue. – Orange inference lines capture and add a geometric relation such as Tangent. – Blue lines show alignment and serve as an aid to sketching, but do not actually capture and add a geometric relation. (Note: Orange inference lines may appear as yellow in the SolidWorks graphics view. Orange is used here to aid visibility.) 11
  • 12.
    Ellipse Sketch Tool Used to create the sweep section for the handle of the candlestick.  An Ellipse has two axes: – Major axis, labeled A at the right. – Minor axis labeled B at the right.  Sketching an ellipse is a two-step operation, similar to sketching a 3 Point Arc. 12
  • 13.
    To Sketch anEllipse: 1. Click Tools, Sketch Entity, Ellipse. – Tip: You can use Tools, Customize to add the Ellipse tool to the Sketch Tools toolbar. 2. Position the pointer at the center of the ellipse. 3. Click the left mouse button, and then move the pointer horizontally to define the major axis. 4. Click the left mouse button a second time. 13
  • 14.
    Sketching an Ellipse: 5.Move the pointer vertically to define the minor axis. 6. Click the left mouse button a third time. This completes sketching the ellipse. 14
  • 15.
    Fully Defining anEllipse Requires 4 pieces of information:  Location of the center: – Either dimension the center or locate it with a geometric relation such as Coincident.  Length of the major axis.  Length of the minor axis.  Orientation of the major axis. – Even though the ellipse at the right is dimensioned, and its center is located coincident to the origin, it is free to rotate until the orientation of the major axis is defined. 15
  • 16.
    More About Ellipses The major axis does not have to be horizontal.  You can dimension half the major and/ or minor axis. – It is like dimensioning the radius of a circle instead of the diameter.  You do not have to use a geometric relation to orient the major axis. – A dimension works fine. 16
  • 17.
    Trimming Sketch Geometry The Trim tool is used to delete a sketch segment.  Power trim is the quickest and most intuitive method. Other methods are useful in certain circumstances.  With Power trim, segments are deleted up to their intersection with another sketch entity.  The entire sketch segment is deleted if it does not intersect any other sketch entity.  To use Power trim, click and drag the pointer over the segment(s) to be removed. Multiple segments can be deleted in one operation. 17
  • 18.
    To Trim aSketch Entity: 1. Click Trim on the Sketch Tools toolbar. 2. Select Power trim . 3. Position the pointer adjacent to the segment to be trimmed, and click and hold the left mouse button. 4. Drag the cursor across the segment, and release the mouse button. 5. The segment is deleted. 18
  • 19.
    Sweep Overview  TheSweep feature is created by moving a 2D profile along a path. Section  A Sweep feature is used to create the handle on the candlestick.  The Sweep feature requires two Path sketches: – Sweep Path – Sweep Section 19
  • 20.
    Sweep Overview –Rules  The sweep path is a set of sketched curves contained in a sketch, a curve, or a set of model edges.  The sweep section must be a closed contour.  The start point of the path must lie on the plane of the sweep section.  The section, path or the resulting solid cannot be self- intersecting. 20
  • 21.
    Sweep Overview –Tips  Make the sweep path first. Then make the section.  Create small cross sections away from other part geometry.  Then move the sweep section into position by adding a Coincident or Pierce relation to the end of the sweep path. 21
  • 22.
    To Create theSweep Path: 1. Open a sketch on the Front plane. 2. Sketch the Sweep path using the Line and Tangent Arc sketch tools. 3. Dimension as shown. 4. Close the sketch. 22
  • 23.
    To Create theSweep Section: 1. Open a sketch on the Right plane. 2. Sketch the Sweep section using the Ellipse sketch tool. 3. Add a Horizontal relation between the center of the ellipse and one end of the major axis. Horizontal 4. Dimension the major and minor axes of the ellipse. 23
  • 24.
    Creating the SweepSection: 5. Add a Coincident relation between the center of the ellipse Coincident and the endpoint of the path. 6. Close the sketch. 24
  • 25.
    To Sweep theHandle: 1. Click Swept Boss/Base on the Features toolbar. 2. Select the Sweep path sketch. 3. Select the Sweep section sketch. 4. Click OK. 25
  • 26.
    Sweeping the Handle– Results 26
  • 27.
    Extruded Cut withDraft Angle  Creates the opening for a candle in the top of the candlestick.  Same process as extruding a boss except it removes material instead of adding it.  Draft tapers the shape.  Draft is important in molded, cast, or forged parts. – Example: Ice cube tray – without draft it would be very hard to get the ice cubes out of the tray. – Find other examples. 27
  • 28.
    To Create theCut: 1. Open a sketch on the top face of the candlestick. 2. Sketch a circular profile Concentric to the circular face. 3. Dimension the circle. 28
  • 29.
    Creating the Cut: 4.Click Extruded Cut on the Features toolbar. 5. End Conditions: – Type = Blind – Depth = 25mm – Draft = On – Angle = 15° 6. Click OK. 29
  • 30.
    Best Practice –Keep it Simple  Do not use a sweep feature when a revolve or extrude will work.  Sweeping a circle along a circular path appears to give the same result as a revolve feature. Revolve  However, the revolve feature: – Is mathematically less complex – Is easier to sketch – one sketch vs. two Sweep 30