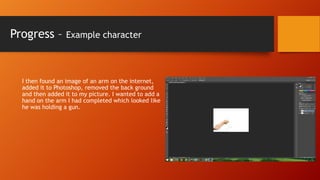
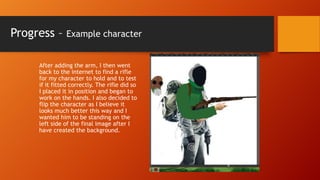
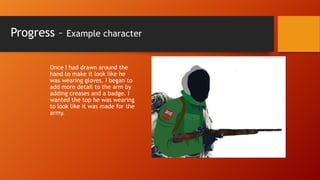
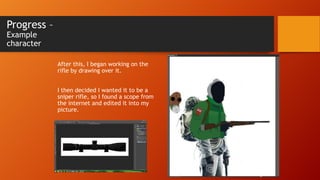
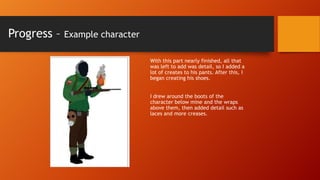
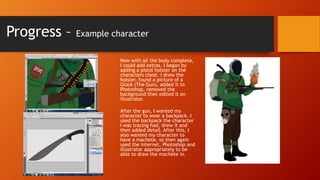
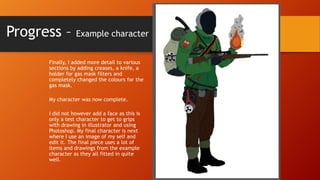
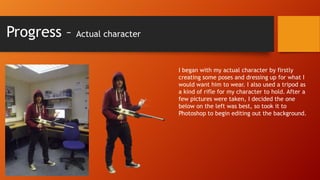
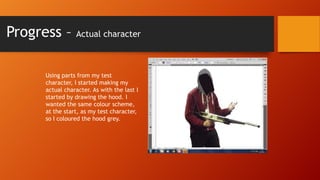
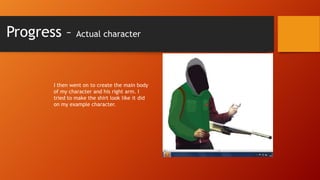
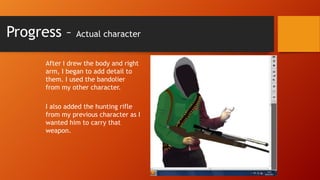
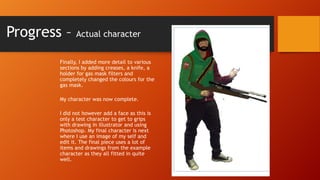
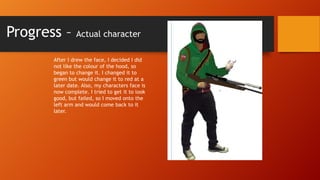
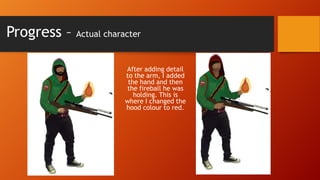
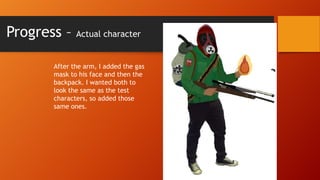
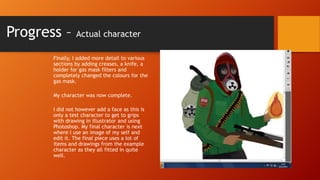
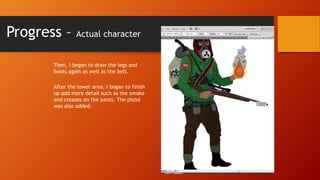
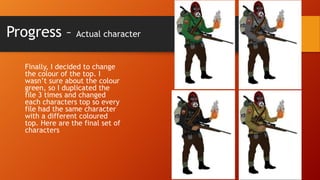
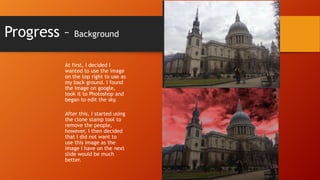
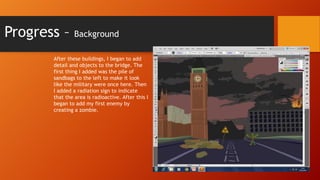
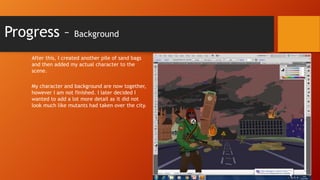
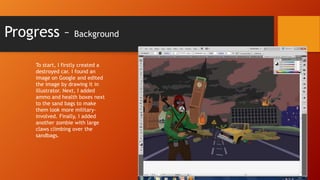
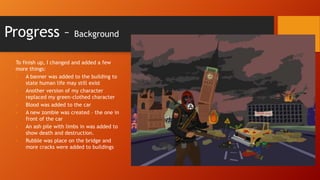
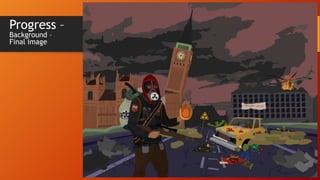
Task 5 - Production
Progress –

Example character

I began by searching for different
images on the internet of characters in
which I could use to create a test
piece. I started by using the image to
the left and drawing the hood in
Illustrator. I then began to draw the
first arm and part of the body, as well
as the gas mask. I wasn’t sure whether
it would be better for this character to
have his gas mask on or off, so I edited
that in another layer and moved it
away.
Progress –

Example character

I then found an image of an arm on the internet,
added it to Photoshop, removed the back ground
and then added it to my picture. I wanted to add a
hand on the arm I had completed which looked like
he was holding a gun.
Progress –

Example character

After adding the arm, I then went
back to the internet to find a rifle
for my character to hold and to test
if it fitted correctly. The rifle did so
I placed it in position and began to
work on the hands. I also decided to
flip the character as I believe it
looks much better this way and I
wanted him to be standing on the
left side of the final image after I
have created the background.
Progress –

Example character

Once I had drawn around the
hand to make it look like he
was wearing gloves, I began to
add more detail to the arm by
adding creases and a badge. I
wanted the top he was wearing
to look like it was made for the
army.
Progress –
Example
character

After this, I began working on the
rifle by drawing over it.
I then decided I wanted it to be a
sniper rifle, so I found a scope from
the internet and edited it into my
picture.
Progress –
Example
character

Here is how the scope
looked when the
image was placed into
position.


This is how the whole
Sniper rifle looks after
completion.

Progress –

Example character

I then began work on the
second arm. I tried to make
his arm look like he was
holding something in front
of him. To create the hand,
I found a good picture of
one on the internet and
edited the hand in. I
changed its colour to look
like the other hand and I
wanted it to look like his is
holding something.
Progress –

Example character

After the hand was completed, I went back to the
main body. I firstly completed the lower half and
added detail.
Since the whole torso was now complete, I could
begin to add the bandolier which you can see on the
image at the bottom. To begin this, I found a picture
of a bullet that would fit into my characters gun,
removed the background in Photoshop and added it
into illustrator where I could draw over it. Using
copy and paste, I created a stream of these bullets
going from top right to bottom left across the
characters body, then I added the brown bandolier
behind it and a holder in front of the bullets.

Next, I went back to the hand and placed fire into
his hand. I drew the flame, then the smoke and then
the glow in that order and then proceeded to add
detail.
Progress –

Example character

Now that the body and arms were
complete, I could move onto the legs,
so began drawing pants. To begin this
lower half, I firstly drew his pants and
coloured them brown with 3 different
shades to show light levels. After the
pants, I began work on a belt for him
to wear that had pockets and a
canteen so he could hold items in
there. I then decided to hook his gas
mask onto his belt.
Progress –

Example character
With this part nearly finished, all that
was left to add was detail, so I added a
lot of creates to his pants. After this, I
began creating his shoes.
I drew around the boots of the
character below mine and the wraps
above them, then added detail such as
laces and more creases.
Progress – Example character
Now with all the body complete,
I could add extras. I began by
adding a pistol holster on the
characters chest. I drew the
holster, found a picture of a
Glock (The Gun), added it to
Photoshop, removed the
background then edited it on
illustrator.
After the gun, I wanted my
character to wear a backpack. I
used the backpack the character
I was tracing had, drew it and
then added detail. After this, I
also wanted my character to
have a machete, so then again
used the internet, Photoshop and
illustrator appropriately to be
able to draw the machete in.
Progress – Example character
Finally, I added more detail to various
sections by adding creases, a knife, a
holder for gas mask filters and
completely changed the colours for the
gas mask.
My character was now complete.
I did not however add a face as this is
only a test character to get to grips
with drawing in illustrator and using
Photoshop. My final character is next
where I use an image of my self and
edit it. The final piece uses a lot of
items and drawings from the example
character as they all fitted in quite
well.
Progress –

Actual character

I began with my actual character by firstly
creating some poses and dressing up for what I
would want him to wear. I also used a tripod as
a kind of rifle for my character to hold. After a
few pictures were taken, I decided the one
below on the left was best, so took it to
Photoshop to begin editing out the background.
Progress –

Actual character

Using parts from my test
character, I started making my
actual character. As with the last I
started by drawing the hood. I
wanted the same colour scheme,
at the start, as my test character,
so I coloured the hood grey.
Progress –

Actual character

I then went on to create the main body
of my character and his right arm. I
tried to make the shirt look like it did
on my example character.
Progress –

Actual character

After I drew the body and right
arm, I began to add detail to
them. I used the bandolier
from my other character.
I also added the hunting rifle
from my previous character as I
wanted him to carry that
weapon.
Progress –

Actual character

I could then move onto the face. The
whole face took a while and at the
end, I didn’t really like it, so I later
decided that it would be best for my
character to wear a gas mask instead. I
also added a badge to his arm.
Progress –

Actual character

Finally, I added more detail to various
sections by adding creases, a knife, a
holder for gas mask filters and
completely changed the colours for the
gas mask.
My character was now complete.

I did not however add a face as this is
only a test character to get to grips
with drawing in illustrator and using
Photoshop. My final character is next
where I use an image of my self and
edit it. The final piece uses a lot of
items and drawings from the example
character as they all fitted in quite
well.
Progress –

Actual character

After I drew the face, I decided I did
not like the colour of the hood, so
began to change it. I changed it to
green but would change it to red at a
later date. Also, my characters face is
now complete. I tried to get it to look
good, but failed, so I moved onto the
left arm and would come back to it
later.
Progress –

Actual character

After adding detail
to the arm, I added
the hand and then
the fireball he was
holding. This is
where I changed the
hood colour to red.
Progress –

Actual character

After the arm, I added the gas
mask to his face and then the
backpack. I wanted both to
look the same as the test
characters, so added those
same ones.
Progress –

Actual character

Finally, I added more detail to various
sections by adding creases, a knife, a
holder for gas mask filters and
completely changed the colours for the
gas mask.
My character was now complete.
I did not however add a face as this is
only a test character to get to grips
with drawing in illustrator and using
Photoshop. My final character is next
where I use an image of my self and
edit it. The final piece uses a lot of
items and drawings from the example
character as they all fitted in quite
well.
Progress –

Actual character

Then, I began to draw the legs and
boots again as well as the belt.
After the lower area, I began to finish
up add more detail such as the smoke
and creases on the pants. The pistol
was also added.
Progress –

Actual character

Finally, I decided to change
the colour of the top. I
wasn’t sure about the colour
green, so I duplicated the
file 3 times and changed
each characters top so every
file had the same character
with a different coloured
top. Here are the final set of
characters
Progress
Background and Final Image design
Progress –

Background

At first, I decided I
wanted to use the image
on the top right to use as
my back ground. I found
the image on google,
took it to Photoshop and
began to edit the sky.
After this, I started using
the clone stamp tool to
remove the people,
however, I then decided
that I did not want to
use this image as the
image I have on the next
slide would be much
better.
Progress –

Background

I firstly began searching
Google for images of
London. After I found the
image on the top right, I
took it to Photoshop to
edit the sky.
In Photoshop, I began by
separating the sky and
ground/buildings. After
this I used a filter effect
to change the colour of
the sky to red. The
Neon Glow effect.
Progress –

Background

After I sorted the background in Photoshop, I
began editing the image illustrator. I started by
drawing the main building here which is Big Ben.
After I drew the tower I added detail.
After the tower, I began drawing the smaller
towers on the left. After this, I again added
detail.
Progress –
Background

After the houses of parliament, I then moved on to the bridge. I drew a
basic shape of the bridge with walls first, then I decided to use the
direct selection tool to manipulate the points to make the bridge look
broken. After this, I added detail.
Progress –

Background

I then changed some colours on the building on
the right, made it look more destroyed and then
added a helicopter (which I edited in Photoshop
and drew in illustrator) to the roof to make it
look crashed
Progress –

Background

After these buildings, I began to add
detail and objects to the bridge. The
first thing I added was the pile of
sandbags to the left to make it look
like the military were once here. Then
I added a radiation sign to indicate
that the area is radioactive. After this I
began to add my first enemy by
creating a zombie.
Progress –

Background

After this, I created another pile of sand bags
and then added my actual character to the
scene.
My character and background are now together,
however I am not finished. I later decided I
wanted to add a lot more detail as it did not
look much like mutants had taken over the city.
Progress –

Background

To start, I firstly created a
destroyed car. I found an
image on Google and edited
the image by drawing it in
illustrator. Next, I added
ammo and health boxes next
to the sand bags to make
them look more militaryinvolved. Finally, I added
another zombie with large
claws climbing over the
sandbags.
Progress –

Background

To finish up, I changed and added a few
more things:
•
A banner was added to the building to
state human life may still exist
•
Another version of my character
replaced my green-clothed character
•
Blood was added to the car
•
A new zombie was created – the one in
front of the car
•
An ash pile with limbs in was added to
show death and destruction.
•
Rubble was place on the bridge and
more cracks were added to buildings
Progress –
Background –
Final image

Task 5 production

  • 1.
    Task 5 -Production
  • 2.
    Progress – Example character Ibegan by searching for different images on the internet of characters in which I could use to create a test piece. I started by using the image to the left and drawing the hood in Illustrator. I then began to draw the first arm and part of the body, as well as the gas mask. I wasn’t sure whether it would be better for this character to have his gas mask on or off, so I edited that in another layer and moved it away.
  • 3.
    Progress – Example character Ithen found an image of an arm on the internet, added it to Photoshop, removed the back ground and then added it to my picture. I wanted to add a hand on the arm I had completed which looked like he was holding a gun.
  • 4.
    Progress – Example character Afteradding the arm, I then went back to the internet to find a rifle for my character to hold and to test if it fitted correctly. The rifle did so I placed it in position and began to work on the hands. I also decided to flip the character as I believe it looks much better this way and I wanted him to be standing on the left side of the final image after I have created the background.
  • 5.
    Progress – Example character OnceI had drawn around the hand to make it look like he was wearing gloves, I began to add more detail to the arm by adding creases and a badge. I wanted the top he was wearing to look like it was made for the army.
  • 6.
    Progress – Example character After this,I began working on the rifle by drawing over it. I then decided I wanted it to be a sniper rifle, so I found a scope from the internet and edited it into my picture.
  • 7.
    Progress – Example character Here ishow the scope looked when the image was placed into position.  This is how the whole Sniper rifle looks after completion. 
  • 8.
    Progress – Example character Ithen began work on the second arm. I tried to make his arm look like he was holding something in front of him. To create the hand, I found a good picture of one on the internet and edited the hand in. I changed its colour to look like the other hand and I wanted it to look like his is holding something.
  • 9.
    Progress – Example character Afterthe hand was completed, I went back to the main body. I firstly completed the lower half and added detail. Since the whole torso was now complete, I could begin to add the bandolier which you can see on the image at the bottom. To begin this, I found a picture of a bullet that would fit into my characters gun, removed the background in Photoshop and added it into illustrator where I could draw over it. Using copy and paste, I created a stream of these bullets going from top right to bottom left across the characters body, then I added the brown bandolier behind it and a holder in front of the bullets. Next, I went back to the hand and placed fire into his hand. I drew the flame, then the smoke and then the glow in that order and then proceeded to add detail.
  • 10.
    Progress – Example character Nowthat the body and arms were complete, I could move onto the legs, so began drawing pants. To begin this lower half, I firstly drew his pants and coloured them brown with 3 different shades to show light levels. After the pants, I began work on a belt for him to wear that had pockets and a canteen so he could hold items in there. I then decided to hook his gas mask onto his belt.
  • 11.
    Progress – Example character Withthis part nearly finished, all that was left to add was detail, so I added a lot of creates to his pants. After this, I began creating his shoes. I drew around the boots of the character below mine and the wraps above them, then added detail such as laces and more creases.
  • 12.
    Progress – Examplecharacter Now with all the body complete, I could add extras. I began by adding a pistol holster on the characters chest. I drew the holster, found a picture of a Glock (The Gun), added it to Photoshop, removed the background then edited it on illustrator. After the gun, I wanted my character to wear a backpack. I used the backpack the character I was tracing had, drew it and then added detail. After this, I also wanted my character to have a machete, so then again used the internet, Photoshop and illustrator appropriately to be able to draw the machete in.
  • 13.
    Progress – Examplecharacter Finally, I added more detail to various sections by adding creases, a knife, a holder for gas mask filters and completely changed the colours for the gas mask. My character was now complete. I did not however add a face as this is only a test character to get to grips with drawing in illustrator and using Photoshop. My final character is next where I use an image of my self and edit it. The final piece uses a lot of items and drawings from the example character as they all fitted in quite well.
  • 14.
    Progress – Actual character Ibegan with my actual character by firstly creating some poses and dressing up for what I would want him to wear. I also used a tripod as a kind of rifle for my character to hold. After a few pictures were taken, I decided the one below on the left was best, so took it to Photoshop to begin editing out the background.
  • 15.
    Progress – Actual character Usingparts from my test character, I started making my actual character. As with the last I started by drawing the hood. I wanted the same colour scheme, at the start, as my test character, so I coloured the hood grey.
  • 16.
    Progress – Actual character Ithen went on to create the main body of my character and his right arm. I tried to make the shirt look like it did on my example character.
  • 17.
    Progress – Actual character AfterI drew the body and right arm, I began to add detail to them. I used the bandolier from my other character. I also added the hunting rifle from my previous character as I wanted him to carry that weapon.
  • 18.
    Progress – Actual character Icould then move onto the face. The whole face took a while and at the end, I didn’t really like it, so I later decided that it would be best for my character to wear a gas mask instead. I also added a badge to his arm.
  • 19.
    Progress – Actual character Finally,I added more detail to various sections by adding creases, a knife, a holder for gas mask filters and completely changed the colours for the gas mask. My character was now complete. I did not however add a face as this is only a test character to get to grips with drawing in illustrator and using Photoshop. My final character is next where I use an image of my self and edit it. The final piece uses a lot of items and drawings from the example character as they all fitted in quite well.
  • 20.
    Progress – Actual character AfterI drew the face, I decided I did not like the colour of the hood, so began to change it. I changed it to green but would change it to red at a later date. Also, my characters face is now complete. I tried to get it to look good, but failed, so I moved onto the left arm and would come back to it later.
  • 21.
    Progress – Actual character Afteradding detail to the arm, I added the hand and then the fireball he was holding. This is where I changed the hood colour to red.
  • 22.
    Progress – Actual character Afterthe arm, I added the gas mask to his face and then the backpack. I wanted both to look the same as the test characters, so added those same ones.
  • 23.
    Progress – Actual character Finally,I added more detail to various sections by adding creases, a knife, a holder for gas mask filters and completely changed the colours for the gas mask. My character was now complete. I did not however add a face as this is only a test character to get to grips with drawing in illustrator and using Photoshop. My final character is next where I use an image of my self and edit it. The final piece uses a lot of items and drawings from the example character as they all fitted in quite well.
  • 24.
    Progress – Actual character Then,I began to draw the legs and boots again as well as the belt. After the lower area, I began to finish up add more detail such as the smoke and creases on the pants. The pistol was also added.
  • 25.
    Progress – Actual character Finally,I decided to change the colour of the top. I wasn’t sure about the colour green, so I duplicated the file 3 times and changed each characters top so every file had the same character with a different coloured top. Here are the final set of characters
  • 26.
  • 27.
    Progress – Background At first,I decided I wanted to use the image on the top right to use as my back ground. I found the image on google, took it to Photoshop and began to edit the sky. After this, I started using the clone stamp tool to remove the people, however, I then decided that I did not want to use this image as the image I have on the next slide would be much better.
  • 28.
    Progress – Background I firstlybegan searching Google for images of London. After I found the image on the top right, I took it to Photoshop to edit the sky. In Photoshop, I began by separating the sky and ground/buildings. After this I used a filter effect to change the colour of the sky to red. The Neon Glow effect.
  • 29.
    Progress – Background After Isorted the background in Photoshop, I began editing the image illustrator. I started by drawing the main building here which is Big Ben. After I drew the tower I added detail. After the tower, I began drawing the smaller towers on the left. After this, I again added detail.
  • 30.
    Progress – Background After thehouses of parliament, I then moved on to the bridge. I drew a basic shape of the bridge with walls first, then I decided to use the direct selection tool to manipulate the points to make the bridge look broken. After this, I added detail.
  • 31.
    Progress – Background I thenchanged some colours on the building on the right, made it look more destroyed and then added a helicopter (which I edited in Photoshop and drew in illustrator) to the roof to make it look crashed
  • 32.
    Progress – Background After thesebuildings, I began to add detail and objects to the bridge. The first thing I added was the pile of sandbags to the left to make it look like the military were once here. Then I added a radiation sign to indicate that the area is radioactive. After this I began to add my first enemy by creating a zombie.
  • 33.
    Progress – Background After this,I created another pile of sand bags and then added my actual character to the scene. My character and background are now together, however I am not finished. I later decided I wanted to add a lot more detail as it did not look much like mutants had taken over the city.
  • 34.
    Progress – Background To start,I firstly created a destroyed car. I found an image on Google and edited the image by drawing it in illustrator. Next, I added ammo and health boxes next to the sand bags to make them look more militaryinvolved. Finally, I added another zombie with large claws climbing over the sandbags.
  • 35.
    Progress – Background To finishup, I changed and added a few more things: • A banner was added to the building to state human life may still exist • Another version of my character replaced my green-clothed character • Blood was added to the car • A new zombie was created – the one in front of the car • An ash pile with limbs in was added to show death and destruction. • Rubble was place on the bridge and more cracks were added to buildings
  • 36.