Surveying by using Digital Theodolite
•
38 likes•36,464 views

This document provides instructions for using a digital theodolite to take horizontal and vertical angle measurements of reference points by following several steps: 1) Setting up the tripod and centering the theodolite over a reference mark. 2) Leveling the theodolite using circular and plate levels to precisely align it. 3) Taking multiple rounds of horizontal and vertical angle measurements in both face-left and face-right positions to reference points, and calculating the mean values. 4) Packing up the theodolite by reversing the setup steps.

Recommended
More Related Content
What's hot
What's hot (20)
Viewers also liked
Viewers also liked (15)
Similar to Surveying by using Digital Theodolite
Similar to Surveying by using Digital Theodolite (20)
More from Ehab AL-Timimi
More from Ehab AL-Timimi (9)
Surveying by using Digital Theodolite
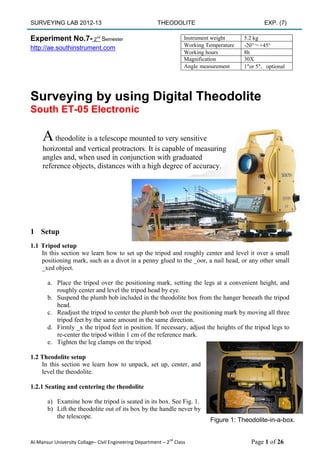
- 1. SURVEYING LAB 2012-13 THEODOLITE EXP. (7) Al-Mansur University Collage– Civil Engineering Department – 2nd Class Page 1 of 26 Experiment No.7- 2nd Semester http://ae.southinstrument.com Surveying by using Digital Theodolite South ET-05 Electronic 1 Setup 1.1 Tripod setup In this section we learn how to set up the tripod and roughly center and level it over a small positioning mark, such as a divot in a penny glued to the _oor, a nail head, or any other small _xed object. a. Place the tripod over the positioning mark, setting the legs at a convenient height, and roughly center and level the tripod head by eye. b. Suspend the plumb bob included in the theodolite box from the hanger beneath the tripod head. c. Readjust the tripod to center the plumb bob over the positioning mark by moving all three tripod feet by the same amount in the same direction. d. Firmly _x the tripod feet in position. If necessary, adjust the heights of the tripod legs to re-center the tripod within 1 cm of the reference mark. e. Tighten the leg clamps on the tripod. 1.2 Theodolite setup In this section we learn how to unpack, set up, center, and level the theodolite. 1.2.1 Seating and centering the theodolite a) Examine how the tripod is seated in its box. See Fig. 1. b) Lift the theodolite out of its box by the handle never by the telescope. Instrument weight 5.2 kg Working Temperature -20°~+45° Working hours 8h Magnification 30X Angle measurement 1″or 5″,optional A theodolite is a telescope mounted to very sensitive horizontal and vertical protractors. It is capable of measuring angles and, when used in conjunction with graduated reference objects, distances with a high degree of accuracy. Figure 1: Theodolite-in-a-box.
- 2. SURVEYING LAB 2012-13 THEODOLITE EXP. (7) Al-Mansur University Collage– Civil Engineering Department – 2nd Class Page 2 of 26 a) Place the theodolite on the tripod head and screw in the centering screw while holding onto the handle. Leave the centering screw just loose enough that the theodolite can still slide around the tripod head. b) Looking through the optical plummet, focus the centering index mark. Slide the theodolite on the tripod head until the reference mark is centered in the optical plummet. c) Fully tighten the centering screw. Look through the optical plummet again and adjust the theodolite foot screws for _ne alignment with the reference mark. 1.2.2 Leveling the theodolite A. Referring to Fig. 2, roughly level the instrument using the circular level: 1. Turn the leveling screws A and B in opposite directions to center the bubble along the AB axis. 2. Turn leveling screw C to bring the bubble to the center of the circular level. B. Referring to Fig. 3, precisely level the instrument using the plate level. 1. Free the horizontal motion clamp and rotate the instrument horizontally until the plate level is parallel with line AB. 2. Bring the bubble to the center of the plate level by turning screws A and B in opposite directions. 3. Rotate the instrument by 90◦ around its vertical axis and turn screw C to center the bubble once more. 4. Repeat procedures i. and ii. for each 90◦ rotation of the instrument and check that the bubble is correctly centered for all four points. If after 180◦ of rotation, the bubble is of center, remove half the error in the bubble centering. Check that when you have swung another 180◦ back to the initial point, the bubble offset is the same as t he offset you allowed to remain in the 180◦ rotated position. Once the theodolite is leveled, double check the optical plummet to make sure that it is still centered. If not, repeat the procedure in section 1.2.1 (d) through all of section 1.2.2. 2 Measurements In this section we learn how to take accurate readings of horizontal and vertical angles using a theodolite. Figure 2: Diagram for rough leveling with the circular level. Leveling screw C Leveling screw A Leveling screw B Leveling screw A Leveling screw B Leveling screw C Figure 3: Diagram for _ne leveling with the plate level.
- 3. SURVEYING LAB 2012-13 THEODOLITE EXP. (7) Al-Mansur University Collage– Civil Engineering Department – 2nd Class Page 3 of 26 f. Determine how many reference points you will need to measure, and make sure that their horizontal and vertical positions are clearly marked. In order of measurement, these reference points will be referred to as X, Y and Z in these instructions. g. Turn on the theodolite by pressing the green power key. 2.1 Horizontal measurement To avoid confusion, all horizontal angle measurements should be completed before taking vertical angle measurements. (a) Take face-left angle measurements. 1. Rotate the telescope about the turning axis until the instrument is in face-left position. 2. Press the OSET key and rotate the telescope horizontally to give a reading between 0◦ and 1◦. 3. Press HOLD to lock this value. 4. After making sure no one is in the telescope line of sight, press the laser on button on top of the telescope. Free the horizontal and vertical clamps and swing the laser spot to reference point X.3 5. Roughly align the laser spot and focus it using the focusing ring on the telescope. Tighten the horizontal and vertical clamps. Turn o_ the laser. 6. Place a blank sheet of paper in front of the telescope, and, looking through the telescope, focus the crosshairs using the eyepiece. 7. Remove the paper and focus the telescope on the reference object using the focusing ring. 8. Check for parallax by moving your head up and down and left to right. If the crosshairs move, refocus the crosshairs, and refocus the reference object as described above. 9. Looking through the telescope, home in on the reference object using the slow-motion screws. For horizontal angle measurements, the vertical crosshair must be perfectly aligned with the reference point, but the horizontal crosshair need not be, as long as approximately the same part of the vertical crosshair is used for each horizontal measurement. 10. Check the telescope pointing, book the horizontal angle reading, and check the booking. 11. Release the HOLD key (only applies to the very first reading). 12. Repeat steps 4 to 10 for reference points Y, Z, etc. (b) Take face-right angle measurements to complete a round of angles. 1. Rotate the telescope about the turning axis until the instrument is in face-right position. 2. Repeat steps (a) 4 - 10 in the face-right position. Now you've booked a series of angles between 0◦ and 360◦ and a series between 360◦ and 720◦. This completes a round of angles. (c) Take at least one more round of angles using an initial horizontal reading between 90◦ and 91◦ for the second round, 180◦ and 181◦ for the third round, etc. If you take only two rounds of angles, make sure that the readings agree within twice the precision of the theodolite. (d) Once the desired precision is achieved, take the mean value of the measured angles. 2.2 Vertical measurement The vertical angle scale is referenced absolutely to the ground, so it is impossible to use different initial readings for the multiple rounds of angles. (a) Take face-left angle measurements. 1. Rotate the telescope about the turning axis until the instrument is in face-left position.
- 4. SURVEYING LAB 2012-13 THEODOLITE EXP. (7) Al-Mansur University Collage– Civil Engineering Department – 2nd Class Page 4 of 26 2. After making sure no one is in the telescope line of sight, press the laser on button on top of the telescope. Free the horizontal and vertical clamps and swing the laser spot to reference point X. 3. Roughly align the laser spot and focus it using the focusing ring on the telescope. Tighten the horizontal and vertical clamps. Turn o_ the laser. 4. Place a blank sheet of paper in front of the telescope, and, looking through the telescope, focus the crosshairs using the eyepiece. 5. Remove the paper and focus the telescope on the reference object using the focusing ring. 6. Check for parallax by moving your head up and down and left to right. If the crosshairs move, refocus the crosshairs, and refocus the reference object as described above. 7. Looking through the telescope, home in on the reference object using the slow-motion screws. For vertical angle measurements, the horizontal crosshair must be perfectly aligned with the reference point, but the vertical crosshair need not be, as long as approximately the same part of the horizontal crosshair is used for each vertical measurement. 8. Check the telescope pointing, book the vertical angle reading, and check the booking. 9. Repeat steps ii. to viii. for reference points Y, Z, etc. (b) Take face-right angle measurements to complete a round of angles. 1. Rotate the telescope about the turning axis until the instrument is in face-right position. 2. Repeat steps (a) ii. - ix. in the face-right position. This completes a round of angles. (c) Take at least one more round of angles. If you take only two rounds of angles, make sure that the readings agree within twice the precision of the theodolite. (d) Once desired precision is achieved, take the mean value of the angles measured. 3 Packing up 1. Open the theodolite box. 2. Turn o_ the theodolite. 3. Align the theodolite as it was before packing. Refer to Fig. 1. 4. Bring the theodolite foot screws to the center of their travel. 5. Holding the theodolite handle with one hand, undo the centering screw with the other. 6. Put the theodolite back in the box in its original position and close the clasps. Refer to Fig. 1. 7. Being careful not to disturb the positioning mark, lift the tripod away, collapse it, and put it away.
- 5. SURVEYING LAB 2012-13 THEODOLITE EXP. (7) Al-Mansur University Collage– Civil Engineering Department – 2nd Class Page 5 of 26 4 Glossary of terms Gradient - An alternative to measuring vertical angles in degrees, the gradient is defending as the tangent of the vertical angle with respect to the horizontal times 100%. For example, a gradient of -50% means a slope of 22:5◦ below the horizontal. Face left - The theodolite position in which the vertical circle is on the viewer's left while he looks into the telescope. Face right - The theodolite position in which the vertical circle is on the viewer's right while he looks into the telescope. Horizontal circle - The graduated circle in the horizontal plane that the theodolite reads out to measure horizontal angles. Horizontal clamp - Thumbscrew that can be used to _x the angle of the theodolite with respect to the Vertical axis. When the horizontal clamp is tight, the instrument can be translated horizontally with the slow-motion screw. Line of collimation - The line of sight through the center of the telescope crosshairs. Optical plummet - Small telescope whose eyepiece is near the bottom of the theodolite that looks at the directly beneath the theodolite and is used for centering. Round of angles - A complete set of angle measurements performed _rst in the face-left, then in the face-right position. Slow-motion screw - The _ne adjustment screw used to translate the theodolite in the horizontal or vertical plane when the horizontal or vertical clamp is tightened. Tangent screw - See slow-motion screw. Trunnion axis - The axis about which the telescope pivots. Vertical axis - The axis about which the horizontal circle pivots. Vertical circle - The graduated circle in the vertical plane that the theodolite reads out to measure vertical angles.
- 6. SURVEYING LAB 2012-13 THEODOLITE EXP. (7) Al-Mansur University Collage– Civil Engineering Department – 2nd Class Page 6 of 26
- 7. SURVEYING LAB 2012-13 THEODOLITE EXP. (7) Al-Mansur University Collage– Civil Engineering Department – 2nd Class Page 7 of 26
- 8. SURVEYING LAB 2012-13 THEODOLITE EXP. (7) Al-Mansur University Collage– Civil Engineering Department – 2nd Class Page 8 of 26 Accessories Digital LCD monitor The Keys
- 9. SURVEYING LAB 2012-13 THEODOLITE EXP. (7) Al-Mansur University Collage– Civil Engineering Department – 2nd Class Page 9 of 26 Battery Laser theodolite
- 10. SURVEYING LAB 2012-13 THEODOLITE EXP. (7) Al-Mansur University Collage– Civil Engineering Department – 2nd Class Page 10 of 26
- 11. SURVEYING LAB 2012-13 THEODOLITE EXP. (7) Al-Mansur University Collage– Civil Engineering Department – 2nd Class Page 11 of 26
- 12. SURVEYING LAB 2012-13 THEODOLITE EXP. (7) Al-Mansur University Collage– Civil Engineering Department – 2nd Class Page 12 of 26
- 13. SURVEYING LAB 2012-13 THEODOLITE EXP. (7) Al-Mansur University Collage– Civil Engineering Department – 2nd Class Page 13 of 26
- 14. SURVEYING LAB 2012-13 THEODOLITE EXP. (7) Al-Mansur University Collage– Civil Engineering Department – 2nd Class Page 14 of 26
- 15. SURVEYING LAB 2012-13 THEODOLITE EXP. (7) Al-Mansur University Collage– Civil Engineering Department – 2nd Class Page 15 of 26 6. BASIC SURVEY 6.1 Observation from Normal/Reversed Position ―Normal position telescope‖ means that the shaft disc is on the left side of the telescope when observers face eyepiece lens (see figure). ―Reversed position telescope‖ means that the shaft disc is on the right side of the telescope when observers face eyepiece lens. In angle measuring, we should get the measuring result through averaging the two values got from both observations above. And only in this way can the influence caused by the instrument’s systematic errors be eliminated effectively. Therefore, when doing horizontal and vertical observation, rotate telescope 180°to do normal position observation after finishing reversed position observation
- 16. SURVEYING LAB 2012-13 THEODOLITE EXP. (7) Al-Mansur University Collage– Civil Engineering Department – 2nd Class Page 16 of 26 6.2 Horizontal Angle “0” Setting (0 SET)
- 17. SURVEYING LAB 2012-13 THEODOLITE EXP. (7) Al-Mansur University Collage– Civil Engineering Department – 2nd Class Page 17 of 26
- 18. SURVEYING LAB 2012-13 THEODOLITE EXP. (7) Al-Mansur University Collage– Civil Engineering Department – 2nd Class Page 18 of 26 6.7 Measure Zenith Distance and Vertical Angle 1. (1)Zenith distance: If vertical angle is 0°in zenith direction, then the vertical angle measured in this way is the zenith distance. (shown as the figure) Zenith distance =(L+360°-R)/2 Index difference =(L+R-360°)/2 2. (2)Vertical angle: If vertical angle is 0° in horizontal direction, then the vertical angle measured in this way is the perpendicular angle.(See the figure). 3. Vertical angle =(L±180°-R)/2 Index difference =(L+R- )/2
- 19. SURVEYING LAB 2012-13 THEODOLITE EXP. (7) Al-Mansur University Collage– Civil Engineering Department – 2nd Class Page 19 of 26
- 20. SURVEYING LAB 2012-13 THEODOLITE EXP. (7) Al-Mansur University Collage– Civil Engineering Department – 2nd Class Page 20 of 26
- 21. SURVEYING LAB 2012-13 THEODOLITE EXP. (7) Al-Mansur University Collage– Civil Engineering Department – 2nd Class Page 21 of 26 6.10 Output Angle Turn on and enter angle measure mode, and press FUNC key to enter the second function selection mode. Press OUT key to transmit the current angle to serial-port or electronic controller (baud rate is 1200), ―-------‖ will be displayed on the screen for one second after successful transmission. 6.11 Save Angle Turn on and enter angle measure mode, press FUNC key to enter the second function selection mode, and then press REC to save angle. At that time, the current angle glitters twice, which represents it has been saved to the memory. If you want to save angle again, press REC key after regulating an angle. If you want to review saved angle data, please refer to Chapter 7 about memory. Notice: the instrument only supplies 256 groups of angle data (each group of angle data includes one vertical angle and one horizontal angle). If angle data saved exceeds256 groups, ―FULL‖ will be displayed on the interface which means that memory is full. Users then need to clear manually to resave angle, please refer to the chapter about memory for more details. 6.12 Measure Distance with Stadia The distance from the measuring object to the instrument can be obtained by using the stadia hair of the telescope with the accuracy ≤0.4%D. Set up the instrument at point A and put the surveying rod on target point B. Read the intercept d of apparent lines from up and down from the reticle on the survey rod. The horizontal distance (D) between A and B can be calculated with the formula below: L= 100× l
- 22. SURVEYING LAB 2012-13 THEODOLITE EXP. (7) Al-Mansur University Collage– Civil Engineering Department – 2nd Class Page 22 of 26
- 23. SURVEYING LAB 2012-13 THEODOLITE EXP. (7) Al-Mansur University Collage– Civil Engineering Department – 2nd Class Page 23 of 26 7. 5 Data Download from New ET (Sample with Access port) Step: 1. Connect series port on ET with the CE-203U to the series port or USB of PC. 2. If connect PC with USB port, pleas install the drive firstly. Open the file like ‗Scomassistant‘ or ‗AccessPort‘ (example:
- 24. SURVEYING LAB 2012-13 THEODOLITE EXP. (7) Al-Mansur University Collage– Civil Engineering Department – 2nd Class Page 24 of 26
- 25. SURVEYING LAB 2012-13 THEODOLITE EXP. (7) Al-Mansur University Collage– Civil Engineering Department – 2nd Class Page 25 of 26 10. SPECIFICATIONS Telescope Image Erect image Magnification 30X Effective aperture 45mm Resolution 3″ Field of view 1°30′ Shortest stadia 1.4m Stadia multiplication constant 100 Stadia additive constant 0 Stadia precision ≤0.40%L Tube length 157mm Angle measurement Angle measurement mode Absolute encoding mode Diameter of raster disks (vertical and horizontal) 79mm Minimum display reading 1″or 5″,optional Detection mode Horizontal angle: dual Vertical angle : dual Angle measurement Unit 360°/ 400gon/6400mil,optional Precision ET-02: 2″, ET –05: 5″ Leveling vials Plate vial 30″/2mm Circular vial 8′/2mm Vertical compensator(05B mode without this item) System liquid condenser mode, optional Working range ±3′ Precision ±3″ Optical plummet Image Erect image Magnification 3X Focusing range 0.5~∝ Field of view 5° Display Type LCD, double lines, line segment Data input/output Interface RS --232C On-board battery Power source Rechargeable NI-H Battery Voltage DC 4.8V Continuous working hours 8h Working environment
- 26. SURVEYING LAB 2012-13 THEODOLITE EXP. (7) Al-Mansur University Collage– Civil Engineering Department – 2nd Class Page 26 of 26