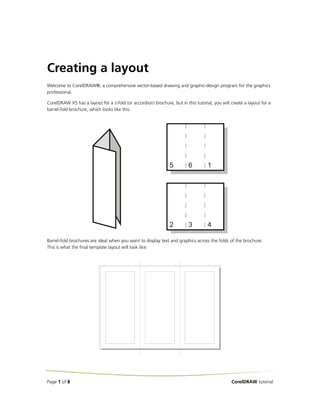
SlideShare a Scribd company logo
Creating a layout
Welcome to CorelDRAW®, a comprehensive vector-based drawing and graphic-design program for the graphics
professional.
CorelDRAW X5 has a layout for a z-fold (or accordion) brochure, but in this tutorial, you will create a layout for a
barrel-fold brochure, which looks like this:

Barrel-fold brochures are ideal when you want to display text and graphics across the folds of the brochure.
This is what the final template layout will look like:

Page 1 of 8

CorelDRAW tutorial
What you will learn
In this tutorial, you will learn
•

to change page orientation

•

to change the paper type

•

to add master layers

•

to set up bleeds

•

to set up print margins

•

to save a drawing as a template

To begin the tutorial, you will create a new document and set the page properties. You will then add guidelines
to set up the brochure pages.
You will add a master layer. You can use master layers when you have content that you want to apply to all pages
in a document. On the master layer, you will set up a bleed that ensures that no white space appears between the
edges of the drawing and the edges of the paper after the document is printed.
You will also set up a printing margin that will inset the brochure text from the edge of the page by creating
rectangles to represent the printing margin. You will put the rectangles on a nonprinting layer so that you will be
able to see and snap to them, without making them part of the final design.
You will finish the tutorial by saving the drawing as a tri-fold barrel brochure layout.
Throughout the tutorial, you will use rectangles to help you set up elements of the brochure. You will also use
time-saving mathematical operators to quickly and precisely resize the rectangles.

To set up the drawing
1

Click File

New to create a new document.

2

In the Create a New Document dialog box, choose A4 from the Size list box, click the Landscape
button to change the page orientation, and then click OK.

3

In the toolbox, double-click the Rectangle tool

to create a rectangle that is the same size as the page.

You will use this rectangle to help you set up guidelines to divide the drawing into brochure pages.
4

On the property bar type /3 after the number in the width section of the Object(s) sizes box to reduce the
rectangle to one third of its original width

5

Ensure that the Lock Ratio button

.

is disabled and press Enter.

The rectangle is centred on the drawing page, dividing it into equal thirds

.

6

In the Objects Manager docker, click Guides under the Page 1 heading.

7

Click the vertical ruler and drag two guidelines, aligning them to both vertical edges of the rectangle.
If the rulers are not visible, click View
enabled.

Page 2 of 8

Rulers. A check mark next to Rulers indicates that the rulers are

CorelDRAW tutorial
If the guidelines are not automatically attaching to the edges of the rectangle, click View
A check mark next to Snap to Objects indicates that snapping to objects is enabled.
8

Snap to Objects.

Now that the guidelines are in place, you will delete the rectangle. In the toolbox, click the Pick tool

,

select the rectangle, and press Delete.

To add a Master layer
1

At the bottom of the Object manager docker, click the New master layer button

2

Name the master layer Bleed Area.

3

Click the Printing and Exporting icon

.

on the Bleed Area layer to make it a nonprinting layer

.

To set up the bleed
1

In the toolbox, double-click the Rectangle tool to create a rectangle that is the same size as the page.

2

On the property bar, type +6 after the number in the width and height sections of the Object(s) sizes box to
add 6 mm to the width and height of the rectangle

3

.

Press Enter.

Page 3 of 8

CorelDRAW tutorial
The top, bottom, left, and right edges of the rectangle expand by 3 mm. The page content will extend 3mm
over the edge of the page, setting up a full bleed

.

To set up the printing margins
1

At the bottom of the Object manager docker, click the New master layer button.

2

Name the master layer Printing Margin.
When you use this brochure layout, text will be contained within the printing margins.

3

Click the Printing and Exporting icon

4

From the View menu, ensure that Snap to Guidelines and Snap to Page are enabled. A check mark next
to the name indicates that it is enabled.

5

In the toolbox, click the Rectangle tool, and draw a rectangle that begins at the top-left corner of the page
and ends where fold left guideline intersects with the bottom of the page.

Page 4 of 8

on the Printing Margin layer to make it a nonprinting layer.

CorelDRAW tutorial
6

On the property bar, type -24 after the number in the width and height sections of the Object(s) sizes box to
create a 12 mm print margin

.

7

Press Enter.

8

With the rectangle selected, press Ctrl + D to duplicate the rectangle.

9

In the Duplicate offset dialog box, type 0 in the Horizontal offset and Vertical offset boxes.

A duplicate rectangle is created directly over the original. The duplicate rectangle will serve as the print
margin for the middle panel of the brochure.
If the Duplicate Offset dialog box does not appear, click Tools Options
the Horizontal offset and Vertical offset boxes, and then click OK.
10 In the toolbox, click the Pick tool

Document

General, type 0 in

, and click the center of the rectangle.

11 Hold down Ctrl to constrain the rectangle to an axis, and drag the rectangle to the right until it snaps to the
center of the page.
12 Press Ctrl + D to duplicate the rectangle again.
A third rectangle is automatically offset by the same distance used when you offset the second rectangle from
the first, placing the third rectangle precisely where you need it on the right panel of the brochure.

Page 5 of 8

CorelDRAW tutorial
To save the drawing as a template
1

Click File

Save as template.

2

In the Save drawing dialog box, locate the folder where you want to save the layout.

3

Type a name for the template in the File name box, and click Save.

4

In the Template properties dialog box, type Barrel Tri-fold Brochure in the Name box.

5

From the Sided list box, choose Double.

6

From the Folds list box, choose 3-fold.

7

From the Type list box, choose Brochures.

8

In the Designer notes box, type 12 mm printing margin, 3 mm full bleed, and click OK.
When you open the layout, the designer notes appear in the New From Template dialog box.

Page 6 of 8

CorelDRAW tutorial
To see an example of a brochure created with this layout
1

Click File

Open.

2

Choose the folder Program filesCorelCorelDRAW Graphics Suite X5Tutorial files.

3

Double-click the filename barrel fold.cdr.

To access the tri-fold brochure layout
1

Click Tools

2

In the list of categories, click Document, and click Layout.

3

From the Layout list box, choose Tri-Fold Brochure.

Page 7 of 8

Options.

CorelDRAW tutorial
From here . . .
You can explore CorelDRAW on your own, or you can learn more by completing other CorelTUTOR™ tutorials.
For more information about the topics and tools discussed in this tutorial, refer to the Help. To access CorelDRAW
Help, click Help Help topics.

Copyright © 2010 Corel Corporation. All rights reserved. All trademarks or registered trademarks are the property
of their respective owners.

Page 8 of 8

CorelDRAW tutorial

More Related Content

What's hot

Ex13 lesson03
Ex13 lesson03Ex13 lesson03
Ex13 lesson03
sadejoseph
 
Designstorm How-to: Dot Plots
Designstorm How-to: Dot PlotsDesignstorm How-to: Dot Plots
Designstorm How-to: Dot Plots
Amanda Makulec
 
Graph of the Day Steps
Graph of the Day StepsGraph of the Day Steps
Graph of the Day Steps
queshia03
 
Word Lesson 7 power point
Word Lesson 7 power pointWord Lesson 7 power point
Word Lesson 7 power pointfgc013
 
Using illustrator for posters by hmftj
Using illustrator for posters by hmftj Using illustrator for posters by hmftj
Using illustrator for posters by hmftj
LGS, GBHS&IC, University Of South-Asia, TARA-Technologies
 
07.bar and chats
07.bar and chats07.bar and chats
07.bar and chats
Steven Alphonce
 
Print13
Print13Print13
Print13
Hassan Samoon
 
How to make Gantt chart in Excel
How to make Gantt chart in ExcelHow to make Gantt chart in Excel
How to make Gantt chart in Excel
Navjyotsinh Jadeja
 
Conditional formatting in excel v2
Conditional formatting in excel v2Conditional formatting in excel v2
Conditional formatting in excel v2
m182348
 
Pagelayout & data tab of ms excel 2010
Pagelayout & data tab of ms excel 2010Pagelayout & data tab of ms excel 2010
Pagelayout & data tab of ms excel 2010Nitish Kumar
 
MS Word Advanced Training
MS Word Advanced TrainingMS Word Advanced Training
MS Word Advanced Training
guest99ab68
 
Data Management in Excel
Data Management in ExcelData Management in Excel
Data Management in Excel
Muhammad Yasir Bhutta
 
Access Chapter 01
Access Chapter 01Access Chapter 01
Access Chapter 01xtin101
 
B Section 16 AutoCAD Paperspace
B Section 16 AutoCAD PaperspaceB Section 16 AutoCAD Paperspace
B Section 16 AutoCAD PaperspacePaul Rouse
 
Data Exploration & Visualization in Excel & Tableau - No Videos
Data Exploration & Visualization in Excel & Tableau - No VideosData Exploration & Visualization in Excel & Tableau - No Videos
Data Exploration & Visualization in Excel & Tableau - No VideosSkylar Ritchie
 

What's hot (20)

Ex13 lesson03
Ex13 lesson03Ex13 lesson03
Ex13 lesson03
 
Unit 010 Spreadsheets
Unit 010 SpreadsheetsUnit 010 Spreadsheets
Unit 010 Spreadsheets
 
Designstorm How-to: Dot Plots
Designstorm How-to: Dot PlotsDesignstorm How-to: Dot Plots
Designstorm How-to: Dot Plots
 
Graph of the Day Steps
Graph of the Day StepsGraph of the Day Steps
Graph of the Day Steps
 
Word Lesson 7 power point
Word Lesson 7 power pointWord Lesson 7 power point
Word Lesson 7 power point
 
Using illustrator for posters by hmftj
Using illustrator for posters by hmftj Using illustrator for posters by hmftj
Using illustrator for posters by hmftj
 
IndesignFlyer
IndesignFlyerIndesignFlyer
IndesignFlyer
 
07.bar and chats
07.bar and chats07.bar and chats
07.bar and chats
 
Print13
Print13Print13
Print13
 
How to make Gantt chart in Excel
How to make Gantt chart in ExcelHow to make Gantt chart in Excel
How to make Gantt chart in Excel
 
Conditional formatting in excel v2
Conditional formatting in excel v2Conditional formatting in excel v2
Conditional formatting in excel v2
 
Pagelayout & data tab of ms excel 2010
Pagelayout & data tab of ms excel 2010Pagelayout & data tab of ms excel 2010
Pagelayout & data tab of ms excel 2010
 
InDesign Crash Course
InDesign Crash CourseInDesign Crash Course
InDesign Crash Course
 
MS Word Advanced Training
MS Word Advanced TrainingMS Word Advanced Training
MS Word Advanced Training
 
Data Management in Excel
Data Management in ExcelData Management in Excel
Data Management in Excel
 
Access Chapter 01
Access Chapter 01Access Chapter 01
Access Chapter 01
 
Excel ch05
Excel ch05Excel ch05
Excel ch05
 
Excel ch07
Excel ch07Excel ch07
Excel ch07
 
B Section 16 AutoCAD Paperspace
B Section 16 AutoCAD PaperspaceB Section 16 AutoCAD Paperspace
B Section 16 AutoCAD Paperspace
 
Data Exploration & Visualization in Excel & Tableau - No Videos
Data Exploration & Visualization in Excel & Tableau - No VideosData Exploration & Visualization in Excel & Tableau - No Videos
Data Exploration & Visualization in Excel & Tableau - No Videos
 

Viewers also liked

Presentasi-Sistem
Presentasi-Sistem Presentasi-Sistem
Presentasi-Sistem
Enjang Jahrudin
 
Menggabungkan gambar 2d ke dalam sajian multimedia 2 english
Menggabungkan gambar 2d ke dalam sajian multimedia 2 englishMenggabungkan gambar 2d ke dalam sajian multimedia 2 english
Menggabungkan gambar 2d ke dalam sajian multimedia 2 englishEko Supriyadi
 

Viewers also liked (6)

Totorial Coreldraw_5
Totorial Coreldraw_5Totorial Coreldraw_5
Totorial Coreldraw_5
 
setupcdr
setupcdrsetupcdr
setupcdr
 
Presentasi-Sistem
Presentasi-Sistem Presentasi-Sistem
Presentasi-Sistem
 
Ife 1
Ife 1Ife 1
Ife 1
 
Turorial Coreldraw_4
Turorial Coreldraw_4Turorial Coreldraw_4
Turorial Coreldraw_4
 
Menggabungkan gambar 2d ke dalam sajian multimedia 2 english
Menggabungkan gambar 2d ke dalam sajian multimedia 2 englishMenggabungkan gambar 2d ke dalam sajian multimedia 2 english
Menggabungkan gambar 2d ke dalam sajian multimedia 2 english
 

Similar to Tutorial Coreldraw_2

MEMBUAT LOGO THE COFFEE SHOP
MEMBUAT LOGO THE COFFEE SHOPMEMBUAT LOGO THE COFFEE SHOP
MEMBUAT LOGO THE COFFEE SHOP
DIANTO IRAWAN
 
Corel draw
Corel drawCorel draw
Logo tutor
Logo tutorLogo tutor
Logo tutor
Mochammad Arfin
 
advanced%20corel%20draw
advanced%20corel%20drawadvanced%20corel%20draw
advanced%20corel%20drawtutorialsruby
 
advanced%20corel%20draw
advanced%20corel%20drawadvanced%20corel%20draw
advanced%20corel%20drawtutorialsruby
 
CorelDraw%20Tutorial%203
CorelDraw%20Tutorial%203CorelDraw%20Tutorial%203
CorelDraw%20Tutorial%203tutorialsruby
 
CorelDraw%20Tutorial%203
CorelDraw%20Tutorial%203CorelDraw%20Tutorial%203
CorelDraw%20Tutorial%203tutorialsruby
 
Adobe indesign cs6
Adobe indesign cs6Adobe indesign cs6
Adobe indesign cs6
ilaazmil2
 
Adobe indesign cs6
Adobe indesign cs6Adobe indesign cs6
Adobe indesign cs6Ila Azmil
 
InDesign CS5 Tutorial
InDesign CS5 TutorialInDesign CS5 Tutorial
InDesign CS5 Tutorial
Zaxapias
 
Gl2010 m5 wd3-presentation
Gl2010 m5 wd3-presentationGl2010 m5 wd3-presentation
Gl2010 m5 wd3-presentationTracie King
 

Similar to Tutorial Coreldraw_2 (20)

dr_3
dr_3dr_3
dr_3
 
MEMBUAT LOGO THE COFFEE SHOP
MEMBUAT LOGO THE COFFEE SHOPMEMBUAT LOGO THE COFFEE SHOP
MEMBUAT LOGO THE COFFEE SHOP
 
Corel draw
Corel drawCorel draw
Corel draw
 
Logo tutor
Logo tutorLogo tutor
Logo tutor
 
Dr 2
Dr 2Dr 2
Dr 2
 
advanced%20corel%20draw
advanced%20corel%20drawadvanced%20corel%20draw
advanced%20corel%20draw
 
advanced%20corel%20draw
advanced%20corel%20drawadvanced%20corel%20draw
advanced%20corel%20draw
 
CorelDraw%20Tutorial%203
CorelDraw%20Tutorial%203CorelDraw%20Tutorial%203
CorelDraw%20Tutorial%203
 
CorelDraw%20Tutorial%203
CorelDraw%20Tutorial%203CorelDraw%20Tutorial%203
CorelDraw%20Tutorial%203
 
dr_1
dr_1dr_1
dr_1
 
dr_1
dr_1dr_1
dr_1
 
Adobe indesign cs6
Adobe indesign cs6Adobe indesign cs6
Adobe indesign cs6
 
Adobe indesign cs6
Adobe indesign cs6Adobe indesign cs6
Adobe indesign cs6
 
dr_3
dr_3dr_3
dr_3
 
dr_3
dr_3dr_3
dr_3
 
InDesign CS5 Tutorial
InDesign CS5 TutorialInDesign CS5 Tutorial
InDesign CS5 Tutorial
 
dr_1
dr_1dr_1
dr_1
 
dr_1
dr_1dr_1
dr_1
 
Gl2010 m5 wd3-presentation
Gl2010 m5 wd3-presentationGl2010 m5 wd3-presentation
Gl2010 m5 wd3-presentation
 
dr_4
dr_4dr_4
dr_4
 

Recently uploaded

一比一原版(Bolton毕业证书)博尔顿大学毕业证成绩单如何办理
一比一原版(Bolton毕业证书)博尔顿大学毕业证成绩单如何办理一比一原版(Bolton毕业证书)博尔顿大学毕业证成绩单如何办理
一比一原版(Bolton毕业证书)博尔顿大学毕业证成绩单如何办理
h7j5io0
 
Mohannad Abdullah portfolio _ V2 _22-24
Mohannad Abdullah  portfolio _ V2 _22-24Mohannad Abdullah  portfolio _ V2 _22-24
Mohannad Abdullah portfolio _ V2 _22-24
M. A. Architect
 
一比一原版(MMU毕业证书)曼彻斯特城市大学毕业证成绩单如何办理
一比一原版(MMU毕业证书)曼彻斯特城市大学毕业证成绩单如何办理一比一原版(MMU毕业证书)曼彻斯特城市大学毕业证成绩单如何办理
一比一原版(MMU毕业证书)曼彻斯特城市大学毕业证成绩单如何办理
7sd8fier
 
Research 20 slides Amelia gavryliuks.pdf
Research 20 slides Amelia gavryliuks.pdfResearch 20 slides Amelia gavryliuks.pdf
Research 20 slides Amelia gavryliuks.pdf
ameli25062005
 
Book Formatting: Quality Control Checks for Designers
Book Formatting: Quality Control Checks for DesignersBook Formatting: Quality Control Checks for Designers
Book Formatting: Quality Control Checks for Designers
Confidence Ago
 
原版定做(penn毕业证书)美国宾夕法尼亚大学毕业证文凭学历证书原版一模一样
原版定做(penn毕业证书)美国宾夕法尼亚大学毕业证文凭学历证书原版一模一样原版定做(penn毕业证书)美国宾夕法尼亚大学毕业证文凭学历证书原版一模一样
原版定做(penn毕业证书)美国宾夕法尼亚大学毕业证文凭学历证书原版一模一样
gpffo76j
 
Maximize Your Content with Beautiful Assets : Content & Asset for Landing Page
Maximize Your Content with Beautiful Assets : Content & Asset for Landing Page Maximize Your Content with Beautiful Assets : Content & Asset for Landing Page
Maximize Your Content with Beautiful Assets : Content & Asset for Landing Page
pmgdscunsri
 
一比一原版(NCL毕业证书)纽卡斯尔大学毕业证成绩单如何办理
一比一原版(NCL毕业证书)纽卡斯尔大学毕业证成绩单如何办理一比一原版(NCL毕业证书)纽卡斯尔大学毕业证成绩单如何办理
一比一原版(NCL毕业证书)纽卡斯尔大学毕业证成绩单如何办理
7sd8fier
 
Portfolio.pdf
Portfolio.pdfPortfolio.pdf
Portfolio.pdf
garcese
 
Can AI do good? at 'offtheCanvas' India HCI prelude
Can AI do good? at 'offtheCanvas' India HCI preludeCan AI do good? at 'offtheCanvas' India HCI prelude
Can AI do good? at 'offtheCanvas' India HCI prelude
Alan Dix
 
Design Thinking Design thinking Design thinking
Design Thinking Design thinking Design thinkingDesign Thinking Design thinking Design thinking
Design Thinking Design thinking Design thinking
cy0krjxt
 
一比一原版(UNUK毕业证书)诺丁汉大学毕业证如何办理
一比一原版(UNUK毕业证书)诺丁汉大学毕业证如何办理一比一原版(UNUK毕业证书)诺丁汉大学毕业证如何办理
一比一原版(UNUK毕业证书)诺丁汉大学毕业证如何办理
7sd8fier
 
EASY TUTORIAL OF HOW TO USE CAPCUT BY: FEBLESS HERNANE
EASY TUTORIAL OF HOW TO USE CAPCUT BY: FEBLESS HERNANEEASY TUTORIAL OF HOW TO USE CAPCUT BY: FEBLESS HERNANE
EASY TUTORIAL OF HOW TO USE CAPCUT BY: FEBLESS HERNANE
Febless Hernane
 
一比一原版(BU毕业证)波士顿大学毕业证如何办理
一比一原版(BU毕业证)波士顿大学毕业证如何办理一比一原版(BU毕业证)波士顿大学毕业证如何办理
一比一原版(BU毕业证)波士顿大学毕业证如何办理
peuce
 
PORTFOLIO FABIANA VILLANI ARCHITECTURE.pdf
PORTFOLIO FABIANA VILLANI ARCHITECTURE.pdfPORTFOLIO FABIANA VILLANI ARCHITECTURE.pdf
PORTFOLIO FABIANA VILLANI ARCHITECTURE.pdf
fabianavillanib
 
vernacular architecture in response to climate.pdf
vernacular architecture in response to climate.pdfvernacular architecture in response to climate.pdf
vernacular architecture in response to climate.pdf
PrabhjeetSingh219035
 
Between Filth and Fortune- Urban Cattle Foraging Realities by Devi S Nair, An...
Between Filth and Fortune- Urban Cattle Foraging Realities by Devi S Nair, An...Between Filth and Fortune- Urban Cattle Foraging Realities by Devi S Nair, An...
Between Filth and Fortune- Urban Cattle Foraging Realities by Devi S Nair, An...
Mansi Shah
 
Connect Conference 2022: Passive House - Economic and Environmental Solution...
Connect Conference 2022: Passive House -  Economic and Environmental Solution...Connect Conference 2022: Passive House -  Economic and Environmental Solution...
Connect Conference 2022: Passive House - Economic and Environmental Solution...
TE Studio
 
一比一原版(LSE毕业证书)伦敦政治经济学院毕业证成绩单如何办理
一比一原版(LSE毕业证书)伦敦政治经济学院毕业证成绩单如何办理一比一原版(LSE毕业证书)伦敦政治经济学院毕业证成绩单如何办理
一比一原版(LSE毕业证书)伦敦政治经济学院毕业证成绩单如何办理
jyz59f4j
 
Technoblade The Legacy of a Minecraft Legend.
Technoblade The Legacy of a Minecraft Legend.Technoblade The Legacy of a Minecraft Legend.
Technoblade The Legacy of a Minecraft Legend.
Techno Merch
 

Recently uploaded (20)

一比一原版(Bolton毕业证书)博尔顿大学毕业证成绩单如何办理
一比一原版(Bolton毕业证书)博尔顿大学毕业证成绩单如何办理一比一原版(Bolton毕业证书)博尔顿大学毕业证成绩单如何办理
一比一原版(Bolton毕业证书)博尔顿大学毕业证成绩单如何办理
 
Mohannad Abdullah portfolio _ V2 _22-24
Mohannad Abdullah  portfolio _ V2 _22-24Mohannad Abdullah  portfolio _ V2 _22-24
Mohannad Abdullah portfolio _ V2 _22-24
 
一比一原版(MMU毕业证书)曼彻斯特城市大学毕业证成绩单如何办理
一比一原版(MMU毕业证书)曼彻斯特城市大学毕业证成绩单如何办理一比一原版(MMU毕业证书)曼彻斯特城市大学毕业证成绩单如何办理
一比一原版(MMU毕业证书)曼彻斯特城市大学毕业证成绩单如何办理
 
Research 20 slides Amelia gavryliuks.pdf
Research 20 slides Amelia gavryliuks.pdfResearch 20 slides Amelia gavryliuks.pdf
Research 20 slides Amelia gavryliuks.pdf
 
Book Formatting: Quality Control Checks for Designers
Book Formatting: Quality Control Checks for DesignersBook Formatting: Quality Control Checks for Designers
Book Formatting: Quality Control Checks for Designers
 
原版定做(penn毕业证书)美国宾夕法尼亚大学毕业证文凭学历证书原版一模一样
原版定做(penn毕业证书)美国宾夕法尼亚大学毕业证文凭学历证书原版一模一样原版定做(penn毕业证书)美国宾夕法尼亚大学毕业证文凭学历证书原版一模一样
原版定做(penn毕业证书)美国宾夕法尼亚大学毕业证文凭学历证书原版一模一样
 
Maximize Your Content with Beautiful Assets : Content & Asset for Landing Page
Maximize Your Content with Beautiful Assets : Content & Asset for Landing Page Maximize Your Content with Beautiful Assets : Content & Asset for Landing Page
Maximize Your Content with Beautiful Assets : Content & Asset for Landing Page
 
一比一原版(NCL毕业证书)纽卡斯尔大学毕业证成绩单如何办理
一比一原版(NCL毕业证书)纽卡斯尔大学毕业证成绩单如何办理一比一原版(NCL毕业证书)纽卡斯尔大学毕业证成绩单如何办理
一比一原版(NCL毕业证书)纽卡斯尔大学毕业证成绩单如何办理
 
Portfolio.pdf
Portfolio.pdfPortfolio.pdf
Portfolio.pdf
 
Can AI do good? at 'offtheCanvas' India HCI prelude
Can AI do good? at 'offtheCanvas' India HCI preludeCan AI do good? at 'offtheCanvas' India HCI prelude
Can AI do good? at 'offtheCanvas' India HCI prelude
 
Design Thinking Design thinking Design thinking
Design Thinking Design thinking Design thinkingDesign Thinking Design thinking Design thinking
Design Thinking Design thinking Design thinking
 
一比一原版(UNUK毕业证书)诺丁汉大学毕业证如何办理
一比一原版(UNUK毕业证书)诺丁汉大学毕业证如何办理一比一原版(UNUK毕业证书)诺丁汉大学毕业证如何办理
一比一原版(UNUK毕业证书)诺丁汉大学毕业证如何办理
 
EASY TUTORIAL OF HOW TO USE CAPCUT BY: FEBLESS HERNANE
EASY TUTORIAL OF HOW TO USE CAPCUT BY: FEBLESS HERNANEEASY TUTORIAL OF HOW TO USE CAPCUT BY: FEBLESS HERNANE
EASY TUTORIAL OF HOW TO USE CAPCUT BY: FEBLESS HERNANE
 
一比一原版(BU毕业证)波士顿大学毕业证如何办理
一比一原版(BU毕业证)波士顿大学毕业证如何办理一比一原版(BU毕业证)波士顿大学毕业证如何办理
一比一原版(BU毕业证)波士顿大学毕业证如何办理
 
PORTFOLIO FABIANA VILLANI ARCHITECTURE.pdf
PORTFOLIO FABIANA VILLANI ARCHITECTURE.pdfPORTFOLIO FABIANA VILLANI ARCHITECTURE.pdf
PORTFOLIO FABIANA VILLANI ARCHITECTURE.pdf
 
vernacular architecture in response to climate.pdf
vernacular architecture in response to climate.pdfvernacular architecture in response to climate.pdf
vernacular architecture in response to climate.pdf
 
Between Filth and Fortune- Urban Cattle Foraging Realities by Devi S Nair, An...
Between Filth and Fortune- Urban Cattle Foraging Realities by Devi S Nair, An...Between Filth and Fortune- Urban Cattle Foraging Realities by Devi S Nair, An...
Between Filth and Fortune- Urban Cattle Foraging Realities by Devi S Nair, An...
 
Connect Conference 2022: Passive House - Economic and Environmental Solution...
Connect Conference 2022: Passive House -  Economic and Environmental Solution...Connect Conference 2022: Passive House -  Economic and Environmental Solution...
Connect Conference 2022: Passive House - Economic and Environmental Solution...
 
一比一原版(LSE毕业证书)伦敦政治经济学院毕业证成绩单如何办理
一比一原版(LSE毕业证书)伦敦政治经济学院毕业证成绩单如何办理一比一原版(LSE毕业证书)伦敦政治经济学院毕业证成绩单如何办理
一比一原版(LSE毕业证书)伦敦政治经济学院毕业证成绩单如何办理
 
Technoblade The Legacy of a Minecraft Legend.
Technoblade The Legacy of a Minecraft Legend.Technoblade The Legacy of a Minecraft Legend.
Technoblade The Legacy of a Minecraft Legend.
 

Tutorial Coreldraw_2

  • 1. Creating a layout Welcome to CorelDRAW®, a comprehensive vector-based drawing and graphic-design program for the graphics professional. CorelDRAW X5 has a layout for a z-fold (or accordion) brochure, but in this tutorial, you will create a layout for a barrel-fold brochure, which looks like this: Barrel-fold brochures are ideal when you want to display text and graphics across the folds of the brochure. This is what the final template layout will look like: Page 1 of 8 CorelDRAW tutorial
  • 2. What you will learn In this tutorial, you will learn • to change page orientation • to change the paper type • to add master layers • to set up bleeds • to set up print margins • to save a drawing as a template To begin the tutorial, you will create a new document and set the page properties. You will then add guidelines to set up the brochure pages. You will add a master layer. You can use master layers when you have content that you want to apply to all pages in a document. On the master layer, you will set up a bleed that ensures that no white space appears between the edges of the drawing and the edges of the paper after the document is printed. You will also set up a printing margin that will inset the brochure text from the edge of the page by creating rectangles to represent the printing margin. You will put the rectangles on a nonprinting layer so that you will be able to see and snap to them, without making them part of the final design. You will finish the tutorial by saving the drawing as a tri-fold barrel brochure layout. Throughout the tutorial, you will use rectangles to help you set up elements of the brochure. You will also use time-saving mathematical operators to quickly and precisely resize the rectangles. To set up the drawing 1 Click File New to create a new document. 2 In the Create a New Document dialog box, choose A4 from the Size list box, click the Landscape button to change the page orientation, and then click OK. 3 In the toolbox, double-click the Rectangle tool to create a rectangle that is the same size as the page. You will use this rectangle to help you set up guidelines to divide the drawing into brochure pages. 4 On the property bar type /3 after the number in the width section of the Object(s) sizes box to reduce the rectangle to one third of its original width 5 Ensure that the Lock Ratio button . is disabled and press Enter. The rectangle is centred on the drawing page, dividing it into equal thirds . 6 In the Objects Manager docker, click Guides under the Page 1 heading. 7 Click the vertical ruler and drag two guidelines, aligning them to both vertical edges of the rectangle. If the rulers are not visible, click View enabled. Page 2 of 8 Rulers. A check mark next to Rulers indicates that the rulers are CorelDRAW tutorial
  • 3. If the guidelines are not automatically attaching to the edges of the rectangle, click View A check mark next to Snap to Objects indicates that snapping to objects is enabled. 8 Snap to Objects. Now that the guidelines are in place, you will delete the rectangle. In the toolbox, click the Pick tool , select the rectangle, and press Delete. To add a Master layer 1 At the bottom of the Object manager docker, click the New master layer button 2 Name the master layer Bleed Area. 3 Click the Printing and Exporting icon . on the Bleed Area layer to make it a nonprinting layer . To set up the bleed 1 In the toolbox, double-click the Rectangle tool to create a rectangle that is the same size as the page. 2 On the property bar, type +6 after the number in the width and height sections of the Object(s) sizes box to add 6 mm to the width and height of the rectangle 3 . Press Enter. Page 3 of 8 CorelDRAW tutorial
  • 4. The top, bottom, left, and right edges of the rectangle expand by 3 mm. The page content will extend 3mm over the edge of the page, setting up a full bleed . To set up the printing margins 1 At the bottom of the Object manager docker, click the New master layer button. 2 Name the master layer Printing Margin. When you use this brochure layout, text will be contained within the printing margins. 3 Click the Printing and Exporting icon 4 From the View menu, ensure that Snap to Guidelines and Snap to Page are enabled. A check mark next to the name indicates that it is enabled. 5 In the toolbox, click the Rectangle tool, and draw a rectangle that begins at the top-left corner of the page and ends where fold left guideline intersects with the bottom of the page. Page 4 of 8 on the Printing Margin layer to make it a nonprinting layer. CorelDRAW tutorial
  • 5. 6 On the property bar, type -24 after the number in the width and height sections of the Object(s) sizes box to create a 12 mm print margin . 7 Press Enter. 8 With the rectangle selected, press Ctrl + D to duplicate the rectangle. 9 In the Duplicate offset dialog box, type 0 in the Horizontal offset and Vertical offset boxes. A duplicate rectangle is created directly over the original. The duplicate rectangle will serve as the print margin for the middle panel of the brochure. If the Duplicate Offset dialog box does not appear, click Tools Options the Horizontal offset and Vertical offset boxes, and then click OK. 10 In the toolbox, click the Pick tool Document General, type 0 in , and click the center of the rectangle. 11 Hold down Ctrl to constrain the rectangle to an axis, and drag the rectangle to the right until it snaps to the center of the page. 12 Press Ctrl + D to duplicate the rectangle again. A third rectangle is automatically offset by the same distance used when you offset the second rectangle from the first, placing the third rectangle precisely where you need it on the right panel of the brochure. Page 5 of 8 CorelDRAW tutorial
  • 6. To save the drawing as a template 1 Click File Save as template. 2 In the Save drawing dialog box, locate the folder where you want to save the layout. 3 Type a name for the template in the File name box, and click Save. 4 In the Template properties dialog box, type Barrel Tri-fold Brochure in the Name box. 5 From the Sided list box, choose Double. 6 From the Folds list box, choose 3-fold. 7 From the Type list box, choose Brochures. 8 In the Designer notes box, type 12 mm printing margin, 3 mm full bleed, and click OK. When you open the layout, the designer notes appear in the New From Template dialog box. Page 6 of 8 CorelDRAW tutorial
  • 7. To see an example of a brochure created with this layout 1 Click File Open. 2 Choose the folder Program filesCorelCorelDRAW Graphics Suite X5Tutorial files. 3 Double-click the filename barrel fold.cdr. To access the tri-fold brochure layout 1 Click Tools 2 In the list of categories, click Document, and click Layout. 3 From the Layout list box, choose Tri-Fold Brochure. Page 7 of 8 Options. CorelDRAW tutorial
  • 8. From here . . . You can explore CorelDRAW on your own, or you can learn more by completing other CorelTUTOR™ tutorials. For more information about the topics and tools discussed in this tutorial, refer to the Help. To access CorelDRAW Help, click Help Help topics. Copyright © 2010 Corel Corporation. All rights reserved. All trademarks or registered trademarks are the property of their respective owners. Page 8 of 8 CorelDRAW tutorial