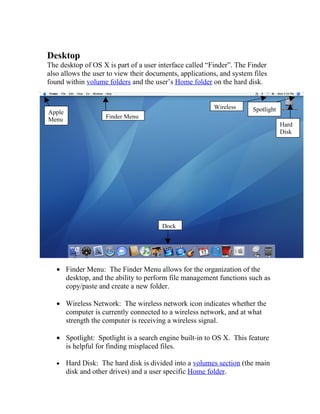
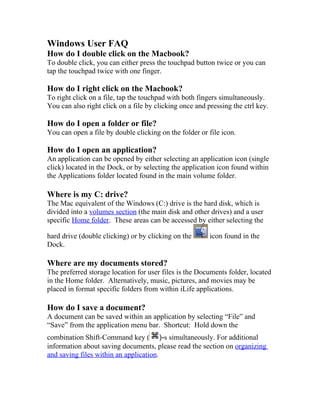
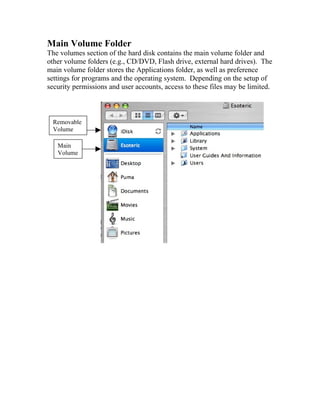
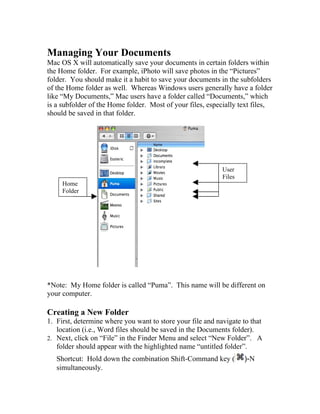
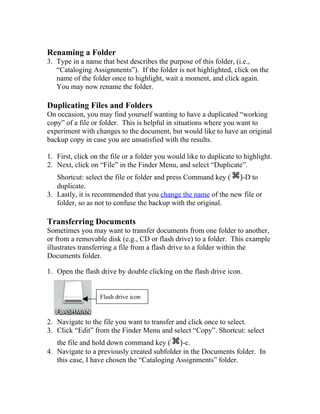
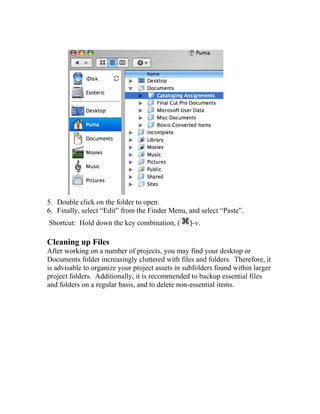
The document provides an overview of the Mac OS X user interface for beginners, including descriptions of the desktop, login screen, desktop elements like the dock and hard disk, and how to perform common tasks like opening files and folders. It also addresses frequently asked questions for Windows users switching to Mac OS X, such as where documents are stored, how to save or find documents, and what the equivalent of the C: drive is in Mac OS X. The document concludes with sections on file management tasks like creating and deleting folders, organizing files within applications, using Spotlight search, and an overview of the Dashboard feature.
The Windows SIG of the Central Florida Computer Society [ http://cfcs.org
] will be hosted by me, Hewie Poplock, at 1:30pm Sunday, February 14. You can attend at the Casselberry, FL Library when it will be shown live just prior to the CFCS Main Meeting, or you can attend on line. It is free & open to all.
This month will be Back to Basics: File Management for Windows 7 & Windows 10. This will also be useful for Windows 8/8.1 users. I will be explaining in detail the using of File Manager & File Explorer. I will also explain how to & where to store, move, and find your files. This is important for all Windows users from the beginner to the experienced user.
This presentation examines such things as trying to manage all those files saved on your desktop, or trying to manage a My Docs file that makes it impossible for users to find anything. It is all about taking advantage of the capabilities of our computers.
ITC 3001, Personal Computer Fundamentals 1 Course Lea.docxMARRY7
ITC 3001, Personal Computer Fundamentals 1
Course Learning Outcomes for Unit I
Upon completion of this unit, students should be able to:
1. Explain the fundamentals of computer hardware and computer software.
1.1 Explain the basics of using Windows 8.
1.2 Compare Microsoft Windows to Mac OS.
Reading Assignment
Part I, Lesson 1:
Getting Started with Windows 8
Part I, Lesson 2:
Navigating and Customizing the Start Screen
Unit Lesson
Computer literacy is an absolute requirement now. You probably use, or will use, your computer at work, at
home, and to help your children learn. This unit is designed to help you feel more comfortable with Windows,
the operating system (OS) used to interact with most personal computers.
We will begin with a review of the basics. A computer is an electronic device that accepts data or input,
manipulates the data based on a user’s instructions, and subsequently produces information or output.
Software provides instructions to your computer. Systems software, or the operating system, manages your
system and determines which types of applications you can run. It is the layer of software packages running
on your machine between your computer and hardware devices and your application software. Application
software includes the programs that you use to complete specific tasks. Examples of application software
include word processors, spreadsheet programs, database management systems, compression software,
accounting packages, photo editors, and more. In this unit, you will be studying the Microsoft Windows
operating system. In future units, you will cover applications that comprise the Microsoft Office Suite, including
Word, Excel, Access, and PowerPoint.
As you probably already know, Windows is an operating system from Microsoft that coordinates the activities
of your computer. The one that we will cover in this unit is Windows 8. It controls how the screen is displayed,
how programs are opened and closed, startup and shutdown procedures, and general computer navigation.
Using the applications in the Office suite requires a general knowledge of Windows. Much of the work that
you do on a computer involves creating, modifying, and saving files. Windows allows you to manage these
files.
Both of the lessons in the reading assignment for this unit provide hands-on instructions and practice in the
use of Windows 8. It is highly recommended that you walk through the activities on your own computer as you
read the textbook.
Windows allows you to work with documents and applications and organize how you interact with your
computer. The Windows desktop is the screen that you see when you turn on your computer and log into
Windows. It is similar to a real-physical desktop, hence the name. Windows provides the mechanisms for you
to customize the desktop, allowing you easy access to the programs and files you use the most. Since the
desktop can be customized, keep i ...
1.0 QuickBooks Fundementals : Day 02 Windows :2.1 windowsVeerendra Singh
What all windows information a NHT should have.The basics of windows which are required to be performed and known by a proadvisor to troubleshoot the error.
1. OS X (Tiger) General User Guide
MLIS Department
Mac OS X for Beginners
Overview
The purpose of this document is to provide a quick introduction to Mac OS
X from a beginner’s perspective. Topics covered include; a description of
the user interface, the use of common actions, and the structure of file
management found in Mac OS X. This document also provides a brief
reference for individuals accustomed to the Windows OS environment.
Log In Screen
Before we begin, it is important to login to OS X by selecting the user icon
and entering the supplied password. Next, click the “Log In” button to
proceed.
2. Desktop
The desktop of OS X is part of a user interface called “Finder”. The Finder
also allows the user to view their documents, applications, and system files
found within volume folders and the user’s Home folder on the hard disk.
Wireless Spotlight
Apple
Menu Finder Menu
Hard
Disk
Desktop Elements
• Apple Menu: The Apple Menu is where the system settings are
Dock
stored. It is not advisable to change these settings.
• Finder Menu: The Finder Menu allows for the organization of the
desktop, and the ability to perform file management functions such as
copy/paste and create a new folder.
• Wireless Network: The wireless network icon indicates whether the
computer is currently connected to a wireless network, and at what
strength the computer is receiving a wireless signal.
• Spotlight: Spotlight is a search engine built-in to OS X. This feature
is helpful for finding misplaced files.
• Hard Disk: The hard disk is divided into a volumes section (the main
disk and other drives) and a user specific Home folder.
3. • Dock: The Dock is an array of functional icons designed to be easily
accessible. If the Dock is not currently visible in the Finder, it may be
in “auto-hide” mode. Drag the mouse cursor to the bottom of the
screen to make the dock reappear.
4. Windows User FAQ
How do I double click on the Macbook?
To double click, you can either press the touchpad button twice or you can
tap the touchpad twice with one finger.
How do I right click on the Macbook?
To right click on a file, tap the touchpad with both fingers simultaneously.
You can also right click on a file by clicking once and pressing the ctrl key.
How do I open a folder or file?
You can open a file by double clicking on the folder or file icon.
How do I open an application?
An application can be opened by either selecting an application icon (single
click) located in the Dock, or by selecting the application icon found within
the Applications folder located found in the main volume folder.
Where is my C: drive?
The Mac equivalent of the Windows (C:) drive is the hard disk, which is
divided into a volumes section (the main disk and other drives) and a user
specific Home folder. These areas can be accessed by either selecting the
hard drive (double clicking) or by clicking on the icon found in the
Dock.
Where are my documents stored?
The preferred storage location for user files is the Documents folder, located
in the Home folder. Alternatively, music, pictures, and movies may be
placed in format specific folders from within iLife applications.
How do I save a document?
A document can be saved within an application by selecting “File” and
“Save” from the application menu bar. Shortcut: Hold down the
combination Shift-Command key ( )-s simultaneously. For additional
information about saving documents, please read the section on organizing
and saving files within an application.
5. How do I find my documents?
The Mac equivalent of Windows Search is called Spotlight . This
program is located in the top right hand corner of the Finder Menu bar. To
do a simple search, click on the Spotlight icon, and type in the name of the
file you are looking for. According to the default, a list of documents should
appear in order of last modified. For additional information, please read the
Spotlight section.
6. Main Volume Folder
The volumes section of the hard disk contains the main volume folder and
other volume folders (e.g., CD/DVD, Flash drive, external hard drives). The
main volume folder stores the Applications folder, as well as preference
settings for programs and the operating system. Depending on the setup of
security permissions and user accounts, access to these files may be limited.
Removable
Volume
Main
Volume
7. Managing Your Documents
Mac OS X will automatically save your documents in certain folders within
the Home folder. For example, iPhoto will save photos in the “Pictures”
folder. You should make it a habit to save your documents in the subfolders
of the Home folder as well. Whereas Windows users generally have a folder
like “My Documents,” Mac users have a folder called “Documents,” which
is a subfolder of the Home folder. Most of your files, especially text files,
should be saved in that folder.
User
Files
Home
Folder
*Note: My Home folder is called “Puma”. This name will be different on
your computer.
Creating a New Folder
1. First, determine where you want to store your file and navigate to that
location (i.e., Word files should be saved in the Documents folder).
2. Next, click on “File” in the Finder Menu and select “New Folder”. A
folder should appear with the highlighted name “untitled folder”.
Shortcut: Hold down the combination Shift-Command key ( )-N
simultaneously.
8. Renaming a Folder
3. Type in a name that best describes the purpose of this folder, (i.e.,
“Cataloging Assignments”). If the folder is not highlighted, click on the
name of the folder once to highlight, wait a moment, and click again.
You may now rename the folder.
Duplicating Files and Folders
On occasion, you may find yourself wanting to have a duplicated “working
copy” of a file or folder. This is helpful in situations where you want to
experiment with changes to the document, but would like to have an original
backup copy in case you are unsatisfied with the results.
1. First, click on the file or a folder you would like to duplicate to highlight.
2. Next, click on “File” in the Finder Menu, and select “Duplicate”.
Shortcut: select the file or folder and press Command key ( )-D to
duplicate.
3. Lastly, it is recommended that you change the name of the new file or
folder, so as not to confuse the backup with the original.
Transferring Documents
Sometimes you may want to transfer documents from one folder to another,
or from a removable disk (e.g., CD or flash drive) to a folder. This example
illustrates transferring a file from a flash drive to a folder within the
Documents folder.
1. Open the flash drive by double clicking on the flash drive icon.
Flash drive icon
2. Navigate to the file you want to transfer and click once to select.
3. Click “Edit” from the Finder Menu and select “Copy”. Shortcut: select
the file and hold down command key ( )-c.
4. Navigate to a previously created subfolder in the Documents folder. In
this case, I have chosen the “Cataloging Assignments” folder.
9. 5. Double click on the folder to open.
6. Finally, select “Edit” from the Finder Menu, and select “Paste”.
Shortcut: Hold down the key combination, ( )-v.
Cleaning up Files
After working on a number of projects, you may find your desktop or
Documents folder increasingly cluttered with files and folders. Therefore, it
is advisable to organize your project assets in subfolders found within larger
project folders. Additionally, it is recommended to backup essential files
and folders on a regular basis, and to delete non-essential items.
10. Deleting a File or Folder
1. First, select the folder or file you want to delete. In this case, I have
chosen the “Cataloging Assignments” folder.
Folder to
Delete
2. Next, drag the folder to the trashcan , found on the end of the
Dock. The trashcan will now appear full . Shortcut: Select the
folder, then click on “File” in the Menu Finder, and select “Move to
Trash”.
11. Organizing and Saving Files within an Application
Ideally, it is preferable that a folder be created prior to launching an
application. From an organizational perspective, this is helpful because it
provides a strategic layout of files before they are created. However, similar
to Windows, if you have yet to create a folder, you can also create one from
within an application. For example, to accomplish this task in Word:
1. First, select “File” from the Finder Menu toolbar.
2. Next, select “Save As”. A popup box should appear. Select the pull
down arrow to choose a specific location to save your files. Note: If you
choose “Save” and not “Save As”, the document will be saved to the last
known file location.
Pull Down
Arrow
Expanded View
New Folder
12. 3. Once, you have found the save location, if you have not yet done so,
create a new folder by selecting the “New Folder” button.
4. After the folder has been located (or created), it is important to give the
document a name, while still maintaining the file extension (i.e., ”.doc”
for a Word document).
13. Spotlight
Spotlight is a simple yet sophisticated search tool found in OS X. Spotlight
searches not only for information related to a document (i.e., title, extension,
date modified), but also within the document itself. In this instance, it is
only necessary to remember some of the key words located within the
document.
1. To conduct a document search, first select the icon.
2. Next, type in the name of the document you are looking for. In this case,
I am going to look for a document about the great librarian, Shiyali
Ramamrita (SR) Ranganathan.
3. As you can see I have received two results for this search despite the fact
that neither of the documents includes the phrase “Ranganathan” in the
title.
4. Double click on the document to open..
5. To get further information about the document, select the document in
the file list (single click), and then select the button. The document
entry will expand with the location directory path. Shortcut: Select the
14. document, and hold down the key combination, ( )-i.
Note: The default search results are returned by date. It is also possible to
search using alternative criteria, as listed in the right hand toolbar of the
Spotlight results box. For example, grouping by “Kind” can be especially
helpful when trying to search for non-text documents such as images, music
or video.
15. Dashboard
Dashboard is designed to hold a number of helpful temporary use
applications known as Widgets.
1. To launch Dashboard, click on the Dashboard icon located within your
Dock.
2. When selecting Dashboard, previously opened Widgets may appear.
Open
Widgets
To view
Widget toolbar
16. 3. To view the Dashboard toolbar and open a new Widget, click on the plus
symbol located in bottom left hand corner. .
To close
Widget
Widget applications
4. You can now choose to select a new Widget application or close opened
Widgets by clicking on the “X” in the right hand corner of the
application.