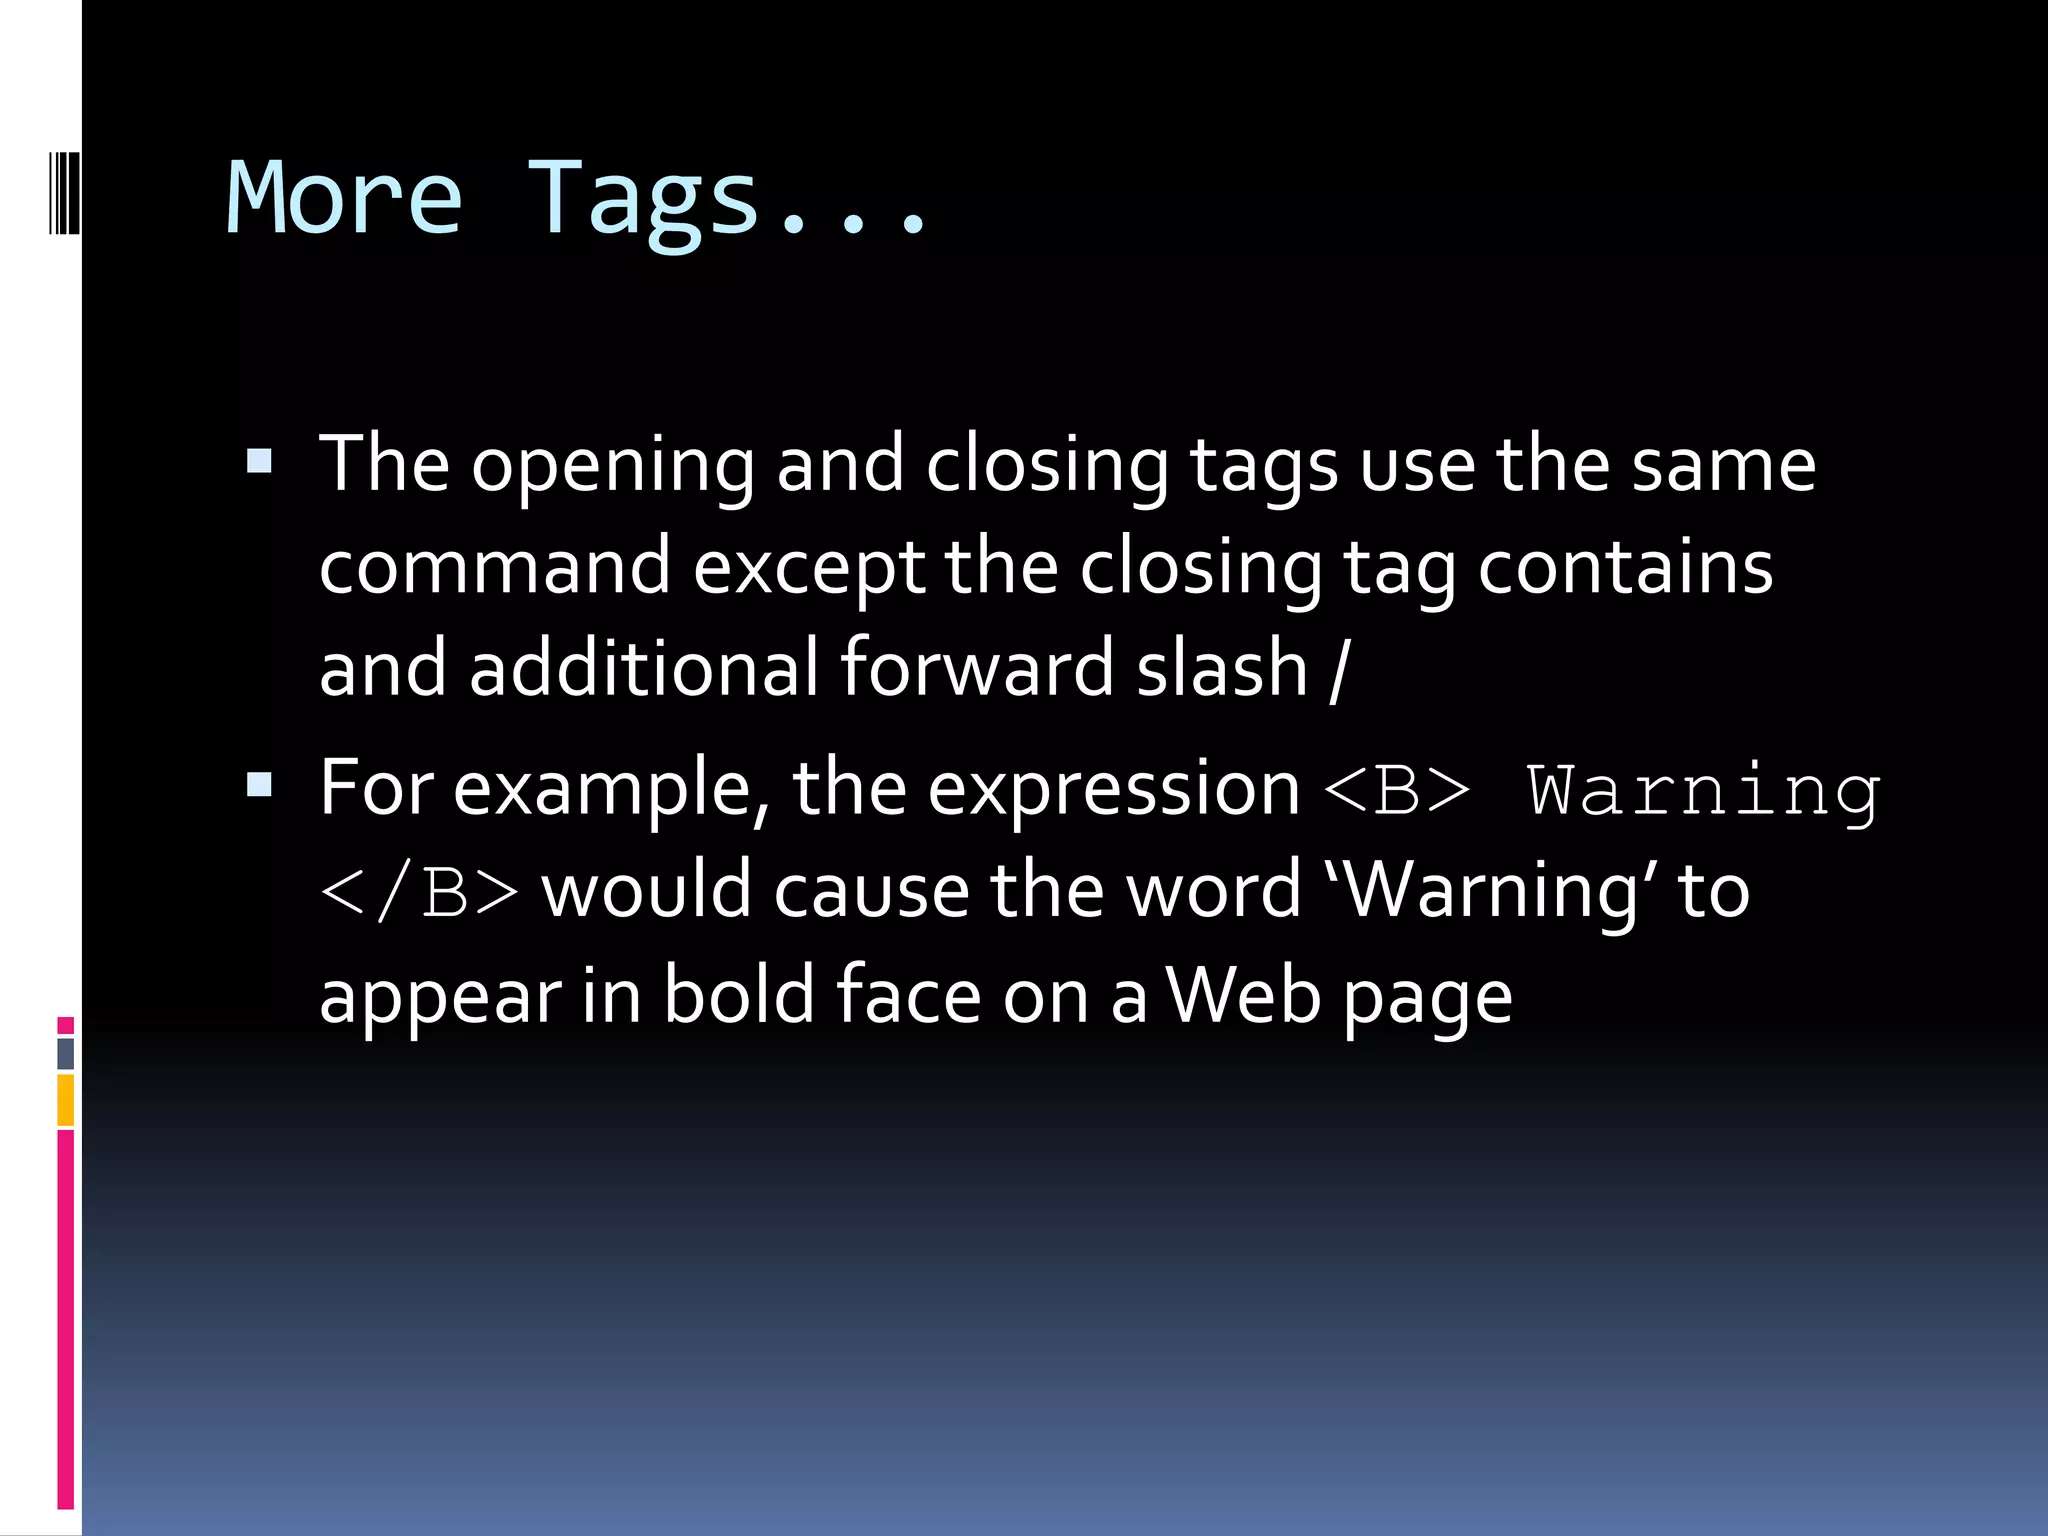
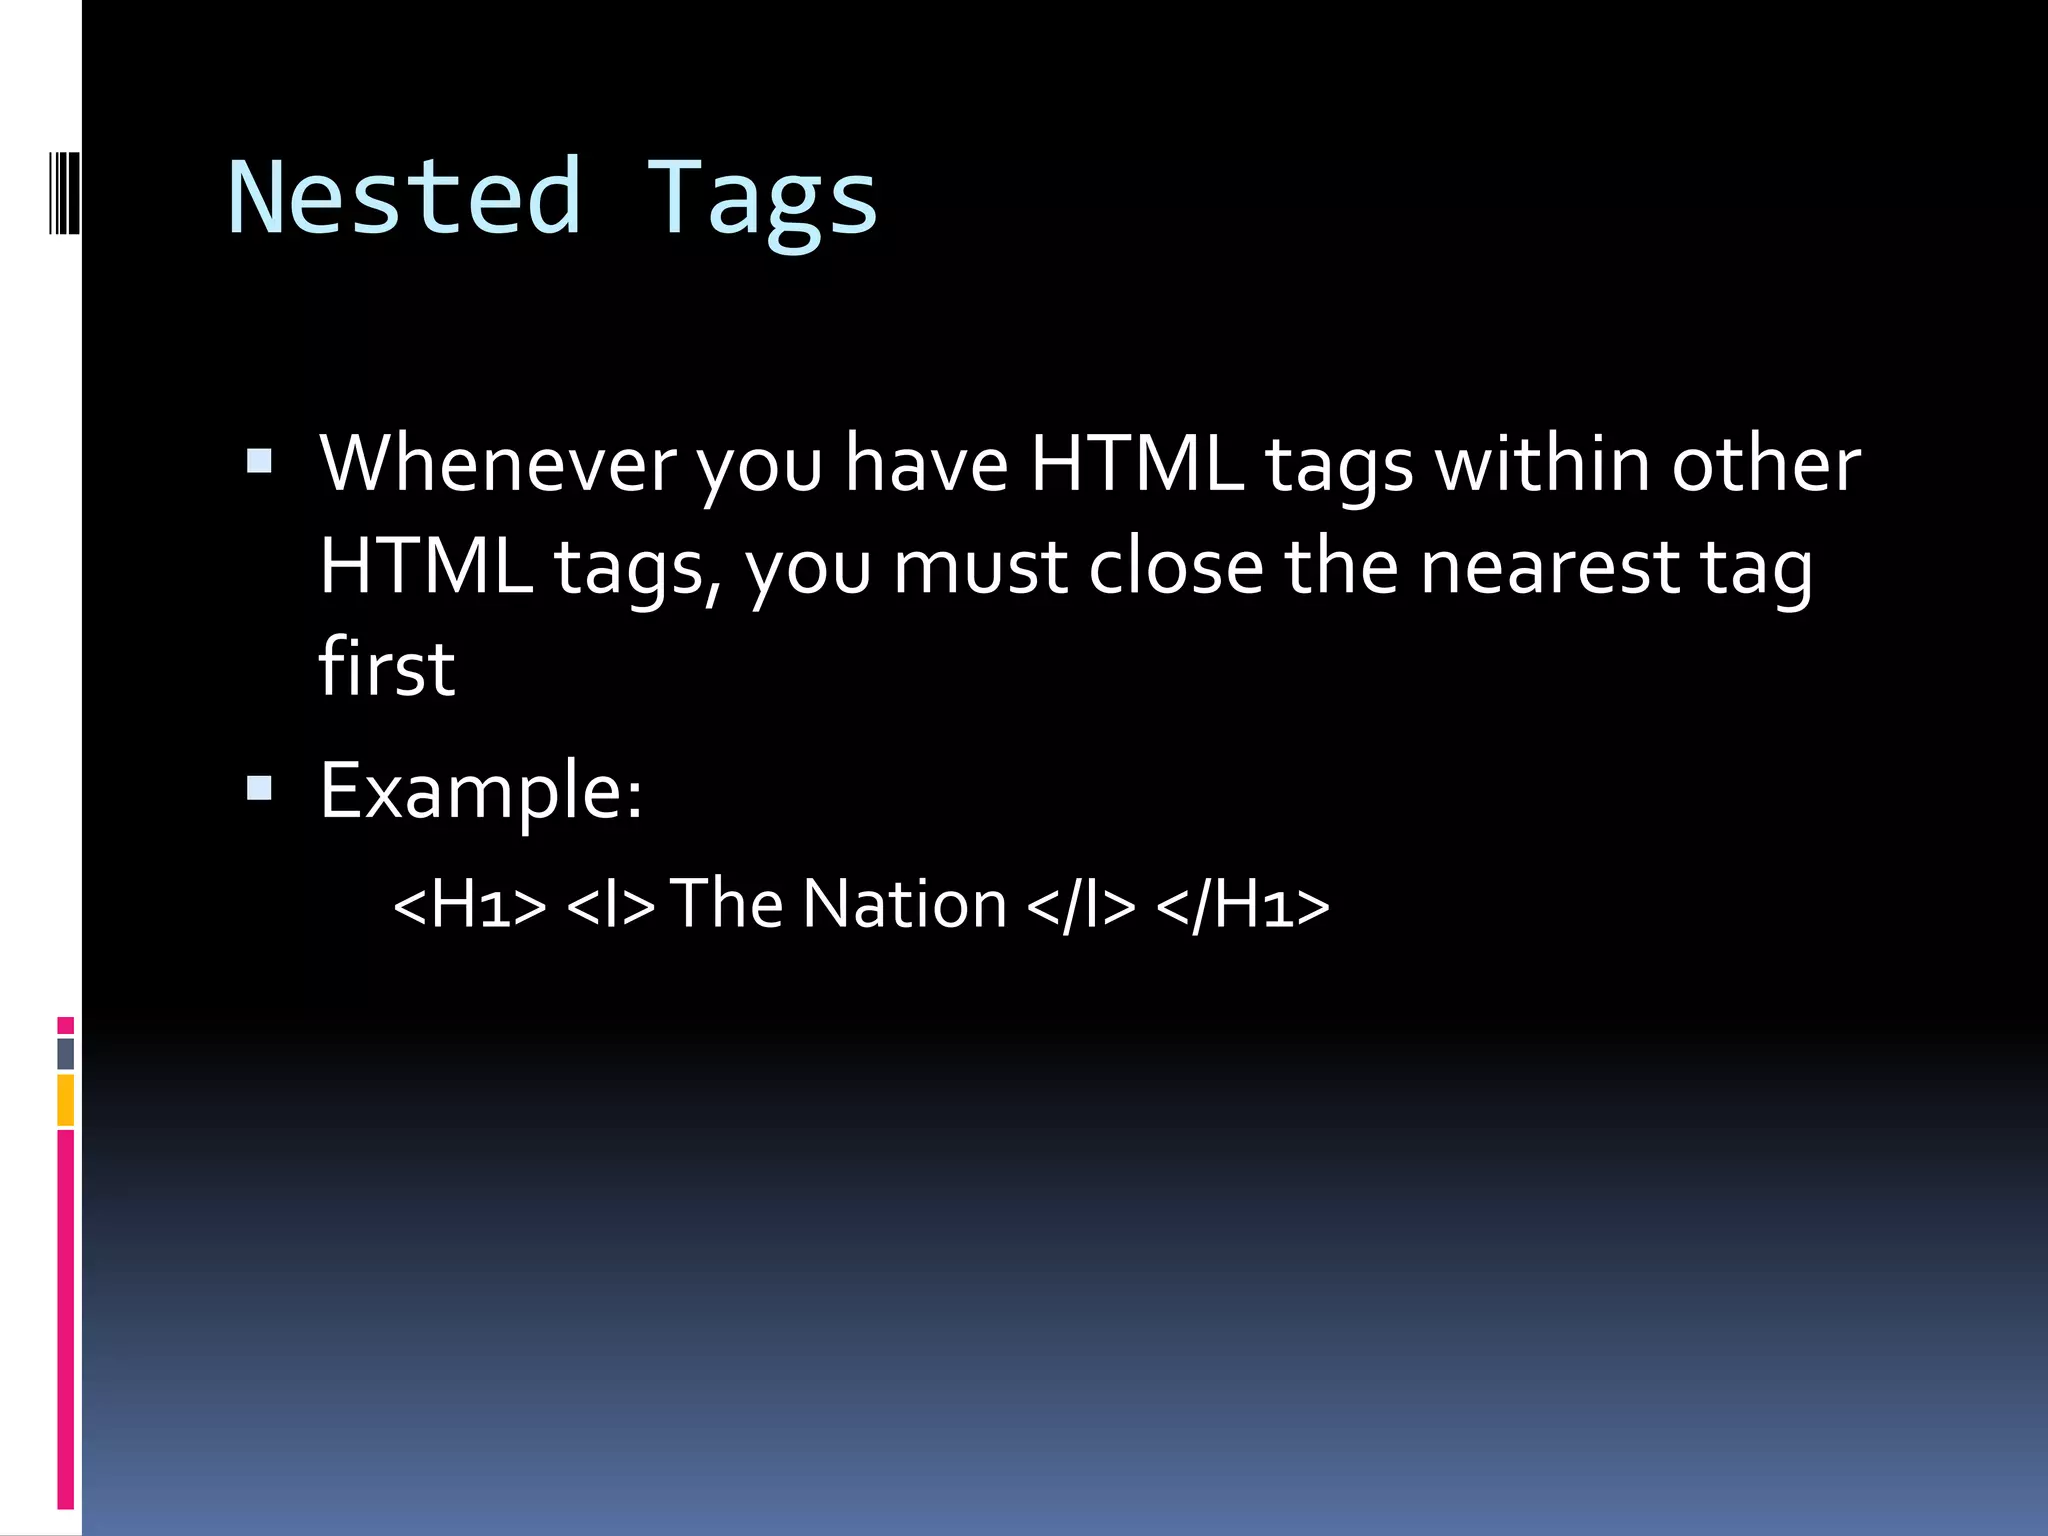
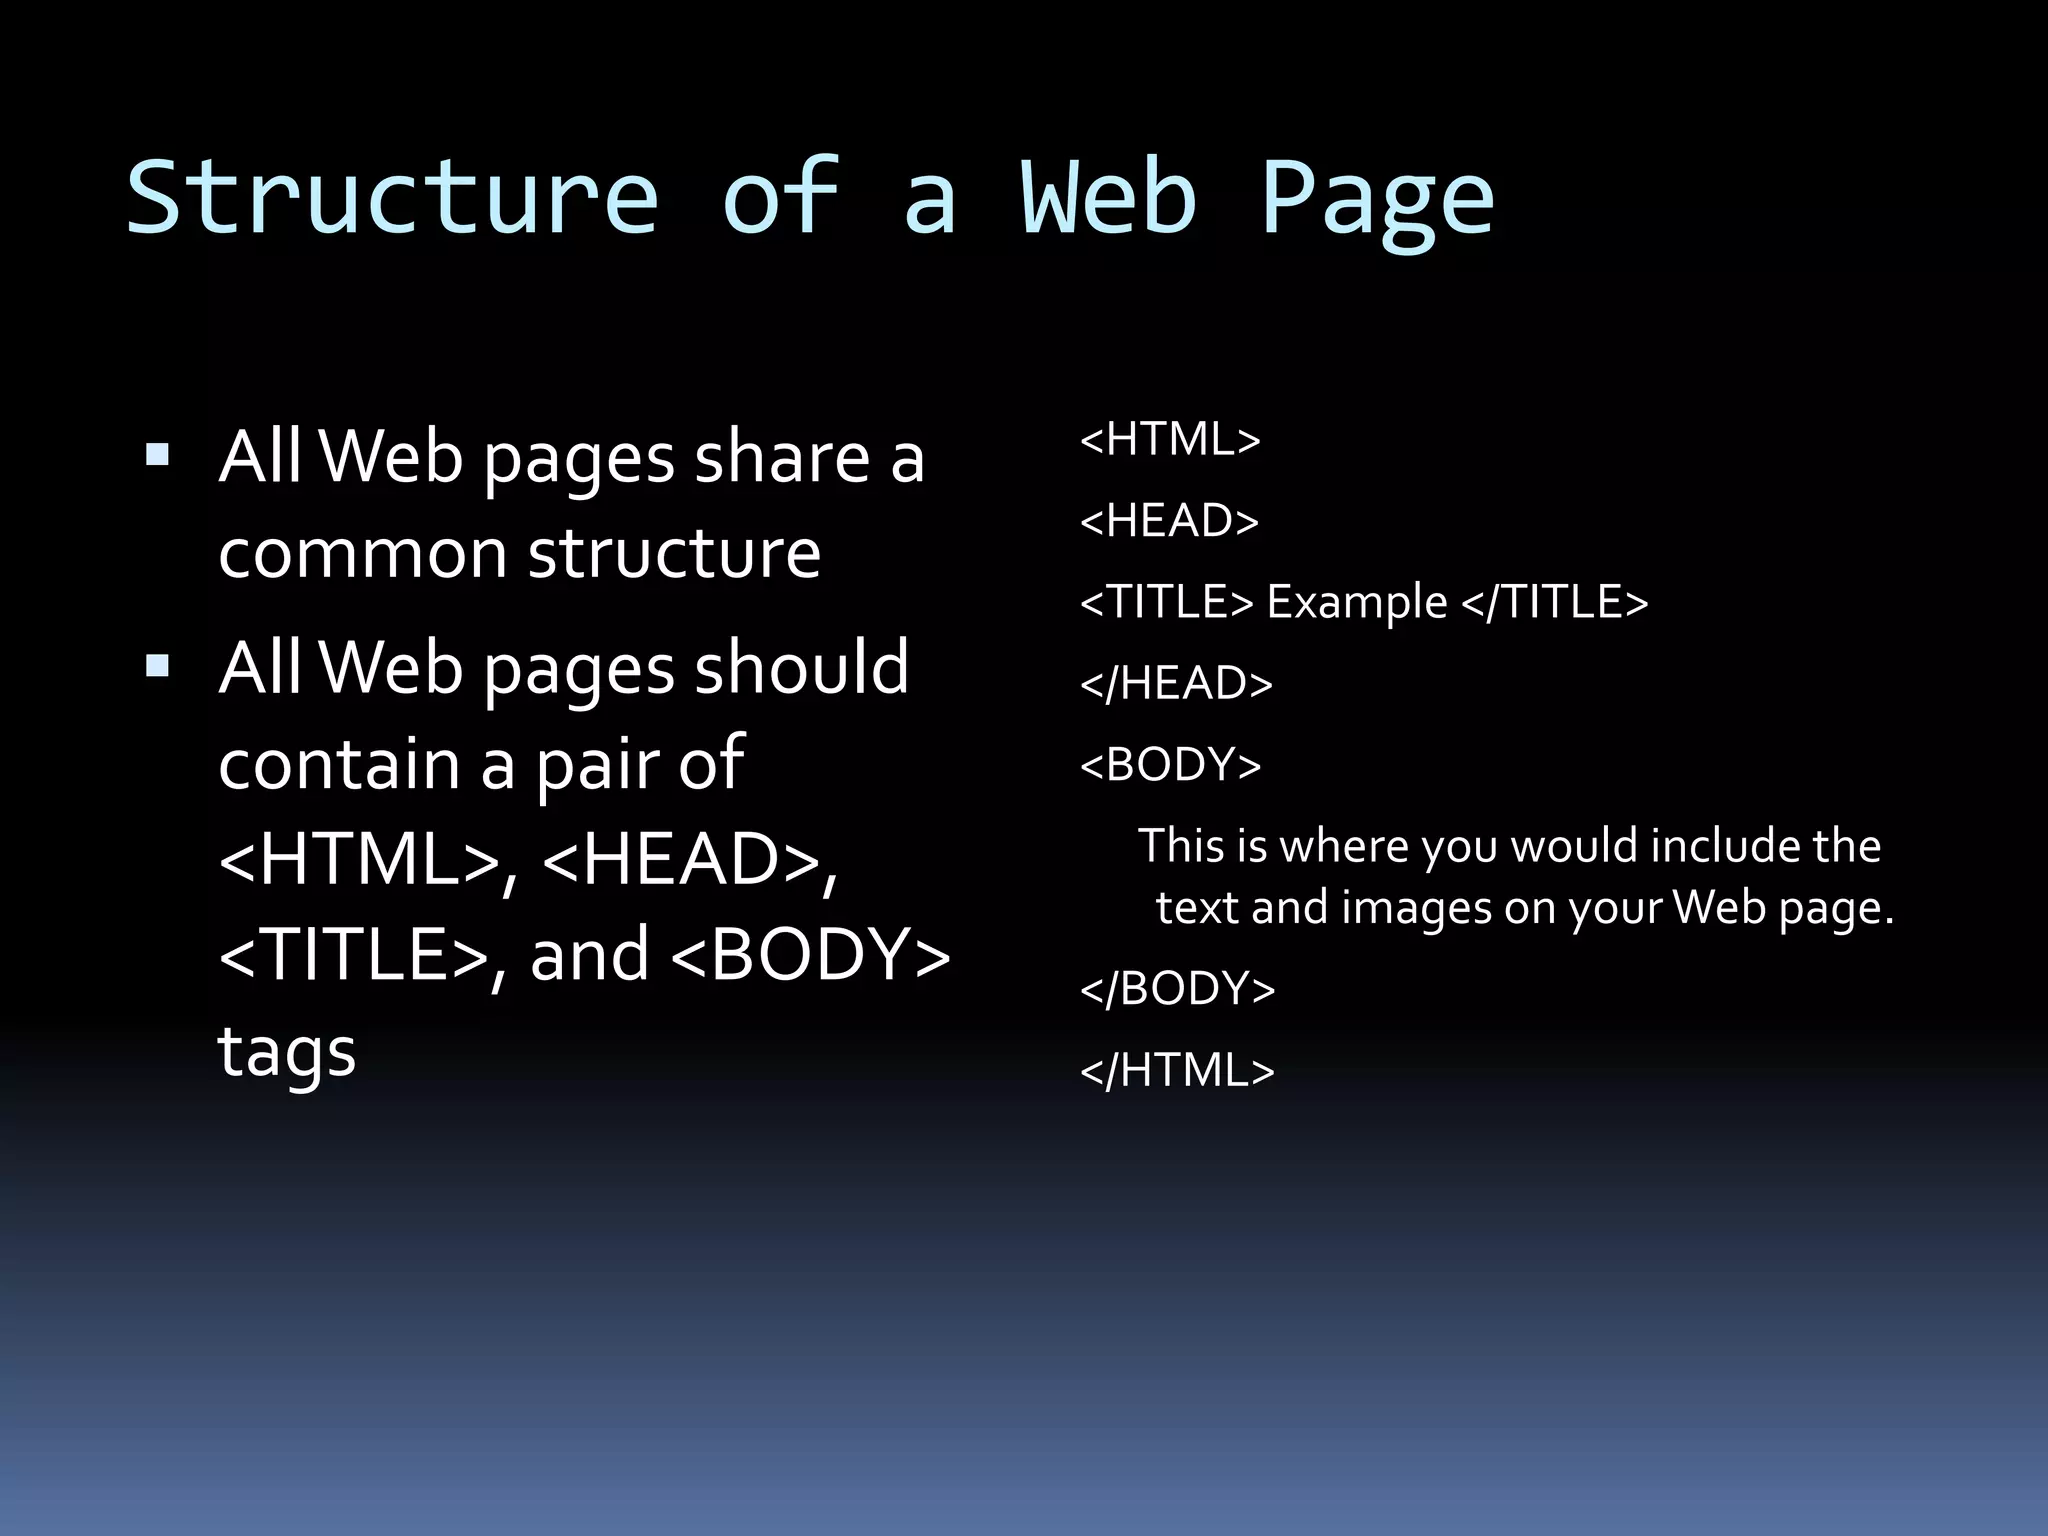
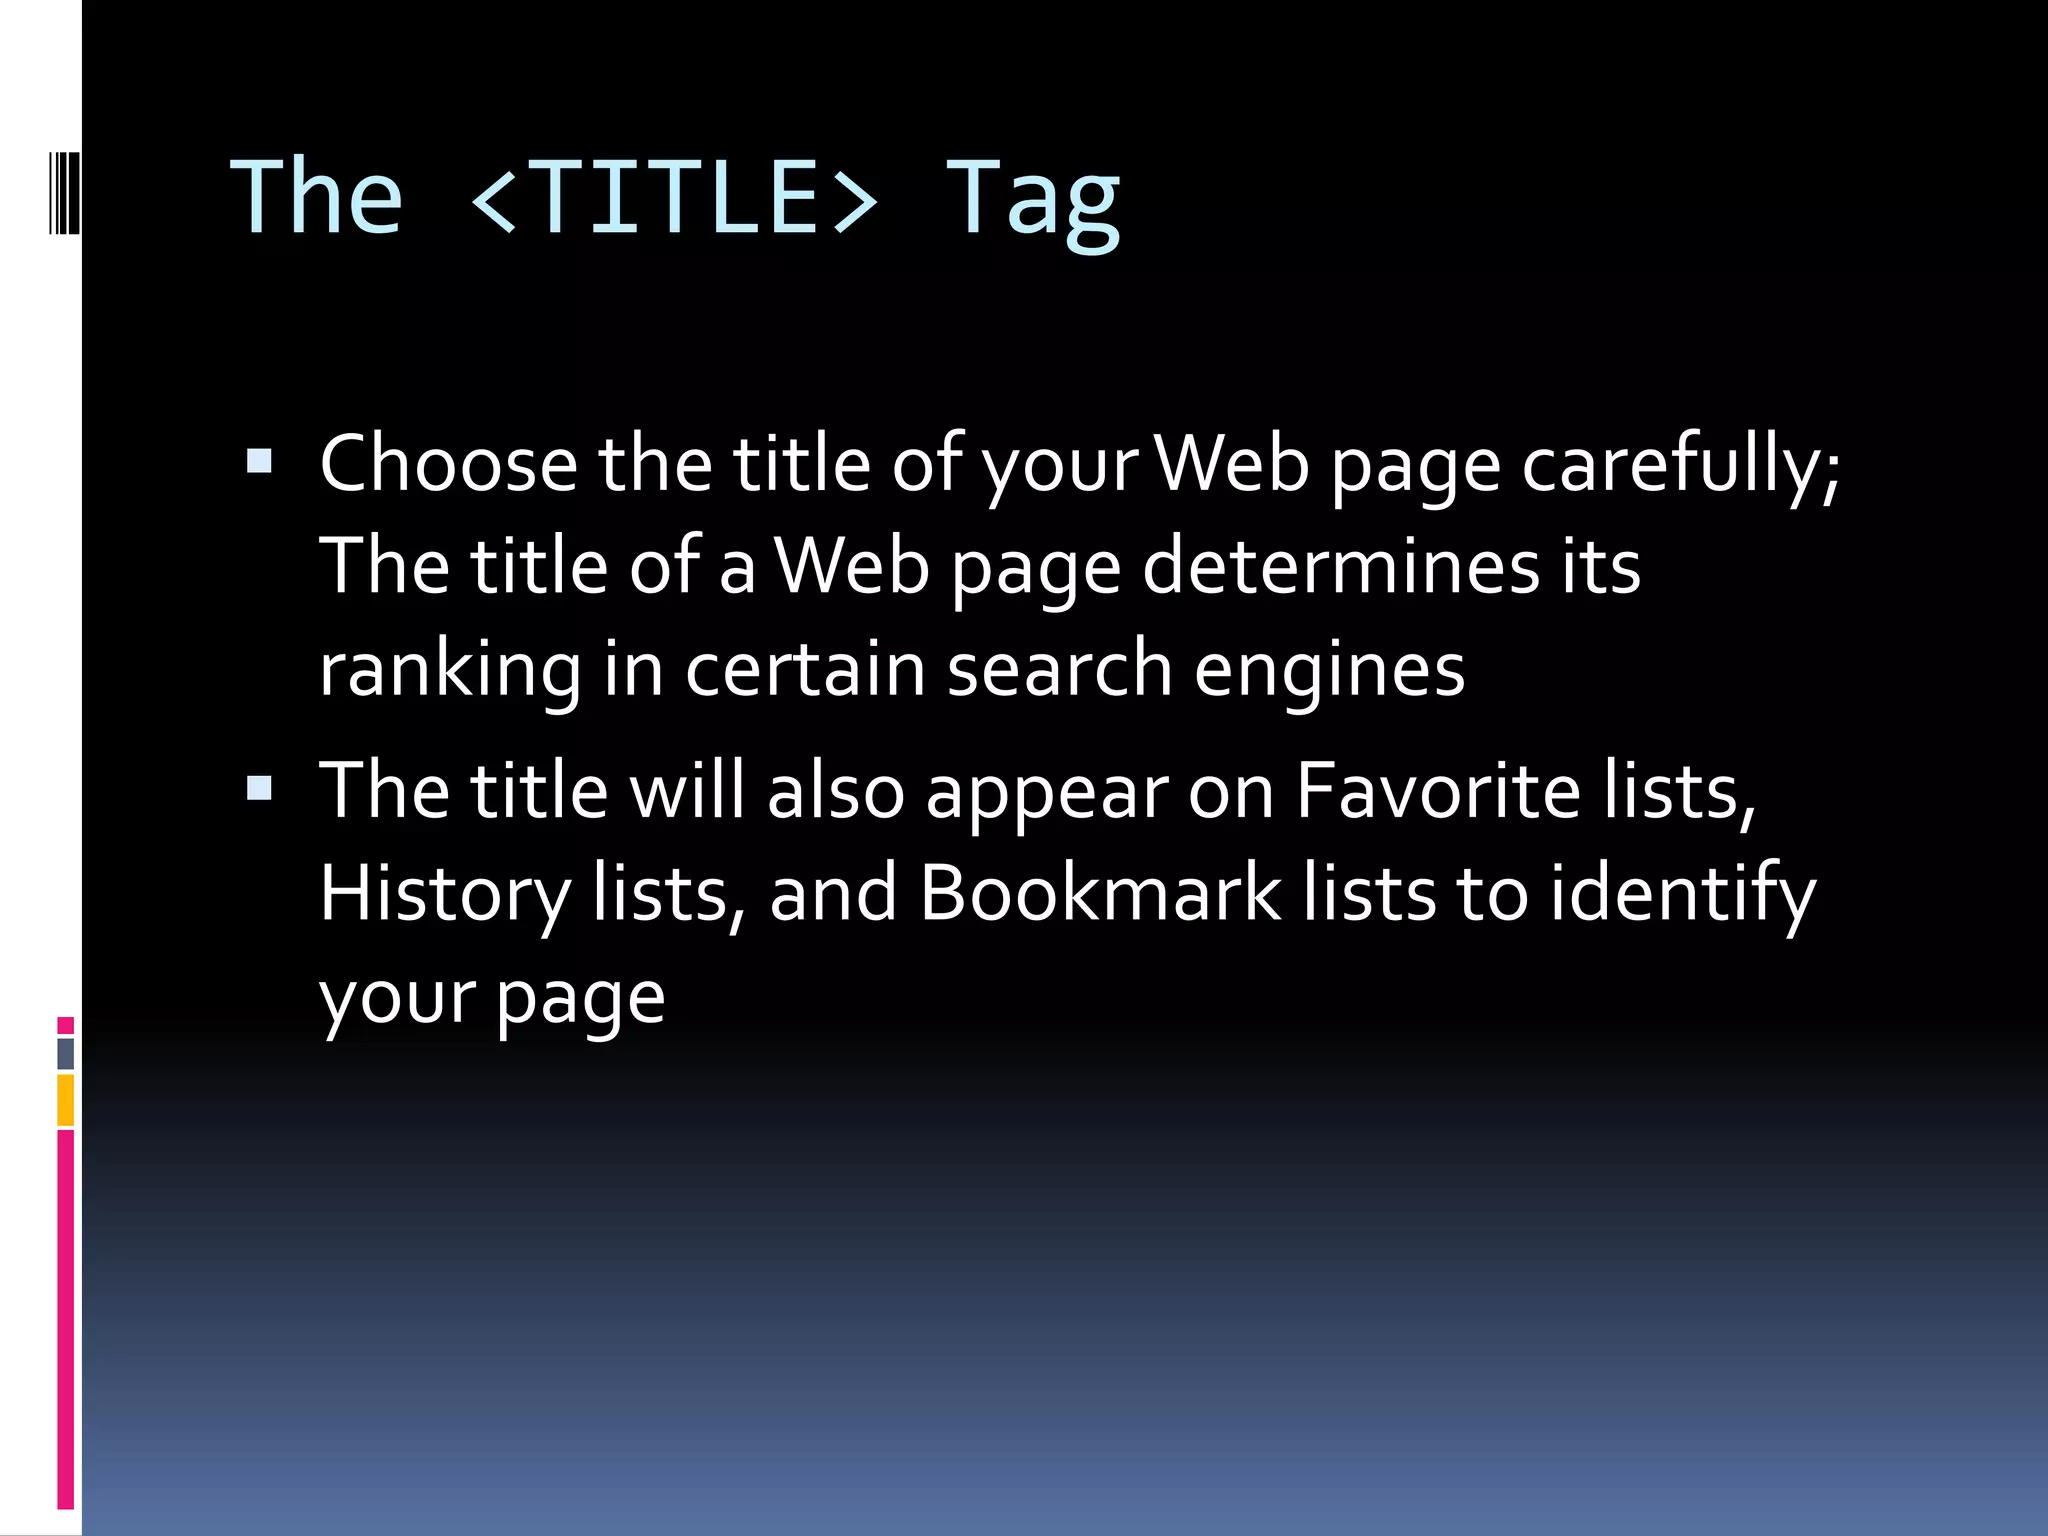
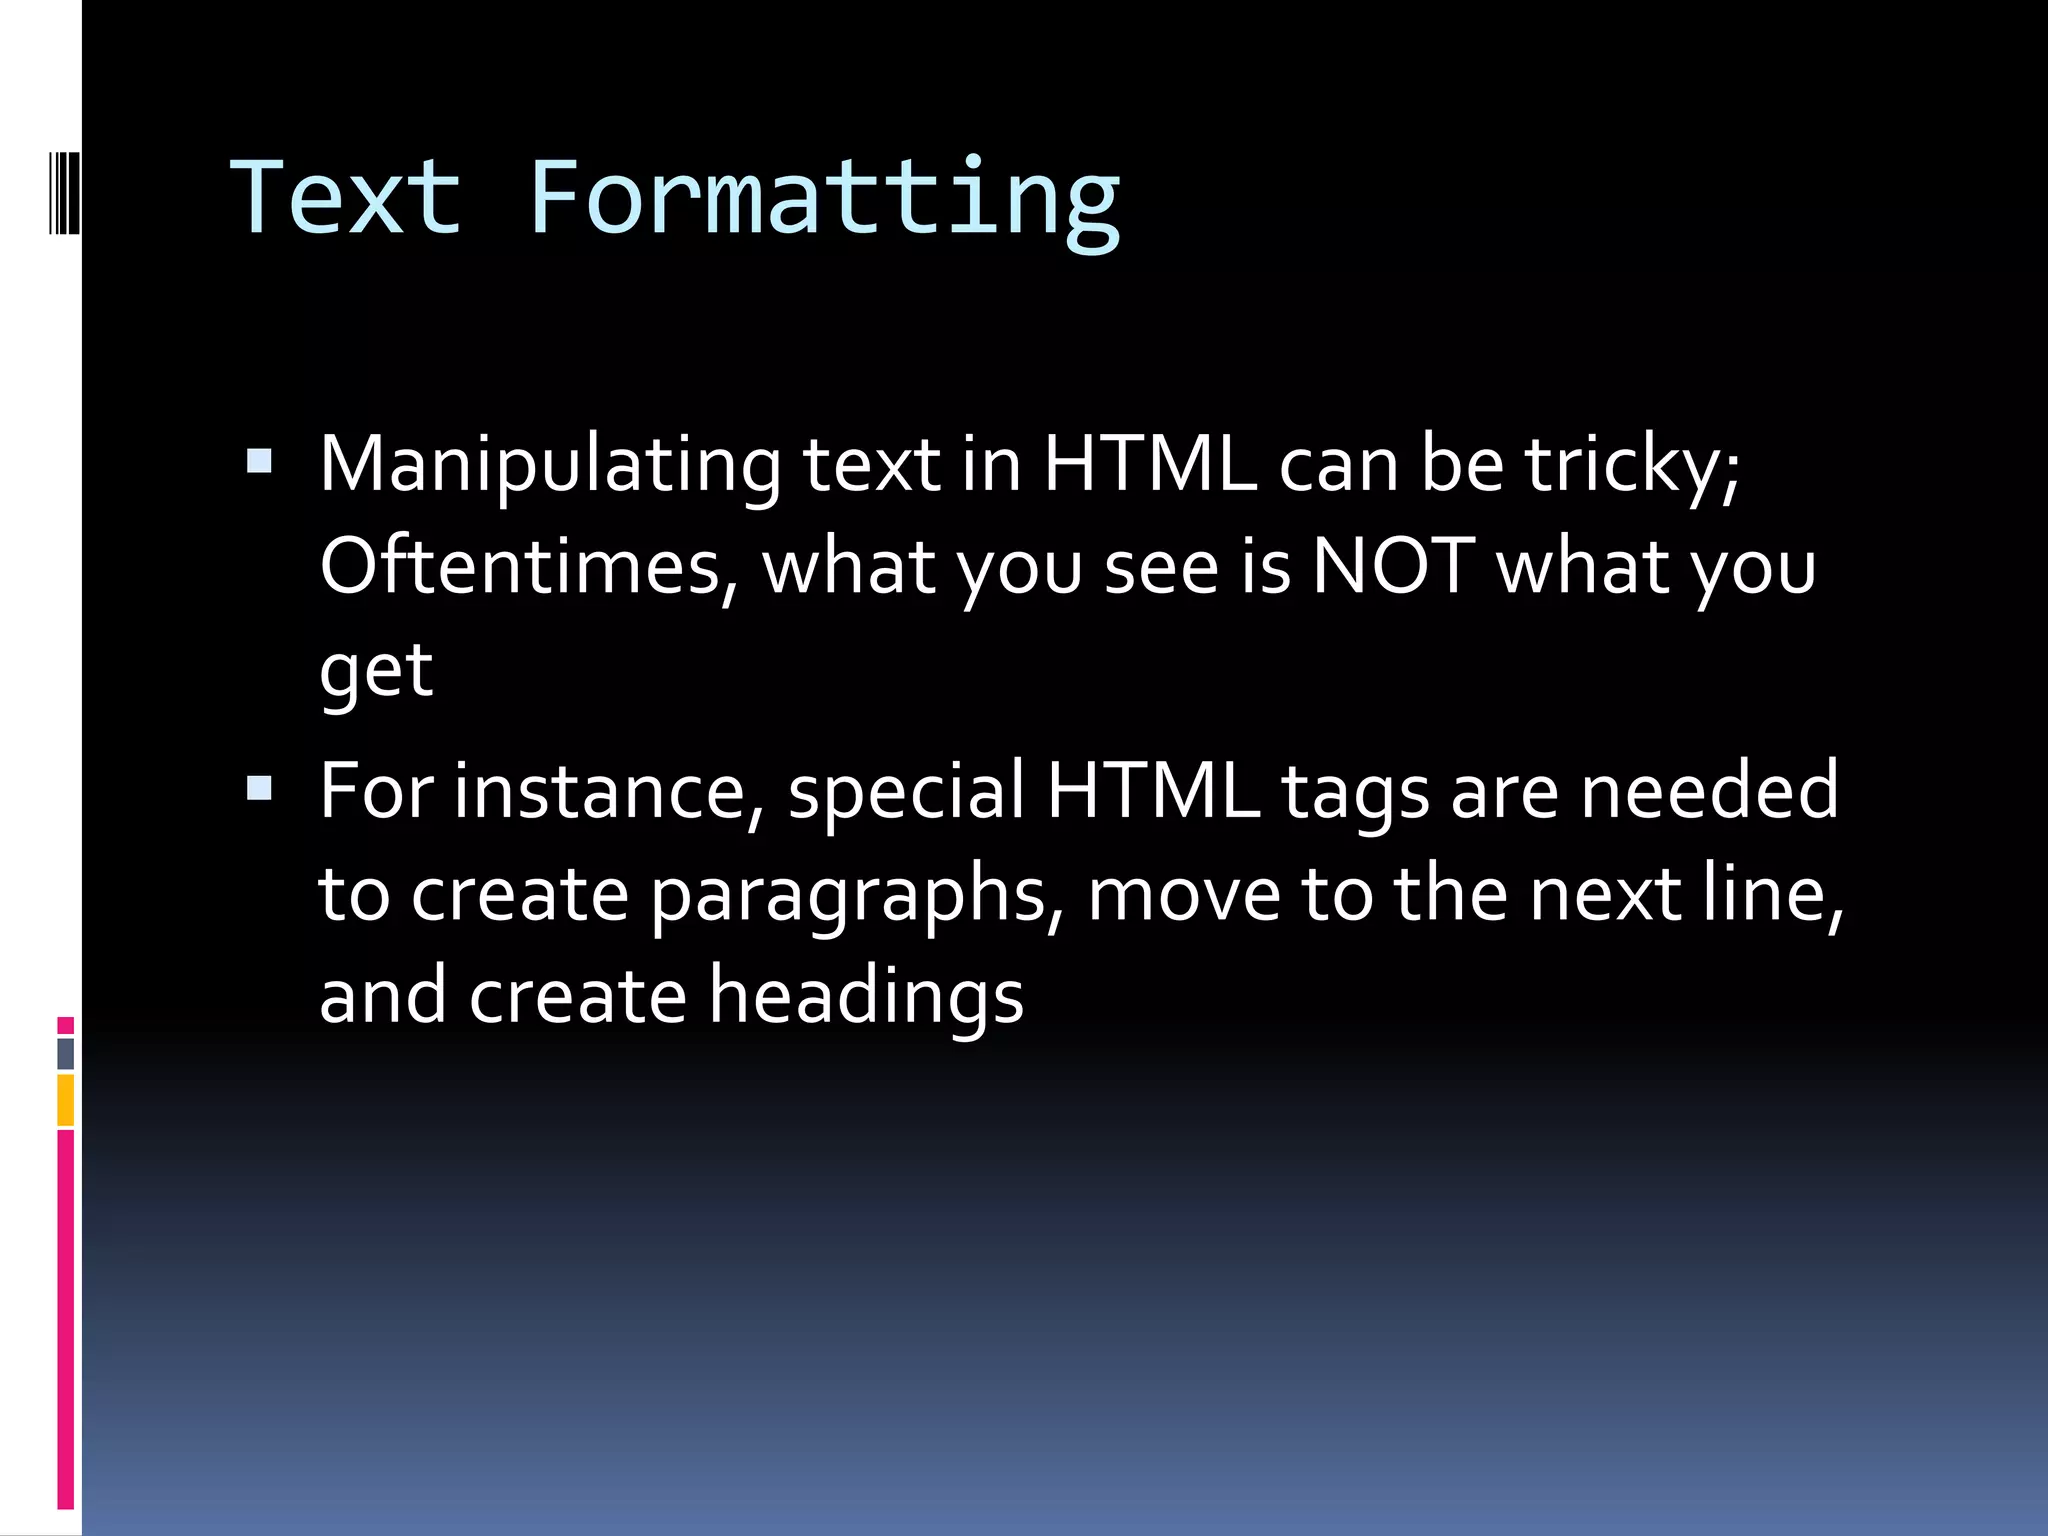
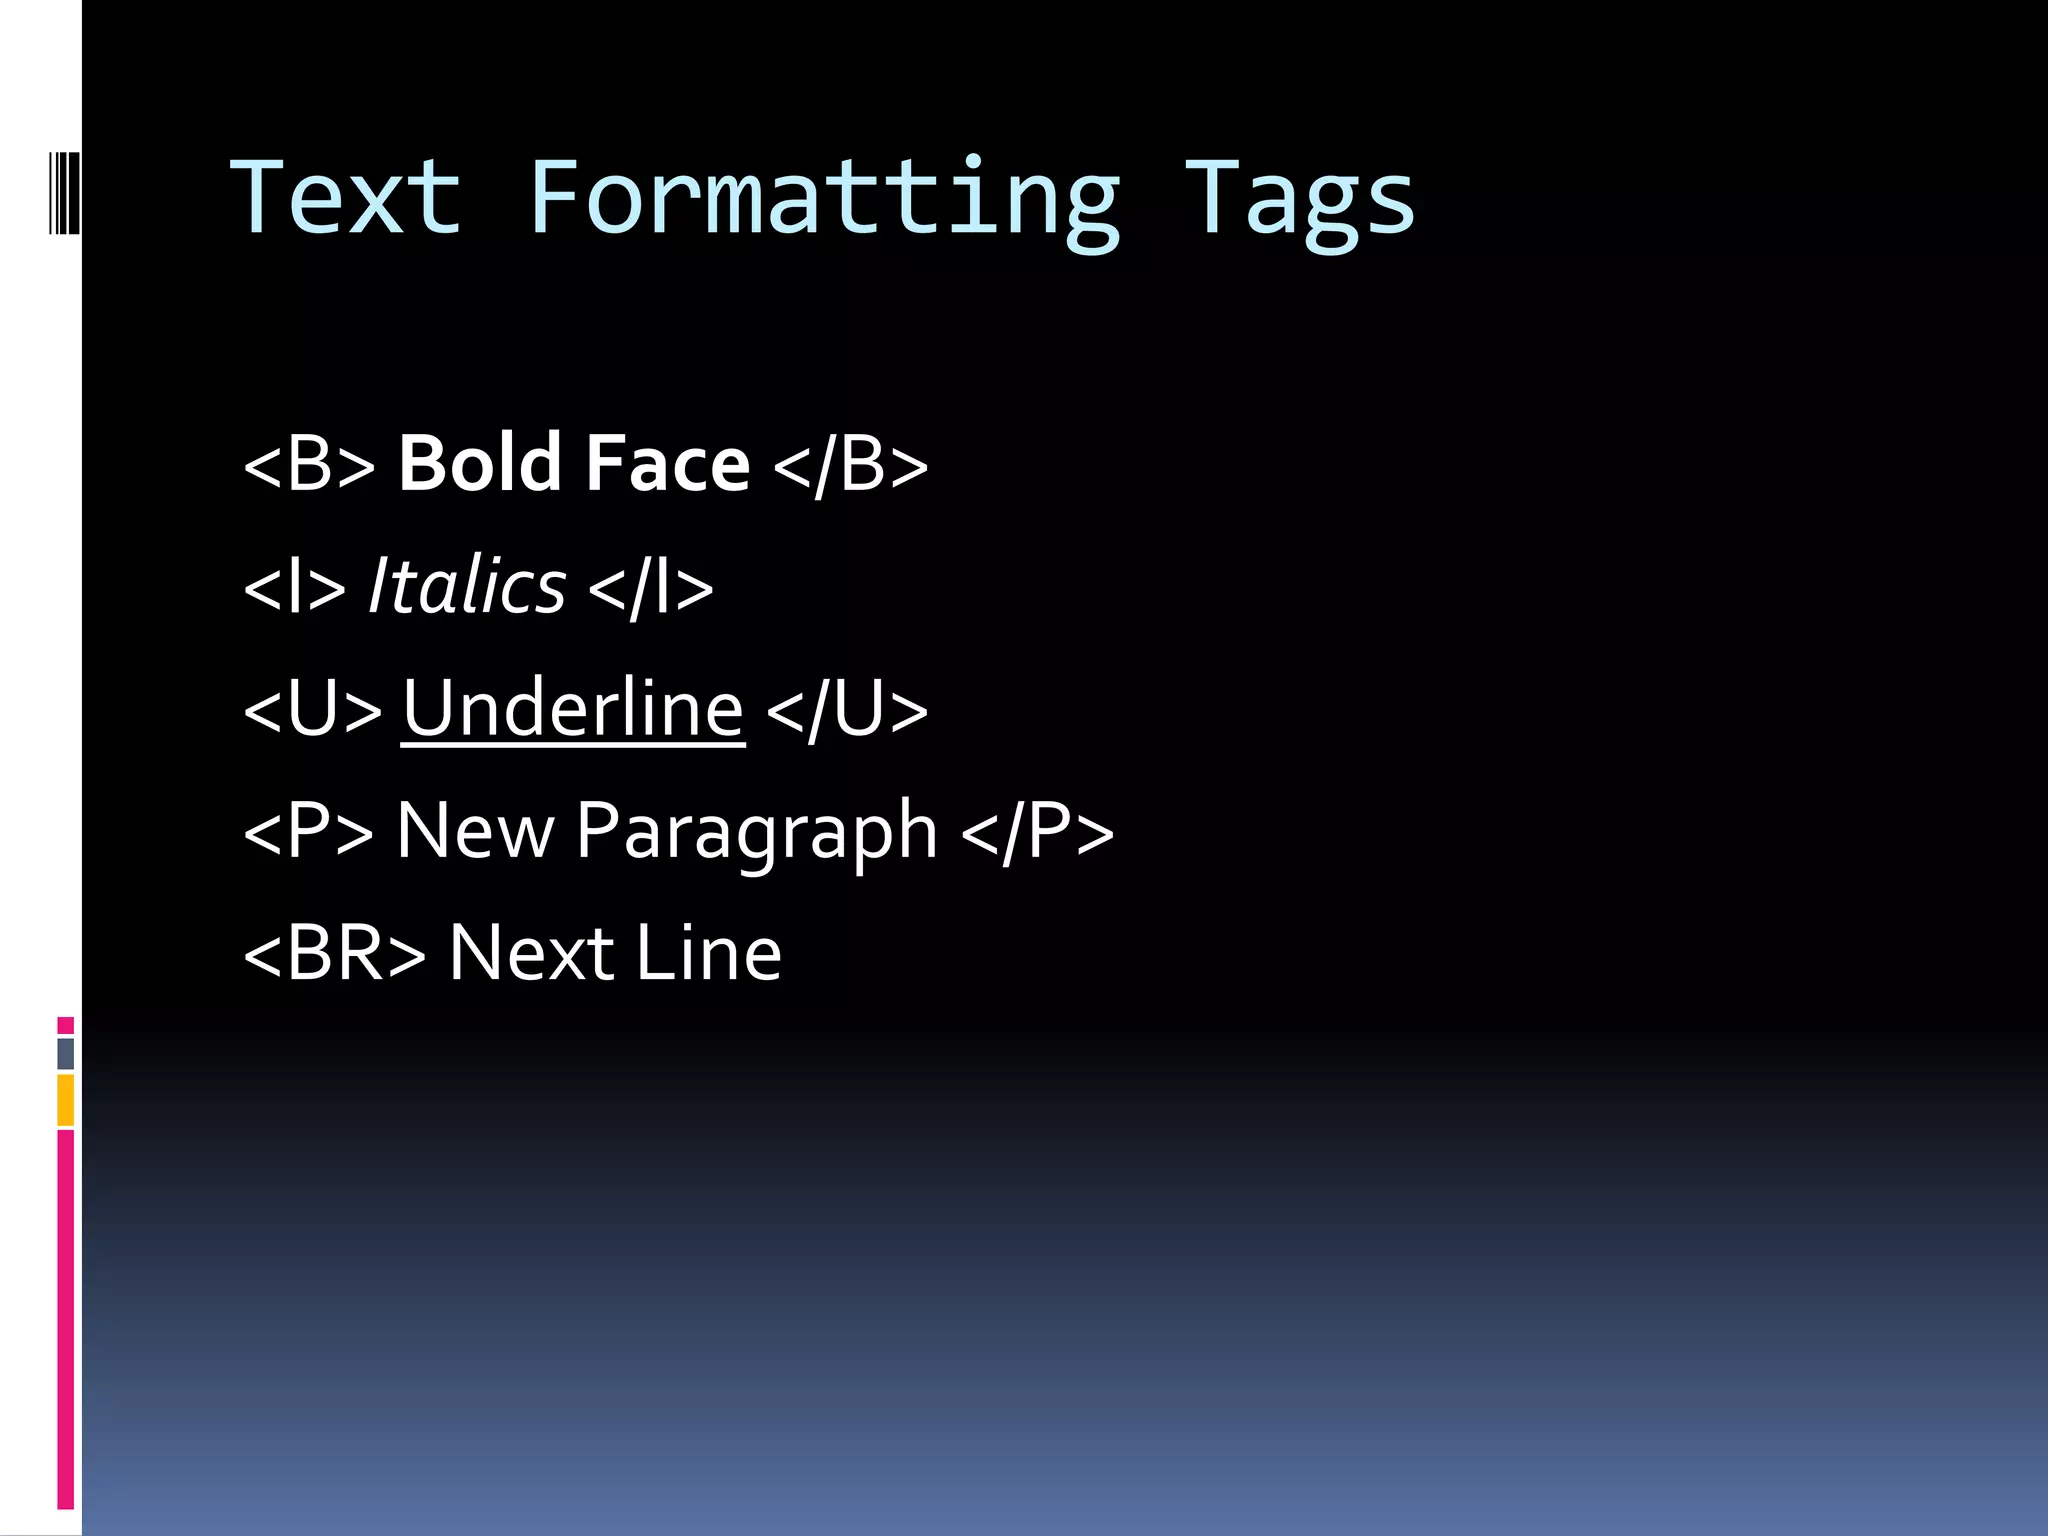
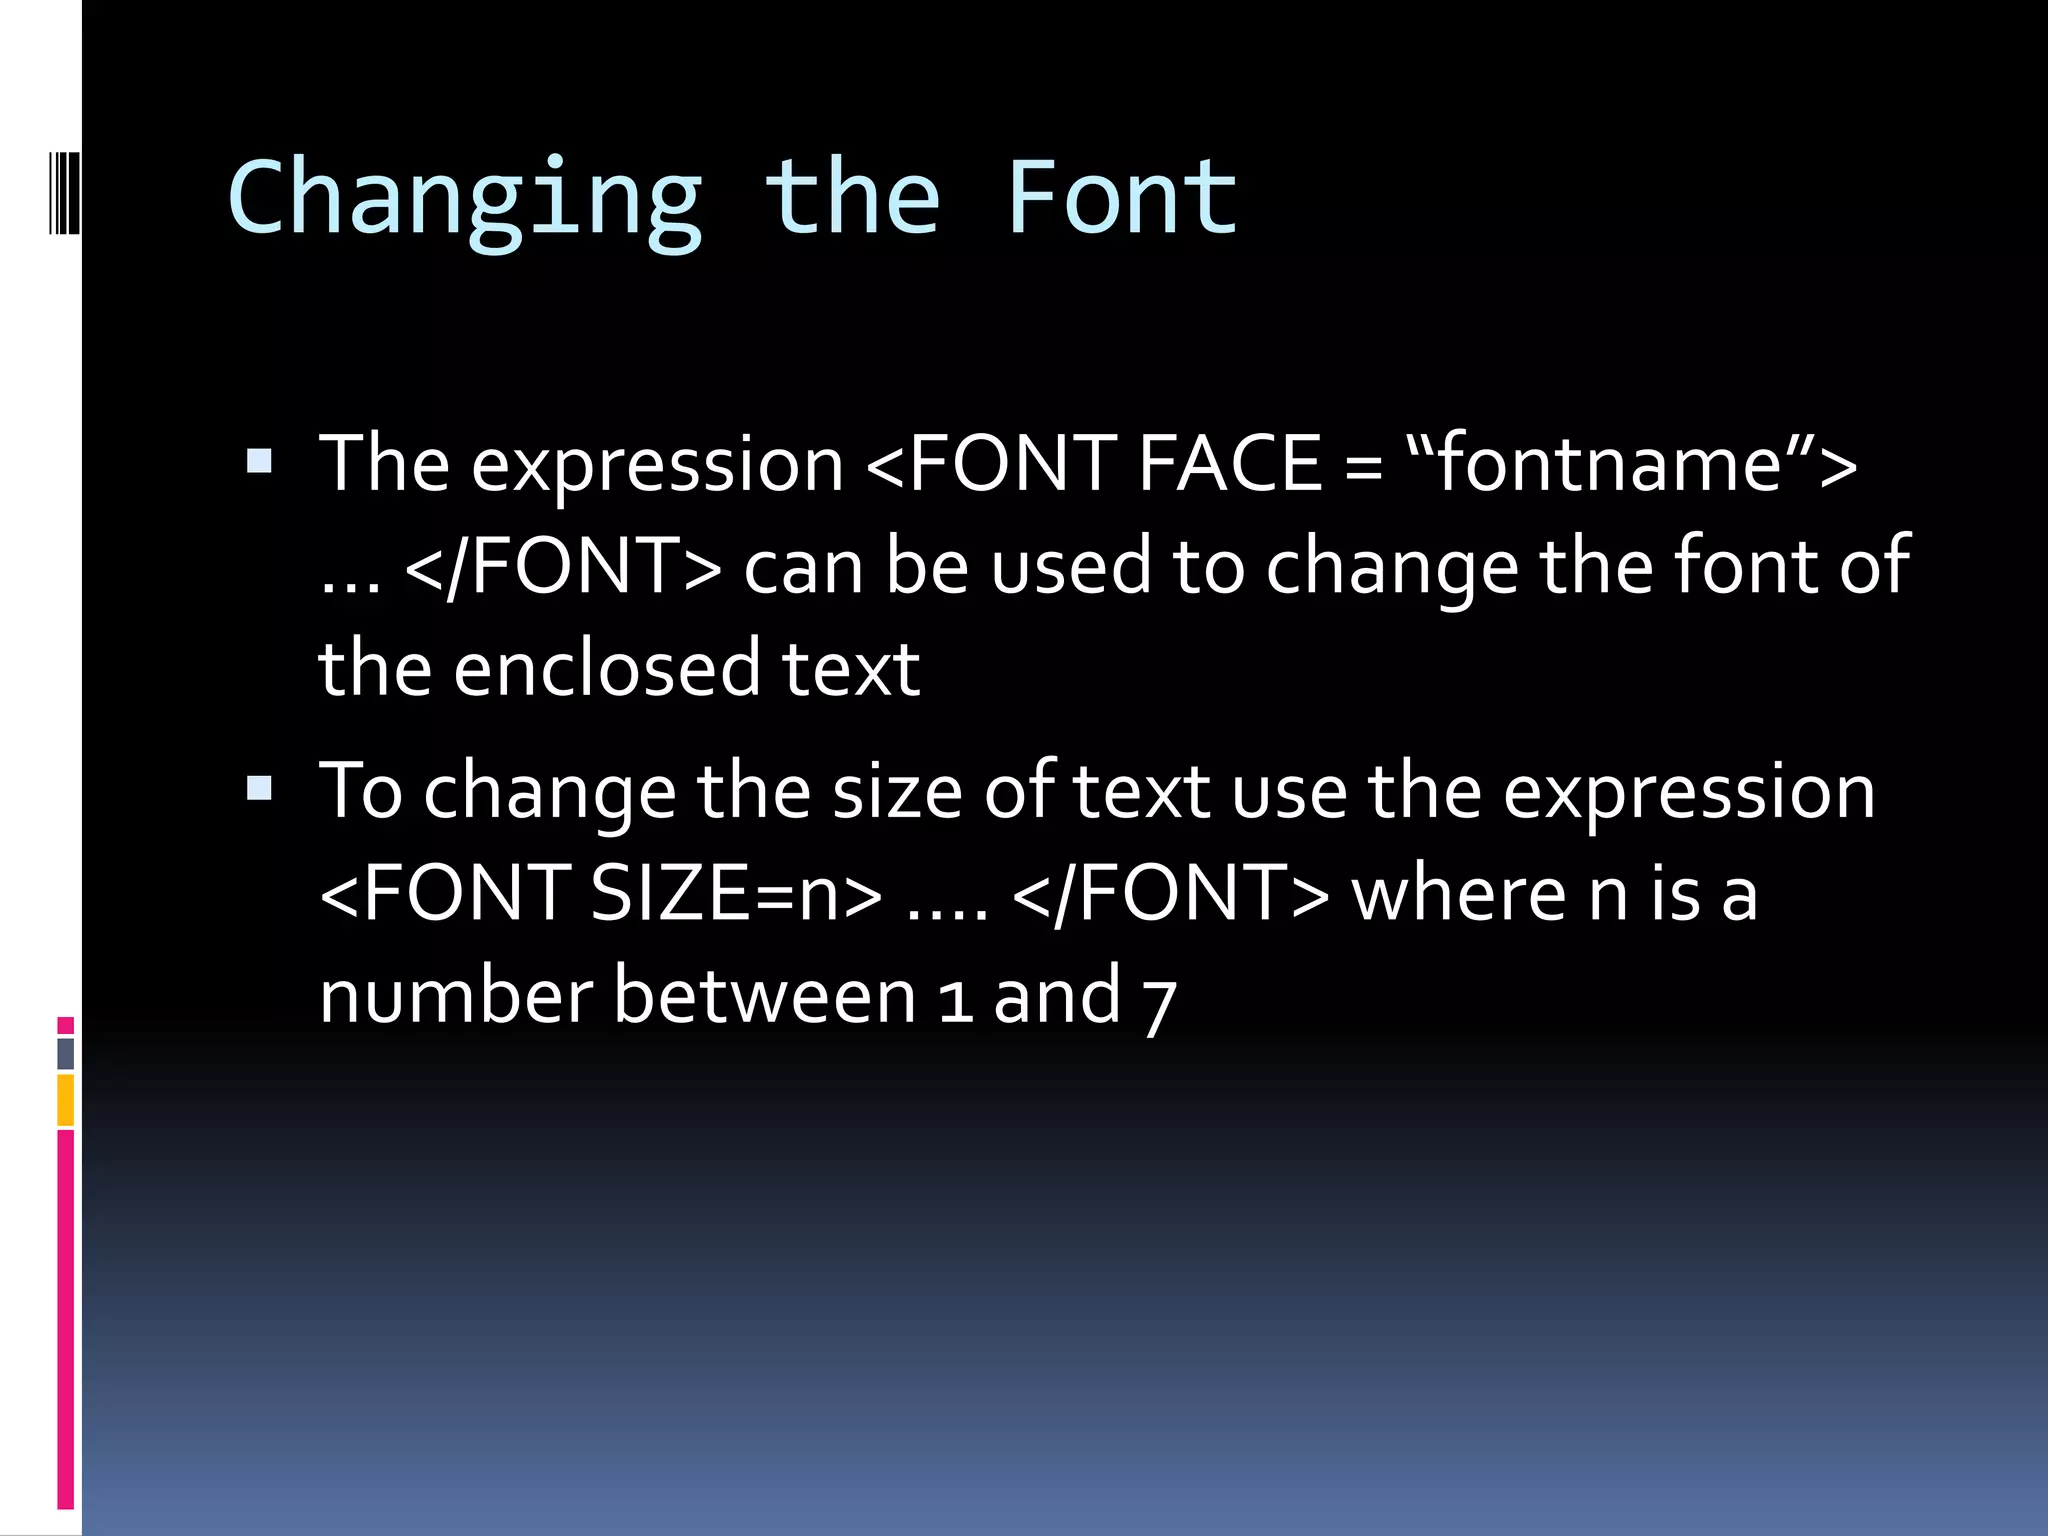
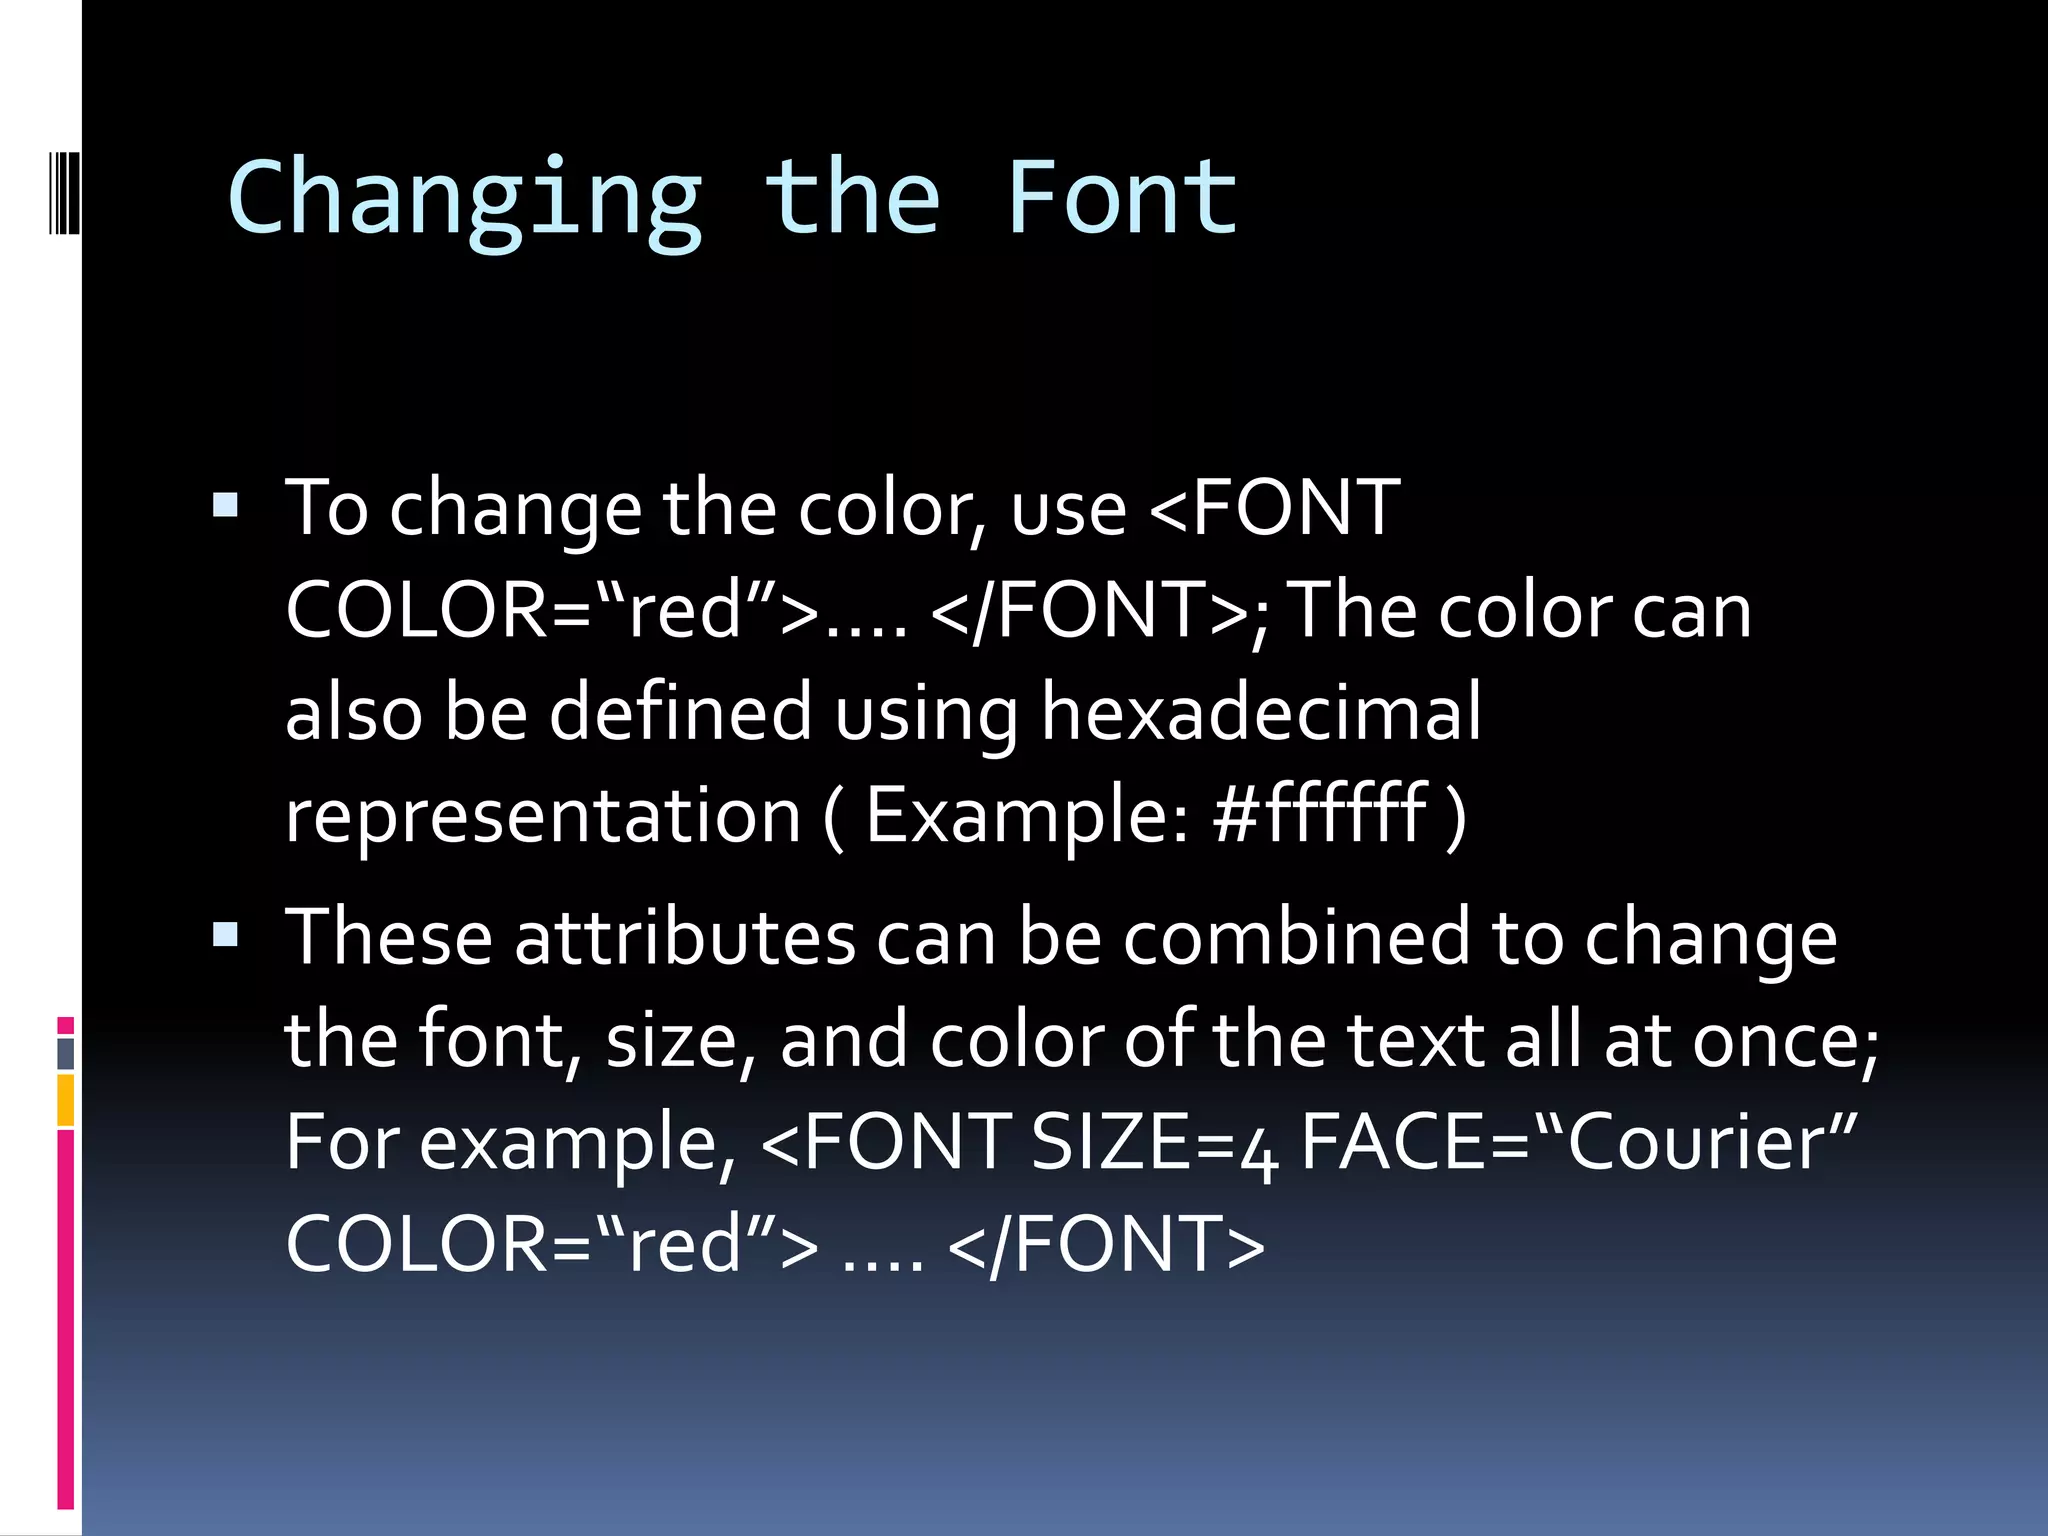
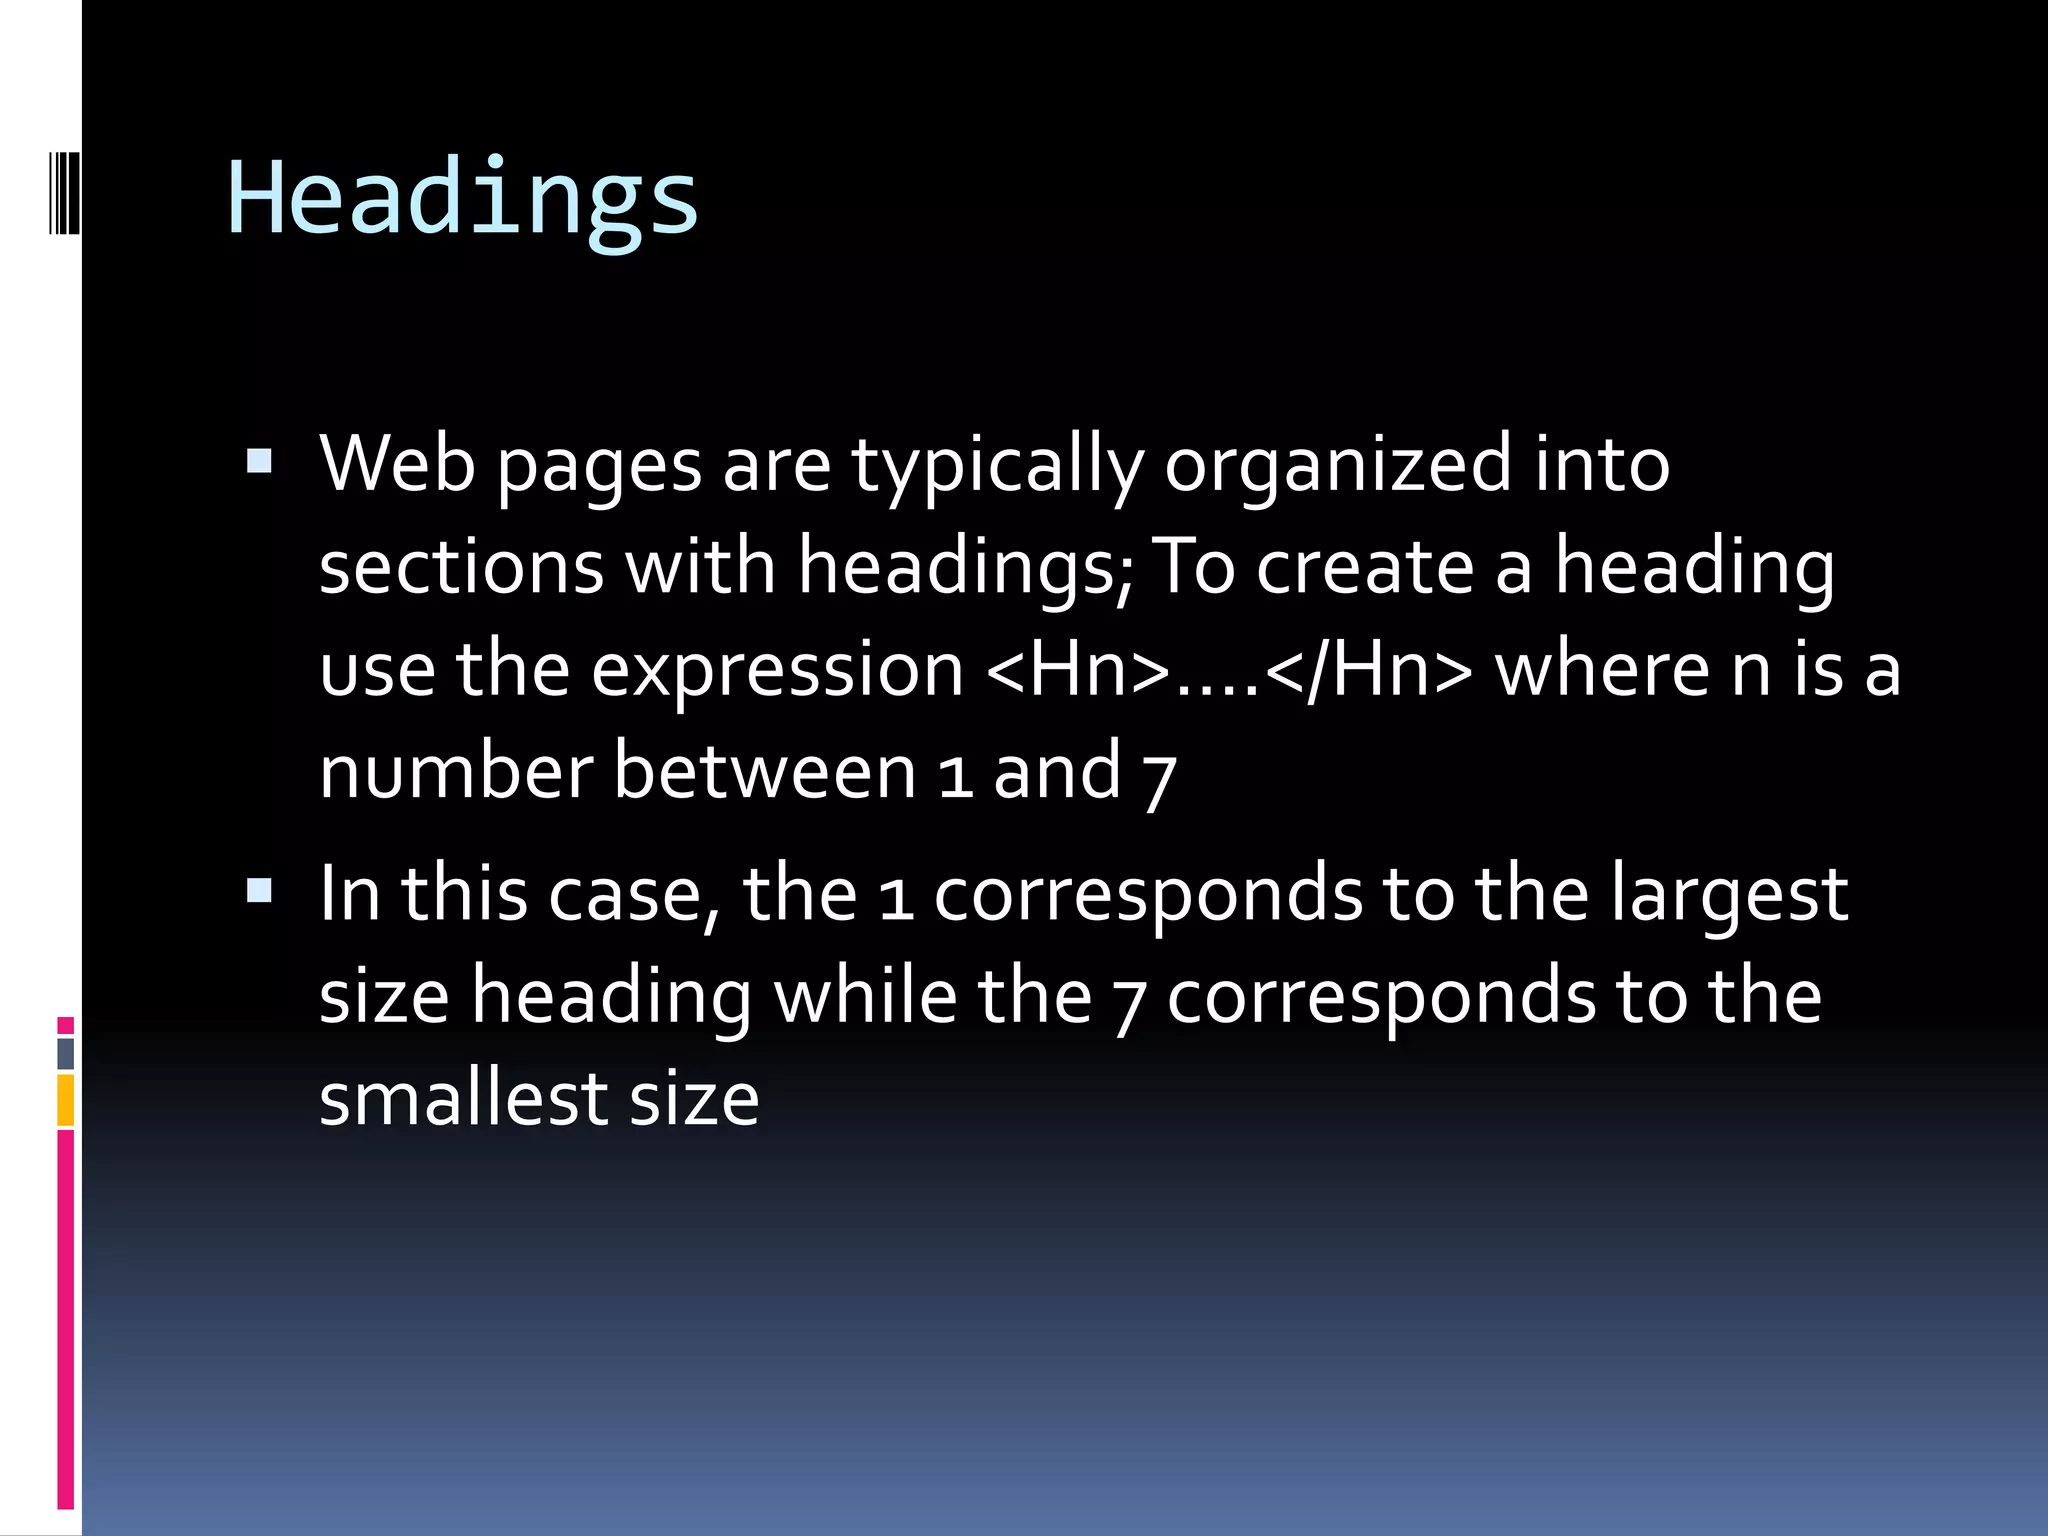
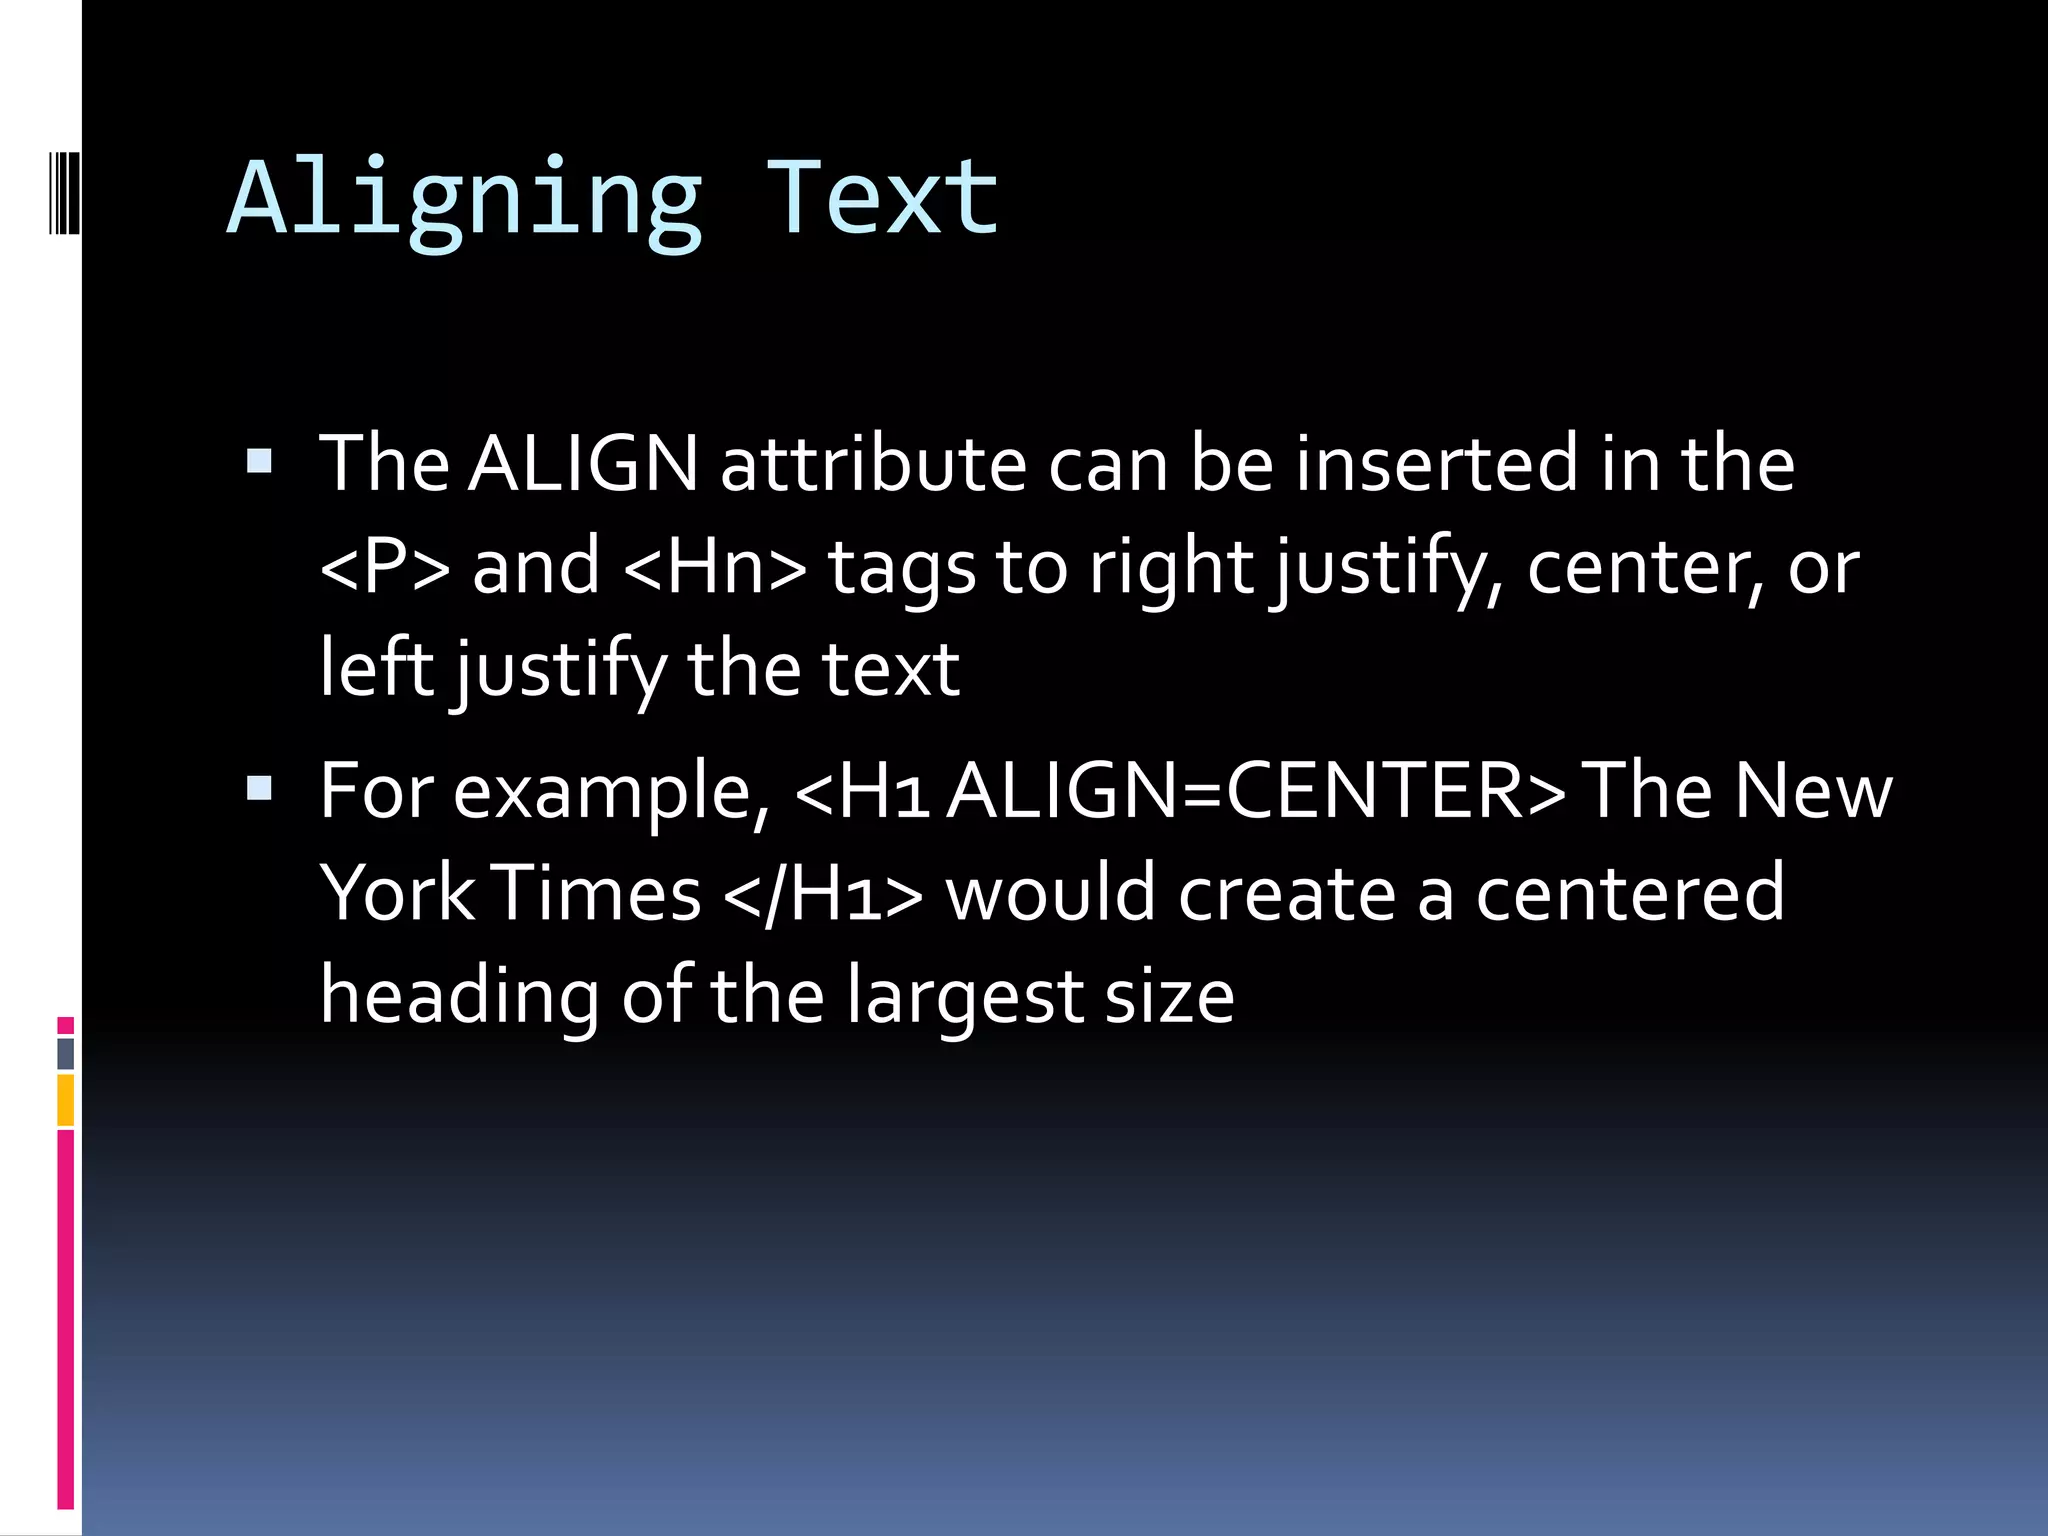
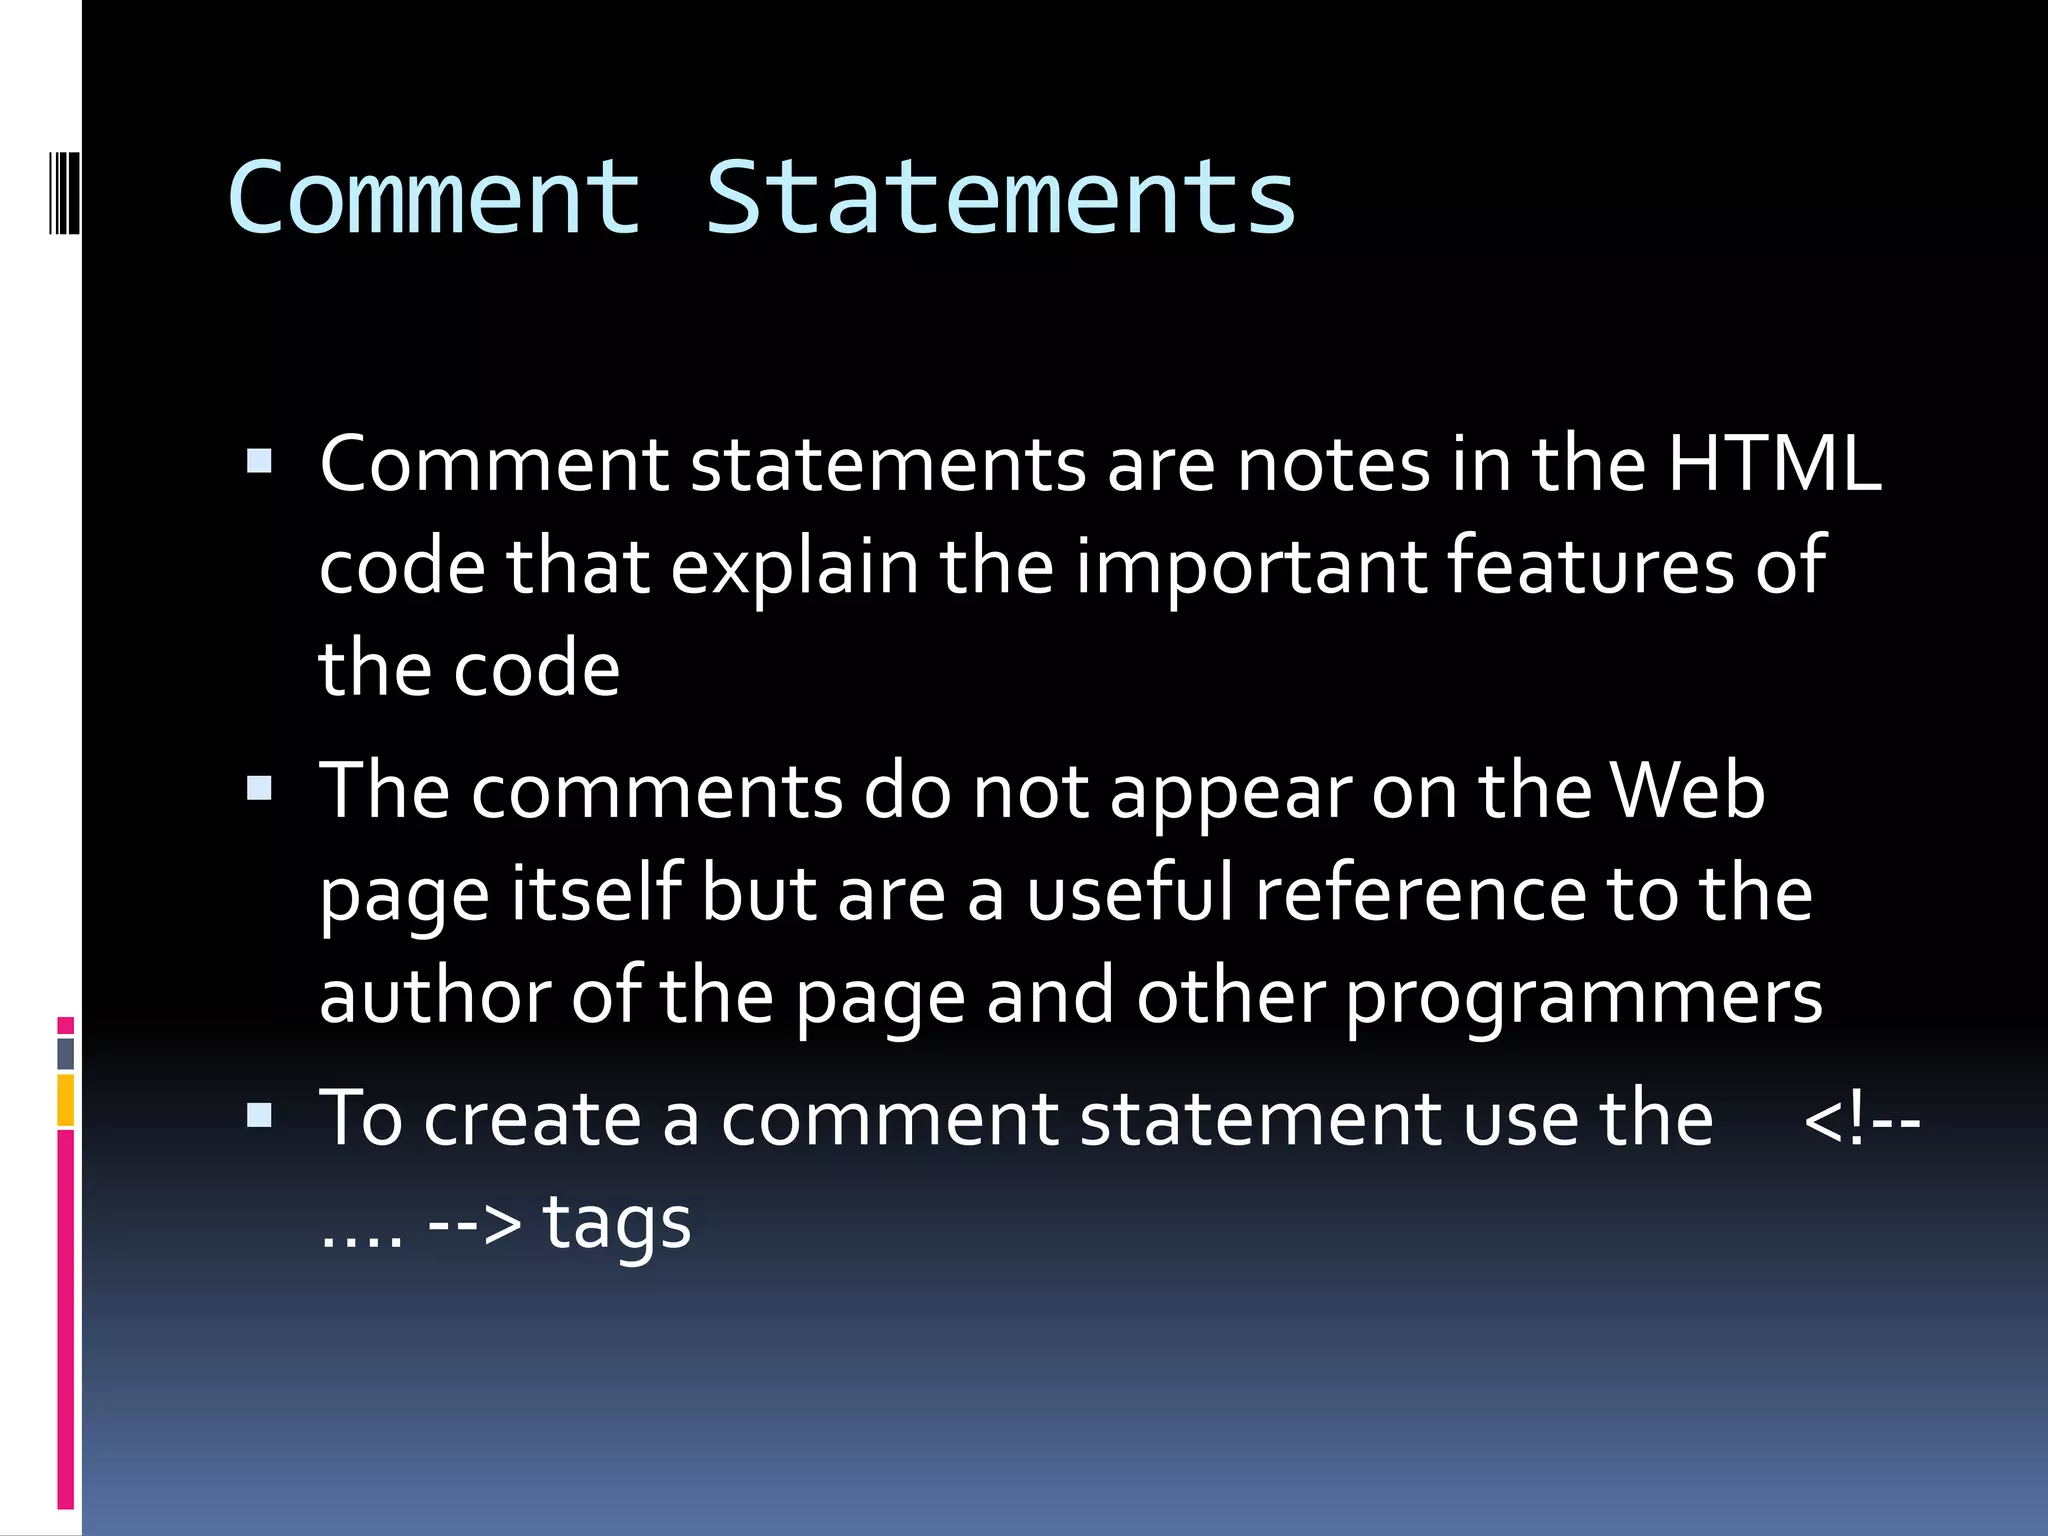
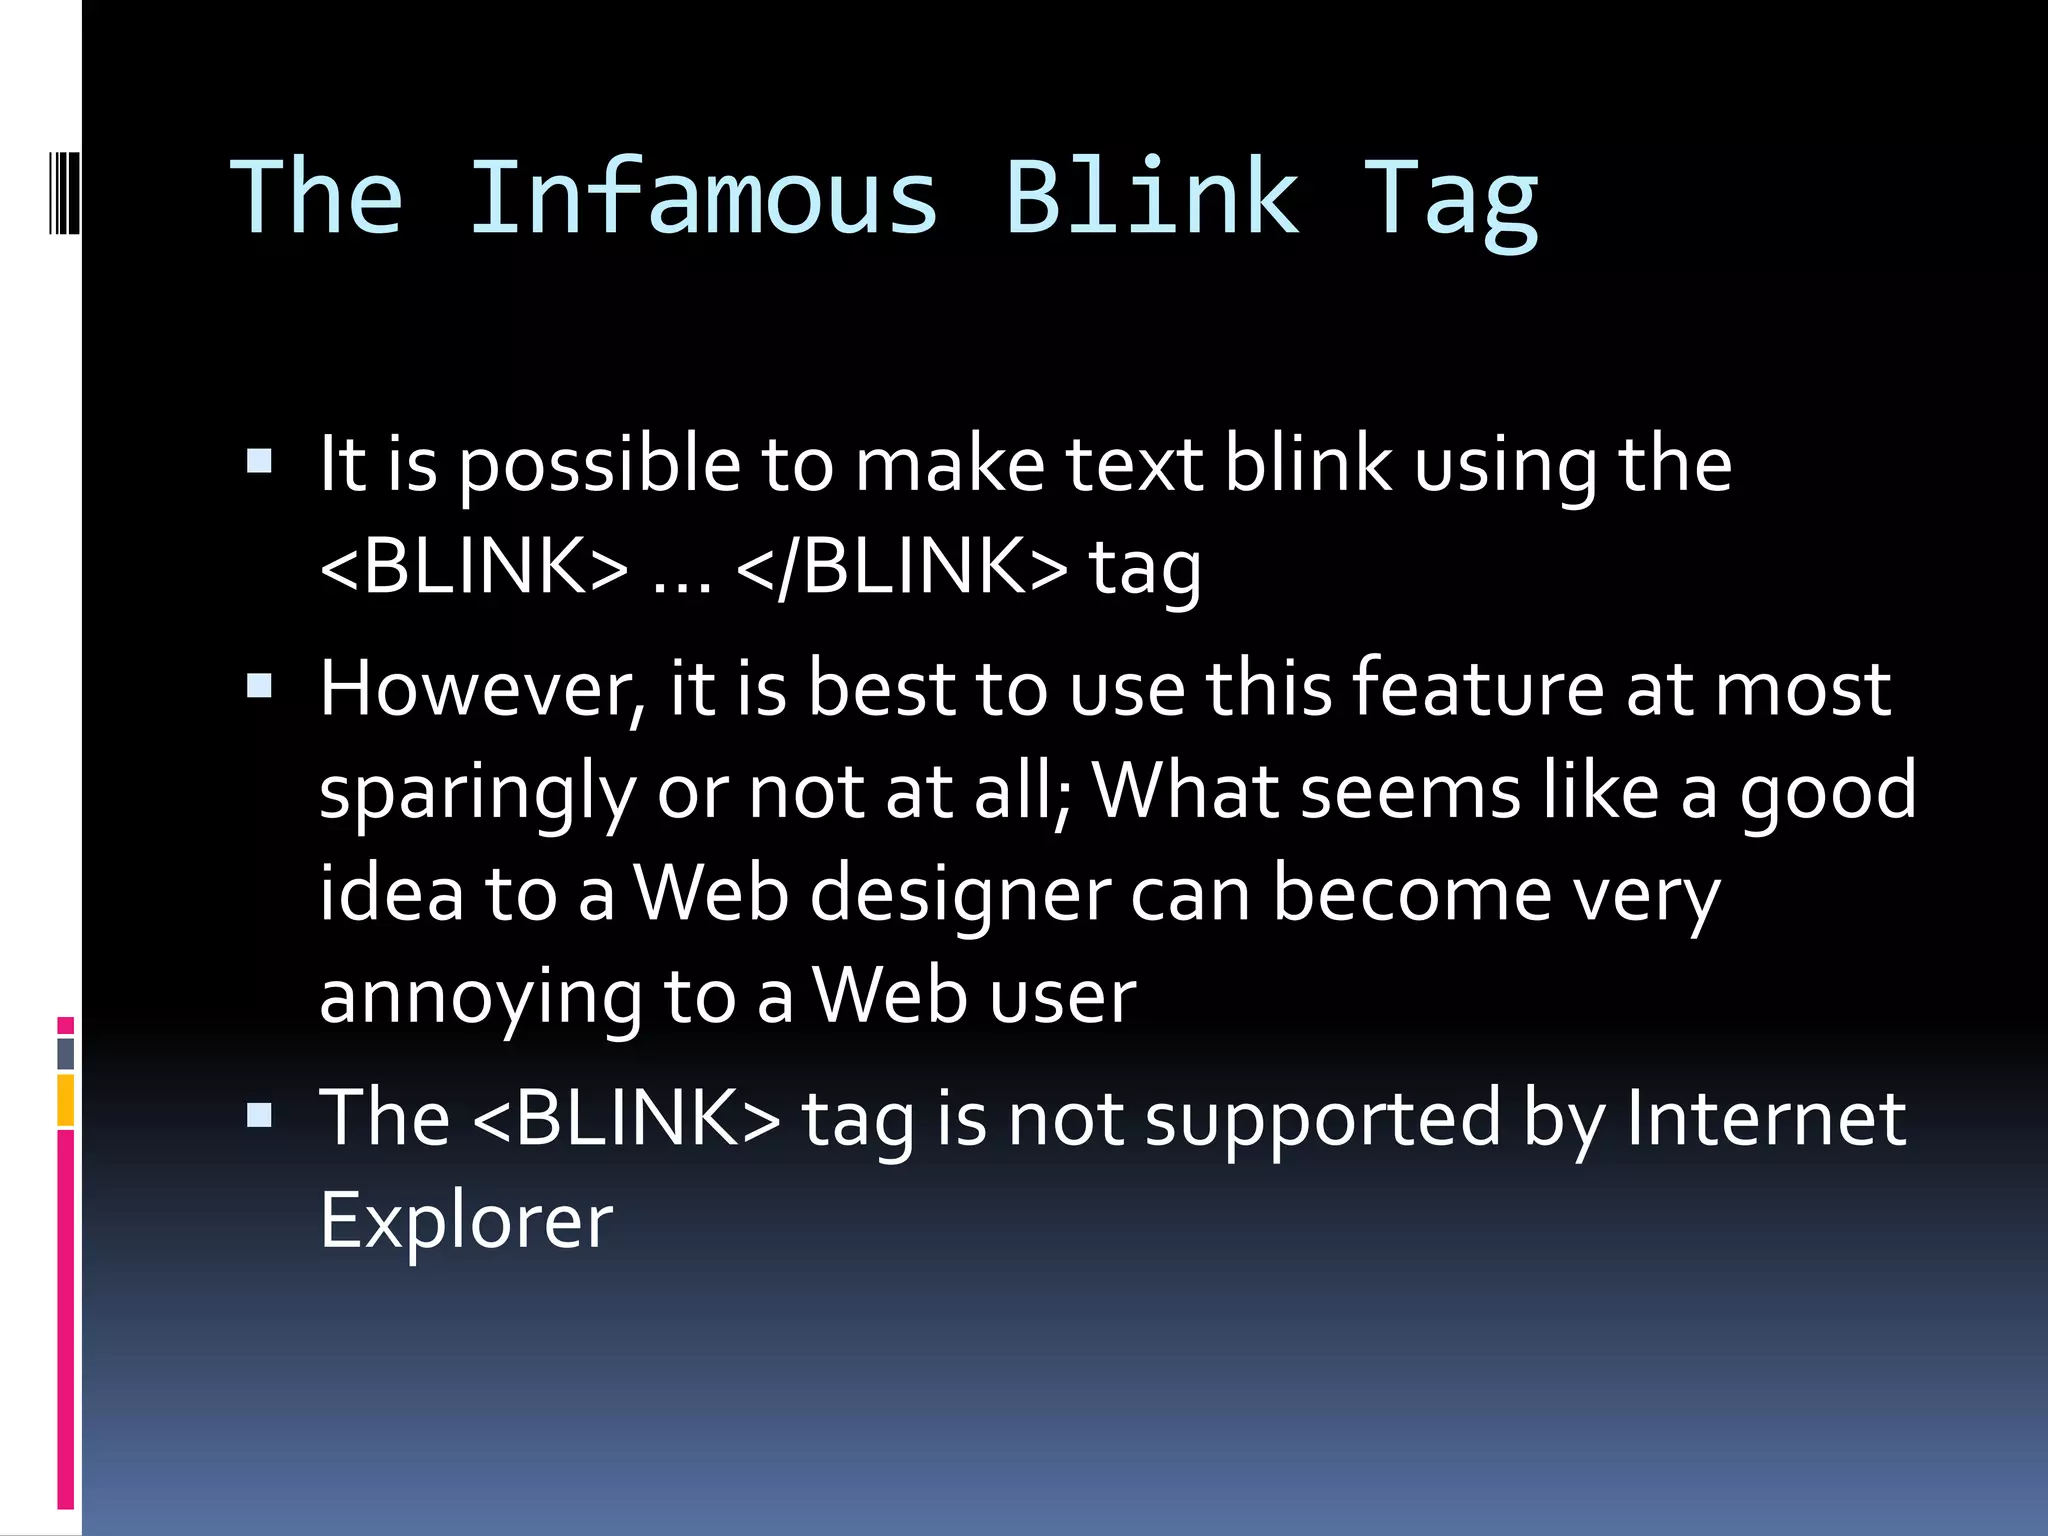
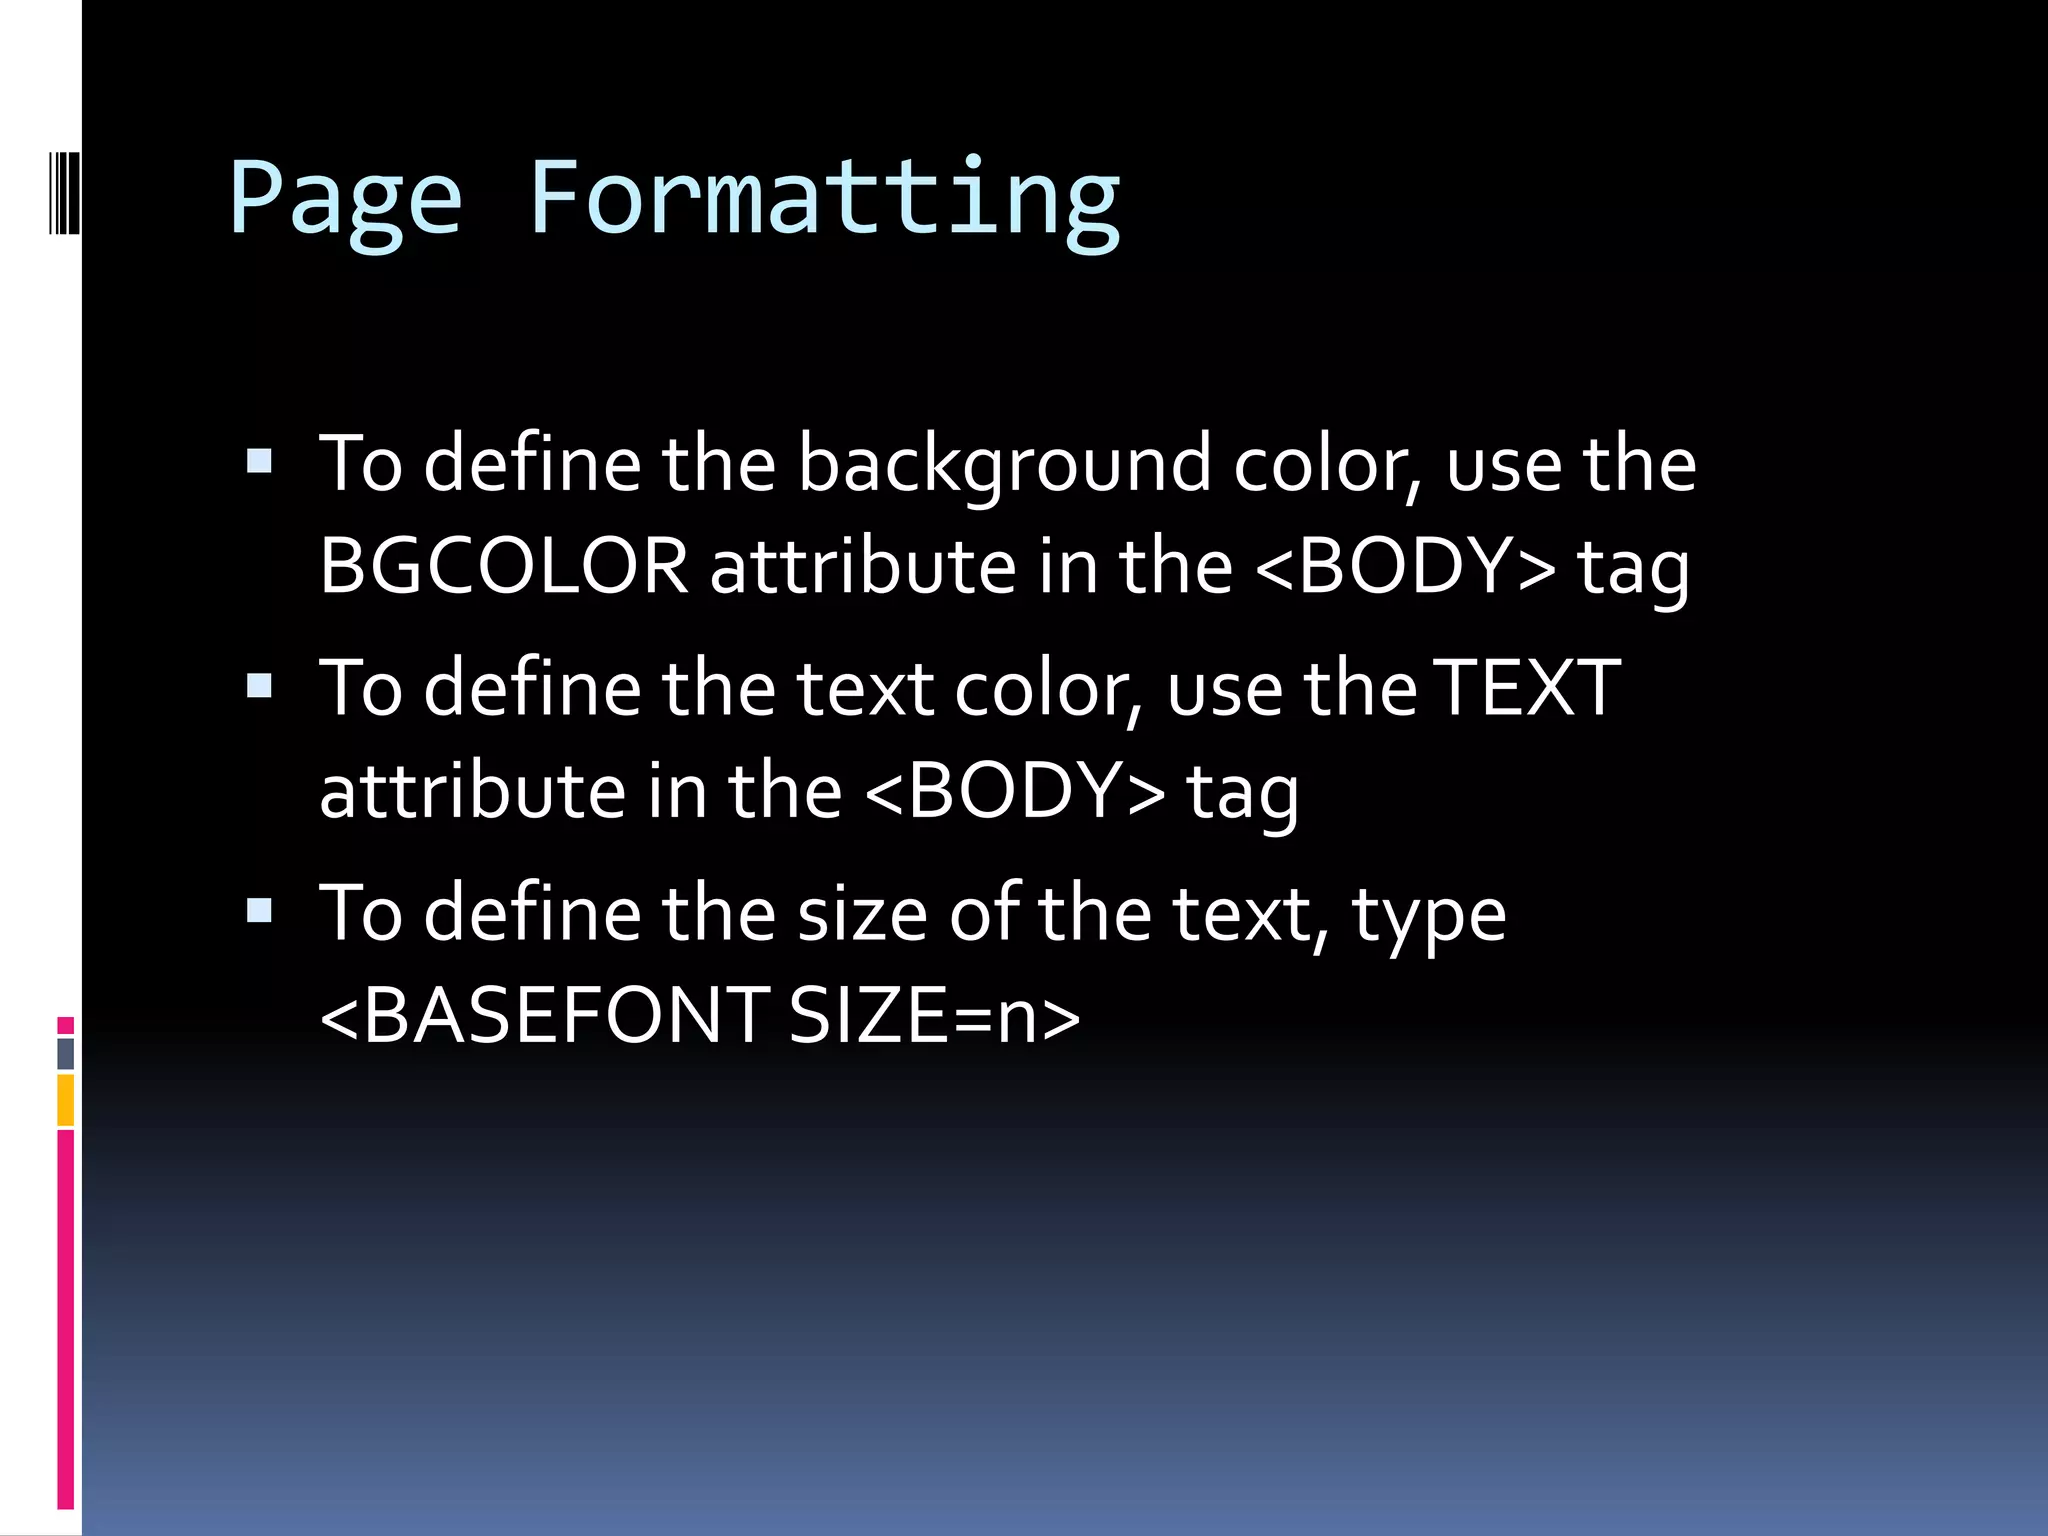
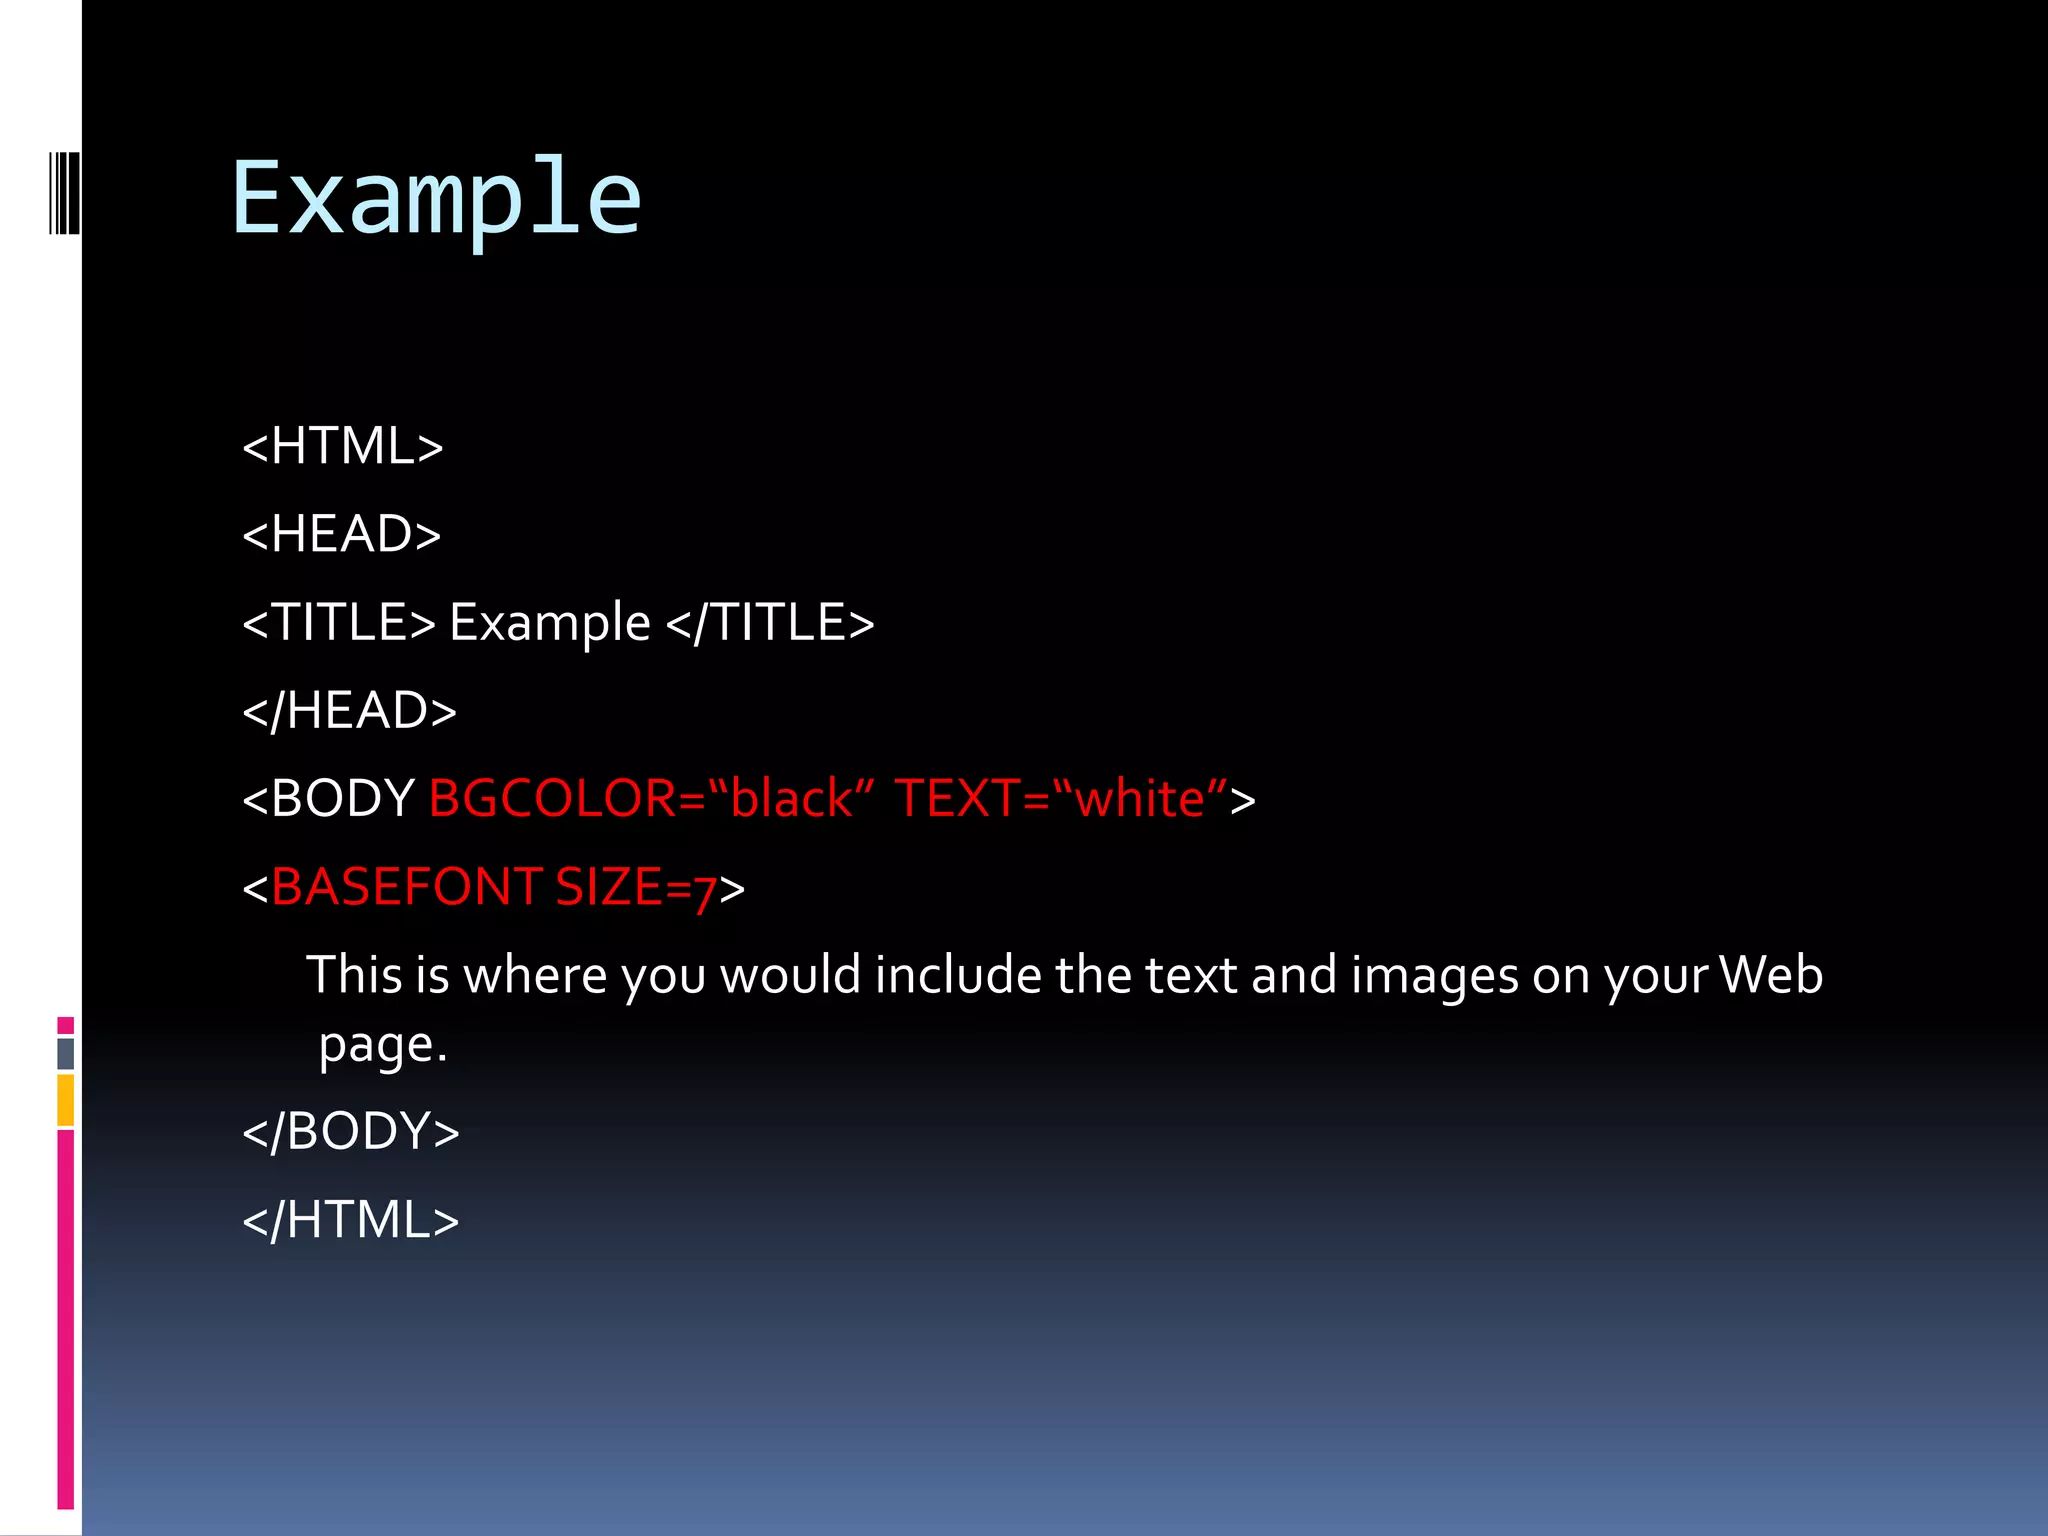
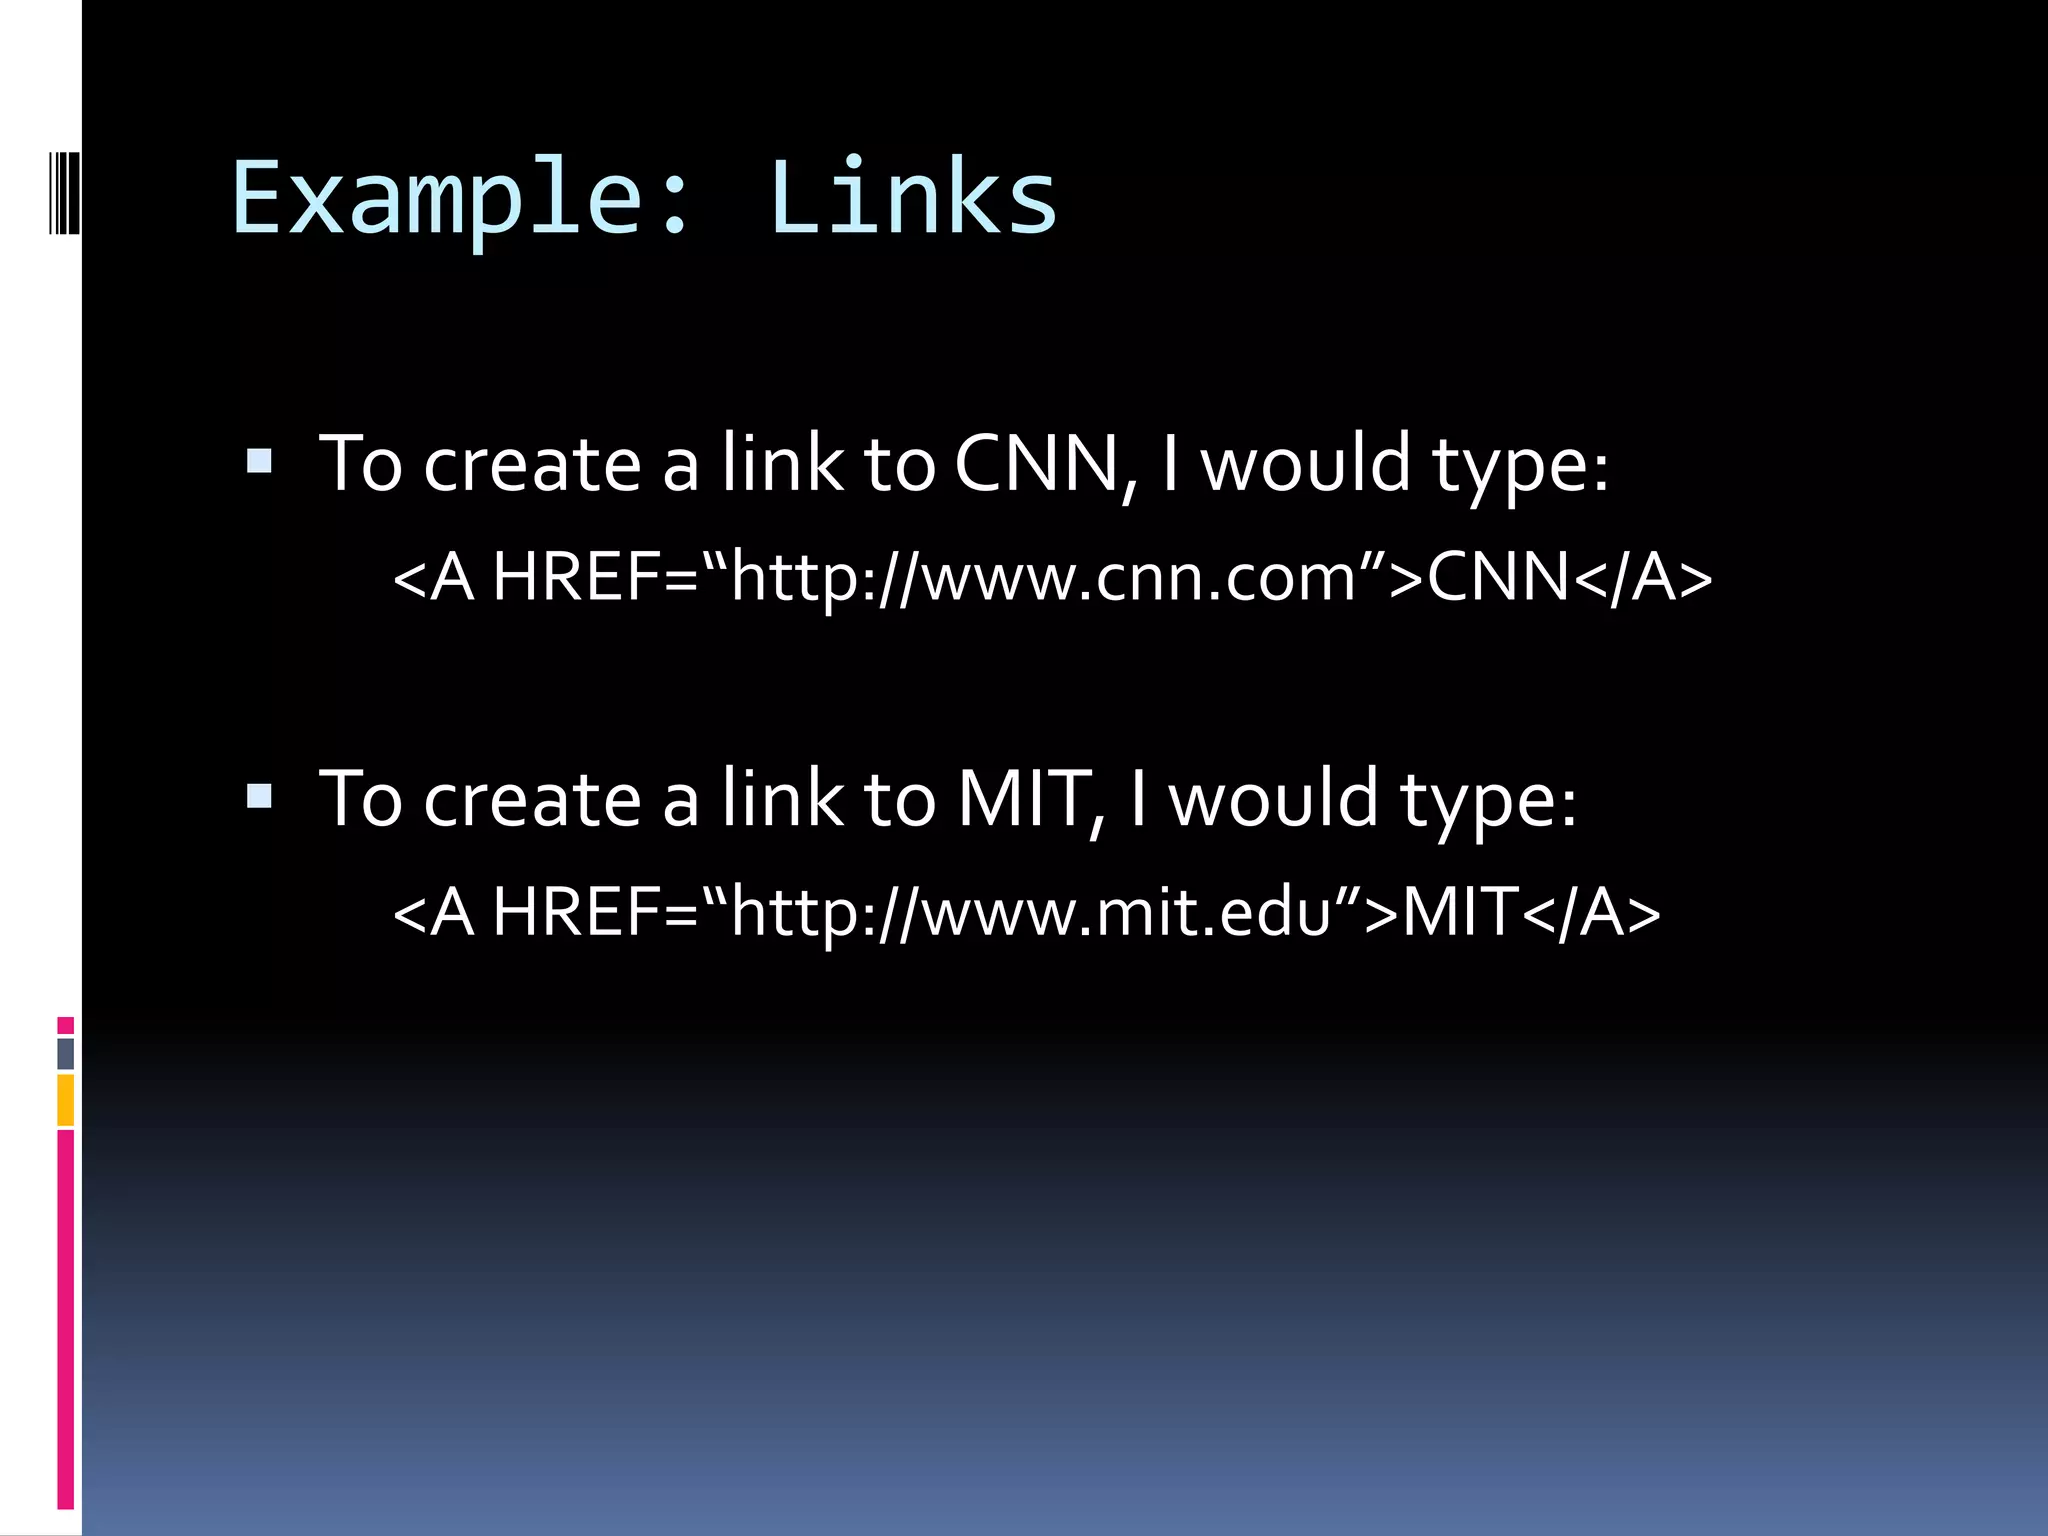
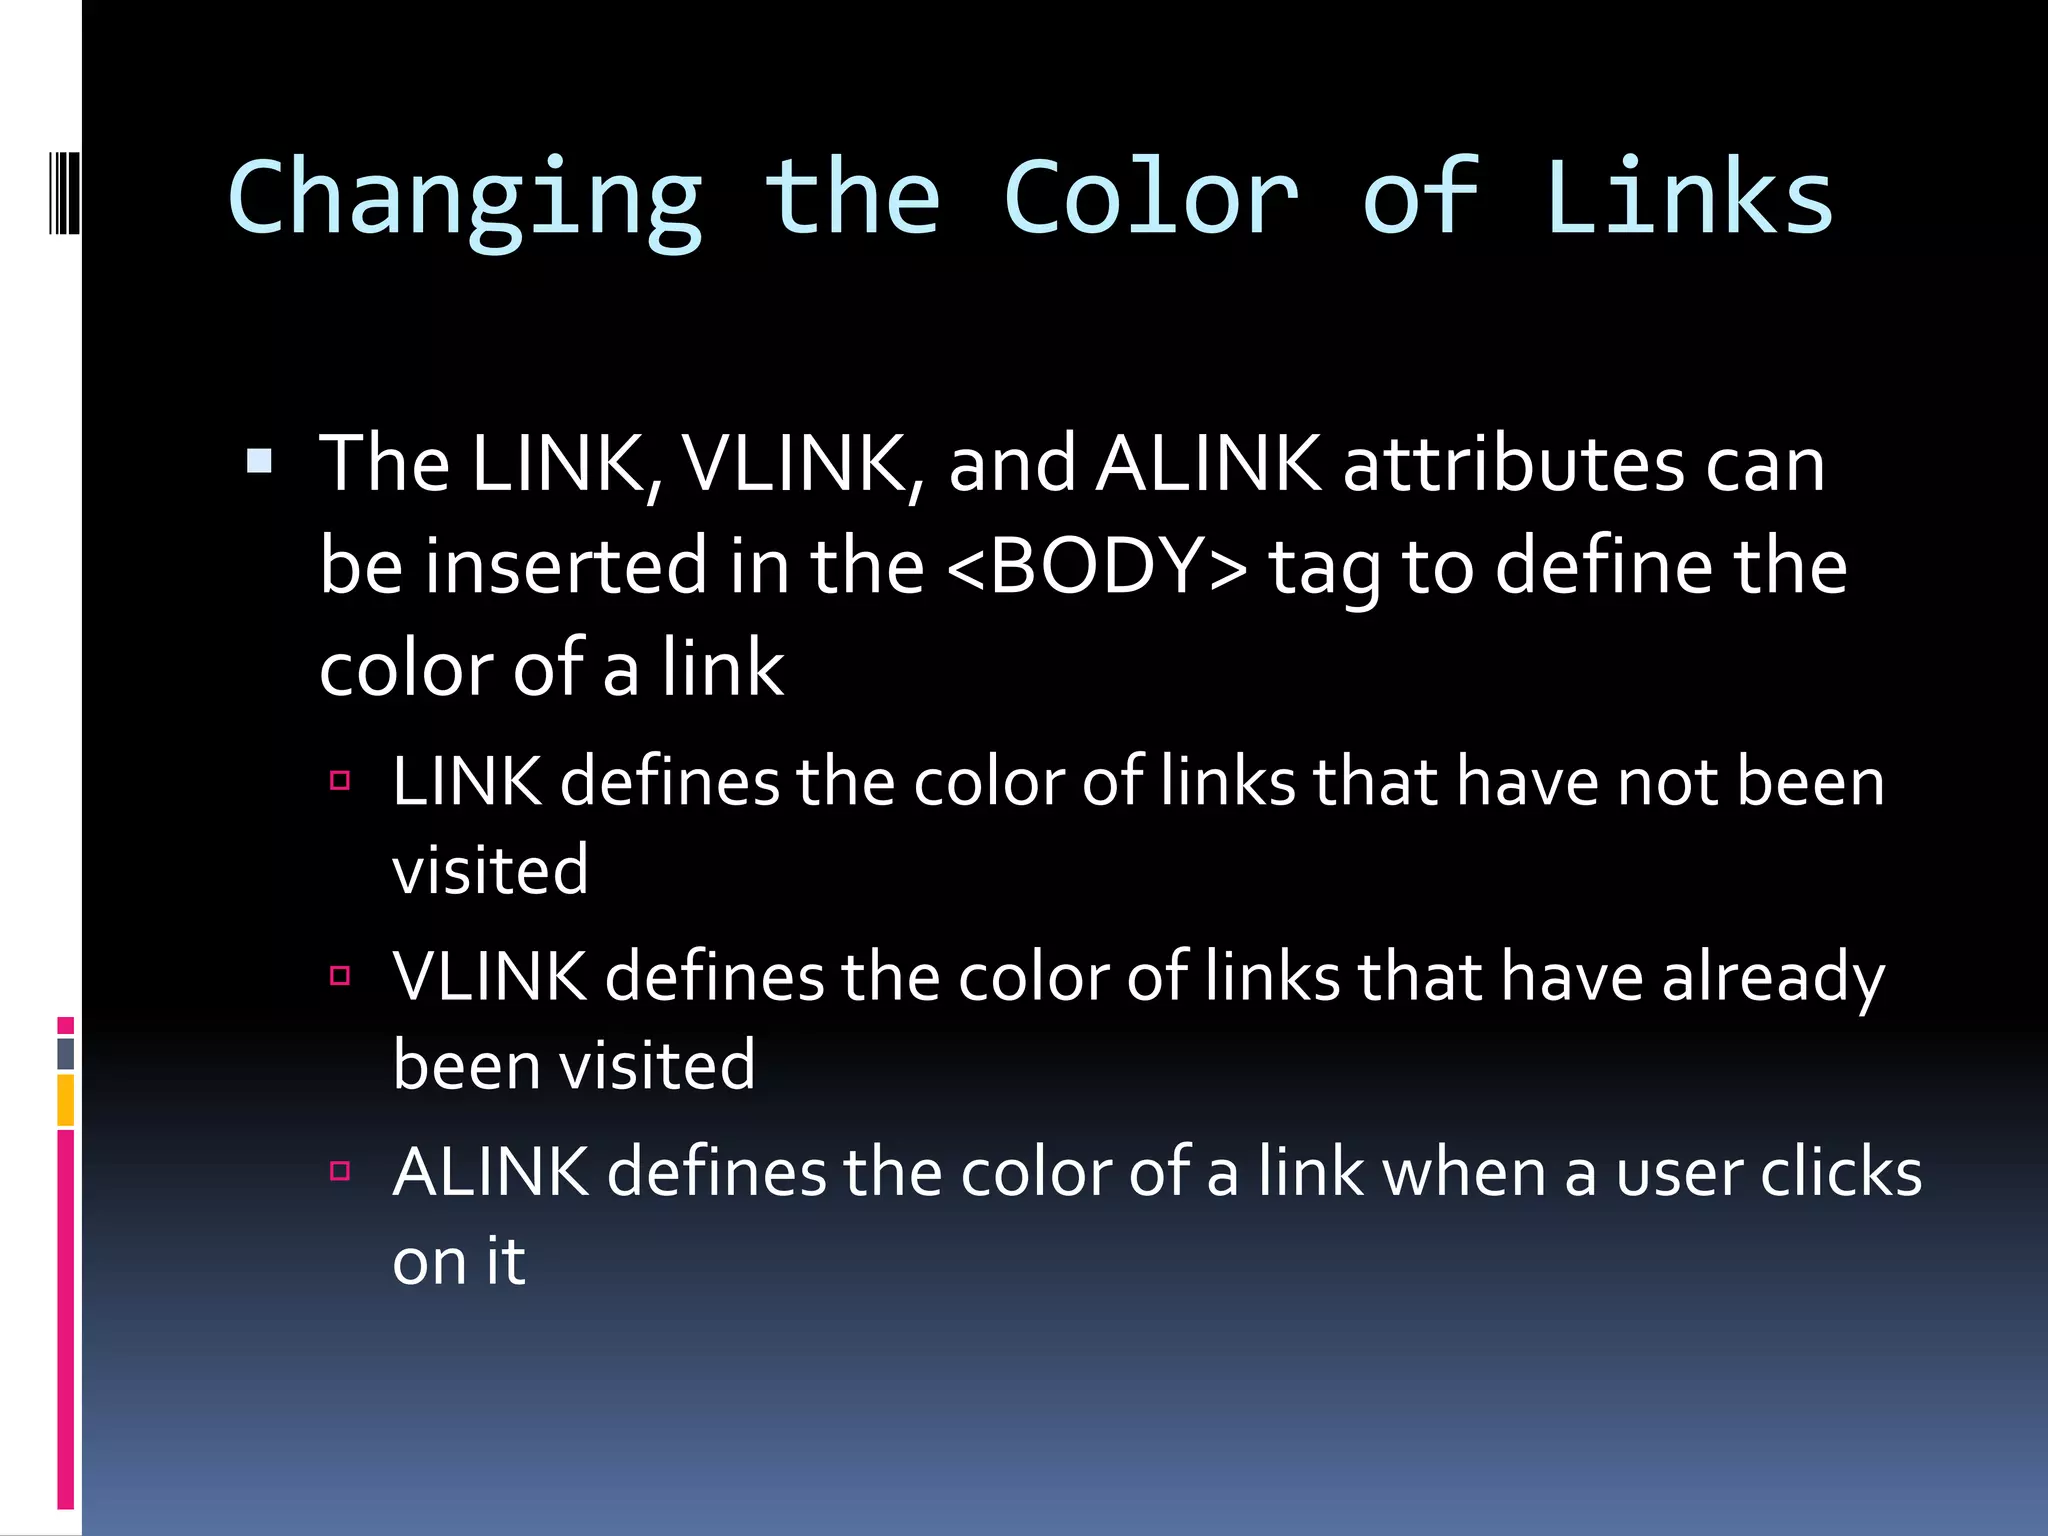
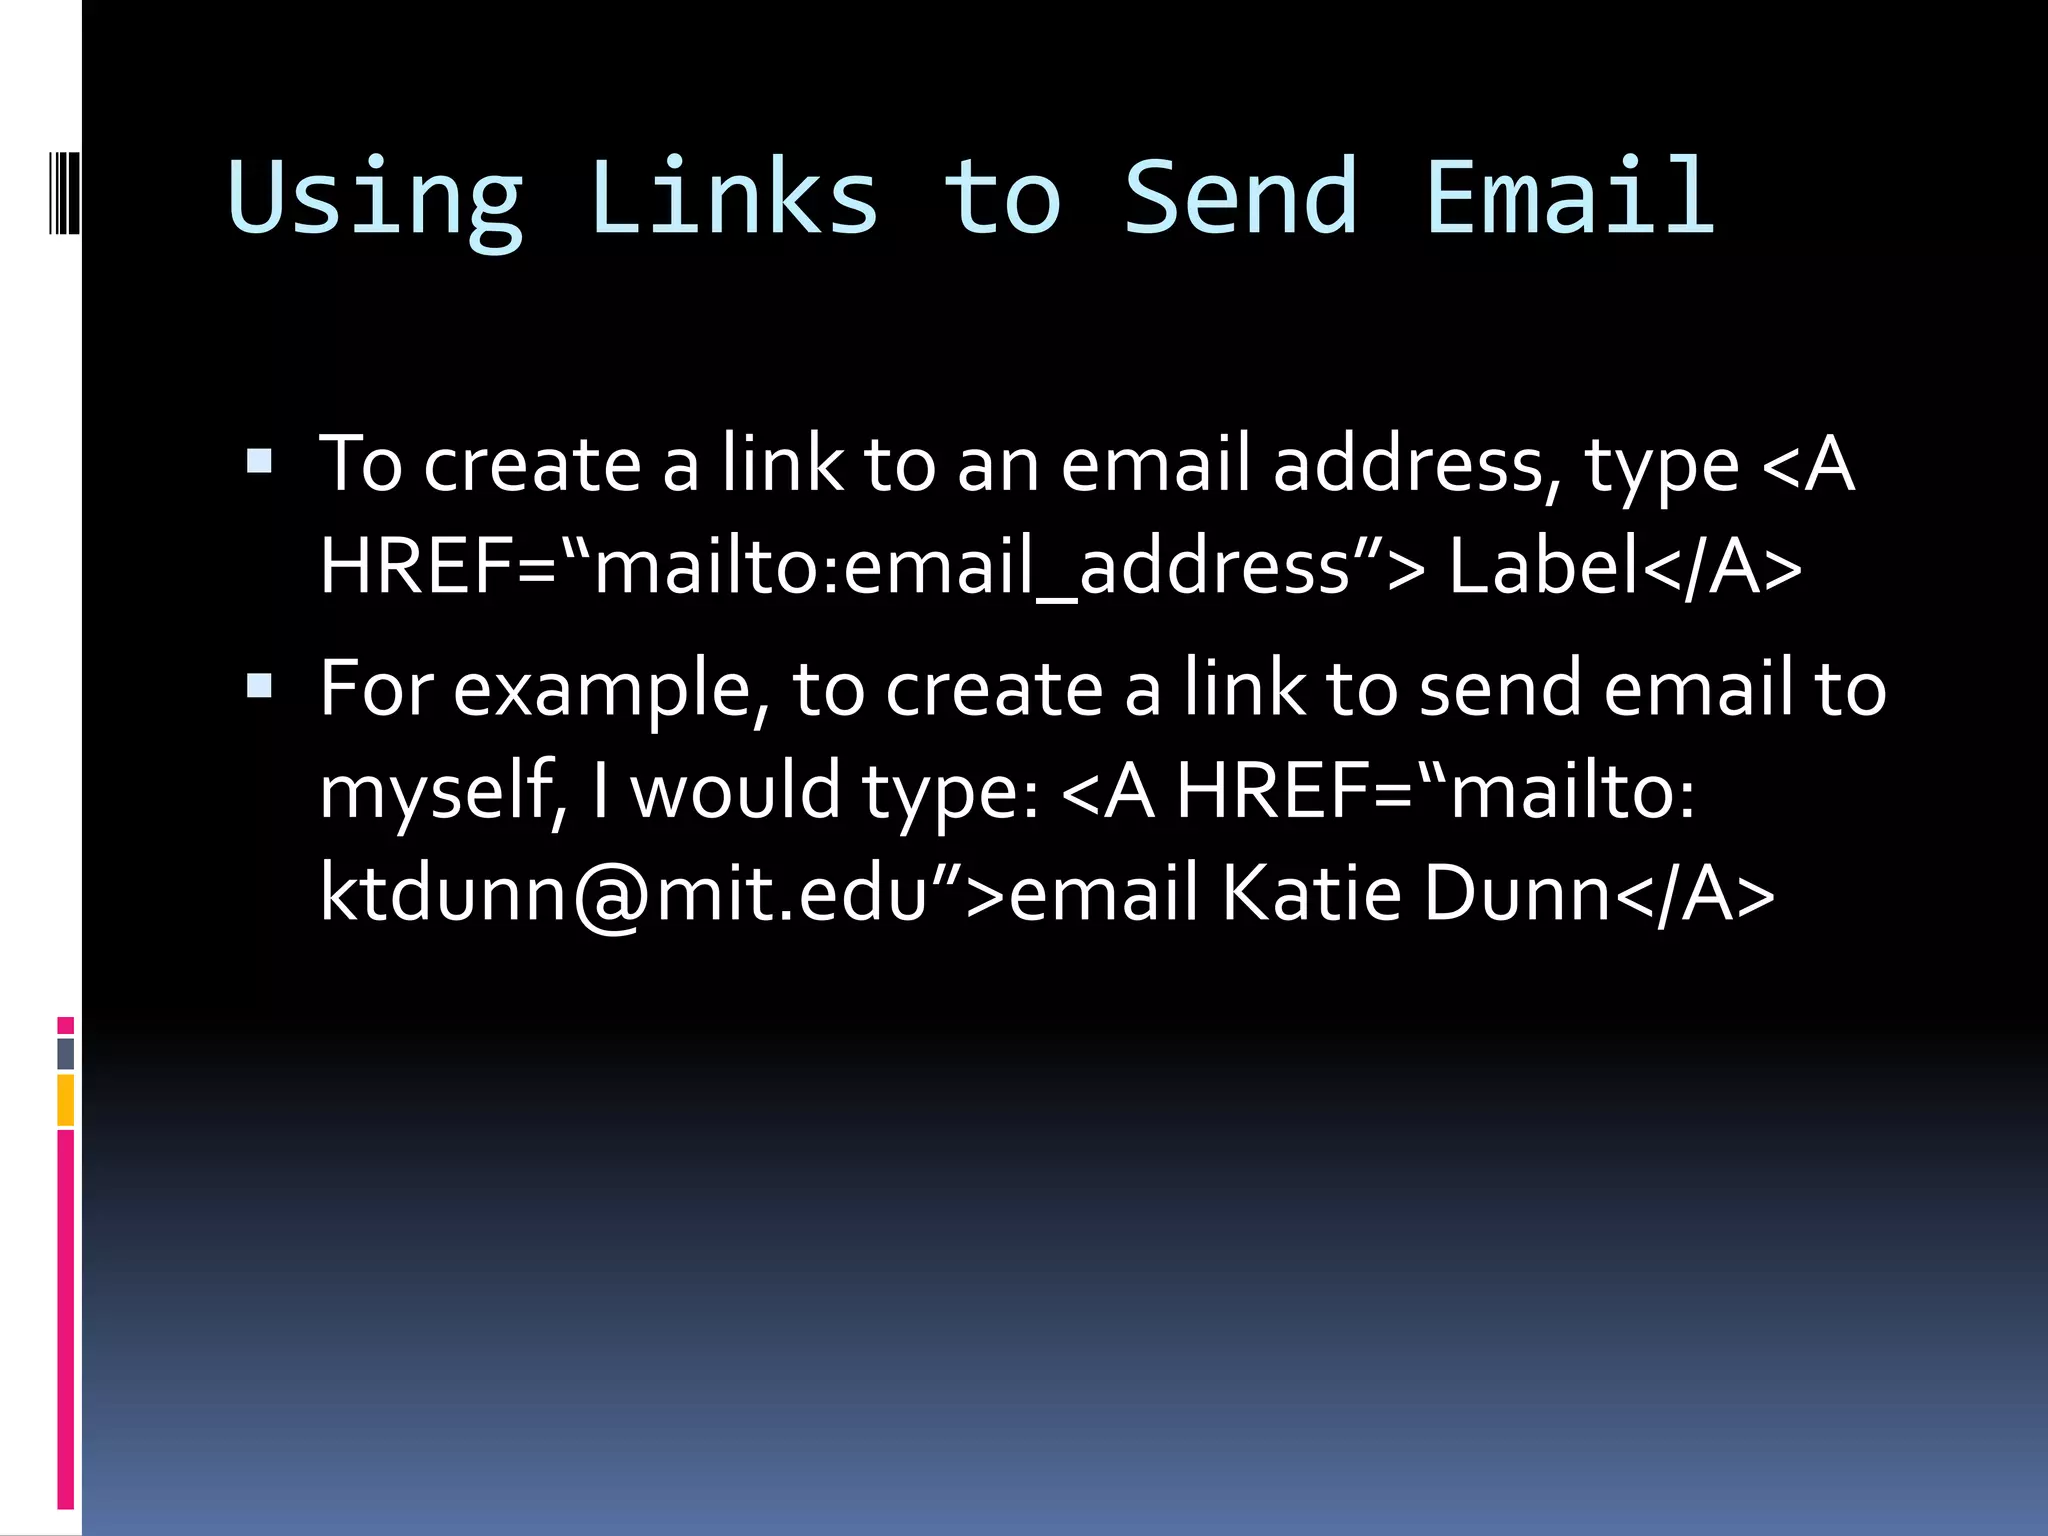
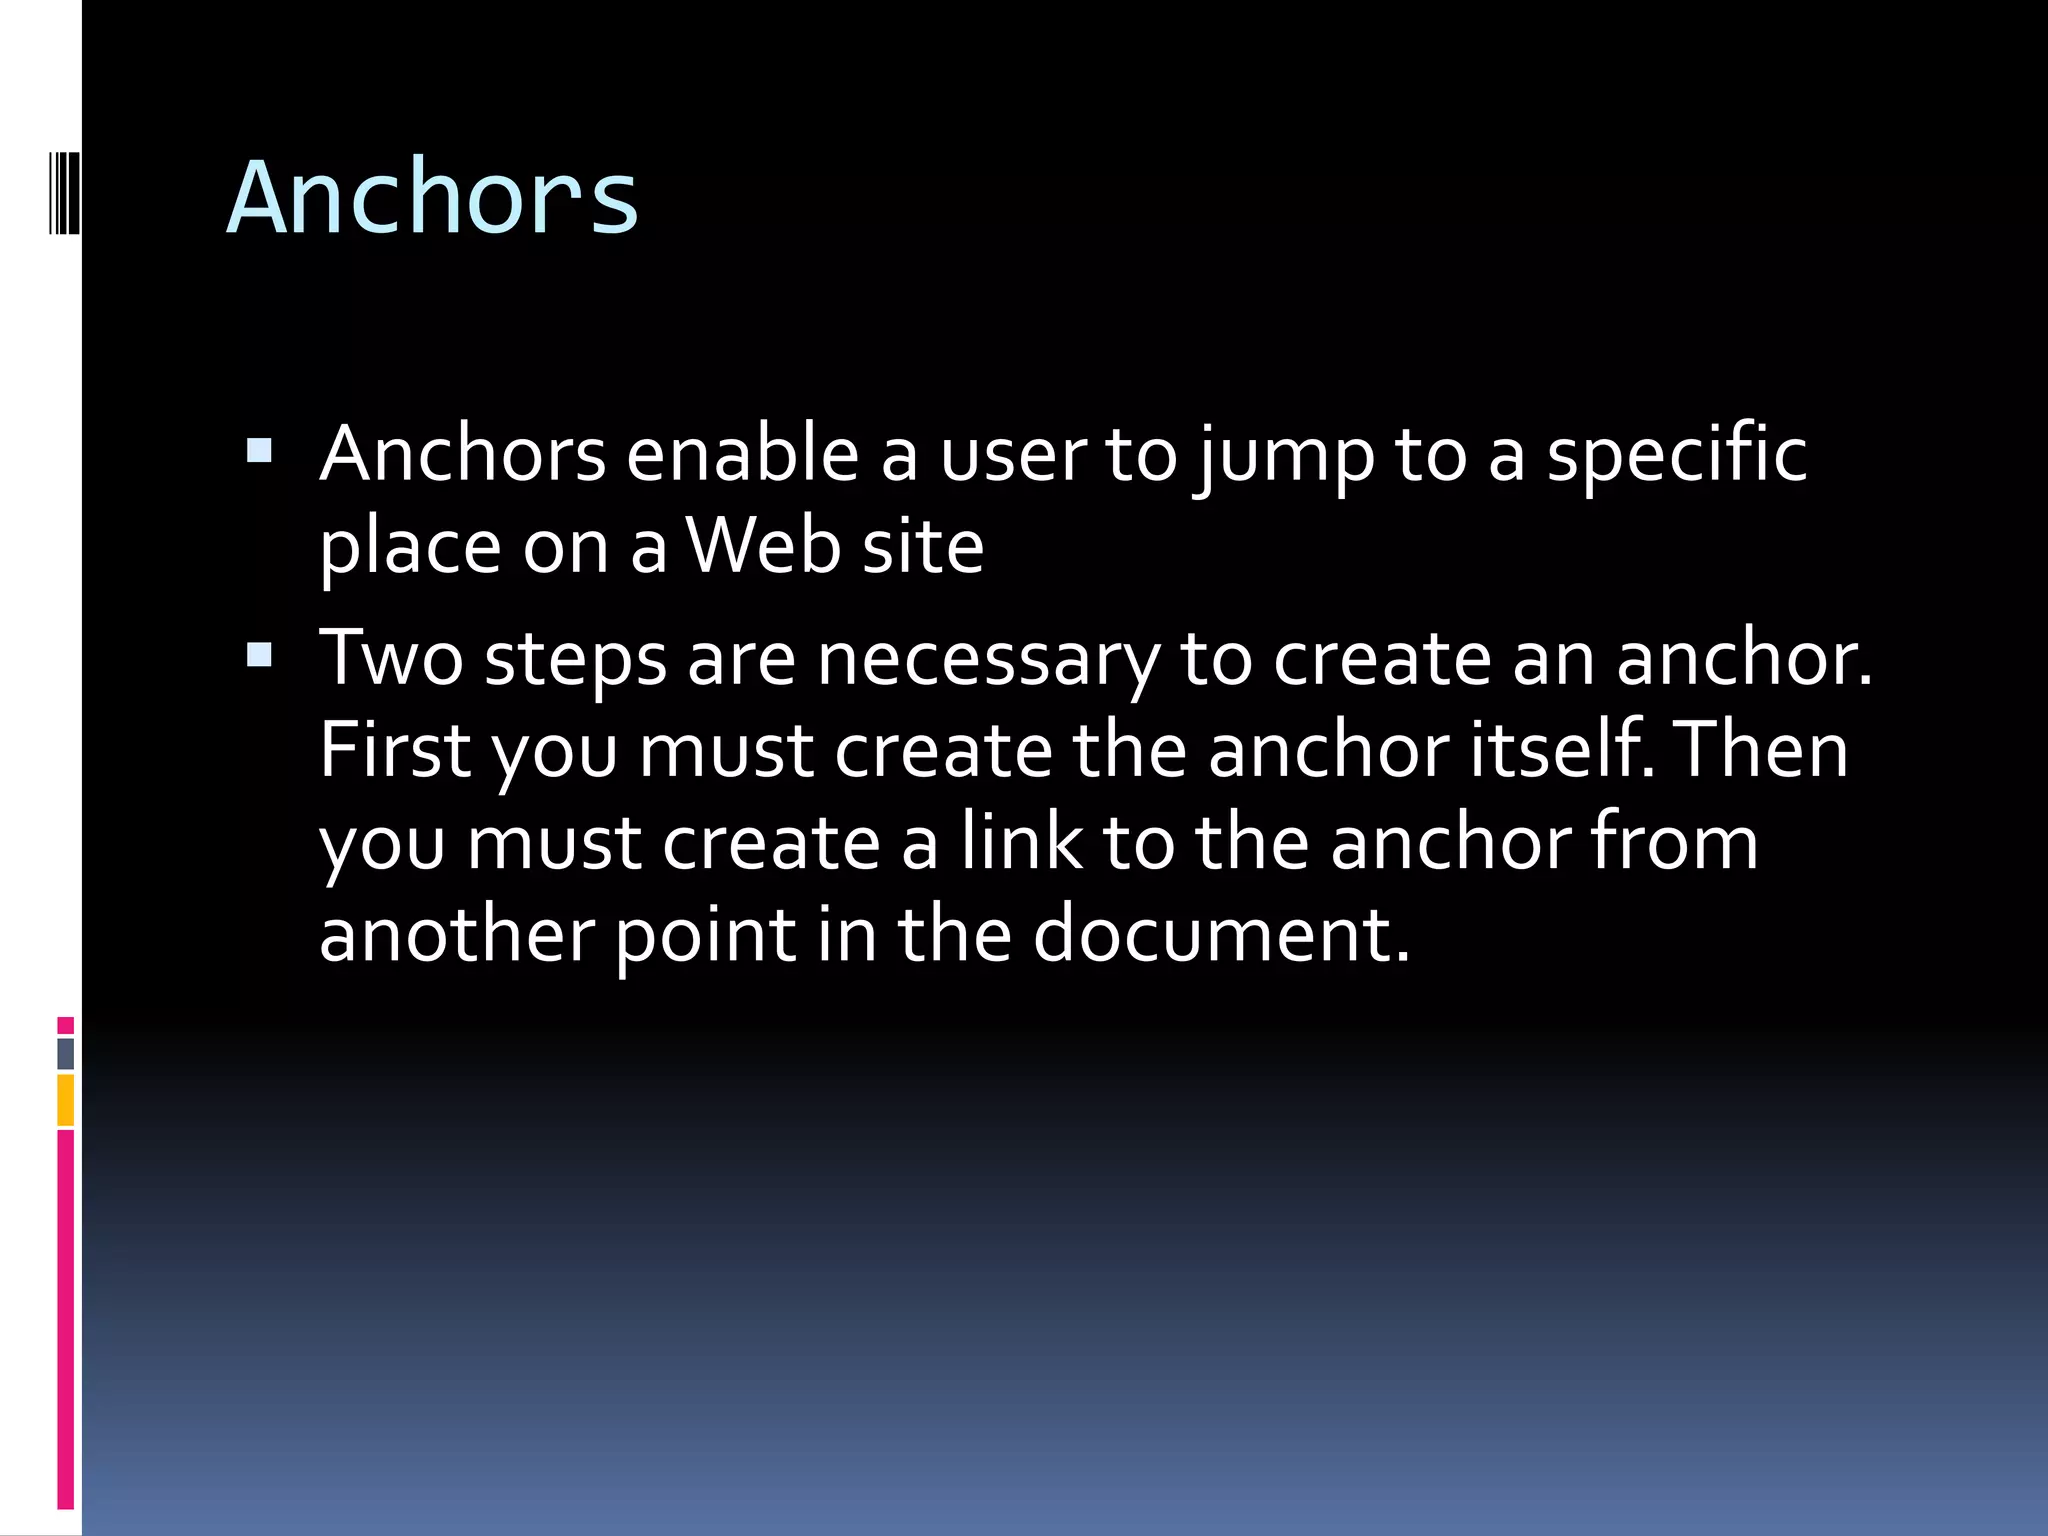
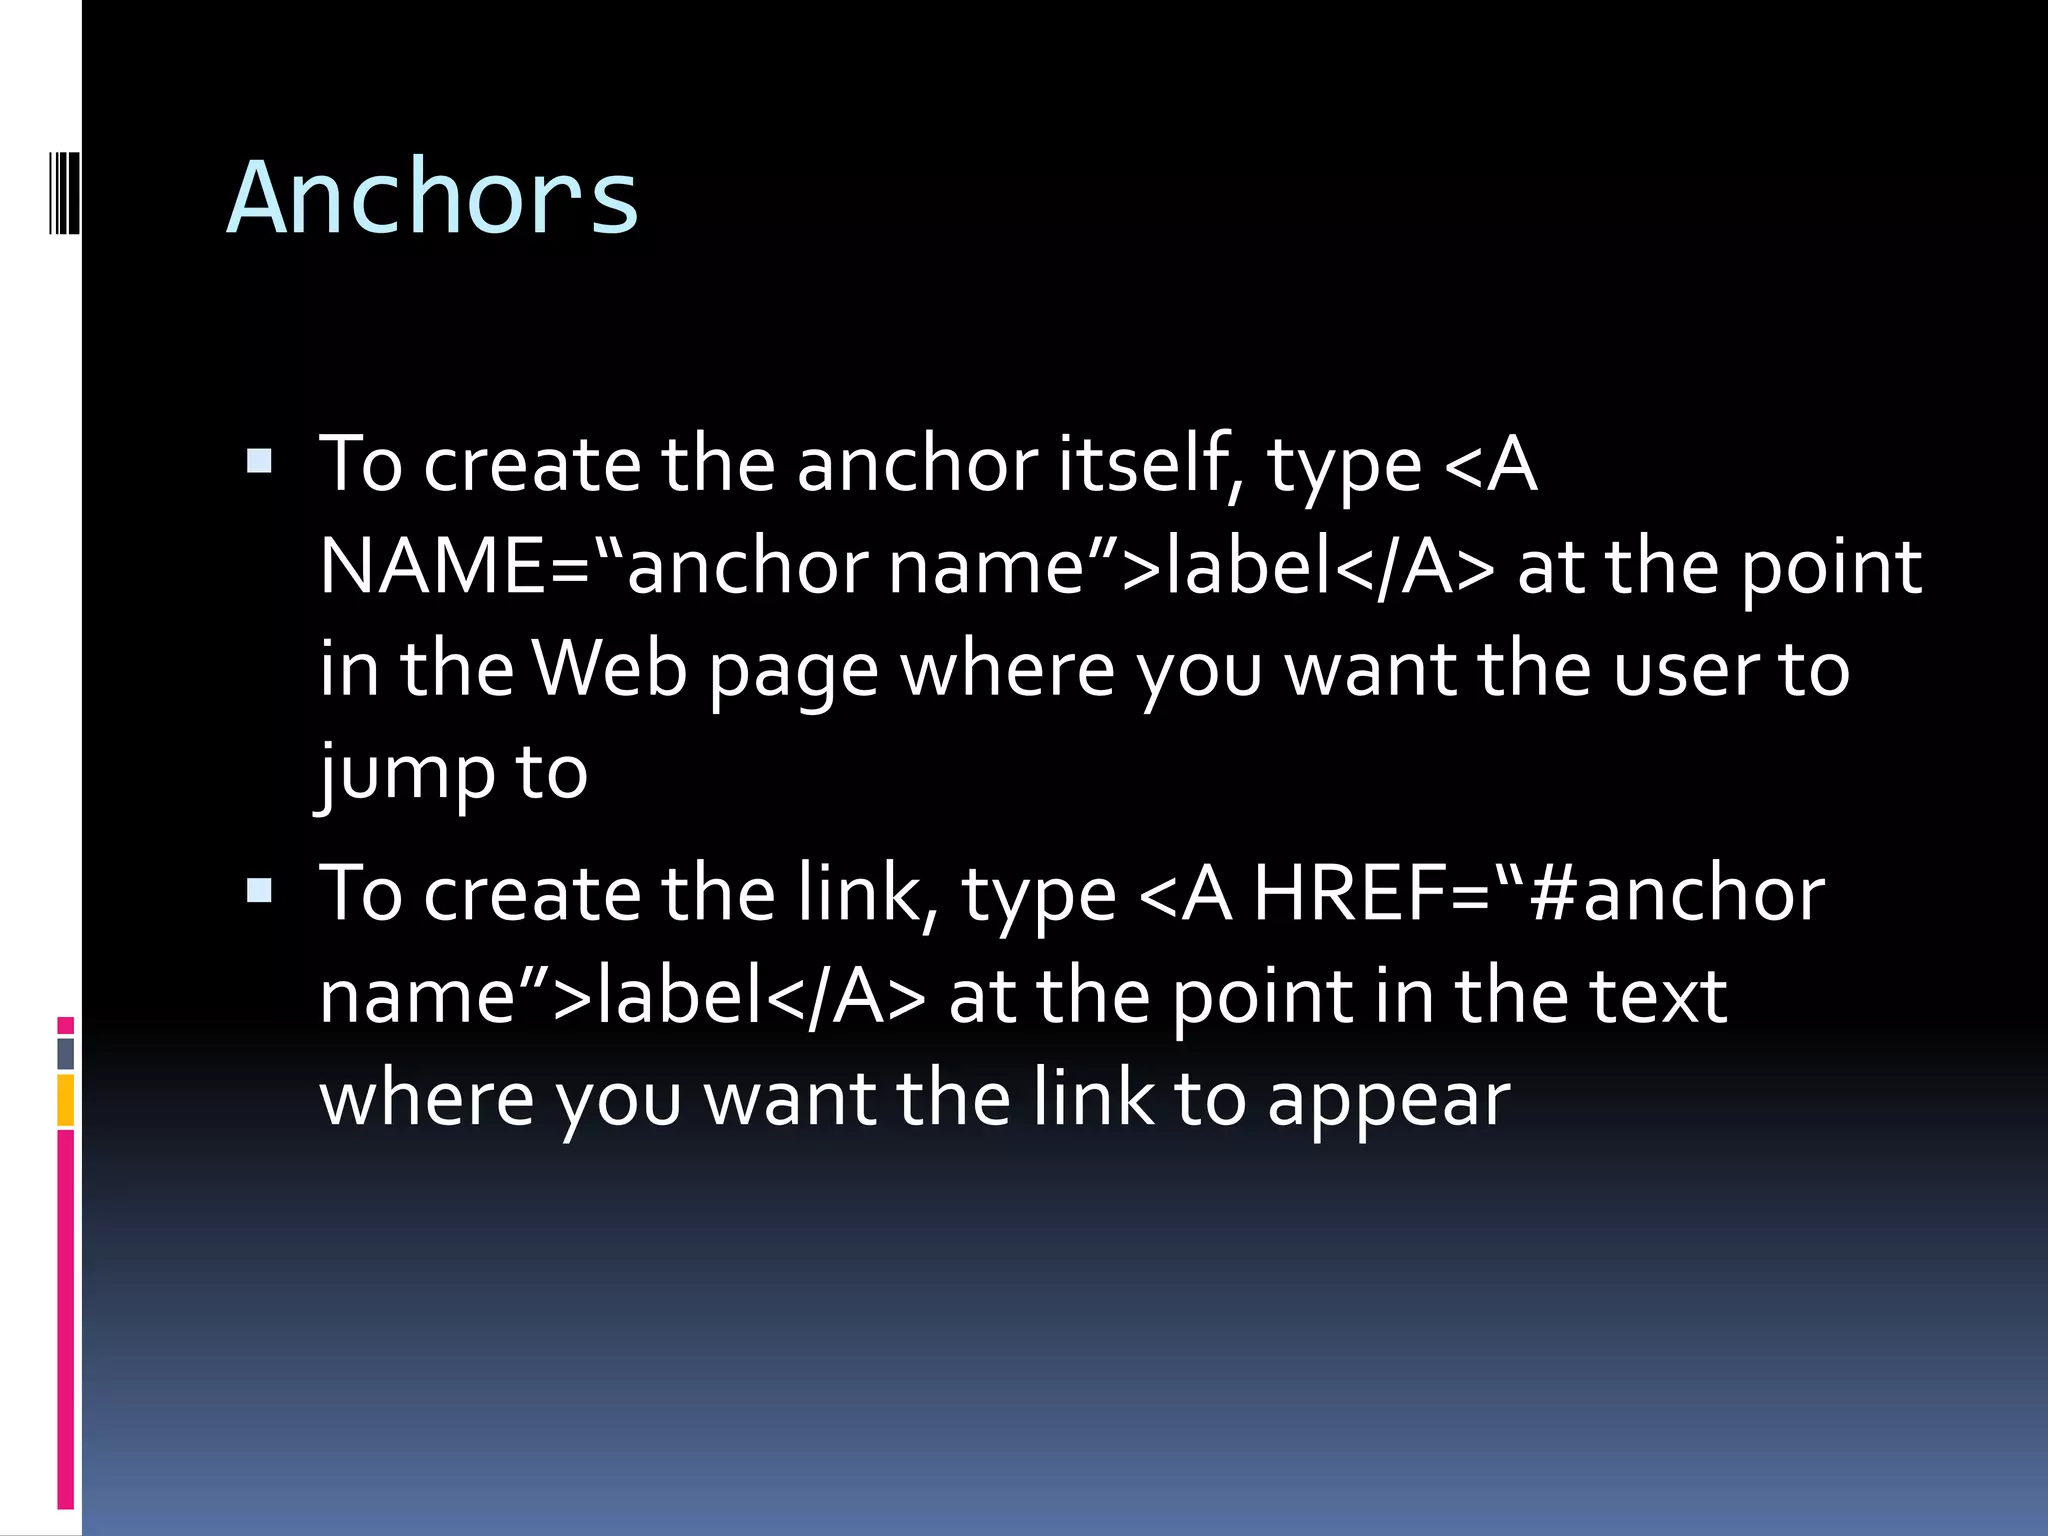
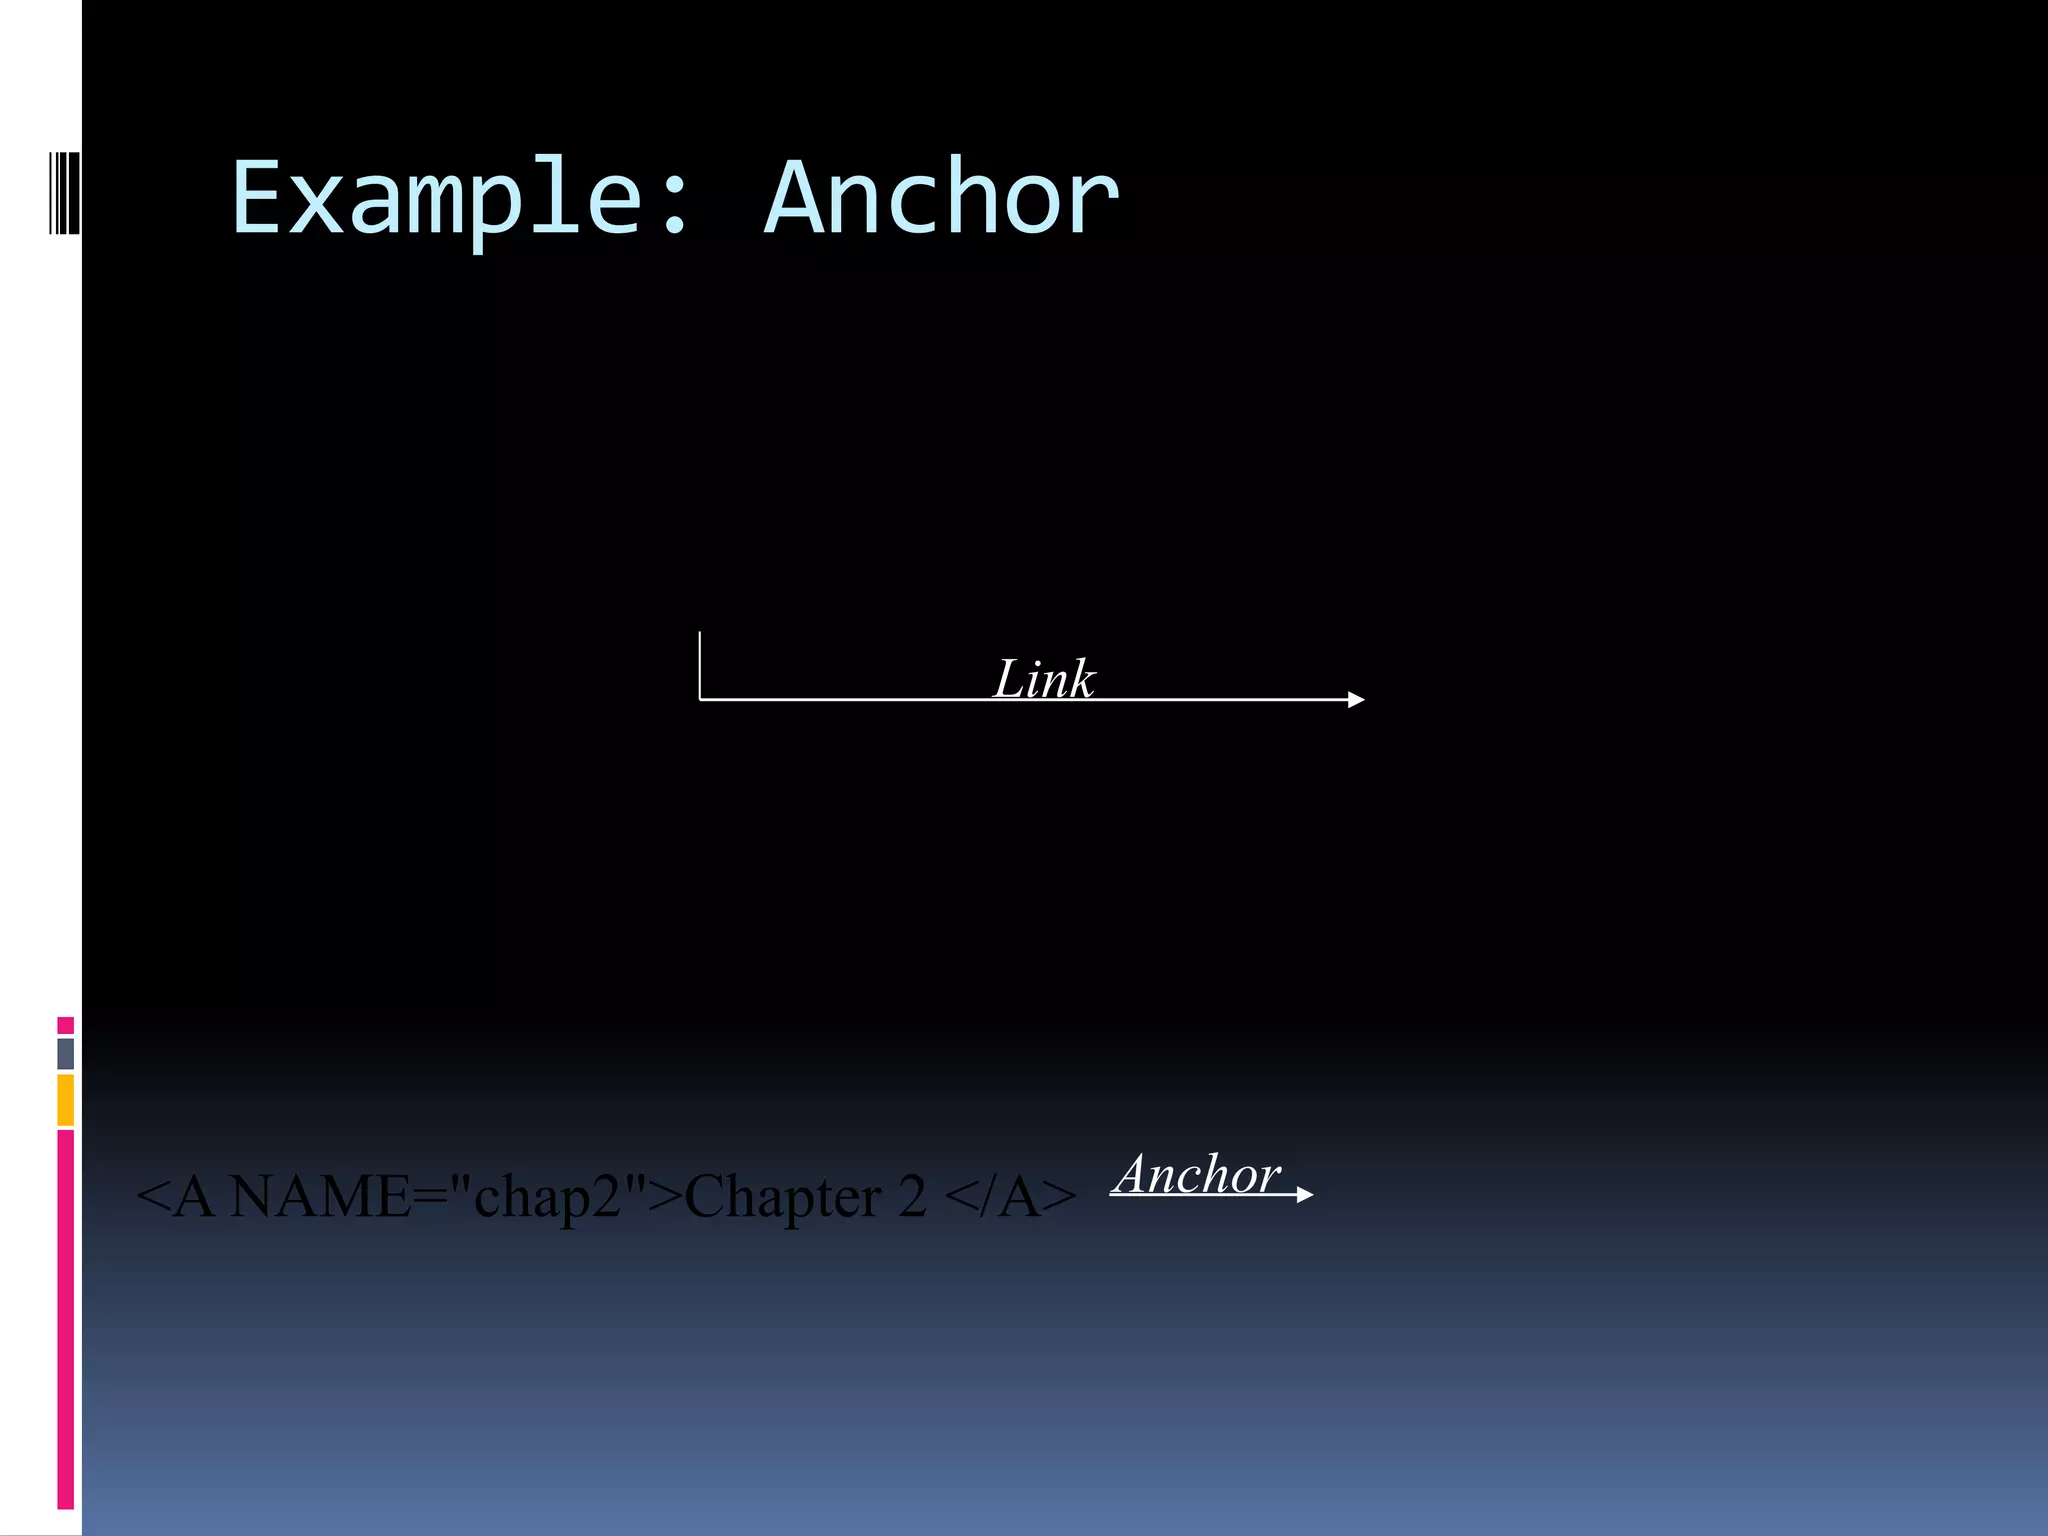
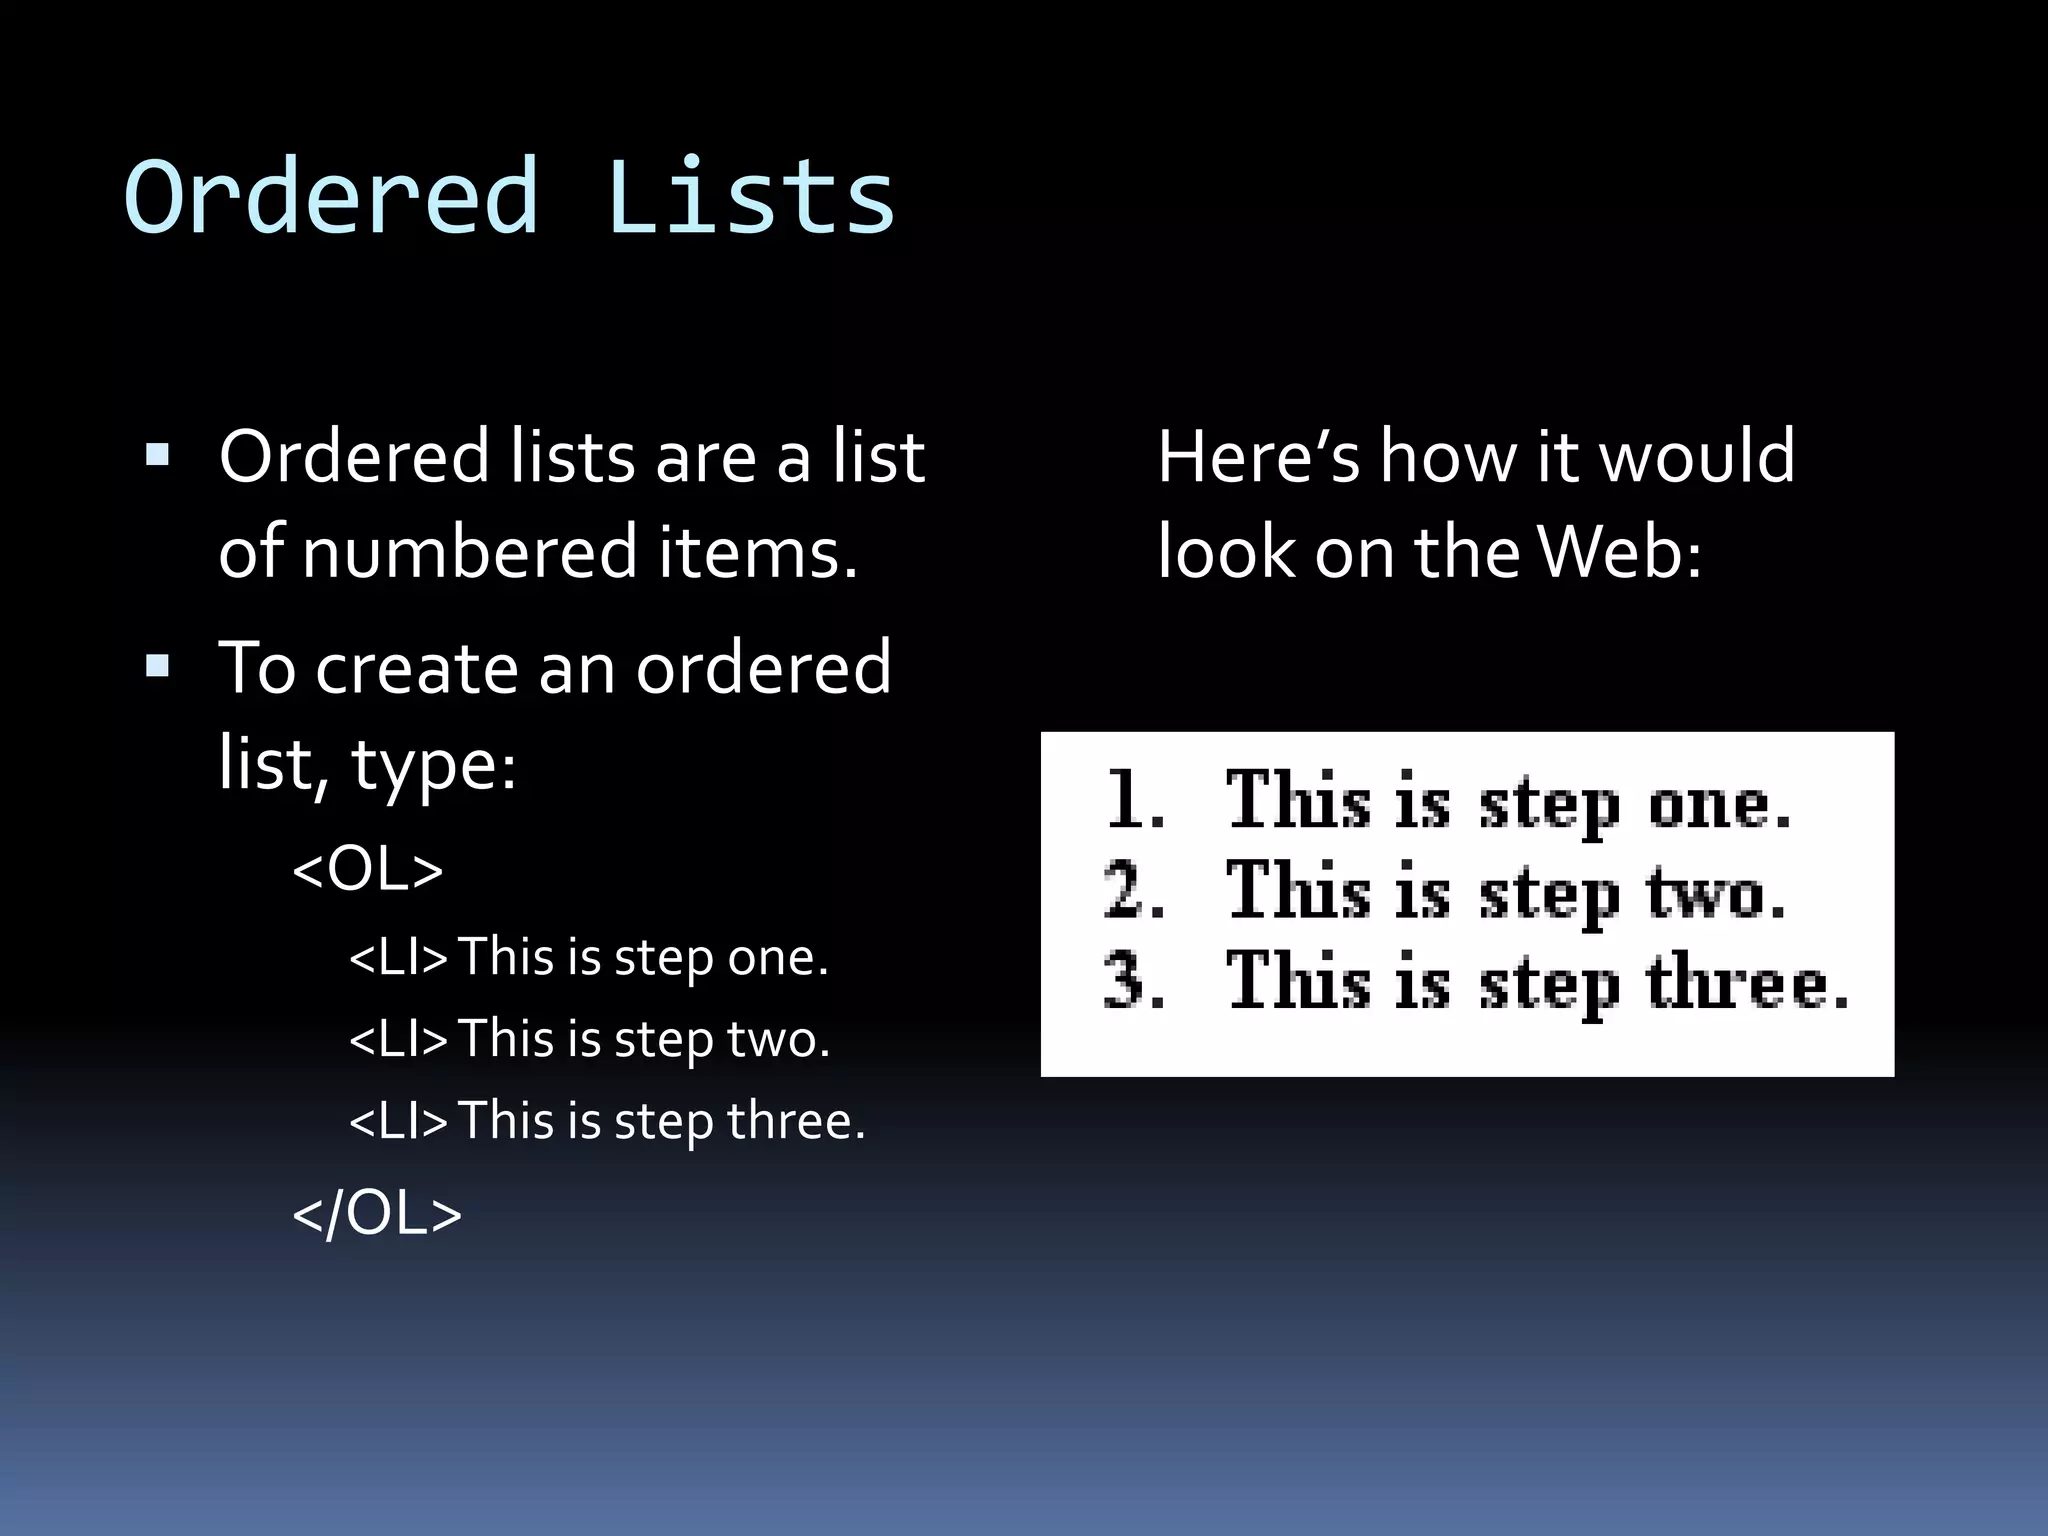
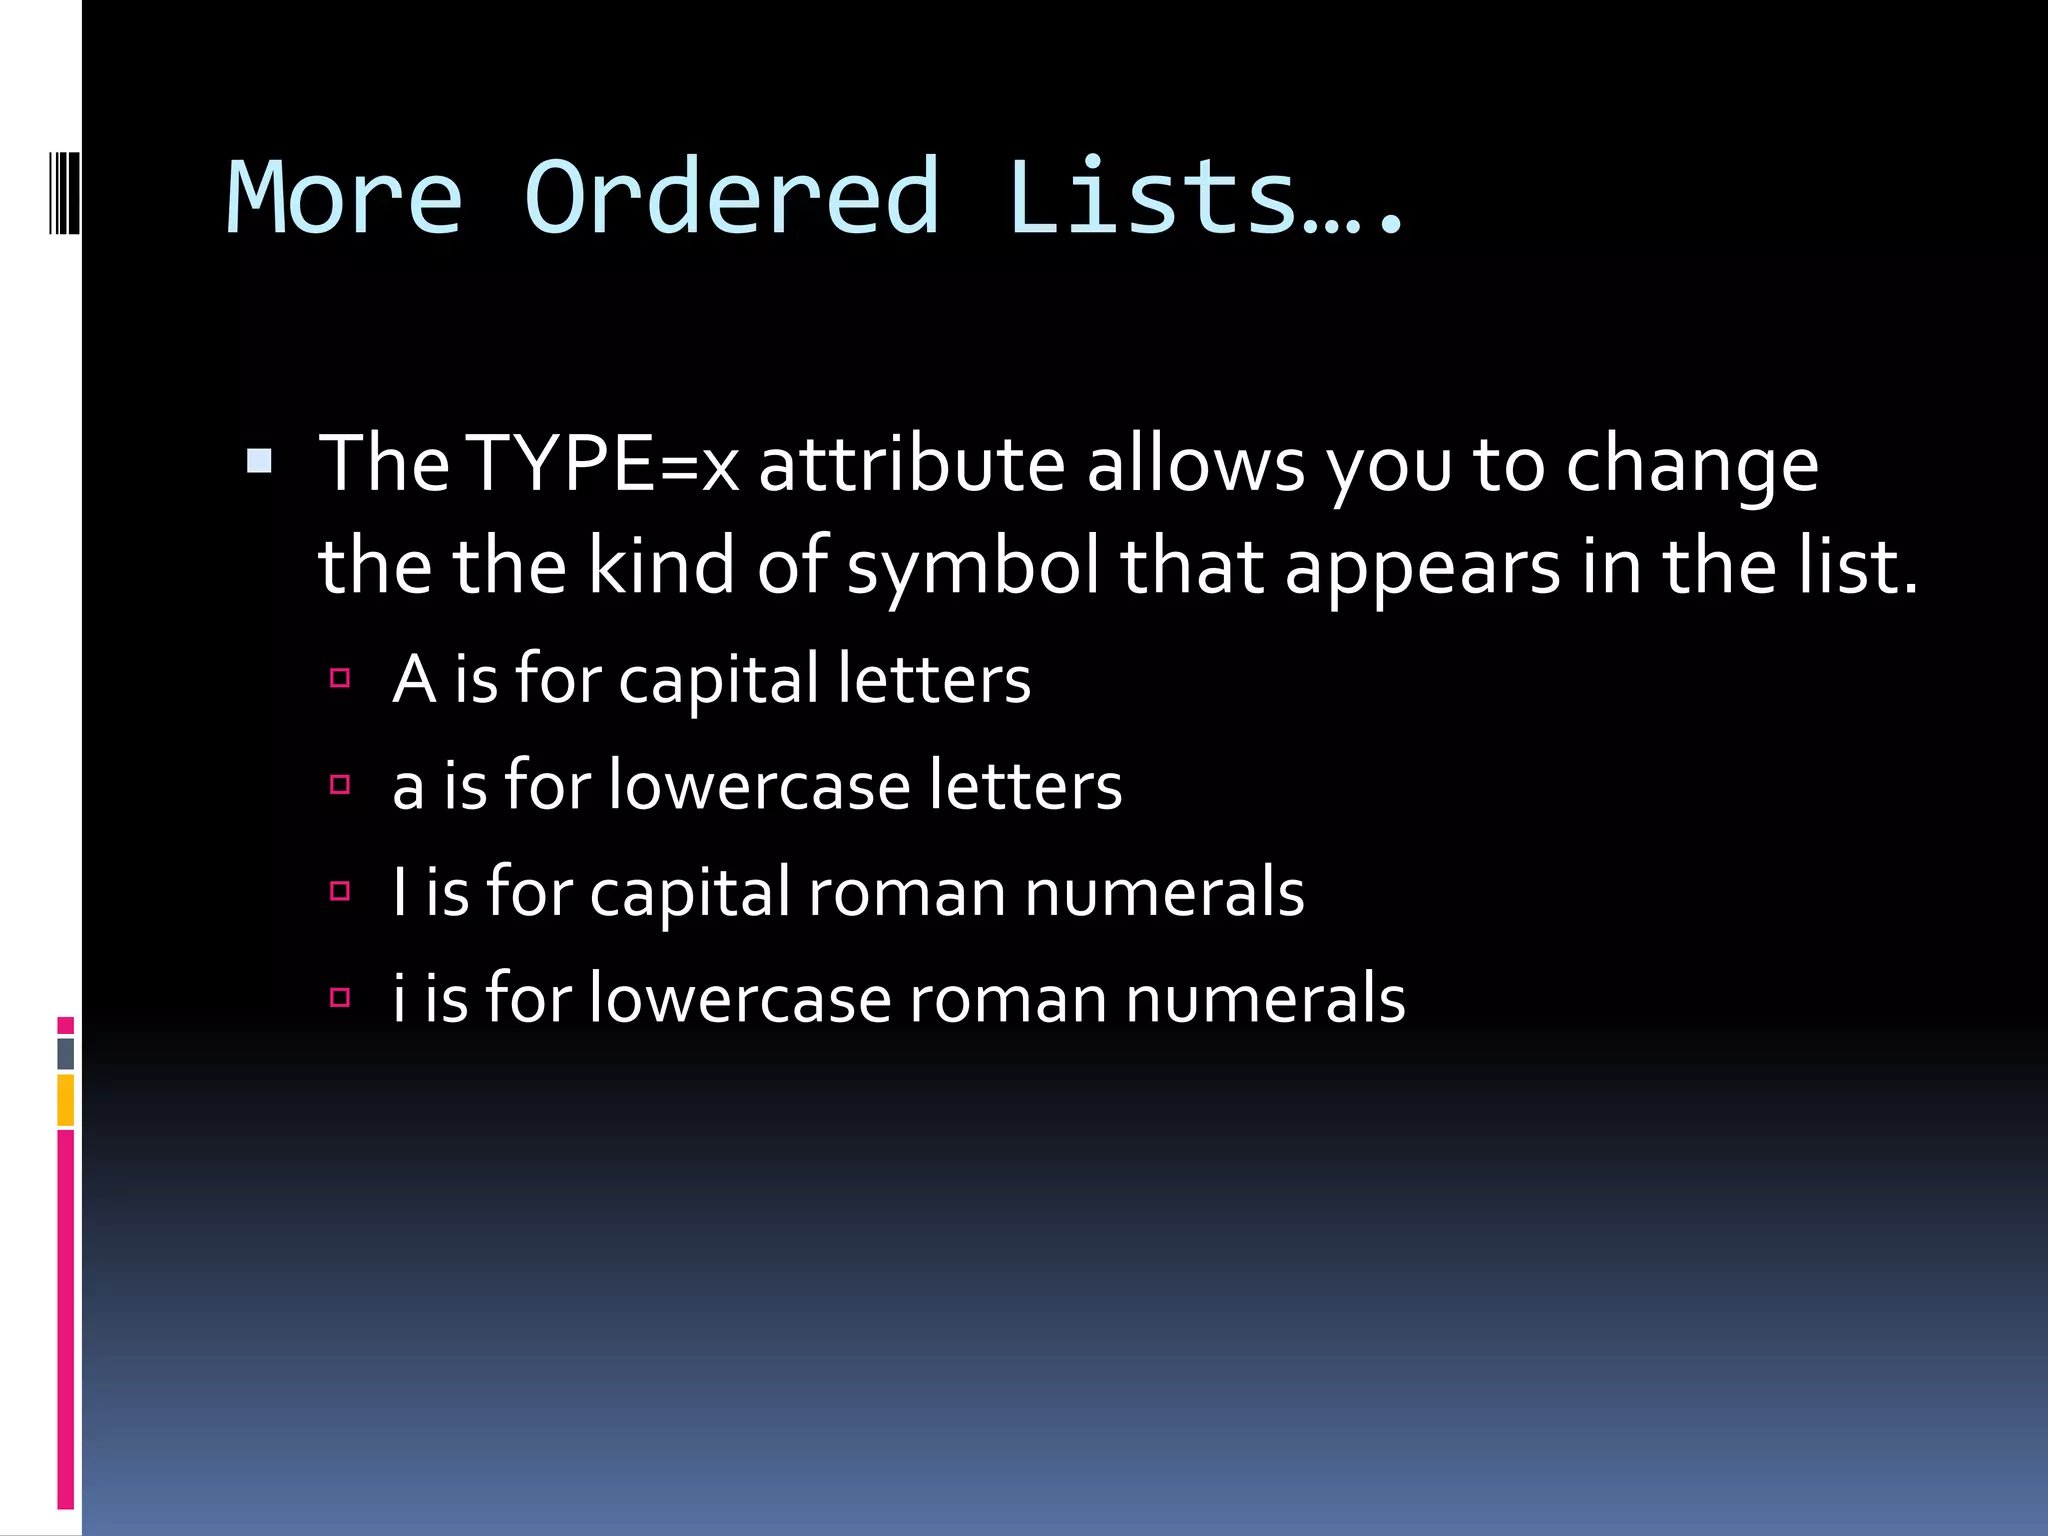
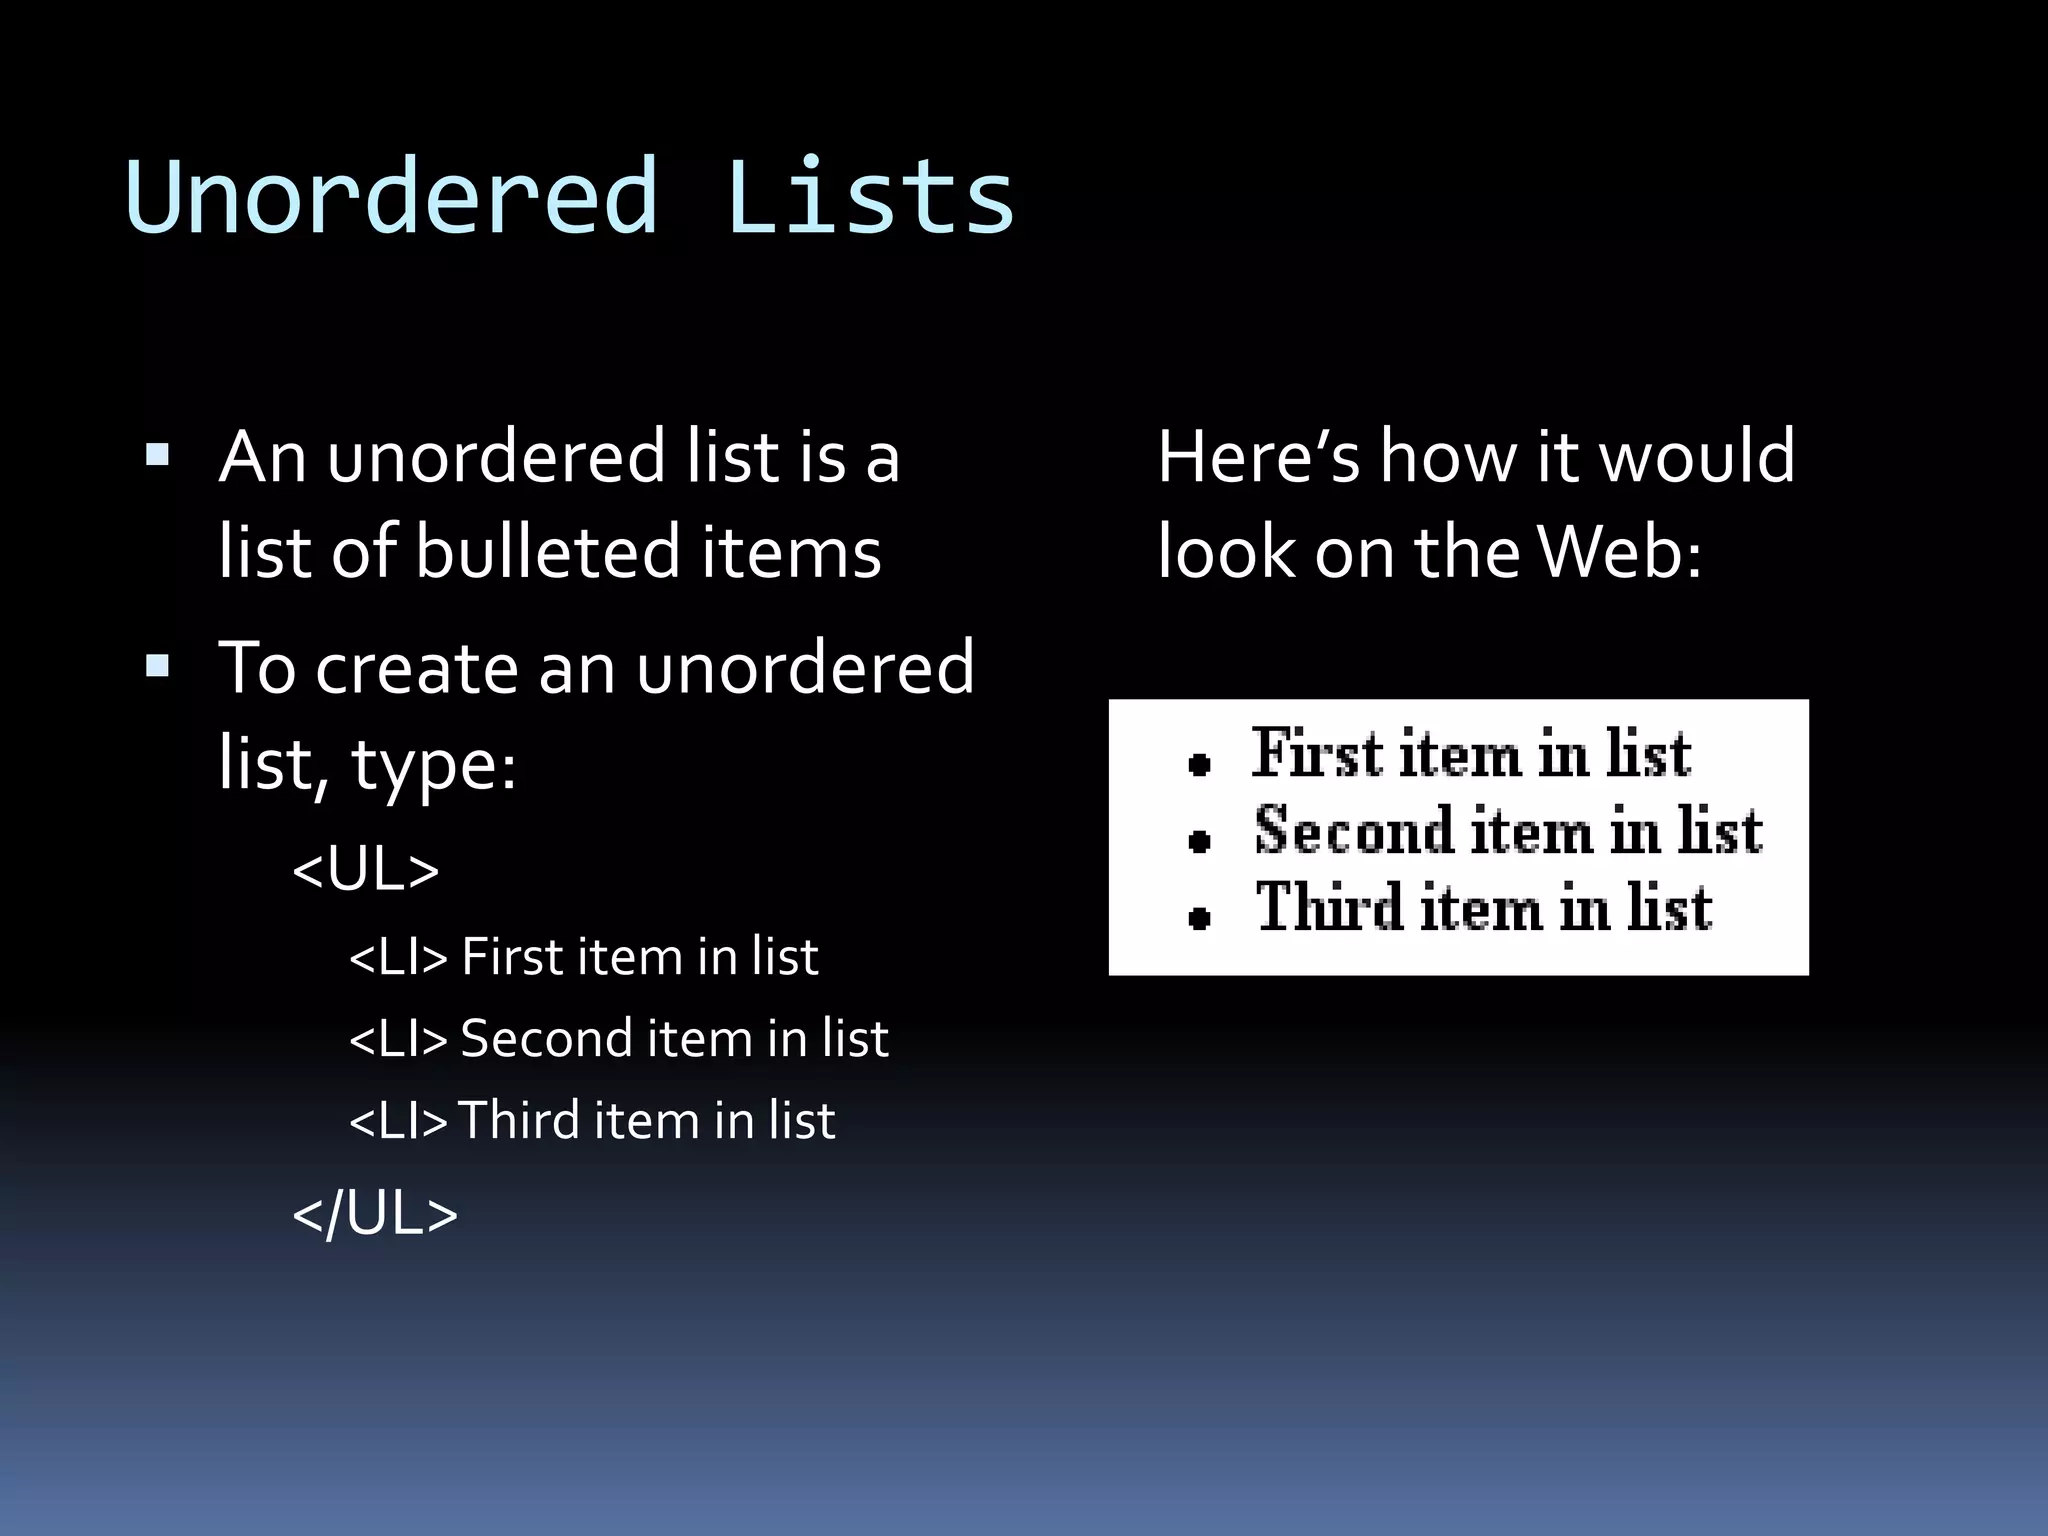
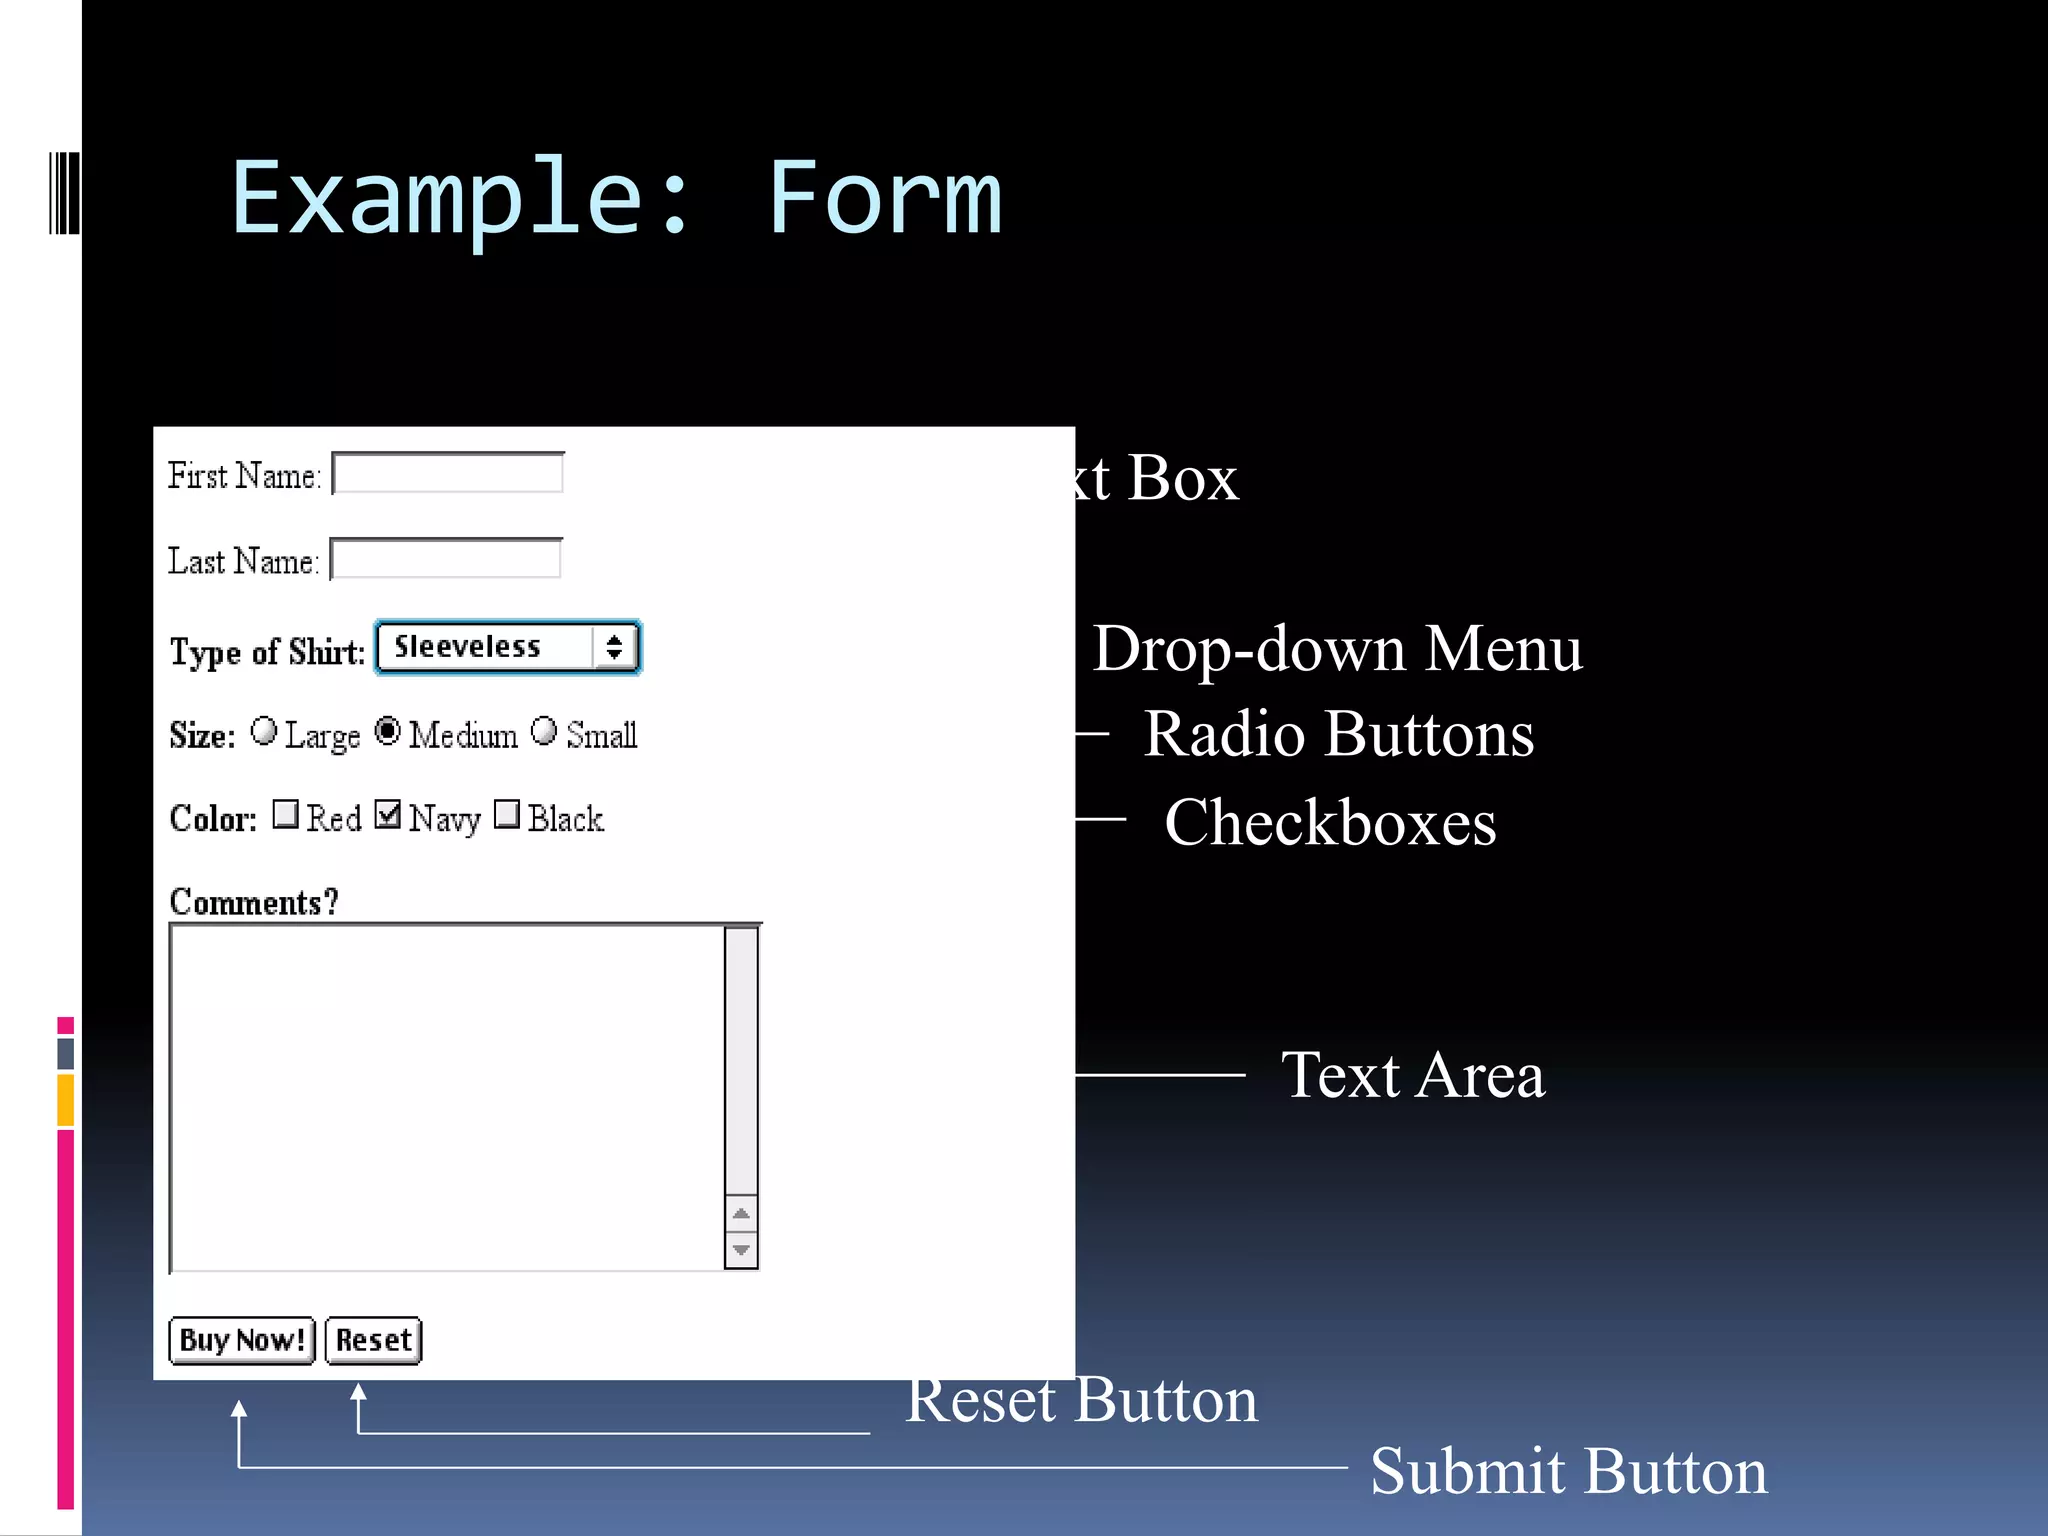
This document provides an introduction to HTML and describes its basic tags and structures. It explains that HTML is used to create web pages and can include text, graphics, sound and video. It outlines common tags like headings, paragraphs, lists, links, images and tables. It also covers adding formatting to text, backgrounds, borders and inserting comments.
This document provides an introduction to Adobe PageMaker, including definitions, features, advantages, disadvantages, and how to use it. PageMaker is a desktop publishing program that allows users to design documents like books, brochures, and newsletters. It includes tools for placing images, data merging, improved PDF support, and updated filters. The document also explains how to create a new PageMaker document and utilize various palettes that control objects, text, styles, layers, master pages, and hyperlinks.
The document describes the tools and functions available in Page Maker, a desktop publishing software. It outlines how to create and customize pages, including page size and margins. It also lists and explains the various tools for working with text, images, colors and styles. Menu commands are described for file handling, editing content, arranging page layout, and modifying text and object styles. Options for viewing and toggling different palettes and tools are also summarized.
PageMaker was one of the first desktop publishing programs, introduced in 1985. It allows users to create documents like resumes, letters, and business cards. The document provides step-by-step instructions on how to use basic PageMaker functions like drawing objects, selecting text, adding and deleting pages, and placing graphics and text on pages. It demonstrates how to work with frames, stories, and palettes to layout publications.
This document provides information about using OpenOffice Writer and some of its features, including wizards for creating letters and agendas, applying digital signatures, recording and merging changes, inserting scanned images, and positioning objects using anchors.
The document provides an introduction to using OpenOffice Writer. It discusses what Writer is, how to get started, how to work with documents and text, formatting options, inserting tables and graphics, and using styles. Key sections include how to create, open, and save documents; selecting, copying, cutting and pasting text; inserting page numbers, bullets and numbering; and changing text to different predefined styles like Title, Heading 1, and Subtitle.
This document provides an overview of OpenOffice Writer, the word processing component of OpenOffice.org. It discusses what OpenOffice.org and Writer are, their features and interfaces. It also provides step-by-step instructions on how to perform common word processing tasks in Writer like creating, opening, and saving documents, formatting text and pages, working with tables and graphics, and using styles. The document is intended to help users get started with and learn how to use the basic functions of Writer.
This document provides an introduction and overview of Adobe PageMaker 7.0 desktop publishing software. It describes PageMaker as a program used to create publications for print and electronic distribution using text, graphics, and layouts. It also lists some of the basic benefits and features of PageMaker, and provides a brief overview of how to get started using the software, including descriptions of the main PageMaker window components and how to work with and format text.
This document provides an overview of Adobe PageMaker 6.5, covering topics such as its interface elements like rulers, palettes, and tools; working with text, pictures, and objects; and printing publications. Key aspects of PageMaker covered include using templates and publications, preferences, the toolbox, colors palette, control palette, rulers and guides, creating and modifying documents, master pages, and basic functions for inputting, editing, and formatting text and images. The document also discusses selecting, arranging, aligning, and modifying objects as well as options for printing publications.
Microsoft Publisher is a desktop publishing program similar to PowerPoint that allows users to create publications like flyers, newsletters, and certificates. It contains templates to choose from and tools to format pages, insert pictures and clipart, and add borders and captions. The instructor recommends using the rulers and print preview to layout and check publications before printing.
Menu Commands and Toolbars in MS PublisherRolly Franco
This document provides a summary of commands available in the Button Menu of Microsoft Publisher, organized by Command and describing the Action performed. It includes common commands like New, Open, Save, Cut, Copy, Paste as well as formatting commands like Format Painter, Undo, Redo, and commands for inserting special characters, zooming, adding hyperlinks, and checking spelling.
PageMaker is a desktop publishing program used to create professional publications for print and electronic distribution like business cards, advertisements, brochures and magazines. It allows users to control layout, design and production through the use of text, graphics and layout features. The PageMaker interface includes tools like rulers, a publication window and toolbox. Key functions include working with text using formatting tools, copying and moving text, and using drawing tools to create simple graphics.
Desktop publishing programs allow users to combine text and graphics to create professional publications for print and web. Layouts should be planned in advance as desktop publishing provides greater design freedom than word processing. Common desktop publishing programs that can be used to create documents like newspapers, magazines, and brochures include QuarkXPress, Adobe InDesign, and Microsoft Publisher, which contains toolbars for formatting text and inserting objects.
This document describes the main interface elements of a desktop publishing program. The title bar displays the program and file names. The ribbon provides one-click access to common commands like save. The page pane displays the current page content while the scratch area acts as a holding space for reusable objects. The status bar, view tabs, and quick access toolbar help navigate and find commands to complete tasks.
1) InDesign allows users to combine text and images into professional layouts such as books, brochures, and posters.
2) The interface includes toolbars, panels to control object properties, and menus. Master pages allow default page formatting to be applied.
3) Key features include placing images, formatting text using character and paragraph styles, flowing text between frames, and exporting to PDF. Baseline grids help align text and objects.
Indesign CS3 is desktop publishing (DTP) software that allows users to combine text, images, and illustrations into a single document. It provides tools for laying out pages, including options for single or double page views. Common tools include selection, text, and shape tools for working with frames. Panels can be customized and positioned on the screen. Basic functions covered include importing and placing images, formatting text styles for consistency, creating books from multiple documents, and exporting to PDF.
This presentation discusses page layout in Microsoft Excel. It covers the Page Layout tab which contains commands for preparing a workbook for printing and PDF export, including page orientation, margins, themes, and more. It explains the different groups on the Page Layout tab like Themes, Page Setup, Scale to Fit, Sheet Options, and Arrange. It provides details on features within these groups for controlling page layout. The presentation also demonstrates how to view the workbook in Page Layout view and includes some example questions and answers about page layout functions in Excel.
The document provides instructions on how to insert various text elements in Microsoft Word 2010, including text boxes, quick parts, word art, drop caps, signature lines, dates and times, and objects. It explains each text element and provides the steps to insert them. For example, it states that to insert a text box, you click the "Insert" tab and then the "Text Box" button to select from built-in text box formats. It also demonstrates how to insert things like a signature line or date and time in different formats. The document serves as a tutorial for learning how to insert and format different types of text in Word.
The Objects Toolbar in MS Publisher contains the most commonly used features for creating publications. It includes buttons for selecting objects, inserting text boxes, tables, WordArt, picture frames, arrows, lines, ovals, rectangles, and other shapes. The toolbar also provides options for inserting hyperlinks, clipart images, and designs from the gallery.
10 Tips and Tricks to Improve Your Workflow in InDesign CS5Pix By Nix
Want to increase your productivity time in InDesign by leaps and bounds?
This presentation was given to the Carolina Adobe Users Group at UNC Chapel Hill on April 27, 2011. This talk covers the things I’ve found to be most helpful, and show you the many ways this robust program can literally cut many hours off of your design time, simply by letting the program do all the work for you. This talk covers Table of Contents, Paragraph Styles, Instant Grid, Placing multiple images, Page Numbering and Data Merge for Variable Data, and more.
If you are a print designer, or use the internet alot to post your designs, you could definitely benefit from this talk.
The document provides an overview of the key tools and features in Microsoft Publisher 2007, including the Getting Started pane for selecting templates or blank pages, the various toolbars for formatting, objects, and tasks, and the Quick Publication Options for changing templates or page sizes. It also references a website that provides additional tips for using Publisher.
This document provides a tutorial on using Adobe InDesign CS6. It discusses getting started, setting up documents, using the toolbox and its tools, organizing documents using columns, rulers and guides, inserting and formatting text, working with objects like images and graphics, and other features like saving, exporting to PDF and new features in CS6. The tutorial is comprehensive for beginners and takes them through using InDesign step-by-step.
The document provides instructions for using various features in Microsoft Publisher 2013, including adding commands to the quick access toolbar, inserting pictures from files or online sources, managing files, switching accounts if working in the cloud, navigating with the ribbon and navigation pane, zooming pages, and accessing help guides. It describes how to insert pictures, swap pictures, add picture and text effects, use photos for printing or as page backgrounds, and find common tools on the ribbon.
The document discusses various ribbon components in Microsoft Word for saving documents, closing documents, and formatting text and paragraphs. It can be summarized as follows:
The document discusses how to save documents in Word using features like Save, Save As, and setting default save locations. It also covers how to close documents and options that appear if changes need to be saved. Formatting tools covered include formatting text fonts, size, style, and color. Paragraph formatting options discussed include indentation, alignment, line spacing, borders, and lists.
This document provides an overview of the CorelDRAW workspace, including its key components and tools. It describes the application window, toolbars, property bar, dockers, status bar, color palette, and toolbox. The tutorial explains how to navigate the workspace, select tools, and understand CorelDRAW concepts and terminology to get started using the vector graphics software.
This document provides an overview of the basic terminology and tools in Microsoft PowerPoint. It discusses how to get started with PowerPoint and open a new presentation. It then summarizes the main menus and tools for formatting text, inserting images, tables, charts and other objects. The tools covered include changing fonts, formatting text, inserting slides, tables, pictures, and shapes. The document aims to accelerate learning PowerPoint through understanding its menus and ribbon interface.
The document provides an overview of using Adobe InDesign to design print layouts. It discusses setting up files in InDesign, creating new documents, and using various tools like rulers, grids, guides, frames, and text tools. It also covers working with pages, windows, colors, strokes, placing images, and making backgrounds and shapes. The purpose is to create a PowerPoint documenting the tools and features in InDesign to use for designing ancillary texts.
HTML is used to create web pages. It uses tags to define text formatting, images, links, and other page elements. Key HTML tags include <b> for bold text, <i> for italics, <img> to insert images, and <a> for links. Forms can be created using tags like <input> for text boxes and buttons, and <textarea> for comment boxes. Well-formatted HTML pages contain <html>, <head>, <title>, and <body> tags, and use additional tags like <h1> for main headings and <p> for paragraphs.
HTML is used to create web pages. It uses tags to format text and add images, links, tables, forms, and other content. Some key tags include <p> for paragraphs, <b> for bold text, <img> for images, <a> for links, <table> for tables, and <form> for forms. Forms allow users to enter text, select options, and submit information using elements like text boxes, radio buttons, checkboxes, and drop-down menus. Tables maintain the layout of page content using <tr> for table rows and <td> for table cells.
HTML is used to create web pages. It uses tags to define text formatting, images, links, and other page elements. Some key tags include <b> for bold text, <i> for italics, <img> to insert images, and <a> for links. Forms can be created using tags like <input> for text boxes and buttons, and <textarea> for comment boxes. Well formatted HTML pages include a <head> with <title>, and a <body> where content is placed.
HTML is used to create web pages and contains tags that define text, images, and other content. Some key tags include:
<p> for paragraphs, <b> for bold text, <i> for italics, and <img> for images. Links between pages are created using the <a> tag along with the href attribute. Forms allow users to enter text, select options, and submit information using tags like <input> for text boxes and buttons, <select> for drop-down menus, and <textarea> for multiple lines of text. The <form> tag defines the form and includes attributes for submission handling.
HTML is the language used to create web pages. It uses tags to structure and format text, images, and other content. Some key HTML tags include <p> for paragraphs, <h1>-<h6> for headings, <b> for bold text, and <img> for images. Links allow users to navigate between pages using the <a> tag, while anchors enable navigation to specific parts of a page. Lists are created with the <ol> and <ul> tags for ordered and unordered lists.
This document provides information about HTML tags and their uses. It begins with an introduction to HTML and defines HTML tags as markup tags that tell the web browser how to display a web page. It then discusses various HTML tags for formatting text, inserting images, creating lists and tables, and developing forms. Key tags covered include paragraph (<p>), heading (<h1>-<h6>), bold (<b>), italic (<i>), horizontal rule (<hr>), image (<img>), unordered (<ul>) and ordered (<ol>) lists, table (<table>), and form (<form>) tags. The document provides examples and explanations of how each tag is used.
This document provides an introduction to HTML (Hypertext Markup Language) and its basic tags and structures. It discusses what HTML is, common tags like <b> and <i> for bold and italics, nested tags, the basic structure of an HTML page with <html>, <head>, <title>, and <body> tags. It also covers how to format text, add headings, comments, images and more using HTML tags.
HTML is a markup language used to define the structure and layout of web pages. It uses tags to annotate text with information about formatting, links, lists, etc. Key points:
- HTML documents have a head and body - the head contains metadata and the body contains visible page content
- Common tags include headings, paragraphs, links, lists, images, forms, and tables
- Additional technologies like CSS and JavaScript can be used to make pages more dynamic and interactive
XML is a metalanguage used to define customized markup languages. It focuses on describing data rather than formatting. The main differences between HTML and XML are that XML tags are not predefined, case-sensitive, and more extensible.
D
HTML is a markup language used to define the structure and layout of web pages. It uses tags to annotate text with instructions for how it should be displayed. Some key HTML tags are <html> <head> <title> <body> <h1>-<h6> <p> <b> <i> <img> <a> <ul> <ol> <li>. XML is a metalanguage used to define customized markup languages for different types of documents. It focuses on describing data rather than formatting. DHTML allows web pages to be dynamic and interactive by combining HTML, CSS, and JavaScript.
Some important aspects of web design covered in the document include: basic HTML page structure; text formatting
This document discusses various HTML formatting tags including:
- Bold, italic, underline, font size, color, and link color tags
- Headers, paragraphs, and alignment
- Background images and colors
- Non-breaking spaces, horizontal rules, and blockquotes
It also covers nesting tags properly and reviewing best practices for using tags like font size, non-breaking spaces, and more.
HTML is a markup language used to define the structure and layout of web pages. HTML uses tags to mark elements like headings, paragraphs, lists, links etc. Some key HTML tags are <h1> for main headings, <p> for paragraphs, <ul> for unordered lists, <ol> for ordered lists, <a> for links, <img> for images. HTML documents have a basic structure with <html>, <head> and <body> tags. CSS can be used to style HTML elements by using the style attribute or external style sheets. HTML also supports basic text formatting tags like <b>, <i>, <u>. Colors in HTML are specified using hexadecimal color codes.
Learn HTML and CSS in few steps . Practice an hour daily for good results in 10 days.
Here I am mentioning basic elements , attributes and tags of HTML with styling them
This document provides an introduction to HTML, including its purpose for creating web pages, basic terminology like tags and elements, how to create an HTML document, text formatting tags, section headings, special characters, and advantages and disadvantages of HTML. It explains how to set up the basic structure of an HTML document with the <html>, <head>, and <body> tags and describes various tags for formatting text, inserting images, and creating lists and links.
HTML or Hypertext Markup Language is a markup language used to create documents on the World Wide Web. It defines the structure and layout of a Web document by using a variety of tags and attributes. A markup language is a set of interpretations to text that describes how it is to be structured, laid out, or formatted.
The tags are predefined combinations of characters enclosed between < (less than) and tags are embedded within the text of a file, and they indicate how the text is to be interpreted and displayed by the browser.
How a Web page looks when displayed depends on three things:
1. The HTML tags used.
2. The specific browser rendering the page.
3. The user’s system and monitor.
Episode 14 - Basics of HTML for SalesforceJitendra Zaa
This document provides an agenda and overview for an introduction to HTML coding basics. It includes 3 sentences:
The document outlines an agenda to cover introduction to HTML tags, text formatting, headings, paragraphs, comments, images, links, lists, forms, tables, cascading style sheets (CSS), and various CSS properties. It provides examples of common HTML elements and tags as well as how to structure an HTML page and insert different types of content. The session will conclude with allowing time for questions and answers.
The document provides an overview of HTML (Hypertext Markup Language) and web design. It discusses HTML tags and elements used to structure web pages, such as headings, paragraphs, images, hyperlinks, lists and tables. It also covers HTML forms, frames, the differences between HTML and XML, dynamic HTML (DHTML), and web hosting options. Scripting languages are introduced, including client-side languages like JavaScript and server-side languages like PHP that enable dynamic web page functionality.
HTML allows users to create web pages. It uses tags to format text, add images and other multimedia, and create hyperlinks. Some key points:
- HTML was created by Tim Berners-Lee in 1989 and standardized in 1997.
- It uses tags enclosed in angle brackets like <p> to format text into paragraphs.
- Common tags include <h1> for main headings, <img> to add images, and <a> for hyperlinks.
- Tables, lists, and forms can be added using <table>, <ul>/<ol>, and <form> tags.
- HTML pages are plain text files that can be viewed on any browser.
HTML (Hypertext Markup Language) is used to create web pages and documents. It was developed by Tim Berners-Lee and allows for the creation of hyperlinks to connect documents. HTML documents contain tags which are enclosed in angle brackets that provide formatting and structure. Common tags include <head>, <title>, <body>, <h1>-<h6> for headings, <p> for paragraphs, and <a> for links. HTML allows embedding of images, tables, lists and other multimedia through the use of additional tags.
The document provides an introduction to HTML (Hypertext Markup Language) and describes some of its key components and tags. It discusses that HTML is used to create structured web pages using tags, and that it can include images, scripts, stylesheets and forms. It then explains several important HTML tags like <html>, <head>, <body>, <p>, <a>, <b>, <font>, <form>, and <ol> and their uses.
This document discusses webpage layout and website design. It provides definitions of webpages and websites, noting that a webpage is a single HTML document while a website is a collection of related webpages. It emphasizes that good website design requires more than just assembling a few pages. The document then gives examples of existing website URLs and discusses important aspects of webpage layout like using tables to lay out content invisibly in a 2x2 grid with areas for menus, headers, content, and logos. It also covers considerations for different monitor resolutions and using consistent design themes, fonts, colors, and navigation across a website.
The document discusses various primitive data types including integer, floating point, decimal, boolean, character, and string types. It covers the implementation and design considerations of these types in different programming languages such as C, C++, Java, and C#. Enumeration types are also introduced as user-defined ordinal types.
The document discusses key concepts in object-oriented programming including creating objects and object reference variables, constructors, modifiers, instance and class variables and methods, scope of variables, and using the this keyword. It provides examples of creating Circle and Mortgage classes to demonstrate these concepts. UML diagrams are used to illustrate graphical notations for classes, objects, fields, and methods.
This document provides an overview of object-oriented programming concepts and the Java programming language. It discusses how classes will be structured in the course, compares object-oriented and procedural programming approaches, and lists advantages of OOP. It then introduces Java, covering its design goals, features, and development environments. Finally, it explains how to build a basic Java class, including class headers, identifiers, blocks of code, indentation, and methods.
This document provides an introduction to web design and web components. It discusses clients and servers, internet service providers, web hosting services, domains names URLs and IPs, and domain registrars. It then covers HTML fundamentals including tags, colors, headings, lists, tables, frames, and screen compatibility. The document is intended as an overview of the key elements involved in web design.
Dreamweaver is a WYSIWYG HTML editor developed by Macromedia that allows users to build and maintain websites without needing to know HTML. It provides tools for page editing like formatting text, inserting images and tables, and adding links. Dreamweaver also offers site management features like defining sites and using a site window. While it provides an easy interface, Dreamweaver is slower for HTML editing than text editors and may not be fully WYSIWYG. The document provides an overview of Dreamweaver's features and references for additional information.
The document summarizes the five generations of computers from 1940 to present. The first generation used vacuum tubes, were large and expensive. The second generation used transistors instead of tubes. The third generation used integrated circuits and allowed multitasking. The fourth generation had microprocessors and chips that housed all components. The fifth generation, still in development, aims to develop artificial intelligence through parallel processing and natural language capabilities.
The document discusses the OSI model, which is a standard networking framework that defines 7 layers of communication. It was developed by ISO in 1984 to establish a common way for diverse communication systems to interconnect. Each layer performs a specific task, with higher layers focusing on software services and lower layers handling physical transmission. Data moves down the layers as it's transmitted, with each layer adding header information.
The document discusses database management systems (DBMS). It defines DBMS as a collection of data and set of programs used to store and retrieve data efficiently. It describes how DBMS offers solutions to problems with storing data in files like data redundancy, difficulty of access, and lack of security. It also discusses data definition languages, data manipulation languages, and data control languages used to define, manage, and control access to data in a DBMS.
How to Add Chatter in the odoo 17 ERP ModuleCeline George
In Odoo, the chatter is like a chat tool that helps you work together on records. You can leave notes and track things, making it easier to talk with your team and partners. Inside chatter, all communication history, activity, and changes will be displayed.
The simplified electron and muon model, Oscillating Spacetime: The Foundation...RitikBhardwaj56
Discover the Simplified Electron and Muon Model: A New Wave-Based Approach to Understanding Particles delves into a groundbreaking theory that presents electrons and muons as rotating soliton waves within oscillating spacetime. Geared towards students, researchers, and science buffs, this book breaks down complex ideas into simple explanations. It covers topics such as electron waves, temporal dynamics, and the implications of this model on particle physics. With clear illustrations and easy-to-follow explanations, readers will gain a new outlook on the universe's fundamental nature.
LAND USE LAND COVER AND NDVI OF MIRZAPUR DISTRICT, UPRAHUL
This Dissertation explores the particular circumstances of Mirzapur, a region located in the
core of India. Mirzapur, with its varied terrains and abundant biodiversity, offers an optimal
environment for investigating the changes in vegetation cover dynamics. Our study utilizes
advanced technologies such as GIS (Geographic Information Systems) and Remote sensing to
analyze the transformations that have taken place over the course of a decade.
The complex relationship between human activities and the environment has been the focus
of extensive research and worry. As the global community grapples with swift urbanization,
population expansion, and economic progress, the effects on natural ecosystems are becoming
more evident. A crucial element of this impact is the alteration of vegetation cover, which plays a
significant role in maintaining the ecological equilibrium of our planet.Land serves as the foundation for all human activities and provides the necessary materials for
these activities. As the most crucial natural resource, its utilization by humans results in different
'Land uses,' which are determined by both human activities and the physical characteristics of the
land.
The utilization of land is impacted by human needs and environmental factors. In countries
like India, rapid population growth and the emphasis on extensive resource exploitation can lead
to significant land degradation, adversely affecting the region's land cover.
Therefore, human intervention has significantly influenced land use patterns over many
centuries, evolving its structure over time and space. In the present era, these changes have
accelerated due to factors such as agriculture and urbanization. Information regarding land use and
cover is essential for various planning and management tasks related to the Earth's surface,
providing crucial environmental data for scientific, resource management, policy purposes, and
diverse human activities.
Accurate understanding of land use and cover is imperative for the development planning
of any area. Consequently, a wide range of professionals, including earth system scientists, land
and water managers, and urban planners, are interested in obtaining data on land use and cover
changes, conversion trends, and other related patterns. The spatial dimensions of land use and
cover support policymakers and scientists in making well-informed decisions, as alterations in
these patterns indicate shifts in economic and social conditions. Monitoring such changes with the
help of Advanced technologies like Remote Sensing and Geographic Information Systems is
crucial for coordinated efforts across different administrative levels. Advanced technologies like
Remote Sensing and Geographic Information Systems
9
Changes in vegetation cover refer to variations in the distribution, composition, and overall
structure of plant communities across different temporal and spatial scales. These changes can
occur natural.
How to Fix the Import Error in the Odoo 17Celine George
An import error occurs when a program fails to import a module or library, disrupting its execution. In languages like Python, this issue arises when the specified module cannot be found or accessed, hindering the program's functionality. Resolving import errors is crucial for maintaining smooth software operation and uninterrupted development processes.
This presentation includes basic of PCOS their pathology and treatment and also Ayurveda correlation of PCOS and Ayurvedic line of treatment mentioned in classics.
How to Setup Warehouse & Location in Odoo 17 InventoryCeline George
In this slide, we'll explore how to set up warehouses and locations in Odoo 17 Inventory. This will help us manage our stock effectively, track inventory levels, and streamline warehouse operations.
Walmart Business+ and Spark Good for Nonprofits.pdfTechSoup
"Learn about all the ways Walmart supports nonprofit organizations.
You will hear from Liz Willett, the Head of Nonprofits, and hear about what Walmart is doing to help nonprofits, including Walmart Business and Spark Good. Walmart Business+ is a new offer for nonprofits that offers discounts and also streamlines nonprofits order and expense tracking, saving time and money.
The webinar may also give some examples on how nonprofits can best leverage Walmart Business+.
The event will cover the following::
Walmart Business + (https://business.walmart.com/plus) is a new shopping experience for nonprofits, schools, and local business customers that connects an exclusive online shopping experience to stores. Benefits include free delivery and shipping, a 'Spend Analytics” feature, special discounts, deals and tax-exempt shopping.
Special TechSoup offer for a free 180 days membership, and up to $150 in discounts on eligible orders.
Spark Good (walmart.com/sparkgood) is a charitable platform that enables nonprofits to receive donations directly from customers and associates.
Answers about how you can do more with Walmart!"
Strategies for Effective Upskilling is a presentation by Chinwendu Peace in a Your Skill Boost Masterclass organisation by the Excellence Foundation for South Sudan on 08th and 09th June 2024 from 1 PM to 3 PM on each day.
This presentation was provided by Steph Pollock of The American Psychological Association’s Journals Program, and Damita Snow, of The American Society of Civil Engineers (ASCE), for the initial session of NISO's 2024 Training Series "DEIA in the Scholarly Landscape." Session One: 'Setting Expectations: a DEIA Primer,' was held June 6, 2024.
How to Make a Field Mandatory in Odoo 17Celine George
In Odoo, making a field required can be done through both Python code and XML views. When you set the required attribute to True in Python code, it makes the field required across all views where it's used. Conversely, when you set the required attribute in XML views, it makes the field required only in the context of that particular view.
বাংলাদেশের অর্থনৈতিক সমীক্ষা ২০২৪ [Bangladesh Economic Review 2024 Bangla.pdf] কম্পিউটার , ট্যাব ও স্মার্ট ফোন ভার্সন সহ সম্পূর্ণ বাংলা ই-বুক বা pdf বই " সুচিপত্র ...বুকমার্ক মেনু 🔖 ও হাইপার লিংক মেনু 📝👆 যুক্ত ..
আমাদের সবার জন্য খুব খুব গুরুত্বপূর্ণ একটি বই ..বিসিএস, ব্যাংক, ইউনিভার্সিটি ভর্তি ও যে কোন প্রতিযোগিতা মূলক পরীক্ষার জন্য এর খুব ইম্পরট্যান্ট একটি বিষয় ...তাছাড়া বাংলাদেশের সাম্প্রতিক যে কোন ডাটা বা তথ্য এই বইতে পাবেন ...
তাই একজন নাগরিক হিসাবে এই তথ্য গুলো আপনার জানা প্রয়োজন ...।
বিসিএস ও ব্যাংক এর লিখিত পরীক্ষা ...+এছাড়া মাধ্যমিক ও উচ্চমাধ্যমিকের স্টুডেন্টদের জন্য অনেক কাজে আসবে ...
বাংলাদেশ অর্থনৈতিক সমীক্ষা (Economic Review) ২০২৪ UJS App.pdf
Intro html
1. INTRODUCTION TO HTML
Presented by
Ms.V.Umamaheswari MCA.,MPhil.,
Department of InformationTechnology
Bon secours College forWomen
Thanjavur-6
2. What is HTML?
HTML, otherwise known as HyperText
Markup Language, is the language used to
createWeb pages
Using HTML, you can create aWeb page with
text, graphics, sound, and video
3. Tags
The essence of HTML programming is tags
A tag is a keyword enclosed by angle brackets
( Example: <I> )
There are opening and closing tags for many
but not all tags;The affected text is between
the two tags
4. More Tags...
The opening and closing tags use the same
command except the closing tag contains
and additional forward slash /
For example, the expression <B> Warning
</B> would cause the word ‘Warning’ to
appear in bold face on aWeb page
5. Nested Tags
Whenever you have HTML tags within other
HTML tags, you must close the nearest tag
first
Example:
<H1> <I>The Nation </I> </H1>
6. Structure of a Web Page
AllWeb pages share a
common structure
AllWeb pages should
contain a pair of
<HTML>, <HEAD>,
<TITLE>, and <BODY>
tags
<HTML>
<HEAD>
<TITLE> Example </TITLE>
</HEAD>
<BODY>
This is where you would include the
text and images on your Web page.
</BODY>
</HTML>
7. The <TITLE> Tag
Choose the title of yourWeb page carefully;
The title of aWeb page determines its
ranking in certain search engines
The title will also appear on Favorite lists,
History lists, and Bookmark lists to identify
your page
8. Text Formatting
Manipulating text in HTML can be tricky;
Oftentimes, what you see is NOT what you
get
For instance, special HTML tags are needed
to create paragraphs, move to the next line,
and create headings
9. Text Formatting Tags
<B> Bold Face </B>
<I> Italics </I>
<U> Underline </U>
<P> New Paragraph </P>
<BR> Next Line
10. Changing the Font
The expression <FONT FACE = “fontname”>
… </FONT> can be used to change the font of
the enclosed text
To change the size of text use the expression
<FONT SIZE=n> …. </FONT> where n is a
number between 1 and 7
11. Changing the Font
To change the color, use <FONT
COLOR=“red”>…. </FONT>;The color can
also be defined using hexadecimal
representation ( Example: #ffffff )
These attributes can be combined to change
the font, size, and color of the text all at once;
For example, <FONT SIZE=4 FACE=“Courier”
COLOR=“red”> …. </FONT>
12. Headings
Web pages are typically organized into
sections with headings;To create a heading
use the expression <Hn>….</Hn> where n is a
number between 1 and 7
In this case, the 1 corresponds to the largest
size heading while the 7 corresponds to the
smallest size
13. Aligning Text
The ALIGN attribute can be inserted in the
<P> and <Hn> tags to right justify, center, or
left justify the text
For example, <H1 ALIGN=CENTER>The New
YorkTimes </H1> would create a centered
heading of the largest size
14. Comment Statements
Comment statements are notes in the HTML
code that explain the important features of
the code
The comments do not appear on theWeb
page itself but are a useful reference to the
author of the page and other programmers
To create a comment statement use the <!--
…. --> tags
15. The Infamous Blink Tag
It is possible to make text blink using the
<BLINK> … </BLINK> tag
However, it is best to use this feature at most
sparingly or not at all; What seems like a good
idea to aWeb designer can become very
annoying to aWeb user
The <BLINK> tag is not supported by Internet
Explorer
16. Page Formatting
To define the background color, use the
BGCOLOR attribute in the <BODY> tag
To define the text color, use theTEXT
attribute in the <BODY> tag
To define the size of the text, type
<BASEFONT SIZE=n>
18. Inserting Images
Type <IMG SRC = “image.ext”>, where
image.ext indicates the location of the image
file
TheWIDTH=n and HEIGHT=n attributes can
be used to adjust the size of an image
The attribute BORDER=n can be used to add
a border n pixels thick around the image
19. Alternate Text
Some browsers don’t support images. In this
case, the ALT attribute can be used to create
text that appears instead of the image.
Example:
<IMG SRC=“satellite.jpg” ALT = “Picture of
satellite”>
20. Links
A link lets you move from one page to
another, play movies and sound, send email,
download files, and more….
A link has three parts: a destination, a label,
and a target
To create a link type
<A HREF=“page.html”> label </A>
21. Anatomy of a Link
<A HREF=“page.html”> label </A>
In the above link, “page.html” is the
destination.The destination specifies the
address of theWeb page or file the user will
access when he/she clicks on the link.
The label is the text that will appear
underlined or highlighted on the page
22. Example: Links
To create a link to CNN, I would type:
<A HREF=“http://www.cnn.com”>CNN</A>
To create a link to MIT, I would type:
<A HREF=“http://www.mit.edu”>MIT</A>
23. Changing the Color of Links
The LINK,VLINK, and ALINK attributes can
be inserted in the <BODY> tag to define the
color of a link
LINK defines the color of links that have not been
visited
VLINK defines the color of links that have already
been visited
ALINK defines the color of a link when a user clicks
on it
24. Using Links to Send Email
To create a link to an email address, type <A
HREF=“mailto:email_address”> Label</A>
For example, to create a link to send email to
myself, I would type: <A HREF=“mailto:
ktdunn@mit.edu”>email Katie Dunn</A>
25. Anchors
Anchors enable a user to jump to a specific
place on aWeb site
Two steps are necessary to create an anchor.
First you must create the anchor itself.Then
you must create a link to the anchor from
another point in the document.
26. Anchors
To create the anchor itself, type <A
NAME=“anchor name”>label</A> at the point
in theWeb page where you want the user to
jump to
To create the link, type <A HREF=“#anchor
name”>label</A> at the point in the text
where you want the link to appear
28. Ordered Lists
Ordered lists are a list
of numbered items.
To create an ordered
list, type:
<OL>
<LI>This is step one.
<LI>This is step two.
<LI>This is step three.
</OL>
Here’s how it would
look on theWeb:
29. More Ordered Lists….
TheTYPE=x attribute allows you to change
the the kind of symbol that appears in the list.
A is for capital letters
a is for lowercase letters
I is for capital roman numerals
i is for lowercase roman numerals
30. Unordered Lists
An unordered list is a
list of bulleted items
To create an unordered
list, type:
<UL>
<LI> First item in list
<LI> Second item in list
<LI>Third item in list
</UL>
Here’s how it would
look on theWeb:
31. More Unordered Lists...
TheTYPE=shape attribute allows you to
change the type of bullet that appears
circle corresponds to an empty round bullet
square corresponds to a square bullet
disc corresponds to a solid round bullet; this is the
default value
32. Forms
What are forms?
• An HTML form is an area of the document that
allows users to enter information into fields.
• A form may be used to collect personal
information, opinions in polls, user preferences
and other kinds of information.
33. Forms
There are two basic components of aWeb
form: the shell, the part that the user fills out,
and the script which processes the
information
HTML tags are used to create the form shell.
Using HTML you can create text boxes, radio
buttons, checkboxes, drop-down menus, and
more...
35. The Form Shell
A form shell has three important parts:
the <FORM> tag, which includes the address of
the script which will process the form
the form elements, like text boxes and radio
buttons
the submit button which triggers the script to
send the entered information to the server
36. Creating the Shell
To create a form shell, type <FORM
METHOD=POSTACTION=“script_url”>
where “script_url” is the address of the script
Create the form elements
End with a closing </FORM> tag
37. Creating Text Boxes
To create a text box, type <INPUT
TYPE=“text” NAME=“name”VALUE=“value”
SIZE=n MAXLENGTH=n>
The NAME,VALUE, SIZE, and MAXLENGTH
attributes are optional
38. Text Box Attributes
The NAME attribute is used to identify the
text box to the processing script
TheVALUE attribute is used to specify the
text that will initially appear in the text box
The SIZE attribute is used to define the size of
the box in characters
The MAXLENGTH attribute is used to define
the maximum number of characters that can
be typed in the box
39. Example: Text Box
First Name: <INPUTTYPE="text"
NAME="FirstName"
VALUE="First Name" SIZE=20>
<BR><BR>
Last Name: <INPUTTYPE="text"
NAME="LastName"
VALUE="Last Name" SIZE=20>
<BR><BR>
Here’s how it would
look on theWeb:
40. Creating Larger Text Areas
To create larger text areas, type <TEXTAREA
NAME=“name” ROWS=n1 COLS=n2WRAP>
DefaultText </TEXTAREA>, where n1 is the
height of the text box in rows and n2 is the
width of the text box in characters
TheWRAP attribute causes the cursor to
move automatically to the next line as the
user types
42. Creating Radio Buttons
To create a radio button, type <INPUT
TYPE=“radio” NAME=“name”
VALUE=“data”>Label, where “data” is the
text that will be sent to the server if the
button is checked and “Label” is the text that
identifies the button to the user
44. Creating Checkboxes
To create a checkbox, type <INPUT
TYPE=“checkbox” NAME=“name”
VALUE=“value”>Label
If you give a group of radio buttons or
checkboxes the same name, the user will only
be able to select one button or box at a time
46. Creating Drop-down Menus
To create a drop-down menu, type <SELECT
NAME=“name” SIZE=n MULTIPLE>
Then type <OPTIONVALUE= “value”>Label
In this case the SIZE attribute specifies the
height of the menu in lines and MULTIPLE
allows users to select more than one menu
option
48. Creating a Submit Button
To create a submit button, type <INPUT
TYPE=“submit”>
If you would like the button to say something
other than submit, use theVALUE attribute
For example, <INPUTTYPE=“submit”
VALUE=“Buy Now!”> would create a button
that says “Buy Now!”
49. Creating a Reset Button
To create a reset button, type <INPUT
TYPE=“reset”>
TheVALUE attribute can be used in the same
way to change the text that appears on the
button
50. Tables
Tables can be used to display rows and
columns of data, create multi-column text,
captions for images, and sidebars
The <TABLE> tag is used to create a table;
the <TR> tag defines the beginning of a row
while the <TD> tag defines the beginning of a
cell
51. Adding a Border
The BORDER=n attribute allows you to add a
border n pixels thick around the table
To make a solid border color, use the
BORDERCOLOR=“color” attribute
To make a shaded colored border, use
BODERCOLORDARK=“color” and
BORDERCOLORLIGHT=“color”
52. Creating Simple Table
<TABLE BORDER=10>
<TR>
<TD>One</TD>
<TD>Two</TD>
</TR>
<TR>
<TD>Three</TD>
<TD>Four</TD>
</TR>
</TABLE>
Here’s how it would
look on theWeb:
53. Adjusting the Width
When aWeb browser displays a table, it often
adds extra space.To eliminate this space use
theWIDTH =n attribute in the <TABLE> and
<TD> tags
Keep in mind - a cell cannot be smaller than
its contents, and if you make a table wider
than the browser window, users will not be
able to see parts of it.
54. Centering a Table
There are two ways to center a table
Type <TABLE ALIGN=CENTER>
Enclose the <TABLE> tags in opening and closing
<CENTER> tags
55. Wrapping Text around a Table
It is possible to wrap text around a table.This
technique is often used to keep images and
captions together within an article.
To wrap text around a table, type <TABLE ALIGN
= LEFT> to align the table to the left while the
text flows to the right.
Create the table using the <TR>, <TD>, and
</TABLE> tags as you normally would
56. Adding Space around a Table
To add space around a table, use the
HSPACE=n andVSPACE=n attributes in the
<TABLE> tag
Example:
<TABLE HSPACE=20VSPACE=20>
57. Spanning Cells Across
Columns
It is often necessary to span one cell across
many columns. For example, you would use
this technique to span a headline across the
columns of a newspaper article.
To span a cell across many columns, type <TD
COLSPAN=n>, where n is the number of
columns to be spanned
58. Spanning Cells Across Rows
To span a cell across many rows, type <TD
ROWSPAN=n>, where n is the number of
rows
59. Aligning Cell Content
By default, a cell’s content are aligned
horizontally to the left and and vertically in
the middle.
UseVALIGN=direction to change the vertical
alignment, where “direction” is top, middle,
bottom, or baseline
Use ALIGN=direction to change the
horizontal alignment where “direction” is left,
center, or right
60. Controlling Cell Spacing
Cell spacing is the space between cells while
cell padding is the space around the contents
of a cell
To control both types of spacing, use the
CELLSPACING =n and CELLPADDING=n
attributes in the <TABLE> tag
61. Nesting Tables
Create the inner table
Create the outer table and determine which cell
of the outer table will hold the inner table
Test both tables separately to make sure they
work
Copy the inner table into the cell of the outer
table
Don’t nest too many tables. If you find yourself
doing that, find an easier way to lay out your
Web page
62. Changing a Cell’s Color
To change a cell’s color, add the
BGCOLOR=“color” attribute to the <TD> tag
Example:
<TD BGCOLOR=“blue”>
63. Dividing Your Table into
Column Groups
You can divide your table into two kinds of
column groups: structural and non-structural.
Structural column groups control where
dividing lines are drawn; Non-structural
groups do not
Both let you format an entire column of cells
at once
64. Column Groups
To create structural column groups, type
<COLGROUP SPAN=n> after the <TABLE> tag,
where n is the number of columns in the group
To create non-structural column groups, type
<COL SPAN=n>, where n is the number of
columns in the group
65. Dividing Table into
Horizontal Sections
You can also create a horizontal section
consisting of one or more rows.This allows
you to format the rows all at once
To create a horizontal section, type
<THEAD>, <TBODY>, or <TFOOT> before the
first <TR> tag of the section
Netscape does not support these tags
66. Controlling Line Breaks
Unless you specify otherwise a browser will
divide the lines in a cell as it sees fit.
The NOWRAP attribute placed within the
<TD> tag forces the browser to keep all the
text in a cell on one line
Example:
<TD NOWRAP>Washington, D.C.
67. Parting Words….
If you can imagine a way to lay out your page,
chances are it is possible using HTML
When in doubt, use an HTML reference