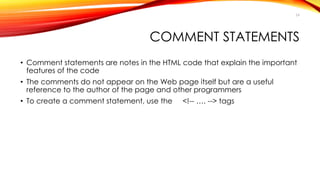
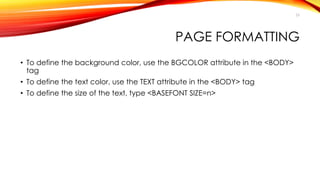
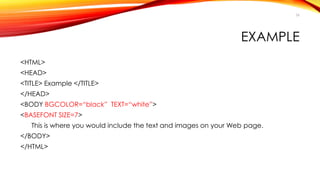
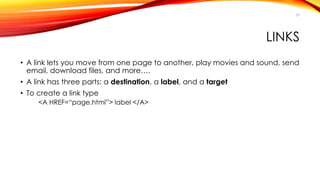
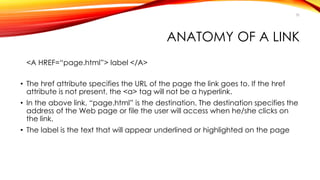
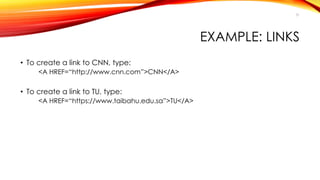
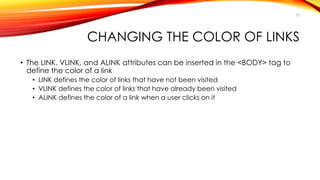
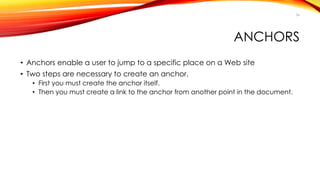
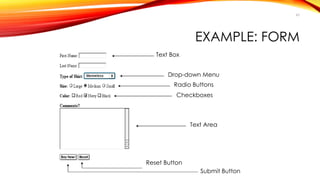
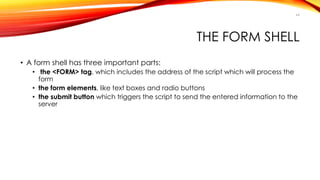
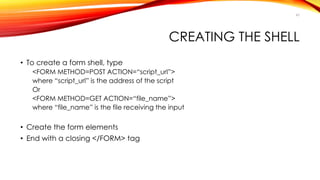
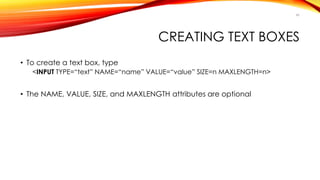
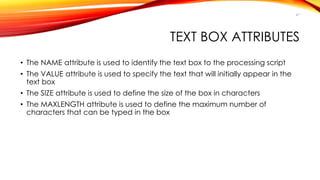
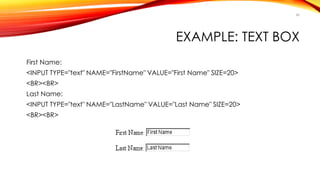
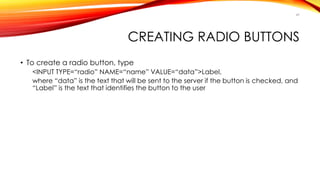
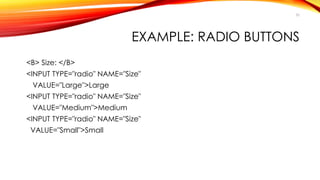
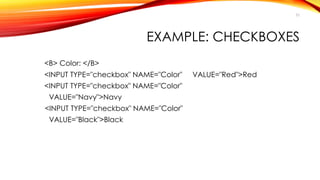
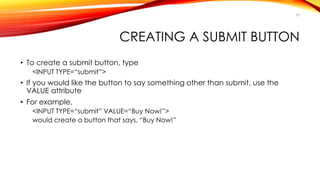
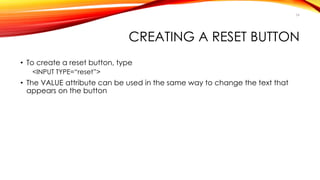
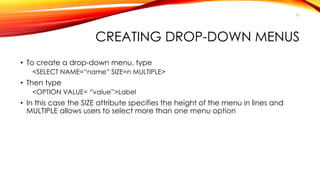
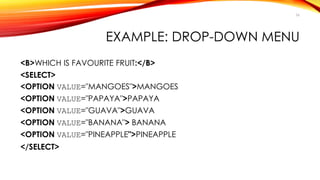
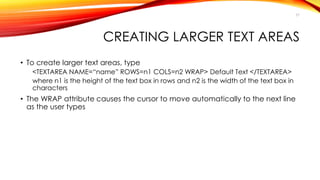
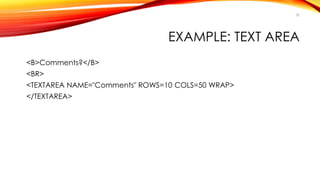
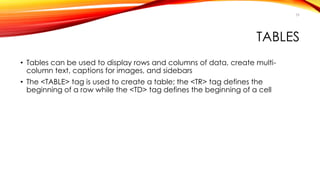
SlideShare a Scribd company logo
1 of 77
Download to read offline
INTRODUCTION TO HTML
CS485- WebE
1
DEFINITIONS
▪ WWW – World Wide Web.
▪ HTML – HyperText Markup Language – The Language of Web Pages
on the World Wide Web.
HTML is a text formatting language.
▪ URL – Uniform Resource Locator.
▪ Browser – A software program which is used to show web pages.
2
WHAT IS HTML?
• HTML, otherwise known as HyperText Markup Language, is the
language used to create Web pages
• Using HTML, you can create a Web page with text, graphics, sound,
and video
3
HTML
• “Normal text” surrounded by bracketed tags that tell browsers how to
display web pages
• Pages end with “.htm” or “.html”
• HTML Editor – A word processor that has been specialized to make the
writing of HTML documents more effortless.
4
CHOOSING TEXT EDITOR
• There are many different programs that you can use to create web
documents.
• HTML Editors enable users to create documents quickly and easily by
pushing a few buttons. Instead of entering all the HTML codes by
hand.
• These programs will generate the HTML Source Code for you.
5
CHOOSING TEXT EDITOR
• For this Course, we are using the standard Microsoft Windows text
editors, NotePad.
• We may also use Visual Studio Code
• https://code.visualstudio.com/
6
STARTING NOTEPAD
• NotePad is the standard text editor that comes with the microsoft
windows operating system. To start NotePad :
• Click on the “Start” button located on your Windows task bar.
• Type “NotePad” and click the shortcut once.
7
CREATING A BASIC STARTING
DOCUMENT
<HTML>
<HEAD>
<TITLE>CS485 Webpage</TITLE>
</HEAD>
<BODY>
This is what is displayed.
</BODY>
</HTML>
8
CREATING A BASIC STARTING
DOCUMENT
• The HEAD of your document point to above window part.
• The TITLE of your document appears in the very top line of the user’s browser.
• If the user chooses to “Bookmark” your page or save as a “Favorite”; it is the TITLE
that is added to the list.
• The text in your TITLE should be as descriptive as possible because this is what
many search engines, on the internet, use for indexing your site.
9
SETTING DOCUMENT PROPERTIES
• Document properties are controlled by attributes of the BODY
element.
• For example, there are color settings for the background color of the page, the
document’s text and different states of link
10
TAGS
• Codes enclosed in brackets
• Usually paired
• <TITLE>My Web Page</TITLE>
• Not case sensitive
• <TITLE> = <title> = <TITLE>
11
TAGS
• The essence of HTML programming is tags
• A tag is a keyword enclosed by angle brackets ( Example: <I> )
• There are opening and closing tags for many but not all tags; The
affected text is between the two tags
12
MORE TAGS...
• The opening and closing tags use the same command except the
closing tag contains and additional forward slash /
• For example, the expression <B> Warning </B> would cause the
word ‘Warning’ to appear in bold face on a Web page
13
NESTED TAGS
• Whenever you have HTML tags within other HTML tags, you must close
the nearest tag first
• Example:
<H1> <I> Web Engineering </I> </H1>
14
STRUCTURE OF A WEB PAGE
• All Web pages share a common
structure
• All Web pages should contain a
pair of <HTML>, <HEAD>, <TITLE>,
and <BODY> tags
<HTML>
<HEAD>
<TITLE> Example </TITLE>
</HEAD>
<BODY>
This is where you would include the
text and images on your Web page.
</BODY>
</HTML>
15
THE <TITLE> TAG
• Choose the title of your Web page carefully; The title of a Web page
determines its ranking in certain search engines
• The title will also appear on Favorite lists, History lists, and Bookmark lists
to identify your page
16
TEXT FORMATTING
• Manipulating text in HTML can be tricky; Oftentimes, what you see is
NOT what you get
• For instance, special HTML tags are needed to create paragraphs,
move to the next line, and create headings
17
TEXT FORMATTING TAGS
<B> Bold Face </B>
<I> Italics </I>
<U> Underline </U>
<P> New Paragraph </P>
<BR> Next Line
18
CHANGING THE FONT
• The expression <FONT FACE = “fontname”> … </FONT> can be used
to change the font of the enclosed text
• To change the size of text, use the expression <FONT SIZE=n> ….
</FONT> where n is a number between 1 and 7
19
CHANGING THE FONT
• To change the color, use <FONT COLOR=“red”>…. </FONT>; The color can
also be defined using hexadecimal representation ( Example: #ffffff )
• These attributes can be combined to change the font, size, and color of the
text all at once; For example, <FONT SIZE=4 FACE=“Courier” COLOR=“red”>
…. </FONT>
• Example
<h1><FONT COLOR="red" SIZE=5 FACE="Courier" >This is Heading
1</FONT></h1>
20
CHANGING THE FONT
21
HEADINGS
• Web pages are typically organized into sections with headings; To
create a heading use the expression <Hn>….</Hn> where n is a
number between 1 and 7
• In this case, the 1 corresponds to the largest size heading while the 7
corresponds to the smallest size
22
ALIGNING TEXT
• The ALIGN attribute can be inserted in the <P> and <Hn> tags to right
justify, center, or left justify the text
• For example, <H1 ALIGN=CENTER> Heading 1</H1> would create a
centered heading of the largest size
23
COMMENT STATEMENTS
• Comment statements are notes in the HTML code that explain the important
features of the code
• The comments do not appear on the Web page itself but are a useful
reference to the author of the page and other programmers
• To create a comment statement, use the <!-- …. --> tags
24
PAGE FORMATTING
• To define the background color, use the BGCOLOR attribute in the <BODY>
tag
• To define the text color, use the TEXT attribute in the <BODY> tag
• To define the size of the text, type <BASEFONT SIZE=n>
25
EXAMPLE
<HTML>
<HEAD>
<TITLE> Example </TITLE>
</HEAD>
<BODY BGCOLOR=“black” TEXT=“white”>
<BASEFONT SIZE=7>
This is where you would include the text and images on your Web page.
</BODY>
</HTML>
26
INSERTING IMAGES
• Type <IMG SRC = “image.ext”>, where image.ext indicates the location of
the image file
• The WIDTH=n and HEIGHT=n attributes can be used to adjust the size of an
image
• The attribute BORDER=n can be used to add a border n pixels thick around
the image
27
ALTERNATE TEXT
• Some browsers don’t support images.
• In this case, the ALT attribute can be used to create text that appears
instead of the image.
• Example:
<IMG SRC=“satellite.jpg” ALT = “Picture of satellite”>
28
LINKS
• A link lets you move from one page to another, play movies and sound, send
email, download files, and more….
• A link has three parts: a destination, a label, and a target
• To create a link type
<A HREF=“page.html”> label </A>
29
ANATOMY OF A LINK
<A HREF=“page.html”> label </A>
• The href attribute specifies the URL of the page the link goes to. If the href
attribute is not present, the <a> tag will not be a hyperlink.
• In the above link, “page.html” is the destination. The destination specifies the
address of the Web page or file the user will access when he/she clicks on
the link.
• The label is the text that will appear underlined or highlighted on the page
30
EXAMPLE: LINKS
• To create a link to CNN, type:
<A HREF=“http://www.cnn.com”>CNN</A>
• To create a link to TU, type:
<A HREF=“https://www.taibahu.edu.sa”>TU</A>
31
CHANGING THE COLOR OF LINKS
• The LINK, VLINK, and ALINK attributes can be inserted in the <BODY> tag to
define the color of a link
• LINK defines the color of links that have not been visited
• VLINK defines the color of links that have already been visited
• ALINK defines the color of a link when a user clicks on it
32
USING LINKS TO SEND EMAIL
• To create a link to an email address, type
• A HREF=“mailto:email_address”> Label</A>
• For example, to create a link to send email to myself, I would type:
<A HREF=“mailto: cs.course.at.tu@gmail.com”>email CS Course</A>
33
ANCHORS
• Anchors enable a user to jump to a specific place on a Web site
• Two steps are necessary to create an anchor.
• First you must create the anchor itself.
• Then you must create a link to the anchor from another point in the document.
34
ANCHORS
• To create the anchor itself, type
<A NAME=“anchor_name”>label</A>
at the point in the Web page where you want the user to jump to
• To create the link, type
<A HREF=“#anchor_name”>label</A>
at the point in the text where you want the link to appear
35
EXAMPLE: ANCHOR
36
<A HREF="#chap2">Chapter Two</A><BR>
<A NAME="chap2">Chapter 2 </A>
Link
Anchor
ORDERED LISTS
• Ordered lists are a list of numbered
items.
• To create an ordered list, type:
<OL>
<LI> This is step one.
<LI> This is step two.
<LI> This is step three.
</OL>
Here’s how it would look on the
Web:
37
MORE ORDERED LISTS….
• The TYPE=x attribute allows you to change the the kind of symbol that
appears in the list.
• A is for capital letters
• a is for lowercase letters
• I is for capital roman numerals
• i is for lowercase roman numerals
38
UNORDERED LISTS
• An unordered list is a list of bulleted
items
• To create an unordered list, type:
<UL>
<LI> First item in list
<LI> Second item in list
<LI> Third item in list
</UL>
Here’s how it would look on the
Web:
39
MORE UNORDERED LISTS...
• The TYPE=shape attribute allows you to change the type of bullet that
appears
• circle corresponds to an empty round bullet
• square corresponds to a square bullet
• disc corresponds to a solid round bullet; this is the default value
40
FORMS
• What are forms?
• An HTML form is an area of the document that allows users to enter information
into fields.
• A form may be used to collect personal information, opinions in polls, user
preferences and other kinds of information.
41
FORMS
• There are two basic components of a Web form:
• the shell, the part that the user fills out, and
• the script which processes the information
• HTML tags are used to create the form shell.
• Using HTML you can create
• text boxes,
• radio buttons,
• checkboxes,
• drop-down menus, and more...
42
EXAMPLE: FORM
43
Text Box
Drop-down Menu
Radio Buttons
Checkboxes
Text Area
Submit Button
Reset Button
THE FORM SHELL
• A form shell has three important parts:
• the <FORM> tag, which includes the address of the script which will process the
form
• the form elements, like text boxes and radio buttons
• the submit button which triggers the script to send the entered information to the
server
44
CREATING THE SHELL
• To create a form shell, type
<FORM METHOD=POST ACTION=“script_url”>
where “script_url” is the address of the script
Or
<FORM METHOD=GET ACTION=“file_name”>
where “file_name” is the file receiving the input
• Create the form elements
• End with a closing </FORM> tag
45
CREATING TEXT BOXES
• To create a text box, type
<INPUT TYPE=“text” NAME=“name” VALUE=“value” SIZE=n MAXLENGTH=n>
• The NAME, VALUE, SIZE, and MAXLENGTH attributes are optional
46
TEXT BOX ATTRIBUTES
• The NAME attribute is used to identify the text box to the processing script
• The VALUE attribute is used to specify the text that will initially appear in the
text box
• The SIZE attribute is used to define the size of the box in characters
• The MAXLENGTH attribute is used to define the maximum number of
characters that can be typed in the box
47
EXAMPLE: TEXT BOX
First Name:
<INPUT TYPE="text" NAME="FirstName" VALUE="First Name" SIZE=20>
<BR><BR>
Last Name:
<INPUT TYPE="text" NAME="LastName" VALUE="Last Name" SIZE=20>
<BR><BR>
48
CREATING RADIO BUTTONS
• To create a radio button, type
<INPUT TYPE=“radio” NAME=“name” VALUE=“data”>Label,
where “data” is the text that will be sent to the server if the button is checked, and
“Label” is the text that identifies the button to the user
49
EXAMPLE: RADIO BUTTONS
<B> Size: </B>
<INPUT TYPE="radio" NAME="Size"
VALUE="Large">Large
<INPUT TYPE="radio" NAME="Size"
VALUE="Medium">Medium
<INPUT TYPE="radio" NAME="Size"
VALUE="Small">Small
50
CREATING CHECKBOXES
• To create a checkbox, type
<INPUT TYPE=“checkbox” NAME=“name” VALUE=“value”>Label
• If you give a group of radio buttons or checkboxes the same name, the user
will only be able to select one button or box at a time
51
EXAMPLE: CHECKBOXES
<B> Color: </B>
<INPUT TYPE="checkbox" NAME="Color" VALUE="Red">Red
<INPUT TYPE="checkbox" NAME="Color"
VALUE="Navy">Navy
<INPUT TYPE="checkbox" NAME="Color"
VALUE="Black">Black
52
CREATING A SUBMIT BUTTON
• To create a submit button, type
<INPUT TYPE=“submit”>
• If you would like the button to say something other than submit, use the
VALUE attribute
• For example,
<INPUT TYPE=“submit” VALUE=“Buy Now!”>
would create a button that says, “Buy Now!”
53
CREATING A RESET BUTTON
• To create a reset button, type
<INPUT TYPE=“reset”>
• The VALUE attribute can be used in the same way to change the text that
appears on the button
54
CREATING DROP-DOWN MENUS
• To create a drop-down menu, type
<SELECT NAME=“name” SIZE=n MULTIPLE>
• Then type
<OPTION VALUE= “value”>Label
• In this case the SIZE attribute specifies the height of the menu in lines and
MULTIPLE allows users to select more than one menu option
55
EXAMPLE: DROP-DOWN MENU
<B>WHICH IS FAVOURITE FRUIT:</B>
<SELECT>
<OPTION VALUE="MANGOES">MANGOES
<OPTION VALUE="PAPAYA">PAPAYA
<OPTION VALUE="GUAVA">GUAVA
<OPTION VALUE="BANANA"> BANANA
<OPTION VALUE="PINEAPPLE">PINEAPPLE
</SELECT>
56
CREATING LARGER TEXT AREAS
• To create larger text areas, type
<TEXTAREA NAME=“name” ROWS=n1 COLS=n2 WRAP> Default Text </TEXTAREA>
where n1 is the height of the text box in rows and n2 is the width of the text box in
characters
• The WRAP attribute causes the cursor to move automatically to the next line
as the user types
57
EXAMPLE: TEXT AREA
<B>Comments?</B>
<BR>
<TEXTAREA NAME="Comments" ROWS=10 COLS=50 WRAP>
</TEXTAREA>
58
TABLES
• Tables can be used to display rows and columns of data, create multi-
column text, captions for images, and sidebars
• The <TABLE> tag is used to create a table; the <TR> tag defines the
beginning of a row while the <TD> tag defines the beginning of a cell
59
ADDING A BORDER
• The BORDER=n attribute allows you to add a border n pixels thick around the
table
• To make a solid border color, use the BORDERCOLOR=“color” attribute
• To make a shaded colored border, use BODERCOLORDARK=“color” and
BORDERCOLORLIGHT=“color”
60
CREATING SIMPLE TABLE
<TABLE BORDER=10>
<TR>
<TD>One</TD>
<TD>Two</TD>
</TR>
<TR>
<TD>Three</TD>
<TD>Four</TD>
</TR>
</TABLE>
• Here’s how it would look on the
Web:
61
ADJUSTING THE WIDTH
• When a Web browser displays a table, it often adds extra space. To
eliminate this space use the WIDTH =n attribute in the <TABLE> and <TD> tags
• Keep in mind - a cell cannot be smaller than its contents, and if you make a
table wider than the browser window, users will not be able to see parts of it.
62
CENTERING A TABLE
• There are two ways to center a table
• Type <TABLE ALIGN=CENTER>
• Enclose the <TABLE> tags in opening and closing <CENTER> tags
63
WRAPPING TEXT AROUND A TABLE
• It is possible to wrap text around a table. This technique is often used to keep
images and captions together within an article.
• To wrap text around a table, type
<TABLE ALIGN = LEFT>
to align the table to the left while the text flows to the right.
• Create the table using the <TR>, <TD>, and </TABLE> tags as you normally
would
64
ADDING SPACE AROUND A TABLE
• To add space around a table, use the HSPACE=n and VSPACE=n attributes
in the <TABLE> tag
• Example:
<TABLE HSPACE=20 VSPACE=20>
65
SPANNING CELLS ACROSS
COLUMNS
• It is often necessary to span one cell across many columns. For example, you
would use this technique to span a headline across the columns of a
newspaper article.
• To span a cell across many columns, type <TD COLSPAN=n>, where n is the
number of columns to be spanned
66
SPANNING CELLS ACROSS ROWS
• To span a cell across many rows, type
<TD ROWSPAN=n>
where n is the number of rows
67
ALIGNING CELL CONTENT
• By default, a cell’s content are aligned horizontally to the left and and
vertically in the middle.
• Use VALIGN=direction to change the vertical alignment, where “direction” is
top, middle, bottom, or baseline
• Use ALIGN=direction to change the horizontal alignment where “direction” is
left, center, or right
68
CONTROLLING CELL SPACING
• Cell spacing is the space between cells while cell padding is the space
around the contents of a cell
• To control both types of spacing, use the CELLSPACING =n and
CELLPADDING=n attributes in the <TABLE> tag
69
NESTING TABLES
• Create the inner table
• Create the outer table and determine which cell of the outer table will hold
the inner table
• Test both tables separately to make sure they work
• Copy the inner table into the cell of the outer table
• Don’t nest too many tables. If you find yourself doing that, find an easier way
to lay out your Web page
70
CHANGING A CELL’S COLOR
• To change a cell’s color, add the BGCOLOR=“color” attribute to the <TD>
tag
• Example:
<TD BGCOLOR=“blue”>
71
DIVIDING YOUR TABLE INTO
COLUMN GROUPS
• You can divide your table into two kinds of column groups: structural and
non-structural.
• Structural column groups control where dividing lines are drawn; Non-
structural groups do not
• Both let you format an entire column of cells at once
72
COLUMN GROUPS
• To create structural column groups, type <COLGROUP SPAN=n> after the
<TABLE> tag, where n is the number of columns in the group
• To create non-structural column groups, type <COL SPAN=n>, where n is the
number of columns in the group
73
DIVIDING TABLE INTO HORIZONTAL
SECTIONS
• You can also create a horizontal section consisting of one or more rows. This
allows you to format the rows all at once
• To create a horizontal section, type <THEAD>, <TBODY>, or <TFOOT> before
the first <TR> tag of the section
• Netscape does not support these tags
74
CONTROLLING LINE BREAKS
• Unless you specify otherwise a browser will divide the lines in a cell as it sees
fit.
• The NOWRAP attribute placed within the <TD> tag forces the browser to
keep all the text in a cell on one line
• Example:
• <TD NOWRAP>Washington, D.C.
75
LAST WORDS….
• If you can imagine a way to lay out your page, chances are it is possible
using HTML
• When in doubt, use an HTML reference
76
ANY QUESTIONS?!

More Related Content

Similar to Introduction to HTML programming for webpages.pdf

Similar to Introduction to HTML programming for webpages.pdf (20)

HTML_JavaScript_Malaysia_2008 (2).ppt
HTML_JavaScript_Malaysia_2008 (2).pptHTML_JavaScript_Malaysia_2008 (2).ppt
HTML_JavaScript_Malaysia_2008 (2).ppt
 
introdution-to-html.ppt
introdution-to-html.pptintrodution-to-html.ppt
introdution-to-html.ppt
 
Web fundamental concept and tags
Web fundamental concept and tags Web fundamental concept and tags
Web fundamental concept and tags
 
introduction-to-html hyper text markup .ppt
introduction-to-html hyper text markup  .pptintroduction-to-html hyper text markup  .ppt
introduction-to-html hyper text markup .ppt
 
Html
HtmlHtml
Html
 
Html
HtmlHtml
Html
 
HTML Comprehensive Overview
HTML Comprehensive OverviewHTML Comprehensive Overview
HTML Comprehensive Overview
 
Html
HtmlHtml
Html
 
Week-1_PPT_WEBAPPS-done.pptx
Week-1_PPT_WEBAPPS-done.pptxWeek-1_PPT_WEBAPPS-done.pptx
Week-1_PPT_WEBAPPS-done.pptx
 
introdution-to-htmlppt.ppt
introdution-to-htmlppt.pptintrodution-to-htmlppt.ppt
introdution-to-htmlppt.ppt
 
Html.ppt
Html.pptHtml.ppt
Html.ppt
 
html
htmlhtml
html
 
Intro html
Intro htmlIntro html
Intro html
 
HTML.pptx
HTML.pptxHTML.pptx
HTML.pptx
 
Html and css
Html and cssHtml and css
Html and css
 
Html
HtmlHtml
Html
 
Html
HtmlHtml
Html
 
Web Development
Web DevelopmentWeb Development
Web Development
 
Part 1 -HTML- Basic_Spring 2023.pptx
Part 1 -HTML- Basic_Spring 2023.pptxPart 1 -HTML- Basic_Spring 2023.pptx
Part 1 -HTML- Basic_Spring 2023.pptx
 
introdution-to-html.ppt
introdution-to-html.pptintrodution-to-html.ppt
introdution-to-html.ppt
 

Recently uploaded

Introduction to AI in Higher Education_draft.pptx
Introduction to AI in Higher Education_draft.pptxIntroduction to AI in Higher Education_draft.pptx
Introduction to AI in Higher Education_draft.pptxpboyjonauth
 
AMERICAN LANGUAGE HUB_Level2_Student'sBook_Answerkey.pdf
AMERICAN LANGUAGE HUB_Level2_Student'sBook_Answerkey.pdfAMERICAN LANGUAGE HUB_Level2_Student'sBook_Answerkey.pdf
AMERICAN LANGUAGE HUB_Level2_Student'sBook_Answerkey.pdfphamnguyenenglishnb
 
Planning a health career 4th Quarter.pptx
Planning a health career 4th Quarter.pptxPlanning a health career 4th Quarter.pptx
Planning a health career 4th Quarter.pptxLigayaBacuel1
 
Influencing policy (training slides from Fast Track Impact)
Influencing policy (training slides from Fast Track Impact)Influencing policy (training slides from Fast Track Impact)
Influencing policy (training slides from Fast Track Impact)Mark Reed
 
ECONOMIC CONTEXT - LONG FORM TV DRAMA - PPT
ECONOMIC CONTEXT - LONG FORM TV DRAMA - PPTECONOMIC CONTEXT - LONG FORM TV DRAMA - PPT
ECONOMIC CONTEXT - LONG FORM TV DRAMA - PPTiammrhaywood
 
Roles & Responsibilities in Pharmacovigilance
Roles & Responsibilities in PharmacovigilanceRoles & Responsibilities in Pharmacovigilance
Roles & Responsibilities in PharmacovigilanceSamikshaHamane
 
Like-prefer-love -hate+verb+ing & silent letters & citizenship text.pdf
Like-prefer-love -hate+verb+ing & silent letters & citizenship text.pdfLike-prefer-love -hate+verb+ing & silent letters & citizenship text.pdf
Like-prefer-love -hate+verb+ing & silent letters & citizenship text.pdfMr Bounab Samir
 
Solving Puzzles Benefits Everyone (English).pptx
Solving Puzzles Benefits Everyone (English).pptxSolving Puzzles Benefits Everyone (English).pptx
Solving Puzzles Benefits Everyone (English).pptxOH TEIK BIN
 
Judging the Relevance and worth of ideas part 2.pptx
Judging the Relevance  and worth of ideas part 2.pptxJudging the Relevance  and worth of ideas part 2.pptx
Judging the Relevance and worth of ideas part 2.pptxSherlyMaeNeri
 
Procuring digital preservation CAN be quick and painless with our new dynamic...
Procuring digital preservation CAN be quick and painless with our new dynamic...Procuring digital preservation CAN be quick and painless with our new dynamic...
Procuring digital preservation CAN be quick and painless with our new dynamic...Jisc
 
call girls in Kamla Market (DELHI) 🔝 >༒9953330565🔝 genuine Escort Service 🔝✔️✔️
call girls in Kamla Market (DELHI) 🔝 >༒9953330565🔝 genuine Escort Service 🔝✔️✔️call girls in Kamla Market (DELHI) 🔝 >༒9953330565🔝 genuine Escort Service 🔝✔️✔️
call girls in Kamla Market (DELHI) 🔝 >༒9953330565🔝 genuine Escort Service 🔝✔️✔️9953056974 Low Rate Call Girls In Saket, Delhi NCR
 
Keynote by Prof. Wurzer at Nordex about IP-design
Keynote by Prof. Wurzer at Nordex about IP-designKeynote by Prof. Wurzer at Nordex about IP-design
Keynote by Prof. Wurzer at Nordex about IP-designMIPLM
 
ENGLISH 7_Q4_LESSON 2_ Employing a Variety of Strategies for Effective Interp...
ENGLISH 7_Q4_LESSON 2_ Employing a Variety of Strategies for Effective Interp...ENGLISH 7_Q4_LESSON 2_ Employing a Variety of Strategies for Effective Interp...
ENGLISH 7_Q4_LESSON 2_ Employing a Variety of Strategies for Effective Interp...JhezDiaz1
 
ACC 2024 Chronicles. Cardiology. Exam.pdf
ACC 2024 Chronicles. Cardiology. Exam.pdfACC 2024 Chronicles. Cardiology. Exam.pdf
ACC 2024 Chronicles. Cardiology. Exam.pdfSpandanaRallapalli
 
Computed Fields and api Depends in the Odoo 17
Computed Fields and api Depends in the Odoo 17Computed Fields and api Depends in the Odoo 17
Computed Fields and api Depends in the Odoo 17Celine George
 
Gas measurement O2,Co2,& ph) 04/2024.pptx
Gas measurement O2,Co2,& ph) 04/2024.pptxGas measurement O2,Co2,& ph) 04/2024.pptx
Gas measurement O2,Co2,& ph) 04/2024.pptxDr.Ibrahim Hassaan
 
AmericanHighSchoolsprezentacijaoskolama.
AmericanHighSchoolsprezentacijaoskolama.AmericanHighSchoolsprezentacijaoskolama.
AmericanHighSchoolsprezentacijaoskolama.arsicmarija21
 

Recently uploaded (20)

Introduction to AI in Higher Education_draft.pptx
Introduction to AI in Higher Education_draft.pptxIntroduction to AI in Higher Education_draft.pptx
Introduction to AI in Higher Education_draft.pptx
 
AMERICAN LANGUAGE HUB_Level2_Student'sBook_Answerkey.pdf
AMERICAN LANGUAGE HUB_Level2_Student'sBook_Answerkey.pdfAMERICAN LANGUAGE HUB_Level2_Student'sBook_Answerkey.pdf
AMERICAN LANGUAGE HUB_Level2_Student'sBook_Answerkey.pdf
 
Rapple "Scholarly Communications and the Sustainable Development Goals"
Rapple "Scholarly Communications and the Sustainable Development Goals"Rapple "Scholarly Communications and the Sustainable Development Goals"
Rapple "Scholarly Communications and the Sustainable Development Goals"
 
Raw materials used in Herbal Cosmetics.pptx
Raw materials used in Herbal Cosmetics.pptxRaw materials used in Herbal Cosmetics.pptx
Raw materials used in Herbal Cosmetics.pptx
 
Planning a health career 4th Quarter.pptx
Planning a health career 4th Quarter.pptxPlanning a health career 4th Quarter.pptx
Planning a health career 4th Quarter.pptx
 
Influencing policy (training slides from Fast Track Impact)
Influencing policy (training slides from Fast Track Impact)Influencing policy (training slides from Fast Track Impact)
Influencing policy (training slides from Fast Track Impact)
 
ECONOMIC CONTEXT - LONG FORM TV DRAMA - PPT
ECONOMIC CONTEXT - LONG FORM TV DRAMA - PPTECONOMIC CONTEXT - LONG FORM TV DRAMA - PPT
ECONOMIC CONTEXT - LONG FORM TV DRAMA - PPT
 
Roles & Responsibilities in Pharmacovigilance
Roles & Responsibilities in PharmacovigilanceRoles & Responsibilities in Pharmacovigilance
Roles & Responsibilities in Pharmacovigilance
 
Like-prefer-love -hate+verb+ing & silent letters & citizenship text.pdf
Like-prefer-love -hate+verb+ing & silent letters & citizenship text.pdfLike-prefer-love -hate+verb+ing & silent letters & citizenship text.pdf
Like-prefer-love -hate+verb+ing & silent letters & citizenship text.pdf
 
Solving Puzzles Benefits Everyone (English).pptx
Solving Puzzles Benefits Everyone (English).pptxSolving Puzzles Benefits Everyone (English).pptx
Solving Puzzles Benefits Everyone (English).pptx
 
Judging the Relevance and worth of ideas part 2.pptx
Judging the Relevance  and worth of ideas part 2.pptxJudging the Relevance  and worth of ideas part 2.pptx
Judging the Relevance and worth of ideas part 2.pptx
 
Procuring digital preservation CAN be quick and painless with our new dynamic...
Procuring digital preservation CAN be quick and painless with our new dynamic...Procuring digital preservation CAN be quick and painless with our new dynamic...
Procuring digital preservation CAN be quick and painless with our new dynamic...
 
OS-operating systems- ch04 (Threads) ...
OS-operating systems- ch04 (Threads) ...OS-operating systems- ch04 (Threads) ...
OS-operating systems- ch04 (Threads) ...
 
call girls in Kamla Market (DELHI) 🔝 >༒9953330565🔝 genuine Escort Service 🔝✔️✔️
call girls in Kamla Market (DELHI) 🔝 >༒9953330565🔝 genuine Escort Service 🔝✔️✔️call girls in Kamla Market (DELHI) 🔝 >༒9953330565🔝 genuine Escort Service 🔝✔️✔️
call girls in Kamla Market (DELHI) 🔝 >༒9953330565🔝 genuine Escort Service 🔝✔️✔️
 
Keynote by Prof. Wurzer at Nordex about IP-design
Keynote by Prof. Wurzer at Nordex about IP-designKeynote by Prof. Wurzer at Nordex about IP-design
Keynote by Prof. Wurzer at Nordex about IP-design
 
ENGLISH 7_Q4_LESSON 2_ Employing a Variety of Strategies for Effective Interp...
ENGLISH 7_Q4_LESSON 2_ Employing a Variety of Strategies for Effective Interp...ENGLISH 7_Q4_LESSON 2_ Employing a Variety of Strategies for Effective Interp...
ENGLISH 7_Q4_LESSON 2_ Employing a Variety of Strategies for Effective Interp...
 
ACC 2024 Chronicles. Cardiology. Exam.pdf
ACC 2024 Chronicles. Cardiology. Exam.pdfACC 2024 Chronicles. Cardiology. Exam.pdf
ACC 2024 Chronicles. Cardiology. Exam.pdf
 
Computed Fields and api Depends in the Odoo 17
Computed Fields and api Depends in the Odoo 17Computed Fields and api Depends in the Odoo 17
Computed Fields and api Depends in the Odoo 17
 
Gas measurement O2,Co2,& ph) 04/2024.pptx
Gas measurement O2,Co2,& ph) 04/2024.pptxGas measurement O2,Co2,& ph) 04/2024.pptx
Gas measurement O2,Co2,& ph) 04/2024.pptx
 
AmericanHighSchoolsprezentacijaoskolama.
AmericanHighSchoolsprezentacijaoskolama.AmericanHighSchoolsprezentacijaoskolama.
AmericanHighSchoolsprezentacijaoskolama.
 

Introduction to HTML programming for webpages.pdf

  • 2. DEFINITIONS ▪ WWW – World Wide Web. ▪ HTML – HyperText Markup Language – The Language of Web Pages on the World Wide Web. HTML is a text formatting language. ▪ URL – Uniform Resource Locator. ▪ Browser – A software program which is used to show web pages. 2
  • 3. WHAT IS HTML? • HTML, otherwise known as HyperText Markup Language, is the language used to create Web pages • Using HTML, you can create a Web page with text, graphics, sound, and video 3
  • 4. HTML • “Normal text” surrounded by bracketed tags that tell browsers how to display web pages • Pages end with “.htm” or “.html” • HTML Editor – A word processor that has been specialized to make the writing of HTML documents more effortless. 4
  • 5. CHOOSING TEXT EDITOR • There are many different programs that you can use to create web documents. • HTML Editors enable users to create documents quickly and easily by pushing a few buttons. Instead of entering all the HTML codes by hand. • These programs will generate the HTML Source Code for you. 5
  • 6. CHOOSING TEXT EDITOR • For this Course, we are using the standard Microsoft Windows text editors, NotePad. • We may also use Visual Studio Code • https://code.visualstudio.com/ 6
  • 7. STARTING NOTEPAD • NotePad is the standard text editor that comes with the microsoft windows operating system. To start NotePad : • Click on the “Start” button located on your Windows task bar. • Type “NotePad” and click the shortcut once. 7
  • 8. CREATING A BASIC STARTING DOCUMENT <HTML> <HEAD> <TITLE>CS485 Webpage</TITLE> </HEAD> <BODY> This is what is displayed. </BODY> </HTML> 8
  • 9. CREATING A BASIC STARTING DOCUMENT • The HEAD of your document point to above window part. • The TITLE of your document appears in the very top line of the user’s browser. • If the user chooses to “Bookmark” your page or save as a “Favorite”; it is the TITLE that is added to the list. • The text in your TITLE should be as descriptive as possible because this is what many search engines, on the internet, use for indexing your site. 9
  • 10. SETTING DOCUMENT PROPERTIES • Document properties are controlled by attributes of the BODY element. • For example, there are color settings for the background color of the page, the document’s text and different states of link 10
  • 11. TAGS • Codes enclosed in brackets • Usually paired • <TITLE>My Web Page</TITLE> • Not case sensitive • <TITLE> = <title> = <TITLE> 11
  • 12. TAGS • The essence of HTML programming is tags • A tag is a keyword enclosed by angle brackets ( Example: <I> ) • There are opening and closing tags for many but not all tags; The affected text is between the two tags 12
  • 13. MORE TAGS... • The opening and closing tags use the same command except the closing tag contains and additional forward slash / • For example, the expression <B> Warning </B> would cause the word ‘Warning’ to appear in bold face on a Web page 13
  • 14. NESTED TAGS • Whenever you have HTML tags within other HTML tags, you must close the nearest tag first • Example: <H1> <I> Web Engineering </I> </H1> 14
  • 15. STRUCTURE OF A WEB PAGE • All Web pages share a common structure • All Web pages should contain a pair of <HTML>, <HEAD>, <TITLE>, and <BODY> tags <HTML> <HEAD> <TITLE> Example </TITLE> </HEAD> <BODY> This is where you would include the text and images on your Web page. </BODY> </HTML> 15
  • 16. THE <TITLE> TAG • Choose the title of your Web page carefully; The title of a Web page determines its ranking in certain search engines • The title will also appear on Favorite lists, History lists, and Bookmark lists to identify your page 16
  • 17. TEXT FORMATTING • Manipulating text in HTML can be tricky; Oftentimes, what you see is NOT what you get • For instance, special HTML tags are needed to create paragraphs, move to the next line, and create headings 17
  • 18. TEXT FORMATTING TAGS <B> Bold Face </B> <I> Italics </I> <U> Underline </U> <P> New Paragraph </P> <BR> Next Line 18
  • 19. CHANGING THE FONT • The expression <FONT FACE = “fontname”> … </FONT> can be used to change the font of the enclosed text • To change the size of text, use the expression <FONT SIZE=n> …. </FONT> where n is a number between 1 and 7 19
  • 20. CHANGING THE FONT • To change the color, use <FONT COLOR=“red”>…. </FONT>; The color can also be defined using hexadecimal representation ( Example: #ffffff ) • These attributes can be combined to change the font, size, and color of the text all at once; For example, <FONT SIZE=4 FACE=“Courier” COLOR=“red”> …. </FONT> • Example <h1><FONT COLOR="red" SIZE=5 FACE="Courier" >This is Heading 1</FONT></h1> 20
  • 22. HEADINGS • Web pages are typically organized into sections with headings; To create a heading use the expression <Hn>….</Hn> where n is a number between 1 and 7 • In this case, the 1 corresponds to the largest size heading while the 7 corresponds to the smallest size 22
  • 23. ALIGNING TEXT • The ALIGN attribute can be inserted in the <P> and <Hn> tags to right justify, center, or left justify the text • For example, <H1 ALIGN=CENTER> Heading 1</H1> would create a centered heading of the largest size 23
  • 24. COMMENT STATEMENTS • Comment statements are notes in the HTML code that explain the important features of the code • The comments do not appear on the Web page itself but are a useful reference to the author of the page and other programmers • To create a comment statement, use the <!-- …. --> tags 24
  • 25. PAGE FORMATTING • To define the background color, use the BGCOLOR attribute in the <BODY> tag • To define the text color, use the TEXT attribute in the <BODY> tag • To define the size of the text, type <BASEFONT SIZE=n> 25
  • 26. EXAMPLE <HTML> <HEAD> <TITLE> Example </TITLE> </HEAD> <BODY BGCOLOR=“black” TEXT=“white”> <BASEFONT SIZE=7> This is where you would include the text and images on your Web page. </BODY> </HTML> 26
  • 27. INSERTING IMAGES • Type <IMG SRC = “image.ext”>, where image.ext indicates the location of the image file • The WIDTH=n and HEIGHT=n attributes can be used to adjust the size of an image • The attribute BORDER=n can be used to add a border n pixels thick around the image 27
  • 28. ALTERNATE TEXT • Some browsers don’t support images. • In this case, the ALT attribute can be used to create text that appears instead of the image. • Example: <IMG SRC=“satellite.jpg” ALT = “Picture of satellite”> 28
  • 29. LINKS • A link lets you move from one page to another, play movies and sound, send email, download files, and more…. • A link has three parts: a destination, a label, and a target • To create a link type <A HREF=“page.html”> label </A> 29
  • 30. ANATOMY OF A LINK <A HREF=“page.html”> label </A> • The href attribute specifies the URL of the page the link goes to. If the href attribute is not present, the <a> tag will not be a hyperlink. • In the above link, “page.html” is the destination. The destination specifies the address of the Web page or file the user will access when he/she clicks on the link. • The label is the text that will appear underlined or highlighted on the page 30
  • 31. EXAMPLE: LINKS • To create a link to CNN, type: <A HREF=“http://www.cnn.com”>CNN</A> • To create a link to TU, type: <A HREF=“https://www.taibahu.edu.sa”>TU</A> 31
  • 32. CHANGING THE COLOR OF LINKS • The LINK, VLINK, and ALINK attributes can be inserted in the <BODY> tag to define the color of a link • LINK defines the color of links that have not been visited • VLINK defines the color of links that have already been visited • ALINK defines the color of a link when a user clicks on it 32
  • 33. USING LINKS TO SEND EMAIL • To create a link to an email address, type • A HREF=“mailto:email_address”> Label</A> • For example, to create a link to send email to myself, I would type: <A HREF=“mailto: cs.course.at.tu@gmail.com”>email CS Course</A> 33
  • 34. ANCHORS • Anchors enable a user to jump to a specific place on a Web site • Two steps are necessary to create an anchor. • First you must create the anchor itself. • Then you must create a link to the anchor from another point in the document. 34
  • 35. ANCHORS • To create the anchor itself, type <A NAME=“anchor_name”>label</A> at the point in the Web page where you want the user to jump to • To create the link, type <A HREF=“#anchor_name”>label</A> at the point in the text where you want the link to appear 35
  • 36. EXAMPLE: ANCHOR 36 <A HREF="#chap2">Chapter Two</A><BR> <A NAME="chap2">Chapter 2 </A> Link Anchor
  • 37. ORDERED LISTS • Ordered lists are a list of numbered items. • To create an ordered list, type: <OL> <LI> This is step one. <LI> This is step two. <LI> This is step three. </OL> Here’s how it would look on the Web: 37
  • 38. MORE ORDERED LISTS…. • The TYPE=x attribute allows you to change the the kind of symbol that appears in the list. • A is for capital letters • a is for lowercase letters • I is for capital roman numerals • i is for lowercase roman numerals 38
  • 39. UNORDERED LISTS • An unordered list is a list of bulleted items • To create an unordered list, type: <UL> <LI> First item in list <LI> Second item in list <LI> Third item in list </UL> Here’s how it would look on the Web: 39
  • 40. MORE UNORDERED LISTS... • The TYPE=shape attribute allows you to change the type of bullet that appears • circle corresponds to an empty round bullet • square corresponds to a square bullet • disc corresponds to a solid round bullet; this is the default value 40
  • 41. FORMS • What are forms? • An HTML form is an area of the document that allows users to enter information into fields. • A form may be used to collect personal information, opinions in polls, user preferences and other kinds of information. 41
  • 42. FORMS • There are two basic components of a Web form: • the shell, the part that the user fills out, and • the script which processes the information • HTML tags are used to create the form shell. • Using HTML you can create • text boxes, • radio buttons, • checkboxes, • drop-down menus, and more... 42
  • 43. EXAMPLE: FORM 43 Text Box Drop-down Menu Radio Buttons Checkboxes Text Area Submit Button Reset Button
  • 44. THE FORM SHELL • A form shell has three important parts: • the <FORM> tag, which includes the address of the script which will process the form • the form elements, like text boxes and radio buttons • the submit button which triggers the script to send the entered information to the server 44
  • 45. CREATING THE SHELL • To create a form shell, type <FORM METHOD=POST ACTION=“script_url”> where “script_url” is the address of the script Or <FORM METHOD=GET ACTION=“file_name”> where “file_name” is the file receiving the input • Create the form elements • End with a closing </FORM> tag 45
  • 46. CREATING TEXT BOXES • To create a text box, type <INPUT TYPE=“text” NAME=“name” VALUE=“value” SIZE=n MAXLENGTH=n> • The NAME, VALUE, SIZE, and MAXLENGTH attributes are optional 46
  • 47. TEXT BOX ATTRIBUTES • The NAME attribute is used to identify the text box to the processing script • The VALUE attribute is used to specify the text that will initially appear in the text box • The SIZE attribute is used to define the size of the box in characters • The MAXLENGTH attribute is used to define the maximum number of characters that can be typed in the box 47
  • 48. EXAMPLE: TEXT BOX First Name: <INPUT TYPE="text" NAME="FirstName" VALUE="First Name" SIZE=20> <BR><BR> Last Name: <INPUT TYPE="text" NAME="LastName" VALUE="Last Name" SIZE=20> <BR><BR> 48
  • 49. CREATING RADIO BUTTONS • To create a radio button, type <INPUT TYPE=“radio” NAME=“name” VALUE=“data”>Label, where “data” is the text that will be sent to the server if the button is checked, and “Label” is the text that identifies the button to the user 49
  • 50. EXAMPLE: RADIO BUTTONS <B> Size: </B> <INPUT TYPE="radio" NAME="Size" VALUE="Large">Large <INPUT TYPE="radio" NAME="Size" VALUE="Medium">Medium <INPUT TYPE="radio" NAME="Size" VALUE="Small">Small 50
  • 51. CREATING CHECKBOXES • To create a checkbox, type <INPUT TYPE=“checkbox” NAME=“name” VALUE=“value”>Label • If you give a group of radio buttons or checkboxes the same name, the user will only be able to select one button or box at a time 51
  • 52. EXAMPLE: CHECKBOXES <B> Color: </B> <INPUT TYPE="checkbox" NAME="Color" VALUE="Red">Red <INPUT TYPE="checkbox" NAME="Color" VALUE="Navy">Navy <INPUT TYPE="checkbox" NAME="Color" VALUE="Black">Black 52
  • 53. CREATING A SUBMIT BUTTON • To create a submit button, type <INPUT TYPE=“submit”> • If you would like the button to say something other than submit, use the VALUE attribute • For example, <INPUT TYPE=“submit” VALUE=“Buy Now!”> would create a button that says, “Buy Now!” 53
  • 54. CREATING A RESET BUTTON • To create a reset button, type <INPUT TYPE=“reset”> • The VALUE attribute can be used in the same way to change the text that appears on the button 54
  • 55. CREATING DROP-DOWN MENUS • To create a drop-down menu, type <SELECT NAME=“name” SIZE=n MULTIPLE> • Then type <OPTION VALUE= “value”>Label • In this case the SIZE attribute specifies the height of the menu in lines and MULTIPLE allows users to select more than one menu option 55
  • 56. EXAMPLE: DROP-DOWN MENU <B>WHICH IS FAVOURITE FRUIT:</B> <SELECT> <OPTION VALUE="MANGOES">MANGOES <OPTION VALUE="PAPAYA">PAPAYA <OPTION VALUE="GUAVA">GUAVA <OPTION VALUE="BANANA"> BANANA <OPTION VALUE="PINEAPPLE">PINEAPPLE </SELECT> 56
  • 57. CREATING LARGER TEXT AREAS • To create larger text areas, type <TEXTAREA NAME=“name” ROWS=n1 COLS=n2 WRAP> Default Text </TEXTAREA> where n1 is the height of the text box in rows and n2 is the width of the text box in characters • The WRAP attribute causes the cursor to move automatically to the next line as the user types 57
  • 58. EXAMPLE: TEXT AREA <B>Comments?</B> <BR> <TEXTAREA NAME="Comments" ROWS=10 COLS=50 WRAP> </TEXTAREA> 58
  • 59. TABLES • Tables can be used to display rows and columns of data, create multi- column text, captions for images, and sidebars • The <TABLE> tag is used to create a table; the <TR> tag defines the beginning of a row while the <TD> tag defines the beginning of a cell 59
  • 60. ADDING A BORDER • The BORDER=n attribute allows you to add a border n pixels thick around the table • To make a solid border color, use the BORDERCOLOR=“color” attribute • To make a shaded colored border, use BODERCOLORDARK=“color” and BORDERCOLORLIGHT=“color” 60
  • 61. CREATING SIMPLE TABLE <TABLE BORDER=10> <TR> <TD>One</TD> <TD>Two</TD> </TR> <TR> <TD>Three</TD> <TD>Four</TD> </TR> </TABLE> • Here’s how it would look on the Web: 61
  • 62. ADJUSTING THE WIDTH • When a Web browser displays a table, it often adds extra space. To eliminate this space use the WIDTH =n attribute in the <TABLE> and <TD> tags • Keep in mind - a cell cannot be smaller than its contents, and if you make a table wider than the browser window, users will not be able to see parts of it. 62
  • 63. CENTERING A TABLE • There are two ways to center a table • Type <TABLE ALIGN=CENTER> • Enclose the <TABLE> tags in opening and closing <CENTER> tags 63
  • 64. WRAPPING TEXT AROUND A TABLE • It is possible to wrap text around a table. This technique is often used to keep images and captions together within an article. • To wrap text around a table, type <TABLE ALIGN = LEFT> to align the table to the left while the text flows to the right. • Create the table using the <TR>, <TD>, and </TABLE> tags as you normally would 64
  • 65. ADDING SPACE AROUND A TABLE • To add space around a table, use the HSPACE=n and VSPACE=n attributes in the <TABLE> tag • Example: <TABLE HSPACE=20 VSPACE=20> 65
  • 66. SPANNING CELLS ACROSS COLUMNS • It is often necessary to span one cell across many columns. For example, you would use this technique to span a headline across the columns of a newspaper article. • To span a cell across many columns, type <TD COLSPAN=n>, where n is the number of columns to be spanned 66
  • 67. SPANNING CELLS ACROSS ROWS • To span a cell across many rows, type <TD ROWSPAN=n> where n is the number of rows 67
  • 68. ALIGNING CELL CONTENT • By default, a cell’s content are aligned horizontally to the left and and vertically in the middle. • Use VALIGN=direction to change the vertical alignment, where “direction” is top, middle, bottom, or baseline • Use ALIGN=direction to change the horizontal alignment where “direction” is left, center, or right 68
  • 69. CONTROLLING CELL SPACING • Cell spacing is the space between cells while cell padding is the space around the contents of a cell • To control both types of spacing, use the CELLSPACING =n and CELLPADDING=n attributes in the <TABLE> tag 69
  • 70. NESTING TABLES • Create the inner table • Create the outer table and determine which cell of the outer table will hold the inner table • Test both tables separately to make sure they work • Copy the inner table into the cell of the outer table • Don’t nest too many tables. If you find yourself doing that, find an easier way to lay out your Web page 70
  • 71. CHANGING A CELL’S COLOR • To change a cell’s color, add the BGCOLOR=“color” attribute to the <TD> tag • Example: <TD BGCOLOR=“blue”> 71
  • 72. DIVIDING YOUR TABLE INTO COLUMN GROUPS • You can divide your table into two kinds of column groups: structural and non-structural. • Structural column groups control where dividing lines are drawn; Non- structural groups do not • Both let you format an entire column of cells at once 72
  • 73. COLUMN GROUPS • To create structural column groups, type <COLGROUP SPAN=n> after the <TABLE> tag, where n is the number of columns in the group • To create non-structural column groups, type <COL SPAN=n>, where n is the number of columns in the group 73
  • 74. DIVIDING TABLE INTO HORIZONTAL SECTIONS • You can also create a horizontal section consisting of one or more rows. This allows you to format the rows all at once • To create a horizontal section, type <THEAD>, <TBODY>, or <TFOOT> before the first <TR> tag of the section • Netscape does not support these tags 74
  • 75. CONTROLLING LINE BREAKS • Unless you specify otherwise a browser will divide the lines in a cell as it sees fit. • The NOWRAP attribute placed within the <TD> tag forces the browser to keep all the text in a cell on one line • Example: • <TD NOWRAP>Washington, D.C. 75
  • 76. LAST WORDS…. • If you can imagine a way to lay out your page, chances are it is possible using HTML • When in doubt, use an HTML reference 76